
ICBDF364G - Cooker WOLF - Free user manual and instructions
Find the device manual for free ICBDF364G WOLF in PDF.
| Product Type | Dual Fuel Range (Gas/Electric) |
| Brand | Wolf |
| Model | ICBDF364G |
| Width | 1219 mm |
| Power Source | Gas and Electric |
| Number of Surface Burners | 4 (including a simmer burner) |
| Additional Surface Options | Infrared grill, griddle/Teppan-Yaki, searing plate |
| Oven Cooking Modes | Convection bake, convection roast, convection broil, traditional bake, roast, broil, stone baking, proofing, dehydrate, self-clean |
| Maximum Oven Temperature | 290 °C |
| Temperature Probe | Yes, for measuring internal food temperature |
| Programmable Functions | Timer, timed cook, delayed start, Sabbath mode |
| Oven Light | 20 W halogen bulb |
| Safety | Anti-tip support, automatic oven lock during self-clean, automatic safety shutoff |
| Maintenance | Stainless steel cleaning, self-clean oven, burner and grate cleaning |
| Warranty | 2 years parts and labor, limited 3rd to 5th year on certain parts |
| Country of Origin | United States (Wolf brand) |
Frequently Asked Questions - ICBDF364G WOLF
User questions about ICBDF364G WOLF
0 question about this device. Answer the ones you know or ask your own.
Ask a new question about this device
Download the instructions for your Cooker in PDF format for free! Find your manual ICBDF364G - WOLF and take your electronic device back in hand. On this page are published all the documents necessary for the use of your device. ICBDF364G by WOLF.
USER MANUAL ICBDF364G WOLF
GUIDA ALL'USO E ALLA MANUTENZIONE
6 Dual Fuel Range Features
6OyenOperation
10SurfaceOperation
12CareRecommendations
12Troubleshooting
13WolfWarranty
Customer Care
The model and serial number are printed on the enclosed product registration card. Both numbers are also listed on the product rating plate. Refer to page 6 for rating plate location. For warranty purposes, you will also need the date of installation and name of your authorized Wulf dealer. Record this information below for future reference.
If your product ever needs attention, be sure to use a Wolf factory certified service provider.
SERVICE INFORMATION
Model Number
Serial Number
Date of Installation
Certified Service Name
Certified Service Number
Authorized Dealer
Dealer Number
Important Note
To ensure this product is installed and operated as safely and efficiently as possible, take note of the following types of highlighted information throughout this guide:
IMPORTANT NOTE highlights Information that is especially important.
CAUTION indicates a situation where minor injury or product damage may occur if instructions are not followed.
WARNING states a hazard that may cause serious injury or death if precautions are not followed.
IMPORTANT INSTRUCTIONS
WARNING
If the information in this guide is not followed exactly, a fire or explosion may result, causing property damage, personal injury or death.
Do not store or use gasoline or other flammable vapors and liquids in the vicinity of this or any other appliance.
WHAT TO DO IF YOU SMELL GAS:
- Do not try to light any appliance.
- Do not touch any electrical switch.
- Do not use any phone in your building.
- Immediately call your gas supplier from a neighbor's phone. Follow the gas supplier's instructions.
If you cannot reach your gas supplier, call the fire department.
This appliance must be properly installed and serviced by a qualified installer, service agency or gas supplier and grounded (earthed) by a qualified technician.
SAFETY PRECAUTIONS
IMPORTANT INSTRUCTIONS
WARNING
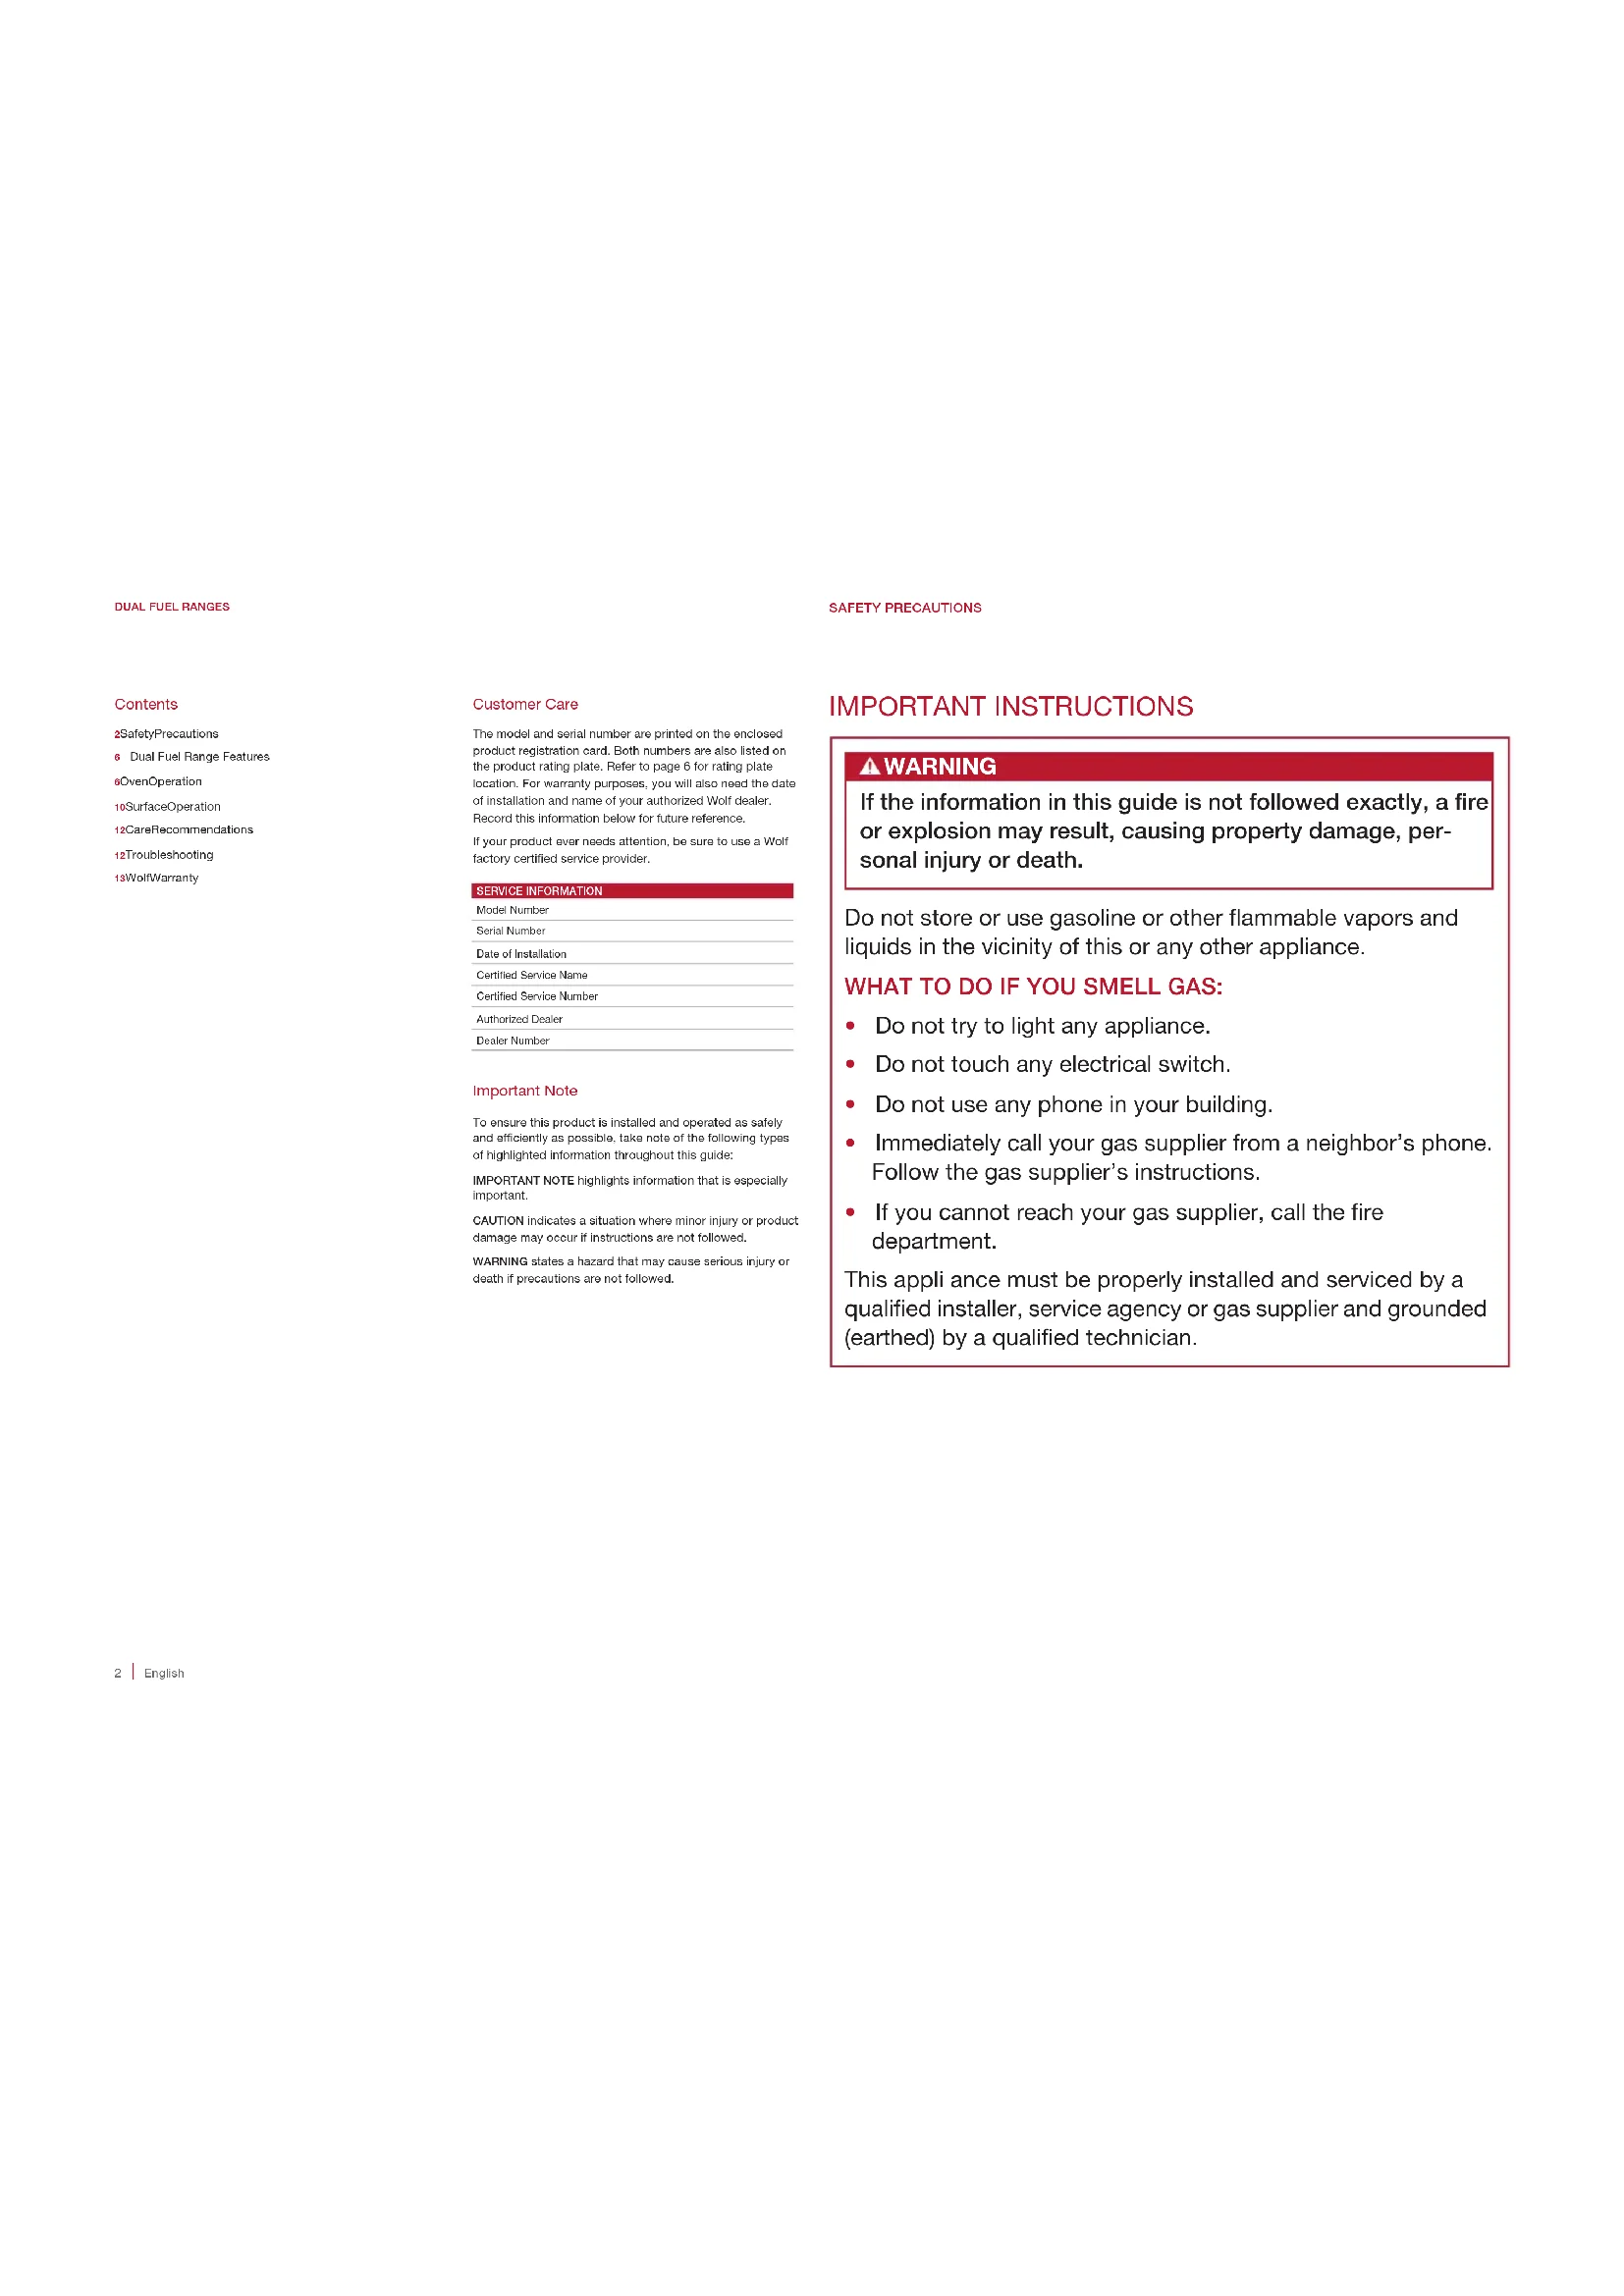
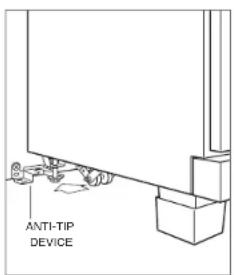
A child or adult can tip this appliance and be killed.
Verify the anti-tip device has been properly installed and engaged. Ensure the anti-tip device is re-engaged when this appliance is moved. Refer to the illustrations below for how to verify correct installation.
Do not operate this appliance without the anti-tip device in place and engaged. Failure to do so can result in death or serious burns to children or adults.
To reduce the risk of burns, do not move this appliance while hot.
Anti-tip device location.
Anti-tip device engaged.
GENERAL SAFETY PRECAUTIONS
- Read this guide carefully before using this appliance to reduce risk of fire, electric shock or injury.
- Before performing service, shut off gas supply by closing the gas shut-off valve and shut off electricity to this appliance.
- Keep appliance area clear and free from combustible material.
- For safety when cooking, set burner controls so flame does not extend beyond the bottom of pan.
Exercise caution when opening oven door. Let hot air or steam escape before looking or reaching into oven. - IMPORTANT: Do not install a ventilation system that blows air downward toward this gas cooking appliance. This type of ventilation system may cause ignition and combustion problems with this gas cooking appliance resulting in personal injury or unintended operation.
- Do not use aluminum foil to line any part of this appliance.
CAUTION
This appliance is for cooking purposes only. It must not be used for other purposes, for example room heating. Doing so may result in carbon monoxide poisoning.
IMPORTANT INSTRUCTIONS
GENERAL SAFETY PRECAUTIONS
- Be sure the oven cool air intake (above the door) and oven exhaust vent (below the door) are unobstructed at all times.
- Wear proper apparel. Loose-fitting or hanging garments should never be worn using this appliance.
- Use extreme caution when moving a grease kettle or disposing of hot grease.
Always use dry pot holders when removing pans from this appliance. Wet or damp pot holders can cause steam burns. Do not use a towel or bulky cloth in place of pot holders. - Position oven racks in desired locations when oven is cool. If a rack must be repositioned after the oven is already hot, be sure pot holder does not contact a hot heating element in the oven.
- Clean only those parts listed in this guide. A steam cleaner is not to be used.
- Do not use harsh abrasive cleaners or sharp metal scrapers to clean the oven door glass since they can scratch the surface, which may result in shattering of the glass.
-
Before using self-clean, remove grill pan, oven racks, oven rack guides and any other utensils.
-
Do not repair or replace any part of this appliance unless specifically recommended in literature accompanying this appliance.
- Do not obstruct the flow of air to ensure proper combustion and ventilation.
- When using this appliance, do not touch grates, burner caps, burner bases or any other parts in proximity to the flame. These components may be hot enough to cause burns.
- Do not clean oven gasket; rubbing or moving the gasket may compromise the door seal.
WARNING
Unattended cooking on a hob with fat or oil can be dangerous and may result in fire. Never try to extinguish a fire with water, but switch off the appliance and then cover flame e.g.with a lid or a fire blanket.
- Never leave this appliance unattended when in use. Boilovers and greasy spills may smoke or ignite.
SAFETY PRECAUTIONS
IMPORTANT INSTRUCTIONS
GENERAL SAFETY PRECAUTIONS
- Do not touch heating elements or interior surfaces of oven. Heating elements may be hot even though they are dark in color. Interior surfaces become hot enough to cause burns. During and after use, do not touch, or let clothing or other flammable materials contact heating elements or interior surfaces of oven until they have had sufficient time to cool.
WARNING
The appliance and its accessible parts become hot during use. Care should be taken to avoid touching heating elements. Children less than 8 years of age shall be kept away unless continuously supervised.
WARNING
This appliance can be used by children aged from 8 years and above and persons with reduced physical, sensory or mental capabilities or lack of experience and knowledge if they have been given supervision or instruction concerning use of the appliance in a safe way and understand the hazards involved. Children shall not play with the appliance. Cleaning and user maintenance shall not be made by children without supervision.
- Do not heat unopened food containers, such as baby food jars and cans. Pressure build-up may cause the container to burst and cause injury.
WARNING
Danger of fire: do not store items on the cooking surfaces.
CAUTION
The use of a gas cooking appliance results in the production of heat and moisture in the room in which it is installed. Ensure that the kitchen is well ventilated; keep natural ventilation holes open or install a mechanical ventilation device (mechanical extractor hood).
Prolonged intensive use of the appliance may call for additional ventilation, for example opening of a window, or more effective ventilation, for example increasing the level of mechanical ventilation where present.
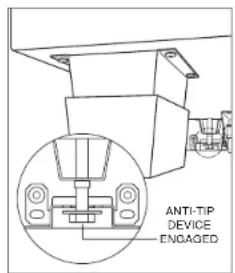
Dual Fuel Range Features
| FEATURE | PG | |
| 1 | Product Rating Plans | 2 |
| 2 | Control Panel (press [to socaa] | 7 |
| 3 | Oven Control Knob | 7 |
| 4 | Convection Oven | 7 |
| 5 | Surface Blumer | 10 |
| 6 | Optional Char Grill | 10 |
| 7 | Optional Griddle/Teppan-Yaski | 11 |
| 8 | Optional French Top (not shown) | 11 |
1219 mm dual fuel range shown.
Getting Started
We know you are eager to start cooking, but before you do, please take some time to read this use & care guide. Whether you are an occasional cook or an expert chef, it will be to your benefit to familiarize yourself with the safety practices, features, operation and care recommendations of your Wolf dual fuel range.
To ensure all residual oil from the manufacturing process has been removed, clean the range thoroughly with hot water and a mild detergent prior to use. Rinse and dry with a soft cloth. Refer to care recommendations on page 12.
- Verify surface burner components are assembled correctly.
- Optional charginl, griddle/teppan-yaki and French top require special attention. Refer to pages 10-11.
To ensure the best results, review cooking modes and special features on page 8.
CAUTION
Do not place cookware on oven floor or use aluminum foil or other material to line oven floor or side walls. Failure to adhere to this notice will damage the porcelain interior and will void your warranty.
Oven Racks
OVEN RACK GUIDES
To insert rack guides in the oven, locate mounting screws on oven side walls. Place rack guide mounting tabe over the screws and slide down until fully seated. Refer to the illustration below.
OVEN RACKS
To insert a standard rack in the oven, place the rack anti-tip look under side rack guide rails. Slide rack back and lift up to clear rack stops. Continue to slide rack back until completely inside the oven. Refer to the illustration below.
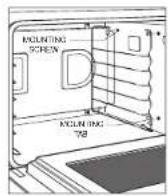
Oven rack guides.
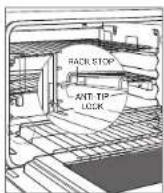
Oven rack anti-tip lock.
The bottom oven rack has a full-extension capability which is supported by the oven door (excluding 457 mm oven). With the rack in the lowest rack guide position, slide it onto door guides for greater stability and accessibility. Refer to the illustration below.
To insert a full-extension easy glide rack, place the two rear tabs onto the rack guide (one tab above and one below). Refer to the illustration below. Angle rack slightly and slide back until the front rack notch engages the front rack guide.
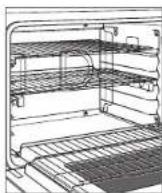
Bottom rack.
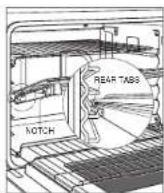
Full-extension rack.
OVEN OPERATION
Oven Operation
Wolf dual fuel ranges utilize a combination of a cooking mode selector bezel, oven temperature control knob and electronic control panel to select desired cooking modes, oven temperature and exclusive features. Open the control panel by pressing
Temperatures are displayed in Celuis. To change to Fahrenheit, touch and hold ④ for 5 seconds. Touch alternate between ^ C and ^ F, then touch
When using the oven, Wolf has created a two-step process to ensure it is never accidentally turned on:
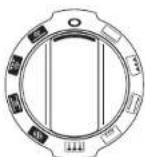
1 Rotate selector bezel to desired cooking mode. Standard modes are displayed in the silver area of the bezel. Convocation modes are displayed in the black area of the bezel. Refer to the illustration below. Once the desired cooking mode is selected, a preset temperature will appear on the control knob.
2 Select preset temperature by touching the control panel or turn the control knob to increase or decrease temperature. Either action completes the second step of the process. Oven indicator light illuminates and preheat begins.
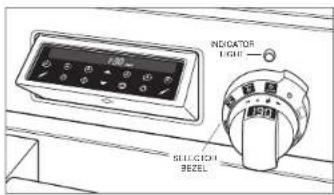
Control panel and oven control knob.
CONTROL PANEL TOUCH PADS
SELECTOR BEZEL
CONTROL KNOBS
OVEN LIGHT
Oven light turns on automatically when the door is open and off when closed. To turn the light on while the door is closed, touch on the control panel.
PREHEAT
During preheat, the oven is heated as quickly and evenly as possible and is not ideal for cooking. Preheat should be utilized for all cooking modes except grill and convection grill. During preheat, temperatures below 65^ appear as 'Lo'. Once preheat is complete, an audible chimie indicates oven has reached set temperature and the oven indicator light is no longer illuminated. To adjust temperature once preheat is complete, turn the knob to the desired temperature.
PRIOR TO USE
To ensure all residual oil from the manufacturing process has been removed, each oven must go through the following procedure.
1 Clean oven thoroughly with hot water and a mild detergent. Rinse and dry with a soft cloth.
3 Rotate selector bezel to adjust temperature to 290^ for one hour.
4 Rotate bezel to that allow even to cool with the door closed.
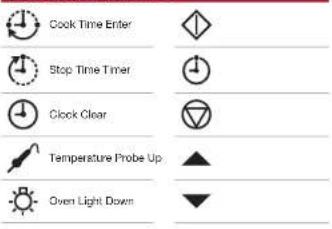
CLOCK
The clock is visible on the control panel during all cooking modes, except when the timer is in use. It is very important the clock is set to the correct time if cook time or stop time feature is used. Clock must be reset after a power failure.
Setting clock:
1 Touch on the control panel.
2 Use and arrows to set time of day. Time will change from am to pm by passing 12:00.
Touch An audible chime indicates time has been set.
4 To alternate between 24-hour clock, press and hold for 5 seconds. Touch , then
TIMER
The timer can be set for a maximum of 8 hours and 59 minutes. Once a time is set, the countdown is illuminated on the control panel display. The last minute counts down in seconds. The timer is independent from the oven. Setting the timer does not affect cook time or stop time. For information regarding auto program features, refer to page 9.
Setting timer:
1 Touch on the control panel.
2 Use and arrows to set time in hours and minutes.
3 Touch to start. An audible chime indicates timer has been set. Oven will chime and time will flash when complete. Timer will continue to chime until is touched on the control panel.
OVEN OPERATION
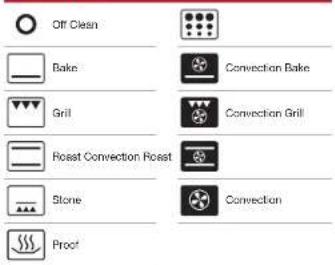
Cooking Modes
| MODE | BEZEL PRESET RANGE PROGE USES | ||
| Convection 160°C 75° | 190°C 75-280°C | Uniform air movement makes it possible to multi-level rack cook with even browning. | |
| Convection Bake | 165°C 75-280°C | Ideal for pre baking. | |
| Convection Roast | 165°C 75-280°C | Perfect for massing tender cuts of beef, lamb, pork and poultry. | |
| Convection Grill | Br1 | 290°C | Shortens grilling times for thicker cuts of meat, fish and poultry. Utilizes two-piece grill pan and always grill with oven door closed. |
| Br2 | 230°C | ||
| Br3 | 175°C | ||
| Bake | 175°C | 75-280°C | Best for single-rack cooking, primarily baked foods. Use for standard recipes. |
| Roast | 175°C 75-280°C | Best for roasting less tender cuts of meat, such as chuck roasts and stew meat that should be covered. | |
| Grill | Br1 | 290°C | Best for grilling meats, fish and poultry pieces up to 25 mm thick. Utilize two-piece grill pan end always grill with oven door closed. |
| Br2 | 230°C | ||
| Br3 | 175°C | ||
| Bake Stone | 205°C | 75-290°C | Baking on a ceramic stone. Great for pizza and bread. Bake stone accessory required. 782 mm and 914 mm oven only. |
| Proof | 30°C | 30-45°C | Ideal for proofing, or using bread dough. 457 mm oven only. For 782 mm and 914 mm oven, refer to page 8. |
| Dehydration | 60°C | 45-70°C | Dry a variety of fruits, vegetables and meals. Accessory marks required. Refer to page 8. |
| Self-Clean | Oven heats to an extremely high temperature to allow food soil to burn off. Refer to page 9. | ||
Selector bezel (762 mm / 914 mm overs)
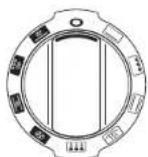
Selector bezel (457 mm oven).
Proof
Setting controls for 762 mm and 914 mm ovens:
Rotate selector bezel to
2 Turn oven control knob left until PrF^ is displayed, then release.
3 Oven temperature is preset at 30^ . Touch select preset temperature or turn control knob to change temperature. Display alternates between set temperature and 'PIF.'
Dehydration
Accessory kit required. Accessories are available through an authorized Wolf dealer.
Setting controls:
1 Place door stop supplied with accessory kit, onto oven door lock.
2 Rotate selector bezel to
3 Turn oven control knob left until "dEH" is displayed, then release.
4 Oven temperature is preset at 45^ . Touch select preset temperature or turn control knob to change temperature. Display alternates between set temperature and -ElL.
Temperature Probe
The temperature probe measures internal temperature of food while cooking. It can be used with all cooking modes except grill and convection grill. Only use the temperature probe recommended for this oven.
Setting controls:
1 Rotate selector bezel to desired cooking mode.
2Touch to direct preset temperature or turn control knob to change temperature.
Insert probe into thickest area of the food. When making bread, cook for approximately 10 minutes before inserting probe.
4 When oreheat is complete, use a pot holder to lift probe receptacle cover, then insert probe. Refer to the illustration below.
5 Probe temperature is preset at 70^ . Touch select preset temperature or turn control knob to change temperature. Display alternates between oven set temperature and actual probe temperature. To alternate between probe set point and actual probe temperature, press Temperatures below 20^ are displayed as "Lo."
An audible chime indicates internal temperature has reached probe set point. Remove, then reinsert probe to verify internal temperature.
CAUTION
Probe and probe receptacle will be very hot. Handle with care.
Probe receptacle.
OVEN OPERATION
Auto Program
TIMED COOK
Timed cook automatically turns the oven off at a specified time. Oven will begin to heat immediately and will turn off at desired stop time. Clock must be set to the correct time for timed cook to function properly. Use in any cooking mode except grill, convection grill and bake stone.
Setting controls:
1 Rotate selector bezel to desired cooking mode.
Touch to test preset temperature or turn control knob to change temperature.
3 Touch Use arrows to select the desired cook time in hours and minutes.
4Touch.
DELAYED START
Delayed start automatically turns the oven on and off at specified times. Oven will remain idle until desired start time and will turn off at desired stop time. Clock must be set to the correct time for delayed start to function properly. Use in any cooking mode except grill, convection grill and bake stove.
Setting controls:
1 Rotate selector bezel to desired cooking mode.
2Touch to select preset temperature or turn control knob to change temperature. If is touched, the oven will begin to heat immediately, but will enter idle mode once sloop time is set.
3 Touch Use arrows to select the desired cook time in hours and minutes.
4 Touch. Use arrows to select the time the oven should turn off.
sTouch.
Self-Clean
During self-clean, the oven is heated to an extremely high temperature to burn off food soil. Remove excess spillage, all oven racks and rack guocles. They will discolor it left in during self-clean. Oven door will lock and remain locked until self-clean is complete and oven temperature has cooled below 150^ . Self-clean times include one hour for cool down.
Setting controls for 4-hour self-clean:
- Rolate selector bazel to
2Touch.
Setting controls for 3-hour self-clean:
1 Rotate selector bezel to
2Toush.
sTouch an to reduce stop time by 1 hour.
4Touch twice.
CAUTION
During self-clean, exterior surfaces may get hotter than
usual. Children should be kept away.
Sabbath
This appliance is certified by Star-K to meet strict religious regulations in conjunction with specific instructions found on www.star-k.org. Sabbath overrobes the automatic 12-hour shut off feature. Sabbath must be reset after a power failure.
Setting controls:
- Turn oven light on or off.
- Rotate selector bezel to cr and select desired temperature.
3 Touch and hold 5 seconds: 'Sab' will appear and flash on oven control knob indicating Sabbath mode has been initiated.
4 To change oven temperature while in Sabbath mode, turn control knob. Each turn will increase or decrease temperature by 10^ (C or F). Display and audible chimie are disabled, but temperature will randomly change after new temperature is selected. Oven will remain on until selector bezil is rotated to .
SURFACE OPERATION
Oven Light
WARNING
Ensure that the appliance is switched off before replacing the lamp to avoid the possibility of electric shock.
Allow oven to cool completely, then remove oven racks and rack guides. To remove the light cover, gently pry bottom edge with a flat screwdriver. Remove existing bulb and replace with a 20-watt halogen bulb. Refer to the illustration below.
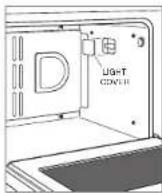
Light bulb replacement.
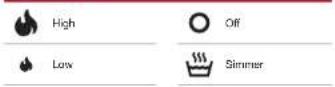
Surface Bumers
To light a burner, push and turn the corresponding control knob counterclockwise to 1. The lighter will begin to click until burner is lit. Once it, continue to turn knob counterclockwise to desired setting.
To select a simmer setting, turn control knob to the detent at the lowest setting. Push and continue to turn counter-clockwise. The flame will transition to the second tier on the burner cap. Continue to turn knob to desired simmer setting.
CAUTION
Never leave pans on a high setting unattended. Be careful when cooking food in fat or grease; it can become hot enough to ignite.
Infrared Chargrill
The charril has an infrared burner that transfers intense heat to food, searing the outside to seal in juices. Cook food directly on the charril grate, do not use cookware. The back 178 mm of the charril is cooler than the rest of the surface. This area can be utilized to hold foods until they are ready to serve.
Assemble charginl:
To assemble, position charginf frame on the range. Refer to the illustration below.
2 Align slots of the radiant plates with front angle of frame. Refer to the illustration below. Slots should fit over front angle and sit flat on charginl frame.
Install chargin grate.
CAUTION
Use care when assembling chagrill to avoid contact with igniter.
CHARGRILL OPERATION
Stainless steel cover must be removed prior to operation.
- Turn on ventilation.
- Push and turn control knob counterclockwise to Igniter will begin to click until burner is lit.
3 Allow to preheat for 10 minutes.
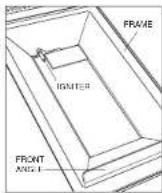
Chargrill frame.
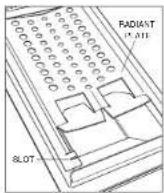
Chargr radiant plate.
SURFACE OPERATION
Infrared Griddle/Teppan-Yaki
The griddie/teppan-yaki is thermostatically controlled to maintain a consistent temperature. To prevent food from sticking, it is necessary to "season" the griddie/teppan-yaki prior to use.
Season griddle/teppan-yaki:
1 Turn on ventilation.
2 Criddie/Teppan-yaki has a protective coating that must be removed before use. Use hot water and mild detergent to remove. Rinse and dry.
3 Push and turn control knob counterclockwise to 175^ and heat to 30 minutes. After 30 minutes, turn to and allow to cool.
4 While surface is slightly warm, pour a small amount of peanut or vegetable oil on a paper towel and spread evenly.
Push and turn control knob to 175^ . Heat until griddle/teppan-yaki begins to smoke, then turn to 0 and allow to cool. Once cool, wipe off any excess oil.
Stainless steel cover must be removed prior to operation.
- Turn on ventilation.
2 Push and turn control knob counterclockwise to desired temperature. Igniter will begin to click until burner is lit. Double griddle/seppan-yaki has separate controls for each side.
Indicator light above the knob illuminates until griddle/ tepan-yaki reaches set temperature. The light will cycle on and off as more heat is required to maintain set tempera-.
GRIDDLE/TEPPAN-YAKI CARE
- Scrape grease into grease collection tray after each use. When surface has cooled, wipe with a paper towel to remove excess grease or oil.
- After each use, reapply a small amount of peanut or vegetable oil on a paper towel and spread evenly.
- Occasionally, remove seasoning. Pour 120 ml warm water and 5 ml griddle/teppan-yaki cleaner onto griddle/teppan-yaki and scrape residue into grease collection tray, then empty. When dry, reapply a small amount of oil for seasoning.
French Top
The French top is a graduated cooking surface with the highest temperature under the center plate. Always use cookware, do not cook food directly on the surface. For higher cooking heat, place cookware closer to the center and for lower heat, closer to edges. Refer to the illustration below.
To protect the surface from food splatters and moisture, it is necessary to "season" the French top prior to use.
Season French top:
1 French top has a protective coating that must be removed before use. Use hot water and mild detergent to remove. Rinse and dry.
2 Push and turn control knob counterclockwise to find heat for 30 minutes. After 30 minutes, turn to and allow to cool.
While surface is slightly warm, pour a small amount of peanut or vegetable oil on a paper towel and spread evenly.
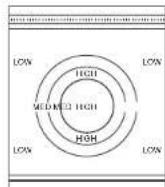
French top heating zones.
Center plate removal.
Stainless steel cover must be removed prior to operation.
- Turn on ventilation.
- Push and turn control knob counterclockwise to lighter will begin to click until burner is lit.
3 Allow to preheat for 30 minutes.
CAUTION
Never leave pans on a high heat zone unattended.
Be careful when cooking food in fat or grease; it can become hot enough to ignite.
FRENCH TOP CARE
- Clean entire surface after each use while slightly warm. Wipe with mild detergent and water. Rinse and dry.
After each use, reapply a small amount of peanut or vegetable oil on a paper towel and spread evenly.
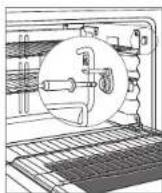
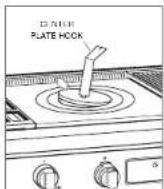
Occasionally, remove seasoning. Apply a small amount of white vinegar and water to surface while slightly warm. Scrub and repeat until excess oil has been removed. Reapply a small amount of oil for seasoning. - French top burner is located below the center plate. To remove, use the center plate hook supplied with the range as shown in the illustration. Never remove the center plate while cooking.
CARE RECOMMENDATIONS
Care Recommendations
| Cleansing | |
| Stainless steel | Use a nonabrasive stainless steel cleaner and apply with a soft int-free cloth. To bring out the natural luster, lightly wipe surface with a water-dampened microfibrer cloth followed by a dry polishing chamol. Always follow the grain of stainless steel. |
| Burner gratesOven rack guides | Remove and place on a flat surface near the sink. Clean with hot water and mild detergent or paste of baking soda and water. Do not immerse in water. Towel dry. |
| Burner pan | Remove surface debris before cleaning to help speed up the cleaning process and decrease the chance of scratching the surface during cleaning. Using mild abrasive cleaners or spray degreasers, clean and rinse the surface and dry immediately to avoid streaking. To clean hard water stains, use white vinegar and water. Rinse and dry immediately. |
| Surface burners | Allow to cool. Use mild detergent or spray degreaser to clean. Rinse with water and towel dry. |
| ChargrillGriddle/teppan-yakiFrench top | Refer to pages 10-11 for care recommendations. |
| Control knobsBezeis | Using a damp cloth, wipe with mild detergent or spray degreaser, rinse and dry. Do not place in dishwasher. |
| Control panel | Use spray degreaser to remove fingerprints and food soil. Spray on a cloth before wiping panel.IMPORTANT NOTE: Do not spray cleaners directly on the control panel. |
| Oven interior | Before utilizing self-clean feature, use a razor blade to gently lift baked on foods from oven cavity and window. For stubborn stains, spray with a mild abrasive cleaner or spray degreaser and scrub with a no-scratch pad. Wash entire oven cavity with soap and water to remove all cleaning chemicals before entering self-clean mode. If residue is not cleaned from the cavity, etching of the porcelain may occur.Once self-clean cycle is complete, allow oven to cool completely and wipe out ash with a damp cloth. |
| Grill pan | To clean the upper rack, use mild detergent and a scouring pad. Rinse and dry. To clean the bottom pan, discard grease and wash with hot water and mild detergent. Rinse and dry. The stainless steel upper rack is dishwasher safe, however, do not place any porcelain-coated rack or pan in dishwasher. |
TROUBLESHOOTING
Troubleshooting
OPERATION
Range does not operate.
- Verify power is on.
- Verify electrical power to unit and home circuit breaker is on.
- Oven will automatically turn off after 12 hours of continual use, except in dehydration or Sabbath mode.
OVEN
Oven temperature issue.
- Contact Wolf factory certified service.
No control knob display. - Pull oven control knob out and reinseit fully. Turn circuit breaker off for 5 seconds, then turn back on.
No response from control panel touch pads.
- Turn oven bezel to 0 to exit Sabbath mode.
Turn circuit breaker off for 5 seconds, then turn back on.
'SAb' displayed on the oven control knob.
Turn oven bezel to 0 to exit Sabbath mode.
'PF' displayed on the oven control knob.
- Unit had a power failure. Tum selector bezel to a cooking mode, then back to 0 to reset.
Turn circuit breaker off for 5 seconds, then turn back on.
"OPP" displayed on the oven control knob.
One of the ovens may be in self-clean mode. If one oven is in self-clean, the other can not be used.
'OE', 'OC' or other error displayed.
- Contact Wolf factory certified service.
Oven 'pops' or 'bangs' during preheat or cool down.
Normal with new oven cavity expansion and contraction.
- Run self-clean cycle. If it persists, contact Wolf factory certified service.
RANGE SURFACE
Erratic flame, poor ignition or no ignition.
- Verify bumer caps are positioned properly.
Clean burner and igniter property.
- If water spilled over recently, let area dry completely. Use hair dryer, if desired.
- If burner cap secures to burner head, verify it is tightly fastened.
- Push in knob, then release. Verify knob springs back.
Chargill clicks continually.
- Verify knob is set fully at
Griddle/teppan-yaki indicator light flashes.
- Tum knob off; then back on. Flame was lost and unit entered safety lock-out mode.
TROUBLESHOOTING
Troubleshooting
SERVICE
- Maintain the quality built into your product by contacting Wolf factory certified service.
- When contacting service, you will need the model and serial number of your product. Both numbers are listed on the product rating plate. Refer to page 6 for rating plate location.
- For warranty purposes, you will also need the date of installation and name of your authorized Wolf dealer. This information should be recorded on page 2 of this guide.
Wolf Products Limited Warranty
INTERNATIONAL PRODUCTS
FULL TWO YEAR WARRANTY
For two years from the date of original installation, your Wolf Appliance product warranty covers all parts and labor to repair or replace, under normal residential use, any part of the product that proves to be defective in materials or workmanship. All service provided by Wolf Appliance under the above warranty must be performed by Wolf factory certified service, unless otherwise specified by Wolf Appliance, Inc. Service will be provided during normal business hours.
LIMITED THIRD THROUGH FIFTH YEAR WARRANTY
For five years from the date of origins installation, Wolf Appliance will repair or replace the following parts that prove to be defective in materials or workmanship: gas burners (excluding appearance), electric heating elements, blower motors (ventilation motor), electronic control boards, magnetron tubes and induction generators. The parts will be repaired or replaced, free of charge, with the owner paying for all other costs including labor. All service provided by Wolf Appliance under the above warranty must be performed by Wolf factory certified services, unless otherwise specified by Wolf Appliance, Inc. Service will be provided during normal business hours.
WOLF
Well, W & E, 106
COCINAS MIXTAS
Wolfe, World Energy, Wolfe, Dornari, & A. Derien and Schutzschlager: an aufgeschriebene Farben- und stellbige begebene Mariner in der Gesellschaften des Inklanzen, U. Subst. 2006, Sub-Sub. 1983, Sub-Sub. 1984, Sub-Sub. 1985, Sub-Sub. 1986, Sub-Sub. 1987, Sub-Sub. 1988, Sub-Sub. 1989, Sub-Sub. 2000, Sub-Sub. 2001, Sub-Sub. 2002, Sub-Sub. 2003, Sub-Sub. 2004, Sub-Sub. 2005, Sub-Sub. 2006, Sub-Sub. 2007, Sub-Sub. 2008, Sub-Sub. 2009, Sub-Sub. 2010, Sub-Sub. 2011, Sub-Sub. 2012, Sub-Sub. 2013, Sub-Sub. 2014, Sub-Sub. 2015, Sub-Sub. 2016, Sub-Sub. 2017, Sub-Sub. 2018, Sub-Sub. 2019, Sub-Sub. 2020, Sub-Sub. 2021, Sub-Sub. 2022, Sub-Sub. 2023, Sub-Sub. 2024, Sub-Sub. 2025, Sub-Sub. 2026, Sub-Sub. 2027, Sub-Sub. 2028, Sub-Sub. 2029, Sub-Sub. 2030, Sub-Sub. 2031, Sub-Sub. 2032, Sub-Sub. 2033, Sub-Sub. 2034, Sub-Sub. 2035, Sub-Sub. 2036, Sub-Sub. 2037, Sub-Sub. 2038, Sub-Sub. 2039, Sub-Sub. 2040, Sub-Sub. 2041, Sub-Sub. 2042, Sub-Sub. 2043, Sub-Sub. 2044, Sub-Sub. 2045, Sub-Sub. 2046, Sub-Sub. 2047, Sub-Sub. 2048, Sub-Sub. 2049, Sub-Sub. 2195 (in German)
WOLF APPLIANCE, INC.
POBOX44848
MADISON, WI 53744 USA
WWW.WOLFAPPLIANCE.COM
824987 REV-A 3/2014

WOLF
