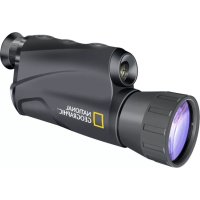
National Geographic 5X50 - Night vision device BRESSER - Free user manual and instructions
Find the device manual for free National Geographic 5X50 BRESSER in PDF.


| Product type | Night vision device |
| Brand | Bresser |
| Model | National Geographic 5X50 |
| Magnification | 5x |
| Objective diameter | 50 mm |
| Range in low light | >200 m |
| Range in total darkness (IR on) | >60 m |
| Power supply | 2 AA batteries (1.5 V) |
| Battery life (IR off) | Approximately 6 hours |
| Battery life (IR on) | Approximately 4 hours |
| Infrared illuminator | Integrated, adjustable brightness |
| Display | Internal screen with brightness adjustment |
| Focus | Manual on the objective |
| Diopter adjustment | Rotating eyepiece |
| Dimensions (approx.) | 20 x 10 x 10 cm |
| Weight (approx.) | 500 g |
| Housing material | Robust plastic |
| Protection | Against dust and moisture (not waterproof) |
| Warranty | 2 years (extendable to 5 years under conditions) |
| Included accessories | Carrying case, microfiber cloth, batteries (not included) |
Frequently Asked Questions - National Geographic 5X50 BRESSER
User questions about National Geographic 5X50 BRESSER
0 question about this device. Answer the ones you know or ask your own.
Ask a new question about this device
Download the instructions for your Night vision device in PDF format for free! Find your manual National Geographic 5X50 - BRESSER and take your electronic device back in hand. On this page are published all the documents necessary for the use of your device. National Geographic 5X50 by BRESSER.
USER MANUAL National Geographic 5X50 BRESSER
- Never use this device to look directly at the sun or in the direct proximity of the sun. This will result in a risk of blindness.
- Do not place the device, particularly the lenses, in direct sunlight. The concentration of light could cause a fire.
- This device contains electronic components which operate via a power source (batteries). Only use the device as described in the manual, or you run the risk of an electric shock.
- Keep batteries out of the reach of children! Make sure you insert the batteries correctly. Empty or damaged batteries could cause burns if they come into contact with the skin. If necessary, wear adequate gloves for protection.
- Do not disassemble the device. In the event of a defect, please contact your dealer. The dealer will contact the Service Centre and can send the device in to be repaired, if necessary.
- Do not expose the device to temperatures above 60^ .
- Use only the recommended batteries. Always replace weak or empty batteries with a new, complete set of batteries at full capacity. Do not use batteries from different brands or with different capacities. The batteries should be removed from the unit if it has not been used for a long time.
Privacy protection!
The device is intended only for private use. Please heed the privacy of other people. Do not use the device to look into apartments, for example.
Notes on cleaning
- Before cleaning the device, disconnect it from the power supply (Remove the batteries).
-
Only use a dry cloth to clean the exterior of the device. Do not use any cleaning fluid to avoid damaging the electronics.
-
Clean the eyepieces and lenses only with a soft, lint-free cloth, like a microfibre cloth. Do not apply excess pressure to the cloth to avoid scratching the lenses.
- Protect the device from dust and moisture! Store it in the supplied bag or transportation packaging.
EC DECLARATION OF CONFORMITY

Bresser GmbH has issued a 'Declaration of Conformity' in accordance with applicable guidelines and corresponding standards. This can be viewed any time upon request.
Warranty and warranty term extension
The warranty term is two years from the date of purchase. Please keep your proof of purchase. Register at www.bresser.de/warranty and fill out a brief questionnaire to get your warranty term extended to five years. Registration must be completed within three months of purchase (date of receipt) to validate the warranty. If you register thereafter, the warranty term will not be extended. If you have problems with your device, please contact our customer service first. Do not send any products without consulting us first by telephone. Many problems with your device can be solved over the phone. If the problem cannot be resolved by phone, we will take care of transporting your device to be repaired. If the problem occurred after the warranty ended or it is not covered by our warranty terms, you will receive an estimate of repair costs, free of charge.
Service Hotline: +49 (0) 2872 - 80 74-210
Name:
Date of purchase:
Street:
Signature:
City/Postcode:
Your dealer:
Telephone:
Art.No:
Parts overview
- Infrared illuminator
- Objective
- Ocular
- Decrease brightness (Infrared illuminator/image display)
- Increase brightness (Infrared illuminator/image display)
- Power On/Off
- Battery compartment
- Status LED
Features
- This night vision device features an integrated infrared illuminator. The brightness is adjustable by pressing the appropriate buttons (4, 5).
- The brightness of the image display can also be adjusted by pressing the appropriate buttons (4, 5).
- The device magnifies residual light to create an image when the infrared illuminator is switched off. Observations in total darkness are possible when the infrared illuminator is switched on.
- Operating time with these batteries is about 6 hours when the infrared illuminator is switched off. With the infrared illuminator turned on, operating time is reduced to about 4 hours.
- In low light conditions, the maximum range of finding an object for observation is more than 200 metres. In total darkness, with infrared illumination switched on, the range of finding an object is more than 60 metres.
- When the device is turned on, the memory function will restore the last display brightness and infrared illuminator settings used before it was turned off.
Operation
Line up the device with an object that is 20-30 metres away. Look through the eyepiece (3) and turn it until the black frame of the screen is clearly visible. Adjust the focus to ensure a clear image of the object by turning the objective lens (2). When adjusting the observation distance, you will achieve a higher quality image simply by turning the objective lens (2). No further turning of the eyepiece (3) is required, your device is now set-up and ready to use.
Multifunction button (3 functions):

Power On
Power Off
Power On: The device can be turned on by pressing the button for 1-2 seconds. The status LED will start flashing green at 1-second intervals when the power is on.
Power Off: Press the button for 3 seconds to switch off the device.
Note: When the device is switched off, long presses of more than 3 seconds will be treated as operating mistakes and the device will not turn on.
Multifunction button (3 functions):

- Infrared illuminator On
- Increase brightness of the infrared illuminator
- Increase brightness of the image display
Increase brightness of the infrared illuminator: When the infrared illuminator is switched off (red status LED off), a single press (more than 1 second, and less than 3 seconds) of the button turns it on. The red status LED then lights up.
When the infrared illuminator is on (red status LED lit), you can increase the brightness by approx. 20% with each press (more than 1 second, and less than 3 seconds) of the button, until the brightness is 100% . After reaching 100% , long presses will have no effect.
You can quickly increase the brightness of the infrared illuminator with a single long press of more than 3 seconds, until it has reached 100% . The red indicator will be lit during this operation. After reaching 100% , long presses will have no effect.
Increase brightness of the image display: When the device is turned on, you can increase the brightness of the image display by 10% with each short press (less than 1 second) of the button, until the display reaches 100% . After reaching 100% , short presses will have no effect.
Multifunction button (3 functions):

- Infrared illuminator Off
- Decrease brightness of the infrared illuminator
Decrease brightness of the image display
Decrease brightness of the infrared illuminator: When the infrared illuminator is on (red status LED lit), a single press (more than 1 second, and less than 3 seconds) of the button decreases the brightness of the infrared illuminator by approx. 20% . This can be repeated until the brightness reaches 0% and the infrared illuminator switches off. The red status LED then switches off as well. After turning off, long presses will have no effect.
When the infrared illuminator is on (red status LED lit), a single long press of more than 3 seconds quickly extinguishes the infrared illuminator, and the red status LED switches off. After turning off, long presses will have no effect.
Decrease brightness of the image display: When the device is turned on, you can decrease the brightness of the image display by 10% with each short press (less than 1 second) of the button, until the brightness reaches 0% . After reaching 0% , short presses will have no effect.
DISPOSAL

Dispose of the packaging materials properly, according to their type, such as paper or cardboard. Contact your local waste-disposal service or environmental authority for information on the proper disposal.
Do not dispose of electronic devices in the household garbage! As per Directive 2002/96/EC of the European Parliament on waste electrical and electronic equipment and its adaptation into German
law, used electronic devices must be collected separately and recycled in an environmentally friendly manner.
Empty, old batteries must be disposed of at battery collection points by the consumer. You can find out more information about the disposal of devices or batteries produced after 6 January 2006 from your local waste-disposal service or environmental authority.
In accordance with the regulations concerning batteries and rechargeable batteries, disposing of them in the normal household waste is explicitly forbidden. Please make sure to dispose of your used batter
ies as required by law - at a local collection point or in the retail market.
Disposal in domestic waste violates the Battery Directive.
Batteries that contain toxins are marked with a sign and a chemical symbol.
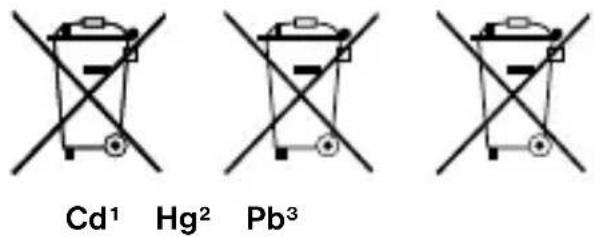
1 battery contains cadmium
^2 battery contains mercury
3 battery contains lead

Advertencias de character general
EcnN IK-ocBETntelb BkIoueH, KaKdoe HaxKaTne n ydepKaHne KHOKN (OT ONDHIO DBA cekyHd) yBeINuHBaet rpkocTB Ha 20%. NocNe DoCTnKeHn MaKcMaJIbHOrO 3NaueHnA (100%) rpkocTB yBeINuHBaTbcr He 6yDet.
National Geographic's net proceeds support vital exploration, conservation, research, and education programs.
Visit our website: www.nationalgeographic.com
© 2012 National Geographic Society
NATIONAL GEOGRAPHIC and Yellow Border Design are trademarks of the National Geographic Society, used under license. All rights reserved.

BRESSER
Bresser GmbH
Gutenbergstr. 2 · DE-46414 Rhede
Brand : BRESSER
Model : National Geographic 5X50
Category : Night vision device