
Mini3 G2 - Receiver VOX - Free user manual and instructions
Find the device manual for free Mini3 G2 VOX in PDF.
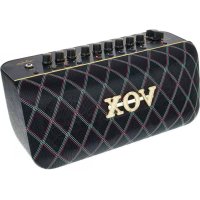
| Product Type | Portable Guitar Amplifier |
| Brand | VOX |
| Model | Mini3 G2 |
| Dimensions (L x D x H) | 262 x 174 x 223 mm |
| Weight | 3 kg (without batteries) |
| Power Supply | 6 AA/LR6 alkaline batteries or included DC 12V power adapter |
| Battery Life | Approximately 12 hours |
| Output Power | 3 W RMS into 4 ohms |
| Speaker | 5 inches, 4 ohms |
| Amplifier Models | 11 models (including BTQ CLEAN, AC15, UK '80S, etc.) |
| Built-in Effects | 8 effects (Compressor, Chorus, Flanger, Tremolo, Delay, Echo, Reverb Spring, Reverb Room) |
| Built-in Tuner | Yes, range E1 to E6 |
| Inputs | INPUT (guitar), MIC IN (microphone), AUX IN (external audio source) |
| Outputs | PHONES (headphones, disables speaker) |
| Auto Power Off Function | Yes, after 1 hour of inactivity (adjustable) |
| Maintenance and Cleaning | Clean, dry cloth; do not use liquid products |
| Safety | Avoid exposure to sun, heat, humidity, dust, vibrations; do not spill liquid; disconnect if object intrusion occurs |
| Spare Parts / Repairability | Batteries not included; power adapter included; contact dealer for repair |
| General Information | User manual available in multiple languages; manufacturer's warranty |
Frequently Asked Questions - Mini3 G2 VOX
User questions about Mini3 G2 VOX
0 question about this device. Answer the ones you know or ask your own.
Ask a new question about this device
Download the instructions for your Receiver in PDF format for free! Find your manual Mini3 G2 - VOX and take your electronic device back in hand. On this page are published all the documents necessary for the use of your device. Mini3 G2 by VOX.
USER MANUAL Mini3 G2 VOX
Modeling Guitar Amplifier
Owner's Manual
Using the unit in the following locations can result in a malfunction:
- In direct sunlight
- Locations of extreme temperature or humidity
- Excessively dusty or dirty locations
- Locations of excessive vibration
- Close to magnetic fields
Power supply
Please connect the designated AC adapter to an AC outlet of the correct voltage. Do not connect it to an AC outlet of voltage other than that for which your unit is intended.
Interference with other electrical devices
Radios and televisions placed nearby may experience reception interference. Operate this unit at a suitable distance from radios and televisions.
Handling
To avoid breakage, do not apply excessive force to the switches or controls.
Care
If the exterior becomes dirty, wipe it with a clean, dry cloth. Do not use liquid cleaners such as benzene or thinner, or cleaning compounds or flammable polishes.
Keep this manual
After reading this manual, please keep it for later reference.
Keeping foreign matter out of your equipment
Never set any container with liquid in it near this equipment. If liquid gets into the equipment, it could cause a breakdown, fire, or electrical shock. Be careful not to let metal objects get into the equipment. If something does slip into the equipment, unplug the AC adapter from the wall outlet. Then contact your nearest VOX dealer or the store where the equipment was purchased.
- All product names and company names are the trademarks or registered trademarks of their respective owners.
THE FCC REGULATION WARNING (for USA)
NOTE: This equipment has been tested and found to comply with the limits for a Class B digital device, pursuant to Part 15 of the FCC Rules. These limits are designed to provide reasonable protection against harmful interference in a residential installation. This equipment generates, uses, and can radiate radio frequency energy and, if not installed and used in accordance with the instructions, may cause harmful interference to radio communications. However, there is no guarantee that interference will not occur in a particular installation. If this equipment does cause harmful interference to radio or television reception, which can be determined by turning the equipment off and on, the user is encouraged to try to correct the interference by one or more of the following measures: Reorient or relocate the receiving antenna.
- Increase the separation between the equipment and receiver.
- Connect the equipment into an outlet on a circuit different from that to which the receiver is connected.
- Consult the dealer or an experienced radio/TV technician for help.
If items such as cables are included with this equipment, you must use those included items.
Unauthorized changes or modification to this system can void the user's authority to operate this equipment.
Notice regarding disposal (EU only)

When this "crossed-out wheeled bin" symbol is displayed on the product, owner's manual, battery, or battery package, it signifies that when you wish to dispose of this product, manual, package or battery you must do so in an approved manner. Do not discard this product, manual, package or battery along with ordinary household waste. Disposing in the correct manner will prevent harm to human health and potential damage to the environment. Since the correct method of disposal will depend on the applicable laws and regulations in your locality, please contact your local administrative body for details. If the battery contains heavy metals in of the regulated amount, a chemical symbol is displayed below the "crossed-out and bin" symbol on the battery or battery package.
IMPORTANT NOTICE TO CONSUMERS
This product has been manufactured according to strict specifications and voltage requirements that are applicable in the country in which it is intended that this product should be used. If you have purchased this product via the internet, through mail order, and/or via a telephone sale, you must verify that this product is intended to be used in the country in which you reside.
WARNING: Use of this product in any country other than that for which it is intended could be dangerous and could invalidate the manufacturer's or distributor's warranty. Please also retain your receipt as proof of purchase otherwise your product may be disqualified from the manufacturer's or distributor's warranty.
Contents
Introduction 3
Welcome aboard! 3
Main features 3
Setup 4
Installing Batteries 4
Parts and their function 5
Top Panel 5
Rear Panel 6
Auto Power Off Function 7
Using the Tuner 7
Amp Models and Effects 8
AMP model 8
Effects 8
Troubleshooting 9
Specifications 10
Introduction
Welcome aboard!
Thanks for choosing the VOX MINI3 G2. To ensure a long and trouble-free relationship with your new amp, please read this manual carefully, use the amp as directed and keep the manual for future reference.
We hope you enjoy the great sound of the VOX MINI3 G2!
Main features
- Sounds distilled from the VOX Valvetronix series are compressed in a compact body.
- This portable amplifier is powered by six AA-size alkaline batteries or by the included AC adapter, enabling you to play anywhere.
- In addition to four high-quality, all-time favorite effects, the amplifier features four delay and reverb effects that simulate acoustic reverb. The amplifier also features a user-friendly interface, enabling you to adjust the tone via a single knob.
- The TAP button enables you to easily set the delay time in sync with the tempo.
- The built-in tuner function enables you to tune a guitar connected to the INPUT jack.
- Inputs include an AUX IN jack, for connecting an external audio device (CD, MP3 player, etc.), and a MIC IN jack, to where you can connect a microphone. You can play along with recorded music or accompany your vocals on guitar.
You can also adjust the send level from the MIC IN jack to the Delay/Reverb effects by using the dedicated SEND knob.
- VOX original Bassilator technology to create a solid Bass tone.
Setup
This section describes the basic setup of your amplifier.
NOTE: This manual also describes safety precautions and functions. Be sure to read the entire manual.
- Set the VOLUME knob and TRIM knob to the minimum level.
- Install batteries in the amplifier. Alternatively, you can connect the included AC adapter to the DC12V jack on the rear panel, then plug the adapter into an AC outlet.
- Plug your guitar into the INPUT jack on the top panel. If you also plan to use a CD or MP3 player or a microphone, connect the player to the AUX IN jack, or the microphone to the MIC IN jack on the top panel.
- Press and hold down the power button until the power LED lights up and the power turns on.
NOTE: When turning off the power, press and hold down the power button until the power LED turns off.
- Slowly raise the VOLUME Knob to the desired level. When using a microphone, you can adjust its volume with the TRIM Knob.
Installing Batteries
Remove the battery compartment cover that's located on the bottom of the unit by pulling the ribbon. Insert six AA-size alkaline batteries as shown in the figure.
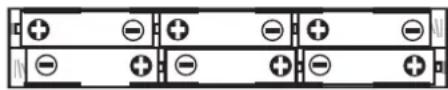
NOTE: Batteries are not included. You will need to purchase them separately. Never use any type of battery other than alkaline batteries.
NOTE: Be sure to install batteries in the correct orientation.
Replacing the Batteries
Replace the batteries when the power LED becomes dim.
NOTE: If the battery level becomes low, noise may be generated.
NOTE: Depleted batteries must be removed from the MINI3 G2 immediately. If you leave them in, malfunctions such as battery leakage may occur. You should also remove the batteries if you're not going to be using the MINI3 G2 for an extended period of time.
Parts and their function
Top Panel
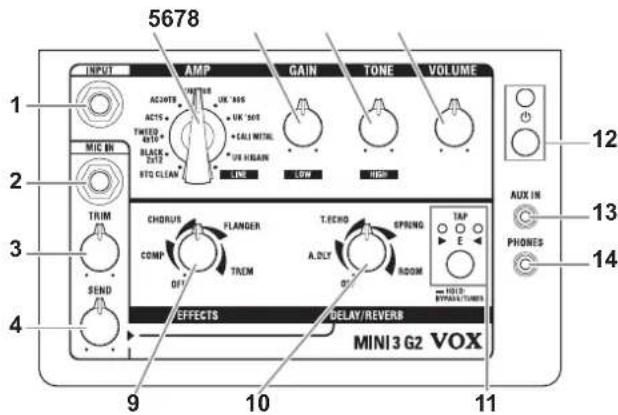
INPUT Section
- INPUT jack
This is where you plug in your guitar.
- MIC IN jack
Connect a microphone here.
- TRIM knob
This knob enables you to adjust the volume level of the microphone input.
- SEND knob
This knob enables you to adjust the volume that is sent from the microphone input to the delay/reverb effect.
AMP section
This section enables you to adjust various amplifier settings.
- AMP selector
This selector enables you to choose an amp model. The gain circuit, tone control characteristics, and circuit layout will be set automatically in accordance with the selected amp model. For more information on each amp model, please refer to "AMP model" on page 8.
- GAIN knob
This knob enables you to adjust the pre amp gain for the selected amp model.
- TONE knob
This knob enables you to adjust the tonal color. The tone will be changed automatically in accordance with the selected amp model.
- VOLUME knob
This knob enables you to adjust the volume that is output from the pre amp to the power amp. With this setting you can change the power amp distortion.
NOTE: The power amp distortion can also be changed with the GAIN knob. The distortion will be eliminated depending on the setting.
EFFECTS section
Here is where you can adjust the settings for the effects.
For additional details on each effect, refer to "Effects" on page 8.
- EFFECTS knob
This knob enables you to choose the compressor/modulation effect and set the intensity of the effect.
To bypass the effects, rotate the knob all the way to the left.
- DELAY/REVERB knob
This knob enables you to select a delay/reverb-type effect and set the intensity of the effect. To bypass the effects, rotate the knob all the way to the left.
To apply an effect (selected via this knob) to the microphone input, use the SEND knob to set the intensity of the effect.
To turn off the delay/reverb effect applied to the guitar input, set the knob to the minimum position of the "swoosh" of the corresponding effect type.
- TAP button, LED/TUNER LED
This button enables you to set the time of the Delay and Reverb effects. Tap this button twice to set the time. The duration between two taps will be used as the time value. The TAP LED will flash in sync with the time.
HINT: To set the time to exactly match the tempo of a song, press the TAP button several times along with the song.
When you hold down the TAP switch for one second or more, all effects will be bypassed, and the tuner function will turn on. For details, refer to the "Using the Tuner" section (page 7).
Power/AUX IN/PHONES Section
- Power button, LED
Pressing and holding down this button enables you to turn the power on or off. The power LED will light up when the power is turned on.
- AUX IN jack
Connect an external audio device to this jack. This enables you to conveniently connect an audio player and play your guitar along with the player's output.
- PHONES jack
Use this jack if you're plugging directly in to a mixer, recording device, or if you're using headphones. The output signal from this jack is taken before the power amp, and the character of the guitar amp cabinet is applied to it.
NOTE: Connecting headphones to this jack will mute the internal speaker.
NOTE: Be sure to make a stereo connection at the PHONES jack.
Rear Panel
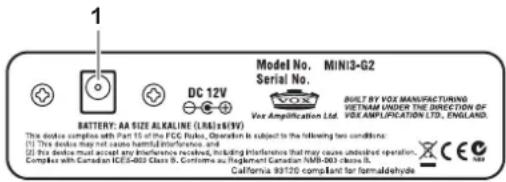
- DC 12V jack
Connect this jack to the included AC adapter.
NOTE: The AC adapter should only be used with the main unit. Do not use the adapter with other devices since doing so may cause a malfunction.
Auto Power Off Function
The VOX MINI3 G2 is equipped with an Auto Power Off function. The Auto Power Off function automatically turns the power off when there has been no user input for about 1 hour.
When the power is turned off, it's not restored even if a knob or selector is used. Turn on the power again.
NOTE: The Auto Power Off function will be in effect when signal is input only to the AUX IN jack or when the input volume to the INPUT jack and MIC IN jack is too low.
NOTE: The Auto Power Off function is set to on as the factory default.
Setting the Auto Power Off function to enable or disable
- Press and hold down the TAP button and turn on the power.
- The TAP/TUNER LED will indicate the current setting.
- Press the TAP button to switch between the enable and disable setting.
- Wait a few seconds without using any of the buttons or controls. The unit will automatically switch to normal operation.
NOTE: The Auto Power Off function enable and disable setting will be saved even when the power is turned off.
NOTE: If you change a setting for the Auto Power Off function, the time setting of the delay/reverb effect will be reset to the factory default.
Using the Tuner
The MINI3 G2's tuner function lets you tune a guitar that's connected to the INPUT jack. The tuner detects the pitch of the input sound, then indicates the discrepancy from the standard pitch of E.
- Press and hold down the TAP button for more than one second. All effects will be bypassed, and the tuner function will turn on.

All effects are bypassed. (No valid signal is being input.)
- Play the open 6th string.
NOTE: Be careful not to touch any other strings. - Tune the guitar so that only the center green LED lights up, as shown on the right.
HINT: The MINI3 G2 recognizes the pitch of E in any octave. This is useful if you want to tune to harmonics or tune other musical instruments, such as a bass guitar. - To exit the tuner function, press the TAP button. The effect bypass will be canceled.
HINT: Once you tune the 6th string using the tuner function, tune the other strings in reference to the 6th string.

The pitch is sharp.

The pitch is slightly sharp.

In tune.

The pitch is slightly flat.

The pitch is flat.
Amp Models and Effects
This section describes characteristics of each amp model and effect.
AMP model
BTQ CLEAN
This models the clean channel of a high-quality amp that was produced only on special order, and was known as the overdrive special. With a beautifully rounded low range, a sharp midrange attack, and a sweet treble register, this is ideal for single coil pickups.
BLACK 2x12
This models a black-faced 2 × 12 combo amp that has become an indispensable item for country and blues players. Its tight and clean sound provides deep piano-like bass tones, and will deliver the classic Chicago blues tone particularly when used with single coil pickups.
TWEED 4x10
This models a 4 × 10^ combo amp from 1959 that was originally designed for bass guitar. Its smooth and crisp overdrive sound will respond sensitively to your picking dynamics and to the volume of your guitar.
AC15
This models channel 2 of the VOX AC15 (1x12", 15W), which was manufactured in 1962 and was a big hit for its compact cabinet, power, and great tone - along with then-popular British bands.
AC30TB
This models an AC30 amp with the "top boost" circuit that was included as standard starting with units produced in 1964. It delivers a smooth and refined top end, majestically deep overdrive, and a rich and brilliant clean sound.
UK '70S
This models the high treble channel of a hand-wired amp head made in England during the early 60's. Raising the volume of this 50W output amp all the way produces the crunch that will forever be the sound of rock 'n' roll.
UK '80S
This models a UK-manufactured 100W single-channel head with master volume made in 1983. Turn the GAIN control all the way up to get that thick, snarling hard rock and heavy metal sound that dominated the 80's.
UK '90S
This models the high-gain channel of a modern 100W amp. While individual notes are clearly defined, it delivers a monster sound that's quite aggressive and arrogant.
CALIMETAL
This models the modern high-gain channel from a wild beast of a high-gain amp. Its deep and loose low-end, sparkling highs, and monstrous gain are ideal for guitars tuned as low as possible, or for metal acts wielding seven-string guitars.
US HIGAIN
This models the overdrive channel of a snakeskin-covered 100W amp head made in 1991. With an open low-end and a compressed mid/high range, its powerful and heavy sound delivers a forceful tone that will not break down even with the most extreme gain settings.
LINE
This model features two-band tone controls that create a pure clean tone with no distortion. Use the GAIN knob to adjust the volume level for the low range, and the TONE knob for the high range.
Effects
EFFECTS Knob: Compressor/Modulation
COMP
This models a compressor that features a clean, percussive, and mellow sustain. Suitable for pop or funk rhythms.
Use the knob to adjust the amount of sustain.
CHORUS
This models a standard analog chorus that adds a rich spaciousness to the sound.
Use the knob to adjust the modulation speed.
FLANGER
This models an analog flanger that creates a sound with a peculiar swooshing effect like a jet engine.
Use the knob to adjust the modulation speed.
TREM
This models a typical tremolo built into a standard U.S. combo amp that changes the volume up and down cyclically.
Use the knob to adjust the tremolo speed.
DELAY/REVERB Knob:
A.DLY
This models an analog delay that uses a bucket brigade device (BBD).
The sound quality is low fidelity, but its warm sound is popular among musicians.
Use the knob to adjust the mix amount of the delay sound. Set the delay time with the TAP button. The maximum delay time is 1.25 seconds.
T. ECHO
This models a popular analog tape echo.
Tape echo was originally created by using a playback head, and the delay time was adjusted by modifying the motor speed. The knob and button functionality is the same as that for the A.DLY model.
SPRING
This models a spring reverb inside a guitar amp.
Use the knob to adjust the mix amount of the reverb sound.
Use the TAP button to set the reverb time.
ROOM
This is a standard room reverb that contains a lot of initial reflection.
The knob and button functionality are the same as the SPRING model.
Troubleshooting
The power does not turn on even when the power button is pressed and held down.
- Have you installed batteries? Is the polarity correct?
Or, is the AC adapter cord connected to the rear panel of the amp correctly?
Is the AC adapter plugged into an AC outlet?
Is the AC outlet switched on and working? - Is the AC adapter damaged?
There's no sound coming from the amp
- Is your guitar turned up?
- Are both ends of your guitar cable plugged into where they should be?
- Is your guitar cable working?
- Are the top panel VOLUME and GAIN knobs turned up?
- Do you have headphones or anything else plugged into the amp's top panel PHONES jack? If "yes," unplug!
The amp doesn't seem very loud.
- Is your guitar turned up?
- Is the top panel VOLUME or GAIN knob turned down low?
- Are the batteries discharged?
There's no sound heard from the PHONES jack when you use it.
-
Check that the top panel VOLUME knob isn't turned all the way down.
-
Make sure sound is coming from the amp. You'll need to unplug your headphones or cable from the PHONES jack to do this, since plugging something into this jack automatically mutes the amp's speakers. If there's still no sound from the amp, go to "There's no sound coming from the amp." If you do hear sound, check the headphones or cable you are hooking up to this jack.
The effects cannot be applied to the sound.
- Is the tuner function turned on? If the tuner function is turned on, the effects will be bypassed. Press the TAP button to cancel the bypass.
- Is the EFFECTS or DELAY/REVERB knob set to OFF or to a lower value? Adjust the EFFECTS and DELAY/REVERB knob.
- If the effects cannot be applied to the MIC signal, the SEND knob might be set to a lower value. Adjust the SEND knob.
The sound of a device connected to the AUX IN jack is not being output.
- Make sure that the external device is connected properly.
- The volume control on the external device might be set too low.
The sound from a microphone connected to the MIC IN jack is not being output.
- Make sure that the microphone is connected properly.
- The microphone switch could be set to off.
- The TRIM knob could be set too low.
Specifications
Number of amp types: 11
Number of effects: 8
Tuner range: E1-E6 (41.2 Hz-1318.5 Hz)
Input/output jacks: INPUT, MIC IN, AUX IN, PHONES
Power amp output: Maximum approx. 3 W RMS @ 4 ohms
Speaker: 5 inch 4 ohms
Signal processing A/D conversion: 24-bit D/A conversion: 24-bit
Power supply: Six AA/LR6 alkaline batteries or the included AC adapter
Battery life: 12 hours
Current consumption: 150mA
Dimensions (W x D x H): 262 x 174 x 223 mm
10.31 x 6.85 x 8.78 inches
Weigh: 3kg / 6.61 lbs. (not including battery)
Included items: AC adapter (DC 12V strap
- Appearance and specifications of this product are subject to change without notice.
For more information on Vox products, please visit our website at www.voxamps.com.
Precautions
Emplacement
Section alimentation/AUX IN/PHONES
- Modeling Guitar Amplifier
- Power supply
- Interference with other electrical devices
- Handling
- Care
- Keep this manual
- Keeping foreign matter out of your equipment
- THE FCC REGULATION WARNING (for USA)
- Notice regarding disposal (EU only)
- IMPORTANT NOTICE TO CONSUMERS
- Contents
- Introduction
- Welcome aboard!
- Main features
- Setup
- Installing Batteries
- Replacing the Batteries
- Parts and their function
- Top Panel
- INPUT Section
- AMP section
- EFFECTS section
- Power/AUX IN/PHONES Section
- Rear Panel
- Auto Power Off Function
- Setting the Auto Power Off function to enable or disable
- Using the Tuner
- Amp Models and Effects
- AMP model
- BTQ CLEAN
- BLACK 2x12
- TWEED 4x10
- AC15
- AC30TB
- UK '70S
- UK '80S
- UK '90S
- CALIMETAL
- US HIGAIN
- LINE
- Effects
- EFFECTS Knob: Compressor/Modulation
- COMP
- CHORUS
- FLANGER
- TREM
- DELAY/REVERB Knob:
- A.DLY
- ECHO
- SPRING
- ROOM
- Troubleshooting
- There's no sound coming from the amp
- The amp doesn't seem very loud.
- The effects cannot be applied to the sound.
- The sound of a device connected to the AUX IN jack is not being output.
- The sound from a microphone connected to the MIC IN jack is not being output.
- Specifications
- Number of amp types: 11
- Number of effects: 8
- Precautions
- Emplacement
- Section alimentation/AUX IN/PHONES
Brand : VOX
Model : Mini3 G2
Category : Receiver