
SB5700BK - Blender AEG - Free user manual and instructions
Find the device manual for free SB5700BK AEG in PDF.
| Brand | AEG |
| Model | SB5700BK |
| Product Type | Blender |
| Power Supply | Domestic electrical network (230 V, 50 Hz) |
| Power | Approximately 600 W |
| Bowl Capacity | Approximately 1.5 L |
| Bowl Material | Glass or resistant plastic |
| Number of Speeds | Multiple speeds + Pulse and Ice Crush function |
| Special Functions | Pulse, Ice Crush (ice crusher) |
| Blade | Removable, stainless steel, very sharp |
| Included Accessories | Lid with filling opening, measuring cap |
| Non-slip Feet | Yes |
| Cord Storage | Under the appliance |
| Safety | Lid locking, automatic shutdown in case of overload |
| Maximum Operating Time | 2 minutes under heavy load, then 10 minutes cooling |
| Maximum Liquid Temperature | 90 °C (do not blend boiling liquids) |
| Care and Cleaning | Quick cleaning with hot water and detergent; removable parts (lid, bowl, cap) are dishwasher safe; wipe the motor unit with a damp cloth |
| Spare Parts and Repairability | Removable cutting unit (blade); for any repair, contact an authorized service center |
| Warranty | In accordance with applicable legislation |
Frequently Asked Questions - SB5700BK AEG
User questions about SB5700BK AEG
0 question about this device. Answer the ones you know or ask your own.
Ask a new question about this device
Download the instructions for your Blender in PDF format for free! Find your manual SB5700BK - AEG and take your electronic device back in hand. On this page are published all the documents necessary for the use of your device. SB5700BK by AEG.
USER MANUAL SB5700BK AEG
natural_image
Exterior view of a modern AEG blender with handle and control knob (no text or symbols on body)BLENDER SB5700BK
D·GR·NL·F·GB
AEG
GB Instruction book .....17–21
Before using the appliance for the first time, please read the safety advice on page 18 carefully.
D
Teile
A. Behälter
B. Ausgusstülle
D
natural_image
Close-up of a blender with a side view showing its interior and interior components (no text or symbols visible)natural_image
Close-up of a glass mug filled with liquid, no visible text or symbols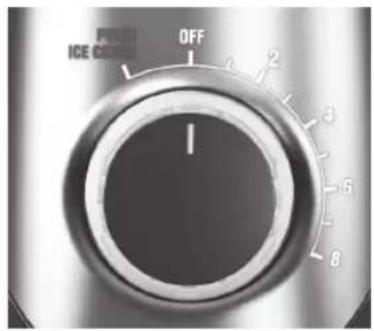
natural_image
Close-up of a blender with ice cubes and a circular control knob (no text or symbols visible)natural_image
Close-up of a blender with liquid being poured into it, shown in an inset magnified view (no text or symbols visible)D
natural_image
Electric stove with solar panel and power plug, no visible text or symbolsnatural_image
Close-up of a blender with a black lid and mechanical components (no text or symbols visible)GB
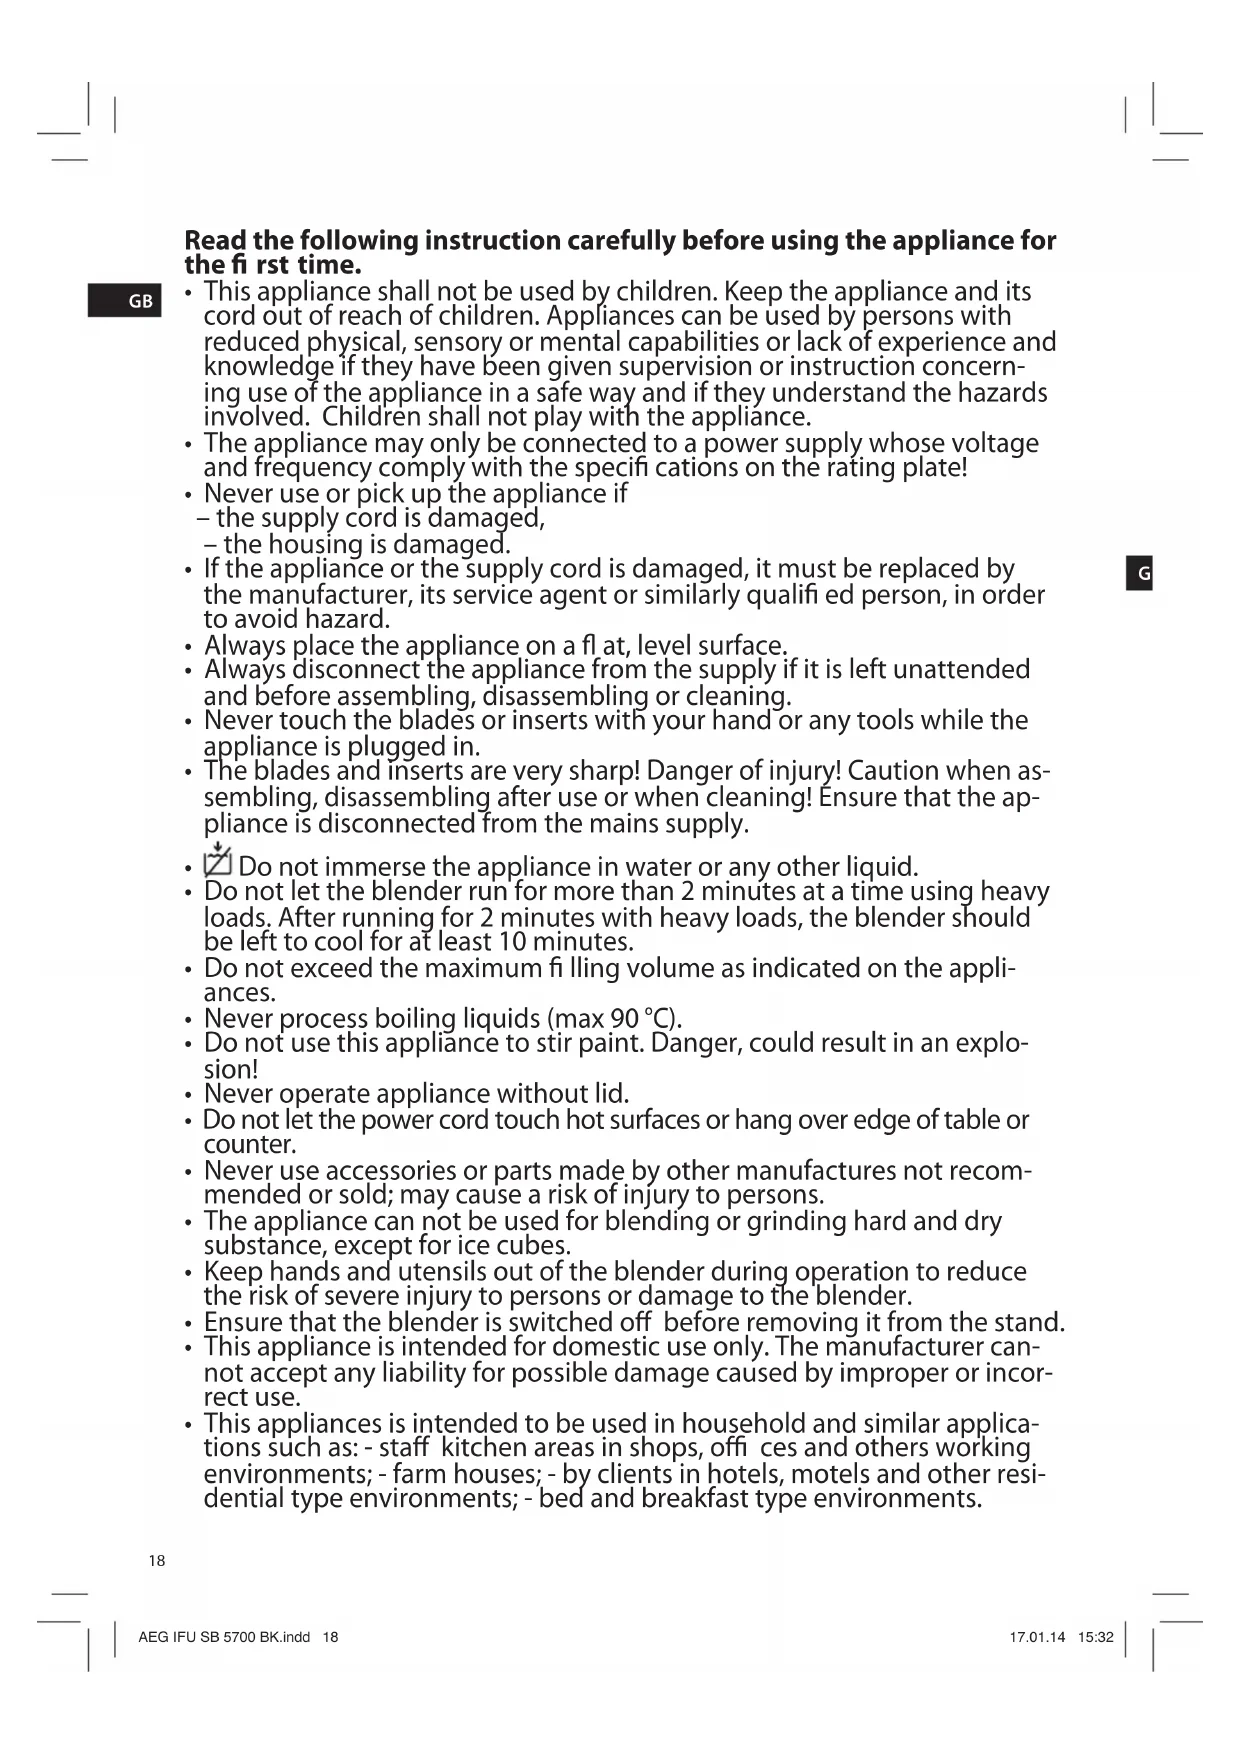
Components
A. Jug
B. Spout
C. Lid with filler hole
D. Measuring cup
E. Blade assembly, detachable
F. Motor housing
G. Speed selector (with PULSE, ICE CRUSH function)
H. Cord storage device (underside of appliance)
I. Non-slip feet
D
GR
NL
F
GB
Read the following instruction carefully before using the appliance for the first time.
- This appliance shall not be used by children. Keep the appliance and its cord out of reach of children. Appliances can be used by persons with reduced physical, sensory or mental capabilities or lack of experience and knowledge if they have been given supervision or instruction concerning use of the appliance in a safe way and if they understand the hazards involved. Children shall not play with the appliance.
- The appliance may only be connected to a power supply whose voltage and frequency comply with the specifications on the rating plate!
- Never use or pick up the appliance if
– the supply cord is damaged, – the housing is damaged.
- If the appliance or the supply cord is damaged, it must be replaced by the manufacturer, its service agent or similarly qualified person, in order to avoid hazard.
• Always place the appliance on a flat, level surface.
- Always disconnect the appliance from the supply if it is left unattended and before assembling, disassembling or cleaning.
- Never touch the blades or inserts with your hand or any tools while the appliance is plugged in.
- The blades and inserts are very sharp! Danger of injury! Caution when assembling, disassembling after use or when cleaning! Ensure that the appliance is disconnected from the mains supply.
- Do not immerse the appliance in water or any other liquid.
- Do not let the blender run for more than 2 minutes at a time using heavy loads. After running for 2 minutes with heavy loads, the blender should be left to cool for at least 10 minutes.
- Do not exceed the maximum filling volume as indicated on the appliances.
- Never process boiling liquids (max 90 °C).
- Do not use this appliance to stir paint. Danger, could result in an explosion!
- Never operate appliance without lid.
- Do not let the power cord touch hot surfaces or hang over edge of table or counter.
- Never use accessories or parts made by other manufactures not recommended or sold; may cause a risk of injury to persons.
- The appliance can not be used for blending or grinding hard and dry substance, except for ice cubes.
- Keep hands and utensils out of the blender during operation to reduce the risk of severe injury to persons or damage to the blender.
- Ensure that the blender is switched off before removing it from the stand.
- This appliance is intended for domestic use only. The manufacturer cannot accept any liability for possible damage caused by improper or incorrect use.
- This appliances is intended to be used in household and similar applications such as: - staff kitchen areas in shops, offices and others working environments; - farm houses; - by clients in hotels, motels and other residential type environments; - bed and breakfast type environments.
Getting started
GB
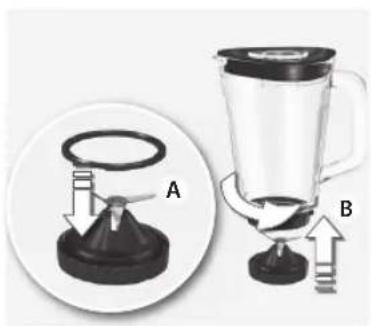
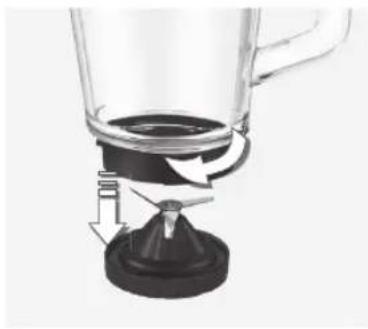
- Before using the blender for the first time, wash all parts except for the motor housing. Assembling: Place the rubber seal on the blade assembly (A) and insert it under the jug. Turn the blade assembly counter-clockwise (B) to fasten. Caution! The blades are very sharp!
natural_image
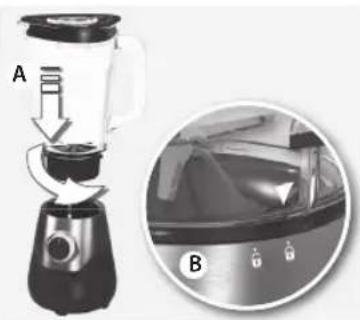
Illustration of a blender with labeled parts (A and B) and a close-up inset showing interior components (no text or symbols on the main objects)- Place the blender on a fl at surface and lock the jug into position on the motor housing. When the arrow is aligned with the "Locked" indicator, the jug is locked in position. Put the ingredients in the jug. (Do not exceed the maximum level as indicated on the jug.)
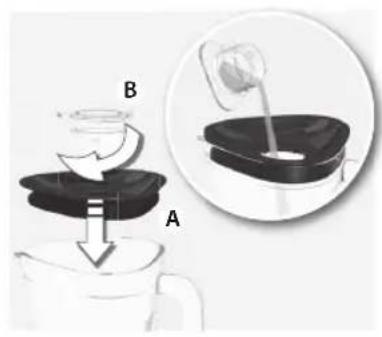
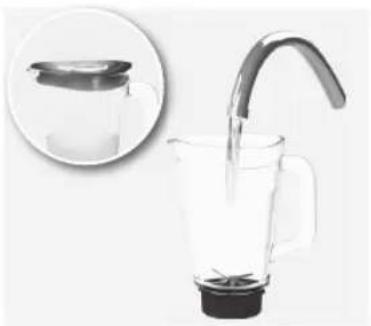
- Close the lid (A) and insert the measuring cup in the fi ller hole and (B) lock into position. (You can use the measuring cup to add ingredients while the blender is running. Close the fi ller hole immediately after, to avoid splashing.) Caution! When processing hot liquids, see step 4.
natural_image
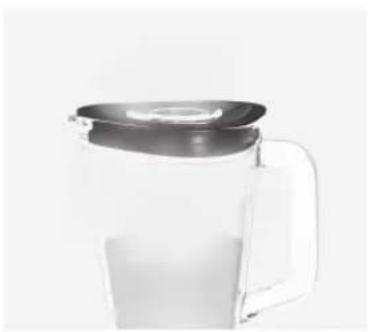
Close-up of a glass mug with a lid and handle, containing a white liquid (no text or symbols visible)- Processing hot liquids: allow hot liquids to cool down until lukewarm before flling the jug. Fill the jug only half full and start processing on low speed. The blender jug can become very warm – take care to protect your hands and to ventilate steam out through the fller hole. Always replace the lid before use.
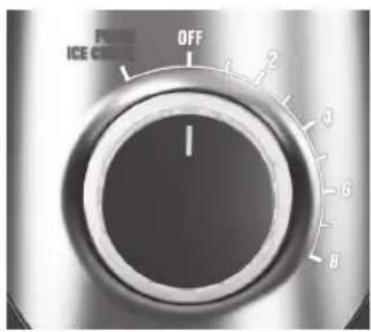
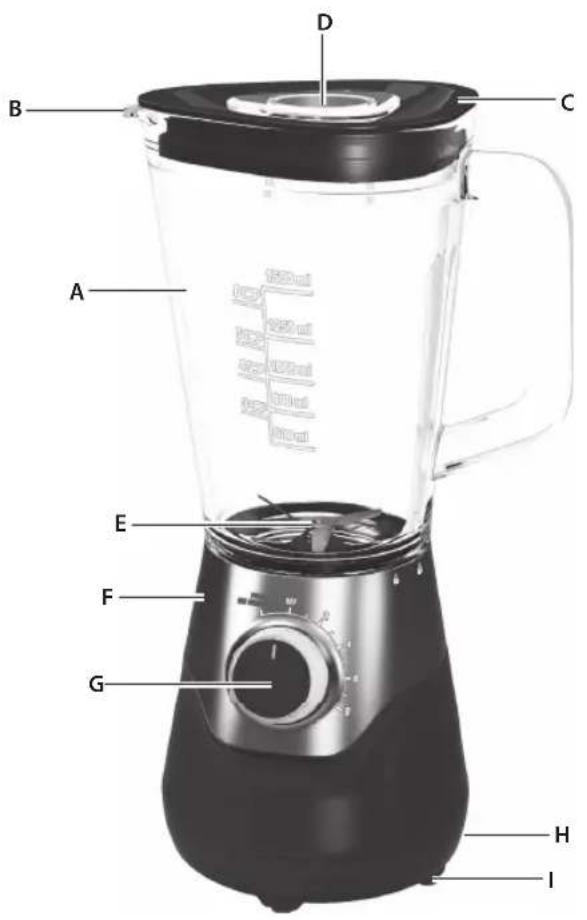
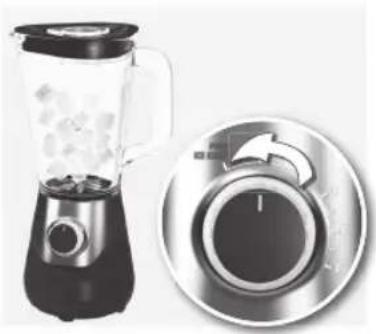
- Start the blender: Make sure the speed selector is set to the "OFF"-position. Plug into mains. Turn the speed selector to your desired setting. Note: Turn the speed selector to "PULSE, ICE CRUSH" without releasing it, to accelerate the process of blending. Release to stop.
natural_image
Close-up of a blender with glass lid and side panel showing control knob (no text or symbols visible)- Ice crushing: Turn the speed selector to "PULSE, ICE CRUSH" for 3-5 seconds several times until you obtain a satisfactory result. Note: You can add more ice through the filler hole while the blender is running.
Cleaning and care
natural_image
Close-up of a blender with water being poured into it, showing liquid and a curved handle (no text or symbols visible)- Quick cleaning: Pour warm water into the jug, add a few drops of detergent. Mix water and detergent by turning the speed selector to "PULSE, ICE CRUSH" briefly. Finally, rinse the jug under running water.

natural_image
Electric blender with solar panel and power plug, next to a wall-mounted socket (no text or symbols visible)- Thorough cleaning: Turn the blender off and unplug the power cord. Wipe the motor housing with a damp cloth.
Warning! Never immerse the housing, plug, and cord in water or any other fluid.
natural_image
Close-up of a blender with a black lid and handle, showing mechanical components (no text or symbols visible)- Remove the lid and jug. Turn the blade assembly clockwise and remove it. Rinse the blade assembly in water and detergent. Caution! Handle carefully, the blades are very sharp! The lid, jug and measuring cup can be washed in the dishwasher.
Troubleshooting
| Troubleshooting | ||
| Symptom Cause Solution | ||
| The blender does not switch on. | Components are not fixed properly. Check if all locked into position. | the components are properly locked into position. |
| The speed selector is not on the right position. | Choose the appropriate speed. To use PULSE function, make sure the speed selector is on PULSE position. | |
| The jug is overfilled. Empty the jug so you do not exceed the maximum level. | ||
| The plug is not properly connected to the power outlet. | Check the connection of the plug to the outlet or try another outlet. | |
| Power outage. Wait until power outage is over. | ||
| Functional problem. Contact authorized service. | ||
Disposal
Recycle the materials with the symbol

Put the packaging in applicable ainers to recycle it.
Help protect the environment and human health and to recycle waste of electrical and electronic appliances.
Do not dispose appliances marked with

the symbol — with the household waste. Return the product to your local recycling facility or contact your municipal office.
Blending quantities and Processing Times
| Maximum Processing time with heavy load | 2 min |
| Recommended blending speed | ||||
| Recipe Ingredients Quantity Time Speed | ||||
| Pureeing raw vegetables | Carrots 20~80 g | 20~30 sec max | ||
| Potatos 20~80 g | ||||
| Onions 20~80 g | ||||
| Water 60~160 g | ||||
| Strawberries margaritas (Cocktail) | Tequila 240 ml | ≤120 sec max | ||
| Triple sec 60 ml | ||||
| Frozen strawberries 225 g | ||||
| Frozen Lemonade concentrate 145 g | ||||
| Ice cubes 150 g | ||||
| Pineapple-apricots Smoothie Dried | Pineapple in slices 250 g | ≤120 sec max | ||
| Apricots 40 g | ||||
| Yoghurt | 300 g | |||
| Milkshake | Milk | 150-300 ml | 20~30 sec mid | |
| Vanilla Ice cream | 200-400 g | |||
| Banana | 14 - 12 pcs | |||
| Chocolate syrup | 30-60 g | |||
| Potato leek soup Leek | Potatoes | 300 g | 50~60 sec mid | |
| 300 g | ||||
| Water 600 g | ||||
| Pancake (Batters) | Wheat flour | 150 g | 40~50 sec mid | |
| Salt | 1 Pinch | |||
| Eggs | 3 pcs | |||
| Milk | 250 ml | |||
| Water 140 ml | ||||
| Butter | 50 g | |||
www.aeg-home.com
With Electrolux, the choice of professionals.

Brand : AEG
Model : SB5700BK
Category : Blender