RSW402 - Radio MAJESTIC - Free user manual and instructions
Find the device manual for free RSW402 MAJESTIC in PDF.
| Product Type | Alarm clock radio with weather station and wireless outdoor sensor |
| Main Power | AC/DC adapter (not included); DC jack input |
| Backup Battery | 1 CR2032 lithium battery (not included); time backup up to 3 days |
| Outdoor Sensor | Wireless, 2x AAA batteries (not included), range 30 meters open air |
| Radio Reception | FM with telescopic antenna |
| Radio Presets | Up to 10 FM presets |
| Alarms | 2 independent alarms, wake by radio or buzzer |
| Snooze Function | Adjustable from 5 to 60 minutes |
| Sleep Timer | 5, 15, 30, 45, 60, 75, 90 minutes or off |
| Display | LED; adjustable brightness (high/low/off) |
| Weather Indicator | Icons (sunny, partly cloudy, cloudy, rainy) based on outdoor sensor data |
| Temperature Ranges | Indoor: 0°C to +50°C; outdoor: -40°C to +60°C |
| Temperature Resolution | 1°C |
| Alarm Duration | 1 hour |
| Radio Volume | From L00 (mute) to L15 (maximum) |
| Maintenance and Cleaning | Clean with a soft, dry cloth; avoid water, solvents, and direct sunlight |
| Safety | Do not open the device; do not expose to rain or humidity; keep away from fluorescent lamps |
| Reset | Reset button on the back to restore factory settings |
Frequently Asked Questions - RSW402 MAJESTIC
User questions about RSW402 MAJESTIC
0 question about this device. Answer the ones you know or ask your own.
Ask a new question about this device
Download the instructions for your Radio in PDF format for free! Find your manual RSW402 - MAJESTIC and take your electronic device back in hand. On this page are published all the documents necessary for the use of your device. RSW402 by MAJESTIC.
USER MANUAL RSW402 MAJESTIC
natural_image
Symbol of a trash bin crossed with no text or labels, accompanied by a black rectangular block below (no readable text or symbols)MANUALE D'ISTRUZIONI RSW 402 "CURVE" RADIO SVEGLIA CON STAZIONE BAROMETRICA RILEVAMENTO TEMPERATURA INTERNA ED ESTERNA
text_image
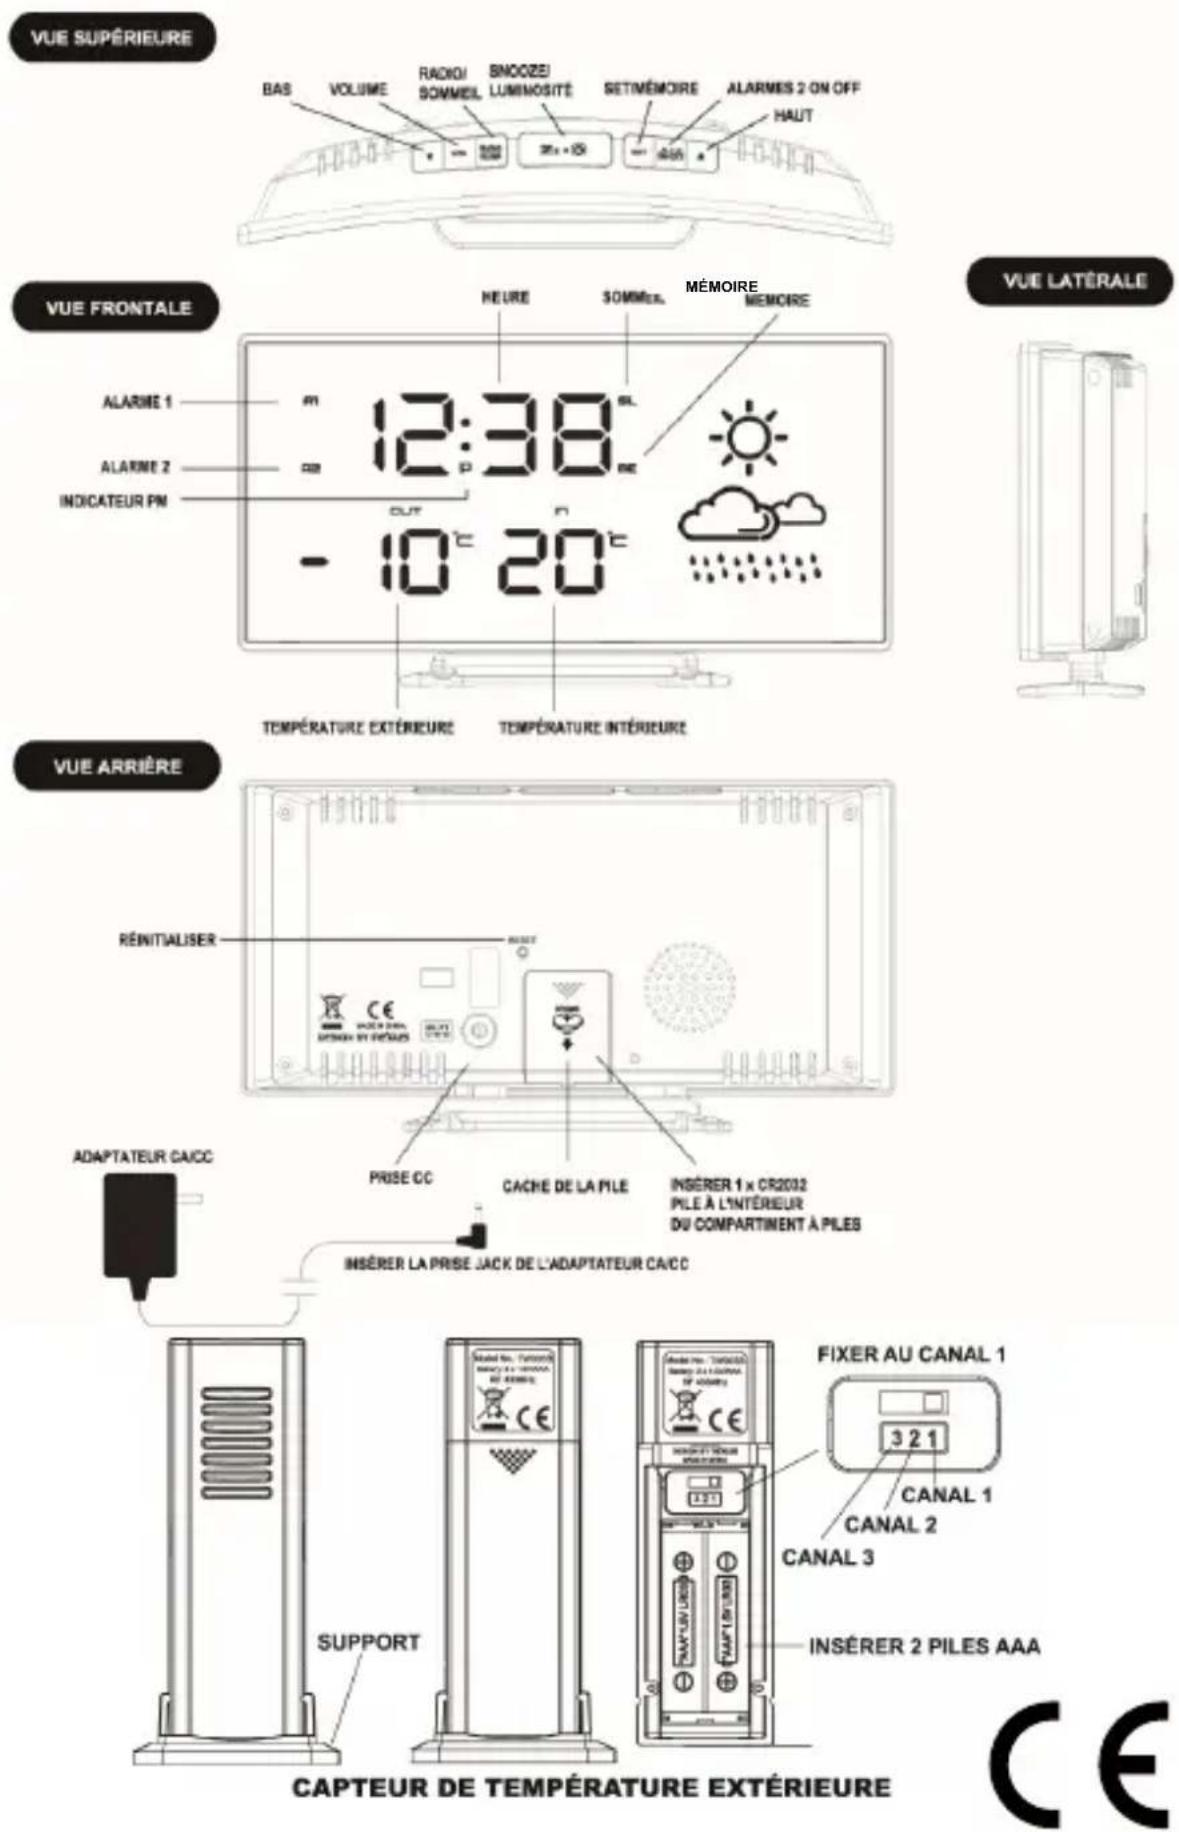
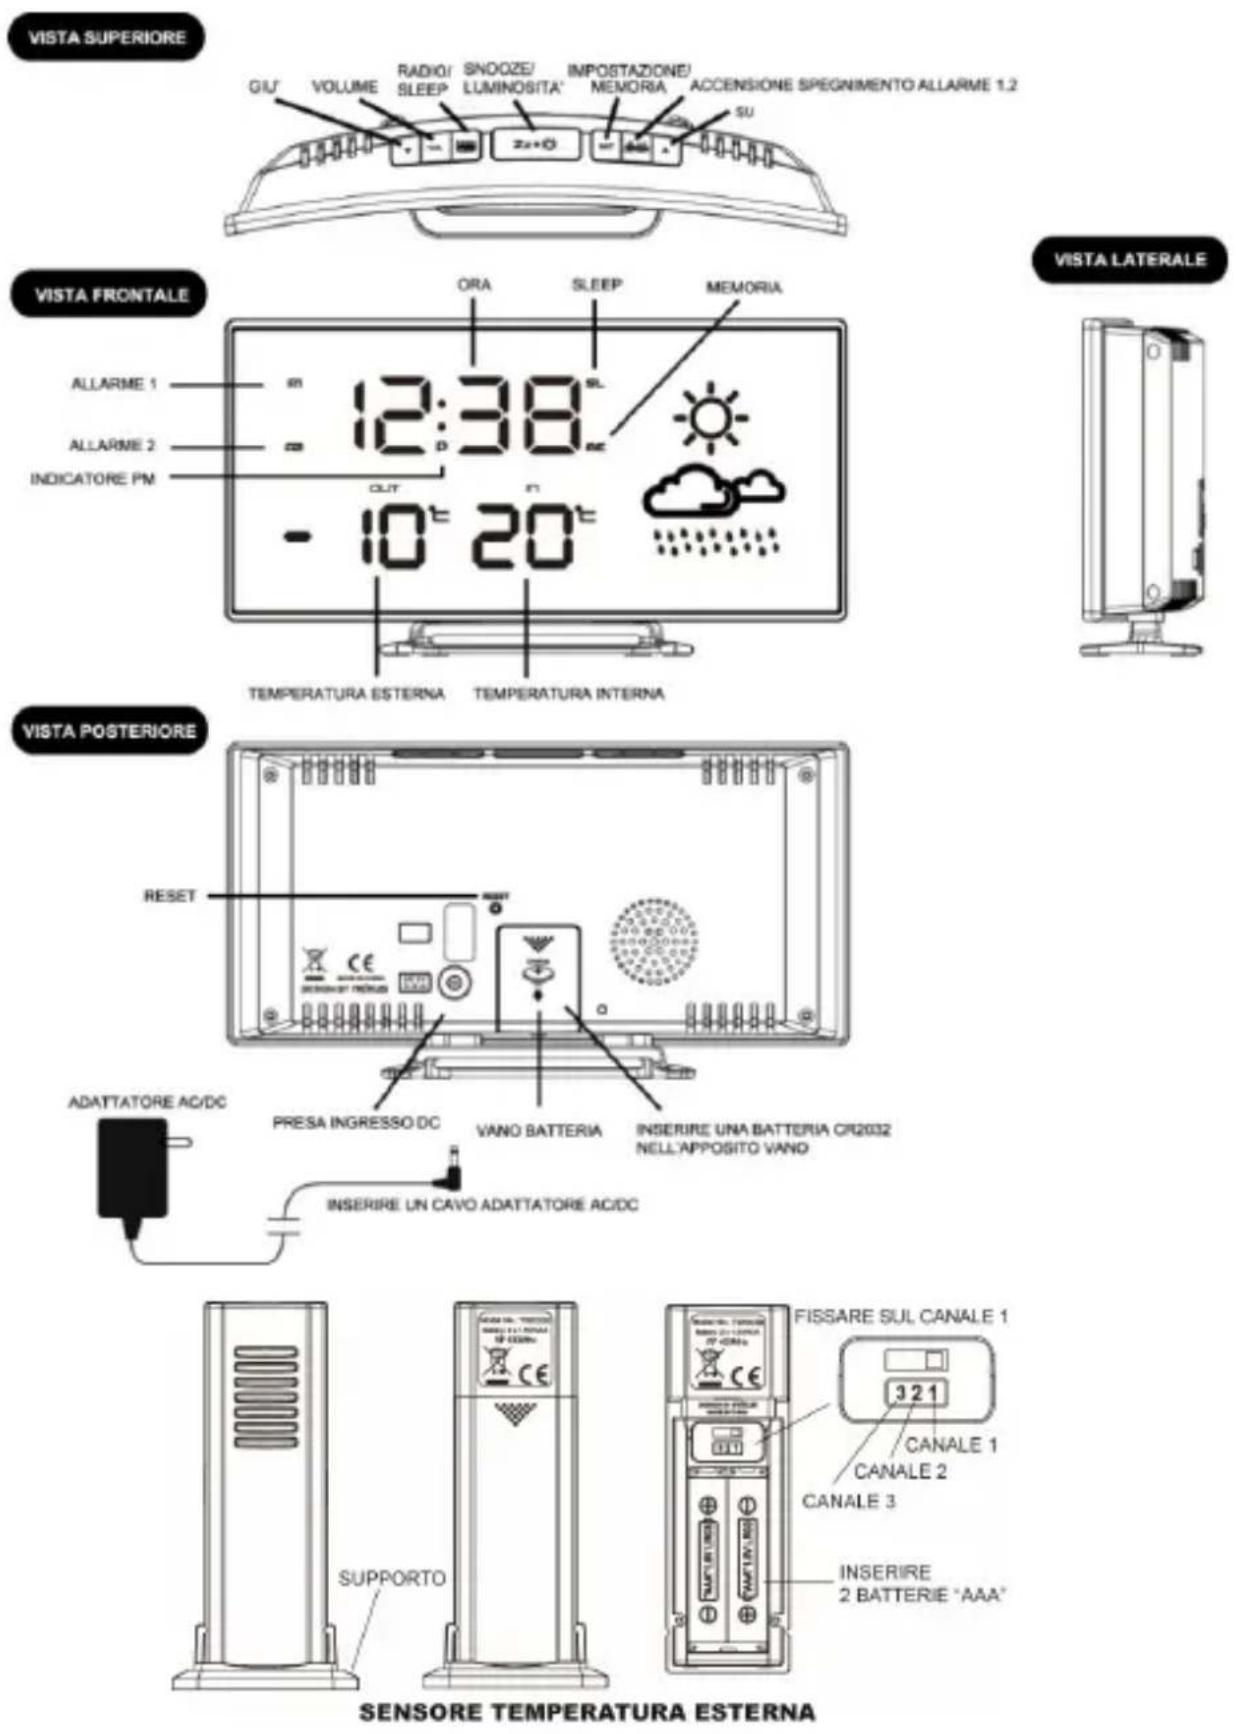
VISTA SUPERIORE QIU' VOLUME RADIO/ SNOOZE/ IMPOSTAZIONE/ ACCENSIONE SPEGNIMENTO ALLARME 1.2 SLEEP LUMINOSITA' MEMORIA SU Zn+0 VISTA FRONTALE ORA SLEEP MEMORIA ALLARME 1 12:38 ALLARME 2 INDICATORE PM OUT - 10° 20° TEMPERATURA ESTERNA TEMPERATURA INTERNA VISTA POSTERIORE RESET PRESA INGRESSO DC VANO BATTERIA INSERIRE UNA BATTERIA CR2032 NELL'APPOSITO VANO ADATTATORE AC/DC INSERIRE UN CAVO ADATTATORE AC/DC FISSARE SUL CANALE 1 321 CANALE 1 CANALE 2 CANALE 3 INSERIRE 2 BATTERIE "AAA" SENSORE TEMPERATURA ESTERNA VISTA LATERALEtext_image
Diagram showing a trash bin with crossed cross lines and a blank rectangular symbol below.Insert the AC/DC adaptor to any AC household outlet. Then insert the DC jack to the back case of your clock radio.
Step 2
Keep your clock radio and wireless sensor next to each other. Slide open the battery cover at the back of your wireless outdoor transmitter, make sure the channel selector is set at position 1 (right position), then insert 2 x AAA batteries (not included) into the outdoor sensor by observing the correct + / - polarity signs inside the battery compartment. Replace the battery door.
Your clock radio will receive data signal from the outdoor transmitter in few seconds. Then place your outdoor sensor in a dry and shaded area outdoor away from direct sun or rain.
Remark : The temperature readings will become stable and more accurate after the unit is powered up for around 30 minutes.
Step 3
Extend the FM wire antenna fully and vary the direction for best FM reception. Do not strip, alter or attach to other antennas.
Wireless Outdoor Transmitter
-
Keep in mind that your outdoor sensor has a 30-meter open-air transmission with no obstructions. Actual transmission range will vary depending on what is in the path of the signal. Each obstruction (roof, walls, floors, ceilings, thick trees, etc.) will effectively cut signal range in half.
-
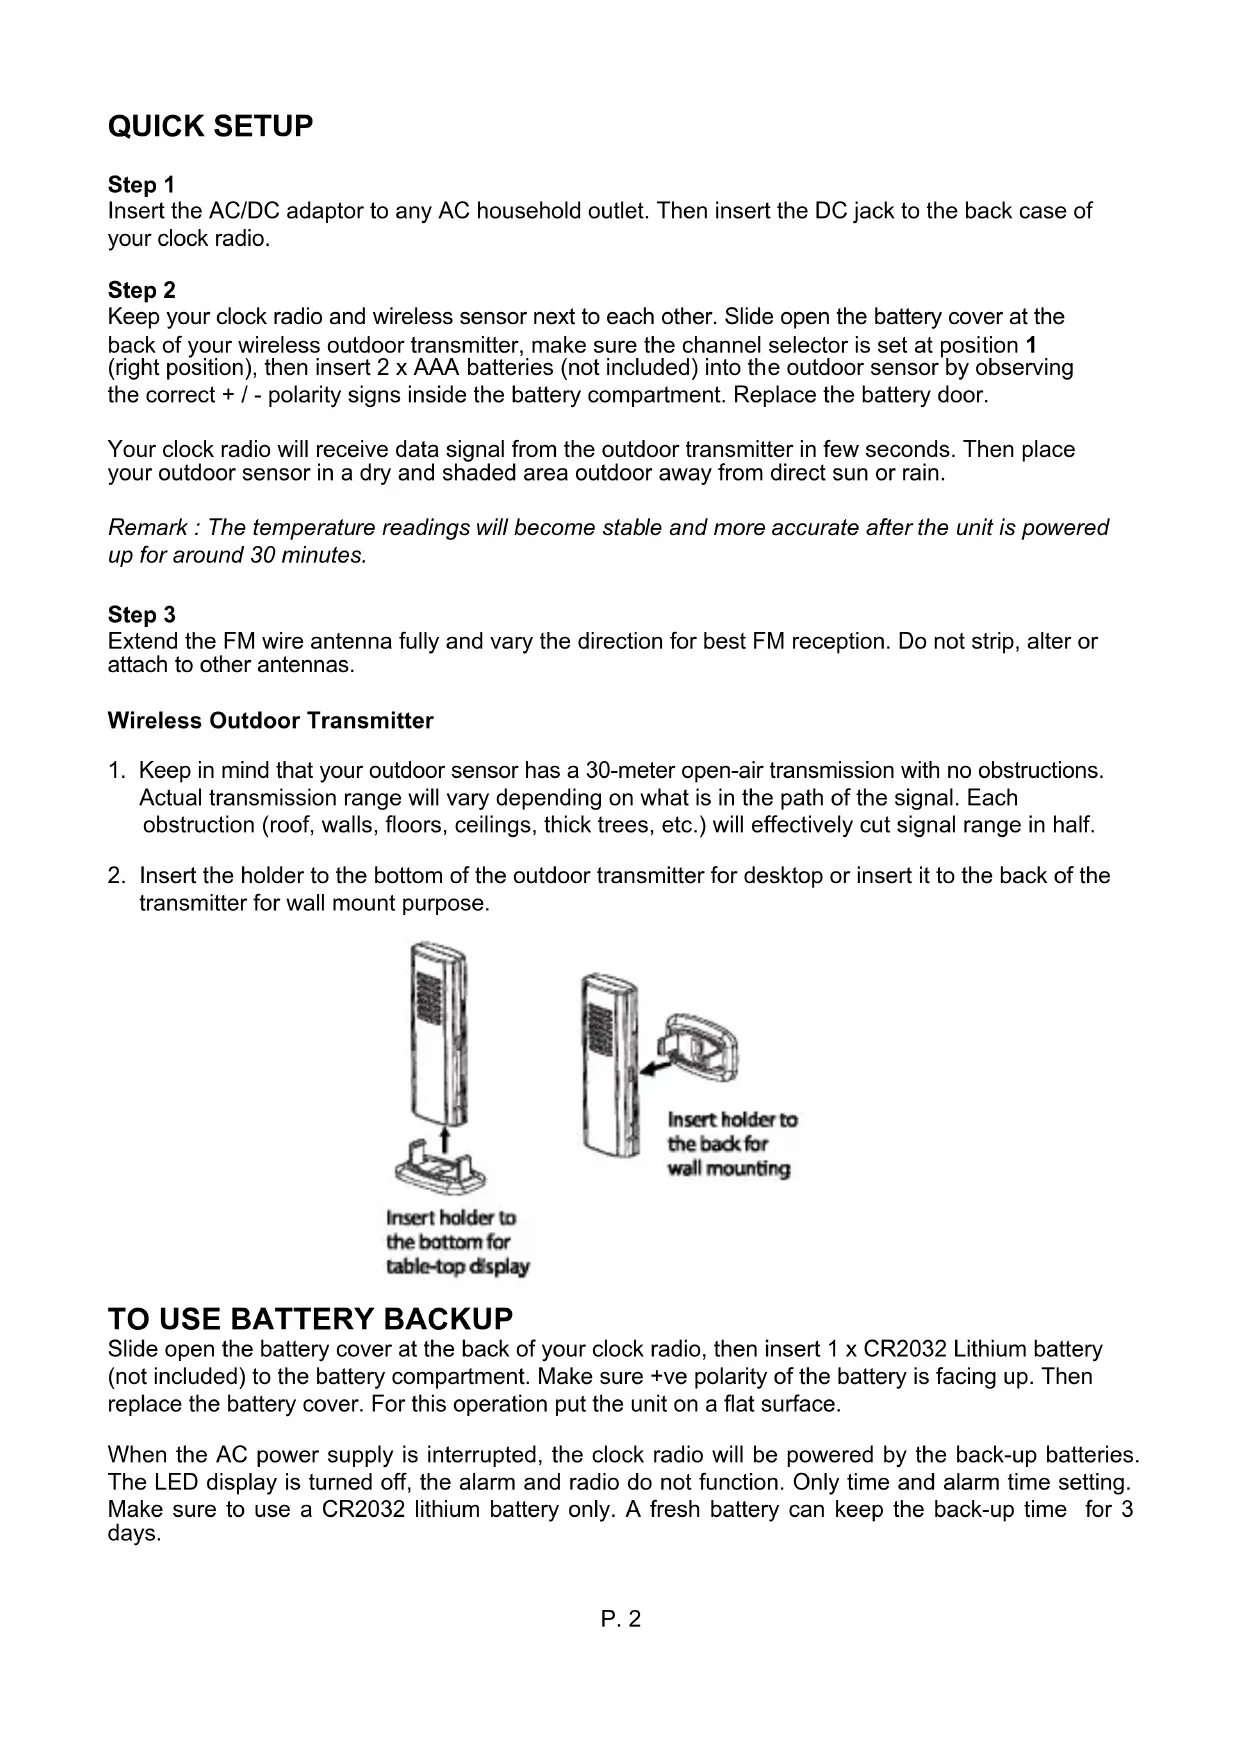
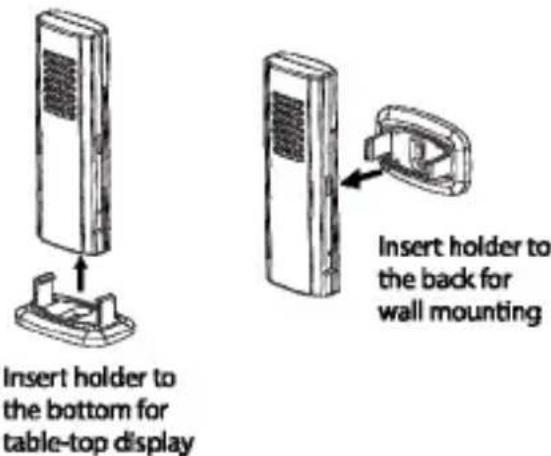
Insert the holder to the bottom of the outdoor transmitter for desktop or insert it to the back of the transmitter for wall mount purpose.
text_image
Insert holder to the bottom for table-top display Insert holder to the back for wall mountingTO USE BATTERY BACKUP
Slide open the battery cover at the back of your clock radio, then insert 1 x CR2032 Lithium battery (not included) to the battery compartment. Make sure +ve polarity of the battery is facing up. Then replace the battery cover. For this operation put the unit on a flat surface.
When the AC power supply is interrupted, the clock radio will be powered by the back-up batteries. The LED display is turned off, the alarm and radio do not function. Only time and alarm time setting. Make sure to use a CR2032 lithium battery only. A fresh battery can keep the back-up time for 3 days.
TO SET TIME, 12/24HR, CALENDAR, SNOOZE DURATION
- Press and hold SET, hour digits flash. Press ▲ or ▼ to set hours.
- Press SET. Minutes digits flash. Press ▲ or ▼ to set minutes.
- Press SET. The display shows “24Hr” flash, press ▲ or ▼ to select 12Hr ⇔ 24Hr. In 12Hr mode, P (PM) LED will appear on the display to indicate afternoon time. There is no AM indicator.
- Press SET, "2016" digits flash. Press ▲ or ▼ button to set the year.
- Press SET, month digit "1" (on the right) flash. Press ▲ or ▼ button to set the month.
- Press SET, date digit "1" (on the left side) flash. Press ▲ or ▼ button to set the date.
- Press SET, display shows 05 and flash. Press ▲ or ▼ button to set snooze duration from 5 to 60 minutes.
- Press SET to return to normal mode or it will return to normal mode in around 10 seconds if no further press of any other buttons.
TO SET ALARM
- Press and hold AL 1.2 / ON.OFF, the A1 LED and the hour digit flashes. Press ▲ or ▼ to set Alarm 1's hours.
- Press AL 1.2/ ON.OFF, the minute digits flash. Press ▲ or ▼ to set the Alarm 1's minutes.
- Press AL 1.2/ ON.OFF once, the LED display shows "bu". To select the sound sources of your alarm, press ▲ or ▼ to select :-
$$ \mathbf {b u} = \text { wake - to - buzzer } $$
$$ \mathbf {r d} = \text { wake - to - radio } $$
- Press AL 1.2/ ON.OFF, "1-7" flashes, Press ▲ or ▼ to select weekly-weekday-weekend alarm:
1-7 = Monday to Sunday
1-5 = Monday to Friday only
6-7 = Saturday and Sunday only
1-1 = Single-day alarm : after the alarm sounds and is stopped, the A1 LED goes off.
Press AL1.2/ON.OFF to re-active another single-day alarm.
- If "rd" (wake-to-radio) is selected, press ▲ or ▼ to select "HI" or "LO" for the volume of radio you wake up to. This selection does not apply for "bu" (wake-to-buzzer).
- Press AL 1.2/ ON.OFF, the A2 LED and the hour digits flash. Press ▲ or ▼ to set Alarm 2's hour. The repeat step 2 to 5 above to set alarm 2.
- To store your alarm settings, press SET once (or if no button is pressed in around 10 seconds).
When the related alarm is turned on, it will be indicated by the appearance of the A1 and / or the A2 LED on the left side of the display.
Note: Alarm function only works when AC/DC adaptor is used to power the clock radio.
TO TURN ON / OFF ALARM 1 AND 2
- Press AL 1.2/ON.OFF once to activate Alarm 1, A1 LED appears.
- Press AL 1.2/ON.OFF once again to activate Alarm 2, A2 LED appears.
- Press once again to activate both Alarm 1 and 2. Both A1 and A2 LED's appear.
- Press once again to deactivate both alarms, both A1 and A2 LED's disappear.
TO STOP AND RESET THE ALARM TO COME ON THE NEXT DAY
When alarm 1 or 2 is sounding, the related A1 or A2 LED flashes. Press the RADIO / SLEEP or AL 1.2/ ON.OFF once to stop the alarm and reset it to come on the following day. After that A1 and / or A2 LED remains on the display.
SNOOZE OPERATION (DEFAULT SNOOZE DURATION IS 5 MINUTES)
When alarm is sounding, press once, the alarm will be silenced and come on again after the set snooze duration.
Note: if your second alarm activates while the first alarm is sounding or it is in the snooze mode, the second alarm overrides the first alarm (the first alarm is reset to come on the next day).
TO USE THE HI-LO DIMMER
Press to select the LED brightness (high/ low-dim/ off) of the LED display. This can only be done when the radio is off.
TO SET UP THE FM ANTENNA
Extend the FM wire antenna fully and vary the direction for best FM reception. Do not strip, alter or attach to other antennas.
TO LISTEN TO THE FM RADIO
- To turn on the radio, press RADIO/SLEEP once, the display shows "ON" and then the radio frequency readings in Mhz.
- Press ▲ or ▼ to tune the radio to a desired station. Press and hold ▲ or ▼ to scan for the next clear station.
- To adjust the volume, press VOL once, the display shows "L06", press ▲ or ▼ to adjust volume from L00 (sound off) to L15 (maximum).
- Press Zz • 🙏 to turn off the radio.
Remark: keep your radio away from fluorescent lamps or other electronic devices, which may cause interference to the radio.
TO USE THE PRESET MEMORY (UP TO 10 PRESET STATIONS)
This clock radio features a total of 10 preset memories of FM stations. These allow you to preset your favorite stations and access them quickly.
- Turn on the radio and select a radio station you like to memorize.
- Press and hold the SET until "ME" LED appears and "P01" flashes. Press SET once to store Memory 1.
- Press ▲ or ▼ to select another station you like to memorize. Then press and hold SET until "mE" LED appears and "P01" flashes. Press ▲ once, "P02" flashes. Press SET once to store Memory 02.
- Repeat Step 2 to 3 to preset memories 3 through 10.
- To access a preset station at any time, press the SET one at a time while the radio is on.
TO USE THE SLEEP TIMER
- When radio is turned on, press and hold RADIO/SLEEP to enter the sleep mode. The SL LED appear and the sleep time "05" (5 minutes) appear on the display.
- Press the RADIO/SLEEP again as needed to adjust the sleep timer from 5, 15, 30, 45, 60, 75, 90 or OFF.
- When the display changes back to show the time, press and hold RADIO/SLEEP to show the sleep time remaining.
- The radio will play for the programmed sleep time and then shut off.
- To turn off the radio before the sleep time has elapsed, press Zz once.
TO USE THE WEATHER STATION
There are four types of weather display in your clock radio:-
 | SUNNY |
 | SUNNY AND CLOUDY |
 | CLOUDY |
 | RAINY |
Remarks: the weather icon indication is oriented from the changes of outdoor temperature and humidity reading from the wireless transmitter. It takes 24 hours to get stable. The weather icons on the display give a reference to the next 12-24 hours weather conditions. It may not match with the current weather condition outside.
IF YOU LOSE THE OUTDOOR TEMPERATURE
-
When the outdoor temperature digits show “--”, the wireless transmission is either interrupted or lost. Press & hold ▲ button of your clock radio to search for outdoor temperature signal (“--” flashes).
-
If you continue to lose the outdoor temperature display, repeat 1) and then re-insert the batteries on the outdoor transmitter. Try placing the transmitter in a different location until you have smooth transmission of temperature data.
TROUBLE SHOOTING
In case your clock radio shows irrelevant information or digits, it maybe affected by electrostatic discharge or interferences from other devices. Press the RESET button on the back of your clock. Your clock radio will be reset to default setting of time and calendar and you need to set it up again.
-
Do not expose the clock radio to extreme temperature, water or direct sunlight.
-
Avoid contact with any corrosive materials.
-
Do not subject the clock radio to excessive force, dust or humidity
-
Do not open the inner back case or tamper with any components of this clock radio.
SPECIFICATIONS
Operation Temperature: 0°C to +45°C
Temperature Range
Indoor 0°C to +50°C (display shows HH.H / LL.L if out of this range)
Outdoor -40°C to +60°C (display shows HH.H / LL.L if out of this range)
Temperature Resolution 1°C
Alarm Duration 1 hour
Snooze Duration 5 to 60 minutes
Sleep Timer Selections 5, 15, 30, 45, 60, 75, 90 minutes to OFF
Volume L00 (sound off) to L15 (maximum)
Preset Memories of Radio 10
Default Settings:-
Time Format 24 hour
Time 0:00
Alarm 1 and 2 6:00
Volume L06 (Level 06)
Snooze duration 05 (5 minutes)
MANUEL D'INSTRUCTIONS RSW 402 "CURVE"
RADIO RÉVEIL AVEC STATION MÉTÉO
RELEVÉ TEMPÉRATURE INTÉRIEURE ET EXTÉRIEURE