
MPV 1703 S - Mp3 player Trevi - Free user manual and instructions
Find the device manual for free MPV 1703 S Trevi in PDF.
| Product type | MP3 player |
| Brand | Trevi |
| Model | MPV 1703 S |
| Dimensions (W x D x H) | 24 x 24 x 14 mm |
| Weight | Approximately 20 g |
| Power supply | Built-in rechargeable lithium battery |
| Charging | Via microUSB port, charging time: 2 hours maximum |
| Battery life | Approximately 8 hours 30 minutes of continuous playback |
| External storage | microSD card up to 32 GB (not included) |
| Supported audio formats | MP3, WMA, WAV |
| Connectivity | USB 2.0 (microUSB) |
| Frequency response | 20 - 20000 Hz |
| Signal-to-noise ratio | 80 dB |
| Compatible operating systems | Windows 2000/XP/Vista/7/8/10, Mac OS 9.2 or higher |
| Main functions | Play/pause, next/previous track, volume +/-, clip, status LED |
| Maintenance | Clean with a soft, dry cloth. Avoid moisture and dust. |
| Safety | Do not expose to heat or water. Use headphones at moderate volume to protect hearing. |
| Battery warning | Charge between 5°C and 35°C. Do not overcharge. Do not disassemble. |
| Repairability | Battery replaceable only by a qualified professional. |
| General information | Mini MP3 player with attachment clip, compact design. |
Frequently Asked Questions - MPV 1703 S Trevi
User questions about MPV 1703 S Trevi
0 question about this device. Answer the ones you know or ask your own.
Ask a new question about this device
Download the instructions for your Mp3 player in PDF format for free! Find your manual MPV 1703 S - Trevi and take your electronic device back in hand. On this page are published all the documents necessary for the use of your device. MPV 1703 S by Trevi.
USER MANUAL MPV 1703 S Trevi
Mini MP3 player with clip
- Recharge the battery in an ambient temperature between 5^ and 35^ .
- When the recharge is complete the device shows a message/signal (check the user's guide).
- Don't recharge more than the suitable period to prevent the risk of overheating and burst.
- Recharging the battery over the suitable period or an extended period of inactivity may reduce battery duration.
- Rechargeable battery is liable to wear and tear and its performance will reduce gradually.
- To extend the duration of the battery use it when is completely charged up to the complete discharging, then recharge it fully before use it again. Recharge a battery not completely consumed, will result a reduced duration. In this case, repeat the full charging/discharging cycle many times.
- Avoid recharge the battery for the whole night.
Warning! Misuse of the battery may cause explosion or overheating of the battery.
To avoid possible hearing damage, limit the time listening at high volumes.
Cautions
- Do not place naked flames, such as lighted candles on or near the product.
- Do not place objects filled with liquids, such as vases on or near the product.
- Do not use or store this product in a place where it is subject to direct sunlight, heat, excessive dust or vibration.
- Do not keep or store this product in wet conditions for long period.
- Do not clean this product with other liquids.
- Do not block or cover the slots and holes in the product.
- Do not push foreign objects into the slots or holes in the product.
- Do not attempt to open this product yourself. There are no user serviceable parts inside.
- Do not allow children access to plastic bags.
SafetyWarnings
Before using this product, read and follow all warnings and instructions.
- This product is not intended for use by young children. Young children should be properly supervised.
- This product is intended for household use only and not for commercial or industrial use.
- Do not expose to dripping or splashing.
- No naked flame sources, such as lighted candles, should be placed on the product.
- Ventilation should not be impeded by covering ventilation openings with items such as newspapers, table cloths, curtains and the like.
- Make sure the unit is adjusted to a stable position. Damage caused by using this product in an unstable position or by failure to follow any other warning or precaution contained within this user manual will not be covered by warranty.
We, suggest retaining the packaging in case for future transport of the product.
If at any time in the future you should need to dispose of this product please note that: All batteries and accumulators need to be removed from this product (Removal of Waste Batteries and Accumulators).
| WARNING: ! WARNING: # | ·When participating in the traffic listening to a personal music player can make the listener less aware of potential dangers such as approaching cars. |
| ·Prolonged exposure to loud sounds from personal music players may lead to temporary or permanent hearing loss. |
Special Features
Elegant appearance and easy to use.
- Playback from Micro SD Memory Card.
- Multi-Code Player - Supporting MP3, WMA and WAV formats.
Brief View of Player
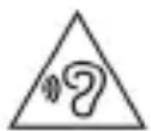
A. Outlook and Controls
- Clip
- 3.5mm Jack
: Earphone output - Status LED
: For charge / play status -
- button
: Decrease volume
- button
-
- button
: Increase volume
- button
- < button
: Play previous song, Previous folder -
button
: Play next song, Next folder - button
: On / Off, Play / Pause, Normal/Shuffle - Micro USB Port
: For PC connect, Charge - Reset Hole
: For reset device - Memory Card Slot
: For micro SD memory card
12.Card Slot Silicon Cover
B. Insert Micro SD Memory Card (not included)
This device is design without an internal memory; before you use it, insert a Micro SD memory card into player for music playback.
- Turn "Off" the play, open the "Card Slot Silicon Cover (12)", then plug in the Micro SD memory card into player's memory card slot and close the card slot silicon cover.
- Now you can use the player for upload / download the desired media files with your PC computer.
- Or, Upload the desired media files direct to the Micro SD memory card direct with your computer before insert it into player.
Note:
- Make sure the player power is in "Off" status when insert / remove the Micro SD memory card from memory card slot. Otherwise, the player functional may result dead halt or the internal data / files will be lost / damaged.
- The player will turn off in seconds automatically if no Micro SD memory card inserted or no supported music file(s) detected in memory card.
C. About player's battery
Player has an internal, non-user-replaceable rechargeable lithium battery. For best results, the first time you use the player, let it charging for about 1 2 hours or until the charging "Status LED (3)" to long light (solid) from blinking red before you use it.
Maintain battery life: Player may continue using battery power energy after it's been turned off. For maintain the battery life and performance, if unit isn't used for a while, the battery need to be recharged, recharging the battery at least once per month.
1 Charging the Battery:
1.1 You can charge the Player's battery in two ways;
1.2 Connect player to your computer. Or;
1.3 Use the USB power charger. (not included)
2 To Charge battery
2.1 Plug the USB plug of USB cable to the Player's "USB micro port (9)";
2.2 The "Status LED (3)" will light blinking red, for every 1 second, it is in charging.
2.3 The "Status LED (3)" will long light red when the battery is fully charged.
2.4 Disconnect the USB cable when it is done.
D. Connect Computer and Charge
You can connect the player to your computer to upload or download those wanted music files, and charging the battery.
1 To Connect PC:
1.1 Plug the USB plug of USB cable to the Player' "USB micro port (9) then plug the other side USB plug into a USB port on your computer;
1.2 The computer will detect and installing necessary driver automatically. And removable disk drive(s) will display in "My computer" folder. (For Windows system). Or;
1.3 An "Untitled" icon will display on desktop indicating the player is removable disk(s). (for MAC system)
1.4 Now the player is ready for music files upload or download with your computer. And the Player battery is in charging at background.
1.5 You can transfer the music files by using the computer mouse and drag and place, or copy and paste, in between the player and computer.
Note: In USB power charger or PC connection mode, the player can play music if you press or press and hold the (8) button.
2 Disconnect from computer :
It's important not to disconnect player while it'sSyncing. Don't disconnect, if you have uploading or downloading music files with your computer.
2.1 If you're using a Windows system PC, you can disconnect the player in My Computer or by clicking the "Safely Remove Hardware" icon in the Windows system tray, select the correspondence name of USB Device and choose Stop > Confirm > Confirm follow by the pop-up dialog from computer.
2.2 If you're using a Mac system PC, you can also disconnect player by dragging the player icon on the desktop to the Trash.
2.3 And, now is safe to disconnect the player with your computer, unplug the player from your computer.
2.4 If you're accidentally disconnect player without disconnect it, reconnect it to your computer and sync again. However, some media file will be loss if this circumstance happens.
Note: The player will go to play mode automatically when is disconnected with computer. Please turn it off when you don't use it.
E. Getting start player
1 Turn On / Off
1.1 Plug-in the earphone set into Player's "3.5mm jack (2)".
1.2 Press and hold the “▶ (8)” button for until the “Status LED (3)” light blue, the player is turning on and the music will play in seconds automatically.
1.3 To Turn Off, press and hold the “▶ (8)” button until “Status LED (3)” light Off.
2 Play / Pause Music
2.1 Short press the "▶ (8)" button to pause the playing music,
2.2 Short press the "▶ (8)" button again to resume.
2.3 If player is in pause state for 3 minutes, it will be turned to Off automatically.
3 Play Next / Previous Music
3.1 Short press the ^>(7)^ button to select next music.
3.2 Short press the 6 button to select previous music.
4 Switch Previous Folder / Next Folder
4.1 In music playing, press and hold the >> (7) button to switch direct to next folder's song to play.
4.2 In music playing, press and hold the << (6)'' button to switch direct to previous folder's song to play.
5 Adjust Volume
5.1 Press and hold the "+" (5)" button to increase volume level.
5.2 Press and hold the "— (4)" button to decrease volume level.
5.3 For hearing protection; a beep warning will be heard from earphone every time you increase the volume level and reach to the default setting level, which may exceed 85dB. Press the (8) button to accept the warning then press and hold the (+)(5) button again to increase the level until to maximum level.
Important:
- In order to protect your hearing and normal functions of the music player, please do not continue listening to music at a high volume levels for more than 20 hours, please restart the music player in 20 hours.
- Ensure your player at low volume levels or turn it off before you leaving.
6 Switch Normal / Shuffle Play mode
6.1 Press twice the "▶ (8)" button in second to switch from "Normal" to "Shuffle" play mode. Two beeps will sound and LED will flash 3 seconds once.
6.2 Press twice the "▶ (8)" button in second again to switch from "shuffle" to "Normal" play mode. One beep will sound and LED will flash 1 second once.
F. Indicator light function
| Mode | Light Method |
| Normal playing mode | Blue light flashing 1 seconds once. |
| Shuffle playing mode | Blue light flashing 3 seconds once. |
| Pause mode | Blue light solid. |
| PC connecting mode | Blue light will flash when data transferring. |
| In charging Mode | Red light flashing 1 seconds once. |
| Charged | Red light solid |
| Low battery in 20% | Red light flashing |
G. Reset the device
- In some circumstances the device's function may hanging and need to reset. To reset the device;
- Use a 0.8 1 mm stick or similar object (like tooth stick), and carefully insert the stick, use dull side, into the "Reset Hole (10)" until you feel to hit the end. Actually that is the tact switch button surface.
- Then add a bit of force and you will get a click sound and feeling return from switch. The device is reset and restart in seconds.
H. Troubleshooting
| Play cannot turn ON | ·Check whether battery have enough energy. |
| No sound is heard | ·Check whether Volume is set to “minimum” and connect the earphone plugs firmly. ·Check whether the earphone plug is dirty. ·Corrupted WMA / MP3 may make a static noise and the sound may cut off. Make sure that the music files are not corrupted. ·Check whether music files format are support. |
| Download music files fail. | ·Check whether USB plug of USB cable is connected properly. ·Check whether driver is installed correctly. ·Check whether memory card is installed firmly and correctly. ·Check whether the player’s memory is in full. |
| No FM station | ·Check whether signal strength of broadcasting is good enough in that area. ·Move location closer to open area if you using device inside your house. |
1. Specification
| Dimension | 48mm (H) x 36.6mm (W) x 16.6mm (D) | ||
| Weight | 15.5g (approximate) | ||
| PC Connection | USB 2.0 (High Speed) | ||
| Earphone Impedance | 32 Ohm | ||
| Internal Memory | Not Applicable | ||
| Memory Card Slot | Micro SD Memory Card (Support up to 32GB and possible to 64GB) | ||
| Power Source | DC Input: DC 5V 500mA | ||
| Battery | Lithium-Polymer (3.7V 110mAh) | ||
| Playing Time: 6 ~ 7 hours | |||
| Supports Music Format | MP3 | 32kbps - 320kbps | |
| WMA | 32kbps - 384kbps | ||
| WAV | IMA-ADPCM PCM | 32kbps - 384kbps 128kbps - 1536kbps | |
| Earphone Output | 2mW x 2 channels (at 32 Ohm) | ||
| Freq. Response | 20Hz – 20,000Hz | ||
| SNR | 80dB | ||
| Operation Temperature | 0°C - 40°C | ||
| Operation Systems | Windows 2000/XP/Vista/Win7/Win8 /10 MAC 9.2 or above | ||
J. Disclaimer
Updates to Firmware and/or hardware components are made regularly. Therefore some of the instruction, specifications and pictures in this documentation may differ slightly from your particular situation. All items described in this guide for illustration purposes only and may not apply to particular situation. No legal right or entitlements may be obtained from the description made in this manual.
INFORMATION NOTE ON THE REMOVAL AND DISPOSAL OF BATTERIES
Warning: Only high-qualified personnel should perform this operation!
BATTERY REMOVAL
1) Remove the back part of the appliance from cogs;
2) Select the battery;
3) Disconnect and remove the battery.
Used batteries should not be disposed of with household waste or thrown into fire or water. Used batteries should be recycled or disposed of separate waste collection centres.
Precautions for correct disposal of the product.
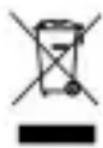
The symbol shown on the equipment indicates that waste must be disposed of in "separate collection" and so the product must not be disposed of together with urban waste.
The user must take the product to special "separate waste collection centres" provided by local government, or deliver it to the retailer against the purchase of a new product.
Separate collection of waste and subsequent treatment, recycling and disposal operations promotes the production of equipment with recycled materials and limits negative effects on the environment and on health caused by improper handling of waste.
Illegal disposal of the product leads to the enforcement of administrative penalties.
MANUEL DE L'UTILISATEUR
LEGEN SIE DIE micro-SD


- Warning! Misuse of the battery may cause explosion or overheating of the battery.
- Cautions
- SafetyWarnings
- Special Features
- Brief View of Player
- Outlook and Controls
- Insert Micro SD Memory Card (not included)
- Note:
- About player's battery
- Charging the Battery:
- To Charge battery
- Connect Computer and Charge
- To Connect PC:
- Disconnect from computer :
- Getting start player
- Turn On / Off
- Play / Pause Music
- Play Next / Previous Music
- Switch Previous Folder / Next Folder
- Adjust Volume
- Important:
- Switch Normal / Shuffle Play mode
- Indicator light function
- Reset the device
- Troubleshooting
- Specification
- Disclaimer
- INFORMATION NOTE ON THE REMOVAL AND DISPOSAL OF BATTERIES
- BATTERY REMOVAL
- Precautions for correct disposal of the product.
- MANUEL DE L'UTILISATEUR
- LEGEN SIE DIE micro-SD
Brand : Trevi
Model : MPV 1703 S
Category : Mp3 player