
VD1611D - Vacuum storage drawer Atag - Free user manual and instructions
Find the device manual for free VD1611D Atag in PDF.

| Product Type | Vacuum Storage Drawer |
| Brand | Atag |
| Model | VD1611D |
| Electrical Supply | 230 V ~ 50 Hz, Class I with ground connection |
| Rated Power | Approximately 150 W (estimate) |
| Vacuum Levels | 3 levels: low (delicate products), medium (soft products), high (solid products) |
| Sealing Time | 3 settings depending on bag thickness (thin, medium, thick) |
| External Vacuuming | Yes, with supplied hose (accessories not included) |
| Dry Running Program | Yes, to remove moisture from pump oil |
| Front Material | Stainless steel or glass (scratch sensitive) |
| Dimensions (H x W x D) | Approximately 14 x 60 x 55 cm (built-in estimate) |
| Net Weight | Approximately 15 kg (estimate) |
| Installation Type | Built into a kitchen cabinet (niche) |
| Cleaning | Damp cloth and soapy water; do not use steam cleaners or abrasive products |
| Oil Filter | Installed upon first use (supplied with the appliance) |
| Supplied Accessories | Hose for external vacuuming, vacuum bags (quantity unspecified), oil filter |
| Energy Consumption | Low, automatic standby (estimate) |
| Warranty | Standard Atag (see terms) |
| Repairability | Authorized Atag after-sales service |
| Environmental Information | Recyclable packaging; appliance subject to selective collection (crossed-out bin) |
Frequently Asked Questions - VD1611D Atag
User questions about VD1611D Atag
0 question about this device. Answer the ones you know or ask your own.
Ask a new question about this device
Download the instructions for your Vacuum storage drawer in PDF format for free! Find your manual VD1611D - Atag and take your electronic device back in hand. On this page are published all the documents necessary for the use of your device. VD1611D by Atag.
USER MANUAL VD1611D Atag
Instructions for use vacuum drawer
External vacuuming 8
Vacuuming failure 8
Start Dry Run Function 9
Maintenance and cleaning 10
Installation
General 11
Connection 11
Building in 12
Your appliance and the environment
Disposal of the appliance and packaging 13
Congratulations on choosing this ATAG appliance. This product is designed with simple operation and optimum comfort in mind.
Read this manual to learn how to get the most out of your appliance. In addition to information about operating the appliance, you will also find background information that may be useful when using the appliance.

Read the separate safety instructions before using the device!
Read this manual before using the appliance and keep it in a safe place for future use.
Before first use

Make sure that during installation, the transport cover was removed, the oil filter was installed and that the appliance was mounted according to the installation instructions.
Description
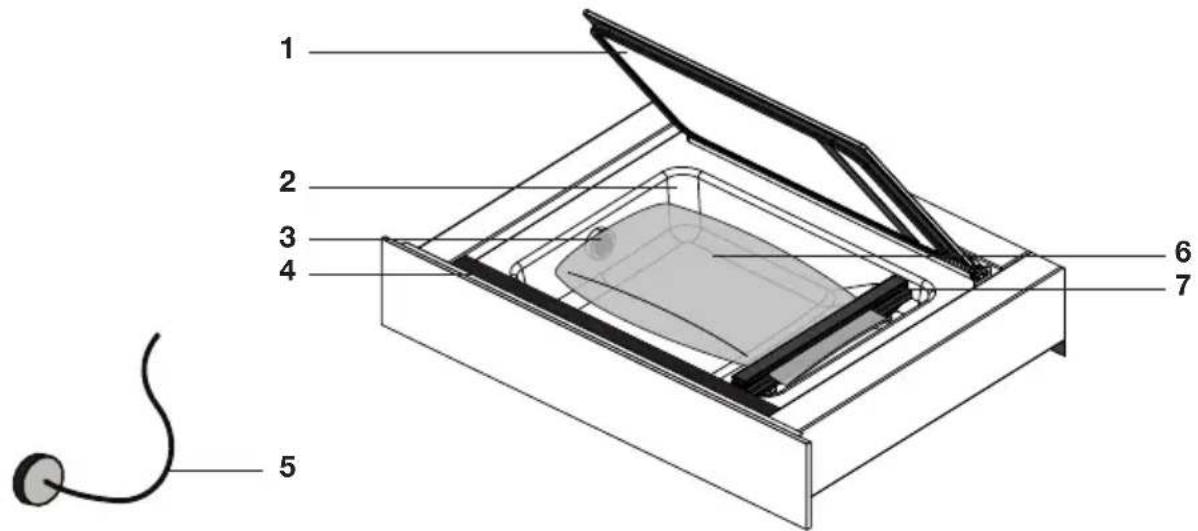
- Lid
- Vacuum chamber
- Suction point
- Control panel
- Hose for external vacuuming
- Vacuum sealer bag
- Sealing strip
Control panel

- On/Off touch key
- Vacuum Level touch key
- Sealing Time touch key
- External Vacuum Level touch key
- Start touch key
- Stop touch key
- Dry Run Function touch key with indicator
- Vacuuming Failure indicator
Operation

Operate the vacuum drawer with the control panel on the top of the drawer.
- Push the drawer in somewhat and slide it out of the cupboard.
- Switch on the drawer with the On/Off touch key. Press the On/Off touch key until the device is switched on.
- Open the lid and place a vacuum sealer bag in the vacuum chamber (see 'Positioning a vacuum sealer bag').
- Close the lid.
- Set the vacuum level with the Vacuum Level touch key (see 'Vacuuming'). The 3 indicator lights display the vacuum level. The lights flash and diminish during vacuuming.
- Set the vacuum closure time (sealing time) with the 'Sealing Time' touch key (see 'Vacuuming'). The 3 indicator lights display the sealing time. The lights flash and diminish during sealing.
- Press the Start touch key to start the vacuuming process.
- Immediately afterwards, shortly press on the front of the lid so that the vacuum chamber can vacuum.

Note! Vacuuming only works if the lid on the front is quickly pushed into the rubber gasket!
Vacuuming stops automatically if the vacuum sealer bag has been vacuumed and sealed.

- Orange indicator lights and orange lighted keys mean that a function is active.
- White indicator lights display the chosen setting and white lighted keys may be operated.
Vacuuming
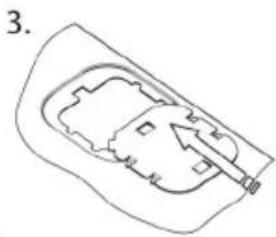
Positioning a vacuum sealer bag
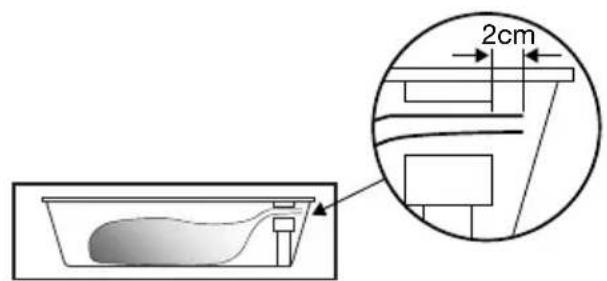

- Open the lid and place the vacuum sealer bag with the food in the vacuum chamber.
- Place the opening of the bag at least 2cm outside the sealing strip.
Note! The bag may not cover the suction point in the vacuum chamber!
Vacuuming
- Press the Vacuum Level touch key a number of times to select a vacuum level. The white indicator lights display the level.
Select from 3 vacuum levels:
Low: for delicate products (bread, soft fruit/vegetables)
Middle: for soft products (liquids, fish, prepared products)
High: for firm products (firm vegetables, meat, dry products)
- Press the Sealing Time touch key a number of times to select a closure time (sealing time). Select from 3 sealing times. The proper sealing time depends on the thickness of the vacuum sealer bag. The white indicator lights display the level.
Select from 3 sealing times:

Thin vacuum sealer bags
Medium vacuum sealer bags

Thick vacuum sealer bags
External vacuuming

Vacuuming failure

- Press the On/Off touch key until the device is switched on.
- Use the included hose to connect the external vacuuming accessory with the connection point in the vacuum chamber.
- Use the External Vacuum Level touch key to select a low, middle or high level.
- Press the Start touch key to start the vacuuming process. Vacuuming stops automatically when the vacuum level has been reached.
Note! Fittings to connect external vacuuming accessories to the hose for use in external vacuuming are not included with the vacuum drawer. These are dependent on the type of vacuuming accessory.
If the vacuum drawer cannot vacuum the vacuum chamber, this can be caused by the following issues:
- The lid is not or insufficiently pushed in when starting vacuuming. The Vacuuming Failure indicator lights up.
Push the lid on the front into the rubber gasket properly.
- The oil of the vacuum pump necessary for vacuuming contains moisture.
The Vacuuming Failure indicator and the Dry Run Function indicator light up.
Start the Dry Run Function*.
- A failure has occurred.
Call a service organisation.

- If the vacuuming fails a number of times, then the Vacuuming Failure indicator and the Dry Run Function indicator light up. It is then advised to perform the Dry Run Function.

Note! If the Vacuum Failure indicator and Dry Run Function indicator are ignored, the drawer can no longer be operated after a certain number of warnings (except the Dry Run Function). It is then necessary to start the Dry Run Function to be able to use the drawer again.
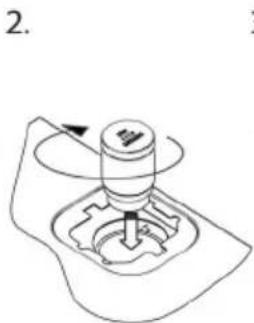
Starting Dry Run Function

After using the vacuum drawer for a period of time, there will be moisture in the oil of the vacuum pump. Because of this, the device may vacuum insufficiently. It is then advised to perform the Dry Run Function. If vacuuming does not work, then the Vacuuming Failure indicator and the Dry Run Function indicator light up. After a number of warnings (Vacuuming Failure indicator and Dry Run Function indicator lighting up), it is advised to perform the Dry Run Function.
- Press the Dry Run Function touch key to start the Dry Run Function.
- Immediately afterwards, shortly press on the front of the lid so that the vacuum chamber can vacuum.
The Dry Run Function symbol flashes during drying.

Note! If the Dry Run Function does not completely remove the moisture from the oil after a maximum of 20 minutes, then the drawer switches to a 'cool off' setting. The vacuum drawer can then not be used for a period of one hour. The Dry Run Function indicator is visible in the display. After that, start the Dry Run Function again!

Regular use of the Dry Run Function is part of the normal operation of the vacuum drawer.

Disconnect the appliance before starting with cleaning.
All surfaces should be cleaned only with a damp cloth and some soapy water. Then dry with a soft cloth.
Do not use a steam cleaner to clean the appliance.
Using abrasive products, alcohol or solvents is not recommended; these can damage the appliance.
The front is stainless steel or glass and is susceptible to scratching. Use special non-abrasive cleaning products suitable for stainless steel.
The vacuum chamber can be cleaned with warm water and washing-up liquid. Then dry with a soft cloth. Avoid to moisten the suction point!
General
This appliance should be connected to the mains power by a registered fitter, who knows and applies the correct safety specifications.
Connection
Electrical connection
This appliance is manufactured in Class I; this means the device must be grounded.
Check whether the power of the electrical mains corresponds to the power on the identification plate on the appliance.
Before connecting to the electrical mains, check whether the power socket is grounded.
The device is equipped with a plug. When installing the appliance, remember that this plug must remain accessible.

Note!
If you want to make a fixed connection, make sure a multi-polar switch with a contact separation of at least 3mm is fitted in the supply line.
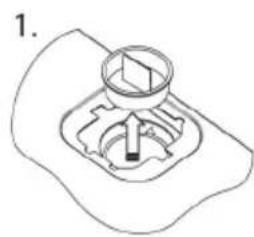
Install oil filter
- Remove the transport cover
Install oil filter
Building in
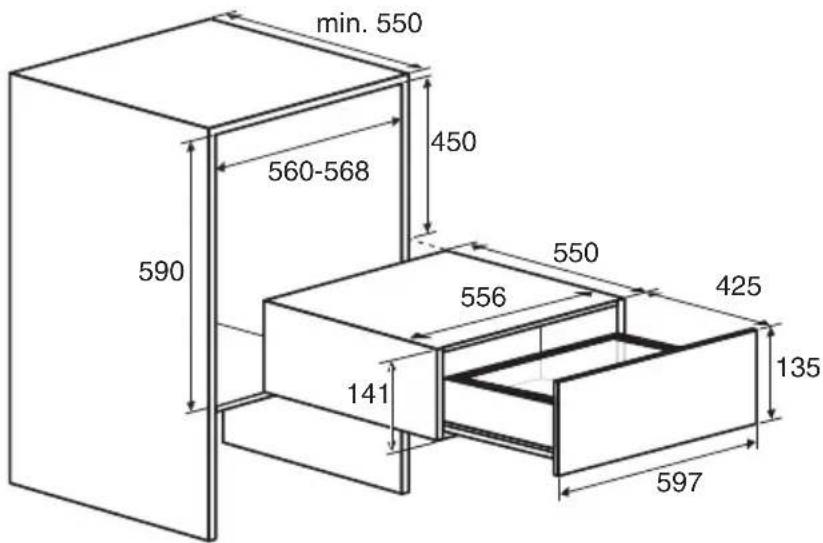
- Put the plug of the device in a grounded wall socket.
Slide the appliance in the kitchen cupboard opening. Check whether the casing fits correctly.
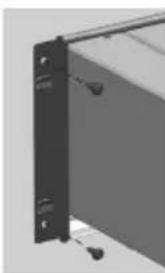
- Screw the drawer securely to the cupboard at the left and right front using the 4 screws supplied.
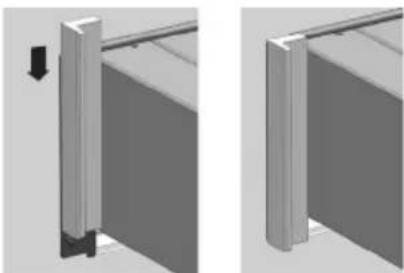
- Slide the decorative strips over the draw profiles on the left and right, starting from the top.

Note! When sliding out the drawer, it can tip forward if it is not securely screwed to the kitchen cupboard.
Disposal of the appliance and packaging
This product is made from sustainable materials. However, the appliance must be disposed of responsibly at the end of its useful life. The government can provide you with information about this.
The appliance packaging is recyclable. The following materials have been used:
cardboard
polyethylene wrapping (PE)
CFC-free polystyrene (hard PS foam)
Dispose of these materials responsibly in accordance with legal provisions.
The product has a pictogram of a crossed-out waste container. This indicates that household appliances must be disposed of separately. This means that the appliance may not be processed via the regular waste flow at the end of its useful life. You should take it to a special municipal waste depot or a sales outlet that offers to do this for you.
Collecting household equipment separately prevents harm to the environment and public health. The materials used in manufacturing this appliance can be recycled, which provides considerable savings in energy and raw materials.

Declaration of conformity
We hereby declare that our products comply with the relevant European directives, standards and regulations as well as all requirements referred to in the standards.
Introduction 4

- Instructions for use vacuum drawer
- Installation
- Your appliance and the environment
- Read the separate safety instructions before using the device!
- Before first use
- Description
- Control panel
- Operation
- Vacuuming
- Positioning a vacuum sealer bag
- External vacuuming
- Vacuuming failure
- Starting Dry Run Function
- Disconnect the appliance before starting with cleaning.
- General
- Connection
- Electrical connection
- Note!
- Install oil filter
- Building in
- Disposal of the appliance and packaging
- Declaration of conformity
Brand : Atag
Model : VD1611D
Category : Vacuum storage drawer