T8311 - Surveillance Camera AXIS - Free user manual and instructions
Find the device manual for free T8311 AXIS in PDF.

| Features | Details |
|---|---|
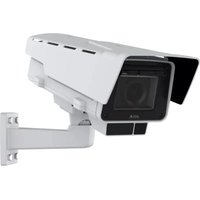
| Product type | Surveillance camera |
| Video resolution | HD 720p |
| Viewing angle | 90 degrees |
| Connectivity | Wi-Fi, Ethernet |
| Power supply | PoE (Power over Ethernet) |
| Storage | SD card, cloud storage |
| Additional features | Night vision, motion detection |
| Usage | Indoor and outdoor surveillance |
| Maintenance | Regular lens cleaning, firmware updates |
| Security | Data encryption, secure access |
| General information | Compatible with AXIS video management systems |
Frequently Asked Questions - T8311 AXIS
User questions about T8311 AXIS
0 question about this device. Answer the ones you know or ask your own.
Ask a new question about this device
Download the instructions for your Surveillance Camera in PDF format for free! Find your manual T8311 - AXIS and take your electronic device back in hand. On this page are published all the documents necessary for the use of your device. T8311 by AXIS.
USER MANUAL T8311 AXIS
AXIS T8310 Video Surveillance Control Board
AXIS T8311 Video Surveillance Joystick
AXIS T8312 Video Surveillance Keypad
AXIS T8313 Video Surveillance Jog Dial
Legal Considerations
Video and audio surveillance can be prohibited by laws that vary from country to country. Check the laws in your local region before using this product for surveillance purposes.
Electromagnetic Compatibility (EMC)
This equipment generates, uses and can radiate radio frequency energy and, if not installed and used in accordance with the instructions, may cause harmful interference to radio communications. However, there is no guarantee that interference will not occur in a particular installation.
If this equipment does cause harmful interference to radio or television reception, which can be determined by turning the equipment off and on, the user is encouraged to try to correct the interference by one or more of the following measures: Re-orient or relocate the receiving antenna. Increase the separation between the equipment and receiver. Connect the equipment to an outlet on a different circuit to the receiver. Consult your dealer or an experienced radio/TV technician for help. Shielded (STP) network cables must be used with this unit to ensure compliance with EMC standards.
USA - This equipment has been tested and found to comply with the limits for a Class B computing device pursuant to Subpart B of Part 15 of FCC rules, which are designed to provide reasonable protection against such interference when operated in a commercial environment. Operation of this equipment in a residential area is likely to cause interference, in which case the user at his/her own expense will be required to take whatever measures may be required to correct the interference.
Canada - This Class B digital apparatus complies with Canadian ICES-003
Europe - This digital equipment fulfills the requirements for radiated emission according to limit B of EN55022, and the requirements for immunity according to EN55024 residential and commercial industry.
Japan - This is a class B product based on the standard of the Voluntary Control Council for Interference from Information Technology Equipment (VCCI). If this is used near a radio or television receiver in a domestic environment, it may cause radio interference. Install and use the equipment according to the instruction manual.
Australia - This electronic device meets the requirements of the Radio communications (Electromagnetic Compatibility) Standard AS/NZS CISPR22:2002.
Equipment Modifications
This equipment must be installed and used in strict accordance with the instructions given in the user documentation. This equipment contains no user-serviceable components. Unauthorized equipment changes or modifications will invalidate all applicable regulatory certifications and approvals.
Liability
Every care has been taken in the preparation of this document. Please inform your local Axis office of any inaccuracies or omissions. Axis Communications AB cannot be held responsible for any technical or typographical errors and reserves the right to make changes to the product and documentation without prior notice. Axis Communications AB makes no warranty of any kind with regard to the material contained within this document, including, but not limited to, the implied warranties of merchantability and fitness for a particular purpose. Axis Communications AB shall not be liable nor responsible for incidental or consequential damages in connection with the furnishing, performance or use of this material.
RoHS
This product complies with both the European RoHS directive, 2002/95/EC, and the Chinese RoHS regulations, ACPEIP.

WEEE Directive
The European Union has enacted a Directive 2002/96/EC on Waste Electrical and Electronic Equipment (WEEE Directive). This directive is applicable in the European Union member states.
The WEEE marking on this product (see right) or its documentation indicates that the product must not be disposed of together with household waste. To prevent possible harm to human health and/or the environment, the product must be disposed of in an approved and environmentally safe recycling process. For further information on how to dispose of this product correctly, contact the product supplier, or the local authority responsible for waste disposal in your area.
Business users should contact the product supplier for information on how to dispose of this product correctly. This product should not be mixed with other commercial waste.
Support
Should you require any technical assistance, please contact your Axis reseller. If your questions cannot be answered immediately, your reseller will forward your queries through the appropriate channels to ensure a rapid response. If you are connected to the Internet, you can:
- download user documentation and firmware updates
- find answers to resolved problems in the FAQ database. Search by product, category, or phrases
- report problems to Axis support by logging in to your private support area.
AXIS T8310, AXIS T8311 AXIS T8312 & AXIS T8313 User's Guide
This User's Guide provides instructions for installing AXIS T8310 Video Surveillance Control Board. For all other aspects of using the product, please see the AXIS Camera Station help pages.
AXIS T8310 Video Surveillance Control Board consists of three units that can be installed separately or together as one unit. AXIS T8311 gives responsive and accurate control of the pan, tilt and zoom functionality of the camera(s) on the network. AXIS T8312 is used to navigate quickly between workspaces, cameras, views and PTZ presets. AXIS T8313 is used to jog and shuttle through recorded video. All the units are powered through the USB connection.
Installation Steps
- Check the package contents against the list below.
- Hardware overview. See page 4.
- Install the hardware. See page 6
Important!
This product must be used in compliance with local laws and regulations.
1 Package Contents
| Item Models/variants/notes | |
| Joystick/Keypad/Jog Dial AXIS | T8311/AXIS T8312/AXIS T8313 |
| USB cable AXIS T8311: 1 x 20 | 0 cm (78.7") when sold as a separate item,connects to PC only |
| AXIS T8312: 1 x 40 cm (15.7") for connection between units1 x 200 cm for connection to PC | |
| AXIS T8313: 1 x 40 cm (15.7")1 x 80 cm (31.5")for connection of two units on either side of keypad | |
| Printed materials AXIS T8310 | /T8311/T8312/T8313 User's Guide (this document)Axis Warranty Document |
② Hardware Overview
AXIS T8310
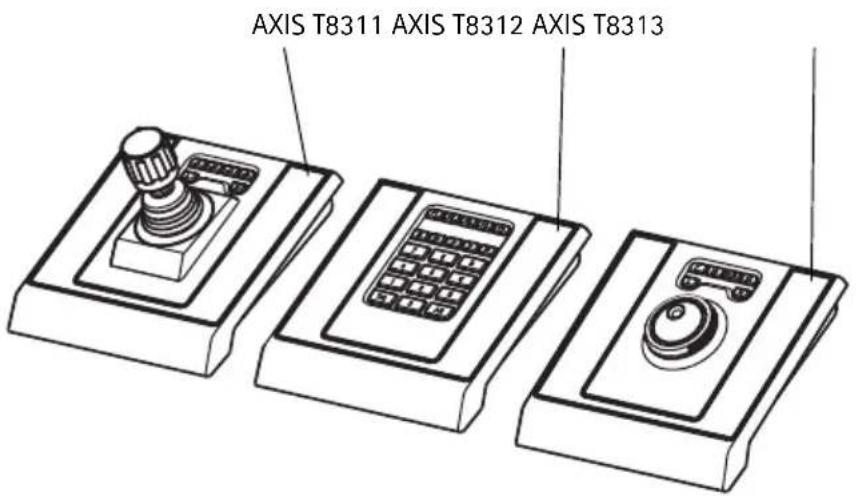
text_image
AXIS T8311 AXIS T8312 AXIS T8313Note:
The functionality of the programmable hotkeys is dependent on the application software. The descriptions below are valid for AXIS Camera Station.
AXIS T8311
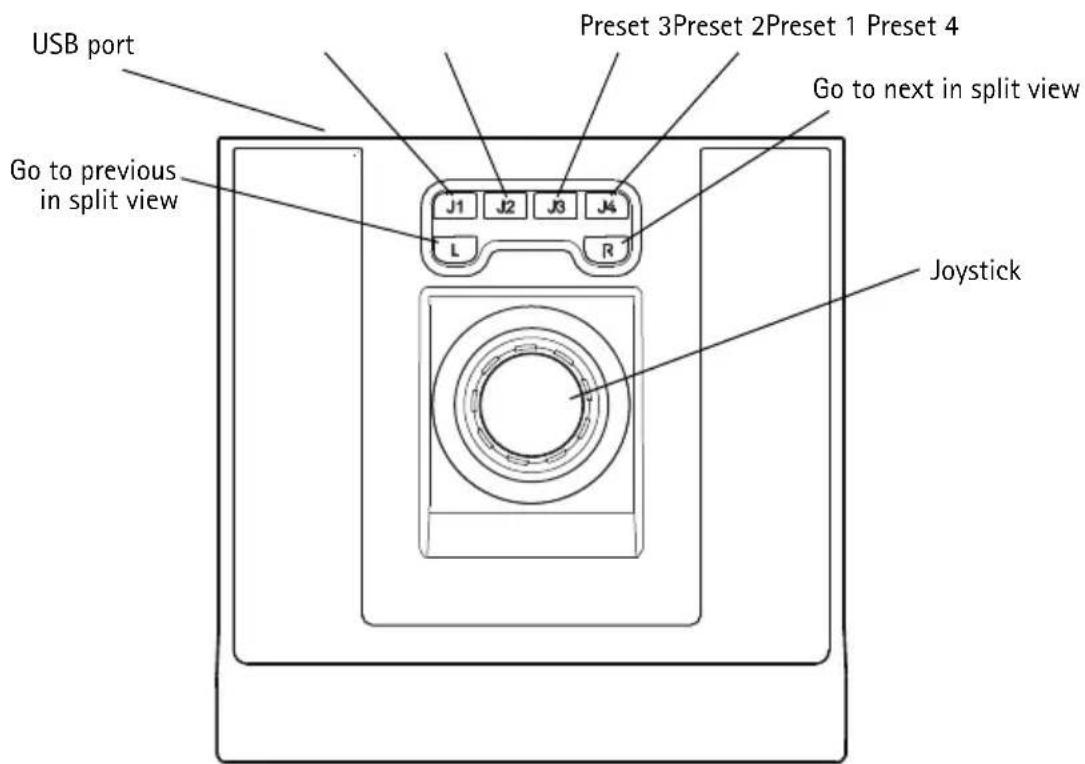
text_image
USB port Go to previous in split view J1 J2 J3 J4 L R Preset 3Preset 2Preset 1 Preset 4 Go to next in split view JoystickAXIS T8312
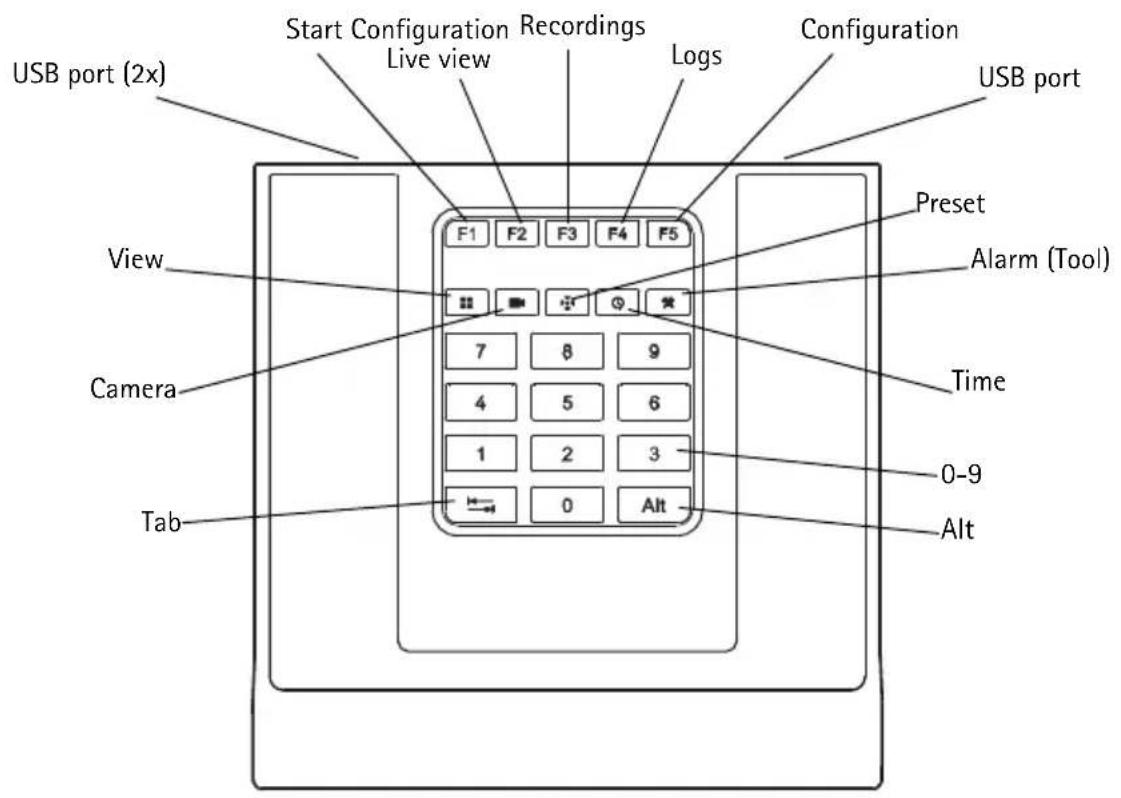
text_image
USB port (2x) Start Configuration Recordings Live view Logs Configuration USB port View Camera Tab F1 F2 F3 F4 F5 7 8 9 4 5 6 1 2 3 0 Alt Preset Alarm (Tool) Time 0-9 AltAXIS T8313
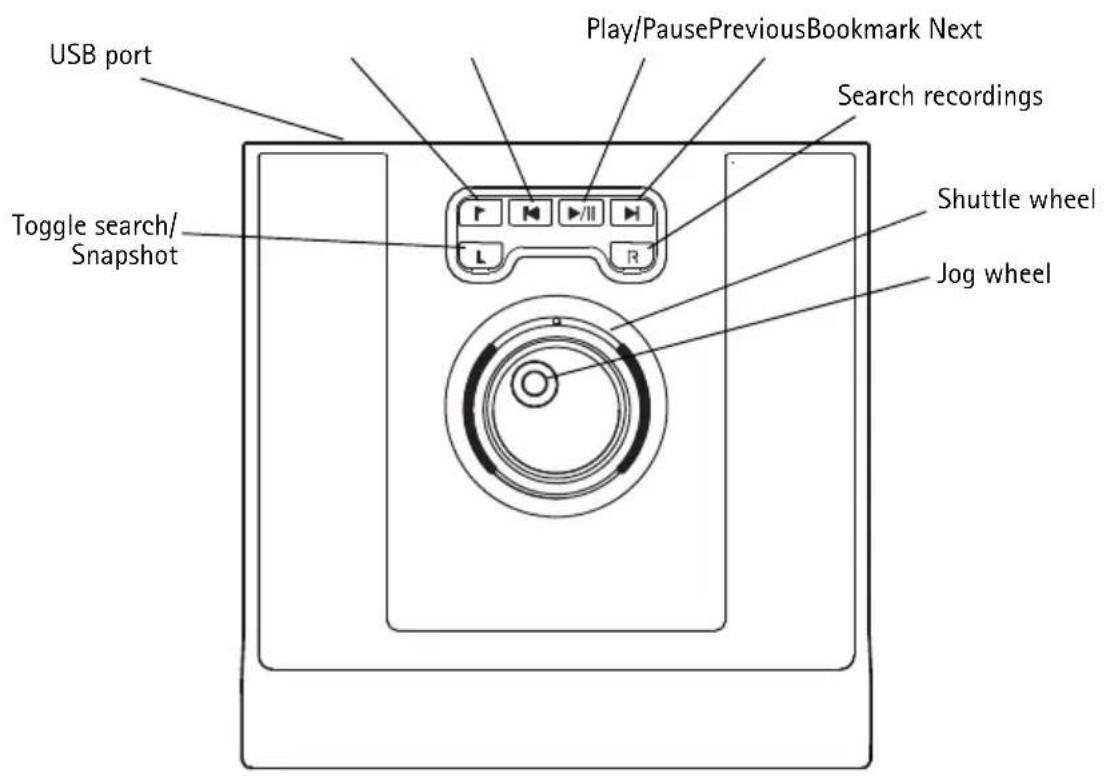
text_image
USB port Play/PausePreviousBookmark Next Search recordings Toggle search/ Snapshot Shuttle wheel Jog wheel2 Install the hardware
AXIS T8311 Video Surveillance Joystick, AXIS T8312 Video Surveillance Keypad and AXIS T8313 Video Surveillance Jog Dial can be connected separately or together as one unit using AXIS T8312 Video Surveillance Keypad as a USB hub. The units can be placed interchangeably to meet the requirements and needs of the workstation and the users.
The illustration below gives examples of how to connect the units.
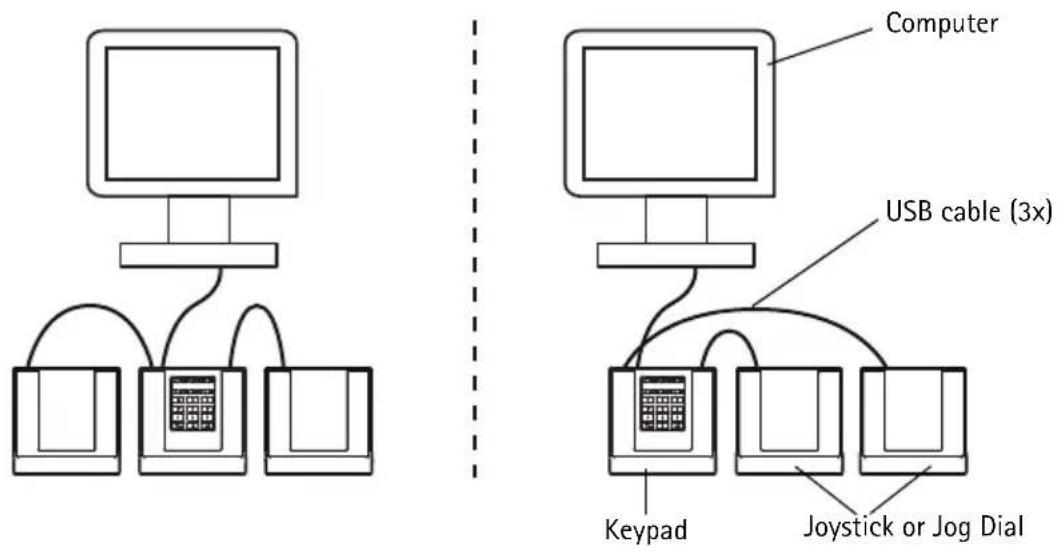
flowchart
graph TD
    A["Computer"] --> B["Keyboard"]
    B --> C["USB cable (3x)"]
    C --> D["Keyboard"]
    D --> E["Joystick or Jog Dial"]
    style A fill:#f9f,stroke:#333
    style B fill:#ccf,stroke:#333
    style C fill:#cfc,stroke:#333
    style D fill:#fcc,stroke:#333
    style E fill:#cff,stroke:#333
- Connect the USB plug to a USB port on your computer.
-
Follow the on-screen instructions (if applicable) to install the necessary drivers.
-
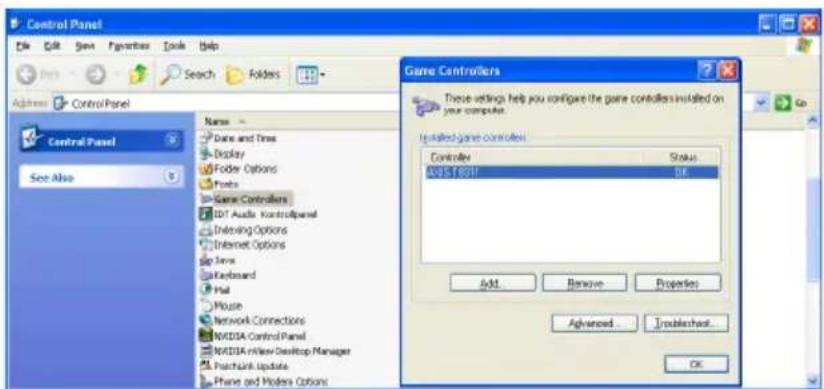
The joystick AXIS T8311 will appear in the Game controllers list in the Windows Control Panel on your computer.
Open Start > Control Panel > Game Controllers.
text_image
Control Panel File Edit Save Favorites Tools Help Address Control Panel Name Date and Time Display Folder Options Ports Game Controllers IDT Audio ControlPanel Deliving Options Internet Options Java Keyboard Mail Mouse Network Connections NVIDIA Control Panel NVIDIA Review Desktop Manager Pushlink Update Plane and Modern Options Game Controllers These settings help you configure the game controllers installed on your computer. Installed Game Controller Controller Status AIDS Tool OK Add... Remove Properties Advanced... Troubleshoot... OK- Start the supporting application software e.g. AXIS Camera Station. The joystick/keypad/jog dial is automatically detected.
Note:
The system must have a supporting application software, e.g. AXIS Camera Station, that can detect the new hardware. Go to www.axis.com for information on supporting systems.
Troubleshooting
If you experience problems during the installation, please do or check the following:
- Restart the supporting application software, e.g. AXIS Camera Station.
- Disconnect the USB plug from the computer, wait 10 seconds and then reconnect.
- Move the USB plug to another available USB port on your computer.
- Verify that the operating system has identified the joystick. Go to Start > Control Panel > Game Controllers and follow the provided troubleshooting steps.
Technical specifications
| Item Specification | |
| Models AXIS T8310 Video Surveillance Control Board:• AXIS T8311 Video Surveillance Joystick• AXIS T8312 Video Surveillance Keypad• AXIS T8313 Video Surveillance Jog Dial | |
| Deflection • AXIS T8311: Square delimiterPan/Tilt (XY): ±15° with central return springZoom (Z): ±25° with central return spring | |
| Functionality • AXIS T8311: Control of the pan, tilt, zoom functionality of cameras• AXIS T8312: Quick navigation between workspaces, cameras, views and PTZ presets• AXIS T8313: Jog dial navigation through recorded video | |
| Application defined hotkeys • AXIS T8311: 6 application defined hotkeys• AXIS T8312: 10 application defined hotkeys of which 5 are LED backlit keys; 0-9, tab, alt• AXIS T8313: 6 application defined hotkeys | |
| Casing Polycarbonate ABS | |
| Interface USB 1.1/2.0 compliantAXIS T8312: Integrated USB hub | |
| System requirements Windows 7, Vista, XP, 2000, 2003 ServerUSB 2.0 portAXIS Camera Station or similar supporting application software, see www.axis.com for information on supporting systems | |
| Power Via USB interface | |
| Operating conditions Indoor 0°C to 60°C (32°F to 140°C) | |
| Storage conditions Indoor -10°C to 60°C (14°F to 140°F) | |
| Approvals EN 55022: Class B | EN 55024EN 61000-6-2FCC Part 15 subpart bClass B ( CISPR 22) C-TickVCCIICES-003IP20 |
| Dimensions (HxWxL) | • AXIS T8311: 109 x 182 x 181 mm (4.3" x 7.2" x 7.1")• AXIS T8312: 35 x 182 x 181 mm (1.4" x 7.2" x 7.1")• AXIS T8313: 45 x 182 x 181 mm (1.8" x 7.2" x 7.1") |
| Weight • AXIS T8311: 730 g (1.6 lb.)• AXIS T8312: 630 g (1.4 lb)• AXIS T8313: 630 g (1.4 lb) | |
text_image
Control Panel File Edit Save Favorites Tools Help Search Folders Agree Control Panel Control Panel See Also Name: Date and Time Display Folder Options Fonts Game Controllers IOT Audio Control Panel Deleting Options Internet Options Java Keyboard Vigil Mouse Network Connections WOSB1 Control Panel WOSB1 New Desktop Manager Pushlink Update Phone and Modem Options Engine Controllers These settings help you configure the game controllers installed on your computer. Installed game controllers Controller Status WOSB1.8591 OK Add... Remove Properties Advanced... Troubleshoot... OKtext_image
Control Panel File Edit View Favorites Tools Help Search Folders Name: Date and Time Display Folder Options Fonts Game Controllers 101 Audio Control Panel Debug Options Internet Options Java Keyboard Plug Mouse Network Connections WKSDIA Control Panel WKSDIA rNew Desktop Manager Pushlink Update Phone and Modem Options Game Controllers These settings help you configure the game controllers installed on your computer. Tested game controllers Controller Status WKSDIA RSDI BL. Add... Remove Properties Advanced... Troubleshoot... OKtext_image
Control Panel File Edit Save Favorites Tools Help Search Folders Active Control Panel Control Panel Save Also Name: Date and Time Display Folder Options Fonts Game Controllers 101 Audio Control Panel Encoding Options Internet Options Java Keyboard Blog Mouse Network Connections MOSB USB Control Panel MOSB USB Desktop Manager Psychard Update Phone and Modem Options Engine Controllers These settings help you configure the game controllers installed on your computer. Tested game controllers Controller Status MOSB USB Add... Remove Properties Advanced... Troubleshoot... OKtext_image
Control Panel File Edit Save Favorites Tools Help Search Folders Agree Control Panel Control Panel See Also Name: Date and Time Display Folder Options Foods Game Controllers 101 Audio Control Panel Debug Options Internet Options Java Keyboard Wall Mouse Network Connections NKDDA Control Panel NKDDA Review Desktop Manager Pushlink Update Phone and Modem Options Game Controllers These settings help you configure the game controllers installed on your computer. Installed game controllers: Controller Status KOSY-8001 OK Add Remove Properties Advanced Troubleshoot OK© Axis Communications AB, 2010
Ver.1.1
Printed: April 2010
Part No. 38752