
Connect Station CS100 - Camera CANON - Free user manual and instructions
Find the device manual for free Connect Station CS100 CANON in PDF.
| Product type | Docking station for photos and videos |
| Brand | Canon |
| Model | Connect Station CS100 |
| Dimensions (L x W x H) | Approx. 155.6 x 51.1 x 155.6 mm |
| Weight | Approx. 570 g (body only) |
| Power supply | AC adapter 100-240 V AC (50/60 Hz), output 7.4 V DC / 2 A |
| Power consumption | Max. 10 W (power on), 9.5 W (standby), 0.5 W (power off) |
| Main features | Image import (via NFC, Wi-Fi, USB, SD/CF card), display on TV via HDMI, network sharing, printing via PictBridge, backup to external hard drive, album creation, transfer between Connect Station devices |
| Supported image formats | Photos: JPEG, RAW (CR2); Videos: MOV, MP4, AVCHD (Full-HD, HD, VGA) |
| Connectivity | Wi-Fi (IEEE 802.11b/g/n), NFC, LAN Ethernet (10BASE-T/100BASE-TX/1000BASE-T), USB 2.0 Hi-Speed, HDMI OUT (type A, CEC compatible) |
| Card slots | CF card (Type I/II), SD/SDHC/SDXC card (not UHS-I compatible) |
| Hard drive capacity | 1 TB (partial user space) |
| Remote control | Supplied, works with 2 AAA/R03 batteries, range approx. 10 m |
| Operating temperature and humidity | 0 to 35 °C, 20 to 85% RH (no condensation) |
| Care and cleaning | Unplug before cleaning; use a dry cloth; do not use solvents; regularly dust cooling inlets/outlets |
| Safety | Do not expose to moisture, shocks, magnetic fields; use only supplied adapter; turn off before unplugging; do not block ventilation openings |
| Spare parts and repairability | Contact Canon after-sales service; do not disassemble or modify the product |
| General information | Manual available in French (340 pages); firmware update possible via Internet; warranty and support via Canon |
Frequently Asked Questions - Connect Station CS100 CANON
User questions about Connect Station CS100 CANON
0 question about this device. Answer the ones you know or ask your own.
Ask a new question about this device
Download the instructions for your Camera in PDF format for free! Find your manual Connect Station CS100 - CANON and take your electronic device back in hand. On this page are published all the documents necessary for the use of your device. Connect Station CS100 by CANON.
USER MANUAL Connect Station CS100 CANON
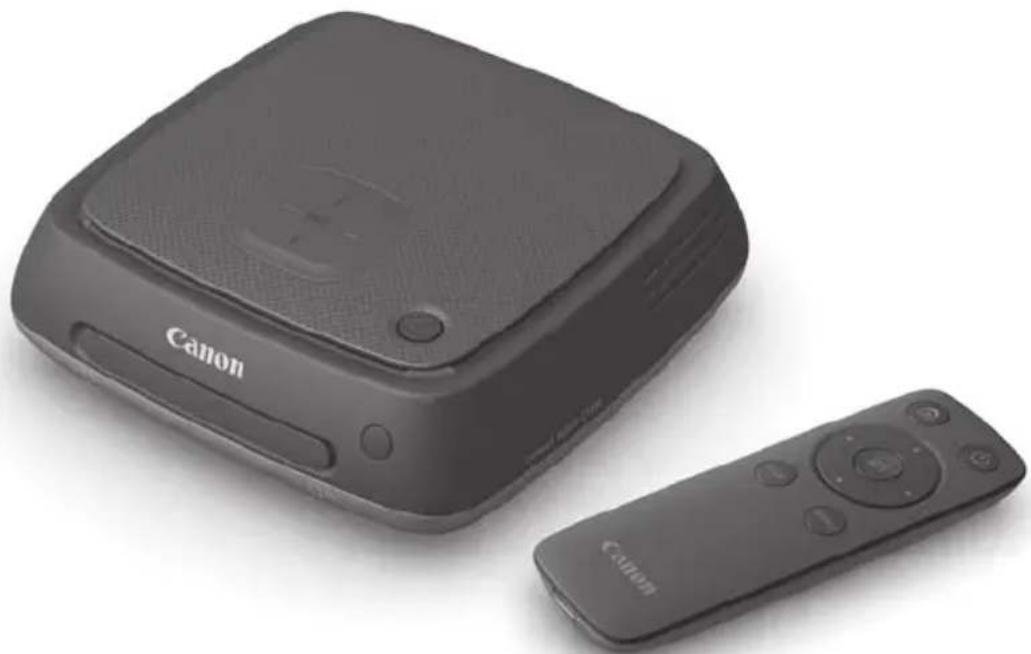
Connect Station CS100
INSTRUCTION MANUAL
MODE D'EMPLOI
The instructions in this manual assume that the firmware version is 2.5 or later.
Note on TV Set
If the resolution of your TV set is other than Full HD (1920x1080) or HD (1280x720), Connect Station's screen may not appear.
Introduction
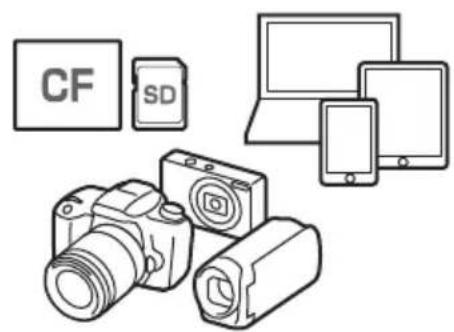
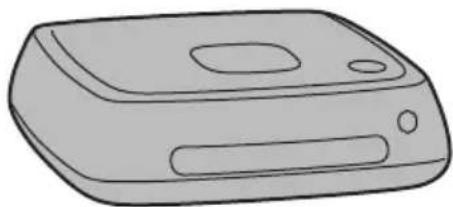
Connect Station is a device that allows you to import captured images for viewing on your TV set, smartphone, etc., or sharing over a network, and more.
You can perform the following operations using this device.
1 Import 2 View

3 Share6 Back
5 Copy 4 Print
1 Import images
2 View images
3 Share images over a network
4 Print images using a printer
5 Copy images to a card or on an external hard disk
6 Back up images to an external hard disk
Before Using Connect Station
To avoid accidents and malfunctions, first read the "Safety Precautions" (p.6-7) and "Handling Precautions" (p.8-9).
Copyrights
Copyright laws in your country may prohibit the use of imported image data of any copyrighted subject in this product for anything other than private enjoyment. Also be aware that certain public performances, exhibitions, etc., may prohibit photography even for private enjoyment.
Backup and Disclaimer of Liability for Image Data
This product is a precision instrument with a built-in hard disk and may lose its image data due to a sudden malfunction or other problem. Therefore, backing up the data to an external hard disk is recommended in case of inadvertent erasure or a malfunction.
If imported image data is destroyed or lost due to a failure of this product, Canon will not repair or recover the image data. Be advised that Canon cannot be held liable for any destruction or loss of image data.
Handling of This Product
This product has a hard disk built in it. The hard disk may malfunction or have imported image data destroyed or lost due to physical shock, vibration, etc. To protect the hard disk, follow the instructions below, regardless of whether the product is in use or standing by.
- Do not subject the product to physical shock or vibration, or drop it.
Install the product in a level place. - Do not put or drop the camera/camcorder or other objects onto the product.
- Do not block the inlet or outlet of the product.
-
Do not put the product in the following locations.
-
Dusty or humid locations
- Extremely hot or cold locations (Operating environment: Temperature 0^ - 35^ / 32^ - 95^ ; Relative humidity 20% - 85% / No dew condensation is allowed.)
- Locations exposed to direct sunlight
- Locations of low pressure (3,000 m / 9,843 ft. or more above sea level)
- Locations where a strong magnetic field such as a magnet or electric motor is present
Poorly ventilated locations - Locations where chemicals are handled, such as a laboratory
The product is not dustproof or splashproof.
Item Check List
Before starting, check that all the following items have been included with your product. If anything is missing, contact your dealer.
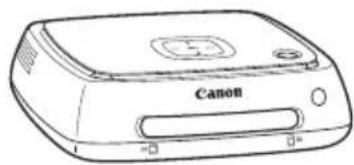
Connect Station CS100
(with a covered card slot)
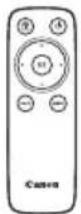
Control
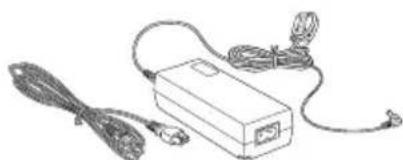
AC AdapterRemote
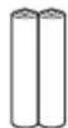
Batteries for the remote control
(two AAA/R03 batteries)

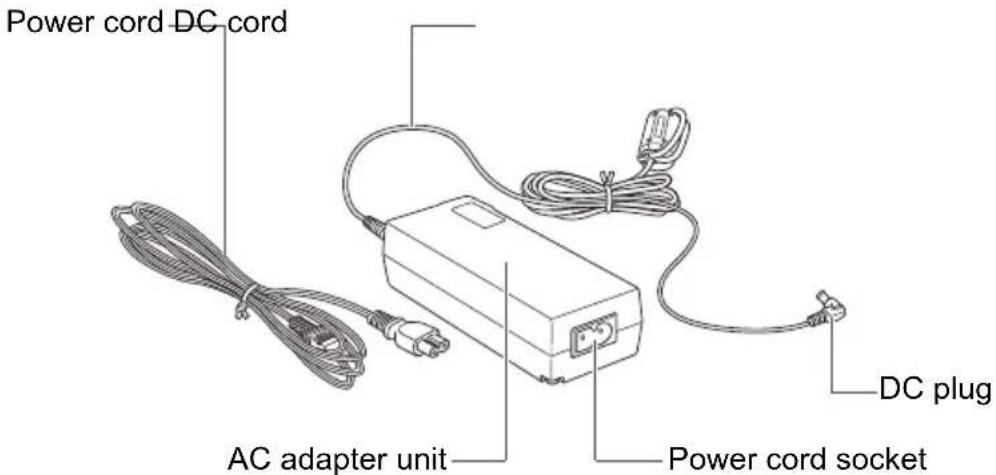
The power cord provided with the product is dedicated to this product. The power cord cannot be connected to any other device.
Conventions Used in this Manual
- In this manual, the term "access point" refers to wireless LAN terminals (wireless LAN access points, wireless LAN routers, etc.) that relay wireless LAN connection.
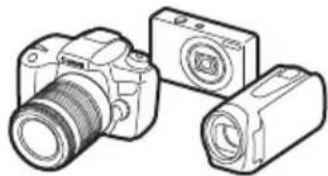
- In this manual, the term "camera/camcorder" refers to compact digital cameras, digital single-lens reflex cameras, compact system (mirrorless) cameras, and digital camcorders. On the screen, the term "Device" refers to these devices.
- Brackets [ ] indicate menu names or other elements displayed on the TV screen. Angled brackets < > indicate buttons or other elements on this device and remote control.
- This manual describes the operations of cameras/camcorders, smartphones, tablets, computers, printers, and TV sets, assuming that you have read the relevant manuals and understand how to operate these devices.
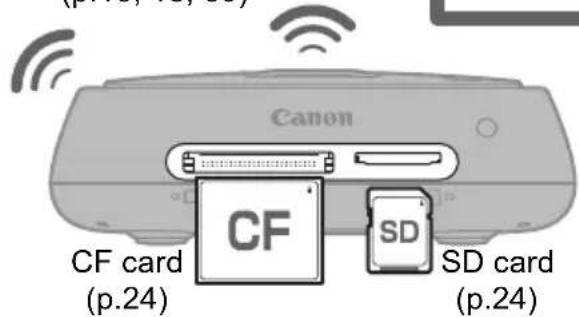
- In this manual, "CF card" refers to CompactFlash cards and "SD card" refers to SD/SDHC/SDXC cards. "Card" refers to all memory cards used to record images or movies.
Icons in this Manual

<▲><▼><△><▶>: Indicates the cross keys on the remote control and directions in which they are pressed.
(p. **): Reference page numbers for more information.


: Warning to prevent problems during operation.
: Supplemental information.
Contents
Introduction: p.2
Safety Precautions: p.6 / Handling Precautions: p.8 / Open Source Software: p.9 / Nomenclature: p.10 /Connection Diagram: p.12
Setup:p.14
Installing Batteries into the Remote Control: p.14 / Connecting Connect Station to a TV Set: p.14 / Performing Initial Settings: p.17 / Home Screen: p.20
Importing Camera/Camcorder Images: p.21
Importing Images: p.21 / Image Importing Status: p.26 / Lamp Indicators: p.27 / Icons on the Screen: p.28 / Viewing New Images: p.29
Viewing Images: p.31
Viewing Images from the Image List: p.31 / Creating and Viewing an Album: p.35 / Operations during Playback: p.38
Printing Still Photos: p.39
Setting Up a Printer: p.39 / Printing: p.40
Operating with a Smartphone or Other Terminals: p.41
Displaying the Operation Screen on a Web Browser: p.41 / Viewing an Album: p.44/ Uploading Images from a Terminal: p.45 / Menu Screen of the Terminal: p.48 / Operating with a Dedicated Application: p.49
Transferring and Sharing Images: p.52
Signing Up as a Member: p.53 / Transferring Images Between Connect Station Units: p.56 / Transferring Images Between a Smartphone and Connect Station: p.61 / Transferring Images with a Dedicated Application: p.64 / Sharing Images via a Web Service: p.66
Checking or Changing Settings: p.67
Supplementary Information on Preferences: p.69 / Backing Up and Restoring Data: p.73
Reference: p.75
Troubleshooting Guide: p.75 / Error Messages: p.77 / Specifications: p.78 / Wi-Fi (Wireless LAN) / NFC Precautions: p.79 / Index: p.82
Safety Precautions
The following precautions are provided to prevent harm or injury to yourself and others. Make sure to thoroughly understand and follow these precautions before using the product. If you experience any malfunctions, problems, or damage to the product, contact the nearest Canon Service Center or the dealer from whom you purchased the product.

Warnings: Follow the warnings below. Otherwise, death or serious injuries may result.
- Do not use a power supply other than a household power outlet of 100 VAC to 240 VAC (50 Hz or 60 Hz).
- Do not touch the power plug or product during thunderstorms.
- Do not use or store the equipment in dusty or humid places. This is to prevent a fire, excessive heat, electrical shock, or burn.
- Unplug the power plug periodically and clean off the dust around the power outlet with a dry cloth. If dust accumulated around the power plug and the outlet becomes moist, it may cause a fire.
- Do not move the product with the AC adapter connected to it. Doing so may damage the cable, causing a fire or electrical shock. Likewise, there is a risk of injury by getting caught on other objects.
- When the product will not be used for a prolonged period of time or during maintenance, make sure to disconnect the power plug beforehand. Leaving or storing the product with the power on may cause a fire due to an electric leakage or some other problem.
- Do not disassemble or modify the product.
-
Follow the safeguards below for the power cord.
-
Always insert the power plug all the way in.
- Do not use a cord whose wire is broken or insulation is damaged.
- Do not twist the cord forcibly.
- Do not put a heavy object on the power cord.
-
Do not modify the power cord.
-
Do not handle a power plug with wet hands. Doing so may cause an electrical shock.
- Do not leave any cords near a heat source.
- Do not short-circuit the plug, terminal, or outlet with a metal material. Doing so may cause an electrical shock, heat generation, or fire.
- Do not pull the power cord when unplugging it (hold the power plug).
- Do not use the provided AC adapter with any other device.
- Do not use any AC adapter not specified in the Instruction Manual. Doing so may cause an electrical shock, heat generation, a fire, or injuries.
- Do not block the internal cooling outlet or inlet of this product. Heat accumulating inside may cause a fire or malfunction.
- If you drop the product and the casing breaks open to expose the internal parts, do not touch the internal parts. There is a possibility of an electrical shock due to high voltage.
- If excessive heat, smoke, or fumes are emitted, immediately unplug the power cord from the product. Otherwise, it may cause a fire, heat damage, or electrical shock. Contact your dealer or nearest Canon Service Center.
- Do not allow water to enter the product or get the product wet. If the product gets wet, do not use it. Otherwise, an electrical shock, burns, or fire may result.
-
Do not wipe the product, using paint thinner, benzene, or other organic solvents. Doing so may cause fire or a health hazard.
-
If the remote control becomes hot, or emits smoke or a burning smell, immediately remove the batteries from the remote control with enough care to avoid burns. Using the remote control in such a condition may cause a fire or burns.
- Do not touch the battery fluid leaked from the remote control. If the fluid comes in contact with the skin or clothes, remove it immediately with clean water. If the fluid gets in your eye, rinse the eye immediately with clean water and see a doctor.
-
To prevent fire, excessive heat, chemical leakage, explosions, and electrical shock, follow the safeguards below for the batteries:
-
Do not use or recharge any batteries not specified in the Instruction Manual. Do not use any home-made or modified batteries. Do not short-circuit, disassemble, or modify the battery. Do not apply heat or solder to the battery. Do not expose the battery to fire or water.
- Do not insert the battery's plus and minus ends incorrectly.
-
Do not mix new batteries with used ones or batteries of different types.
-
When disposing of a battery, insulate the electrical contacts with tape to prevent contact with other metallic objects or batteries. This is to prevent a fire or an explosion.
-
Keep equipment out of the reach of children and infants, including when in use, and be aware of the cautions below.
-
Looping the power cord or DC cord around the neck may result in suffocation.
- Looping the power cord or DC cord around the neck or body may cause an electrical shock or injury.
- Swallowing any of the accessories (parts) or batteries may result in suffocation or injury. If a child or infant swallows any of these, see a doctor immediately. (There is a risk of the battery fluid damaging stomach and intestines.)

Cautions: Follow the cautions below. Otherwise, physical injury or property damage may result.
- Do not use or store the product where it will be exposed to high temperatures (place exposed to direct sunlight, trunk or dashboard of a car, etc.). The product may become hot and cause skin burns.
- Do not place the product on an unstable location. Doing so may cause the product to fall, resulting in injury or malfunction.
- Do not leave the product in a low-temperature environment. The product will become cold and may cause injury when touched.
- Do not connect the AC adapter to a voltage transformer for overseas travel, etc. Doing so may result in malfunction of the AC adapter.
- If the remote control will not be used for an extended period, make sure to remove the batteries to avoid damage or corrosion to the product.
Handling Precautions
- This product is a precision instrument. Do not drop it or subject it to physical shock.
- Never leave the product near anything having a strong magnetic field such as a magnet or electric motor. Also avoid using or leaving it near anything emitting strong radio waves, such as a large antenna. Strong magnetic fields can cause malfunction or destroy image data.
- Do not disassemble the product. Doing so may result in a malfunction or the loss of image data.
- If this product is placed in a location made of metal, it may experience transmission failure or some other malfunction.
- An instantaneous loss of power due to a power outage, lightning, etc. may result in a malfunction or the loss of image data.
- Image data requiring copyright protection technology cannot be imported.
- Do not use the product with the AC adapter placed in a narrow place such as space between the product and a wall.
- When children use this product, make sure that they are supervised by an adult who understands how to use the product.
- When connecting the product to a device, read and follow the warnings and cautions provided by the manufacturer of the device to be connected.
- Do not wipe the product, using cleaners containing organic solvents.
- To avoid rust or corrosion, do not store the product where there are strong chemicals, such as in chemical labs.
- If dust has accumulated on the inlet or outlet for internal cooling of the product, remove it after you turn off the power and unplug the power plug and DC plug.
Rise in Temperature
While the product is used, its main unit and/or AC adapter may become hot. Although this is not a malfunction, keeping the skin in contact with the product for a prolong period may cause a low temperature burn.
Dew Condensation
Dew condensation occurs when water droplets form outside or inside the product in the cases such as the following:
- The product is moved suddenly from a cold place to a warm place.
- The product is moved suddenly from an air-conditioned place to a hot, humid place.
- The product is left in a humid place.
Using the product with dew present may cause a malfunction. If the product is suspected to have dew condensation, turn off its power and wait for its temperature to become equal to the ambient temperature before using the product.
Transport
When transporting the product, remove the card, AC adapter, and cables from the main unit and pack it using its original packaging material or container or in such a way that the product can withstand the physical shock that it may be subject to during transport.
Cards
To protect the card and its recorded data, note the following:
- Do not drop, bend, or wet the card. Do not subject it to excessive force, physical shock, or vibration.
- Do not touch the card's electronic contacts with your fingers or anything metallic.
- Do not affix any stickers, etc., on the card.
- Do not store or use the card near anything that has a strong magnetic field, such as a TV set, speakers, or magnet. Also avoid places prone to having static electricity.
- Do not leave the card in direct sunlight or near a heat source.
- Store the card in a case.
- Do not store the card in hot, dusty, or humid locations.
- Do not disassemble or modify the card.
- Be sure to insert the card in the right direction. Inserting the card in the wrong direction may cause the product and/or card to malfunction.
- Before you transfer the card to someone else, completely erasing the card data using data erasing software for computers is recommended. When disposing of the card, physically destroying the card is recommended.
Disposal and Transfer of the Product
When disposing of or transferring the product, take the actions below to prevent the leakage of the personal information contained in images and the wireless LAN settings.
- Even if you perform [Format system hard disk], the personal information and other data recorded in the built-in hard disk of the product may not be deleted completely. When disposing of or transferring the product, executing low-level formatting by checkmarking [Low-level format] is recommended.
Open Source Software
The product contains Open Source Software modules.
For details, select [Preferences] on the home screen of the product, and click [OSS license] under the [0] tab.
Software under the GPL and LGPL
The product contains software modules licensed under the GPL and LGPL. If you need to obtain the source code of the software, please contact the Canon sales company in the country / region where you purchased the product.
Nomenclature
Body
Front and top sides
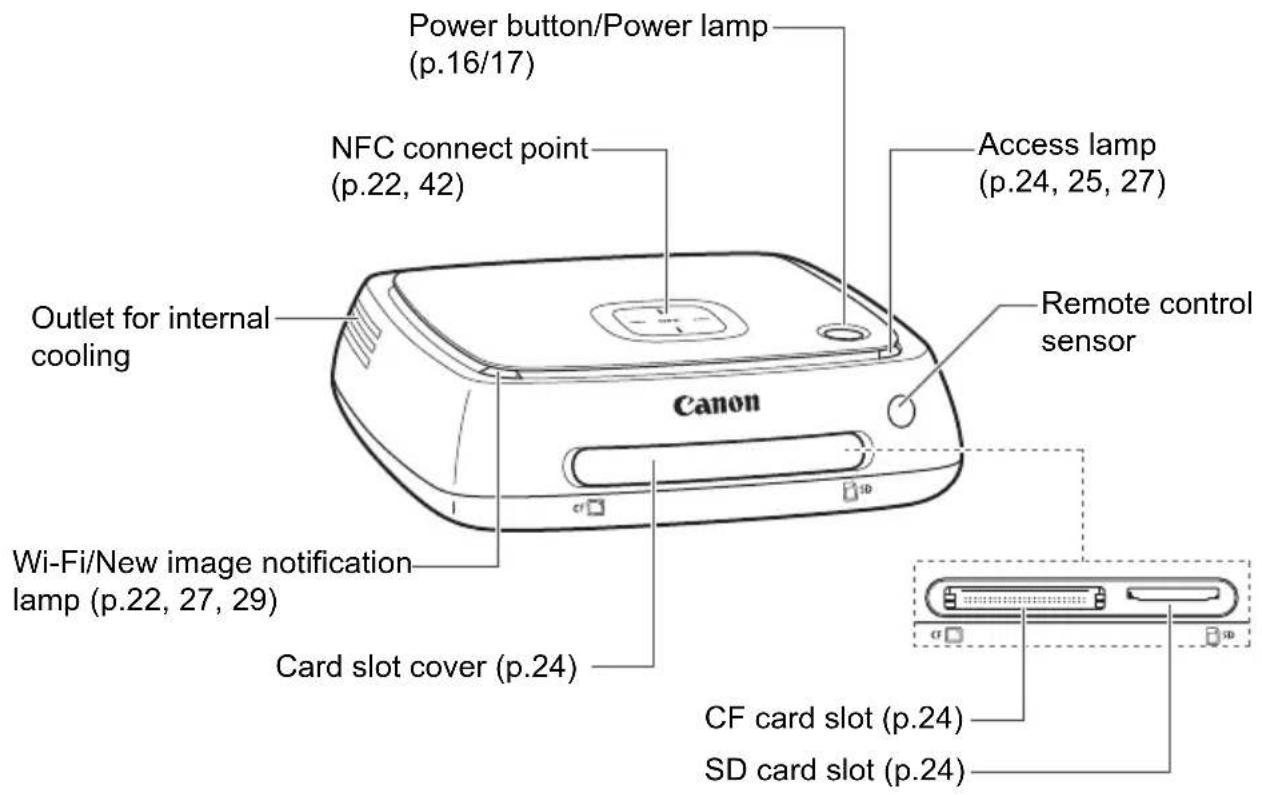
Rear and bottom sides
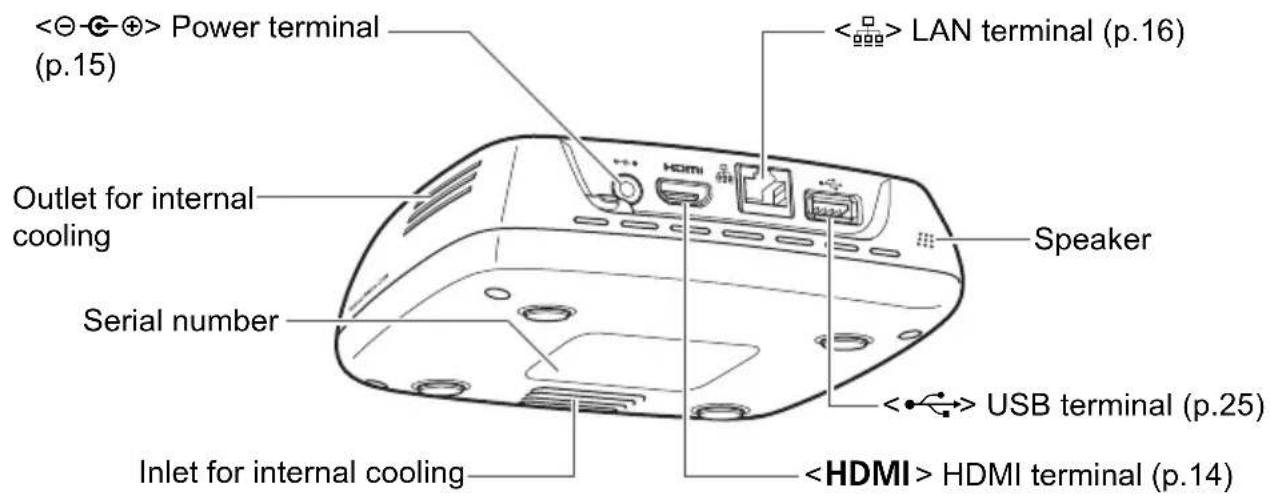

The USB terminal cannot be used for charging.
The CF card slot is not compatible with the CFast card.
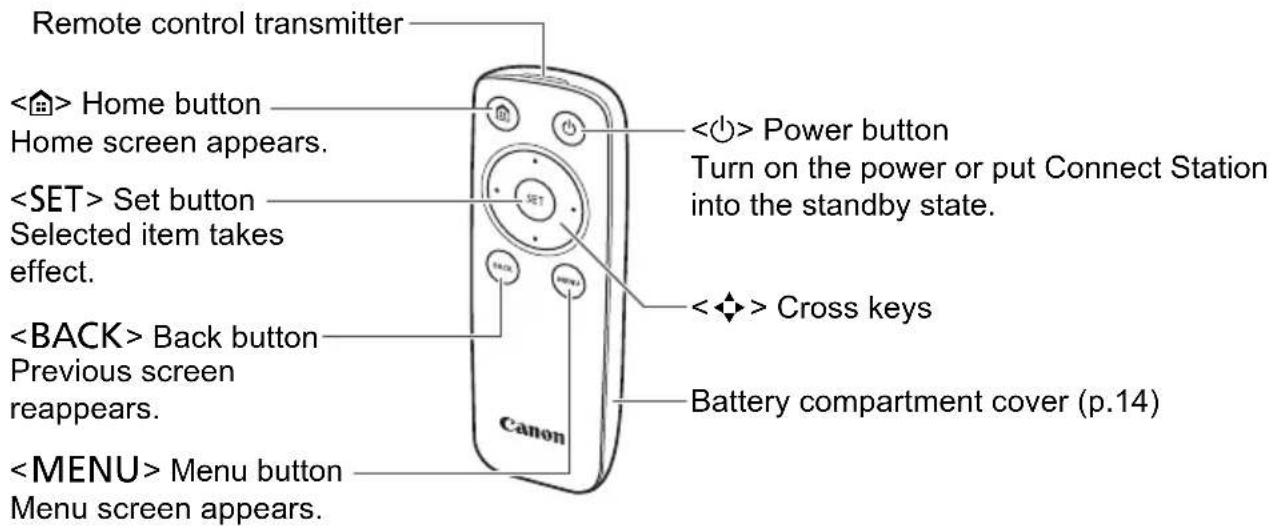
Remote Control
AC Adapter (p.15)
Connection Diagram

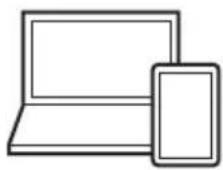
Smartphone/ Tablet/ Computer (p.41, 49)
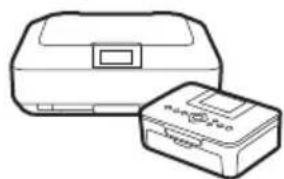
Printer (p.39)
Web service (p.53)

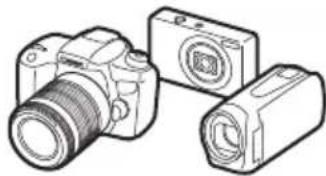
Canon NFC-compatible camera/ camcorder (p.22)
Access point or router (p.16, 18, 69)
(LAN cable)
- Not required when Connect Station is connected to the access point via a wireless LAN.
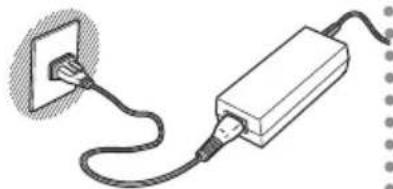
AC adapter (p.15)
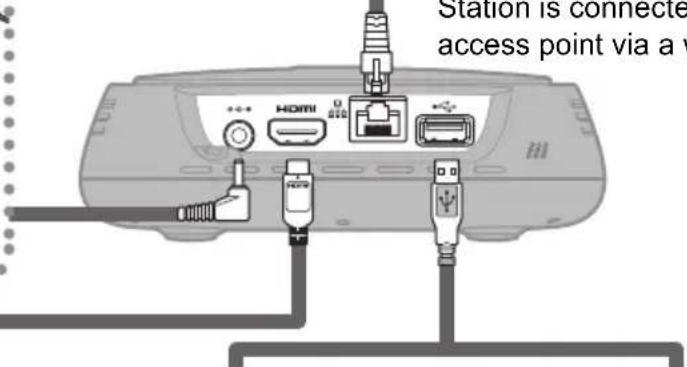
(HDMI cable) (USB cable) (Interface cable)
TV set (p.14) External hard disk
(p.73)
Canon camera/camcorder (p.25)

- USB hubs are not supported.
Operation cannot be guaranteed if a USB extension cable is used.
Connectable Devices for Connect Station
| Device to be Connected | When Connected, You can... | Connection Method (Connection Terminal) | Remarks |
| TV set with an HDMI terminal | View images | Wired connection (HDMI) | Connect with an HDMI cable (commercially available)*1 |
| Canon camera/camcorder*2*3 | Import images | Wireless LAN | Canon NFC-compatible model |
| Wired connection (USB) | Connect with an interface cable (sold separately)*4 | ||
| SD card/CF card | Import*5 and copy images*6 | Card slot - | |
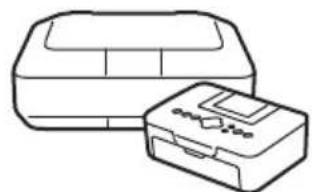
| Wi-Fi printer Print images | Wireless LAN/Wired LAN (LAN)*7 | Printer supporting PictBridge (Wireless LAN) or Pictbridge (LAN) (p.39) | |
| Access point | Share images, etc. | Wireless LAN - | |
| Router | Share images, etc. | Wired LAN (LAN) | Connect with a LAN cable (commercially available)*8 |
| Computer | Upload and view images | Wireless LAN/Wired LAN (LAN)*7 | Computer on which a Web browser is installed (p.41) |
| Smartphone/tablet | Upload, download, and view images | Wireless LAN | Terminal on which a Web browser or the “Connect Station” application is installed (p.41, 49) |
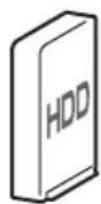
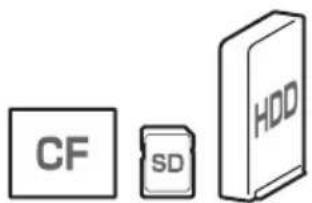
| External hard disk | Back up*9 and copy images*10 | Wired connection (USB) | Connect with a USB cable |
1 Use a "high-speed HDMI cable."
2 For wireless LAN connection compatible cameras/camcorders, see page 22.
3 For wired connection compatible cameras/camcorders, see page 25.
4 Depending on the camera/camcorder, the cable may be provided with the product. For compatible cables, refer to the Camera/Camcorder Instruction Manual, etc.
5 For cards compatible with importing images, see page 23.
6 For cards compatible with copying images, see page 33.
7 Establish a connection via an access point, router, etc.
8 As the LAN cable, use an STP (Shielded Twisted Pair) cable of category 5e or above.
9 For conditions of external hard disks compatible with backup, see page 73.
10 For conditions of external hard disks compatible with copying images, see page 34.
Setup
Installing Batteries into the Remote Control
The remote control uses two AAA/R03 batteries (provided).
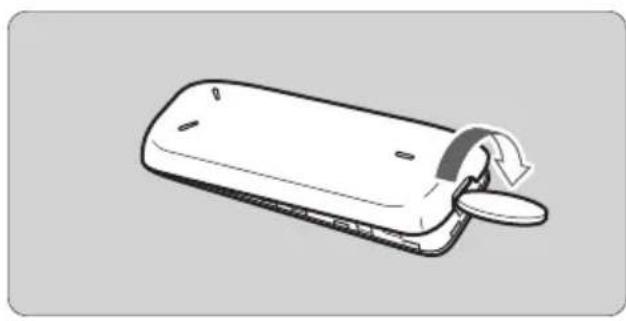
(1) Open the battery compartment cover by putting a coin or other similar object in the cover's groove and turning it.
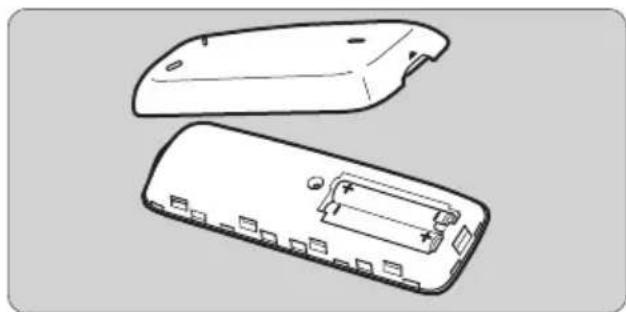
(2) Insert batteries in the battery compartment, making sure that their plus and minus ends are correct, then close the cover.

When replacing batteries, use two new batteries of the same brand. In the case of rechargeable batteries, use fully-charged batteries of the same brand.
Connecting Connect Station to a TV Set
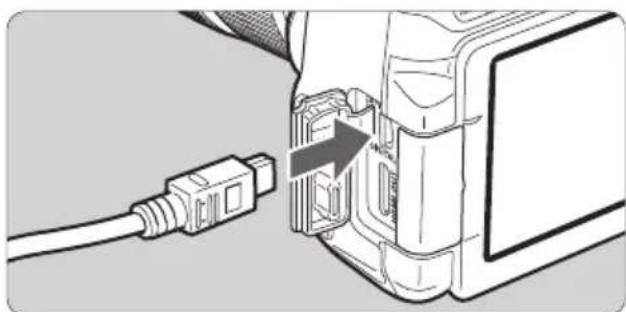
Connect Station must be connected to a TV set so that you can operate it while looking at the TV screen. When connecting Connect Station to a TV set, prepare an HDMI cable (commercially available) and connect according to the procedure below.
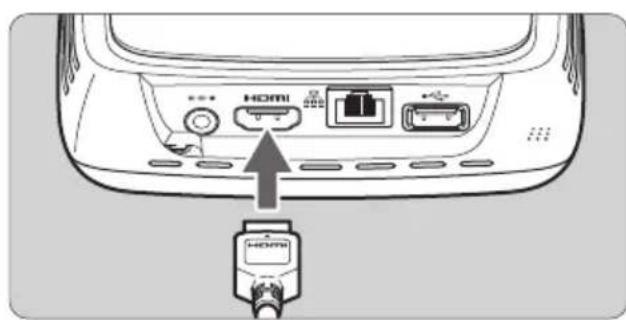

Connect the HDMI cable to Connect Station.
Plug the cable connector to the HDMI terminal of Connect Station.
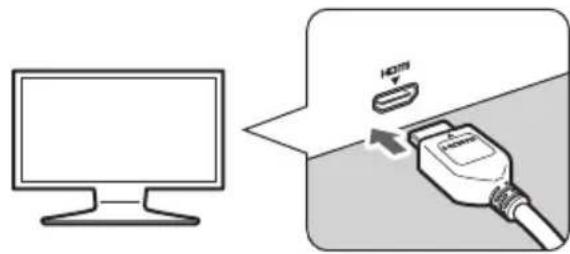
2 Connect the HDMI cable to the TV set.
- Connect the HDMI cable to the TV's HDMI IN terminal.
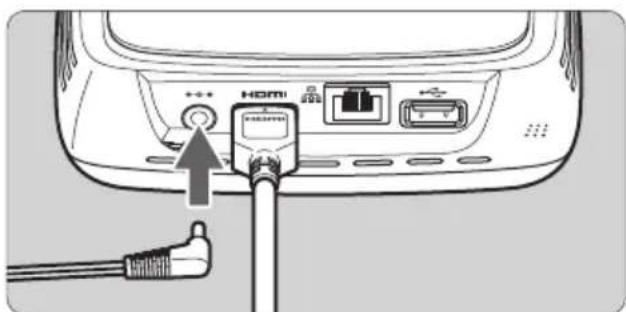
3 Connect the DC plug to Connect Station.
- Connect the plug of the DC cord to the power terminal of Connect Station, with the cord of the plug facing outward, as shown in the illustration.
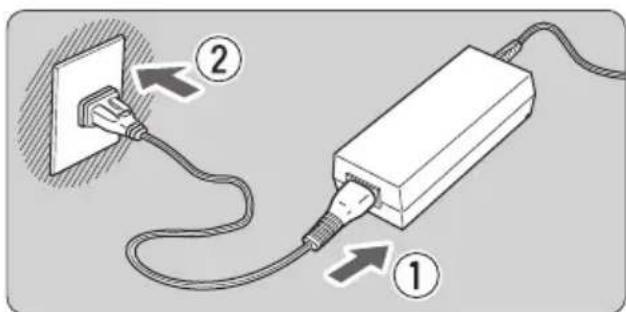
4 Connect the power cord.
- Connect the power cord as shown in the illustration.
5 Turn on the TV set and switch the TV's video input to select the connected terminal.
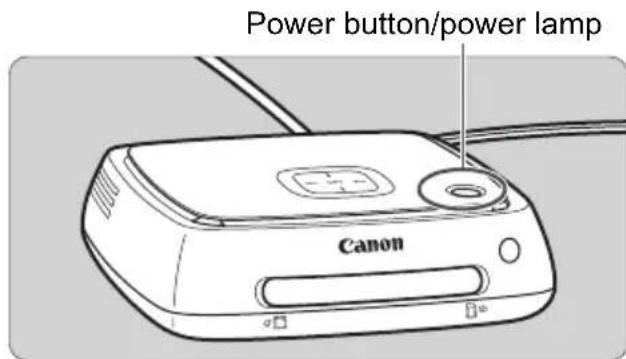
Turn on Connect Station.
- Press the power button to turn on Connect Station.
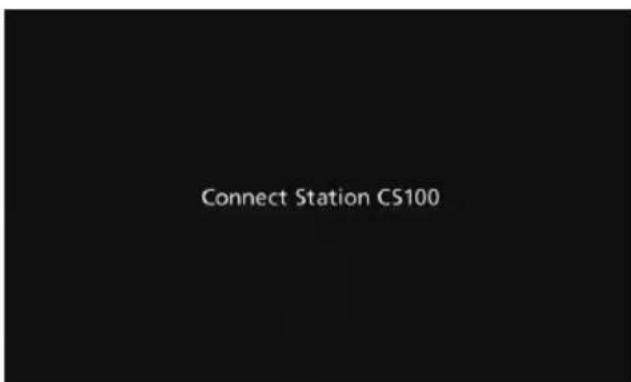
The connection is complete when [Connect Station CS100] appears on the screen.
When you turn on the power for the first time, the power lamp turns from orange to green, and the Initial settings screen (p.17) appears. (It takes approx. one minute before Connect Station starts.)

Do not lift or move Connect Station when its power is on or it is standing by. Dropping Connect Station or hitting it against an object may damage its hard disk.
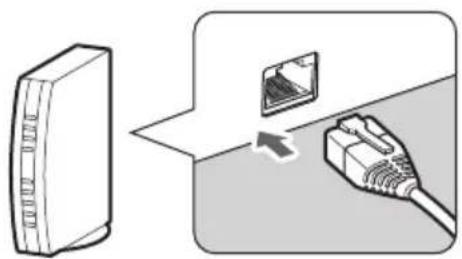
Connecting via a Wired LAN
When connecting Connect Station to a network via a wired LAN, connect Connect Station and a router connected to the Internet with a LAN cable (commercially available).

Installation Location of Connect Station
- Blocking the outlet for internal cooling located on either side of Connect Station or the inlet located on the bottom side can lead to a malfunction. Do not put a piece of cloth, etc. under Connect Station. (Doing so may block the inlet.)
- Provide a clearance of at least 5cm (2 in.) on both sides of Connect Station.
- Install Connect Station in a level place where there is no danger of falling, etc.
- Do not put any object on Connect Station.
- Do not install Connect Station in a place where it can become very hot or near a potential heat source.
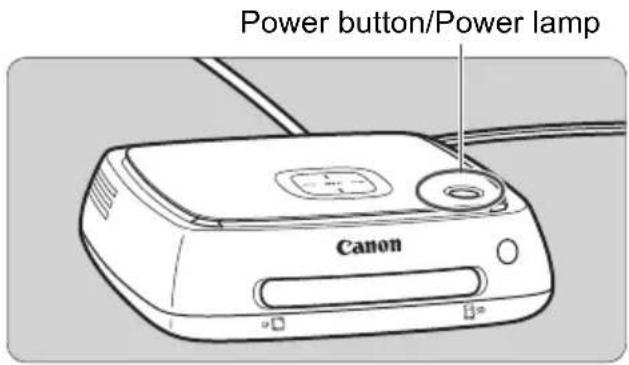
Power Button Operation
Turning on the power
If you press the power button on Connect Station with its power off, the power lamp will light up in orange. The light will turn green when Connect Station starts. (It takes approx. one minute before Connect Station starts.)
Turning off the power
Keep the power button on Connect Station pressed until [Shutdown] appears on the screen (approx. 2 seconds). When the shutdown processing is complete, the power lamp will turn off.
Putting Connect Station in standby mode
Press <> on the remote control or the power button on Connect Station. The power lamp of Connect Station will turn from green to orange.
Put Connect Station in standby mode in the following cases.
- Connect Station is used frequently.
- Enable automatic reception of images sent from another Connect Station.

If you do not operate Connect Station for 30 minutes while the power is on, it will go into standby mode (except during image playback and when [Auto standby] is set to [Disable], p.67).
Power Lamp Indicators
| Connect Station Status | Power Lamp Indicator |
| Power on Green (lamp on) | |
| Power off (Lamp off) | |
| Standby Orange (lamp on) | |
| Updating the firmware Green (blinking) | |
| Error Red (blinking) |

- Do not lift or move Connect Station when its power is on or it is standing by. Dropping Connect Station or hitting it against an object may damage its hard disk.
- Disconnecting the power cord or DC plug when the power to Connect Station is on or Connect Station is standing by can lead to a malfunction. Before disconnecting the power cord or DC plug, check that the power lamp is off.
Before turning on the power, check that no card is inserted and that no camera/camcorder is connected to the USB terminal. - If the power lamp is blinking in red, turn on Connect Station and check the TV screen to see the content of the error (p.28). If you cannot turn on Connect Station when the power lamp is blinking in red, contact the nearest Canon Service Center.
- Even if it is standing by, Connect Station consumes as much power as it does when its power is on (p.78).
Performing Initial Settings
Perform the Connect Station operations as described below while looking at the TV screen and using the Connect Station remote control.
- When Connect Station is connected via a wired LAN (p.16), the screens shown in steps 3 and 4 will not be displayed.
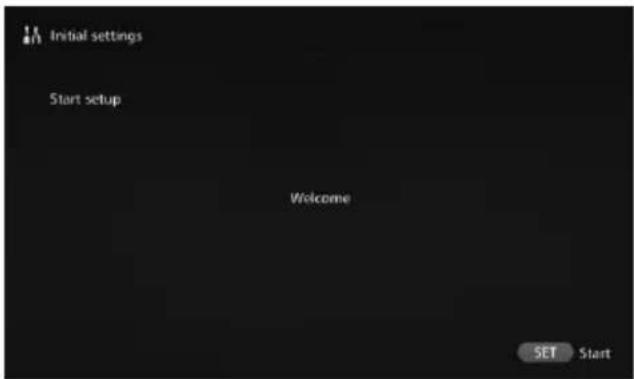
1 Press < SET>.
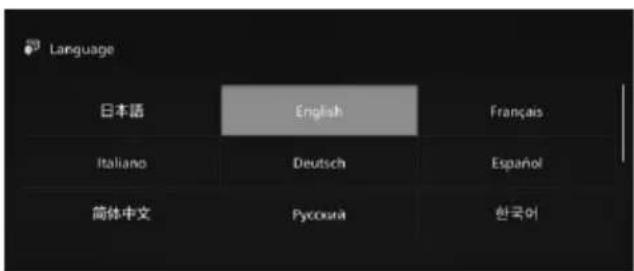
Select the language.
- Press the <> key to select the language, then press SET
Depending on the selected language, a screen may appear prompting you to select your country or region. Select an area first, then select a country or region.
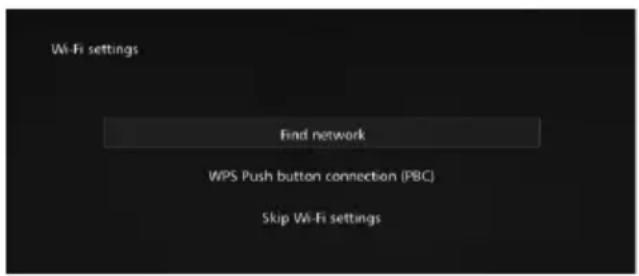
Select an item.
- Select an item, then press <SET> .
-
Select a step as appropriate for the item.
-
[Find network]: Go to step 4-B (p.19).
- [ WPS Push button connection (PBC)]: Go to step 4-A.
- [Skip Wi-Fi settings]: Go to step 5.
- When Connect Station is connected via a wired LAN (p.16), this screen will not be displayed. Go to step 5.
4-A [WPS Push button connection (PBC)]
First, check whether the access point you will use supports WPS (Wi-Fi Protected Setup).
![CANON Connect Station CS100 - 4-A [WPS Push button connection (PBC)] - 1](/content/2026/02/425180/images/b465ca8a7f72bc09cdc2b48693f6a2ff74c243d6b7e39fe8ae3712b67e4ef1b0.jpg)
![CANON Connect Station CS100 - 4-A [WPS Push button connection (PBC)] - 2](/content/2026/02/425180/images/d8348b9cf05b176a0cc1f3b5e5481b0415e1f0b5c92d9e31d2b09fa0b16755d5.jpg)
![CANON Connect Station CS100 - 4-A [WPS Push button connection (PBC)] - 3](/content/2026/02/425180/images/c2a75407065586433779d6f734639efe2c83cee378ea09b274718822868db0d7.jpg)
- Press the access point's WPS button while the screen shown on the left is displayed.
For details about where the button is located and how long to press it, refer to the access point's instruction manual.
When the connection is complete, the [Set date/time] screen will appear.
Set the date and time.
- Press the <> keys to select the item you want to change and press the <> keys to change the value.
- When you finish the setup, press
.
Check the settings.
- When the setting complete screen appears, the initial setting is complete. Check the settings, then press <SET> .
The Home screen will appear (p.20).
4-B [Find network]
Before establishing a connection, ensure you have the following information:
- Access point name (SSID)
-
Encryption key (password) specified for the access point
-
For information on the access point name (SSID) and encryption key (password), refer to the access point's instruction manual.
![CANON Connect Station CS100 - 4-B [Find network] - 1](/content/2026/02/425180/images/fce9dde7a252d523d0a6d356aab5f1513858e563f5c7835174d975df64e868f1.jpg)
![CANON Connect Station CS100 - 4-B [Find network] - 2](/content/2026/02/425180/images/aec422734bbef0f1159661579b519b5c0a6bf9f96d81f72a2ee43eeb38c08470.jpg)
(1) Select the access point name (SSID) to connect to.
- Press the <><> keys to select the access point name (SSID) of the [Peripherals found], then press SET
- When [Enter manually] is selected, enter the access point name (SSID) in the input screen.
(2) Enter the encryption key (password).
- Select a character with the <> keys, then press <SET> to enter it.
- When you are finished, select [OK], then press
. Wait until the connection is complete.
This screen is not displayed when you connect to an unencrypted access point.
When the connection is complete, the [Set date/time] screen will appear.
![CANON Connect Station CS100 - 4-B [Find network] - 3](/content/2026/02/425180/images/5eec53c91da5e0f56d485c815ec0ac62c678d69e9cb2a03757a17569eeb1b493.jpg)
- If you select [Skip Wi-Fi settings], reconnect to another access point, or connect using WPS (PIN code), you can make the settings later in [Preferences] (p.69).
- If the access point cannot be detected within two minutes after you select [WPS Push button connection (PBC)], an error message appears. In that case, check that the access point supports WPS and try again, or select [Find network] to establish the connection.
- If the network you use filters by MAC address, register the MAC address of Connect Station at the access point. The MAC address is indicated on the bottom of Connect Station.
- If the response of the remote control is slow when selecting characters or images, operate the remote control slowly.
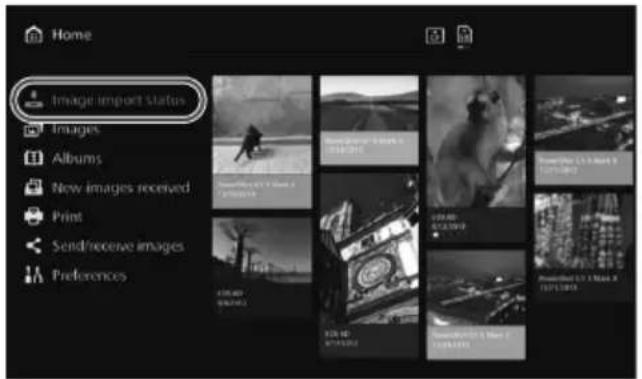
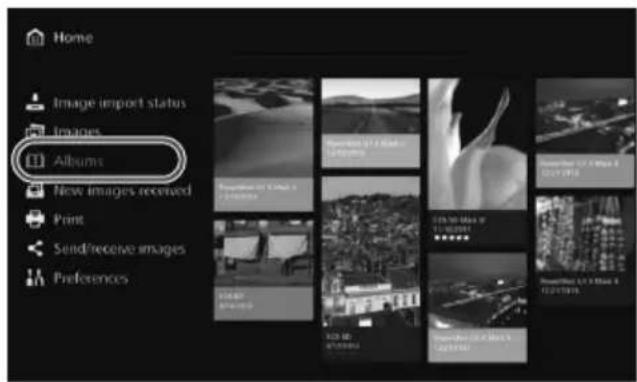
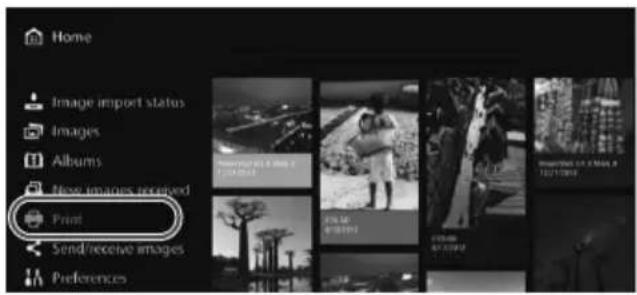
Home Screen
When you select a menu and press
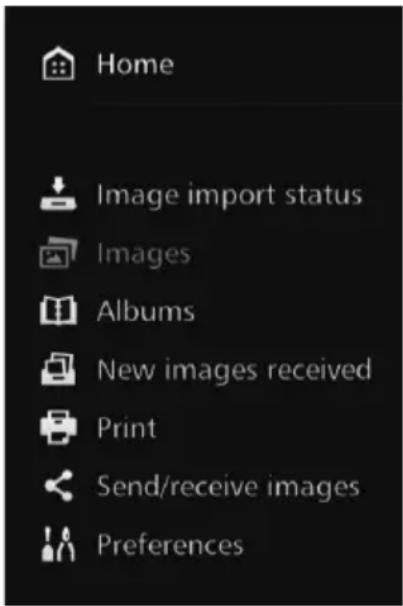
[Image importing status] (p.26)
You can check the importing status while importing an image from a camera/camcorder, card, etc.
[Images] (p.31)
Images will be listed by shooting month or camera/camcorder. You can also delete multiple images at once or copy them to a card or on an external hard disk.
[Albums] (p.35)
You can view, create, and edit albums.
[New images received] (p.29)
You can check newly imported images.
[Print] (p.39)
You can print still photos.
[Send/receive images] (p.52)
You can transfer images with another Connect Station.
[Preferences] (p.67)
You can change the Connect Station settings. You can also back up images to an external hard disk and restore them from backup.
Importing Camera/Camcorder Images
Import images captured with a camera/camcorder to Connect Station. When you hold the camera/camcorder close to Connect Station, connect it with an interface cable, or insert a card into Connect Station, the images that have not been imported yet will be imported to Connect Station.
To import images from a smartphone, tablet, computer, etc. to Connect Station, see "Operating with a Smartphone or Other Terminals" (p.41).
Importing Images
When importing captured images, you can select one of the following three methods.
| Importing via a wireless connection p. | 22 |
| Importing from a card p.23 | |
| Importing via a wired connection p.25 |
If you change the folder name or folder structure where the images are saved, importing images may no longer be possible.

Images recorded on the internal memory of camcorder can be imported via wired connection.
- For the power source of the camera/camcorder, using a fully charged battery or AC adapter kit is recommended.
Image Formats That Connect Station Can Play Back
Connect Station can play back images of the formats shown below. Files of any other formats cannot be played back even if they are imported to Connect Station.
| Still photos JPEG/R | AW (CR2 format only) |
| Movies | MOV/MP4/AVCHD (Full HD, HD, and VGA (SD) recording quality) |

- Images edited with a computer, etc. may not be played back with Connect Station or playback may take time.
- The remote control (except the power button) cannot be used until image playback starts.
4K movies cannot be played back with Connect Station.
Importing via a Wireless Connection
Import images by connecting Connect Station and a camera/camcorder wirelessly.
Compatible cameras/camcorders
Only the images shot with Canon NFC-compatible compact digital cameras, digital single-lens reflex cameras, compact system (mirrorless) cameras, or digital camcorders can be imported via a wireless connection. For information on Canon NFC-compatible cameras/camcorders that support Connect Station, refer to the Canon Web site.
NFC function of the camera
- Turn on the camera/camcorder to be connected and set it up to allow use of its NFC function in advance. For the operation procedure, refer to the Camera/Camcorder Instruction Manual.
- The location of the (N-Mark) differs by each camera/camcorder model. Check the location of in advance.

mark of the camera/camcorder
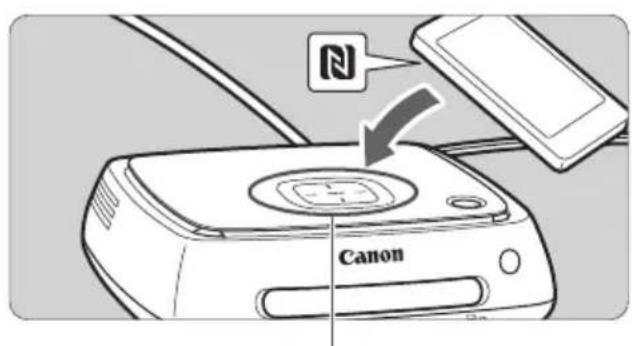
Importing images
-
Carefully hold the on the camera/camcorder to be connected close to the NFC connect point on Connect Station.
Connect Station gives two short beeps, and the Wi-Fi lamp blinks twice. If message indicating the connection is displayed on the camera/camcorder's LCD monitor, communication is established via Wi-Fi even if the camera/camcorder is moved away from Connect Station.
When Connect Station is connected, the Wi-Fi lamp will blink and the import of images will start. -
Do not put the camera/camcorder on Connect Station, because the camera/camcorder does not sit there stably.
- When the import is complete, turn off the camera/camcorder to terminate the connection.

- When holding the camera/camcorder close to Connect Station, do not drop the camera/camcorder on it or push the camera/camcorder hard against it. Doing so may damage the built-in hard disk.
While images are being imported, you cannot connect an NFC-compatible camera/camcorder even if you hold it close to Connect Station. - If a case etc. is attached to the camera/camcorder, connection may not be possible. In such a case, detach the case etc., and hold the camera/camcorder close to Connect Station.
- Since the camera/camcorder may not be recognized readily, carefully hold the camera/camcorder close to the NFC connect point on Connect Station while rotating the camera/camcorder horizontally.
- Just holding the camera/camcorder close to Connect Station may not establish a connection. In such a case, gently touch Connect Station with the camera/camcorder.
- When connecting Connect Station to a camera/camcorder, and it gives three short beeps and the power lamp blinks in red, this indicates that Connect Station is not in a status to establish connection. Make sure if the camera/camcorder is ready for connection.
- If the camera/camcorder and Connect Station are moved too far away from each other while importing images, the import may take time or the connection may be terminated.
- If the camera's/camcorder's battery runs out during import, the import will stop. Charge the battery, then try importing again.
- While a wireless LAN connection is established, you may not be able to connect a camera/camcorder even if you connect it with an interface cable.
- You may not be able to connect a certain NFC-compatible camera/camcorder with low battery level to Connect Station, even when you hold it close to Connect Station. In such a case, recharge the battery, then hold the camera/camcorder close to Connect Station.

- The power to some cameras/camcorders may be turned on when you hold the camera's/camcorder's close to Connect Station.
- When all images are already imported, import does not start.

Importing from a Card
Import images by inserting a card storing captured images into Connect Station.
Images can be imported from a card used for shooting with Canon compact digital cameras, digital single-lens reflex cameras, compact system (mirrorless) cameras, or digital camcorders released in 2010 or later. Although images may be imported from a card used in other cameras, there is no guarantee for the import of images to Connect Station.
Compatible cards
The following cards can be used when importing images from a card.
SD/SDHC/SDXC memory card
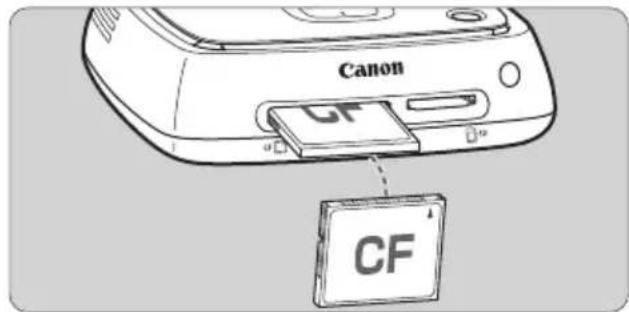
CF (Compact Flash) card
- The CFast card is not supported.

CF card
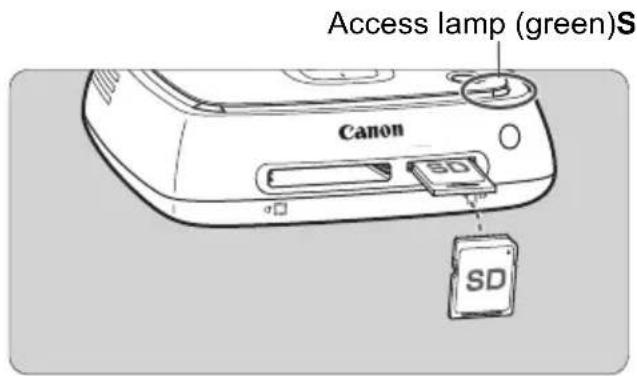
Inserting a card
- Remove the card slot cover in advance.
- Insert an SD card with its front side facing upward until it clicks in place.
- Insert a CF card with its front side facing upward so that the end where tiny holes are aligned goes inside. Inserting the card in the wrong direction will damage Connect Station.
Removing a card
- Check that the access lamp is not blinking.
An SD card will be ejected when you gently push it in and release it.
In the case of a CF card, pull it out slowly.
Importing images
- Insert a card into the card slot.
The access lamp will blink, and the import of images will start.
The import is complete when the access lamp stops blinking and stays lit. Remove the card.

-
Connect Station is importing, copying, or backing up images when its access lamp (green) is blinking. Do not do any of the following when the access lamp is blinking; doing so may destroy image data or damage Connect Station, card, or connected device.
-
Disconnecting the USB cable.
- Removing the card.
-
Unplugging the power cord.
-
When inserting or removing the card, hold Connect Station in place.
- Be careful not to lose the card slot cover. Make sure the card slot is covered when not in use.

When all images are already imported, import does not start.
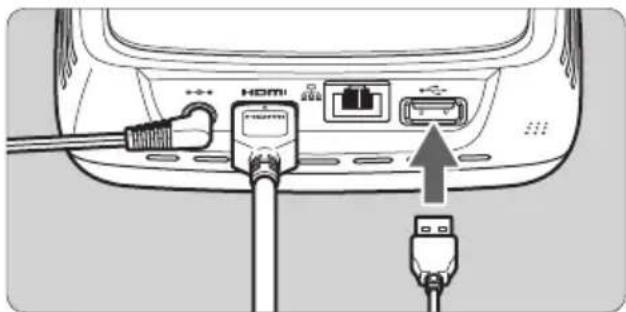
Importing via a Wired Connection (USB Terminal)
Import images by connecting Connect Station to a camera/camcorder with an interface cable (USB cable). For information on the interface cable, refer to the Camera/Camcorder Instruction Manual.
Compatible cameras/camcorders
Cameras/camcorders from which images can be imported via a wired connection are Canon compact digital cameras, digital single-lens reflex cameras, compact system (mirrorless) cameras, and digital camcorders released in 2010 or later. Although cameras/camcorders other than these may be connected via a wired connection, there is no guarantee for the import of images to Connect Station.
Importing images
Use the interface cable that you use to connect a camera/camcorder to a computer.
- Connect the USB terminal on Connect Station to a camera/camcorder, then turn on the camera's/camcorder's power.
The access lamp will blink, and the import of images will start.
The import is complete when the access lamp stops blinking and stays lit. Turn off the camera's/ camcorder's power, then disconnect the cable.

- When connecting or disconnecting the cable, hold Connect Station in place. When disconnecting the cable, be sure to hold the plug; do not pull the cable.
- When connecting the cable to Connect Station, do not lift or move Connect Station with its power on. Dropping Connect Station or hitting it against an object may damage its hard disk.
- If you connect a camera/camcorder or insert a card and the import of images does not start even when there are images that have not been imported yet, disconnect the camera/camcorder, remove the card, restart Connect Station, then try again.
- When connecting to a camera/camcorder, use fully-charged batteries.
Images cannot be imported to Connect Station from a USB charging-compatible camera/camcorder by connecting them with an interface cable. - Do not connect a USB cable or insert a card while the Connect Station's hard disk is being formatted or its firmware is being updated.
- Movie files exceeding 4 GB in file size shot with the EOS-1D X Mark II cannot be imported via a wired connection. Import them from the card (p.23).

Images can be imported even when Connect Station is standing by (p.16).
- When all images are already imported, import does not start.
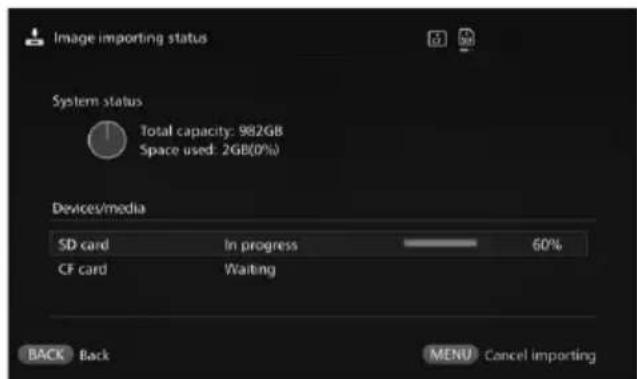
Image Importing Status
To check the image importing status, select [Image importing status] on the Home screen.
- When you select an item by pressing the <> keys and press
-
During the import, the icon indicating that data is being imported is displayed on the upper right of the screen (p.28).
The image import time varies depending on following conditions, etc. -
Number and sizes of the images to be imported.
Write out speed of the card used. -
Signal reception status when connected wirelessly.
-
Importing movies takes a considerable time.
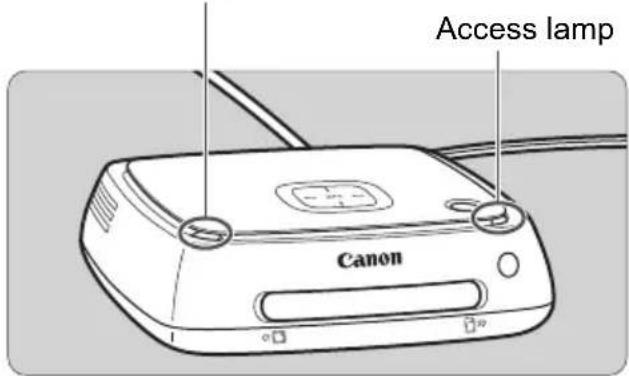
Lamp Indicators
The lighting conditions of the Wi-Fi/New image notification lamp and access lamp allow you to check the connection status of the connected device or the processing status.
Wi-Fi/New image notification lamp
| Lamp Display | Connection | Status/Processing Status |
| Wi-Fi/New image notification lamp (blue) | Blinks | When images are being imported from a camera/camcorder connected via a wireless LANWhen there are new images*1When images have been received from another Connect Station*1When a device is held close to the NFC connect point and connection is establishedWhen the firmware is being updated*2 |
| Access lamp (green) | Blinks*3 | When images are being imported from a card or a camera/camcorder connected via wired connectionWhen image data is being copied to a card or on an external hard diskWhen image data is being backed up to an external hard diskWhen the firmware is being updated*2 |
| Lights up | When importing images is complete |
1 Selecting [New images received] on the Home screen turns off the lamp.
2 The power lamp also blinks in green.
*3 The lamp stays lit when the processing is complete.
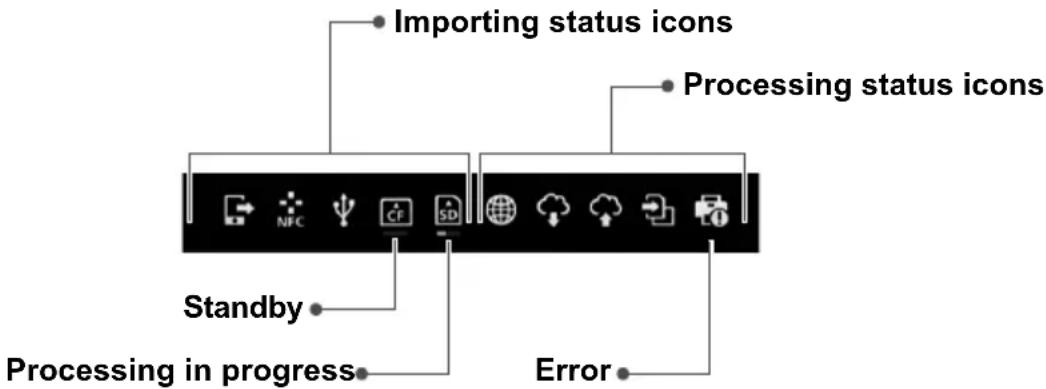
Icons on the Screen
An icon is displayed on the upper right of the screen when processing (importing or transferring images), when standing by, or when an error occurs. The icon disappears when the processing is complete or the cause of the error is eliminated.
| → | Uploading images from a Web browser or application |
| :: NFC | Importing images from a camera/camcorder via a wireless LAN |
| ↑ | Importing images from a camera/camcorder via a wired connection |
| CF | Importing images from a CF card |
| SD | Importing images from an SD card |
| Connecting with a Web browser or application | |
| Receiving images from a Web service | |
| Sending images to a Web service | |
| Copying images to a card or on an external hard disk | |
| Printing images |
When an error (0) is indicated
- When the importing status icon indicating an error (0) is displayed, see the [Image importing status] screen (p.26) to check the error status. When you select the error item and press
- When the processing status icon indicating an error (0) is displayed, select [Preferences] [Tab] tab [Show status] (p.69), then check the error status.
- If there is an error, [O] is displayed in [Image importing status] or [Preferences] and [Show status].

If there is at least one icon displayed, you cannot perform the following operations: [Backup], [Restore data], [Format system hard disk], [Update firmware], and [Delete all images on system]
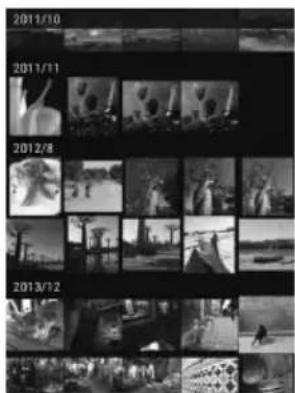
Viewing New Images
To view newly imported images, select [New images received] on the Home screen. In the [New images received] screen, all simultaneously imported images are managed as a group (new image group).

New image group
- Up to five new image groups imported within the last one-month period are managed in the order of the dates when they were imported.
- When images are added, [] is displayed in [New images received] on the Home screen and the new image notification lamp (blue) blinks. When you select [New images received] and press <SET> , [] and the lamp will turn off.
- When you select a new image group and press <SET> , the images in that group will be displayed as thumbnails.
- When you select a new image group and press
Setting the submenu
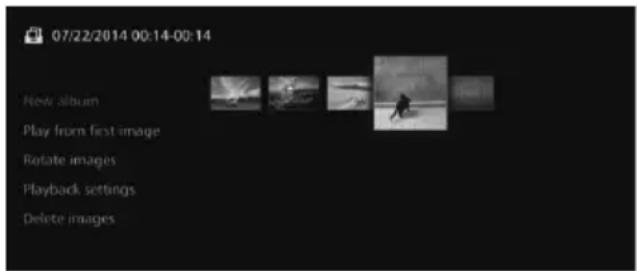
When you press
- Not available when a movie is selected.
Viewing Images
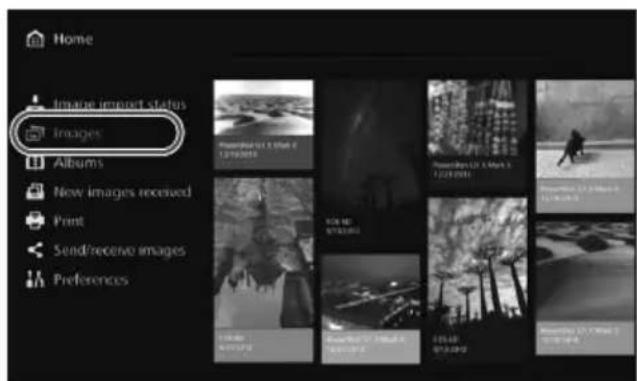
To view images on a TV set, select [Images] or [Albums] on the Home screen.
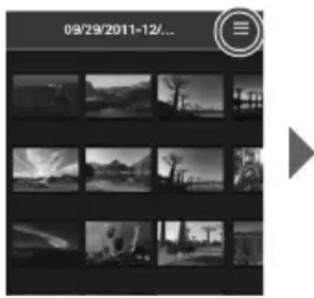
Viewing Images from the Image List
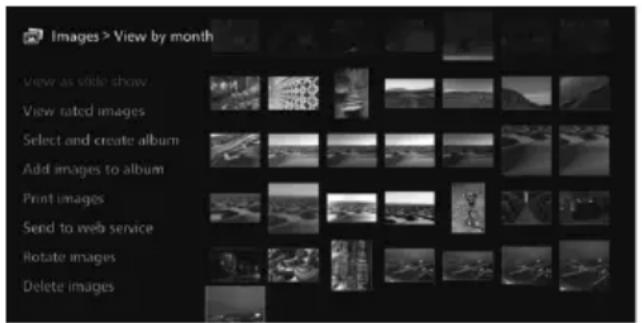
To view the images of a selected shooting month or camera/camcorder, to delete multiple images at once, or to copy multiple images to a card, select [Images] on the Home screen.
- Sort the images to be displayed, according to the shooting month or the camera/camcorder used for shooting.
- You can create an album, add images to an album, print, send images to a Web service, rotate, delete, etc., by selecting images from the displayed list. You can also view a slide show of the listed images or have only rated images displayed.
- When deleting multiple images or copying multiple images to a card at once, sort the images to be displayed according to the shooting month.
Viewing Images by Shooting Month or Camera/Camcorder
Search for images by selecting the shooting month or the camera/camcorder used for shooting.
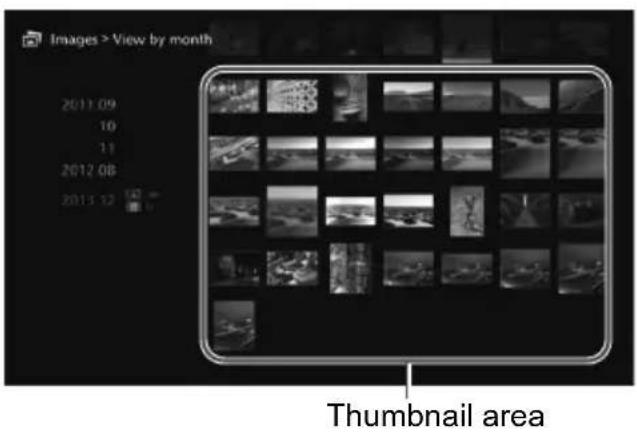
- When you select the shooting month or the camera/camcorder used for shooting in the left-side area, the corresponding images will be displayed as thumbnails in the right-side area of the screen.
- When you press <SET> or the <> key, you can select images in the thumbnail area.
To print the selected images, play back a slide show, or perform other operations, press

- [Protect] is set (p.38) for images displayed with [] .
- If you keep pressing the < ◇> key to browse images, the selection frame may skip.
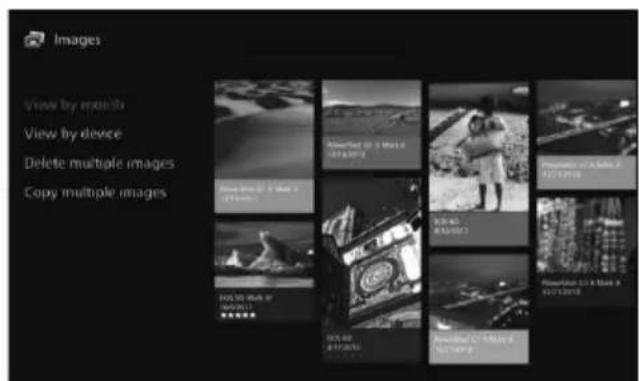
Setting the submenu
When you press
- Sort the target images by a shooting month and append [✔] for the images to be deleted or copied.
- Select a shooting month in the left-side area and press <SET> to append [✔] for all the target images.
- Press the <> key to select images in the thumbnail area. Select an image and press <SET> to append [ ] for that image.
- Pressing
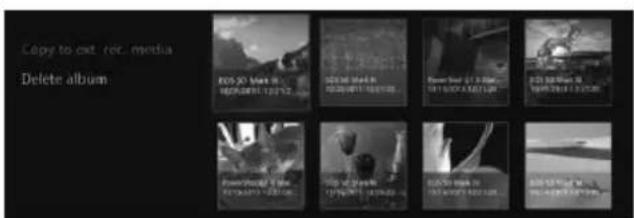
[Copy multiple images]
The function to copy images is for transferring images to a computer or other devices. Even if you copy images to a card and insert the card into the camera/camcorder, the camera/camcorder cannot display those images.
When copying images, follow the instructions below.
- When copying to a card, use an SDXC card or CF card. An SD card or SDHC card cannot be used for copying images with Connect Station.
- Use a card or external hard disk formatted with exFAT.
-
The card or external hard disk may be formatted. Do not use a card or external hard disk storing images or data that you do not want to delete.
-
When you select [Copy multiple images], the destination selection screen will appear first. Press the <> keys to select the destination.
Set the write-protect switch upward
![CANON Connect Station CS100 - [Copy multiple images] - 1](/content/2026/02/425180/images/5f9470139f652f43d8cc879330723361110594e89122593724eca0088a49dd3c.jpg)
![CANON Connect Station CS100 - [Copy multiple images] - 2](/content/2026/02/425180/images/dae1ebc291c20e1fb3571d7703d8fd9ea7abe80f1c5ec540695b97beb82fcbaa.jpg)
![CANON Connect Station CS100 - [Copy multiple images] - 3](/content/2026/02/425180/images/5a4bc15418fa74417fa5a02433c18d4989a0c27e9c37eb0cfc6ef872212a5c39.jpg)
Use a self-powered external hard disk with a capacity within 2 TB.
An external hard disk for copying images cannot be used for backup.
- If there is a DCIM folder in a destination, the destination cannot be selected. Use a computer or other devices to delete the DCIM folder.
- Even if you perform [Delete multiple images], protected images will not be deleted.
- When images are copied to a card or external hard disk from Connect Station, you cannot import them again to Connect Station from that card or external hard disk.
- If a card or external hard disk formatted with a file system other than exFAT is used, a screen for initializing the card or external hard disk appears.
![CANON Connect Station CS100 - [Copy multiple images] - 4](/content/2026/02/425180/images/52024aadea5259ed6639e830d698a39d7acc754b5ab8edd981ecf45547fe82d4.jpg)
- [Copy multiple images] is not available when a card is not inserted in Connect Station or when an external hard disk is not connected to it.
- If you perform [Copy multiple images] for images of 64 GB in total, it takes approx. 3 hours to complete the copying. However, depending on the operation status of Connect Station and the conditions (size, number, etc.) of the images to be copied, it may take 3 hours or longer to complete the copying.
- To use an SDXC card or CF card that has been formatted with Connect Station for shooting, format the card using the camera/camcorder.
Creating and Viewing an Album
Creating an album enables you to do the following:
View favorite images at once and share them.
View images of a trip or some other event at once and share them.
View images from a Web browser.
To view, create, or edit an album, select [Albums] on the Home screen.
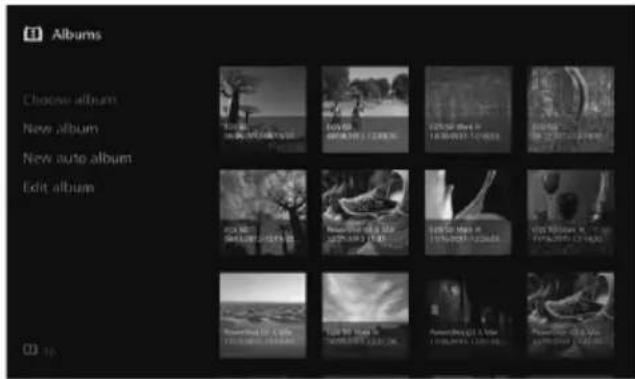
Creating an Album
Select desired images from the images imported to Connect Station and create an album.
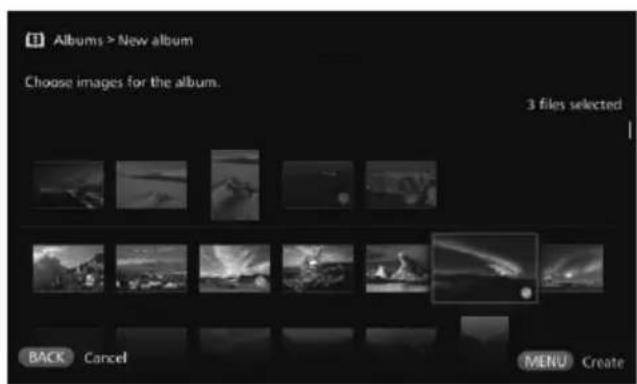
- Selecting [New album] displays the image selection screen.
- Select images and press
to append [✔] for the images to be compiled into an album. - Pressing < MENU > creates an album.
Creating an Album Automatically
Connect Station automatically selects images and creates an auto album.
- Selecting [New auto album] displays the auto album setting screen. When you set [Auto album playback time] and [Type of images] and select [OK], an auto album will be created.
Selecting an Album
When you select an album and press <SET> , a slide show of the album will be played back.
Setting the submenu
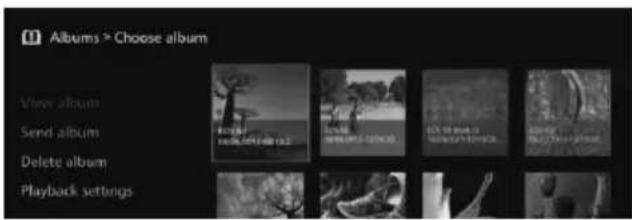
When you press
- When you select an album and press < SET> , the editing screen will appear.
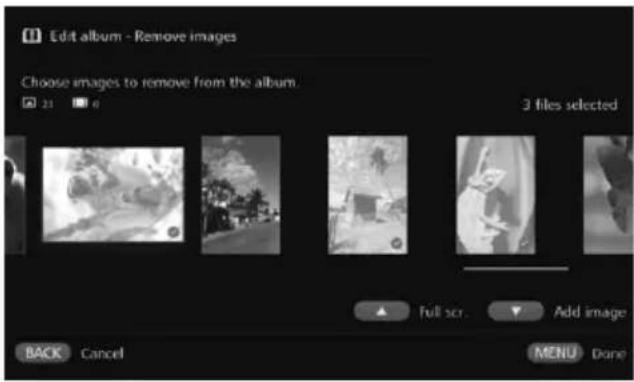
Selecting an image to remove
- Select an image and press
to append [ ] for the image to be removed.
Selecting an image to add
- Press the <> key to display the image selection screen. Select an image and press <SET> to append [ ] for the image to be added.
- When you press
Saving the edited data
- When you press
Setting the submenu
When you press
- Select [Preferences] on the Home screen.

Select [Printer selection].
Under the [2] tab, select [Printer selection].
The printers that can be connected will be listed.
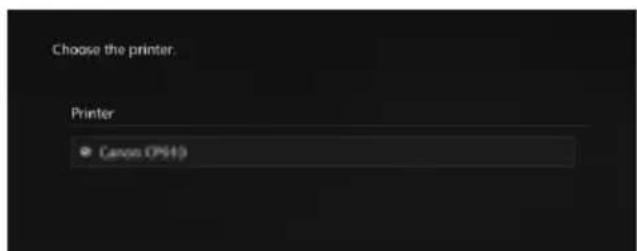
Select a printer.
- Press the <> keys to select the printer, then press SET to append [O] for the printer to be connected.
If only one printer has been detected, [O] is already appended.
After checking that [ ] is appended, pressor <to exit the setting screen.
Printing
Selected images are printed.
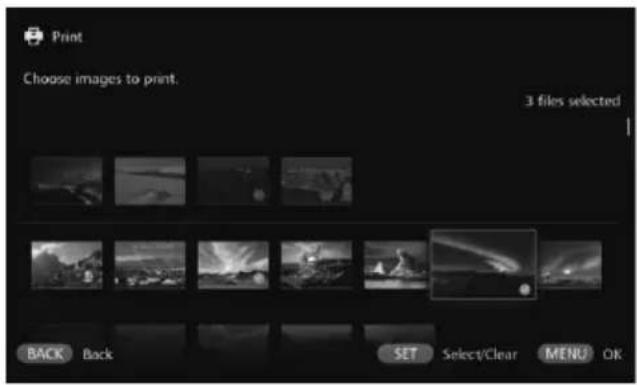
1 Select [Print].
- Select [Print] on the Home screen.
The image selection screen will appear.
Select an image to print.
- Select an image and press
to append [ ] for the image to be printed.
Press
After selecting the image to print, press
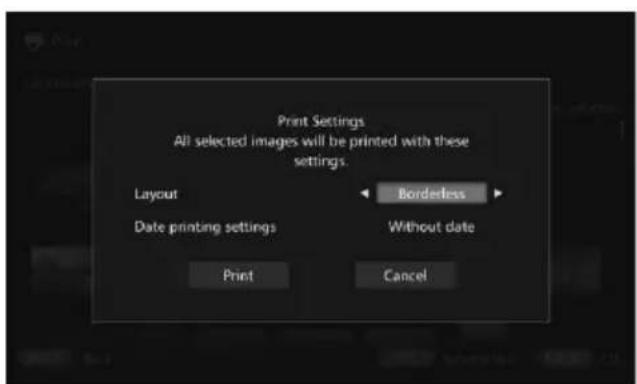
- When you select [Print] and press <SET> , printing will start.
Movies cannot be printed.
- Depending on the printer model, the Connect Station's [Print Setting] screen may not be displayed or printing dates is not possible.
- Depending on the printer model and settings, the [Layout] setting may be inconsistent with the print result.
- You cannot print even if you connect Connect Station and a printer with a USB cable.
- With Connect Station, the settings other than [Layout] and [Date printing settings] cannot be specified. For information on how to specify the paper size, type, etc., refer to the printer's instruction manual.
Depending on the printer model, printing the large size image may not be possible.
Up to 99 images can be selected at a time.
Operating with a Smartphone or Other Terminals
You can use a terminal such as a smartphone, tablet, or computer to view images stored in Connect Station or send images from the terminal to Connect Station.
Operation is performed using a dedicated application or Web browser.
- To use this function, you need to connect Connect Station to an access point, router, etc. in advance (p.16). Also, you need to connect the terminal to the same access point, router, etc. as Connect Station in advance.
- Up to five terminals can be connected at a time. However, images can only be uploaded from one terminal at a time.
Browsers
The following operating systems and Web browsers have been confirmed to be compatible with this device. Depending on your environment, operation may differ.
- Windows 10, Windows 8.1, Windows 7: Chrome
Mac OS X 10.11/10.12: Safari (The function is not available when Private Browsing is enabled.) -
iOS (OS version 9/10): Safari (The function is not available when Private Browsing is enabled.)
Android (OS version 4.4/5.1/6.0): Chrome -
Operation on the above operating systems and Web browsers cannot be guaranteed for all the terminals.
- If JavaScript is disabled by the Web browser setting, images will not be displayed properly.
Dedicated application
On a smartphone or tablet, you can use the dedicated application "Connect Station" to view, download, and upload images (p.49).
Displaying the Operation Screen on a Web Browser
Displaying by Using the NFC Function
An NFC-compatible Android smartphone or tablet (OS version 4.2 or later) supporting Android Beam allows you to display the operation screen by using the NFC function.
- A terminal having (N-Mark) is compatible with NFC. Note that some NFC-compatible terminals do not have . If you are not sure whether your terminal supports NFC, contact its manufacturer.
- Set the terminal in advance so that the NFC function can be used, and make sure you know where the NFC antenna is located. For information on the setup procedure, refer to the terminal's instruction manual.
- Operation using the NFC function cannot be guaranteed for all the terminals. If you cannot display the operation screen using the NFC function, see "Displaying by Entering an IP Address" (p.43).
NFC connect point
1 Operate the terminal to connect to the access point, router, etc. to which Connect Station is connected.
2 Hold the terminal close to the NFC connect point on Connect Station.
- Carefully hold the on the terminal close to the NFC connect point on Connect Station.
Connect Station gives two short beeps, and the Wi-Fi lamp blinks twice. If the browser on the terminal starts and the login screen is displayed, communication is established via Wi-Fi even if the terminal is moved away from Connect Station.
3 Operate the terminal to log in to Connect Station.
On the terminal screen, select [OK].
The album list screen will appear (p.44).

- When holding the terminal close to Connect Station, do not drop the terminal on it or push the terminal hard against it. Doing so may damage the built-in hard disk.
- If a case etc. is attached to the terminal, connection may not be possible. In such a case, detach the case, etc., and hold the terminal close to Connect Station.
- Since the terminal may not be recognized readily, carefully hold the terminal close to the NFC connect point on Connect Station while rotating the terminal horizontally.
- Just holding the terminal close to Connect Station may not establish a connection. In such a case, gently touch Connect Station with the terminal.
- When Connect Station gives three short beeps and the power lamp blinks in red, check whether Connect Station is connected to the access point, router, etc.
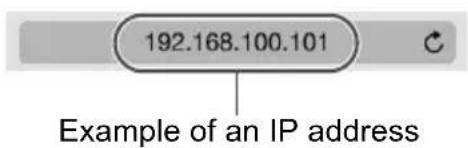
Displaying by Entering an IP Address
If the terminal does not support NFC, display the operation screen by entering an IP address into the Web browser.

Example of an IP address
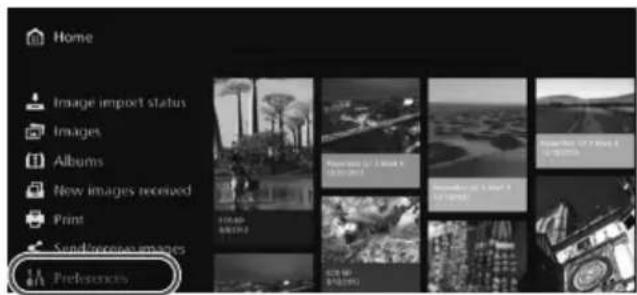
1 Select [Preferences] in Connect Station.
- Select [Preferences] on the Home screen.
Check the IP address.
The number displayed on the lower right of the [Preferences] screen is the IP address.
3 Operate the terminal to connect to the access point, router, etc. to which Connect Station is connected.
4 Start the Web browser on the terminal.
5 Enter the IP address into the terminal.
- Enter the IP address you checked in step 2 in the address field of the Web browser.
6 Operate the terminal to log in to Connect Station.
On the terminal screen, select [OK].
The album list screen will appear (p.44).
Viewing an Album
View an album in Connect Station by using the Web browser on the terminal.
How to Operate the Screen
Flick
To scroll the screen, flick horizontally.
- By flicking an album vertically, you can play back its slide show on a TV screen
Tap
- When you select an album or image from the list, the screen will switch in the order as below.
Albums > Thumbnail display > Single-image display
- When you select [< ] on the upper left of the screen, the screen will switch back in the order as below.
Single-image display > Thumbnail display > Albums > Login screen
- When you select [三] on the upper right of the screen, the menu will appear.
- When you select [ ] in the single-image display, a slide show of the album will be played back. The [ ] appears when you tap on the outer side of an image.
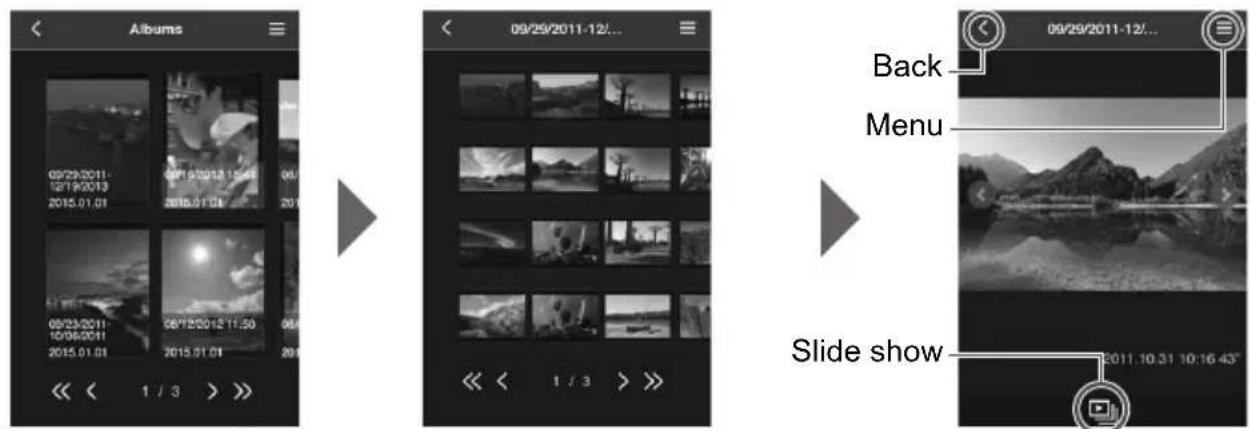
Albums Thumbnail display
Single-image display of a still photo

- If you delete or edit an album using Connect Station while viewing it in the Web browser, images may not be displayed properly on the terminal.
Images that are not managed as albums in Connect Station cannot be viewed. - Although movies are displayed in the list, they cannot be played back. In the single-image display, the [ ] appears on the upper left of the movie.
- When the [Preferences] screen (p.67) is displayed, you cannot play back a slide show on a TV screen by flicking an album vertically.
- When a terminal is logged in, you cannot delete images on Connect Station.

- Images on Connect Station can also be saved on the terminal depending on the browser's function.
- When you tap on an image in the single-image display, you can display the image in actual size. Select [< ] to revert to the single-image display.
Uploading Images from a Terminal
Smartphones and Tablets
Import still photos on a smartphone or tablet to Connect Station.
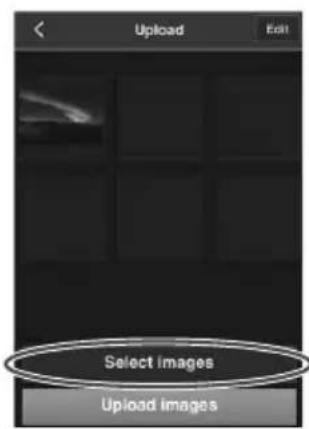
1 Display the upload screen on the smartphone or tablet.
From the menu, select [Upload].
2 Select [Select images].
Select an image.
- When you select an image on the smartphone or tablet, the selected image will be added to the upload screen.
To select another image, select [Select images] again.
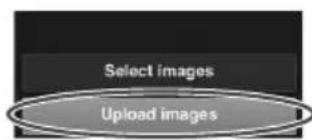
Up to six images can be selected.
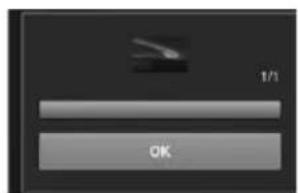
Select [Upload images].
The images will be sent to Connect Station.
- When the upload is complete, select [OK].
To send other images, select [Select images] again.
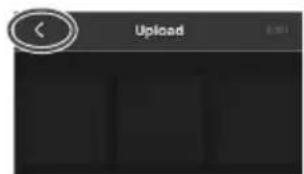
Exit the upload screen.
- By selecting < on the upper left of the screen, you can return to the previous screen.

Movies cannot be uploaded.
- A transmission error may occur if a power saving feature of the smartphone or tablet is activated during the upload.
- If the power saving feature of the smartphone or tablet is activated, the communication with Connect Station will be disconnected.
- While downloading images from a camera/camcorder or card, uploading images from a smartphone or tablet cannot be performed. Likewise, uploading images from multiple smartphones or tablets at the same time cannot be performed.

By using the dedicated application "Connect Station," you can upload still photos and movies from a smartphone or tablet at once.
Computers
Import still photos and movies on a computer to Connect Station.
1 Display the upload screen on the computer.
From the menu, select [Upload].
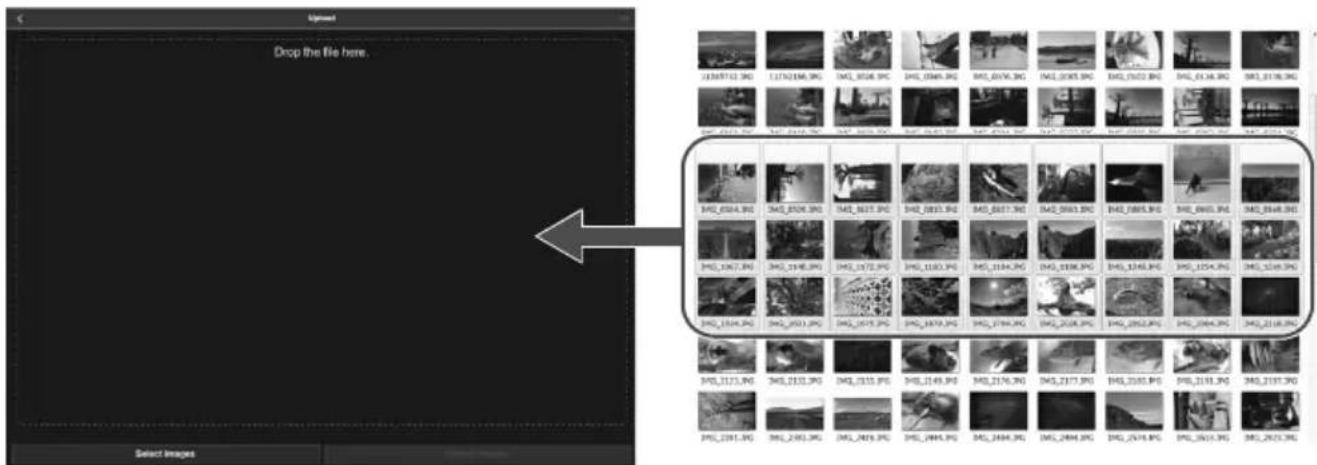
Select still photos and movies.
- When you drag and drop still photos and movies to the upload screen, the images will be added.
- When you select [Select images], you can also select images in a dialog.
Up to 1,000 images can be selected at a time.

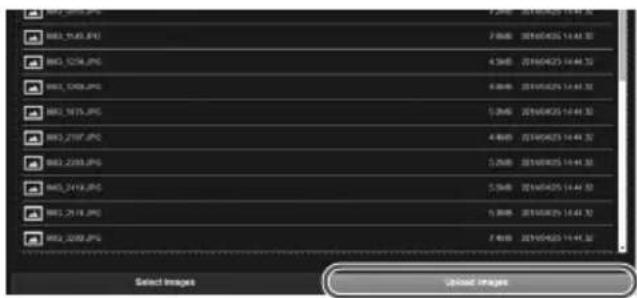
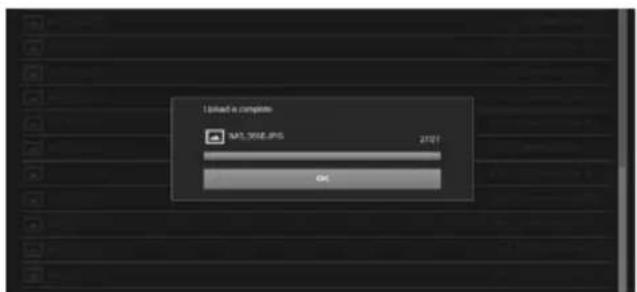
Select [Upload images].
The still photos and movies will be sent to Connect Station.
- When the upload is complete, select [OK].
The [Albums] screen will reappear.
![CANON Connect Station CS100 - Select [Upload images]. - 1](/content/2026/02/425180/images/37a5dd459fb03273f6725ce434e3b1510178eccb6807c70d4846288297482879.jpg)
- A transmission error may occur if a power saving feature of the computer is activated during the upload.
- If the power saving feature of the computer is activated, the communication with Connect Station will be disconnected.
- While downloading images from a camera/camcorder or card, uploading images from a computer cannot be performed. Likewise, uploading images from multiple computers at the same time cannot be performed.
Menu Screen of the Terminal
Upload images or make various settings from the menu screen of the terminal.
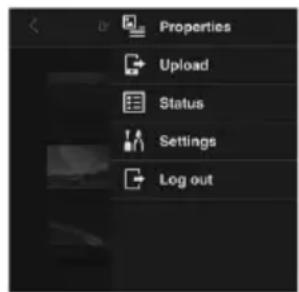
- Selecting [三] on the upper right of the screen displays the menu screen.
Properties
Edit the titles and comments of albums and images.
In the thumbnail display, you can edit the titles and comments of albums.
In the single-image display, you can edit the comment of the image.
Upload
Import images on a terminal to Connect Station. For information on the operation procedure, see "Uploading Images from a Terminal" (p.45).
Status
Check the operation status of Connect Station, such as the remaining capacity of the hard disk and the image importing status.
Settings
Specify the slide show playback settings.
| Slide show Set the image transition time. |
| Transition effect Set the image transition method. |
Log out
Return to the login screen after disconnecting the connection between Connect Station and the terminal.

Only single-byte upper- and lower-case letters from A to Z, periods (.), underscores (_) , hyphens (-) , colons (:) , slashes (/) , spaces, and numerals can be entered in [Properties]. You can enter up to 40 characters.
Operating with a Dedicated Application
Use the dedicated application "Connect Station" (free of charge) to view images stored in Connect Station on a smartphone or tablet, or download/upload images.
- You need to install the "Connect Station" application on a smartphone or tablet on which iOS or Android is installed.
- You need to connect Connect Station and the smartphone or tablet to the same access point in advance (p.16, 18).
- Up to five smartphones or tablets can be connected at a time. However, images can only be uploaded from one smartphone or tablet at a time.
"Connect Station" application
- The "Connect Station" application can be downloaded from the App Store or Google Play.
- For the operating system versions supported by the "Connect Station" application, refer to the download site of the "Connect Station" application.
- Interface or functions of the "Connect Station" application are subject to change due to firmware updates for Connect Station or software updates for the "Connect Station" application, iOS, Android, etc. In such a case, sample screens or operation instructions in this manual may differ from the features of the "Connect Station" application.
Connecting via the "Connect Station" Application
The procedure for connecting a smartphone or tablet and Connect Station via the "Connect Station" application is as follows.
Starting the "Connect Station" application
- Start the "Connect Station" application on the smartphone or tablet.
- If a screen showing multiple Connect Station icons appears, select and tap the serial number (p.10) of the model to connect to.
When the screen shown on the left appears on the smartphone or tablet, the connection is complete.
What You Can Do with the "Connect Station" Application
The main functions of the "Connect Station" application are described below.
- You can view all images stored in Connect Station in the order of date. You can also search for images by specifying the shooting month.
- You can select the images and albums you want to download, and download them to a smartphone or tablet at once.
You can edit the titles and comments of albums. - You can upload the images on the smartphone or tablet at once.
- By flicking an image vertically, you can display the image on a TV screen.
The functions specific to the "Connect Station" application version 2.0 or later are described below.
- You can upload movies captured with a smartphone.
- You can log in to CANON iIMAGE GATEWAY to transfer images between a smartphone and Connect Station (p.52, 61).

- Only single-byte upper- and lower-case letters from A to Z, periods (.), underscores (_), hyphens (-), colons (:), slashes (/), spaces, and numerals can be entered in [Properties]. You can enter up to 40 characters.
Cautions for the "Connect Station" Application Version 2.0 or Later
- Movies captured with a smartphone are converted for playback with Connect Station as they are imported. However, depending on the original movie file, conversion may not be performed properly, and playback with Connect Station may fail or look different from the playback on the smartphone. It is recommended that you also keep the original movies. Note that movies imported without using the dedicated application cannot be played back properly.
- For the shooting date and time for movies imported to Connect Station from a smartphone, either the imported date and time or the Coordinated Universal time (UTC, essentially the same as Greenwich Mean Time) will be displayed.
- Uploading movies captured with a smartphone may take time.
- Depending on the movie type, sound may be out of sync during playback or playback may not be smooth.

For details on the "Connect Station" application, refer to its download site.
For details on CANON iIMAGE GATEWAY, see page 52.
The actual application screen may subject to change without notice.
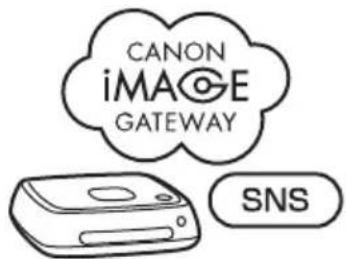
Transferring and Sharing Images
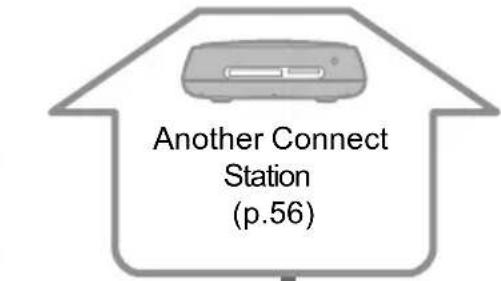
You can connect Connect Station to the Internet to share images, as well as transfer images between Connect Station units to share those images with your family and friends (p.56).
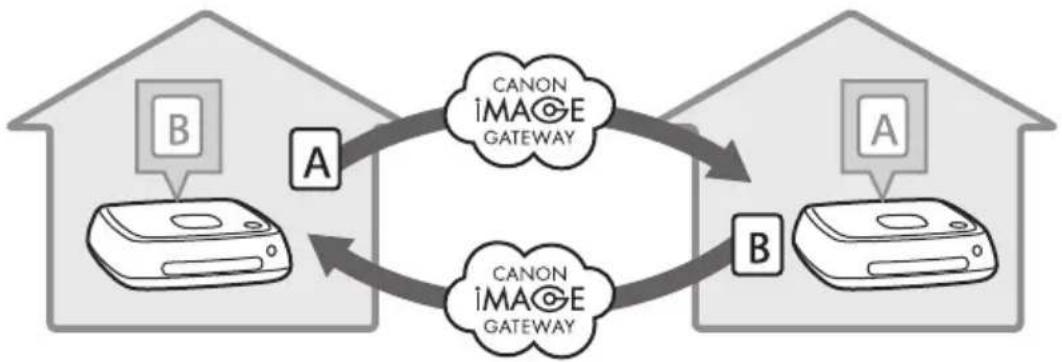
Transferring images (between Connect Station units)
With the dedicated application "Connect Station" version 2.0 or later, you can perform the following by logging in to CANON iMAGE GATEWAY.
- Send images captured with a smartphone to a registered Connect Station unit (p.64).
- Receive images sent from a registered Connect Station unit on a smartphone (p.65).
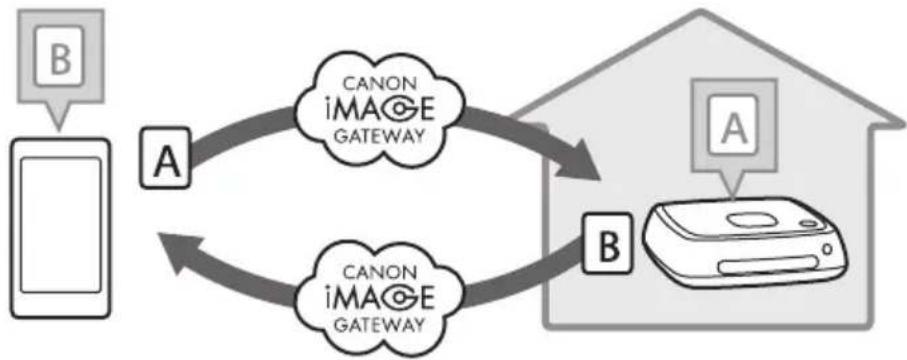
Transferring images (between a smartphone and Connect Station)

Signing Up as a Member
To share and transfer images via the Internet, you need to sign up as a CANON iIMAGE GATEWAY member (free of charge) and add the account to Connect Station. Once you are a CANON iIMAGE GATEWAY member, you can share photos you took in online albums and use a range of services. Also, when you transfer images with another Connect Station or share images using a registered Web service, CANON iIMAGE GATEWAY serves as the site for relaying the images.
- To sign up as a CANON iIMAGE GATEWAY member, you need a terminal that can receive Emails (smartphone, tablet, computer, etc.).
- If you use Web services other than CANON iMAGE GATEWAY, you must have an account with the services. For details, consult each individual Web service's site.
- If you add a CANON iIMAGE GATEWAY account to Connect Station, a message about device information collection appears when a new device is detected (p.70).

CANON iIMAGE GATEWAY services are not supported in certain countries and areas For information on countries and areas supporting the services, refer to the Canon Web site (http://www.canon.com/cig).
- To share and transfer images, you must be able to connect to the Internet. (An account with an internet service provider is necessary and a line connection must be completed.)
- Fees to connect to your provider and communication fees to access your provider's access point are charged separately.
- If there has been a change in the service features of registered Web services, operation may be different from the description in this manual, or operation may not be possible.
For cautions regarding member registration, refer to Help on the CANON iMAGE GATEWAY site.
Creating a New Account
Newly sign up as a CANON iIMAGE GATEWAY member, and set up an account on Connect Station.
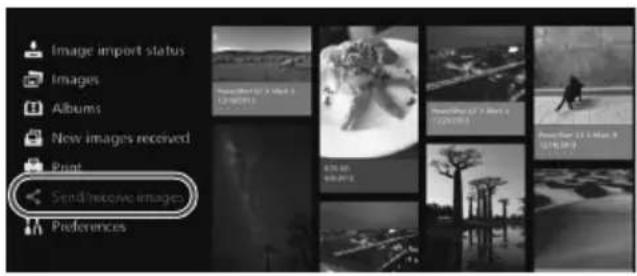
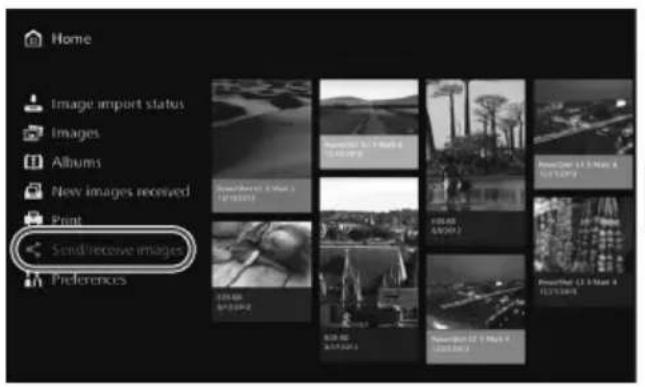
1 Select [Send/receive images].
- When setting up an account for the first time, select [Send/ receive images] on the Home screen.
If you have set up an account with Connect Station, select [Preferences] [Tab [Web service account settings].
![CANON Connect Station CS100 - Select [Send/receive images]. - 1](/content/2026/02/425180/images/c3be00081c83b51d533e6710cbaabdf3da58ba61cb23c573119edbf03e0c8523.jpg)
Press the < > key.
- Press the <> key, then select [Create new account].

Press.
A keyboard screen will appear.
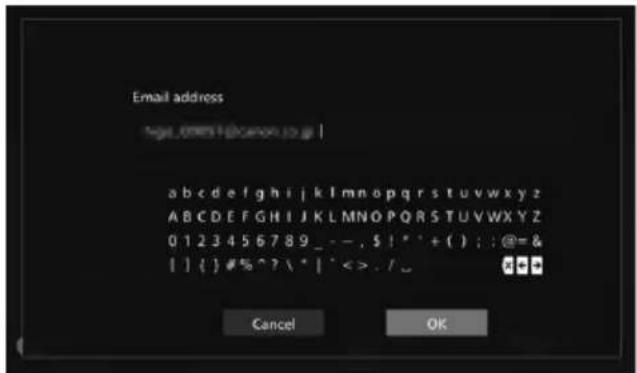
Enter the Email address.
- Enter the Email address for your computer, smartphone, etc.
- Select a character with the <♣> keys, then press <SET> to enter it.
- When you are finished, select [OK].

Press
An Email will be sent to the registered Email address from CANON iIMAGE GATEWAY.
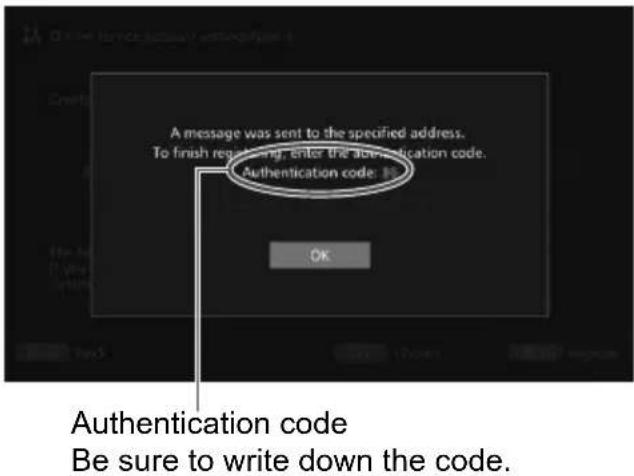
Sign up as a member.
- Connect to the CANON iIMAGE GATEWAY site from the link shown in the Email that you have received on your computer, smartphone, etc. Sign up as a member by following the instructions of the site.
To sign up, you need the authentication code displayed on the TV screen.
When you are finished signing up, press <SET> on Connect Station.
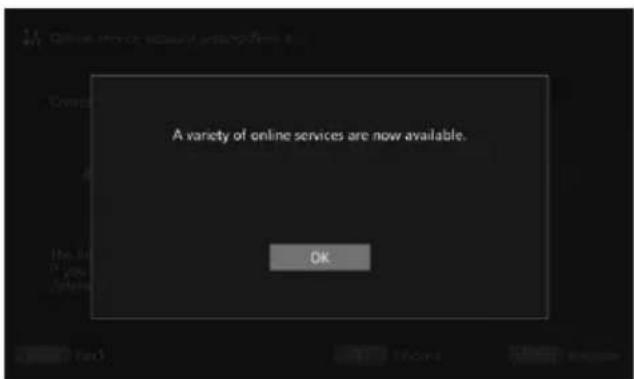
7 Finish the setting.
-
When the screen shown on the left appears on the TV, the sign-up with CANON iIMAGE GATEWAY and the setup of the account on Connect Station are complete. Press
to exit the setting screen. -
When the setup is complete, a message about device information collection appears (p.70).
Registering an Existing Account
If you already have an account with CANON iIMAGE GATEWAY, you can set that registered account on Connect Station.
- In step 2, press <SET> and select [Register existing account].
- In steps 3 to 5, enter the Email address and password registered with CANON iIMAGE GATEWAY.
- When setting a registered account, you do not need to register with the CANON iIMAGE GATEWAY site. When the screen shown in step 7 appears, the setup is complete.
Canceling a Registered Account Setting
Cancel an account that is set on Connect Station. Once you cancel the account setting, you will no longer be able to share images via the Internet.
- In step 2, when you press
- Even if you delete your account from Connect Station, your CANON iMAGE GATEWAY membership remains.

If you forget the authentication code, perform [Create new account] again from the beginning. You can redo the operation up to ten times.
Transferring Images Between Connect Station Units
To transfer images with another Connect Station, select [Send/receive images] on the Home screen. You can transfer albums, check transferred albums, register and edit contacts, etc.
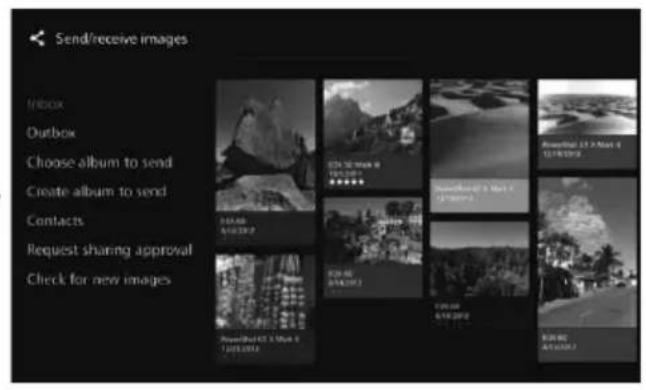
Requesting Transfer Approval
To transfer images between Connect Station units, you need to register the contact in your Connect Station in advance.
- When registering a contact, one Connect Station sends an approval request. If the other Connect Station receiving the request approves it, the registration of transfer between the two units will be completed.

Sending an approval request
First, send an approval request from a Connect Station to the Connect Station of the contact.
- Before performing this operation, check the recipient's Email address (the one that the recipient Connect Station has registered with CANON iIMAGE GATEWAY).

1 Select [Request sharing approval].
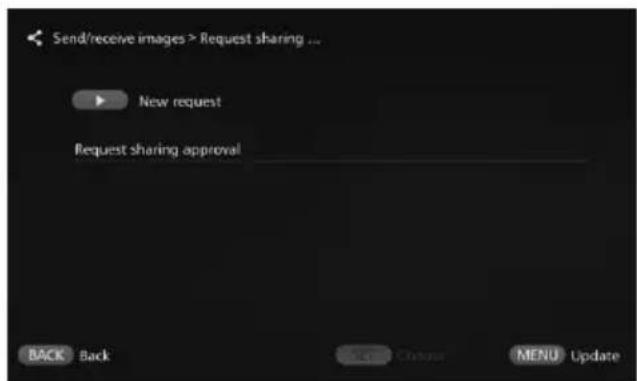
2 Press the < > key.
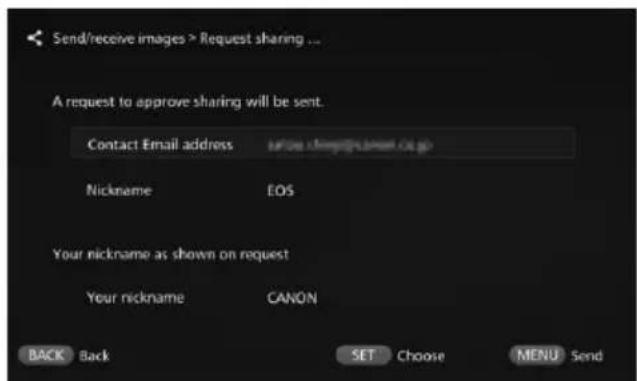
Enter the Email address.
- Select [Contact Email address], press <SET> , then enter the recipient's Email address.
If necessary, you can also enter your nickname and the recipient's nickname (the names to be displayed).
Press
An approval request will be sent.
Note that just sending an approval request does not register the contact.

It is recommended to use one nickname for a CANON iIMAGE GATEWAY account.
- Up to ten approval requests you sent or received can be saved. Registered contacts and approval requests can be saved up to twenty in total. The number of approval requests which can be saved may be altered due to the specification change of CANON iIMAGE GATEWAY.
Approving the received approval request
Perform the approval operation on the Connect Station unit that has received an approval request.
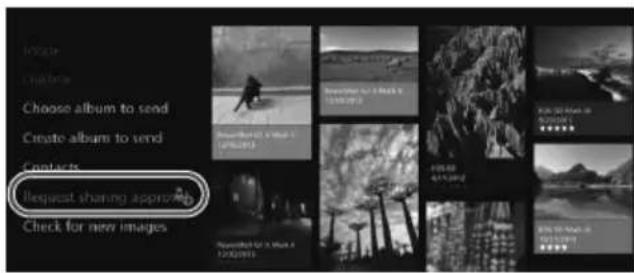
5 Select [Request sharing approval].
- When an approval request has been received, [Request sharing approval] is displayed with [_] .
![CANON Connect Station CS100 - Select [Request sharing approval]. - 1](/content/2026/02/425180/images/55ba830d536cd92e444476b856a997c125756dffdc7270bd4e96985da01356ca.jpg)
6 Select a received approval request.
- Select the request to be approved from the list, then press <SET> .
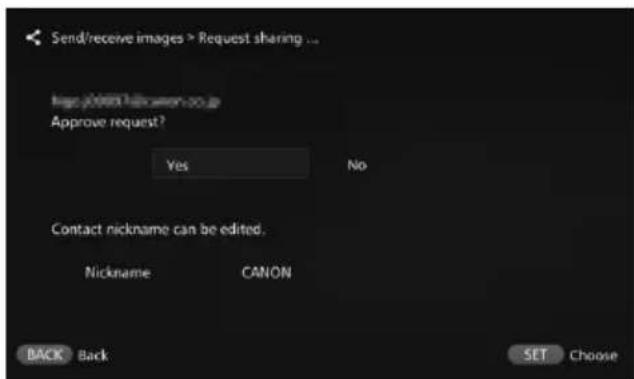
7 Select [Yes].
- When you select [Yes] and press
, the registration of transfer will be completed.
If necessary, you can also change the nickname.
- When the registration of the contact is complete, albums can be transferred with the registered contact. The registered Email addresses are added to [Contacts] on both Connect Station units and can be selected when sending images.
![CANON Connect Station CS100 - Select [Yes]. - 1](/content/2026/02/425180/images/c6353212514b9cd29c1b250fd314d44a1d57e5ed6d9965b6e7f1da408958926a.jpg)
Inbox/Outbox
A list of received or sent albums is displayed.
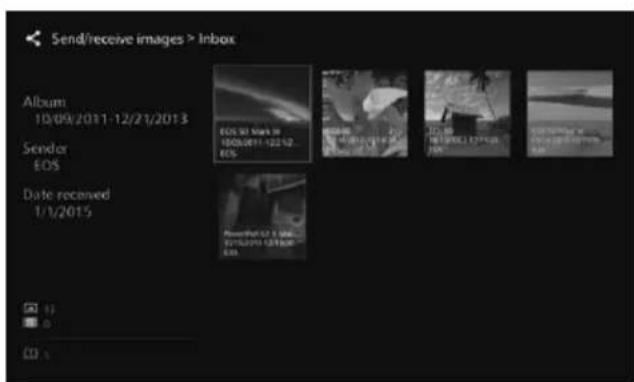
-
When you select an album using the <> keys, you can check the album name, number of images, sender and recipient, date of transfer, album comments, etc.
-
When you select an album and press <SET> , the album viewing screen appears, allowing you to view the content of the album.
Selecting and Sending an Album
Select and send a created album.
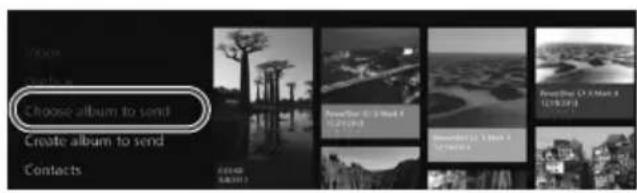
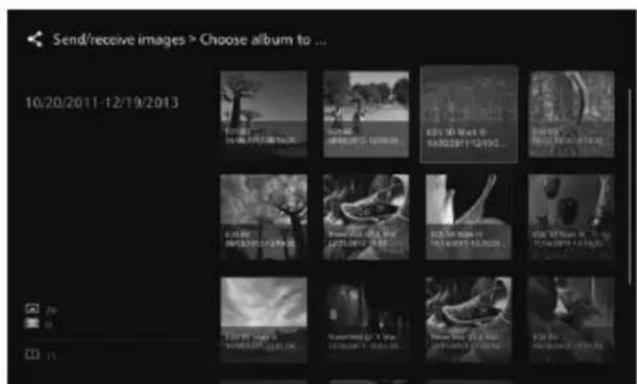
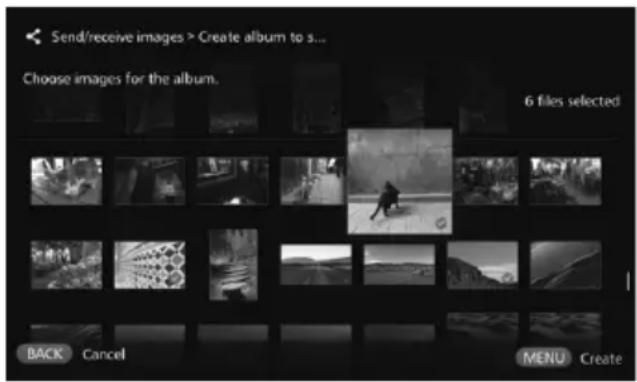
1 Select [Choose album to send].
Select the album to be sent.
- When you press
- Select the album to be sent, then press <SET> .
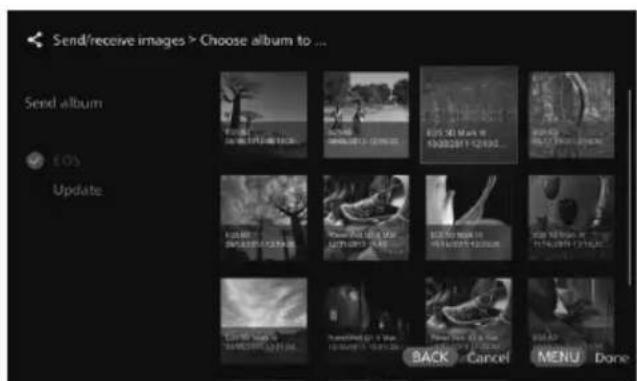
3 Select the recipient from the list.
The registered recipients are listed in [Contacts].
- Press the <> <> keys to select the recipient, then press <SET> to append [].
- You can select multiple recipients and send the album to them simultaneously.
Press
- When you are finished selecting the recipient, press
Receiving an album
When Connect Station is in use or standing by, it checks the CANON iMAGE GATEWAY site periodically and receives images automatically.
- When an album is received, the new image notification lamp (blue) blinks.
- You can check the received album by selecting either [New images received] on [Send/receive images] [Inbox] on the Home screen.
If you do not receive an album within 30 days, it will no longer be available to you. - When you want to receive images immediately, select [Check for new images] (p.60).
Creating and Sending an Album
Create and send a new album.
For information on how to create an album, see "Creating an Album" (p.35).
- Pressing
- When you select a registered contact and press <SET> , the editing screen appears, allowing you to change the contact's nickname and clear the contact.
- Up to twenty contacts can be registered. The number of contacts which can be registered may be altered due to the specification change of CANON iIMAGE GATEWAY.
Checking New Images
Check CANON iIMAGE GATEWAY to see whether there are images sent from another Connect Station.
- When Connect Station is in use or standing by, it receives images automatically. Perform this operation when you want to check received images right away or the power to Connect Station has been off for a prolonged period.

- When a sent album has not been received, an Email is sent to the sender's Email address one week before the expiration date.
- File sizes you can transfer, image receiving expiration date, and notification date may be altered. For the latest information, refer to CANON iIMAGE GATEWAY Web site (http://www.canon.com/cig).
Transferring Images Between a Smartphone and Connect Station
To transfer images between a smartphone and Connect Station, install and use the dedicated application "Connect Station" version 2.0 or later on a smartphone.
- For details on the "Connect Station" application version 2.0 or later, refer to its download site.

Requesting Transfer Approval
To transfer images between a smartphone and Connect Station, they need to be registered with each other as a contact in advance.
- When registering a contact, the smartphone sends an approval request. If the Connect Station receiving the request approves it, the registration of transfer between the two devices will be completed.
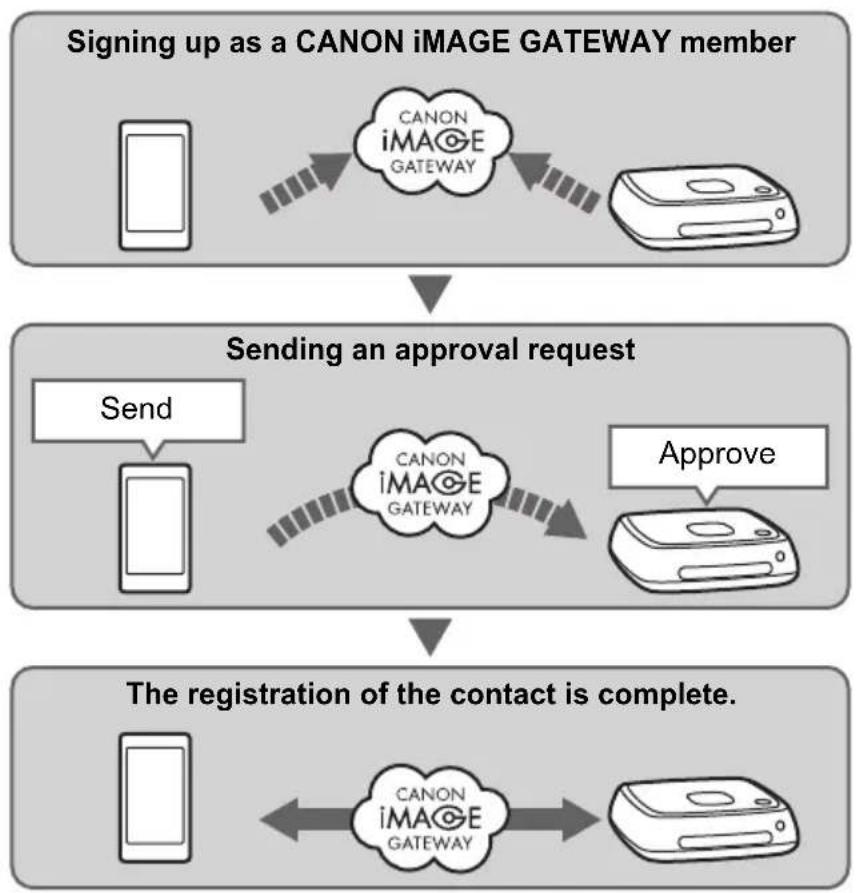
Sending an approval request
First, send an approval request from a smartphone to the Connect Station you want to register as a contact.
- Before performing this operation, check the recipient's Email address (the one that the recipient Connect Station has registered with CANON iIMAGE GATEWAY).
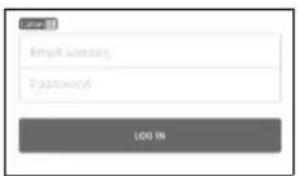
1 Log in to CANON iMAGE GATEWAY.
- Start the "Connect Station" application version 2.0 or later on a smartphone, then log in to CANON iMAGE GATEWAY.
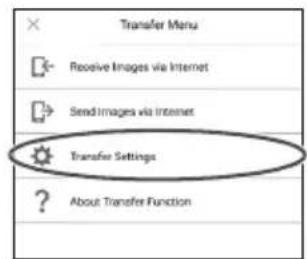
Select [Transfer Settings].
3 Select [Send Request].
![CANON Connect Station CS100 - Select [Send Request]. - 1](/content/2026/02/425180/images/0da2c9719b8f54b4e3d9054c1483767fda2dc27dbfefa6e6f3879fd24f79456e.jpg)
4 Select [New Request].
![CANON Connect Station CS100 - Select [New Request]. - 1](/content/2026/02/425180/images/843091693d990d98b14c541dc3f933aae81f5d73f96c5f14b73780749b1e3b18.jpg)
![CANON Connect Station CS100 - Select [New Request]. - 2](/content/2026/02/425180/images/65881647d43d22fc0483930a3716d8564794faf6e1cbec12494626ba38b046c2.jpg)
It is recommended to use one nickname for a CANON iIMAGE GATEWAY account.
- When you start the "Connect Station" application version 2.0 or later for the first time, instructions for image transfer appear.
- When restarting the "Connect Station" application version 2.0 or later, you do not need to log in to CANON iIMAGE GATEWAY.
![CANON Connect Station CS100 - Select [New Request]. - 3](/content/2026/02/425180/images/504ed4891285d81d9c84286cf3528d8a65dad5b33af7ddc92c4ea8fe9daec28a.jpg)
5 Send a new request.
- Enter the recipient's Email address in the upper field.
- Enter the recipient's nickname (name to be displayed) in the lower field.
- Select [Send].
An approval request will be sent.
Note that just sending an approval request does not register the contact.

Up to ten approval requests you sent or received can be saved. Registered contacts and approval requests can be saved up to twenty in total. The number of approval requests which can be saved may be altered due to the specification change of CANON iIMAGE GATEWAY.
Approving the received approval request
Perform the approval operation on the Connect Station unit that has received an approval request. For details, see "Approving the received approval request" on page 58.
- When the registration of the contact is complete, albums can be transferred with the registered contact. The registered Email addresses are added to [Contacts] on the smartphone (the "Connect Station", dedicated application) and the Connect Station unit. They can be selected when sending images.
Transferring Images with a Dedicated Application
Sending Images
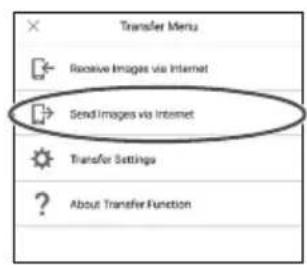
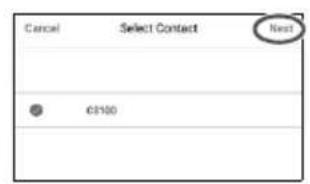
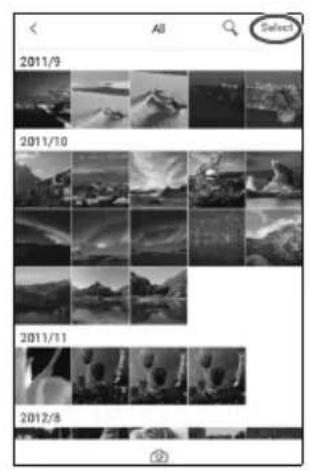
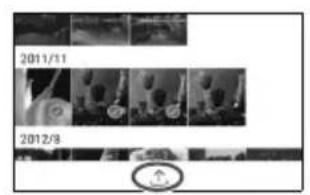
1 Log in to CANON iMAGE GATEWAY.
- Start the "Connect Station" application version 2.0 or later on a smartphone, then log in to CANON iMAGE GATEWAY.
2 Select [Send Images via Internet].
Select a recipient.
- Select a recipient. After selecting a recipient, select [Next].
Select an image to send.
-
Tap on [Select], then select an image to send.
-
When you tap on [O], you can capture and send a still photo immediately.
- When you tap on [□], you can send an entire album (iOS only).

5 Send the image.
- Tap on [向上] to send the image.

Receiving Images
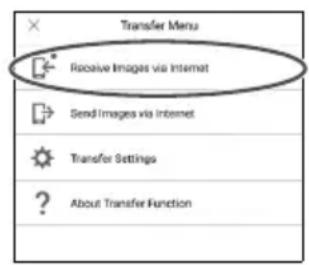
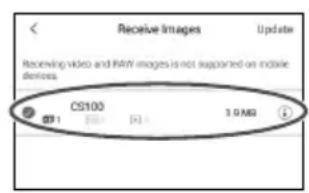

1 Log in to CANON iMAGE GATEWAY.
- Start the "Connect Station" application version 2.0 or later on a smartphone, then log in to CANON iMAGE GATEWAY.
2 Select [Receive Images via Internet].
Receive an image.
-
Select an image to receive.
-
Tap on [↓] to receive the image.

- When you start the "Connect Station" application version 2.0 or later for the first time, instructions for image transfer appear.
- When restarting the "Connect Station" application version 2.0 or later, you do not need to log in to CANON iIMAGE GATEWAY.
Sharing Images via a Web Service
When you select [Send to web service] from the submenu while images are displayed in [Images], you can share the images via CANON iIMAGE GATEWAY or a registered Web service.
- To share images via a Web service other than CANON iIMAGE GATEWAY, access CANON iIMAGE GATEWAY from a computer or other terminal and register the Web service you use.
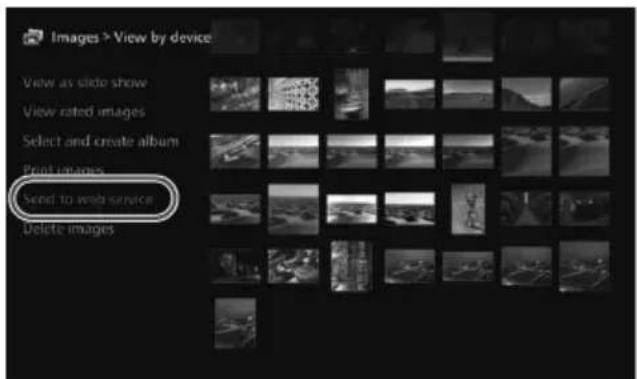
1 Select [Send to web service].
- Display the submenu of [Images] (p.32), then select [Send to web service].
![CANON Connect Station CS100 - Select [Send to web service]. - 1](/content/2026/02/425180/images/ba0a5984e41c25d29e9df5f1dac6f5ed3dadf070281823fdf8126f13e2a1a5b4.jpg)
Select a Web service.
The Web services registered with CANON iIMAGE GATEWAY will be listed.
- Select a Web service, then press
.
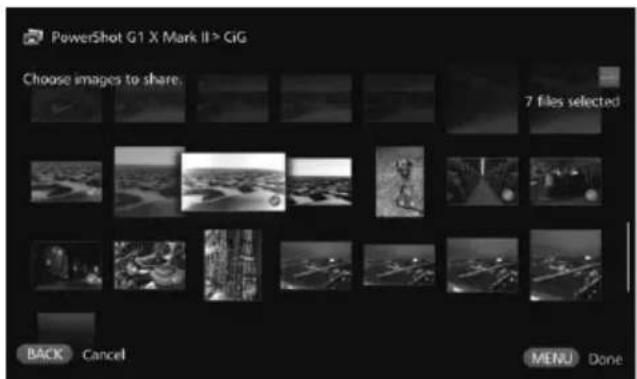
Select images.
- Select images and press
to append [ ] for the images to be shared.
Press
When you are finished with selecting images, press
- When the [Terms of use] screen appears, read its content carefully, and select [Accept].

Checking or Changing Settings
To check or change settings, select [Preferences] on the Home screen.
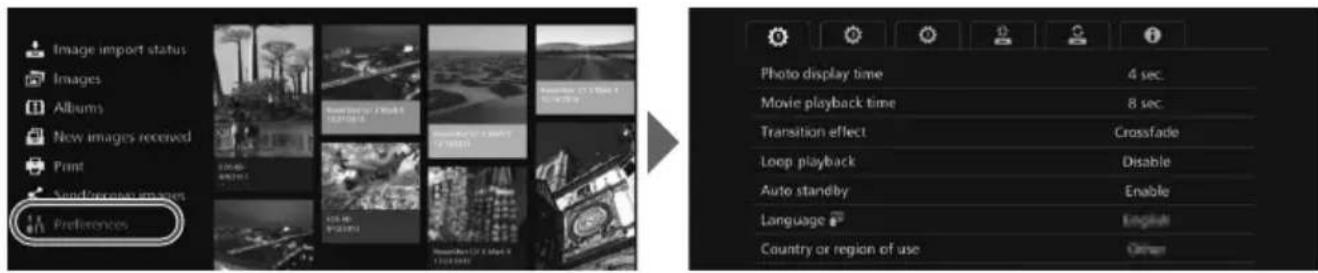
Preferences List
| Menu Items Menu Settings Page | ||
| \(\text{ tab }\) | ||
| Photo display time*1 | 2 sec. / 4 sec. / 6 sec. / 8 sec. - | |
| Movie playback time*1 | 4 sec. / 8 sec. / 16 sec. / All - | |
| Transition effect None / Crossfade - | ||
| Loop playback*2 | Disable / Enable - | |
| Auto standby*3 | Enable / Disable - | |
| Language Select the language to be used. - | ||
| Country or region of use | Select the target country or region. | - |
| \(\text{ tab }\) | ||
| Border settings | Borderless / Bordered | - |
| Date printing settings | Without date / With date | - |
| Printer selection | Set the printer to be connected. | - |
| Background music settings | Off / On | - |
| Background music | Select background music. | - |
| Audio settings | Movie audio / Background music / Movie audio + background music | - |
| Show status | Check the image importing status and transfer status. | 69 |
1 The actual time may not be exact.
2 When [Enable] is set, playback of an album, auto album, or slide show is repeated.
*3 When [Enable] is set, Connect Station will automatically go into standby mode after approx. 30 minutes (p.16).

When [Auto standby] is set to [Disable] and the Connect Station is left for a prolonged period with the same screen displayed on the monitor, screen burn-in may result.
| Menu Items Menu Settings Page | ||
| tab | ||
| Wi-Fi settings Change Wi-Fi settings. 69 | ||
| Network settings Change network settings. - | ||
| Web service account settings | Sign up as a CANON iIMAGE GATEWAY member and set up an account. | 70 |
| Collect device information | Make the settings for the collection of camera/camcorder information. | 70 |
| Collection of device info. | The details about the collection of camera/camcorder information are displayed. | - |
| Set date/time Change the date and time set on Connect Station. - | ||
| Turn off Turn off Connect Station. - | ||
| tab | ||
| LED brightness Bright / Dark - | ||
| Control via HDMI On / Off 71 | ||
| Update firmware | Select to update the firmware. | 71 |
| Initialize settings | Reset Connect Station to its initial settings. | 71 |
| Delete all images on system | Delete all images on Connect Station. | 72 |
| Format system hard disk | Delete all the settings and images on Connect Station. | 72 |
| tab | ||
| Backup | Back up images to an external hard disk. | 73 |
| Restore data | Restore images backed up to an external hard disk. | 74 |
| Format external disk | Format the external hard disk connected to the USB terminal. | 74 |
| tab | ||
| OSS license | Display information on Open Source Software. | - |

Supplementary Information on Preferences
Items in Preferences for which supplementary information is necessary are described below.


Tab
[Show status]
Check the status of the ongoing processing such as image transfer or printing.
![CANON Connect Station CS100 - [Show status] - 1](/content/2026/02/425180/images/b2f51aba763b0017626f1939d9e6b962c88ef92bda21ff1d99d9caccc9ecde13.jpg)
- When you select a processed item with the <> keys and press
![CANON Connect Station CS100 - [Show status] - 2](/content/2026/02/425180/images/ed9ac541ab997f89a28a3d7ada0b86609d45df8bf7b91e4373858c78fd53e7ff.jpg)
![CANON Connect Station CS100 - [Show status] - 3](/content/2026/02/425180/images/be759be6510a737d4de34cf7a33e97a602bae1a39febdd28d1faed0de7af19a6.jpg)
Tab
[Wi-Fi settings]
Change the settings of the connection with the access point. If you do not make the Wi-Fi settings during the initial setting, use this menu to make the settings.
![CANON Connect Station CS100 - [Wi-Fi settings] - 1](/content/2026/02/425180/images/a78724d31e7e320834e52938ef3b513fa5554deb4f59fea218a9da2bf06e3dfc.jpg)
- Select the connection method from the following three options: [Find network], [WPS Push button connection (PBC)], and [WPS (PIN code) connection].
[Web service account settings]
Sign up as a CANON iIMAGE GATEWAY member and set up an account. For information on the setup procedure, see "Signing Up as a Member" (p.53).
[Collect device information]
For the purpose of providing you with information regarding Canon's products and services and of developing products and services that better meet customer needs, Canon requests that the information related to your usage of this product and cameras/camcorders, lenses and accessories that you connect to this product, be regularly transmitted to Canon via the Internet.
Please note that you may still use this product even if you do not agree to the above. And even after you agree, you may choose to discontinue transmission of your information at any time by changing the setting of this product. For details on how transmitted information is treated, please refer to the CANON iIMAGE GATEWAY Privacy Statement.
![CANON Connect Station CS100 - [Collect device information] - 1](/content/2026/02/425180/images/de800f7a0fec8f2672d76d35695e2dddb6edc1498d0f67ec20fb9046e096d1fe.jpg)
This is available when your CANON iIMAGE GATEWAY account is set up on Connect Station.
- When you press
- An HDMI-standard function enabling HDMI devices to control each other so that you can control them with one remote control unit.
- When you operate with the TV's remote controller, the functions of the remote control for Connect Station are assigned as follows:
<》:Power button
[Update firmware]
Update the firmware of Connect Station.
![CANON Connect Station CS100 - [Update firmware] - 1](/content/2026/02/425180/images/d94935a34278a063f8e19e9cc2a7bfd3903ad9fa270725020a43edddde531841.jpg)
- When Connect Station is connected to the Internet and there is firmware to be updated, [0] will be displayed in [Preferences] on the Home screen.
- Under the < tab in the [Preferences] screen shown on the left, select [Update firmware] and press < SET.
- When you press
[Initialize settings]
Delete the settings on Connect Station and restore the settings it had at the time of purchase. When you initialize the settings, the network and printer settings will also be deleted; set them again from the beginning.
![CANON Connect Station CS100 - [Initialize settings] - 1](/content/2026/02/425180/images/ab9dbec59950ccf6efa1aa5100a472998d76186c7151a7265b1e0c3dcc85525a.jpg)
- When you press
- Even if you perform [Initialize settings], the imported images and albums will not be deleted.
![CANON Connect Station CS100 - [Initialize settings] - 2](/content/2026/02/425180/images/99f261afc55e70e5a878e17fa8bef45d80b5d34edd3a1a56e26bf968469ea2b4.jpg)
Certain TV sets, even those compatible with HDMI CEC, may not operate properly. In that case, operate the TV set using the Connect Station remote control.
[Delete all images on system]
Delete all images imported to Connect Station.
![CANON Connect Station CS100 - [Delete all images on system] - 1](/content/2026/02/425180/images/8071a134bfbada96beefd7878991ab07a6843597b30f541e1ecb13ea7ffbfd67.jpg)
- Protected images will not be deleted.
- Once an image is deleted, it cannot be recovered. Backing up images before deleting them is recommended.
- When you press
[Format system hard disk]
Delete all images imported to Connect Station as well as all its settings.
![CANON Connect Station CS100 - [Format system hard disk] - 1](/content/2026/02/425180/images/fa2433a7037267a93a2025bfffa3d66dffdaa83b339616ea2c74d5d3773be9d4.jpg)
- When you press
- The normal formatting cannot delete all the data on Connect Station's hard disk. To delete the data completely, press <SET> to append [] for [Low-level format], then execute formatting.
- When the formatting is complete, Connect Station will restart.
The standard time it takes for formatting is as follows.
Normal formatting: Approx. 1 minute
- Low-level formatting: Approx. 10 hours
![CANON Connect Station CS100 - [Format system hard disk] - 2](/content/2026/02/425180/images/ed683f0981ccdfca246194a580a8b7b006f744cb0806547ae574e1ab703950d0.jpg)
- When you perform [Format system hard disk], all the images imported to Connect Station will be deleted. Even protected images will be deleted, so make sure there is nothing you need to keep. Back up the necessary recorded data before executing formatting.
- When formatting the hard disk to transfer or dispose Connect Station, see "Disposal and Transfer of the Product" (p.9).
- Do not remove or insert a card or USB cable during formatting or firmware update.
- If an error occurs while the system hard disk is formatted, the hard disk may be damaged. In such a case, contact the nearest Canon Service Center.
Backing Up and Restoring Data
Back up (copy) the data on Connect Station, and restore the backup data to Connect Station. To perform the backup- and restore-related operations, use the [ ] tab in [Preferences].
[Backup]
Back up the data on Connect Station to an external hard disk connected to the USB terminal. If the data on Connect Station is corrupted, you cannot view images; backing up the data on a regular basis is recommended.
![CANON Connect Station CS100 - [Backup] - 1](/content/2026/02/425180/images/75af58b715b6565a8fcefd4388302c40fab5eea0b2f8d91f2ada83bbb345f208.jpg)
- When you press
- When you back up data to an external hard disk that is connected for the first time, a screen for initializing the external hard disk appears.
Notes on Backup
Use a self-powered external hard disk with a capacity from 1 to 2 TB.
An external hard disk for backup cannot be used for copying images.
Using new external hard disk is recommended for backup.
- The backup formats the external hard disk, replacing its content with the data of Connect Station. Do not use an external hard disk storing any data you do not want to delete.
- After the backup, the external hard disk may not be recognized even when it is connected to a computer.
- Do not add data to or delete data from the data backed up on an external hard disk, using a computer etc. The data may become impossible to be used for restoring.
[Restore data]
If Connect Station malfunctions or data is lost, you can restore the backup data. Also, you can restore Connect Station to the latest state of back up, in case you accidentally delete the images on Connect Station.
![CANON Connect Station CS100 - [Restore data] - 1](/content/2026/02/425180/images/b973938376308f1205fb0880e6d56678c8c0abf7277ddca1af13987582761b4d.jpg)
- When you press
[Format external disk]
Delete all the data recorded on an external hard disk to format it.
![CANON Connect Station CS100 - [Format external disk] - 1](/content/2026/02/425180/images/3f8dbac0b4fa7f97c8f3a82264c028ec2be63c35b992746304f8dac46faeb027.jpg)
- When you press
Normal formatting: Approx. 4 minutes
- Low-level formatting: Approx. 11 hours and 30 minutes
* When using a hard disk with a capacity of 1 TB.
![CANON Connect Station CS100 - [Format external disk] - 2](/content/2026/02/425180/images/a5b3e3d5f45c73afdfb58b91485ded0b8878c79aa53446b961b54bd2b3554616.jpg)
Notes on Data Restoring
When restoring data, execute data restoring before importing any images. All images imported before restoring will be deleted.
Troubleshooting Guide
If a problem occurs, first refer to this Troubleshooting Guide. If this Troubleshooting Guide does not resolve the problem, contact the nearest Canon Service Center.
Power-Related Problems
The power cannot be turned on.
- Connect the power cord firmly to the AC adapter unit and power outlet (p.15).
- Insert the DC plug of the AC adapter to Connect Station firmly.
The power is turned on or off by the TV set's remote control.
- If you set [Control via HDMI] to [Off] under the [Preferences: ] tab, Connect Station will no longer respond to the TV set's remote control (p.71).
The power cannot be turned off even when the power button on Connect Station is pressed.
- You may not be able to turn off the power in such cases as when the firmware is being updated. Wait a while before turning off the power.
Connect Station gets hot.
- Connect Station may get hot during use, but this is not a malfunction.
The cooling fan and built-in hard disk are always running.
The cooling fan and built-in hard disk are running even in the standby state, but this is not a malfunction.
The power to Connect Station is turned off.
- If Connect Station becomes hot, its safety mechanism may turn off the power. If dust has accumulated on the inlet or outlet for internal cooling, remove it.
Wait a while for Connect Station to cool down before resuming its use.
Importing Images
It takes time to recognize the card or a camera/camcorder connected.
It may take approx. one minute to recognize the card or a camera/camcorder connected to the USB terminal.
Images are not imported.
Images that have already been imported to Connect Station are not imported.
- If new images are not imported, remove the card or disconnect the device connected to the USB terminal, then restart Connect Station. After Connect Station is started, import images again.
In the case of the NFC function or Wi-Fi function, check that the function is set properly (p.22).
- Check whether the file format of the image you want to import is compatible with Connect Station (p.21).
- If the same image is recorded on multiple recording media within a camera supporting multiple cards or a camcorder equipped with built-in memory, only one image will be recorded to Connect Station. As a result, the number of transferred images displayed on the camera/camcorder may be different from the number of images saved to Connect Station.
- If there are any destroyed image files among the data to be downloaded, downloading images may not be completed. Delete the destroyed image files before downloading.
Images cannot be copied to an external hard disk.
- Check that an USB cable is connected to the external hard disk.
- If Connect Station and the external hard disk are connected before Connect Station starts, the external hard disk cannot be recognized. Connect the external hard disk after Connect Station starts.
It takes time to import images via a wireless LAN.
- If the total size of the image files to be imported is large, the import takes time.
If you are using a camera/camcorder, put it as close to Connect Station as possible.
If you are using a smartphone, put it as close to the access point as possible. - If multiple devices are connected via a wireless LAN at the access point, the target device may not be able to connect. For details, refer to the access point's instruction manual.
- If a microwave oven, Bluetooth device, or other device that uses the 2.4 GHz band is used nearby, put it far away or turn off its power.
Viewing on a TV Set
Connect Station's screen does not appear on the TV screen.
Make sure that the HDMI cable's plug is inserted all the way in (p.14).
- On the TV screen, select the TV's video input to which Connect Station is connected.
Movies with a resolution exceeding 1920x1080 cannot be played back.
Movies with a resolution exceeding 1920 × 1080 cannot be played back.
Movies are not played back smoothly.
In some movies, the movement of the subject may not be played back smoothly.
- When Connect Station performs another operation while playing back a movie, the movie may not be played back smoothly.
Operation became disabled.
Hold down the power button for 2 sec. or longer to turn off the power, then turn on the power again.
It takes time to play back images.
It may take some time to play back images edited with a computer, etc.
NFC Function and Wireless LAN
Connect Station does not respond when I hold a camera/camcorder, smartphone, etc. close to its NFC connect point.
- Check the location of on the camera/camcorder, or the location of the NFC antenna of the smartphone or tablet.
- When Connect Station gives three short beeps and the power lamp blinks in red, make sure the NFC function and Wi-Fi function are correctly set on Connect Station, the camera/camcorder, smartphone, etc. (p.22, 41).
- Make sure the smartphone or tablet is compatible with NFC function.
To find out whether the camera/camcorder is compatible with Connect Station's NFC function, contact the nearest Canon Service Center.
Connect Station cannot connect to the access point.
Make sure the power to the access point is on.
- If you cannot connect to the access point now although you were able to connect before, turn off and on Connect Station, the smartphone, tablet, printer, access point, etc. If Connect Station is away from the access point, put it closer.
- If a microwave oven, Bluetooth device, or other device that uses the 2.4 GHz band is used nearby, put it far away or turn off its power.
Connect Station cannot be connected directly to a smartphone or tablet.
- A smartphone or tablet cannot be connected directly to Connect Station. Connect it via an access point (p.41).
Transferring Images
You don't receive the Email from CANON iIMAGE GATEWAY when newly signing up as a member.
- There may be cases that you cannot receive Emails from CANON iIMAGE GATEWAY when your Email is set not to accept Emails from certain domains, etc. Refer to the Help in CANON iIMAGE GATEWAY site (http://www.canon.com/cig) for the details of Email settings.
Printing
Images cannot be printed.
Make sure the power to the printer, access point, router, etc. is on.
Make sure there is no error displayed on the printer.
Make sure the printer is connected to the same access point or router as Connect Station.
Copying Images to a Card
Images cannot be copied to a card.
- Check if a CF card or SDXC card is inserted (p.33).
- Slide the SDXC card's write-protect switch to the Write/Erase position.
- Check the remaining capacity of the card.
Error Messages
An error related to Connect Station appears on the TV screen.
- Do as instructed in the error message. If you are unsure how to handle the problem, write down the error message, and contact the nearest Canon Service Center.
Backup and Restoring
Data cannot be backed up.
Use a self-powered external hard disk with a capacity from 1 to 2 TB.
An external hard disk for backup cannot be used for copying images.
Using new external hard disk is recommended for backup.
Images are gone after I restore data.
- When you restore data, images that are not backed up are deleted.
Blinking of Lamps
All the lamps are blinking.
The firmware is being updated (p.71). The lamps stop blinking when the update is complete.
An error message appears during firmware update.
- Under the [Preferences: ] tab, select [Update firmware] to update the firmware again (p.71). If error message remains after updating the firmware again, contact the nearest Canon Service Center.
Specifications
Built-in Hard Disk
Capacity
1 TB
- Since part of the disk space is used by the system, the indicated capacity is less than 1 TB.
Wireless LAN
- Standards compliance
IEEE802.11b/g/n
Transmission method
DS-SS modulation (IEEE 802.11b)
OFDM modulation (IEEE 802.11g / n)
Transmission range
Approx. 15m /49.2 ft.
- With no obstructions between the transmitting and receiving antennas and no radio interference
Transmission frequency
(Center frequency)
Frequency: 2412 - 2462 MHz
Channel: 1 - 11
Security
WEP, WPA-PSK (TKIP), WPA-PSK (AES),
WPA2-PSK (TKIP), WPA2-PSK (AES)
Wired LAN
- Ethernet
10BASE-T, 100BASE-TX,
1000BASE-T
Interface
USB
Hi-Speed USB equivalent
HDMI OUT
Type A, CEC-compatible
Card slot
CF card slot, SD memory card slot
-
Supported cards: CF card (Type I or II compatible), SD memory card, SDHC memory card, SDXC memory card (UHS-I not compatible)
-
The CFast card is not supported.
Formats That Can Be Played Back
Still Photos
JPEG, RAW (CR2 only)
Movies
MP4, MOV, AVCHD
(Full HD, HD, and VGA (SD) recording quality)
Dimensions and Weight
- Dimensions (W x H x D)
Approx. 155.6 × 51.1 × 155.6 mm / 6.13 × 2.01 × 6.13 in. (including projecting portions)
Weight
Approx. 570g / 20.11 oz. (body only, excluding the card slot cover)
Operation Environment
Working temperature range and humidity
0^ - 35^ / 32^ - 95^, 20% - 85% RH
(no dew condensation allowed)
Power Consumption
Power on / standby / power off
Max. 10 W / 9.5 W / 0.5 W
Remote Control
Remote Control (CS-RC1)
Transmission range
Approx. 10m /32.8 ft.
- Reception angle (for Connect Station)
Up/down/left/right: 25^ in each direction
- Dimensions (W x H x D)
Approx. 41.3 × 15.1 × 125.5 ~mm / 1.63 × 0.59 × 4.94 in.
Weight
Approx. 42g / 1.48 oz.(excluding
batteries)
AC Adapter
AC Adapter (CA-PS700)
- Rated input
100 - 240 V AC (50/60 Hz)
- Rated output
7.4 V DC / 2 A
DC cord
Approx. 1.8m / 5.9 ft.
- Dimensions (W x H x D)
Approx. 112.0 × 29.0 × 45.0 ~mm / 4.4 × 1.1 ×
1.8 in. (excluding power cord)
Weight
Approx. 185g / 6.53 oz. (excluding power cord)
All preceding specifications are based on Canon testing standards.
- Product specifications and the exterior are subject to change without notice.
Wi-Fi (Wireless LAN) / NFC Precautions
Model: CS100 systems
This device complies with Part 15 of the FCC Rules. Operation is subject to the following two conditions: (1) This device may not cause harmful interference, and (2) this device must accept any interference received, including interference that may cause undesired operation.
Note: This equipment has been tested and found to comply with the limits for class B digital devices, pursuant to Part 15 of the FCC Rules. These limits are designed to provide reasonable protection against harmful interference in a residential installation. This equipment generates, uses and can radiate radio frequency energy and, if not installed and used in accordance with the instructions, may cause harmful interference to radio communications. However, there is no guarantee that interference will not occur in a particular installation. If this equipment does cause harmful interference to radio or television reception, which can be determined by turning the equipment off and on, the user is encouraged to try to correct the interference by one or more of the following measures:
Reorient or relocate the receiving antenna.
Increase the separation between the equipment and receiver.
Connect the equipment into an outlet on a circuit different from that to which the receiver is connected.
Consult the dealer or an experienced radio/TV technician for help.
The cable with the ferrite core provided with this device must be used with this equipment in order to comply with Class B limits in Subpart B of Part 15 of the FCC rules.
Do not make any changes or modifications to the equipment unless otherwise specified in the manual. If such changes or modifications should be made, you could be required to stop operation of the equipment.
Canon U.S.A. Inc.
One Canon Park, Melville, NY 11747, U.S.A. Tel No. 1-800-OK-CANON (1-800-652-2666)
CANICES-3(B)/NMB-3(B)
Countries and Regions Permitting wireless LAN/NFC Use
Use of wireless LAN/NFC is restricted in some countries and regions, and illegal use may be punishable under national or local regulations. To avoid violating wireless LAN/ NFC regulations, contact the nearest Canon Service Center.
Note that Canon cannot be held liable for any problems arising from wireless LAN/NFC use in other countries and regions.
Model Number
CS100:DS586021
(including WLAN module model: AW-NU173)
(including NFC module model: CH9-1372)
FCC/IC NOTICE
Model: CS100 (including WLAN Module Model AW-NU173, FCC ID: VUI-CMST173/ IC: 7582A-CMST173, NFC module model: CH9-1372 FCC ID: AZD226/ IC: 498J-226)
This device complies with Part 15 of FCC Rules and Industry Canada's licence-exempt RSSs. Operation is subject to the following two conditions: (1) this device may not cause harmful interference, and (2) this device must accept any interference received, including interference that may cause undesired operation.
This transmitter must not be co-located or operated in conjunction with any other antenna or transmitter except Canon accessories supplied or designated for this product.
This equipment complies with FCC/IC radiation exposure limits set forth for an uncontrolled environment and meets the FCC radio frequency (RF) Exposure Guidelines and RSS-102 of the IC radio frequency (RF) Exposure rules. This equipment should be installed and operated keeping the radiator at least 20cm or more away from person's body.
Hereby, Canon Inc., declares that this CS100, CH9-1372 is in compliance with the essential requirements and other relevant provisions of Directive 1999/5/EC.
Please contact the following address for the original Declaration of Conformity: CANON EUROPA N.V.
Bovenkerkerweg 59,1185 XB Amstelveen, The Netherlands CANON INC.
30-2, Shimomaruko 3-chome, Ohta-ku, Tokyo 146-8501, Japan

Use of Wireless LAN
- According to foreign exchange and foreign trade law regulations, export permission (or service transaction permission) from the Japanese government is necessary to export strategic resources or services (including this product) outside Japan.
- Because this product includes American encryption software, it falls under U.S. Export Administration Regulations, and cannot be exported to or brought into a country under U.S. trade embargo.
- Be sure to make notes of the wireless LAN settings you use.
The wireless LAN settings saved to this product may change or be erased due to incorrect operation of the product, the effects of radio waves or static electricity, or accident or malfunction. Be sure to make notes of wireless LAN settings as a precaution. Note that Canon accepts no responsibility for direct or indirect damages or loss of earnings resulting from a degradation or disappearance of content.
-
Canon will not make compensation for damages resulting from loss or theft of the product.
-
Canon accepts no responsibility for damages or loss resulting from unauthorized access or use of target devices registered on this product due to loss or theft of the product.
-
Be sure to use the product as directed in this manual.
Be sure to use the wireless LAN function of this product according to the guidelines noted in this manual. Canon accepts no responsibility for damages or loss if the function and product are used in ways other than as described in this manual.
To turn off the wireless LAN, turn off Connect Station.
Security Precautions
Because a wireless LAN uses radio waves to transmit signals, security precautions more stringent than when using a LAN cable are required.
Keep the following points in mind when using a wireless LAN.
- Only use networks you are authorized to use.
This product searches for wireless LAN networks in the vicinity and displays the results on the screen. Networks you are not authorized to use (unknown networks) may also be displayed. However, attempting to connect to or using such networks could be regarded as unauthorized access. Be sure to use only networks you are authorized to use, and do not attempt to connect to other unknown networks.
If security settings have not been properly set, the following problems may occur.
Transmission monitoring
Third parties with malicious intent may monitor the wireless LAN transmissions and attempt to acquire the data you are sending.
Unauthorized network access
Third parties with malicious intent may gain unauthorized access to the network you are using to steal, modify, or destroy information. Additionally, you could fall victim to other types of unauthorized access such as impersonation (where someone assumes an identity to gain access to unauthorized information) or springboard attacks (where someone gains unauthorized access to your network as a springboard to cover their tracks when infiltrating other systems).
To prevent these types of problems from occurring, be sure to thoroughly secure your wireless LAN network.
Only use this product's wireless LAN function with a proper understanding of the wireless LAN security, and balance risk and convenience when adjusting security settings.
Complies with IMDA Standards DB00671
Only for European Union and EEA (Norway, Iceland and Liechtenstein)
These symbols indicate that this product is not to be disposed of with your household waste, according to the WEEE Directive (2012/19/EU), the Battery Directive (2006/66/EC) and/or national legislation implementing those Directives.
If a chemical symbol is printed beneath the symbol shown above, in accordance with the Battery Directive, this indicates that a heavy metal (Hg = Mercury, Cd = Cadmium, Pb = Lead) is present in this battery or accumulator at a concentration above an applicable threshold specified in the Battery Directive.
This product should be handed over to a designated collection point, e.g., on an authorized one-for-one basis when you buy a new similar product or to an authorized collection site for recycling waste electrical and electronic equipment (EEE) and batteries and accumulators. Improper handling of this type of waste could have a possible impact on the environment and human health due to potentially hazardous substances that are generally associated with EEE. Your cooperation in the correct disposal of this product will contribute to the effective usage of natural resources.
For more information about the recycling of this product, please contact your local city office, waste authority, approved scheme or your household waste disposal service or visit www.canon-europe.com/wee or www.canoneurope.com/battery.
For CA, USA only
Included lithium battery contains Perchlorate Material - special handling may apply. See www.dtsc.ca.gov/hazardouswaste/perchlorate/ for details.
Trademarks
SDXC logo is a trademark of SD-3C, LLC.
HDMI, the HDMI logo and High-Definition Multimedia Interface are trademarks or registered trademarks of HDMI Licensing LLC in the United States and other countries.
-
The Wi-Fi CERTIFIED Logo and the Wi-Fi Protected Setup Mark are certification marks of the Wi-Fi Alliance.
-
WPS used on Connect Station settings screens and in this manual stands for Wi-Fi Protected Setup.
-
The N-Mark is a trademark or registered trademark of NFC Forum, Inc. in the United States and in other countries.
Manufactured under license from Dolby Laboratories. Dolby and the double-D symbol are trademarks of Dolby Laboratories.
All other trademarks are the property of their respective owners.

Index
A
AC Adapter 11, 12
Access lamp 10,24,25,27
Access point name 19
Account. 54, 55, 70
Album 35, 36, 37
Adding. 32
Comment 48
Creating 30, 35
Creating automatically 35
Deleting. 37
Editing 37
List 35,44,58
Receiving 59
Removing. 37
Sending. 59,60
Title 48
Viewing 35, 36, 44
Approval request 56
Authentication code 55
B
Background music. 36, 38, 67
Backup. 3, 13, 73
Battery compartment 11, 14
C
Camera/camcorder
information collection. 70
CANON iMAGE GATEWAY 53
Account 54, 55, 70
Online album. 53
Signing up (Registering) as a member...53
Card. 9, 12, 13, 23
Copying. 33, 37
Importing images 24
Inserting 24
Removing. 24
Slot. 10
Classify images Rating
Comment 48
Computer. 12, 13, 41
Connect Station. 49
Connection diagram 12
Contacts 56, 60
Copy all images 33
D
Data restoring Restoring
Date/Time 18,68
Delete all images. 33
E
Encryption key 19
Erase 30,32,33,38,72
Error. 17, 28, 77
External hard disk. 12, 13, 73
Formatting. 74
F
Find network 19, 69
Firmware. 71
Flick 44
Format system hard disk. 72
H
HDMI 13, 14
Cable. 12, 13
Device control (HDMI CEC) 71
Terminal 10
Home screen 20
1
Imageimportingstatus. 26,28
Image list 31
Initial setting. 17
Initialize settings 71
Interface cable 12, 13, 25
IP address 43
L
LAN. 13, 16
Cable. 12, 13
Terminal 10
Language. 17, 67
Log in. 42, 43
Log out. 48
Low-level format 72, 74
M
Music 36, 38, 67
N
(N-Mark). 22, 41
New image notification lamp. 10, 27, 29
New images. 29, 60
NFC 22,41
Connect point. 10, 22, 42
P
Password Encryption key
PictBridge 13, 39
Playback settings 30, 36, 38, 48
Power. 12, 16
Button 10, 11, 15, 16
Lamp 10, 15, 17
Terminal 10
Preferences. 67
Print. 32, 38, 39
Settings 39
Printer 12, 13, 39
Processing status. 27, 28, 69
Properties 48
Protect. 38
R
Rating 32, 38
Remote control. 11, 14
Restoring. 74
Rotate 30, 32, 38
Router 12, 13, 16
s
Sharing 66
Shooting information 38
Shooting month 31
Slide show. 30, 32, 36, 38, 44, 48
Smartphone 12, 13, 41
SSID Access point name
Standby state 16
Status. 48
T
Tablet 12, 13, 41
Tap. 44
Thumbnail 29,31,36,44
Transferring images. 52
Transition effect 48, 67
U
Upload 45, 48
USB 13
Cable 12, 13
Terminal 10, 25
V
Viewing images by
camera/camcorder model used 31
W
Web browser. 41
Web service 12, 53, 66
Wi-Fi lamp. 10, 22, 27
Wired connection 25
Wired LAN. 16
Wireless connection. 22
WPS. 18, 69
Personal identification number (PIN)
mode 69
Push button connection (PBC)
mode 18,69
Canon
-
The descriptions in this Instruction Manual are current as of February 2017. For information on the compatibility with any products introduced after this date, contact any Canon Service Center.
-
Interface or functions of this product are subject to change for product improvement or firmware update. In such a case, sample screens or operation instructions in this manual may differ from the screens or operations on the actual product.
For the Instruction Manual reflecting the improvement or firmware update, refer to Canon Web site.
Connect Station CS100
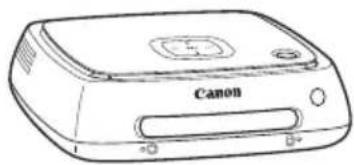
Connect Station CS100
Appareil photo/camscope Canon compatible NFC (p. 22)
Adaptatour CA (p. 15)
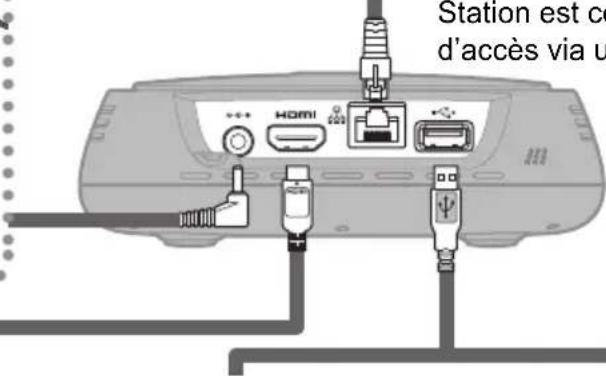
(Cable HDMI) (Cable USB) (Cable d'interface)
Téléviseur (p. 14)

Appareil photo/camscope Canon (p. 25)
