A 571 CD - Hi-Fi System Noxon - Free user manual and instructions
Find the device manual for free A 571 CD Noxon in PDF.

| Product Type | Hi-Fi system with Internet radio, DAB+/FM, Bluetooth, USB, CD player |
| Brand | Noxon |
| Model | A 571 CD |
| Dimensions (W x H x D) | 430 mm x 68 mm x 303 mm |
| Weight | 2.9 kg |
| Power Supply | External power adapter: input 100-240 V AC, output 5 V DC / 2 A |
| Standby Power Consumption | < 1 W (without network connection); < 2 W (with network connection) |
| Display | 3.2-inch TFT color screen (320 x 240 pixels) |
| Network Connectivity | Wi-Fi IEEE 802.11 a/b/g/n (2.4 and 5 GHz bands), Ethernet (RJ45), WPS |
| Bluetooth | Bluetooth V5.2 (A2DP, AVRCP profiles) |
| Radio Reception | DAB/DAB+ (Band III: 174.928 - 239.200 MHz); FM (87.5 - 108.0 MHz) with RDS |
| CD Player | Compatible with CD-DA, CD-R, CD-RW; MP3 and WMA formats (up to 48 kHz/384 kbps) |
| USB Port | Play MP3 files from a USB flash drive |
| Audio Outputs | RCA line output (stereo), optical output, coaxial output, headphone jack (3.5 mm) |
| Main Functions | Internet radio, Spotify Connect, USB, DAB+, FM, Bluetooth, CD, 40 presets, dual alarm, sleep timer, UNDOK app |
| Equalizer | Presets: Normal, Flat, Jazz, Rock, Movie, Classic, Pop, News; Customizable EQ |
| Remote Control | Infrared remote control with dedicated buttons; power: 2 AAA/LR03 batteries |
| Care and Cleaning | Use a dry, soft cloth; do not use corrosive solvents |
| Safety | Laser class 1; use only the provided adapter; avoid moisture and heat sources |
| Spare Parts and Repairability | Contact Noxon customer service for spare parts; do not disassemble yourself |
| General Information | Manufacturer: Palotec AG, Zofingen, Switzerland; made in China |
Frequently Asked Questions - A 571 CD Noxon
User questions about A 571 CD Noxon
0 question about this device. Answer the ones you know or ask your own.
Ask a new question about this device
Download the instructions for your Hi-Fi System in PDF format for free! Find your manual A 571 CD - Noxon and take your electronic device back in hand. On this page are published all the documents necessary for the use of your device. A 571 CD by Noxon.
USER MANUAL A 571 CD Noxon
7.1 Internetradio, Podcasts
http://www.spotify.com/connect/third-party-licenses
7.3 USB
6.1 Connection and Preparation 6
6.2 General Device Functions 6
6.3 First-time Setup 7
7 Menu Operation. 8
7.1 Internet Radio, Podcasts 8
7.2 Spotify Connect 8
7.3 USB 8
7.4 DAB + Radio 9
7.5 FM Radio 9
7.6 Bluetooth 9
7.7 CD 10
7.8 Sleep 12
7.9 Alarm 12
7.10 UNDOK 12
8 System Settings 13
8.1 Equaliser 13
8.2 Streaming Audio Quality 13
8.3 Network 13
8.4 Time/Date 13
8.5 Language 13
8.6 Factory Reset. 13
8.7 Software Update 14
8.8 Setup Wizard 14
8.9 Info 14
8.10 Backlight 14
9 Troubleshooting 15
10 Technical Specifications 17
11 Conformity. 18
12 Trademarks 18
1 Introduction
Thank you very much for buying the A571 CD. To let you freely operate the product and fully enjoy the overbalancing happiness it brings you, we have introduced each product function in detail in this user manual. Please carefully read this user manual before use and keep it for future reference. If you pass the smart radio on to someone else, make sure to give them all the relevant documents with it.
2 Package Contents
The items enclosed in the packaging box are as follows:
Noxon A571 CD
Remote Control
Power Adaptor
RCA audio cable
FM/DAB+ antenna
WiFi/BT antenna
User Manual
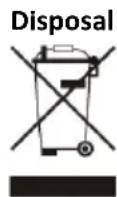
3 Disposal
- If you must dispose of the device in the future, note that all electrical and electronic devices must be disposed of separately from household waste at official disposal centres.
- Avoid damage to the environment and risks to your health by disposing of the device properly.
- For further information about proper disposal, contact your local government, disposal bodies, or the shop where you bought the device.
- Dispose of all packaging in an environmentally-friendly manner.
- Cardboard packaging can be taken to paper recycling containers or public collection points for recycling.
- Any film or plastic contained in the packaging should be taken to your public collection points for disposal.
- Respect the environment. Old batteries must not be disposed of with domestic waste. They must be handed in at a collection point for old batteries. Please note that batteries must be fully discharged before disposal at appropriate collection points for old batteries. If the batteries are not fully discharged before disposal, take precautions to prevent short circuits.
4 Safety
General
- Do not drop the device or expose it to any liquid, moisture, or humidity. These might lead to damage to the device.
- If the device is moved from a cold environment into a warmer one, please let it adapt to the new temperature before operating it. Otherwise, it might lead to condensation and cause malfunctions in the device.
- Do not use the device in dusty environments, as dust can damage the interior electronic components and lead to malfunctions in the device.
- Protect the device from strong vibrations and place it on stable surfaces.
- Do not attempt to disassemble the device.
- If the device is not used for a long period of time, disconnect it from the power supply by unplugging the power plug. This is to avoid the risk of fire.
- The ventilation should not be impeded by covering the ventilation openings with items such as newspapers, tablecloths, and curtains.
No naked flame sources, such as lighted candles, should be placed on the apparatus. - To maintain the compliance with the WiFi RF exposure requirement, place the product at least 20cm (8 inches) from nearby persons except when operating the controls.
Compact discs
- Use only Digital Audio CDs which have the symbol

DO NOT USE THESE TYPES OF DISCS:
- Mini (8cm) CDs. Use only full-size 12cm discs. Mini CDs will jam the feed mechanism.
- Discs which do not have a complete metallic reflection layer. Discs with a large transparent section will not be detected and may fail to play or eject.
-
Discs which are extra thin or flexible. Such discs may fail to feed in or out correctly and may jam the CD mechanism.
-
Never write on a CD or attach any sticker to the CD. Always hold the CD at the edge and store it in its box after use with the label facing up.
- To remove dust and dirt, blow on the CD and wipe it with a soft, lint free cloth in a straight line from the centre towards the edge.
- Cleaning agents may damage the CD.
- Do not expose the CD to rain, moisture, sand, or to excessive heat. (e.g. from heating equipment or in motor cars parked in the sun).
- The CD player uses an invisible laser beam. If used incorrectly, this can injure your eyes. Never look directly into the open CD compartment.
This devices has been classified as CLASS 1 LASER. The corresponding sticker (CLASS 1 LASER PRODUCT) is on the rear of the device.
Power adapter
- Only use the power adaptor delivered with the device.
- The socket outlet should be installed near the device and should be easily accessible.
- Never touch the power plug with wet hands and never pull on the power cable when pulling the plug out of the power socket.
- Make sure the electrical voltage specified on the device and its power plug is corresponding to the voltage of the power socket. An incorrect voltage will destroy the device.

Risks associated with high volumes
- Listen to the device with headphones. Always reduce the volume before putting on the headphones. After the headphones are positioned properly, increase the volume to the desired level.
- To prevent possible hearing damage, do not listen at high volume for long periods.
Maintenance/Cleaning
Always power off the device before cleaning it.
- Never use any harsh or strong solvents to clean the device since these may damage the surface of the device. A dry, soft cloth is appropriate. However, if the device is extremely dirty, it may be wiped off with a slightly moist cloth. Make sure the device is dried off after cleaning.
- When you ship the device, store it in its original package. Save the package for this purpose.
5 Overview
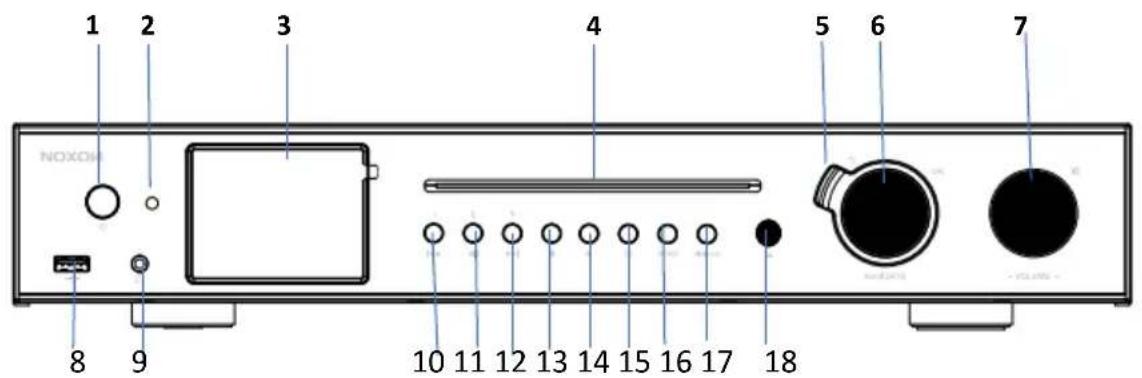
Main Unit: Front
1 Power On/Standalone button
2 Remote control IR receiver
3 3.2" TFT colour display
4 CD player slot
5 Back button
6 Reel: Navigate; Ok/Select
7 Reel: Volume; short press to mute
8 USB port for music playback
9 Earphone jack
10 Previous/Rewind; Preset 1
11 Play/Pause; Preset 2
12 NEXT/FAST FORWARD; Preset 3
13 STOP
14 FAV button
15 Alarm button
16 Mode button
17 Menu/Info button
18 Eject
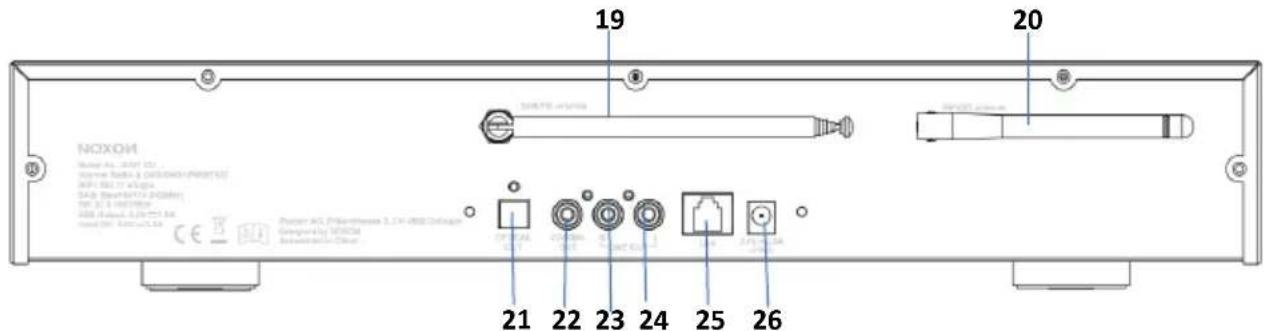
Main Unit: Back
19 DAB+/FM Antenna
20WiFi/BT Antenna
21 OPTICAL Out socket
22 COAXIAL Out socket
23 RCA LINE Out-R socket
24 RCA LINE Out-L socket
25 LAN Port
26 DC In power supply
Remote Control
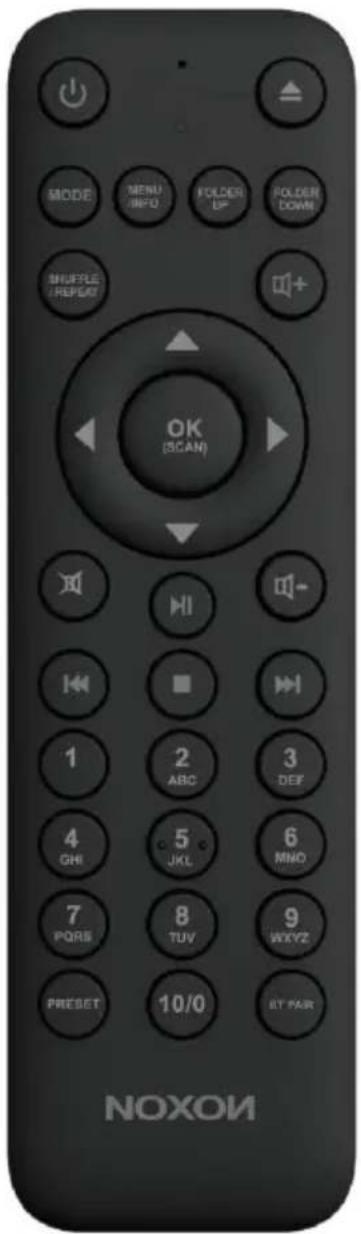
| ○ | Device power on/off; alarm off |
| ▲ | Eject the CD |
| MODE | Open/Close mode selection |
| MENU/INFO | Display FM mode info (Name, PTY, RT, frequency) Display DAB mode info (Station, track, artist, etc.) Display CD/USB mode info (Track, artist, etc.) Press and hold to open/close menu |
| FOLDER UP | Move up the folder for CD |
| FOLDER DOWN | Move down the folder for CD |
| SHUFFLE/REPEAT | Music: random/repeat selection |
| ▲ | Move up; FM: Set frequency |
| ▲ | Move left; step back |
| OK (SCAN) | Confirm entry; FM: Scan; Playing: album in full screen |
| ▲ | Move right; step next |
| ▼ | Move down; FM: Set frequency |
| + | Increase volume |
| - | Decrease volume |
| × | Mute/Unmute |
| × | Select track; hold to scan down |
| ■ | Stop |
| || | Start playback; pause |
| || | Select track; hold to scan up |
| 1-10/0 | Number buttons: retrieve saved favourite stations; hold down to save the station |
| Preset | Select favourite stations |
| BT PAIR | Press and hold to BT discoverable under BT mode |
6 Getting Started
6.1 Connection and Preparation
Connect the power adaptor to the back of the device and plug it into the power socket. Switch on the device, and then it starts up.
Install the telescopic FM/DAB+ antenna for DAB and FM reception.
Install the rod WiFi antenna for WiFi reception.
Connecting to the network
For wired Ethernet
- Use an Ethernet cable (RJ45 jack) to connect the LAN ports on A571 CD and your network device. Check if the light indicators on the network device are in appropriate status.
For wireless WiFi
- A broadband connection in combination with a wireless access point, router, or similar network device.
The network device needs to support WiFi (802.11 b/g/n) wireless connection.
Make sure you have set up the wireless network, and you have the WEP, WPA, or WPA2 security password to activate the connection. You may also use the WPS (Wi-Fi Protected Setup) function for easy pairing between the network device and A571. Check if the light indicators on the network device are in appropriate status.
Connecting the RCA line out
Use a standard RCA audio cable to connect from the line out socket on the back of the device to the external device.
Connecting the Coaxial out
It allows you to connect an audio cable from A571 to your own HiFi speaker system to enhance sound performance.
Connecting the Optical out
It allows you to connect an optical cable from A571 to your own HiFi speaker system to enhance sound performance.
6.2 General Device Functions
On the playing screen, rotate the volume knob or press on the remote control to adjust the
volume. Switch off the sound by pressing on the remote control or device.
Press MODE on the device or MODE on the remote control to select modes.
Press and hold MENU on the device or MENU on the remote control to open the menu. Press MENU again to close the menu and return to the playing screen.
On the menu, rotate the knob or press on the remote control to move along the entries.
Press OK to confirm; press BACK on the device or on the remote control to step back.
Press on the device or on the remote control to switch to standby mode. The time, date, and any active alarm times are displayed on the screen. Switch on with the same button.
When the album cover is displayed on the playing screen, press OK to view the full-screen size of the picture. (This feature may need a software update. Contact us if required.)
Presets
Presets are stored in the radio and cannot be accessed from other radios.
To store an Internet radio preset, press and hold FAV on the device or Preset on the remote control. The display shows the Save to preset screen. Select one of the 40 presets to save the currently playing station.
Shortcut to preset store 1-10 favourite stations by directly pressing numbers on the device or remote control.
To select a preset, press FAV on the device or Preset on the remote control, then select one of the listed preset stations. When a preset station is playing, it shows n ( 1 , 2 , etc.) at the bottom of the screen.
Shortcut to preset recall 1-40 favourite stations by directly pressing numbers on the remote control or press Combined number under 40.
Now playing information
While stream/DAB/FM is playing, the screen shows information about the station. Press INFO on the device or INFO on the remote control to view.
The device may process a large amount of data after a period of operation. No matter in which mode, it will cause the system to freeze or malfunction.
Reboot the device if necessary.
6.3 First-time Setup
When powering on the device for the first time, it displays privacy policy information. Press OK to continue. Then a setup wizard appears to help you set up the device's main use.
Select "YES" to confirm your selection and launch the setup wizard.
If you select "NO", the next window will ask you choose if you want to start the setup wizard again next time you power the device on.
The setup wizard helps you to set up the main use of the device.
Selecting the menu language - Rotate the knob to select the menu language you want from the list and press OK to confirm.
Setting date and time - Select "12" for 12-hour display format or "24" for 24-hour display format. If you select the 12-hour format, the display shows "AM" in the morning or "PM" in the afternoon after the time.
After this, the following options are available to define the time to be synchronised from radios: Update from DAB, Update from FM, Update from Network, or No update
If you choose "Update from Network" you must indicate your time zone in the next window.
Next choose "ON" for summer time, otherwise select "OFF".
If you choose "No update", you will have to enter the date and time manually.
"AM"/"PM" displays only if you have chosen the 12-hour time format. Select "AM" for the morning hours or "PM" for the afternoon hours.
Setting network - First, the device asks whether to keep the network connected. If you want to control the device in all operating modes via the app, select "YES". If you choose "NO", it is impossible to control the device from the app in the (Standby, AUX-IN, FM, and DAB) operating modes. Note that the power consumption in standby mode will be higher when the network connection is kept up.
Any WLAN networks found are listed on the display, along with their names. For wired Ethernet, select [Wired].
After selecting the WLAN/network, you will be asked to input standard encryption. To enter the network's key, use the reel or direction keys on the remote control to move the cursor through the characters and press OK to confirm. As each character is selected, the key is built up near the top of the display.
Three options are accessible by tuning the navigate reel back before the first characters - Backspace, OK, and Cancel.
[WPS] There will be hints for the type of network if your network device supports the WPS function. Use one of the following methods of connection:
o Push button: The device prompts you to press the connect button on the router. It then scans for a ready Push Button Connect network and connects.
o Pin: The device generates an 8-digit code number which you enter into the wireless router, access point, or an external registrar.
o Skip WPS: Enter key as for a standard encrypted network.
For more information on setting up a WPS encrypted network, see your WPS router's instructions.
Device attempts to connect to the selected network.
It will show connected if the setup is successful. If connecting fails, it returns to a previous screen to try again. Once completed, press OK to quit the setup wizard.
7 Menu Operation
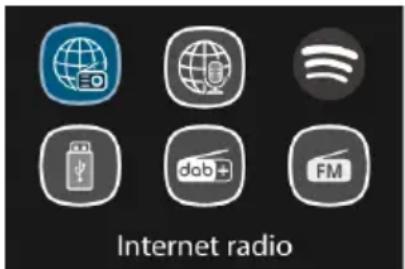
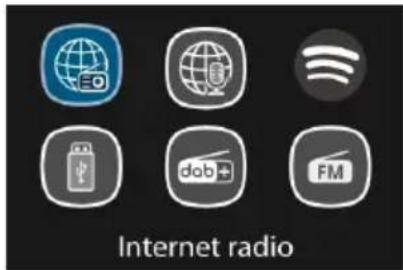
Press the device or on the remote control to select modes. The 8 available operating modes show on the display.
Internet Radio, Podcasts, Spotify Connect, USB, DAB, FM, Bluetooth, CD.
7.1 Internet Radio, Podcasts
Device can play thousands of radio stations and podcasts from around the world though a broadband Internet connection. When you select Internet radio or Podcasts mode, the device directly contacts the Frontier Smart Technologies portal to get a list of stations or podcasts. The list menu is provided from the portal, so it is only accessible when the device is connected to the Internet. The contents and submenus may change from time to time.
Choose required category and search the station or podcast to listen.
7.2 Spotify Connect

Use your phone, tablet, or computer as a remote control for Spotify. Go to Spotify.com/connect to learn how
The Spotify Software is subject to third-party licenses found here:
http://www.spotify.com/connect/third-party-licenses
7.3 USB
USB mode plays audio from the USB stick/device after plugging into the USB port.
- Menu are generated from the folders on the USB device. Browse folders with the navigate reel, back button, shuffle/repeat, or direction keys on the remote control. The display shows folder and file names (not necessarily track names).
Once you have found a track you want to play, press OK to play.
Notice: The USB port supports MP3 files playback.
7.4 DAB + Radio
DAB mode receives DAB/DAB+ digital radio and displays information about the station, stream, and track playing.
Scanning for stations
The first time you select DAB radio mode, or if the station list is empty, the radio automatically performs a full scan to see what stations are available. You may also need to start a scan manually to update the list of stations.
To start a scan manually, choose Full scan. To scan only stations with good signal strength, select Local scan. Once the scan is complete, the radio shows a list of available stations.
To remove stations that are listed but not unavailable, choose Prune invalid. Turn the navigate reel to view a list of stations and press to select. Once selected, the station plays and the screen show information about station, track or show as broadcast.
Settings
- Dynamic range compression (DRC): If you are listening to music with a high dynamic range in a noisy environment, you may wish to compress the audio dynamic range. This makes quiet sounds louder, and loud sounds quieter. You can change DRC as off, low, or high.
7.5 FM Radio
FM radio mode receives analogue radio from the FM band and displays RDS (Radio Data System) information about the station and where broadcast.
To find a station, press OK. The frequency display starts to run up as the device scans the FM band. Alternatively, you can scan up or down by holding and pressing on the remote control or tuning manually with quick presses. For up and down adjusts, you can press on the remote control or press the TUNE button once and then turn the reel.
Settings
- Scan settings: By default, FM scans stop at any available station. This may result in a poor signal-to-noise ratio (hiss) from weak stations. To change the scan settings to stop only at stations with good signal strength, select "Yes" after choosing "Strong station only?"
- Audio settings: All stereo stations are reproduced in stereo. For weak stations, this may result in a poor signal-to-noise ratio (hiss). To play weak stations in mono, select FM weak reception: "Listen in mono only", and then "YES".
7.6 Bluetooth
In Bluetooth mode, you can turn on the Bluetooth of your Bluetooth device. Go to the menu and turn Bluetooth discoverable. From your Bluetooth device, search for the A571 CD to pair. When it is waiting for pairing, there is a blinking Bluetooth icon at the bottom. If the pairing is successful, the Bluetooth icon becomes steady. Control the music playback from your Bluetooth device.
Press on the remote control to go back to the forward track or go to the next track. Press to play or pause the track.
7.7 CD
The smart radio can playback CD-DA format audio and CD-R/CD-RW discs that have been finalised* upon completion of recording. It may fail to play some CD-R/CD-RW discs due to poor recording and wide variation in quality of the CD-R/CD-RW disc.
*Finalising enables a CD-R/CD-RW disc to playback on audio players. A disc which has not been finalised may have information added to it using a computer but may not always be playable.
Insert a disc with the printed side facing up into the CD slot. The disc will be loaded automatically. The unit will check the CD type and load its track list. The display will show 'Loading' and then 'Reading' as the information is read.
Playback
Use to play the previous or next track. Press and hold to rewind or fast forward.
Press to pause the track. Press it again to resume.
Press to stop the track.
To take out the CD, press . Note that this device does not eject the CD if it is not in the CD mode.
Repeat/shuffle
Press on the remote control to swap among normal playback, repeat one, repeat all (and repeat folder for MP3/WMA CD) and turn on/off the function of random.
CD track programming
Stop the playback first if any track is playing.
Press to program.
Set the first programming track. Use or to seek the track. Press OK to confirm and set the next programming track. Repeat the steps. When programming is completed, press FAV!
Press to start playing the programmed track(s).
MP3/WMA CD
The radio is able to play CD-R and CD-RW discs containing MP3 and WMA files. It is assumed in this section that a file is equivalent to a CD track.
It allows skipping folder by pressing FOLDER or FOLDER on the remote control. The first file of the next or previous folder will be played.
An MP3/WMA CD may not contain more than 512 files and no more than 99 folders. MP3 and WMA files should be created with an audio sample rate of 44.1kHz (this is normal for files created from CD audio content).
MP3 and WMA data that rate up to 320 kilobits per second are supported. WMA Lossless files are not supported. The unit will not play files which include digital rights management (DRM) protection.
When burning CD-R and CD-RW discs with audio files, various problems may arise, which could lead to problems with playback. Typically, such problems are caused by poor CD writing or audio encoding software, or by the hardware settings of the PC's CD writer, or by the CD being used. Should such problems arise, contact the customer services of your CD writer or software manufacturer or look in their product documentation for relevant information. When you are making audio CDs, take care to observe all legal guidelines and ensure that the copyright of third parties is not infringed.
7.8 Sleep
To set the sleep timer, select Sleep under Main menu. Or press Sleep/snoopze button on the remote control to set it. Choose from Sleep OFF, 15, 30, 45, or 60 minutes and confirm. Once you select a sleep period, the system returns to the now playing screen.
7.9 Alarm
There are two versatile wake-up alarms with snooze facility. Each alarm can be set to start in a particular mode.
Select Alarms under Main menu to set or change an alarm.
After setup all the parameters, select Save to activate. The screen shows active alarms with an icon at the bottom left.
At the set time, the alarm will sound. To temporarily silence the alarm, press any key except or ALARM on the device or or Sleep/snooze on the remote control. You can change the snooze period. The radio returns to standby for the set period with the silenced alarm icon flashing.
Press or ALARM on the device or press or Sleep/snoopze on the remote control to turn off the alarm.
7.10 UNDOK
The device gives a feature of network remote by smartphone or tablet in iOS or Android system. By downloading the assigned app named UNDOK, you can view all the modes the device.
Search UNDOK from Google Play or Apple Store, and install it to your smartphone or tablet.

For Android system (Google Play)

For iOS system (Apple Store)
Before using the UNDOK app, make sure the device and the smartphone/tablet are in the same WiFi network.
Launch the app. The app initialises and scans for Internet Radio in the network. Tap the device to make the connection.
When prompted, enter the current PIN code. The default PIN is "1234". You can view and edit the current PIN on the Internet Radio in the menu Select your desired mode in the main page. You may then control the selected mode on your smartphone/tablet and on the display of the device simultaneously.
NOTE: Be aware that if another smartphone/tablet with the app in the same network have access with the device, the original connection will be cut off.
8 System Settings
8.1 Equaliser
Several preset EQ modes are available: Normal, Flat, Jazz, Rock, Movie, Classic, Pop, News, and My EQ. Press to select.
A user-defined setting is available; create your own EQ with custom bass, treble settings.
8.2 Streaming Audio Quality
Set the Streaming audio quality: Low quality, Normal quality, High quality.
8.3 Network
There will be hints for the type of network – if you plug the LAN cable, it will show one network of [wired]; if your network device supports the WPS function, it will be [WPS] before the SSID (the name of network device). Select the one you want to connect with.
For the wireless connection, you will be asked to input encryption in the next step.
Network wizard: Enter to search AP SSID, then input the WEP/WPA key or choose Push Button/Pin/Skip WPS to connect to the wireless network.
PBC Wlan setup: Push Button Configuration to connect the AP that supports WPS (Wi-Fi Protected Setup).
View settings: View the information of current connected network: Active connection, MAC address, Wlan region, DHCP, SSID, IP address, Subnet mask, Gateway address, Primary DNS, and Secondary DNS.
Manual settings: Enable or disable DHCP (Dynamic Host Configuration Protocol). Input the SSID, WEP/WPA key, and/or other configuration.
NetRemote PIN Setup: Here you can view and edit the NetRemote PIN. The default NetRemote PIN is: 1234. The NetRemote PIN is required when you want to connect a smartphone or tablet PC to your radio using the feature mentioned in Section6.3.
Network profile: The device remembers the last four wireless networks it has connected to and automatically tries to connect to whichever one of them it can find.
From here you can see the list of registered networks. You can delete unwanted networks.
Clear network settings: Select "YES" to clear all the current network settings. Select "NO" to cancel.
Keep network connected: If you choose to keep network connected, the WiFi will not disconnect even you are in standby mode or non-network mode. This option allows the device to be ready for UNDOK and Spotify Connect connection in any modes.
8.4 Time/Date
Set the time manually, or auto-update the time format, time zone, and daylight.
Details can be referred to Setting date and time under Section 6.3. First-time Setup
8.5 Language
The default language is German. Change it as your preference. Available languages: English, Czech, Danish, Dutch, Finnish, French, German, Italian, Norwegian, Polish, Portuguese, Slovak, Spanish, Swedish, Turkish.
8.6 Factory Reset
Resetting all user settings to default values so that time and date, network configuration, and presets are lost. However, current software version of the radio is maintained
8.7 Software Update
Auto-check setting: This option automatically checks for new updates from time to time.
Automatic updating is enabled by default.
Check now: Search for available updates immediately.
You will be asked if you want to go ahead with download and installation of an update. After a software upgrade, all user settings are maintained.
NOTE: Before starting a software upgrade, ensure that the radio is plugged into a stable main power connection. Disconnecting power during an upgrade may permanently damage the unit.
8.8 Setup Wizard
With this function, you can start the setup wizard at any time. Any parameters or stations entered already are not deleted. For more information, please read the Section 6.3 First-time Setup.
8.9 Info
View the firmware version and the radio ID.
8.10 Backlight
You may change the backlight of each environment (power on level or standby) to High, Medium, Low, or Auto. And adjust the timeout duration which the radio turns to standby backlight level when it has not been controlled.
9 Troubleshooting
| Error | Remedy |
| The device does not switch on. | Check it the power adaptor is connected properly. |
| No sound. | 1. Turn on the sound as it may be muted 2. Increase the volume. 3. Re-connect the speaker from the connector jack. |
| No network connection can be established. | 1. Check the WLAN function. 2. Try to set an IP address at the device. 3. Activate the DHCP function on the router and make the connection again at the device. 4. A firewall is activated on the network – set the respective program in such a way that access is possible. 5. Reboot the router |
| WiFi connection cannot be established. | 1. Check the availability of WLAN network on the router. 2. Place the device closer to the router. 3. Make sure the password is correct. |
| No station is found. | 1. Check the network as well as the access point and firewall. 2. The station may not be available currently. Try again later. 3. The link of the station is changed or the station no longer transmits – ask the provider for information. 4. The link of manual added station may not be correct, check and change it. |
| Hiss in FM mode | 1. Check/Move the FM antenna. 2. Move the radio. |
| No stations available/burbling/interrittent in DAB mode. | 1. Move the radio. 2. Rescan local stations only (high-strength). 3. Check the local DAB coverage. |
| Alarm does not work. | 1. Switch on the alarm. 2. Due to the volume setting, refer to the solutions of “No sound”. 3. The source of alarm was set to be station but there is no network connection. Change the source of alarm or reconfigure the connection. |
| USB driver or MP3 player is not detected. | 1 Check if the USB driver or MP3 player is plugged properly. 2 Some USB hard disks need external power supply. Make sure it is connected to the power. 3 Not all MP3 players can be read directly on the device – use an USB drive instead. |
| The CD is not playing or skips during playback. | 1 The device is not in CD mode. Faulty CD inserted. 2 The CD is incorrectly inserted. Insert the CD with the labelled side facing upwards. 3 The CD is dirty or faulty. Clean the CD. Use another CD. |
| All other undetermined cases. | The smart radio may process a large amount of data after a period of operation. No matter in which mode, it will cause the system to freeze or malfunction. Reboot the device if necessary. |
| All other undetermined cases. | The normal function of the product may be disturbed by strong Electro-Magnetic Interference. If so, simply reset the product to resume normal operation by following the instruction manual. In case the function could not resume, please use the product in other location. |
| The device may malfunction when used in areas with strong radio interference. The device will work properly again once there is no more interference. |
10 Technical Specifications
| Model number | A571 CD |
| Description | Internet, DAB+/FM, Bluetooth, USB, CD Player |
| Display | 3.2", 320 x 240, TFT colour display |
| Network supported | Wi-Fi IEEE 802.11 a/b/g/n wireless, Encrypted key WEP, WPA, WPA2 (PSK), WPS Bluetooth (BT V5.2, Supports A2DP, AVRCP profiles) |
| Frequency band | WiFi: 2.400 - 2.4835 GHz 5.18-5.32 GHz; 5.55-5.72 GHz; 5.745-5.825 GHz; Bluetooth: 2.4GHz - 2.48 GHz |
| Max. radio frequency power transmitted | WiFi: <20dBm Bluetooth: Max. 8dBm |
| DAB/DAB+ | Band III (174.928 - 239.200 MHz) |
| FM | 87.5 - 108.0 MHz, support RDS |
| CD player | Supports CD-ROM, CD-R, CD-RW |
| Supported playback formats (CD) | CD-DA, MP3, WMA (up to 48kHz, 384kbps) |
| USB supported format | MP3 |
| Remote Control Power Supply | 2 x 1.5V AAA/LR03 battery |
| Standby mode power consumption | <1.0W |
| Networked standby mode power consumption | <2.0W |
| Operating temperature | 0°C - 35°C |
| Connections | USB port (for music playback) Optical out socket COAXIAL out socket RCA Line out socket LAN Port DC IN power supply socket (5.5mm) |
| Dimensions | 430mm(L) x 68mm(H) x 303mm(D) |
| Weight | 2.9 kg |
Specifications are subject to change without notice.
| Power Adaptor | |
| Manufacturer's name | Shenzhen Shi Ying Yuan Electronics Co. Ltd. |
| Address | 5/F-7/F of West, Building 8, Hongye Industry Park, Lezhujiao Resident Squad, Huangmabu Community, Xixiang Street, Bao'an District, Shenzhen, Guangdong Province, China |
| Model no. | SAW12-050-2000GD |
| Input voltage | AC 100-240V |
| Input AC frequency | 50/60 Hz |
| Output voltage | DC 5.0V |
| Output current | 2.0A |
| Output power | 10.0W |
| Average active efficiency | 86.48% @ 115VAC/50Hz 86.70% @ 230VAC/50Hz |
| Efficiency at low load (10%) | 85.91% @ 115VAC/50Hz 83.18% @ 230VAC/50Hz |
| No-load power consumption | 0.04W @ 115VAC/50Hz 0.08W @ 230VAC/50Hz |
Use only original AC adaptor
Use only the power supply listed in the user instructions
11 Conformity
This device has been approved for compliance with the basic and other relevant requirements of the RE Directive 2014/53/EU, the ErP Directive 2009/125/EC, and the RoHS Directive 2011/65/EU.

12 Trademarks
Google® and Android® are trademarks of Google Inc.
Bluetooth® is a registered trademark of Bluetooth SIG, Inc.
The Spotify® logo, Spotify®, and Spotify® Connect are registered trademarks of Spotify Ltd.
UNDOK is a trademark of Frontier Smart Technologies Ltd.
Other names and products can be the trademarks or registered trademarks of their respective owners.
Manufacturer:
Palotec AG
Frikartstrasse 3
CH-4800 Zofingen
Switzerland
www.noxonradio.ch
info@noxonradio.ch
Made in China
Note:
NOXON accepts no liability for failures or malfunctions of third party providers.
Subject to technical changes with regard to the software.
Table des matieres
Radio Internet, Podcasts, Spotify Connect, USB, DAB, FM, Bluetooth, CD.
7.1 Radio Internet, Podcasts
http://www.spotify.com/connect/third-party-licenses