68501 - Dehumidifier HYUNDAI - Free user manual and instructions
Find the device manual for free 68501 HYUNDAI in PDF.
| Product Type | Industrial Dehumidifier |
| Brand | Hyundai |
| Model | 68501 |
| Weight | 37.5 kg |
| Power Supply | 230 V ~ 50 Hz |
| Power Consumption | 500 W (max 1200 W at 5.4 A) |
| Dehumidification Capacity (30 °C / 80 % RH) | 50 L / 24 h |
| Dehumidification Capacity (26 °C / 60 % RH) | 28 L / 24 h |
| Airflow | 595 m³/h |
| Operating Temperature Range | 1 °C to 36 °C |
| Operating Relative Humidity Range | 0 % to 99 % RH |
| Refrigerant | R290 (flammable gas) |
| Refrigerant Quantity | 150 g |
| Pump Lift Height | 5 m (max 45 cm with supplied hose) |
| Sound Pressure Level | 65 dB(A) |
| Protection Class | I |
| Minimum Installation Area | 9 m² |
| Main Functions | Condensation dehumidification, integrated drain pump, digital control with LED display, target humidity adjustment (26% to 90%), timer, purge function, key lock function |
| Maintenance and Cleaning | Regular cleaning of air filter (every 2 weeks); cleaning the pump with a solution of water and bleach or vinegar; cleaning the coils if necessary |
| Safety | Use of flammable refrigerant gas R290; do not puncture or incinerate; install in a room of at least 9 m²; use a grounded outlet; do not use an extension cord; keep air inlets and outlets clear |
| Warranty | 2 years (according to manufacturer's conditions, see attached document) |
Frequently Asked Questions - 68501 HYUNDAI
User questions about 68501 HYUNDAI
0 question about this device. Answer the ones you know or ask your own.
Ask a new question about this device
Download the instructions for your Dehumidifier in PDF format for free! Find your manual 68501 - HYUNDAI and take your electronic device back in hand. On this page are published all the documents necessary for the use of your device. 68501 by HYUNDAI.
USER MANUAL 68501 HYUNDAI
Declaration of conformity
A
INDUSTRIÈLE LUCHTONTVOCHTIGER 68501
WAARSCHUWING

BESCHRIJVING (FIG. A)

Read all safety warnings and all instructions. Failure to follow the warnings and instructions may result in electric shock, fire and/or serious injury. Save all warnings and instructions for future reference.
The following symbols are used throughout this manual:

Denotes risk of personal injury or damage to the machine.

Important information about the use of the machine.
IMPORTANT
You will find the following symbols on the appliance and/or in this manual:

The appliance is filled with flammable gas R290.

Danger of personal injury or material damage.

Read the instruction manual before installing and using the appliance.

Have repairs carried out by an authorized service centre and only follow the manufacturer's instructions
SAFETY REGULATIONS
- The appliance must be installed, operated and stored in a dry room with a floor area of at least 9m^2 .
- Never use the appliance in an airtight room. Provide adequate ventilation to prevent underpressure in the room. Underpressure can disrupt safe operation.
- Place the appliance on a solid and flat surface.
Always move the appliance with both hands. -
Never touch the appliance with damp or wet hands.
-
Keep the appliance out of the reach of children and animals.
- The appliance must be stored in a dry room without permanent ignition sources (such as: open fire, a gas appliance or an electric heater)
- Never pierce or incinerate the appliance.
- Never immerse the appliance, cord or plug in water.
- Make sure the air inlet and outlet are not blocked by dirt or objects.
- Do not place any clothing or objects on the appliance.
- Be aware that refrigerants do not have any odour.
- Only install this appliance if it complies with local standards, laws and regulations.
- Do not use an extension cord, have a grounded outlet installed by a qualified electrician.

SAFETY INSTRUCTIONS FOR APPLIANCES WITH R290 REFRIGERANT
(EG) 842/2006
This appliance contains R290 refrigerant. R290 is a refrigerant gas that complies with European environmental directives. The quantity is less than 1kg (see rating plate for exact quantity) and is in a closed circuit. The coolant has no ozone-depleting capacity. However, it is a greenhouse gas under the Kyoto protocol and can thus contribute to global warming when released into the atmosphere. Only trained technicians with an appropriate refrigerant certificate are allowed to fill or empty the appliance. Your appliance must not be topped up with refrigerant if it is used correctly and with an undamaged refrigerant circuit. GWP: R290: 3.
- Do not pierce any part of the refrigeration circuit.
- When defrosting and cleaning the appliance, use only tools recommended by the manufacturer.
-
If the appliance is installed, operated or stored in a non-ventilated area, measures must be taken to prevent fire or explosion due to leaked refrigerant. Make sure that no ignition sources (such as fire, stoves, sparking electrical equipment, lit cigarettes, etc.) are in the same room.
-
The appliance must be stored in such a way as to prevent mechanical defects.
- Persons working or operating the refrigeration circuit must have the appropriate certification, issued by an authorized organization, certifying that these persons are authorized to handle refrigerants in accordance with industry specifications.
- Repairs should be made as recommended by the manufacturer. Maintenance and repair requiring the assistance of other trained personnel must be performed under the supervision of a person specialized in the use of flammable refrigerants.
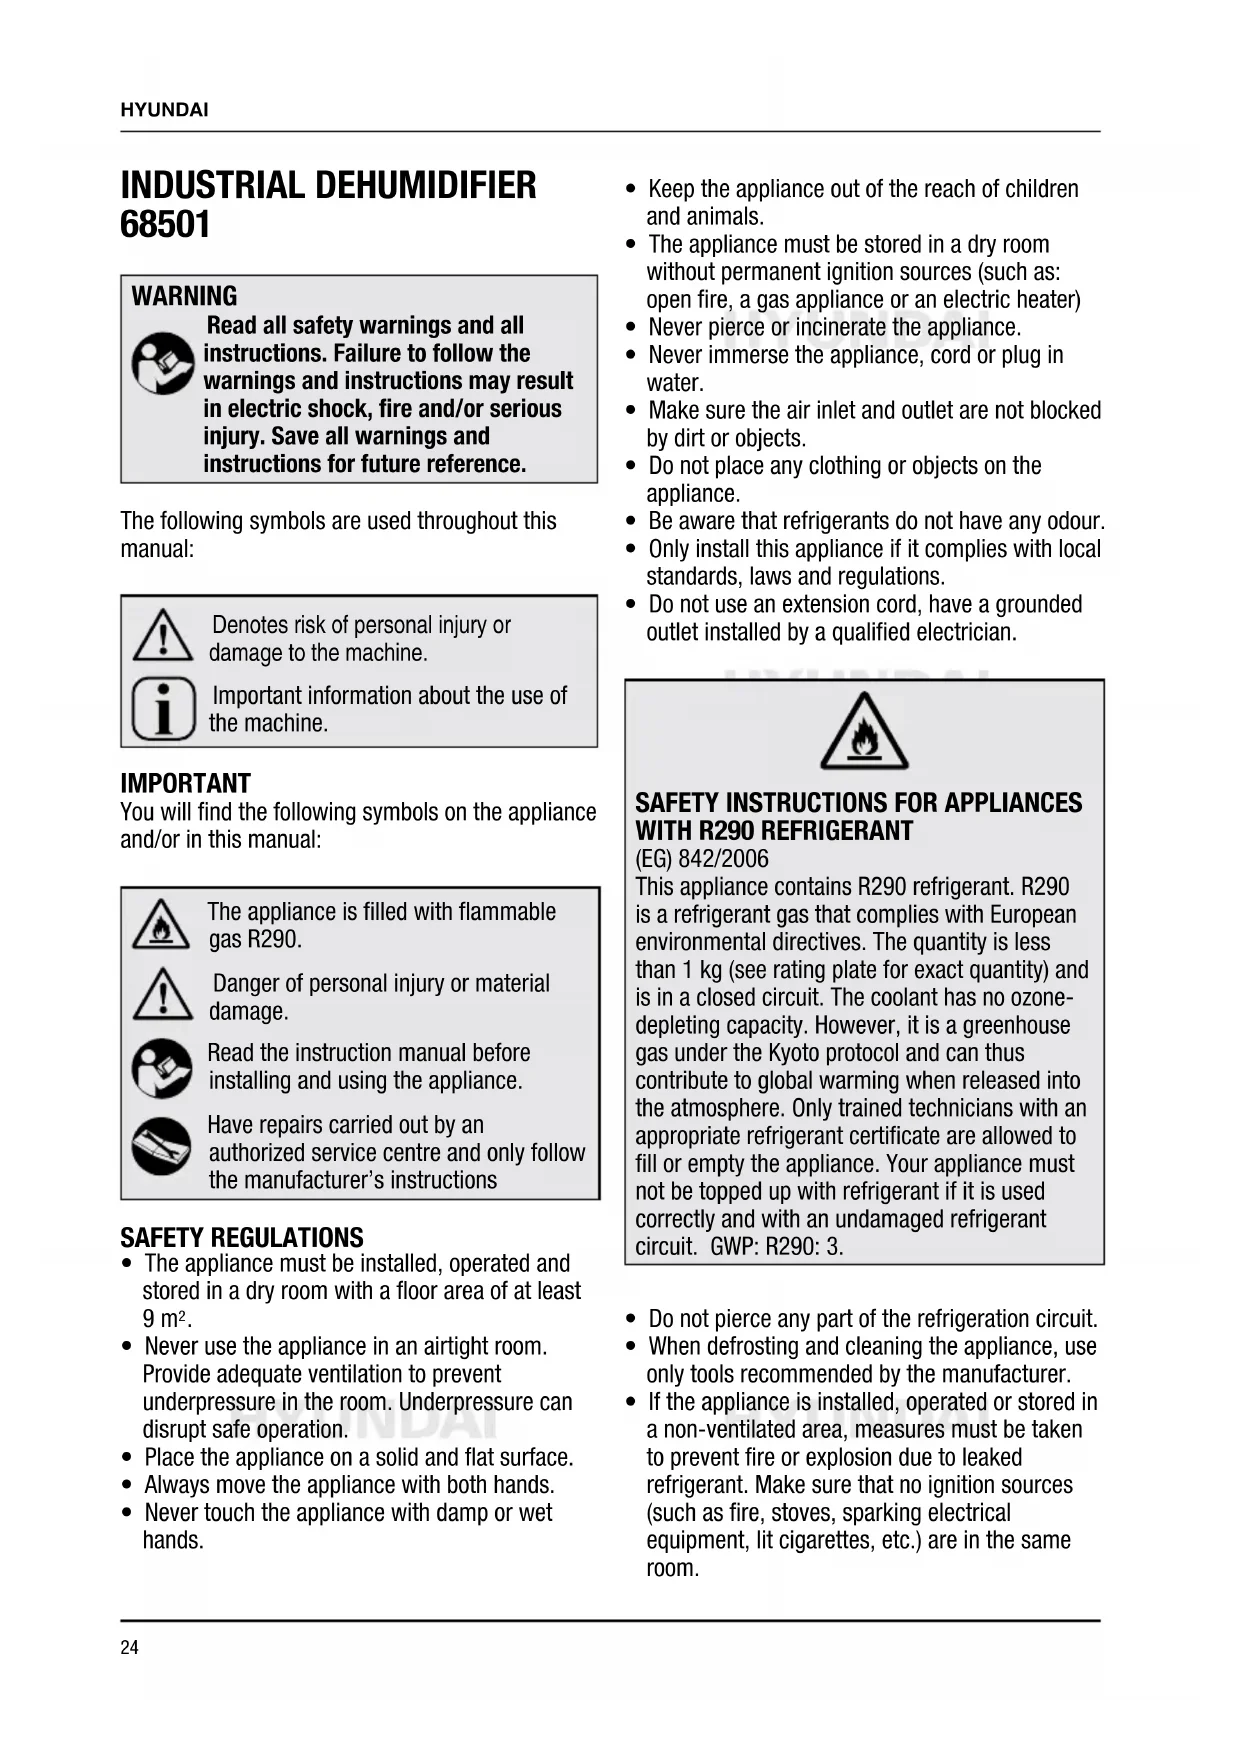
DESCRIPTION (FIG. A)

This industrial dehumidifier is designed for lowering the humidity and keeping warehouses, garages, corridors, washing and changing rooms dry. Also suitable for protecting stored electronic equipment, documents and medicines against moisture, erosion and fungi.
- Handle
- Control panel
- Air outlet
- Air inlet
- Filter holder
- Transport wheel
- Adjustable foot
- Pump reservoir
Package contents
- Dehumidifier
Water drain hose - Instructions
- Guarantee and service conditions
ELECTRICAL SAFETY

Check whether the voltage stated on the rating plate of the appliance corresponds to the locally available mains voltage. If not, do not use the appliance.
- Only connect the appliance to an earthed socket.
- Never use the appliance with a damaged cord or
plug but have it replaced by a qualified electrician.
- Keep the cord away from sharp edges.
- Never clamp the cord.
Make sure that the plug and socket are always easily visible and accessible. - Never pull on the cord to remove the plug from the socket.
- Do not move the appliance by pulling the cord.
Always remove the plug from the socket when the appliance is moved or not in use.
OPERATION
This dehumidifier works by means of condensation to automatically dehumidify rooms. The fan sucks in moist air through the air filter and blows it through an evaporator. The moist air is strongly cooled in the evaporator, causing the water vapor present in the air to precipitate as condensation. This condensation water is collected in a water reservoir and discharged through a hose by means of the built-in water pump. The dehumidified cooled air is passed through a condenser where the air is heated. This heated dry air is blown back into the room, reducing the humidity in the room.
FOR USE
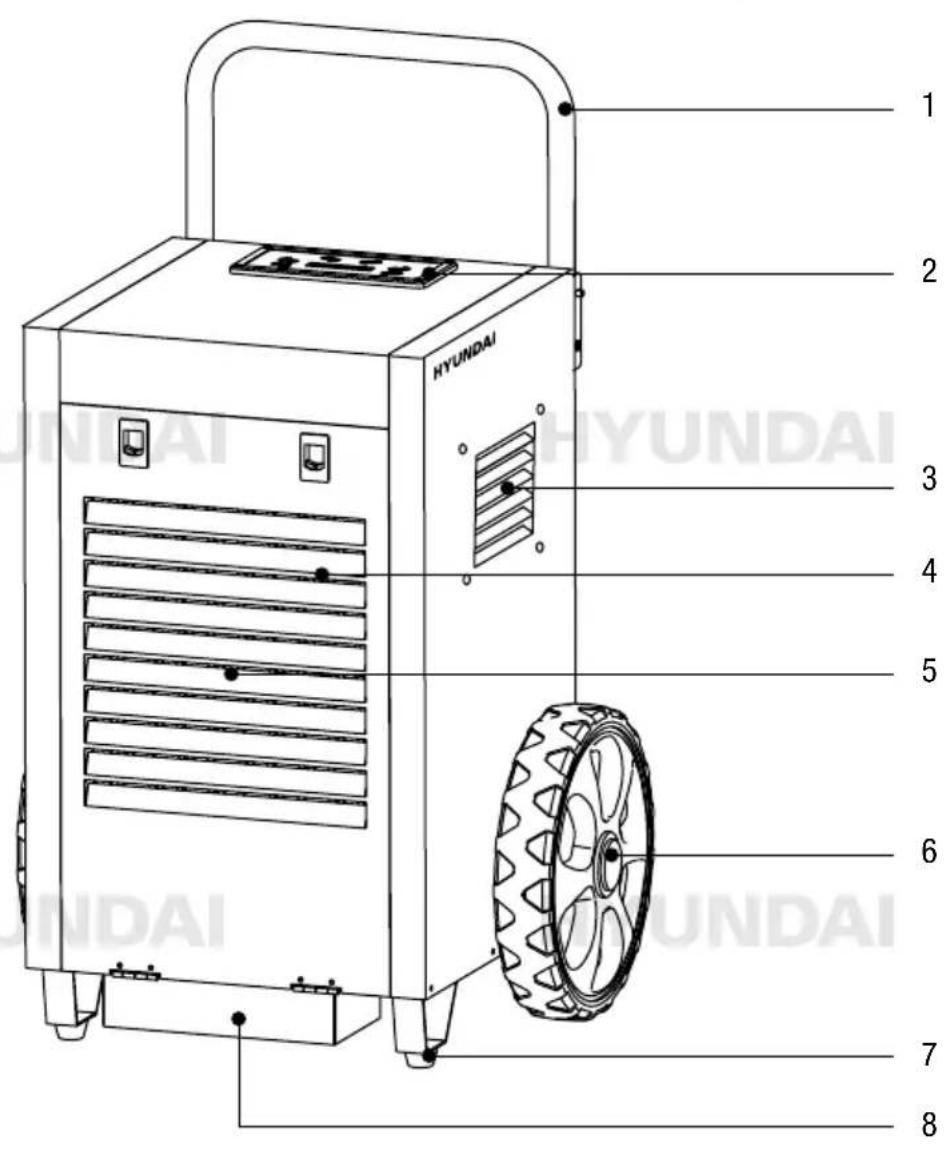
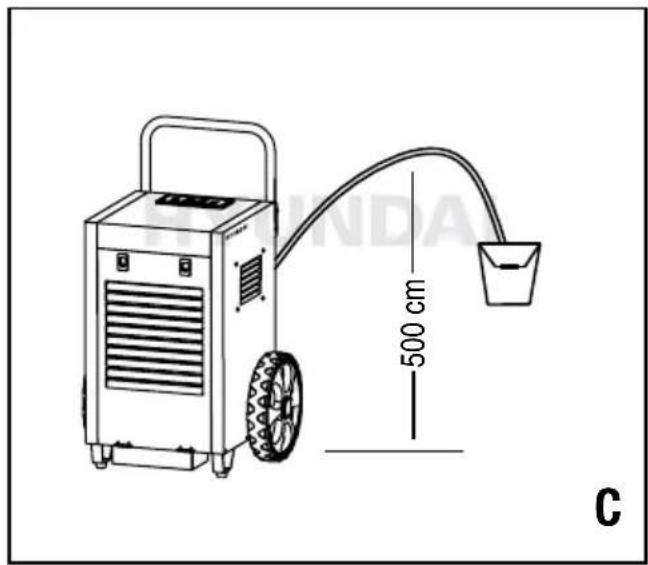
Placement of the appliance (fig. B - C)
- Place the appliance at least 30~cm away from a wall on all sides. The front should face towards the place to be dried. Let the appliance stand for at least 30 minutes after installation.
- Connect the supplied drain hose with the quick coupling to the connection on the back of the appliance.
- Route the drain hose to a suitable container or outside. The hose can run up to 500~cm (fig. C).
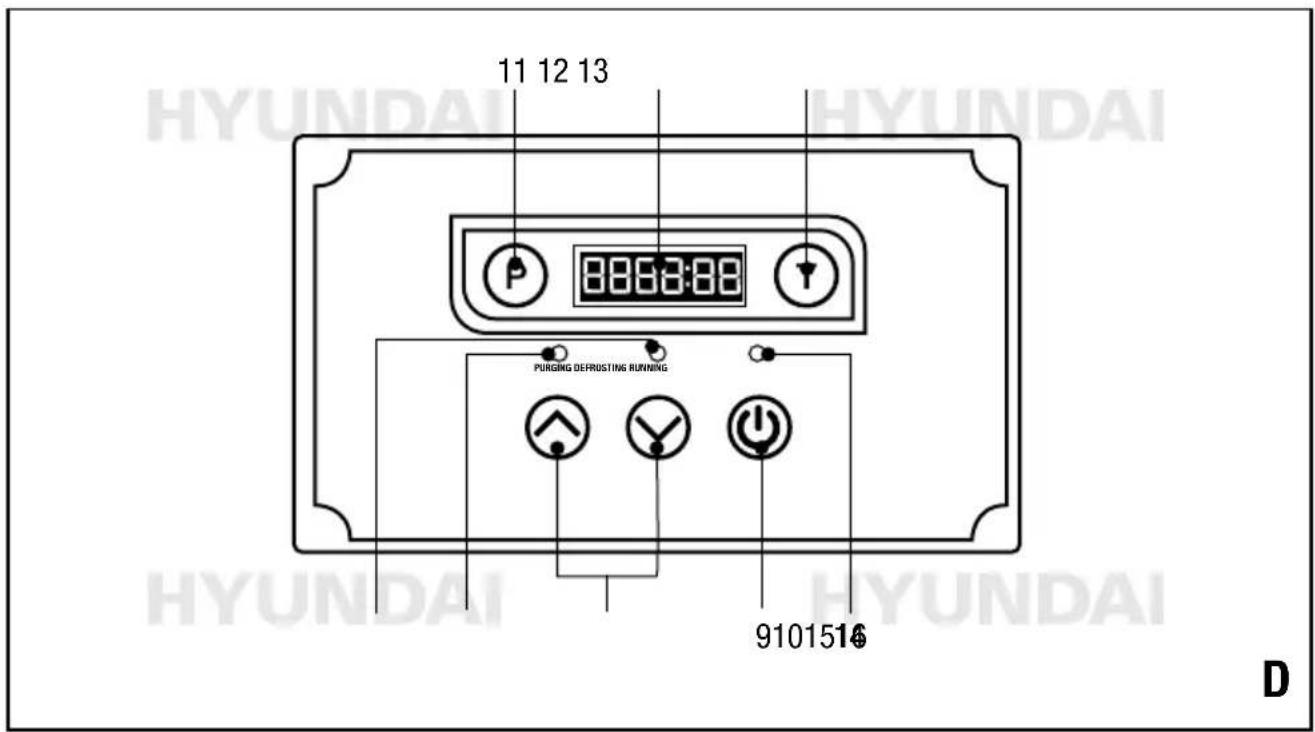
USE (FIG. A + D)
CONTROL PANEL
- On/off key
- Up and down key
- Purge key
- LED display
- Time key
- Operation indicator
- Purge indicator
- Defrost indicator
Switch
- Put the plug in the wall socket.
- Switch the appliance on with the on/off key (9).
- Set the desired air humidity (between 26% and 90% ) with the up and down keys (10). As soon as the humidity is lower than 26% , "CO" appears on the display.
- Press the purge key (11) to empty the pump reservoir (8). The purge indicator (15) lights up. In normal use, the pump reservoir is automatically emptied when the reservoir is full.
- Press the time key (13) to see the current and total hours worked. After starting the appliance, the set humidity (left) and current humidity can be displayed (right), the humidity can be adjusted by using the "up and down" keys (10), for the current time, and the time in minutes, example: if the display shows "0000: 50", it means the appliance has been working for 50 minutes. Press the time key again to display the total time worked for 10 seconds.
If the appliance is switched on but not in operation, the display will show nothing. Press the time key to display the last worked time for 10 seconds. Within these 10 seconds, press the time key again to display the total time worked. If the time key is pressed again, the display will go out. If the time key is held down for 5 seconds, the current time worked will be deleted but added to the total hours worked.

The total time worked cannot be deleted. If the display of the total worked time is too long for the display, the time is deleted and counts again from start.
Defrost indicator
During defrosting, the defrost indicator (16) lights up. After defrosting, dehumidification is switched on again.
Switch off
Switch the appliance off with the on/off key (9).

The pump continues to run for another 40 seconds to drain the rest of the water and then switches off automatically

Do not switch off the appliance by pulling the plug from the socket, but always use the on/off key to switch off the appliance and then remove the plug from the socket. Do not move the appliance until 3 minutes after it has been switched off to prevent leakage..
Lock function
By simultaneously pressing the purge key (11) and the time key (13) for 2 seconds, the operation indicator (14) will remain lit at 50Hz and all keys on the control panel are locked. Repeating this action will release the lock.
CLEANING AND MAINTENANCE
Regular cleaning is important for a long service life of the appliance!

Before performing any cleaning or maintenance work, always switch off the appliance and remove the plug from the socket!
Cleaning the outside
Clean the outside with a soft, damp cloth and then dry with a soft cloth.

Do not use aggressive or abrasive cleaning agents.
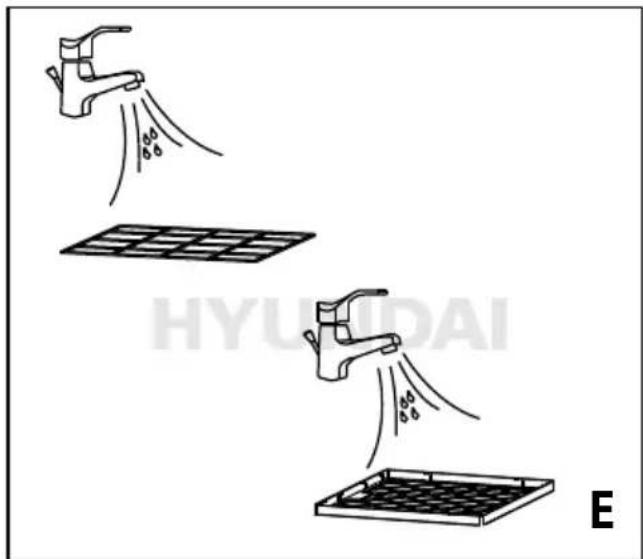
Cleaning the air filter (fig. E)
Dust and debris collect on the filter and restrict the airflow. Restricted airflow reduces optimal operation and can cause damage to the appliance. The air filter should be cleaned regularly (every two weeks). The air filter is removable for easy cleaning. To avoid contamination of the evaporator, do not use the appliance without the air filter.
- Switch off the appliance and remove the plug from the wall socket.
- Open the filter holder by pressing down the 2 locking keys.
- Use a vacuum cleaner to vacuum dust from the filter.
- Rinse the filters under running warm water. Do not use wax or solvent. Allow the filter to air dry completely before replacing it.
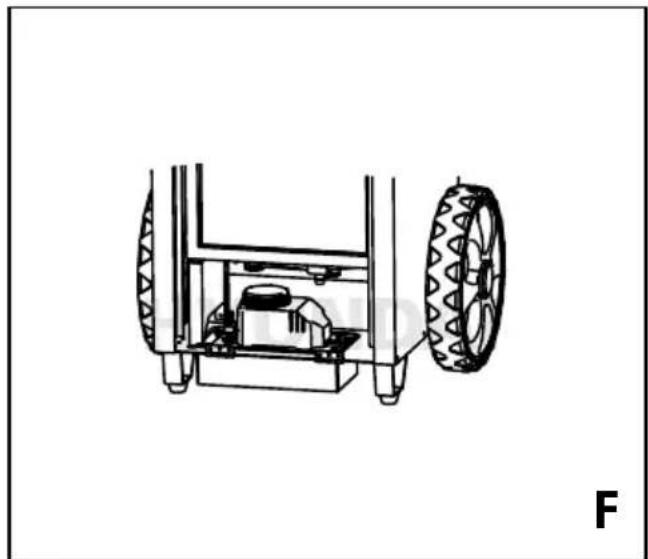
Maintenance of the pump (fig. A + F)
Regular cleaning and maintenance of the pump is necessary to prevent malfunctions due to debris remaining in the pump system.

The pump is equipped with a quick coupling. In case of repair, the condensate hose, float switch connections and the power cable can be easily disconnected. The pump can be lifted out of the reservoir with a flat screwdriver.
Basic cleaning
- Press the purge key (11) to drain the water from the reservoir.
- Switch off the machine and unplug it.
- Make a mixture of 450~ml water and 30~ml bleach, or 360~ml water and 120~ml vinegar. Pour this solution into the receptacle at the bottom of the coils.

Rinse the coils with water immediately if the cleaning solution is spilled on the coils.
- Let it soak for 15 minutes.
- Switch on the appliance again.
- Fill the reservoir and flush it by running the pump at least 2 times.
- Repeat these actions if necessary.
Deep cleaning
- Press the purge key (11) to drain the water from the reservoir.
- Switch off the machine and unplug it.
- Open the rear panel and remove the pump.
- Use a liquid vacuum or rags to remove the
remaining water from the reservoir.
- Fill the pump reservoir (8) with cleaning solution (450 ml water and 30 ml bleach, or 360 ml and 120 ml vinegar).
- Reassemble the pump and use the purge key to flush the tubing with the solution.
- The same solution can be slowly poured into the drain tank at the bottom of the coil to clean the hose between the tank and the pump. This process can be stopped once the pump has been running.

Rinse the coils with water immediately if the cleaning solution is spilled on the coils.
- Pour enough clean water into the drain tank and run the pump again.
- Replace the back panel
The coils
If necessary, clean the coils with a vacuum cleaner or a specific cleaning agent.
STORAGE (FIG. A + F)
If the appliance will not be used for a longer period of time, take the following measures!
- Press the purge key (11) to drain the water from the reservoir.
- Switch off the machine and unplug it.
- Clean and reinstall the filter.
- If possible, pack the appliance in its original packaging or in a plastic bag.
- Store the appliance in an upright position in a clean, dry and well-ventilated area no smaller than 9m^2
- Do not place heavy objects on the appliance.
PROBLEMS AND SOLUTIONS
Fault Cause Solution
The appliance is not working. No indication on the display.
Power failure or incorrect connection.
The room temperature is outside the operating range. Error code: HI or LO.
Check the electrical equipment.
Provide a temperature between 1 and 36^
| Fault Cause Solution | ||
| The appliance cannot be turned on. | The mesh of the filter holder is clogged. | Clean the filter holder. |
| The air inlet or outlet is blocked. | Make the air inlet and outlet free. | |
| No air flow. The filter is clogged. | Clean the filter. | |
| The appliance is not properly installed. | Place the appliance in a vertical position on a flat surface. | |
| Strong/unusual sound. The pump is not properly seated. Place the pump correctly in the reservoir. | ||
| Error code E1. Faulty or incorrectly connected moisture sensor. | Check the sensor cable or have the sensor replaced. | |
| Error code E3. Faulty or incorrectly connected temperature sensor. | Check the sensor cable or have the sensor replaced. | |
| Foutmelding E4. The pump detects a too high level in the reservoir (see below remarks). Check the drain hose for blockage. | Check the operation of the pump and have it repaired or replaced if necessary. | |
| Error code L0. The appliance detects a room temperature lower than 1 °C. | Increase the temperature in the room. Check the sensor. Check the sensor connection cable. | |
| Error code HI. The appliance detects a room temperature higher than 36 °C. | Lower the temperature in the room. Check the sensor. Check the sensor connection cable. | |
| Error code E1, L0, HI. The display shows E1, L0, HI at the same time. This means a wrong connection, a bad cable or a defective sensor. | Check the connections. Replace the cable. Replace the sensor. | |
Pump alarm (error code E4)
If the pump alarm E4 is shown on the display, proceed as follows:
- Clear the error code by unplugging the power cord and plugging it in again.
Note: The appliance will not operate as long as the error code is displayed. - Check that the pump is working. Press the purge key, and see if the pump starts up and stops correctly and if the water is drained. If the pump has not been cleaned recently, check that the hoses are not clogged and clean the pump according to the instructions.
- Replace the hoses or the pump if the fault is not resolved.
TECHNICAL DATA
Mains voltage Vac 230
Mains frequency Hz 50
Power
W
500
Dehumidifying cap.
at 30^ / 80% RH I/24u 50
Dehumidifying cap.
at 26^ / 60% RH l/24u 28
Air displacement m
3/h
595
Operating range
temp. C 1-36°
RH
0%
0-99
Power consumption
3.0A
kW
0.66
5.4A
KW
1.2
Protection class
Refrigerant GWP type/gr
R290/150g
Pump capacity
W 55
Elevation height pump
m
5
Sound pressure level
dB(A) 65
Weight
kg
37.5

GUARANTEE
Refer to the enclosed guarantee conditions for the terms and conditions of guarantee.
ENVIRONMENT
Your product, accessories and packaging should be sorted for environmental-friendlyly recycling.
Only for EC countries
Do not dispose of power tools into domestic waste. According to the European Guideline 2002/96/EC for Waste Electrical and Electronic Equipment and its implementation into national right, power tools that are no longer usable must be collected separately and disposed of in an environmentally friendly way.
Subject to change; specifications can be changed without further notice.

HUYUUPAL
HYUNDAI
HYUNDAI
HYUNDAI
HYUNDAI
HYUNDAI
HYUNDAI
C E
VERKLARING VAN OVEREENSTEMMING CERTIFICAT DE CONFORMITE
KONFORMITÄTSERKLÄRUNG DECLARATION OF CONFORMITY
ART. NR. HYUNDAI 68501 TYPE NR. IRONMEN 50L
Dvize by declares under its sole responsibility that this product is in conformity with the following standards or standardization documents:
Volgens de bepalingen van de richtlijnen: Selon les dispositions des directives :
Licensed by Hyundai Corporation Holdings, Korea
Imported/Distributed by Dvize bv, The Netherlands