
Seiren Mini - Microphone RAZER - Free user manual and instructions
Find the device manual for free Seiren Mini RAZER in PDF.
| Product type | Microphone |
| Brand | Razer |
| Model | Seiren Mini |
| Microphone type | Electret condenser |
| Polar pattern | Cardioid |
| Connectivity | USB-C (USB-A to USB-C cable included) |
| Frequency response | 20 Hz – 20 kHz |
| Sampling rate | 96 kHz |
| Resolution | 24 bits |
| Weight | Approx. 400 g |
| Dimensions (W x H x D) | 9.2 x 13.5 x 9.2 cm |
| Power supply | USB bus power |
| Key features | Plug-and-Play recording, noise attenuation, built-in volume control |
| Care and cleaning | Dust with a soft, dry cloth. Do not use abrasive products. |
| Safety | Avoid moisture and shocks. Use only with compliant USB cables. |
| Spare parts and repairability | Not user-serviceable. Contact Razer support if issues arise. |
| General information | Compact and portable microphone, ideal for streaming and gaming. |
Frequently Asked Questions - Seiren Mini RAZER
User questions about Seiren Mini RAZER
0 question about this device. Answer the ones you know or ask your own.
Ask a new question about this device
Download the instructions for your Microphone in PDF format for free! Find your manual Seiren Mini - RAZER and take your electronic device back in hand. On this page are published all the documents necessary for the use of your device. Seiren Mini by RAZER.
USER MANUAL Seiren Mini RAZER
natural_image
Line drawing of a robotic arm with articulated joints and a head-mounted device (no text or symbols)512-BBA USER GUIDE
S12
AUDIO
Congratulations for purchasing the BBA from 512 Audio! Perfect for any situation where a microphone boom arm is needed, the 512-BBA allows you to position your microphone where it sounds best for your voice, with a professional look on camera, every time.
LET'S GET STARTED
The BBA is intended to be mounted to a desktop or similar flat surface, using the clamp assembly at the base of the arm.
Begin by determining where on your worktop the base should be placed. The boom arm should ideally come close to forming an inverted "L" when set up, to allow the internal spring assembly to handle the weight of any microphone easily. That means that for very deep and large table tops or work surfaces you may need to mount the arm on the same side of the table that your body sits on, in order to maintain the desired shape for the arm.
natural_image
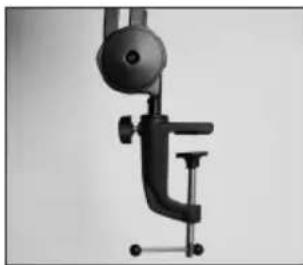
Close-up of a mechanical clamp or clamping device with a circular head and handle (no visible text or symbols)Open the clamp at the base of the arm wide enough to accommodate the flat surface, and place the arm in position. The clamp will be seated properly when both of its surfaces are making solid contact with a flat and solid surface on the top and bottom of the clamp.
natural_image
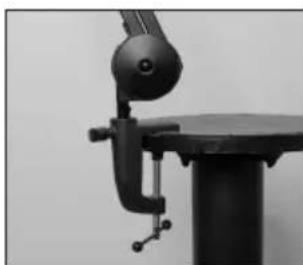
Close-up of a black office chair with a clamping arm and handle, mounted on a cylindrical table (no visible text or symbols)Tighten the clamp until the assembly is secure and the base of the arm won't move unintentionally.
NOTE: Make sure that you don't over-tighten the clamp! (We realize that might sound a lot like “make sure you don’t get overly wet when you go swimming”, or “enjoy your dinner but don’t eat it all”, but it’s true.)
SETTING UP YOUR MICROPHONE
The BBA has a number of different ways to mount a microphone to it: mics can be attached to the boom arm via hard mount, shock mount or even directly to the microphone itself if desired (for instance, the Blue Yeti is often attached directly if a shockmount isn't being used).
The BBA can attach mounts or clips using either 3/8 or 5/8-inch threading, and the microphone can hang from underneath the top of the arm (which is the most traditional way of mounting mics in the broadcast world), or be mounted face up above the top of the arm, if desired.
©
REFINE YOUR SETUP
Now that you have everything roughly in place, it's time to get things looking and sounding great for your production environment.
- Sit down in your chair and get your body into the position that it will normally be in when you're streaming or broadcasting.
- Determine the best position by speaking into the microphone and listening to the sound of your voice. If you're not appearing on-camera, it makes sense to put the mic where it sounds the absolute best, regardless of what it does to the look of your setup. If you ARE appearing on camera, you will need to find the best compromise between sound quality, lighting and on-camera look.
- Now that your microphone is properly situated, you can clean up the final
look by attaching the microphone cable along the length of the boom arm with the provided Velcro straps, pulling the cable tight to the arm but still loose enough to make sure that the arm can swing freely.
Enjoy your BBA!
SPECIFICATIONS
Upper arm length 470mm (18.5")
Lower arm length 470mm (18.5")
Weight 1.75kg (3.9 lbs)
Horizontal Reach 800mm (31.5")
Vertical Reach 820mm (32")
Rotation 360 degrees
Load Supports microphones weighing 450g - 1360g (1-3 lbs) including shock mount
Maximum Desktop 55mm (2.17")
Thickness
WARRANTY STATEMENT
512 Audio warranties this product to be free from defect in materials and workmanship for one year from the date of purchase, for the original purchaser to whom this equipment is registered. This warranty is non-transferable.
This warranty is void in the event of damage incurred from unauthorized service to this unit, or from electrical or mechanical modification. This warranty does not cover damage resulting from abuse, accidental damage, misuse, improper electrical conditions such as mis-wiring, incorrect voltage or frequency, unstable power, disconnection from earth ground (for products requiring a 3 pin, grounded power cable), or from exposure to hostile environmental conditions such as moisture, humidity, smoke, fire, sand or other debris, and extreme temperatures.
512 Audio will, at its sole discretion, repair or replace this product in a timely manner. This limited warranty extends only to products determined to be defective and does not cover incidental costs such as equipment rental, loss of revenue, etc. Please visit us at www.512audio.com for more information on your warranty, or to request warranty service.
This warranty applies to products sold in the United States of America. For warranty information in any other country, please refer to your local 512 Audio distributor. This warranty provides specific legal rights, which may vary from state to state. Depending on the state in which you live, you may have rights in addition to those covered in this statement. Please refer to your state laws or see your local 512 Audio retailer for more information.
BIENVENUE
natural_image
Black-and-white photo of a desk lamp with adjustable arm and stand (no text or symbols visible)natural_image
Close-up of a mechanical clamp or clamping device with a cylindrical head and handle (no visible text or symbols)natural_image
Close-up of a black mechanical clamp or clamping device mounted on a cylindrical base (no visible text or symbols)natural_image
Close-up of a mechanical linkage component (no visible text or symbols)natural_image
Black-and-white photo of a standard desk lamp with adjustable arm and circular base (no text or symbols visible)natural_image
Black-and-white photo of a mechanical clamp or clamping device with a circular head and lever (no visible text or symbols)natural_image
Close-up of a black mechanical clamp or clamping device mounted on a cylindrical base (no visible text or symbols)natural_image
Close-up of a mechanical linkage component with a small connector (no visible text or symbols)natural_image
Black-and-white photo of a desk lamp with adjustable arm and stand (no text or symbols visible)natural_image
Close-up of a black office chair with a cylindrical head and adjustable arm (no visible text or symbols)natural_image
Close-up of a black mechanical clamp or clamping device mounted on a cylindrical base (no visible text or symbols)natural_image
Close-up of a mechanical lever mechanism with a handle and pivot (no visible text or symbols)natural_image
Black-and-white photo of a standard desk lamp with adjustable arm and stand (no text or symbols visible)natural_image
Black-and-white photo of a mechanical clamp or clamping device with a cylindrical head and handle (no visible text or symbols)natural_image
Close-up of a black office chair with a clamping arm and handle, mounted on a cylindrical table (no visible text or symbols)natural_image
Close-up of a mechanical linkage component with a handle and lever (no visible text or symbols)natural_image
Black-and-white photo of a standard desk lamp with adjustable arm and circular base (no text or symbols visible)natural_image
Black-and-white photo of a mechanical clamp or clamping device with a cylindrical head and handle (no visible text or symbols)natural_image
Close-up of a black office chair with a clamping arm and handle, no visible text or symbolsnatural_image
Close-up of a mechanical linkage with a handle and lever (no visible text or symbols)
Brand : RAZER
Model : Seiren Mini
Category : Microphone