OneStep 2 VF - Camera POLAROID - Free user manual and instructions
Find the device manual for free OneStep 2 VF POLAROID in PDF.

| Product type | Instant camera |
| Brand | Polaroid |
| Model | OneStep 2 VF |
| Dimensions (L x W x H) | 150 mm x 111 mm x 97 mm |
| Weight | 460 grams |
| Battery type | Lithium-ion 1100 mAh, 3.7 V, 4.07 Wh (non-removable) |
| Battery life | Approximately 15 to 20 film packs (with flash) |
| Charging time | Approximately 2 hours via AC adapter, 3-4 hours via computer USB |
| Flash type | Vacuum discharge tube flash |
| Lens | Fixed polycarbonate lens with coating, focal length 106 mm |
| Field of view | 41° vertical, 40° horizontal |
| Compatible films | Polaroid Originals i-Type and 600 type (color and B&W) |
| Viewfinder | Traditional optical viewfinder |
| Self-timer | Yes, 8-second delay |
| Exposure compensation | ±1/2 EV compensation (lighten/darken) |
| Photo counter | 8 LEDs indicating remaining photos |
| Battery charge indicator | Green LED (sufficient charge), orange (low), red (depleted) |
| Housing material | Polycarbonate + ABS plastic |
| Connectivity | Micro USB port for charging |
| Tripod mount | Yes, standard |
| Operating temperature | Do not exceed +42°C / +108°F |
| Roller cleaning | Built-in cleaning mode: use a damp cloth or cotton swab |
| Warranty | See polaroidoriginals.com/warranty |
| Customer service | Europe: 00 800 577 01500, service@polaroidoriginals.com |
Frequently Asked Questions - OneStep 2 VF POLAROID
User questions about OneStep 2 VF POLAROID
0 question about this device. Answer the ones you know or ask your own.
Ask a new question about this device
Download the instructions for your Camera in PDF format for free! Find your manual OneStep 2 VF - POLAROID and take your electronic device back in hand. On this page are published all the documents necessary for the use of your device. OneStep 2 VF by POLAROID.
USER MANUAL OneStep 2 VF POLAROID
OneStep2 i-Type camera
User Manual

For updated information, video tutorials and more, please visit polaroidoriginals.com/help
Inspired by the original OneStep camera from 1977, the Polaroid OneStep 2 is an analog instant camera for the modern era. It takes a moment and turns it into something you can hold, something you can share, something real.
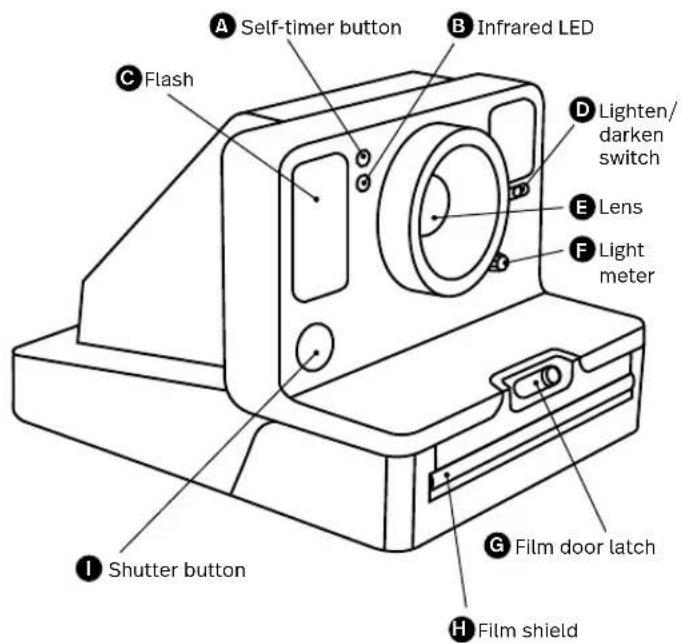
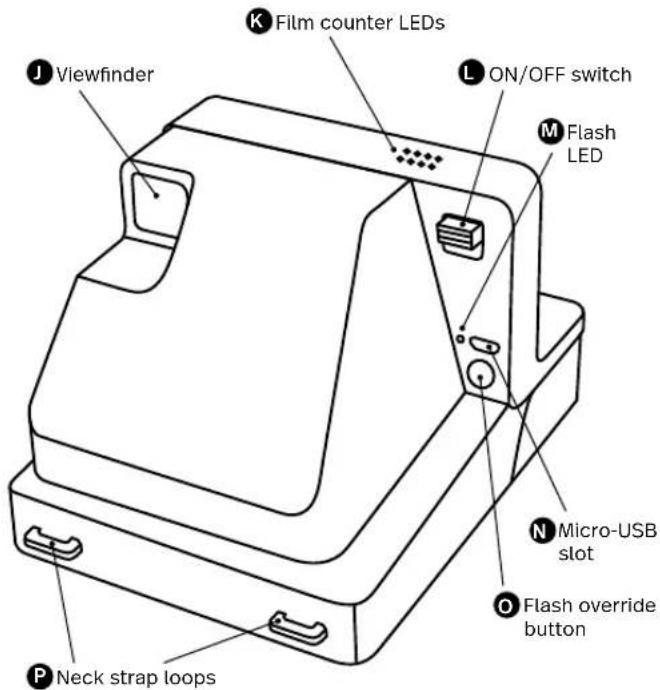
45Parts Diagram
89Attach the camera neck strap
14 Box Contents
14 How to Use the OneStep 2
17 Further Guidance
19 Troubleshooting & FAQ
21 Tips for Making Great Photos
22 Customer Support
22 Technical Specifications
23 Safety Information
24 Compliance
Mahuale Uentee
PyKOBODCTBO nonb30BaTeTn
126 Komlnekt NOCTABKU
126HCTOVKUNNO 3KCNNYATAUM
OneStep 2
129 DononHHTeNbHbIe HcTpyKu
132NONCKyCTpaHEHMe
HENCnPaBHOCTeNuaCTO
3DABAEMBEOPOOCH
Please be sure to read
through this manual before
using the OneStep 2
Keep for future reference.
User
Manual
Warranty
Find the Warranty for this camera
by following this link:
polaroidorphicals.com/warranty

Box contents
01OneStep2Camera
02 USB Charging Cable
03 User Manual
04 Camera Neck Strap
How to use the OneStep2
Charge the camera
Important The OneStep 2
will not be fully charged upon
purchase - it should be fu
charged before first use. To charge the camera, plug the USB charging cable into the Micro-USB slot on the camera's back panel, and the other end of the cable into a charger, such as a smartphone adapter or your computer's USB slot. The red flash charge LED will turn off when the battery is fully charged.
A full charge usually takes about 2 hours through a wall socket with a smartphone adapter, or up to 4 hours through a computer's USB slot. A fully-charged OneStep 2 camera will have enough power to shoot 15-20 packs of film, depending on usage.
Remember to turn your camera off after every use to conserve battery life.
1. Turn the
camera on/off
To turn the camera on, slide the power switch into the ON position (down). The flash charging LED on the back panel will start blinking to charge the flash, and the remaining film counter on the top of the camera will light up to indicate that the camera is switched on. To turn the camera off again, return the power switch to the OFF position.
2. Load the film
Slide the film door latch to open the film door. Push the film cassette all the way in, with the film's darkslide facing up.
Note Please check individual film packaging for development time, handling and storage details.
3. Close film door
When you close the film door, the darkslide will eject from the camera automatically, underneath the film shield. The plastic film shield is
designed to protect images from light as they develop - it should not be removed. Take the darkslide out from under the film shield and let the film shield roll back up. If the darkslide has not ejected, remove the film pack and re-insert it, making sure it is pushed all the way to the back of the camera.
4. Set the Flash
& Lighten/Darken
Flash The camera flash will trigger by default when you shoot with the OneStep 2. To shoot without the flash, press and hold the flash override button on the back panel as you press the shutter button.
Warning Shooting without flash will reduce camera performance and picture quality in most lighting situations except brightly-lit, sunny environments. We recommend always shooting with flash.
Lighten/Darken Use the lighten/darken switch on the right side of the lens barrel to adjust

the exposure of your shot. To get a brighter photo, move the lighten/darken switch right to the plus/lighten position. For a darker photo, move the lighten/darken switch left to the minus/darken position. These two settings correspond to different Exposure Values (EV). The camera's Exposure Values are +1/2 EV (when you move the switch to plus/lighten) and -1/2 EV (when you move the switch to minus/darken).
5. Using the viewfinder
The OneStep 2 uses a traditional viewfinder located on the right side of the lens barrel. The viewfinder is most accurate when you align your right eye with the space behind the viewfinder, resting your cheek on the slope of the camera body.
Note Remember that the viewfinder sits slightly above and to the right of the camera's lens - above and to the left from your perspective when shooting - so you will need to adjust
your aim to compose your shot correctly when shooting at distances of 1.2 meters or less.
6. Compose your photo
To avoid a blurry photo, make sure you are at least 60cm (2 feet) away from your subject when you take the picture. For the best results, always try to shoot with your light source behind you.
7. Take the photo
Press the shutter button all the way in to take the photo. The photo will be ejected from the slot at the front of the camera as soon as you let go of the shutter button. It will be shielded from the light by the film shield, and will be held in place until you are ready to remove it.
8. Remove and shield the photo
Remove the photo from beneath the film shield and let the film shield roll back into the camera. Place the photo face
down to continue shielding it from light as it develops.
Further Guidance
Using the self-timer
The OneStep 2 has a self-timer function allowing you to place yourself in your photos or create perfectly-timed photographs. To use the self-timer, press the self-timer button on the left of the lens barrel. The self-timer button will light up to solid orange, indicating that the self-timer is activated. Once you have framed your photo, press the shutter button. The self-timer uses an 8-second interval between pressing the shutter button and taking the photograph. Once triggered, the self-timer's orange LED will blink to indicate the self-timer countdown. In bright or sunny environments, the camera flash will also countdown with short, low-power flashes.
Note When using the self-timer to shoot, the
flash will trigger automatically. To make self-timed photos without flash, activate the self-timer, then press and hold the flash override button as you press the shutter button.
How much film is left in the pack
There are 8 orange LED lights on top of the camera. When the OneStep 2 is switched on and not in sleep mode, the LEDs will constantly display the film count. The number of LEDs which light up corresponds to the number of shots left in the film pack. For example: If 6 LEDs light up, that means there are 6 shots left in the film pack. If you have used up all 8 shots in the film pack, or if there is no film pack inserted in the camera, then the LEDs will blink rapidly when you turn the camera on.
How much battery
you have left
The camera has 3 battery states, indicated by
the camera's flash charge LED light:
- Battery charged: Enough charge for at least 2 packs of film.
The flash LED will blink green whilst charging between shots, and will be solid green when ready to shoot.
- Battery low: Enough charge for about 1 pack of film.
The flash LED will blink orange whilst charging between shots, and will be solid orange when ready to shoot.
- Battery empty: No charge remaining. The flash LED will blink red, and the camera will cease to operate until it is recharged.
A fully-charged OneStep 2 camera will have enough power to shoot 15-20 packs of film, depending on usage. To check the camera's charge at any time, switch the camera off, then switch it back on whilst holding down the self-timer button. The 8 film counter LEDs on top of the camera will light up, indicating
how much battery remains.
For example: If 6 LEDs light up, that means the camera has 6/8 (75%) charge remaining.
Once you release the self-timer button, the LEDs will return to displaying the number of shots remaining in your film pack.
Compatible Film
The OneStep 2 works with all Polaroid Originals i-Type and 600 type film packs. We recommend using i-Type film as it is optimized for use with the OneStep 2.
Power supply
Charge the OneStep 2 before use to ensure it has enough power for the duration of your shoot (see Charge the Camera). The flash charge LED will be solid red whilst the camera is plugged in and charging, and will turn off once the camera is fully charged.
Attach the camera neck strap
See page 8 for guide to attaching your neck strap.
Using a Tripod
The OneStep 2 has a tripod socket in its base, which works with most standard tripods. Simply screw your tripod mount into the socket on the base of the OneStep 2.
Note With most tripods, the tripod mount will need to be unscrewed before you can load or exchange film into the OneStep 2.
Cleaning the rollers
Sometimes excess developer paste from photos may build up on the camera's rollers, affecting the camera's performance and causing photos to show unwanted imperfections. The OneStep 2 has a built-in roller cleaning mode to help with this issue. Just follow these steps:
- Turn the camera off.
- Open the film door.
- Hold the flash override butt and press the shutter button.
- The camera is now in roller cleaning mode.
-
Using a damp cloth or cotton swab, gently clean the rollers.
-
Press shutter button to incrementally advance roller positions.
- Once both rollers are clean on all sides, close the film door.
- Rollers will automatically return to their correct position.
Troubleshooting & FAQ
My OneStep 2 won't eject my photo/darkslide
Make sure that your OneStep 2 camera is charged: The camera's flash charge LED will blink red if it doesn't have enough charge to operate. If this is the case, you should recharge your camera before using the camera again.
Make sure you still have film in your camera: to check, slide the power switch off and
on. The remaining film counter LEDs will indicate how many shots you have left in the film pack. If the LEDs flash rapidly when the the camera turns on again, this means that there are
no shots left in the film pack, or that no film pack is inserted.
The flash doesn't fire when I take a photo
When taking photos make sure you aren't accidentally pressing the flash override button, located on the camera's back panel.
My photo turned out slightly too dark
We strongly recommend that you always shoot with flash when shooting indoors, as well as outside at night-time, at dusk and on cloudy days with low light conditions.
Make sure you are not shooting towards the sun; the OneStep 2 meters the average light level it sees. When shooting toward sunlight, the excessive light may cause the camera to over-compensate when exposing the image, creating an image that is too dark to expose your subject properly.
Move the lighten/darken switch on the right side of the lens barrel to the plus/lighten
position for a brighter image.
My photo turned out blurry or fuzzy
When shooting, make sure to hold the camera steady, especially in low light conditions, and make sure you have a strong light source to illuminate your shot.
We strongly recommend that you always shoot with flash when shooting indoors, as well as outside at night-time, at dusk and on cloudy days with low light conditions. You can also use a tripod to give your camera a stable base.
Make sure you are not too close to your subject when taking photos. In order to avoid blurry or out-of-focus photos, you should shoot from at least 60cm (2 ft) away from your subject.
Tips for Making Great Photos
Make photos indoors
Always use the flash when shooting indoors, even if you don't think you need it.
Indoor light appears yellow on analog film - the OneStep 2's flash is designed to compensate for this.
Make photos at night
When shooting at a party (or any indoor night-time environment), you should always use the flash.
You can also try moving the lighten/darken switch to the plus/lighten position to get a brighter shot.
Make photos outdoors
Natural light is your best friend when it comes to instant photography. On a sunny day outdoors, you don't need to use your flash at all. Make sure not to shoot towards the sun; shoot with the sun behind you, facing your subject directly
or side-on. If your environment is very bright, you can try moving the lighten/darken switch to the minus/darken position to let less light into the shot and prevent it from being "blown out".
In any situation where you are not shooting in bright, direct sunlight, we recommend still using the flash to achieve the best shots.
Make landscape photos
When trying to capture a landscape shot, make sure that the sun or main light source is behind you to prevent the image from being "blown out" by excess light.
On a cloudy or overcast day with low light, you may wish to place the camera on a tripod or steady surface which will make it easier for the entire scene to remain in focus.
Customer Support
The Polaroid Originals Customer Support Team is always more than happy to hear from you. Get in touch using the contact details provided. For more detailed and up-to-date information, visit polaroidoriginals.com/help
USA/Canada
usa@polaroidoriginals.com
+212 219 3254
Europe/Rest of World
service@polaroidorphinals.com
0080057701500
Impossible B.V.
P.O.Box 242
7500AE Enschede
The Netherlands
Technical Specifications
General
Dimensions
150mm(L)×111mm(W)×97mm(H)
Weight
460 grams (without film pack)
Operating Temperature
40-108°F/4-42°C,5-90%
relative humidity
Compatible Film
Polaroid Originals I-Type and 600
type film in both Color and Black &
White, including Special Editions.
Battery
High performance lithium-ion
battery, 1100mAh, 3.7V nominal
voltage, 4.07Wh
Materials
Outer shells
Polycarbonate + ABS plastics
Lens
Optical grade polycarbonate
lens,coated
Shutter system
Custom design using precision
step motor
Optical System
Lens
Fixed focus lens
Focal length
106mm
Field of view
41 degrees vertical.
40 degrees horizontal
Flash System
Vacuum discharge tube strobe
Safety Information
Caution. RISK OF ELECTRIC SHOCK - DON NOT OPEN/ DISSEMBLE THE AUTOPRESSED POWER SYSTEM
- Do not disassemble the device. Incorrect reassembly can cause electrical shock in the device is used again.
- Do not immerse the device in water or other fluids.
- Do not operate the device in a high humidity environment or very dusty environments.
- Do not attempt tamper with, adjust or remove the battery and/or the electronics located below the rollers behind the device's film door.
- Do not attempt to remove the door itself as it is connected electronically to the body of the device. Doing so is unsafe, will likely damage your device, and will void your warranty.
- Do not insert metal objects into the device.
- Do not insert any objects into the rollers or gears.
- Keep small children and infants away from device to avoid them being injured by the device's moving parts.
- Do not use or store the device near any heat source or any type of equipment that generates heat, including stereo amplifiers.
- Do not use the device near flammable or explosive gases.
- Do not charge the device if you notice any unusual odors, noise or smoke.
- Do not attempt to disassemble the film's battery or modify it in any way (if using 600-type film). If battery fluid gets in your eyes, immediately rinse your eyes with fresh, cold running water and seek medical attention immediately.
Battery and Charger
-
This device uses a custom lithium-ion battery that is non-removable and mounted inside the camera body. No other type of battery can be used. Battery replacement can only be done by authorized service centers. The b will provide many years of service if properly used.
-
Power consumption varies depending on the environment the device is used in and how the device has been stored. Used immediately after full charge, the battery will power the processing of up to 20 film packs with flash exposures. Due to the high energy requirements of the flash, we recommend charging the camera fully before every session for best results.
Once the battery energy level falls below a certain level, the device will no longer process film. The LED will blink and signal when it needs to be recharged. This is to avoid a photo getting stuck as it is being processed through the roller system. - The rechargeable battery is not fully charged at the time of purchase. Charge the battery fully with the USB charging cable (provided). This usually takes 1-2 hours (can vary depending on usage).
The supplied battery charging cable has been tested to work with the Apple iPhone power adaptors. While it can be used in other USB ports e.g. computer, USB power adaptors, TVs, cars etc., correct operation cannot be guaranteed. - When the device is no longer in use, please recycle it properly.
Usage Environment
To protect the high-precision technology contained in this device, never leave the camera in the following environments for extended periods of time: high temperature (+42^ / 108^) , high humidity, places with extreme changes in temperature (hot and cold), direct sunlight, sandy or dusty environments such as beaches, damp places, or places with strong vibrations.
- Do not drop the device or subject it to severe shocks or vibrations.
- Do not push, pull or press on the lens.

Compliance
Important directions for using
Lithium-Ion Batteries
1. Do not throw into fire.
2. Do not short circuit.
3. Do not disassemble.
4. Do not continue to use when damaged.
5. Dispose correctly after use.
6. Keep away from water.
EU Declaration of Conformity
Hereby, Impossible B.V. declares that the OneStep 2 analog instant camera is in compliance with the essential requirements of the Electromagnetic Compatibility Directive (2014/30/EU), Low Voltage Directive (2014/35/EU) and RoHS Directive (2011/65/EU) and other relevant provisions when used for its intended purpose.
FCC Compliance Statement
This device complies with Part 15 of the FCC Rules. Operation is subject to the following two conditions: (1) this device may not cause harmful interference, and (2) this device must accept any interference received, Including Interference that may cause undesired operation.
Caution The user is cautioned that changes or modifications not expressly approved by the party responsible for compliance could void the user's authority to operate the equipment. This equipment must not be co-located or operated in conjunction with any other antenna or transmitter.
Note This equipment has been tested and found to comply with the limits for a Class B digital device, pursuant to part 15 of the FCC rules. These limits are designed to provide reasonable protection against harmful interference in a residential installation. This equipment generates, uses and can radiate radio frequency energy and, if not installed and used in accordance with the instructions, may cause harmful interference to radio communications. However, there is no guarantee that interference will not occur in a particular installation. If this equipment does cause harmful interference to radio or television reception, which can be determined by turning the equipment
off and on, the user is encouraged to try to correct the Interference by one or more of the following measures:
Reorient or relocate the receiving antenna.
- Increase the separation between the equipment and receiver.
- Connect the equipment into an outlet on a circuit different from that to which the receiver is connected.
- Consult the dealer or an experienced radio/TV technician for help.
This equipment complies with FCC radiation exposure limits set forth for an uncontrolled environment. End user must follow the specific operating instructions for satisfying RF exposure compliance.
Industry Canada (IC)
This device complies with part 15 of the FCC Rule and Industry Canada license-exempt RSS standard(s). Operation is subject to the following two conditions: (1) This device may not cause harmful interference, and (2) this device must accept any interference received, including interference that may cause undesired operation. The present appeelie est conforme aux CNR d'Industrie Canada applicables aux appellie radio exemptes de licence. L'exploitation est autorise aux deux conditions suivantes: (1) l'appeelie ne doit pas produit de broullage, et (2) l'utiliser appeelie doit accepter tout brouillage radioelectrique subi, meme si le brouillage est susceptible d'en compromitre le fonctionnement.
The symbol means that according to local laws and regulations your product should be disposed of separately from household waste. When this product reaches its end of life, take it to a collection point designated by local authorities. Some collection points accept products for free. The separate collection and recycling of your product at the time of disposal will help conserve natural resources and ensure that it is recycled in a manner that protects human health and the environment.
Specifications techniques
Général
Dimensions
(sans cartouche de film)
4-42℃/40-108°F,5-90%
d'humidité relative
Films compatibles
Directives Importantes relatives
4-42℃/40-108°F,5-90%
umldita relativa
Pellicole compatibili
41 gradi in vertical,
4-42°C/40-108°F,5-90%
KUHJUHJUHJUHJUHJUHJUHJUHJUHJUHJUHJUHJUHJUHJUHJUHJUHJUHJUHJUHJUHJUHJUHJUHJUHJUHJUHJUHJUHJUHJUHJUHJUHJUHJUUHUJI HUUUUUUUUUUUUUUUUUUUUUUUUUUUUUUUUUUUUUUUUUUUUUUUUUUUUUUUUUUUUUUUUUUUUUUUUUUUUUUUUUUUUUUUUUUUUUUUUUUUUUUUUUUUUUUUUUUUUUUUUUUUUUUUUUUUUUUUUUUUUUUUUUUUUUUUUUUUUUUUUuuuuuuuuuuuuuuuuuuuuuuuuuuuuuuuuuuuuuuuuuuuuuuuuuuuuuuuuuuuuuuuuuuuuuuuuuuuuuuuuuuuuuuuuuuuuuuuuuuuuuuuuuuuuuuuuuuuuuuuuuuuuuuuuuuuuuuuuuuuuuuuuuuuuuuuuuuuuuuuuuuuuuuuuuuuuuuuuuuuuuuuuuuuuuuuuuuuuuuuuu
卫吉自
2. 華蓉龙豆
OneStep2 kama hao chunqyoidenit
chinyiHaiHaiHaiHaiHaiHaiHaiHaiHaiHaiHaiHaiHaiHaiHaiHaiHaiHaiHaiHaiHaiHaiHaiHaiHaiHaiHaiHaiHaiHaiHaiHaiHaiHaiHaiHaiHaiHaiHaiHaiHaiHaiHaiHaiHaiHaiHaiHaiHaiHaiHAI HAI HAI HAI HAI HAI HAI HAI HAI HAI HAI HAI HAI HAI HAI HAI HAI HAI HAI HAI HAI HAI HAI HAI HAI HAI HAI HAI HAI HAI HAI HAI HAI HAI HAI HAI HAI HAI HAI HAI HAI HAI HAI HAI HAI HAI HAI HAI HAI HAI HAI
kanlhyhHSAKnKsWuHcKngdKa
kkanrHanHJHnKnKnKnKnKnKnKnKnKnKnKnKnKnKnKnKnKnKnKnKnKnKnKnKnKnKnKnKnKnKnKnKnKnKnKnKnKnKnKnKnKnKnKnKnKnKnKnKnKnKn
如LEDa 落白川电
Polaroid Originals i-ahaii 600 Aauii,
E
PykoBoDCTBO NOIb3OBaTeJIa
TapaHTnA
TapaHTna Ha daHHbI foToaannapat
PnPBedeHa no aDpeCy:
polaroidoriginals.com/warranty
KoMnJIeKT nOCTaBKN
01 Φοταπηρατ OneStep 2
02 USB-ka6ebnIaIra3apdKn
03PyKOBOCTBO
ПОЛьЗВаТЕЛЯ
04 甲HbIpeMeHb foToaannapata

Hnctpykun no 3Kcnnyataun OneStep2
3apnte foToannapaT
BaKHO Ha MOMENT npno6peTeHnIaOneStep 2 3apXeH He nONHOCTbIO - nepei nepBbIM NC-NOb3OBAHNEM ero Heo6xOdmoN0NoHOCTbIO 3apJNTb. YTo6bl3apJNTb foTOannapat, BCTABTe USB-Ka6enb M Micro-USBHa 3aDHe N aHeN, a BTOpoi KOHeuKa6eN NoKnIOHTe K 3apJNDMy yCTpoiCTBy (HaNPmep, MOHO BOCNtBc0BaTcBc 3apJNbHMycPOIcBOM cMapfOHa HINUSB BaWero KOMNtOpeA).KorDa aKKyMylTop 6ydt 3apXeH NOHOCTbIO, KpachbIM MIRAOUcN CBeTOnIOhBn HNDkAtop BblKNIOHTC
ДлгпОннOHЗардКН OT po3eTkn СИСПОЛБЗОВАHЯМДАДАТЕРа ДлгсмApTФОHA O6bIHHO Tpe6y- ETcR OKONo 2 yapOB, a OT USB KOMMbIOTepa Do 4 yapOB. ПО- HORO 3apraФOTOannapata OneStep 2doCTaTOHOnДпЯИ нOLьЗОВАн� 15-20ФINьMnA- KOB (B 3aBnCIMOCTN OT pEXMIMOB
cbeMn).He 3a6bibaTe BbIKIOuA Tb foToaannapat nocne kaxDOro NcNoB3OBAHn, YTo6bl npOaNTb pecypc akkMynraTopa.
1.BkIIOUeHne N BbIKIOUeHne fOtoannapata
TtObB BKNIOUHTb fOtoannapat, CDBINbTe NpeKIOUcATEb NITAHNBA NOIOXeHMe BKNIOUeHn (BHN).Ha 3aDHei naHEn HaHT He MIRATb CBToDNIOI 3apRKn BCbIuKN, a HA BPxHei NaHEn NOCDBTNTC qETNUK OCTABUNXCKA KApOB, yKa3bIBaH BA KJIIOUeHne fOtoannapata.
BbIKHOUHINH pOToa-napata BepHnTe nepeKIOUa-TeNb NITaHnB INCXoHoe NOJOKHe.
2.3arpy3ka nIeHKn
CdBHbTe 3aueNk KpbIuKo OTCeKa dIe PnEKn, YTO6bIOT-Kpblb KpbIuKc. BcTaBte KaCCeTy cPiEKnO do ynpa, CBeTo3aUHTHO 3acNoHKOBBepX.
PpmeaHne Bpem npoBKn, yka3aHnno obaaeeHIO n xpaHeHIO cm. Na HnDnBu
DyaJIbHOYyNAKOBE NHeKN.
3.3akpbTne KpbIuKn OTeKa DnA nHeKN
Pn3aKpblTn KpbIuKn OTceKa
JII PIIeHKn CBTeO3aUHTHa 3aCLOHka 6ydt ABOMaTHueCKn
YdaJIeHa n3 fOToaInpaTa n3-
ND3aUHTHO 3KpaHa.
MaccobB 3aUHTbH 3KpaH
PpeOTbPaAaet 3acBeUHBAHne
N3o6paKeHH B IpOeCE PPO8KN - He CHIMaTe erO. N3BLeKNTe CBTeO3aUHTHy O3CLOHKY n3-ND 3aUHTHO
3KpHa H dAIte 3KpaHY BCTaTB
Ha MeTO. ECNI CBTeO3aUHTHa
3aCLOHKA He BblNa, IN3BLeKNTe
fInlbMaNK i CHOba BCTabBte erO
B fOToaInpaT Do yNopa.
4. HactpoKa BCbIuKn I cyHKun OCBtJeHn/3aTeMHeHn
Bcblka Pnp cbemke foToaannapatom OneStep 2 BCblka cpaabaBaet no yMOnuHIO. TObchIMaTb6e3 BCblkUN, B MOMENT HaxKaTIN KHONKn Cnycka 3aTBOPa HaxMITE n UyepKJBauTe KHOKNB6NKOPOBKN BCblNKn Ha 3aDnei NaHenn.
PepdunpexdeHne Cbemka 6be3 BCnbluKIN CHNkAeT aΦ-FeKTINBHOCTb FOToaannapata N KaeeCTBO CHIMKOB B 60bnMHCTBe ycNOBnOCBEueHnra, 3a NCKIOUeHnEM npKOro COJIHeHORO CBeta. PekomdyetcBcerda NOIb3OBATCBNblkoKo
OcBeTJIeHne/3aTeMHeHne
C NOMOUSI nepeKJIIOUATEJRA OCBETLEHNA/3aTEMHEHNA Cnpaba OT ONPABBI oBekTNIBA MOXHO peryINPOBATb 3KCN0NtNUO CHIMKA.Дд NOUYeHNA 6Oone CBETLIORO CHIMKA cDIBNHTE peKeKIIIOUATeB OCBETLEHNA/3aTEMHEHNA BNPABO, B NOIOXeHNE «NIOOC/OBCTMEHNE».YTO6bl CdelaTb FOToTropaFIO TEMHeE, CDBINHBTe nepeKIIIOUATeB OC-BETLEHNA/3aTEMHEHNA BNEBO, B NOIOXeHNE «MHNYC/3aTEMHEHNE).3TN DB COOTBECTBYOT pa3HBIM 3KCN0NtNUOHHbIM YNCnAM (ev). 3KCN0NtNUOHHbIE YNCnA foToaannapata +1 / 2 ev (pni nepemeueHNI nepeKIIIOUATEJRA B NOIOXeHNE «NIOUC/OCBETLEHNE») n-1/2 ev (pni nepemeueHNI nepeKIIIOUATeRBA NOIOXeHNE «MHNYC/3aTEMHEHNE)
5.Исплььзоване ВДОДСКАТЕЛ
B OneStep 2 nCnoIb3yetyTpa- dIuOnHbI BUnOcKATENb, pa- nOIOKeHHbI cnpaba OT npabbl o6BeKTnBa. BUnOcKATENb pa- 6oTaET C HAnbONbSe TOnHOCTbIO, KOrDa NOnb30aTeNb pN6nHexaET npABb rna3 K npoctpaHCTBy No3aH Hero, OIIpaYbc UeKOHa ChCKoKOpNyCa KaMepbl.
CneyET NOMHnB, YTO BN-ONCKATEb paCNOJIOXeH HEMHOrO BblIe N IpaBee 06bEKNTBa FOToaannapata -BblIe N neEe HAnpABNeH N B3rrJaNoJIb3OBaTEB N MOMENT CbEMK, -N03TOMy Heo6xOmIMO yHTbIBaT 3TO DnI NOnUeyHIN pA-BnJIbHOI KOMPOn3uIN KAdpa npN FOToRpaOpobAHNI Ha pacCToTHnx1,2MeTp aNN MeHee.
6. Komno3nua foToIpaHn
TObbl NoJyHbIpe3KnCHMOK,B MOMeHT CbeMKHyXHO HaxOuNTbcraHa pacCToRHMHe MeHee 60cmOTobekTa.Dna NOyueHHaONTMaJIbHbIX
pe3yIbTaTOB CTapaNTecb foToTpaHPOBaT TaK, YTO6bI NCTOHHK OCBueHn8 6bl y Bac 3a CnIHOH.
7.Cbemka
TTo6bI CdeNaTb CHMOK, HAKMNTe KONIK CyNcKa 3aTBopa. AK TOJbKO Bt OTNYCTNE KONKcy Cnyska 3aTBopa OT CBeta 3a-HTbIM 3kpaHOM NФКСИРуETC RA He MeCeTo E Tex NOP, NOKA Bbl He 6yDeTe FOToBb ee.
8.N3BneHne 3aunTa CHMka
N3-NO3aunTHoro 3KpaHa N daIte EMByepHybcB afoaannapat. IIOXnTe FOToRpaHIO nueBOCTOPHOBHN3,HTO6bl 3auNTNb eeOTCBETA BO BpEM npo8BKn.
DOnoJIHnTeIb-HbIe HNcTpkyCUN
McnoIb3ObaHne aBTOcnycka OneStep 2 ochaueh fyuHKnnei aBTOcNYcka, KOTOPaI NO3BOJnEe
foTOrpaHnpoBaTBc6aIINeIaTbNdeAaBHo CnHxPoHn3nPoBaHHbIe CHMkN. YToobI BOCNoIb3OBAbTCABrABTOCnYCKOM, HaxMMTE KHOKNy ABTOCnYCa CJIeBAOTOnpABBI OObEKTINBa. KHONKa ABTOCnYCa OPaHKeBbIMUBeTOM, YTO YKa3bIbAEt HaAKTNBaUNo ABTOCnYCa. BbIbPAKOMIOuNIO KaPDA, HAXMMTeKHOKNy CNyCKa 3aTbOPa.BpeMa3aDePKM MeKdy HAXATNeMHKONi n CNYCKOM 3aTbOPaCoCTaBNIET 8 cekyH. Iocne aKTNBaUNn OPaHKeBbI CBeTODNOHb INHdNKATOp ABTOCnYCaMMaTb, YTO yKa3bIbAEt HaHaJIo 6bathoro OTCeTa. B JRPOKO C0BSeHbIX MecTx IINHaCONHeHOM CBeTe BCblIka FoToaannapata Takoke HauHaeT O6pAThBIOCTe, O6OHaaeMbIKOPOTKMMN BCblIbKAMm ManoiMOUHOCTH.
Pn INoJIb3OaHn ABTOCnycka DnA CbeMKn BCbIuKc Pca CpaBtBbaet ABOMaTHeck.Ny6blcenaTCHIMOK cABTOCnyckom Be3BCbIuK,AKTNbPyTe ABTOCnyck,3aTeM OJHOBeMeHHO C HxKaTNe M KhoNk
Cnyska 3aTBopa Haxmnte N ydepxnbaiTe KhoNk6Iokn-POBK BCbblKN.
OctaOKΦOTONJIENKIN B KACCETe
HaBepxHe naneHn foToannapata paonOnKeHbI 8 opaHkeBbIX CBeToNDhbIX INDkATOpOB. KOrda OneStep 2 BKNIOUeHn He HAXOINTCB CnAeM peKMME, INDkATOpBI NOCTOHHO OTObpaKaHO T3anac NNeHKn. KOJIueCTBO INDkATOpOB COOTBECTByET KOINCeTBy KaDPOB, OCTabuNXcB FmNbMnake. Hanpimpe: ecn6 INDkATOpOB, 30oO3NaHaet, YTO BfNbMnake octanocb 6 KaDPOB. EcnNcNOJ3ObaHb BCE 8 KaDPOB fNlbMnaka, IIn6o ecn fNblMaNK He yctaHOBHe B fOtoannapat, pRn BKNIOUeHN NocJeHrO INDkATOpBI sbICTPO MrrAOT.
3apd akkymnyTopa
Bpoaannapate npedymotpe
HO 3 coctoHnA kkyMnyTopp,
Oo3Haayemble CBToDIOHbIM
INDAKATOPM 3apra BcNbIuK:
1.AkkyMnyTOp NOnHOCTbIO 3apxHe:
3apda doctaToHOKak MNHmym Ha 2fMbnaKa.BoBpem3 ZapdIKM MeKdy Ka-dpamn HndkATOp BCbIuKN Mraet 3eNehBM,a nocne rotobHOcTNI K CbeMe 3eNehbln HndkATOp
2.Hn3kn3apnakkymyntopa: 3apna doctatoHNO npimepHoHa1ΦnMbNak.
BoBpEmzapJmMxJyKa- dpaAMnHnKATOP BCbIbIKM Mraet OApHKeBbIM, a NocLe roTOBHOCTN K cBeMeKe OApHXKeBbIMnHnKaTop
3.AkkymyIaTOp IOnHocTbIO pa3pJKeH:
3apnOTCyTCTByeT
IkpchbIM, n foToaannpata BblKIOaETc. NOBtHoe BKNIOeHne BO3MOKHO TOnBko Nocne 3apdKn AKKyMnTopa.
POnHoro 3apra da foToannapata OneSlep 2 doctatoHOnIa IcNOnb3OBOAHn15-20ФmblMnAOB (B 3aBnCmOCTn OTpeXIMOB cbemKn).UTo6bI npoBeRHTb 3apd foToannapata BIOIOOM MOMENT, BByKIOHNTe foToanpapat, 3aTeM CHOBA BKIOHOTe er, yDepkBaRa HaxaToI
KHOIky ABOCTNYcKa.8 INHIMKaTOpOB CyeTHNk KaDPO HA BepX-Hei NaHEIN FOToaannapata, NOKA3bIBaB OCTaBmC3apJdAKyMyIITopA.
Hanpimep:ecn6MHdkaTOpOB,30O3HaAeT,4TO OCTabWmC3 3apd fOtoannapata coCTabJre8/6(75%)OTMAKcMyma. Nocne OTnyckHnKONk ABTOcNycka HNDNKaTOpbCHOBA6yDyT NOKa3bIBaTb KOnIYeCTBO OCTaBxXCR KaPOB BfNlbMaKe.
COBmecTmMaI nnEHa
B OneStep 2 MoXHo NcOnb3oBaT bIIO6Be FmJIbMnAKn TINa Polaroid Originals i-Type n TINa 600. PeKOMeHnyTeC rNcOnb3oBaT bIIeHky i-Type, taK KaO h ONTIIMnIropOBaHa dЯ pa6Ot bI cOneStep 2.
NCTOCHNKNTAHNA
Npeed nCnoIb3oBaHnem 3apA Dnte OneStep2, yTo6bl o6ecneuTb DoCTaTOHyB yPoBeHb Ha BCE BpEmc bEmKn (cm. pa3dEi 3apAaTe foToaannapat). Ioka fpoaannpat noDknIOueH K NCTOCHNY NTaHn H
3apKaetc, INDnKaTOp 3apKIN BCblIKN NOCTOHHKO KpaHbIM NOCNE IOCTUKeHnI NIOHO 3apJa FOToaannapata INDnKaTOp NORaCHET.
PnncoeDHHne WeyHOro pemHa foToaannapata
Nopdok npkpenneHs Hto pemn noka3an Ha ctp.8.
McnoJIb3ObaHne UtaTnBa
HnKHe nHaHeN OneStep 2 PnpDyCMOTpeh, COBMeCTIM C BoNBWHCTBOm CTaHApTbIX uTaTNBOB. IpOcTo BBePHnte KpEnJIHe Me UtaTBA B Ha HnKHe nHaHen OneStep 2.
A3arpy3kn nn 3aMeHbI nHeKnB ONeSop 2 Heo6XOdMnO OToCoEINHrTB KpeNnHne 60bnHcHCTBa MoPeJeIe sTuTaNBOB.
OuInctka poJnKOB
HOrdaHa polnkaX foToannapata MOrYT cKaIINBaTbCRA YaCTNUI pOraBIAIOero COCTaBC fOtoRpaDm, YTO BNIeT Ha paBOOHe XapaKTePcTmKf FoToaannapata NMOkET BblBaTb HeKeNaTeJIbHbIe DepeKtBi Ha
CHIMKax.ДЯУСТРаЕнгИЗTOI npO6bEmbB OneStep 2 nped- yCMOTpeH pexIM OYICTKN polIOKOB.ВыПОЛНITE cNeуюшпе DeiCTBnIa:
- BbIKIOHTe cpoToaannapat.
- OtkpoTe KpbIuKy oTceKa dIra nnHkn.
3.YdepknBaHakatoKhONky 6IOKMPOBKn BCbIuKn,HAKMNTe KhONkCnycka3aTBopa.
4.Фотогларатнххдгсв ржиме очichtkn polnikob. - IcnoIb3yBnAkhHyIO TkaHb IINBaTHyIO NaOChky, OCToPOKHO OCHNTe pONKn.
- HaxMMTE KhoNky cnycka 3aTBopa, yTObI NOCTeNEHNOpeMeuATb pONIK.
- Korda oba polnka 6dyt ouHu- uenbI co BCex cTOpOH,3akponTe KpbliKy OTEcKa DnA PHeHNK.
- PONIKN ABTOMATNUeCKN 3aI- MYT INPABINbHOE NOIOKeHMe.
Ponck u yctpaHne HeNCpabHOCTeN uacto 3aDaBaembie BONpocbl
OneStep 2 He BbIaet foTo- rpaHn / He OTkpBaet CBETO3aunTHyIO 3acNoHky
Y6eHNTecb, YTO foToaannapat OneStep 2 3apxhen: ecn 3apa- aAkkymyToppa HeoCTatoHO dIpaobtby UcTPOHCTBA, INDkKatop 3apra BcblIKMmRAET KpaChbIMuTeOM. B 30m Cnyae Heo6xoJIMO 3aprntb foToaannapat nepe cneJeUwm IcNoJIb3OBAHNEM.
Y6eNTecb, YTO B fOToaannapate ectb PHeHka: TToBb IpoBepnTb 3TO, BBKIIIOHTe IN CHOBBAKNIOHTe NITAHne. CBeToNDHIE INDIAKATOpBc ChETNkA PNeHHK NOKAKyT, CKJbKO KaPBO8OCTAnOCB B FNbMnake.EcnnINDAIKATOpB bICTPO MIRAOI npBNKIOUeHN FfOToaannapata, 3TOROBOPOTOM, YTO B fNtBMnakeHE OCTANOCB KAdpOB,Ni60fNlbMnak HE BCTABJIeH.
Bcblka He cpa6aTbIbae Tnp CbeMke foTorpaqn Y6eNTecb, YTO np CbeMck cnuaHNO He HaxaIN KHOKy 6IOKIPOBKN BCblIKN Ha 3aHne nAHeN fOToaannapata.
ΦotorpaФн noIyauHOTc CJNWKOM TEMHbIMN
HaCToTeBHo peKOMeHdyETc HcNoJIb3OBAtB BCIIbIuKy npn CbEMKe B NOMeUeHIn, a TaKKe BHe NOMeUeHIn B TEMHOE BPEM CYTOK IN BObNaHyIO NorOy C HeIOCTaTOUYbIM OCBSeUeHnEM.
He cHmMaIte npOTNB coNHa; OneStep 2 n3MepReT cpedn H ypoBeH oBcSeEHHocTn B nole CBOERO 3peHn. PnP cbEMKe npOTNB COINHa CNIIKOM apKm CBET MOKET Bb3BaTb Ype3MePHyO KOMTeHCaUHn PpN EKClONHOPOBAHn KaJa, B pe3yIbTaTe Yero N3o6paXeHne NOlyuAeTc SNlKOM TemHbIM N obEeKt Ha FOToTpaHn pINOxo BVdH.
YTo6bI CTeNaTb N3o6paKHeHne
rpe, CdBnHbTe NepeKIOuHaTeNb
OCBeTJIeHn/3aTeMHeHn CnpBa
OT OnPpAbI ObEeKtNBa B NoNOkeHne «NNIOc/OCBETJeHne>.
FotorpaHn nonyuHTcpa3MbITbIMN HIN HeueTKMnB O BpeM CbeMKy UdepKmBaIteΦoToaIIapAT HeNOdBIXKHO,OC06eHHBO YCIOBNX HEOCTaTOHOrO OCBeUeHN, PnI 3OM 6b-ekt CbeMKn DOnKeH 6blTbXopoWIO OCBeUeH.
HactoTeIbHO peKOMeHyetyTcNcNoIb3OBA Tb BCblIuKy npCbeMke B NOMEseHn, a TaKKe BHe NOMEueHn B TeMHoe BpEMy CYtOK n B O6NaHuYIO NorOdy C HeOCTaTOUHbIM OCESeHnEM. MoXHo TaKKe BOCNoIb3OBA Tb cS TATINBOM, YTO6bl ObecneHTb yToHnBOe NoIooKeHne foToannapata.
Y6eHITcB, YTO npi CbEMKe Bb HaxoINTcB Ha DCtAToCHOM ydaneHH OT oBeKt. Yo6bI N36EkaTb pa3MbITbIX N FOToRpaΦn, paccToHnE Do o6kTe Ca bEmKIOJINKHO 6bITb He MeHee 60 cm.
Kak noIyUHTb notpcaUoUne CHIMK
CbeMaBnomeHnn
PnCbEMKeB NOMeEHNNO83aTeBHO NcNoB3yIte BCblIWKy,DAKe eCN BAM KAKeTcY,TOOHA He HyxHa.OCBeUeHHe B NOMeEHM BbrrnDHT Ha aHAnorOBONHeJeXeTTbIM-BCblIwKa OneStep 2 KomneHcnpyET 3OT 3ΦΦeKT.
Houhara cbemka
Ipi CBemke Ha BeuepHKe (INN B IIO60I DpyroO6ctaHOBKe B NOMeUeHN B HOOHe BPEMa) O6r3aTeJIbHO NIOb3yITcB BCbIIKo. MoTKaTkoNpo6OBaT nepeMeuTaB NepeKInOuaTeJIb OCBeTHeHNA3TeMHeHBA NIOXKeHNE (PnHoc/OcBeTHeHNe), YTO6bl NoYHTb 6Olee JPKn CHMOK.
CbeMka BHe NOMEueHnA
Korda pehIeT o MometaHb-HOM fotorpaHpOBAHm, ONTMaHbHb BapMaHT - 30 eCTeBHeHOcBEuEHN. B CoNHeHbI DeHb Ha npPoDe
NcOJIb3OBAtB BCblUKy BOO6e He Tpe6yeTcR. He ChIMaIte npoTIB COIIHua; npr CbEMKe CoINHue DOJIKHO 6blTy B aC 3a CNHoi, OCBeUaA OB6Kt npRAO MnN CBOky. Ecn Cpda CNuKOM npKa, MOxHO npeDVBHTy nepeKIOHaTeNB OCBETJeHNA/3aTEMHeHNA B NOLOXEHNE (MmHyC/3aTEMHeHNE), YTObI yMeHbUHTb KOINHECTBO CBeta, nonaDOUeHO Ha KaAp, n PpEOdTBPaTIb ero «3aCBETKy). B IIObO bcyauu, KpoMe CBEMKn B yCIOBnx RpKOro NpAmoro COJIneHOrO CBTa peKoMEHdyETcR cNcIOB3OBaTB BCblHKY DnI POUYHEn CHIMKOB MaC-CMImalHoT O KaHctBa.
IaHuaapthar foTOrpaHn
Pn CbEMKe ne3aKeen coIHue
HIN OCHOBHO HCTOCHK CBeta
DOJIKNHb 6BtB 3a CnHIO, YTO6bI
He DOnyCTNT 3acBeTKN IIO6paXeHHA N3-3a CnMxKOM RpKORo OCBeUeHN. B NaCmpyHb INn XMypbl DeHb C HeOCTaOHTbIM
YPOBHEM OCBSeHcEHOct MNHO
ycTaHOBIT FOToaannapat Ha
HTATIN IN HA yCTOINHBIO NOBepxHOCTb -3TO oBleIeHT COxpan pe3kOCT Bce CIeHb.
TexHnuecka npDnepKka
CnykbaTexnueckon nopepkn Polaroid Originals bcerda pada npniTuHa nOmoiIb. Ia cB3aun C hAmu MCNOIb3yute npBeeHhble HNKE KOHTAKTHbe daHHBe.IIra NoNYeHHBE 6oBeNo pOboHoi n AKTAYbHOH INHOPMaUN Ha Be6caIT polaroidoriginals.com/help
CUSA/KaHana
usa@polaroidorphinals.com
+212 219 3254
Ebpona/ocTaNbHbIeCTpaHbI
service@polaroidorphinals.com
0080057701500
Impossible B.V.
P.O.Box 242
7500 AE Enschede
Hnepnndb
TexHnueckne xapaKTepeNCTnKn
06uhe xapaKTepeNCTnKN
Pa3Mepb1
He copaciteyctpOCTBOH Hne pndepraitee
He HAXIMaIe, He TRHITe OObkTNB.
COOTBETCTBNE HOPMATNBHBM Tpe60BAHBM
Bakhye yukazanba no ncohfo3oahno nntnHnbo h kaxmymTTOO
1.He6pocatb8 orphb.
2. He nonBepratb KopoTkOMy 3AmbikaHIO.
3. He pa36npa7b.
4.He npoipnokatb wHONB308AHBE CNYAe
NOBpeXdeHH.
5. PpabunbHo yTnnnmpoBaTb no OKOHann
0KcnnyataaHn.
6. XpaHmB DAnn OT BoDbl
Deknapaun EC o COOTBETCTBUN
KOMKANIAH IIOPOSSIBLE B.V. 3AABHHT,TOA HAMONOBH POTATOBNTMHRBOHOHN CEMINOneStep2OTBEAEBCTOCHOBHM TPEBOBHAMI DAPTECBTH6OENETPOMARAHTHNO CHOMEETMOCTN(2014/30/EU)DPCBTH6O O HAKKOLOTNOMOBOPOUPDOBAHNN(2014/35/EU),DIPMECBTH6O OPAHPAAHEQCOMDEPKHAJI BPEDHXBEVCECT(2011/65/EU)nDPYNX COOTERTBYQUXIPOPPNDHCNAHPI pYCROBNIC NCRTHNBAHIBHRAPOATMNPATA NOUEBBOH HAHAYEHNO.
CIMBONO 034HHaOT, YTO B COOTBOCTBH M CMEHTHM 3AKOHODATNECTBOM H OHPMAH YTNMIHOPOBaTb 3TO HdJIeNHe NEO6HOAMIO DNTIOHIO TO DOTBOXIE XOTDOB.
TO INTECHENM CPOKA CYKbIK DaHBOHO HNDJIEMBO CNOcIeYET cAaB b NYKT pINHMA, MECHbHM OropAHMA BnACTb. HekToPbe NyHKTI pINHMA PpINHMAHKT KEDNtBcEgTHaHO. YTMHaauaJIu MDAHN a C60NILOHEmP pINHAI RABDIIHO C6Opa H INepeAOBTHMOKET PPINOIDHDe DecpchI I rapaHTNIpyET nepeoBtoy Ka oOTBETCBM T Cpe6OBaHBMMA 3aJITZ3DOPOBbI NKQYAKOUe CPDEI.

OneStep2 i-Type camera
OneStep 2 Analog Instant Camera Polaroid Originals
Impossible B.V.
P.O. Box 242
7500 AE Enschede
The Netherlands

Revision 3.0 - 10/2017
Manufactured in China. This product is distributed and sold by Impossible B.V., P.O. Box 242, 7500 AE Enschede, The Netherlands and its wholly owned subsidiaries. Polaroid, Polaroid Classic Border logo, Polaroid Originals Design and Polaroid OneStep are trademarks of PLR IP Holdings, LLC, used under license. PLR IP Holdings, LLC does not manufacture this product or provide any Manufacturer's Warranty or support.
Join our community by signing up at polaroidoriginals.com