
Curl Secret C1300E - Curling iron BABYLISS - Free user manual and instructions
Find the device manual for free Curl Secret C1300E BABYLISS in PDF.
| Product type | Automatic curling iron |
| Brand | BaByliss |
| Model | Curl Secret C1300E |
| Cylinder coating | Ceramic |
| Maximum temperature | 230 °C |
| Temperature settings | Position I: 190 °C (35 mm) / 210 °C (25 mm); Position II: 210 °C (35 mm) / 230 °C (25 mm) |
| Removable accessories | 2 diameters: 25 mm (tight curls) and 35 mm (volume and loose curls) |
| Adjustable heating time | 8, 10, 12 s (for 35 mm); 10, 12, 14 s (for 25 mm) with audible signal |
| Curl direction | Right (R), Left (L), Automatic (A) |
| Ionic technology | Yes, for shine and anti-static |
| Automatic shutdown | After 60 minutes of continuous use |
| Sleep mode | After 20 minutes of inactivity (temperature reduced to 150 °C) |
| Protection system | Anti-tangle: lock and stop in case of tangling |
| Swivel cord | Yes |
| Power supply | Mains (220-240 V ~ 50/60 Hz, estimated) |
| Maintenance and cleaning | Wipe with a damp cloth after cooling and unplugging |
| Repairability | Not specified (made in China) |
| General information | Made in China; Distributed by BaByliss, 99 Avenue Aristide Briand, 92120 Montrouge, France |
Frequently Asked Questions - Curl Secret C1300E BABYLISS
User questions about Curl Secret C1300E BABYLISS
0 question about this device. Answer the ones you know or ask your own.
Ask a new question about this device
Download the instructions for your Curling iron in PDF format for free! Find your manual Curl Secret C1300E - BABYLISS and take your electronic device back in hand. On this page are published all the documents necessary for the use of your device. Curl Secret C1300E by BABYLISS.
USER MANUAL Curl Secret C1300E BABYLISS
CHARACTERISTIQUES DU PRODUIT
With the BaByliss Curl Secret® 2, you can increase the volume of your hair and create exceptionally long-lasting, beautiful curls in complete comfort. Thanks to its clever automatic system, the Curl Secret® 2 satisfies all your desires without requiring tedious hand movements.
Read the safety instructions first.
PRODUCT FEATURES
- Ceramic-coated cylinder (1)
-
2 removable accessories to create different diameter curls:
-
25 mm: tight curls (2)
- 35 mm: volume and larger curls (3)
Heats up quickly (max. 230^
- Temperature setting using the 0-I-II switch: 190^ - 210^ (I), 210^- 230^ (II) (4)
-
Timer settings with audio beep indicator to create various types of curls (5) - 10, 12 and 14 seconds for the 25-mm accessory
-
8, 10 and 12 seconds for the 35-mm accessory
-
Adjustment of the direction of the curl R/L/A (Right/Left/Auto) (6)
- Ion technology: glossy, non-static
- Indicator light (LED) (7)
Automatic shut off - Swivel cord (8)
USE
Notes
- When using the unit for the first time, you might notice a little smoke and a distinct odour: this is common and will disappear by the next use.
Each time you use the appliance, you may see some steam. Do not be concerned, this could be because of evaporation of the natural oils of the hair, residual hair products (leave-in hair products, hairspray, etc.), or excess moisture evaporating from your hair. - A heat-protection spray can be used to provide optimal protection of the hair.
-
The ioniser within the device frees gives off ions which have an anti-static effect, leaving your hair nice and soft with a shine. Please note: It is quite normal to hear a slight noise, similar to a crackle: this is the characteristic noise of the ion generator.
-
Select the accessory according to the type of curls desired:
-
25 mm: tight curls
-
35 mm: volume and larger curls
-
Always position or remove accessories before plugging the appliance in and switching it on.
- To remove the accessory, press the two buttons on the two sides of the accessory at the same time, using your thumb and index finger (FIG. 1).
- To position the accessory, place it onto the appliance head until it clicks in.
- Plug in the appliance, switch on, and select the desired temperature using the 0-I-II switch. See table below:
| Temperature Ø 35 mm | Temperature Ø 25 mm | Hair type |
| (I): 190°C | (I): 210°C | Fine, bleached, and/or damaged hair |
| (II): 210°C | (II): 230°C | Normal hair, thick and wavy, or dyed |
- The indicator light comes on and will start to flash.
- The indicator light will stop flashing when the appliance has heated up to the selected temperature. The appliance is now ready to use; the indicator light will stay on.
- Select the time setting depending on the desired curl effect. For loose curls, select the minimum time setting. For tighter curls, select the maximum time setting. Please refer to the table below:
| Time Audio beep indicator Curl effect | ||
| 8 seconds (Ø 35 mm) | 3 beeps (Ø 35 mm) | |
| 10 seconds (Ø 25 mm) | 4 beeps (Ø 25 mm) | Loose waves |
| 10 seconds (Ø 35 mm) | 4 beeps (Ø 35 mm) | |
| 12 seconds (Ø 25 mm) | 5 beeps (Ø 25 mm) | Soft curls |
| 12 seconds (Ø 35 mm) | 5 beeps (Ø 35 mm) | |
| 14 seconds (Ø 25 mm) | 6 beeps (Ø 25 mm) | Defined curls |
- Select the adjustment of the direction of the curl, according to the desired result:
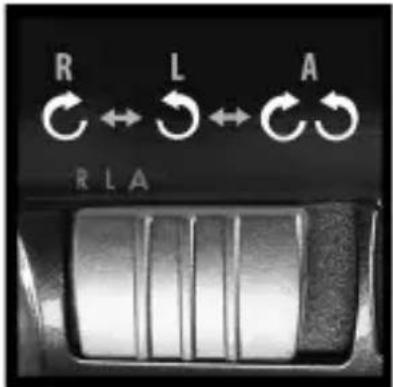
-
For an even, more sophisticated style, adjust the appliance to the "L" (left) position, to create curls to the left side of the head. Then adjust the appliance to the "R" (right) position, to create curls on the right side of the head.
-
For a softer, more natural style, adjust the appliance to the "A" (automatic) position. This adjustment will create alternating curls, first in one direction and then the opposite.
Precautions for use
- Ensure that hair is dry.
- Clip the upper layers to the top of your head and start working on the layers underneath.
- Separate a section of hair that is no wider than 3 ~cm . Ensure that there are no tangles in the section.
- Bring the appliance close to the hair and position it in the correct direction: the cavity formed by the cylinder downwards (FIG. 2 and 3) and facing the head (FIG. 4 and 5).
- With your free hand, take hold of the tip of the section of hair and place it in the opening, in the funnel situated between the two handles (FIG. 6). Please note: To prevent the appliance from blocking, ensure that you have no hair lying across the edges.
Also ensure that you are not pulling your hair before activating the handles (FIG. 7 and 8).
If these precautions are not respected, you risk catching your hair in the appliance.
- Once the section of hair is in place, close the handles to allow the hair to automatically enter into the appliance.
- Keep the handles closed until the beeping stops (after 3, 4, 5 or 6 beeps depending on the selected time setting; see the table above) (FIG. 9).
- Gently release the hair from the appliance by opening the handles (FIG. 10). Do not pull on the appliance to free the hair. If you do this, you will ruin the curl effect.
- Allow your hair to cool before handling or combing it.
- Repeat all over the head until you have the number of curls you want.
- After use, switch off and unplug the appliance. Allow to cool before storing.
Protection system
The appliance is fitted with a protection system. If hair becomes tangled, the appliance emits an audible signal, it blocks, and stops heating. If this occurs, release the handles, ensuring that the appliance and section of hair are correctly positioned, then simply re-close the handles to deactivate the security system and re-start the appliance.
Sleep mode
If the appliance is not in use for more than 20 minutes, the temperature will automatically reduce to 150^ . If you wish to continue using the appliance after this time, simply close then release the handles and the appliance will return to the temperature setting previously selected.
Automatic shut off
If the appliance is left switched on for more than 60 minutes at a time, it will automatically shut off. If you want to continue using the appliance once this time has passed, slide the switch to position "0" and then to the desired position to start the appliance.
CLEANING AND MAINTENANCE
Once unplugged and cooled, the appliance housing may be wiped down with a damp cloth. Ensure the appliance is completely dry before plugging it in again.
DEUTSCH
VEDLIKEHOLD OG RENGJØRING
Ppoulaeic yia tn xpnon
Ecnn He co6IouaTb 3TN npedoctopoxknoctn, cyuecTByET BepoTHOCTb 3anyTbIBaHnB BOLOC B aannapate.
- Правиьно расноложиВ пядь,зakpoite pyuKn,чTOбыДаТБ BO3MOЖHOCt b annapaTy aBTOMaTnueCKN 3axBaTNTb пядь BOJOC.
- YdepxuBaTe aannapat B BbI6paHNo IO3nUIN Do Tex nop, NOKa He pa3dactc 3BykoBoi cnHaI (Yepez 3, 4, 5 nnn 6 cneyuOux dpyr 3a npyrom 3BykoBbIX cnHaI na nocJe Bbl6opa peKIma, CMOTpnte npnbEdeHHyO Bbiue Ta6nUy). (PNC.9).
3aTe m paKpoIe aannapat, OTnycTnB pyuKn, n aKKypaTHO BbICBO6OJnte npAdb BOIoc (PNC.10). He nbTaIteCb paHbWe BpeMeHN BbITaHyTb npAdb n3 aannapata. OHa moKeT noTepeTb CBOIO oOpMy. - Побождente, noka BOJOCbI OCTbIHyT, npexKe che m yIoXHTb INx B npuYeCKy nII paCyeCaTb npaIN.
- Пocтуар Te aHaIOrnHbIM 6pa3OM CO BCeM N OCTaBWMNcR npraMBOJOC, nOKa He nOlyuHTe XeJaemoe KOJIyEcTBO JOKOHOB.
- Послесноьзоваяньыкючite annapat n OTknioчite ero ot ceTN. Дайтаблару OCTbITb, пекдем убрath erо на xpaheHne.
CnCTema 3aunTbI
Annapat cna6xeh cnctem0n 3aunTbI. EcnB OJocbl 3anytaInc, annapat n3dact 3ByKOBOu CNrHaJI, BKIOUHTC8 6LOKnpOBKa n annapat npekpATNT HArpeB.
Ecnn cpa6oTana cnCTema 3aunntbI, y6eintecb, yTO aannapat n npraDb paCnoLoXeHb I npabnIbHO, 3aTeM npocTo 3axmnte pyuKn dJa OTKIOUeHn CnCTembl 3aunntbI IN NOBTOPO BKNIOUHTe aannapat.
Pekm OxndaHna
EcnBbI He noJIb3yeTecb annapaTom B TeueHne 6oJee 20 MInHyT, TempeatyperaeroHarpeBa aBTOMaTnueCKN NOHN3NTcA Do 150^
EcnBxOTHe CHOBA BOCNoIb3OBaTbcraannapatom no nCTeueHn DaHHoro npomexyTkabpeMeH,doCTaTOUHO cKaTb pyuKn annapata N 3aTeM OTNcyTb nx; TaKIM o6pa3OM annapaT Harpeetcdo 3aDaHHoN TemnepaTypbl.
ABTOMaTnuecka OCTaHOBKa
Ecn annapaT 6bI BkIouen 6e3 nepepbBa B TeueHne 60 MInHyT, OH aBTOMaTHueCKN OTKIOUHTcR. Ecn Bbl JeNaete npoJOnKntb NCNoJIb3OBaHne annapaTa nOcNe NCTeueHnJaHHoro cPoka, yCTaHOBNTe nepeKIOUaTeIb B NOLOXKeHne «0», a 3aTeM - B JKeJaEMoe NIOJOxKeHne, dIra TORO, YTO6bl NOBTOpHNO BKIOUHTb annapaT.
UXODI UNCTKA
Kopnyc annapata MOxHNo npOtepeTb BnaXHO TpIIOyKOI NOcTe TORO, KaK OTKJIIOUeHHbI OT cETn annapat NOLHOCTbIO OCTbIHet. IpePeTem, KaK CHOBA BKIOuHTb annapAT B cETb, y6eINTEcB B TOM, YTO OH NOJHOCTbIO BbICOX.
EAC
UINpIyIyKnaIKNBONOC
ПюИЗВОДИТЕЛБ: BABYLISS 99 Авени Apистд Брпан
92120, MoHpyK, ΦpaHπy
ΦaKc 33 (0)146564752
CdeJanaHO B Kntae
Iata npOn3BOOCTBa (HeJeIra, rOJ): cm. Ha TOBape