
Alicante 170 - Car radio BLAUPUNKT - Free user manual and instructions
Find the device manual for free Alicante 170 BLAUPUNKT in PDF.
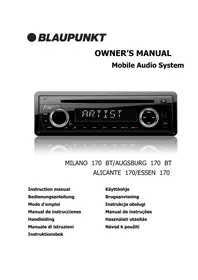


| Product Type | Car Radio |
| Brand | Blaupunkt |
| Model | Alicante 170 |
| Chassis dimensions (L x D x H) | 178 x 160 x 50 mm |
| Approximate weight | 1.0 kg |
| Power supply | 12 V DC, negative ground |
| Maximum current consumption | 10 A |
| Max output power | 4 x 40 W |
| Supported media types | CD, CD-R/RW, MP3, WMA, USB, TF card, Bluetooth (depending on version) |
| FM radio | 87.5 - 109 MHz, RDS (AF, TA, REG, EON) |
| AM radio (MW) | 522 - 1620 kHz |
| Signal-to-noise ratio (CD) | Greater than 55 dB |
| Tone control | Bass ±10 dB (100 Hz), Treble ±10 dB (10 kHz) |
| Main functions | Radio, CD/MP3/WMA, USB, TF, Bluetooth (depending on version), AUX input, RDS |
| Detachable front panel | Yes, with release button |
| Remote control | Included |
| Maintenance | Clean the front panel with a cotton swab soaked in isopropyl alcohol |
| Safety | RESET button, protection fuse |
| General information | Complies with CE and RoHS directives; warranty at www.blaupunkt.com |
Frequently Asked Questions - Alicante 170 BLAUPUNKT
User questions about Alicante 170 BLAUPUNKT
0 question about this device. Answer the ones you know or ask your own.
Ask a new question about this device
Download the instructions for your Car radio in PDF format for free! Find your manual Alicante 170 - BLAUPUNKT and take your electronic device back in hand. On this page are published all the documents necessary for the use of your device. Alicante 170 by BLAUPUNKT.
USER MANUAL Alicante 170 BLAUPUNKT
Location of keys 4 Turn on/off the unit 5 Mute. 5 Faceplate release 5 Sound adjustment 5 REG on/off 5 TA volume 5 LOC on/off 5 Stereo/mono 5 1 Beep on/off 53 AREA 5 EQ 6 XBASS 6 Display information. 6 Set the time 6 Liquid crystal display 6 ESP function 6 Auxiliary input 6 Reset function 6 Radio operation 6 Switching to radio mode 6 Selecting the frequency band 6 Selecting station 7 Automatic memory storing& program scanning. 7 Manually store station & recall presentation 7 RDS (Radio Data System) operation CD/ MP3/WMA operation 8 Switching to disc mode 8 Selecting tracks/file 8 Pausing playing 8 Scan play all tracks/files 8 Repeating the same track/file 8 Playing all tracks/files in random 8
Ejecting a disc 8 Select directory up/down. 8 Selecting files by button .9 USB play operation 9 TF operation 9 Disc notes 10 Bluetooth operation*) .11 Remote control 13 Specification 14 Trouble shooting 15 Installation instructions 208
*) Only for devices with Bluetooth function
Declaration of conformity
The Blaupunkt Competence Center Car Multimedia-Evo Sales GmbH declares that the device complies with the basic requirements and the other relevant regulations of the directive 2014/53/EU. The declaration of conformity can be found on the Internet under www.blaupunkt.com
CE
Declaration of Conformity with regard to the RE Directive 2014/53/EU Declaration of Conformity with regard to the RoHS Directive 2011/65/EU
Warranty
The warranty terms can be called up from www.blaupunkt.com
Warranty
If you ever need to use a repair service, you will find information about service partners in your country under www.blaupunkt.com
LOCATION OF KEYS
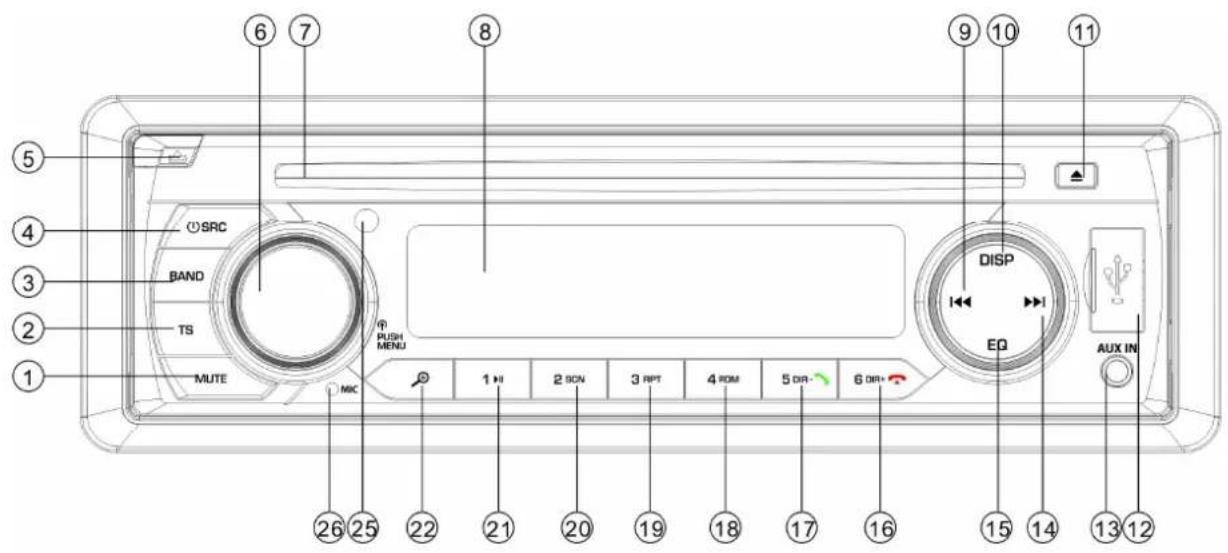
- "MUTE" button.
- "TS" button.
- "BAND" button.
- "①/SRC (source)" button.
- "▲" (panel release) button.
- "VOL/MENU" button.
- DISC Slot.
- LCD display.
- "SEEK DOWN" button.
- "DISP" button.
- "Eject" button.
- USB port.
- "AUX IN" jack.
- "SEEK UP" button.
- "EQ" button.
- "6 DIR+/" button.*)
- "5 DIR- f button.*)
- "4 RDM" button
- "3 RPT" button.
- "2 SCN" button.
- "1 button.
- MP3 search button
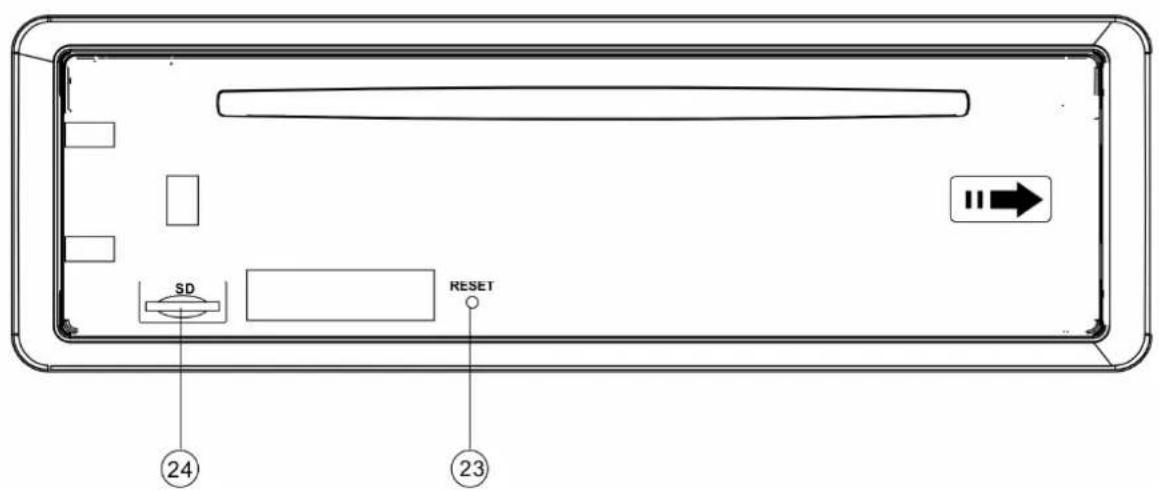
- RESET button.
- TF card slot. 25.IR SENSOR 26.MICPHONE *) Only for devices with Bluetooth function
OPERATION
TURN ON/OFF THE UNIT
Turn on the unit by pressing button(4). When system is on. Press and hold button (4) for 2 seconds to turn off the unit.
MUTE
Shortly press MUTE button(1) to muting the audio output. Press it again to recover output.
FACEPLATE RELEASE
Press release button (5) to detach the removable faceplate.
SOUND ADJUSTMENT
Press MENU button (6) shortly to select the desired adjustment mode. The adjustment mode will change in the following order: -BAS-TRE-BAL-FAD-VOL-
BAS: bass
TRE: treble
BAL: balance
FAD: fader
VOL: volume
By rotating the audio knob (6) it is possible to adjust the desired sound quality.
Press and hold MENU button (6) for 2 seconds into the system menu as below:
TA: Traffic Announcement
REG: region
TAVOL: TA volume
LOC: local
STEREO
AREA: Europe
REG on/off
When the AF function is on, you can switch the REG item in the system menu on or off. Some broadcasting stations change their program from normal broadcasting to regional broadcasting for a certain time period. When REG is on, the
current listening program remains unchanged.
TA volume
This function allows you to define the minimum volume for traffic announcements. The adjustable range is 20 to 43. The default value is 25. Rotate the volume knob to adjust the volume of the traffic announcements.
LOC on/off
In this item, rotate the audio knob (6) to turn the local function on or off. In LOC ON mode, the unit will reduce the receiving sensitivity when you search for stations. This means you can receive stations with good sound quality, and it will ignore stations with poor sound quality. In LOC OFF mode, it will increase the receiving sensitivity when you search for stations, allowing you to receive more stations.
STEREO/MONO
In this item, rotate the audio knob (6) to choose STEREO or MONO mode. In STEREO mode, you can receive FM stereo signals. In MONO mode, stereo stations will be switched to monaural. Sometimes when the signal is not good, switching to MONO mode will reduce the noise.
BEEP on/off
The car audio device is equipped with 2 beep tone modes. Rotate the volume knob to choose one.
- Beep on mode: The confirmation beep sound is heard whenever a button is pressed.
- Beep off mode: The confirmation beep is switched off whenever a key is pressed.
AREA
In this item, rotate the volume to select Europe/USA/LAT area.
OPERATION
XBASS
Press and hold the EQ button for 2 seconds to activate the XBASS function. Press and hold it again to cancel this function.
EQ (Equalization)
Press the EQ button briefly to select the preset EQ mode as below:
FLAT - CLASSICS - POP - ROCK - EQ OFF
DISPLAY INFORMATION
Press the DISP button (10) to show the time for 5 seconds. Then it returns to show the information.
SET THE TIME
(1) Manual setting:
Press and hold the DISP button for 2 seconds. The hour of the time will flash. Press the ▸ / ▸ button to set the correct hour.
Press the DISP button briefly to change to minutes. Also use the button to set the correct minutes. After that, press the DISP button to confirm.
(2) Synchronize the time from the RDS station:
To receive an RDS station with a good signal (the AF symbol on the LCD is not flashing). Several minutes later, the time will be synchronized to the correct time by the station's signal. (Note: Non-RDS stations do not have this function.)
LIQUID CRYSTAL DISPLAY
Display the current frequency and active functions on the screen.
ESP FUNCTION
The unit is shockproof for a duration of ten to twenty seconds.
AUXILIARY INPUT
The unit can be connected to a portable
audio player via the AUX IN jack (13). Press the SRC button to switch to AUX mode when an audio source is connected to the unit.
RESET FUNCTION
The RESET button (23) must be activated using a ballpoint pen or a thin metal object.
The RESET button should be activated in the following situations:
- During initial installation of the unit, once all wiring is completed.
- When all function buttons are unresponsive.
- When an error symbol appears on the display.
Note: If pressing the RESET button (23) does not restore functionality, use a cotton swab dipped in isopropyl alcohol to clean the socket on the front panel.
RADIO OPERATION
SWITCHING TO RADIO MODE
Press SRC button (4) to select radio mode, the radio mode appears in the display together with the memory band and frequency.
At radio mode, press BAND button (3) to select the desired band.
The reception band will change in following order:

SELECTING STATION
Press button (14) or button (9) shortly to activate automatic seek function. It will search up/down a station automatically. Press for 2 seconds until "MANUAL" appears on the display, the manual tuning mode is selected. In this
mode you can turn up/down a step frequency one by one till searched a station. If both buttons have not been pressed for 5 seconds, it will return to seek tuning mode and "AUTO" appears on the display.
AUTOMATIC STORING & PROGRAM SCANNING
Automatic storing
- Press TS button (2) for 2 seconds the radio searches from the 87.5MHz frequency and checks the signal strength until one cycle search is finished. And then some strong stations are stored into the corresponding preset number button of the FM3 band. In the first cycle it will in LOCAL mode to receive the stronger station. If it is less than 6 pcs station it will searching stations in 2nd cycle in LOCAL OFF mode.
- Program scanning
Press TS button (2) shortly to scan preset station. The radio is holding at that preset number for 5 seconds with release mute.
- MANUALLY STORE STATION & RECALL PRESET STATION
To receive a station, Press one of the preset button (1~6) for 2 seconds. The current station is stored into the number button. Shortly press the preset button (1~6) to directly listen the station that saved in the corresponding preset button.
In AF item of system menu. Rotating audio knob to switch on or off the AF function.
Whenever AF is on, symbol "AF" appears on the display.
Program name is displayed when receiving an RDS station.
"AF" starts blinking if the broadcasting signal is getting worse.
"AF" starts blinking if the broadcasting signal is getting worse.
"ALARM" will be displayed when an emergency broadcast is received. Meanwhile, the sound output level will be automatically adjusted to the preset output level when the volume control is set to minimum.
When AF function is on, in the REG item of the system menu, rotate the audio knob to turn the REG function on or off. When AF function is off, the REG function cannot be set to off.
When the AF function is on, in the REG item of the system menu, rotate the audio knob to turn the REG function on or off. When the AF function is off, the REG function cannot be set to off.
Some broadcasting stations change their program from normal broadcasting to regional broadcasting for a certain time period. When region is on, the current listening program remains unchanged. When region is off, it allows the reception to move to the regional station.
In the TA item of the system menu, rotate the audio knob to switch on or off the TA function. When TA mode is on and a traffic announcement is transmitted:
In the TA item of the system menu, rotate the audio knob to switch the TA function on or off. When TA mode is on and a traffic announcement is transmitted:
When the unit was in CD (MP3) or AUX mode, it will switch temporarily to radio mode.
Temporary switch over to an EON linked station when EON detects a traffic announcement on that other program.
If the volume level was below the threshold, it will be raised to the threshold.
When TA mode is on, TA of individual segment is turned on. When a TP station is received, TP of individual segment is turned on.
The current traffic announcement is cancelled by turning the TA function to STOP (in the TA item of the RDS menu, when
The current traffic announcement is cancelled by turning the TA function to STOP (in the TA item of the RDS menu, when
If the TA station is not received, it only has
on/off. But when a TA station is received, the TA item will have on/stop/off for your selection. However, the TA mode will not be off.
unwanted EON TA switching, where EON TA information was received from the current station and the radio switched to that EON linked station, but no information could be received because the EON linked station is located too far from that area. So the radio is switched back to the current station again. In the above operation, a customer listens to a wrong program or mute sound for a while. The RDS data used are the PI, PS, AF, TP, TA, EON, and PTY data.
PS: Program Service Name
Broadcast station name data expressed in alphanumeric characters
AF: Alternative Frequencies
Frequency list of broadcasting stations transmitting the same program
TP: Traffic Program Identification
Identification data for traffic information-broadcasting station
TA: Traffic Announcement Identification. Identification data showing whether traffic information is being transmitted or not.
EON: Enhanced Other Networks Information
Broadcasting information on PI, AF, TP, TA, etc., relating to networks other than the network used for current reception.
SWITCHING TO DISC MODE
If there is no disc inserted in the driver:
Gently insert a disc with the printed side uppermost into the disc compartment until you feel some resistance. The disc is drawn into the driver automatically. Disc playback begins.
If a disc is already inserted in the driver: Keep pressing SRC button (4) shortly until the DISC mode display appears.
- SELECTING TRACKS/FILES
Press button (14) or button (9) to move to the previous track/file or the following track/file. Track/file number
shows on the display.
Hold button (14) or button (9) to fast reverse or fast forward. disc play starts from when you release the button.
- PAUSING PLAYING
Press button (21) to pause playing.
Press it again to resume play.
- SCAN PLAY ALL TRACKS/FILES
Press SCN button (20) to play first several seconds of each track/file. Press again to stop intro play and listen to track/file.
- REPEATING
THE SAME
TRACK/FILE
Press RPT button (19) to continuously repeat the same track/file. Press it again to repeat all the tracks/files.
- PLAYING ALL TRACKS IN RANDOM
Press RDM button (18) to play all tracks/files in random order. Press it again to cancel the random function.
EJECTING A DISC
Press the △ button (11) to stop disc playing and eject the disc from the disc slot (6).
SELECT DIRECTION UP/DOWN
Press the DIR- button (17) or DIR+ button (16) to select the previous directory or the next directory. If the MP3/WMA disc does not contain any directory, pressing the DIR- button (17) or
DIR+ button (16) has no function.
- SELECTING FILES BY BUTTON

(22) is assigned as the selection button in MP3/WMA operation.
When pressed, it activates the selection of each mode as below:
Search from folder. => Search file number.
Search From Folder
Press the button once. It enters the "Searching from folder" mode. Rotate the VOL knob to select the desired folder. After that, press
the MENU knob (6) to enter the folder. Rotate knob (6) to select the desired file. Then press the MENU knob (6) again to play. Press the button to go back to the previous folder.
Search File number
Press the button twice. It activates the "Search file number" mode. Rotate knob (21) to select the file number, then press the MENU knob (4) to confirm. The unit searches for the selected file to play. You can also enter the file's number. On the front panel, except for 1~6 digits, please note 7/8/9/0 as below:
EQ:7
:8
:9
DISP:0.
If the file number was selected, the unit waits for a few seconds. The unit searches for the track after a few seconds, even if the MENU (4) button is not pressed.
USB PLAY OPERATION
On the front panel of the unit, there is a USB interface (10). You can connect a USB drive through this interface (12).
When you connect a USB drive through the interface, the unit will search for MP3/WMA files on the USB drive and start playing. If you are in another mode, you can also press the
SRC button to select USB mode.
When playing MP3/WMA files from the device, the operation is the same as the CD/MP3/WMA operation described above.
Note:
The main unit can only support standard USB memory devices that are approved by Microsoft. USB MP3 players are not standardized, meaning different brands or models have their own standards. Therefore, our product cannot support every MP3 player. When connecting an MP3 player that uses normal (non-rechargeable) batteries, you should remove the battery from the MP3 player before connecting it to the USB interface. Otherwise, it may cause the battery to burst.
TF OPERATION
There is a TF interface (24) on the front panel of the unit.
When you insert a TF card into the TF interface, the unit will search for MP3/WMA files on the card and start playing. The operation is the same as the
CD/MP3/WMA operation described above.
If in other mode. You can also press SRC (4) button to select SD mode.
SUPPORTED MP3/WMA DECODING MODES
The main unit supports MP3/WMA (Windows Media Audio) decoding modes as below.
| Standard | Bit Rate (kbps) | Supports Mode |
| MPEG1 Audio Layer 3 (44.1kHz) | 32,48,64,96, 128,192,256, 320 | Stereo |
| Windows Media Audio (44.1kHz) | 64,96,128,192 | Stereo |
The USB solution can support:
- Folder: 500 max.
- File: 999 max.
- Depth of folder: 8 layers
- Size: 32 GB
CAUTION
When there are important files in the USB device or TF card, do not connect it to the main unit to play. And don't play the CD-R/RW disc that has important files in it. Because any wrong operation may cause files loss. And our company assumes no responsibility for this.
DISC NOTES
A. Notes on discs:
Attempting to use non-standard shape discs (e.g. square, start, heart) may
- damage the unit. Be sure to use round shape CD discs only for this unit.
- Do not stick paper or tape, etc., onto the label side or the recording side of any discs, as it may cause a malfunction.
- Dirt, dust, scratches, and warping discs will cause mis-operation.
B. Notes on CD-Rs (recordable CDs)/CD-RWs (rewritable CDs):
- Be sure to use discs with the following marks only for the unit to play:

DIGITAL AUDIO

DIGITAL AUDIO
Recordable

DIGITAL AUDIO
ReWritable
- The unit cannot play a CD-R and CD-RW that is not finalized. (Please refer to the manual of your CD-R/CD-RW recorder or CD-R/CD-RW software for more information on the finalization process).
CD-R/CD-RW software for more information on finalization process).
- Depending on the recording status, conditions of the disc and the equipment used for the recording, some
a: Use CD-RWs with speed 1x to 4x and write with speed 1x to 2x.
*1: To have more reliable playback, please see the following recommendations:
a: Use CD-RWs with speed 1x to 4x and write with speed 1x to 2x.
b. Use CD-Rs with speeds from 1x to 8x and write at speeds from 1x to 2x.
c. Do not play a CD-RW that has been written more than 5 times.
C. Notes on MP3 files (MP3 Version Only):
- The disc must be in ISO9660 level 1 or level 2 format, or Joliet or Romeo in the expansion format.
- When naming an MP3 file, be sure the file name extension is ".MP3".
- For a non-MP3 file, even though the file name extension is ".MP3", the unit cannot recognize it.
(i) When using Bluetooth, please make sure the mobile phone supports Bluetooth function. (ii) For different kinds of mobile phones, Bluetooth emissive power has some differences. To get the best conversation quality, it is recommended that the distance between the mobile phone and the unit is within 3m. And please don't put any metal object or any obstacle between the path of the mobile phone and the unit.
PAIRING
1) On the mobile phone, select the Bluetooth setup. (Please refer to the instruction manual of your mobile phone on how to operate Bluetooth.) 2) "CAR KIT" should appear in the list on your
mobile phone, please select "BP 170 BT" and then input password "0000" if it needs a password. 3) When successfully paired, the BT mark will be displayed on the LCD.
- Answering / rejecting an incoming call
When there is an incoming call, press the key to answer the call. Press the key to reject the call.
- Hang up a call
When finished a conversation, press the key to hang up this call.
Checking phone book / received / dialed / missed call (for Android and iPhone mobile)
Press the SRC key to show "PHONE" on the display. Press the button to show BOOK on the LCD. Then repeatedly press it to cycle through the items as below:
Note: On the first connection, your mobile will receive a message that the unit will access your mobile via Bluetooth. You must agree and press "YES" to confirm.
(Note: The phone number must be stored in the phone's memory, not on the SIM card.)
- Call out
1) Making an outgoing call by entering the phone number manually.
Press the SRC key to show "PHONE" on the
display. Press and hold the key. The LCD
will become blank. Then you can enter the phone number and press the key to confirm
the dialing. (Note: If you entered wrong
numbers, press the key to cancel the wrong numbers.)
On the front panel, besides the 1-6 digits, please note the following for 0/7/8/9/*/#:
0: DISP button. 7: EQ. 8: (not specified). 9: (not specified). *: press and hold the 5 key for 2 seconds. #: press and hold the 6 key for 2 seconds.
1) Redialing an outgoing call
Press the SRC key to show "PHONE" on the display. Press and hold the key for 2 seconds to redial the last phone number.
2) Making an outgoing call from the phone book / received / dialed / missed calls (for Android and iPhone mobile)
- Please reference "Checking phone book / received / dialed / missed call" item then select a phone number. Press key to dial.
Note: If there are 2 pcs of SIM card in your mobile phone. When you dial out a call from the front panel of the unit. The call will be dialed out from the default card (or asking using which card each time dial out).
- Transfer the call between mobile phone and unit
During the talking mode, you can press

button (22) to transfer the phone call
between the mobile phone and the unit.
- Bluetooth audio (A2DP function)
Press SRC button (4) it will show "PHONE" on the display. Then turn on the music player of your mobile phone and playing a song. The sound will come out from the speaker of the
unit. Press key (21) of the front panel of the unit to pause/play the song. Press button (14) or button (9) to select next/previous song.
Connect/disconnect bluetooth
Press and hold SRC button for 2 seconds to connect/disconnect bluetooth.
*) Only for devices with Bluetooth function
FUNCTION KEY & CONTROL
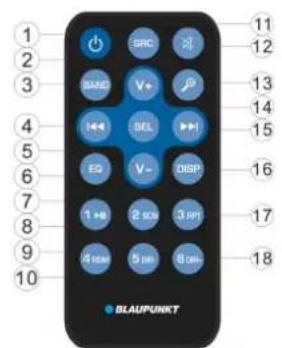
| 1. | Power ON/OFF Button. |
| 2. | VOL+: Volume up button. |
| 3. | BAND: To select FM1/FM2/FM3/AM1/AM2 band in RADIO mode. |
| 4. | In RADIO mode: Press it shortly for seek down function. Press and hold it for manual turn down. In CD/MP3/WMA mode: Press it shortly for skip previous one track/file. Press and hold it for fast reverse. |
| 5. | VOL- : Volume down button. |
| 6. | EQ: It is EQ button. |
| 7. | 2 SCN: In RADIO mode: Number 2. See page 11 MANUALLY STORE STATION & RECALL PRESET STATION. In CD/MP3/WMA mode: Press it turn on/off SCANNING function. |
| 8. | 1▶1 In RADIO mode: Number 1. See page 11 MANUALLY STORE STATION & RECALL PRESET STATION. In CD/MP3/WMA mode: Press to pause/resume playing. |
| 9. | 4 RDM: In RADIO mode: Number 4. See page 11 MANUALLY STORE STATION & RECALL PRESET STATION. In CD/MP3/WMA mode: turn on/off random function. |
| 10. | 5 DIR-: In RADIO mode: Number 5. See page 11 MANUALLY STORE STATION & RECALL PRESET STATION. In MP3/WMA mode: Press it back to previous folder. It is key in BT mode.*) |
| 11. | SRC: It is SRC key. |
| 12. | Press it to mute/recover the sound. |
| 13. | In RADIO mode: It is TS function. See page 11 AUTOMATIC STORING & PROGRAM SCANNING In MP3/WMA mode: It is file searching function. (See page 12). In PHONE mode. Its function seeing page 15 BLUETOOTH OPERATION |
| 14. | SEL: Press it shortly for audio menu. Press and hold for system menu (See page 9). In MP3/WMA searching mode press it for confirm function (See page 13). |
| 15. | In RADIO mode: Press it shortly for seek down function. Press and hold it for manual turn up. In CD/MP3/WMA mode: Press it shortly for skip next one track/file. Press and hold it for fast forward. |
| 16. | DISP: Press DISP to show the time. |
| 17. | 3 RPT: In RADIO mode: Number 3. See page 11 MANUALLY STORE STATION & RECALL PRESET STATION. In CD/MP3/WMA mode: Press it turn on/off repeat function. |
| 18. | 6 DIR+: In RADIO mode: Number 6. See page 11 MANUALLY STORE STATION & RECALL PRESET STATION. In MP3/WMA mode: Press it to next folder When incoming a call or finish a call. It is key.*) |
SPECIFICATION
GENERAL
Power Supply Requirements: DC 12 Volts, Negative Ground
Chassis Dimensions: 178 (W) x 160 (D) x 50 (H)
Tone Controls
- Bass (at 100 Hz): ±10 dB
- Treble (at 10 kHz): ±10 dB
- Maximum Output Power: 4x40 watts
- Current Drain: 10 Ampere (max.) (For Normal Power Version)
CD PLAYER
Signal to Noise Ratio: More than 55 dB
Channel Separation: More than 45 dB
Frequency Response: 40Hz - 18 kHz
RADIO
FM
Frequency Coverage 87.5 to 108 MHz
IF 10.7 MHz
Sensitivity (S/N = 30dB) 4μV
Stereo Separation >25dB
AM(MW)
Frequency Coverage 522 to 1620 kHz
IF 450 kHz
Sensitivity (S/N = 20dB) 36 dBuV
Before going through the checklist, check wiring connection. If any of the problems persist after checklist has been made, consult your nearest service dealer.
| Symptom Cause Solution | ||
| No power. | The car ignition switch is not on. | If the power supply is connected to the car accessory circuits, but the engine is not moving, switch the ignition key to "ACC". |
| The fuse is blown. Replace the fuse. | ||
| Disc cannot be loaded or ejected. | Presence of CD disc inside the player. | Remove the disc in the player, then put a new one. |
| Inserting the disc in reverse direction. | Insert the compact disc with the label facing upward. | |
| Compact disc is extremely dirty or detective disc. | Clean the disc or try to play a new one. | |
| Temperature inside the car is too high. | Cool off or until the ambient temperature return to normal. | |
| Condensation. | Leave the player off for an hour or so, then try again. | |
| No sound. | Volume is in minimum | Adjust volume to a desired level. |
| Wiring is not properly connected. | Check wiring connection. | |
| Sound skips. | The installation angle is more than 30 degree. | Adjust the installation angle less than 30 degree. |
| The disc is extremely dirty or defective disc. | Clean the compact disc, then try to play a new one. | |
| The operation keys do not work. | The built-in microcomputer is not operating properly due to noise. | Press the RESET button. Front panel is not properly fix into its place. |
| The radio does not Work. The radio station automatic selection does not work. | The antenna cable is not connected. | Insert the antenna cable firmly. |
| The signals are too weak. | Select a station manually. | |
TABLE OF CONTENTS
Operation 18
Key locations 18
DIGITAL AUDIO ReWritable
Activate/deactivate LOC 35
Stereo / mono mode 35
Activate/deactivate the beep 35
ZONE 35
EQ 36
DIGITAL AUDIO ReWritable
INFORMATIE WEERGEVEN
Tidsinstallinging. 102
WYBOR KATALOGU W GORE/W DOL
DIGITAL AUDIO ReWritable
VAESKEKRYSTAL DISPLAY 150
EKSTRAINDGANG 150
RESET FUNKTION 150
RADIO DRIFT. 150
RDS (RADIO DATASYTEM) BETJENING151
TA-AFBBRYDELSESFUNKTION 151
CD / MP3 / WMA DRIFT 152
VAELG KATALOG OP/NED 152
BETJENING AF USB-AFSPILLER 153
TF OPERATION 153
DECODING STATES THAT
SUPPORT MP3/WMA 154
WARNING 154
DISC NOTES 154
BLUETOOTH OPERATION*) 154
FUNCTION KEY & CONTROL 157
GENERAL INFORMATION 159
LIQUID CRYSTAL DISPLAY
TP: Identification of traffic program
Identification data for traffic information TV station
BOOK --- RECEIVED --- DIALED --- MISSED ---PHONE
(Phonebook -> Received -> Calls -> Missed -> Phone)
In each item, you can use the button or the button to check the corresponding number.
Removal of the front panel 164
Reproduction with "scan" of all
Starting playback 183
0: Display button (DISP)
7:EQ:
8:
9:
*: Press and hold button (5) for 2 seconds.
: Press and hold button (6) for 2 seconds.
→FM1→FM2→FM3→MW1(AM1)→MW2(AM2)
STATION SELECTION
Supplied mounting hardware
Available as an option
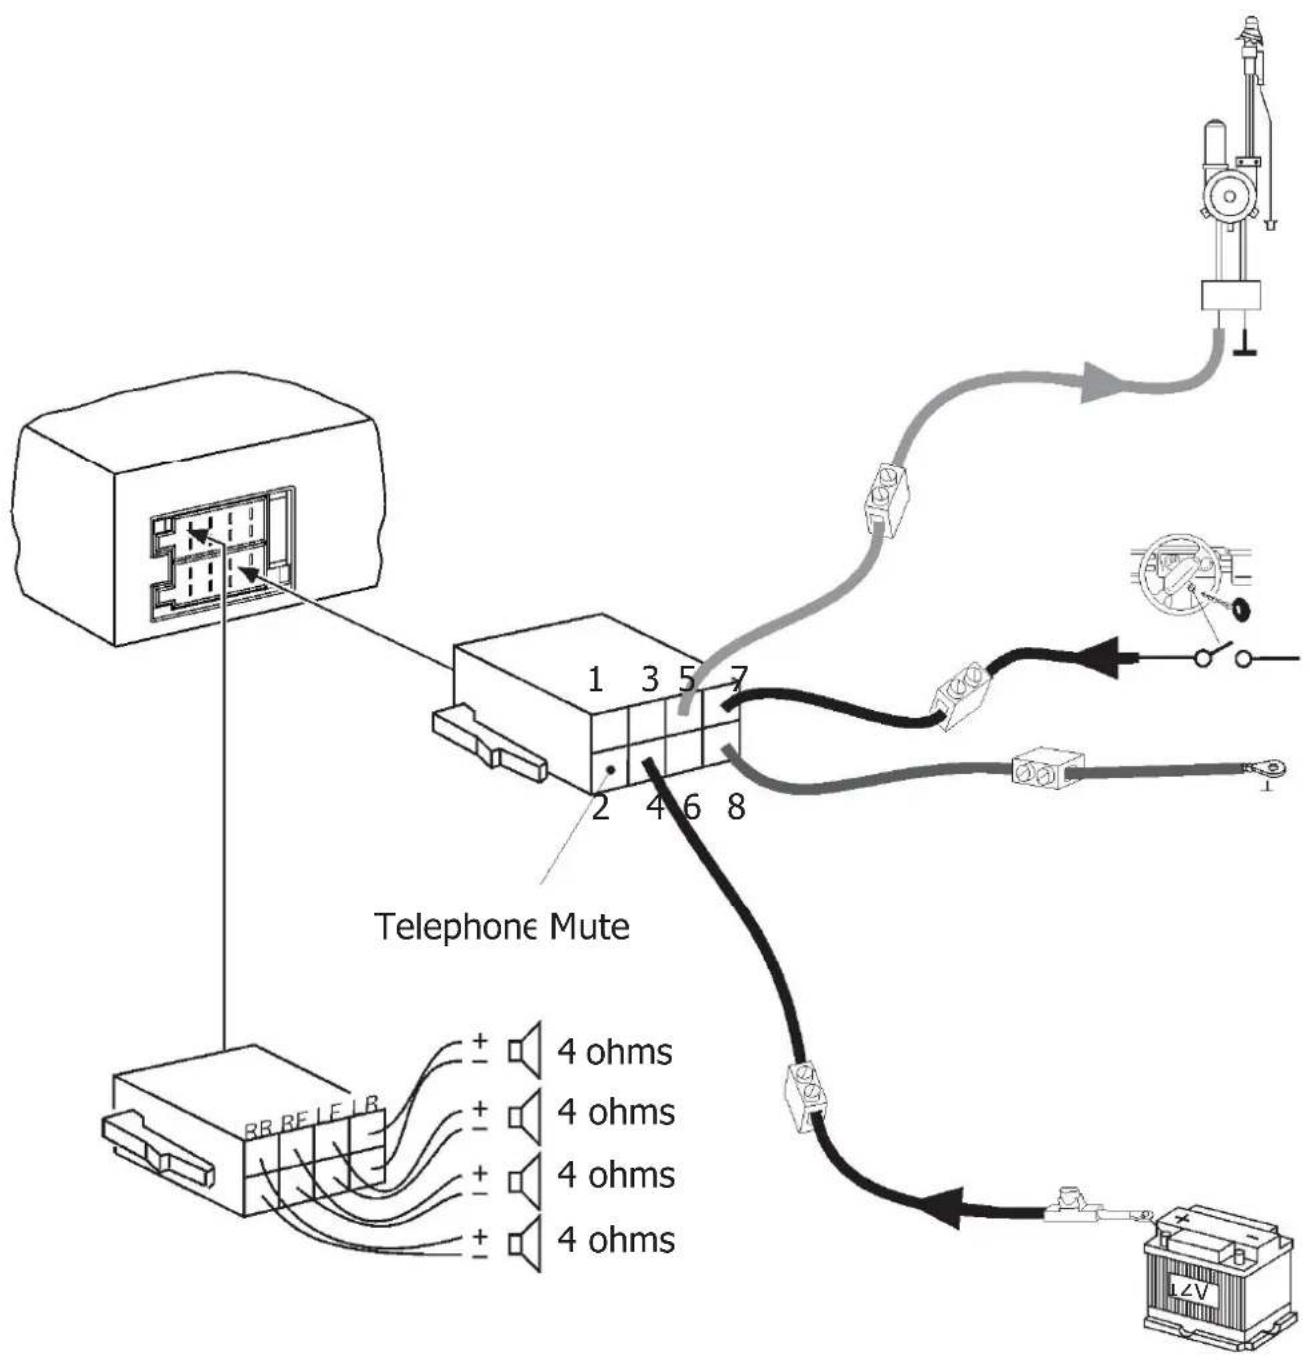
| B | |||
| 1 | NC | 1 | Speaker out RR+ |
| 2 | NC | 2 | Speaker out RR- |
| 3 | NC | 3 | Speaker out RF+ |
| 4 | Permanent +12V | 4 | Speaker out RF- |
| 5 | Auto antenna* | 5 | Speaker out LF+ |
| 6 | NC | 6 | Speaker out LF- |
| 7 | TI.15/Ignition | 7 | Speaker out LR+ |
| 8 | Ground | 8 | Speaker out LR- |

- Switched power supply +12 V / max. 150 mA
Subject to modifications! • Vorbehaltlich Modifikationen! • Sous réserve de modifications!
- Modifications reserved! - Subject to alterations! - Modifications reserved! - Modifiche riservate! - Zmiany techniczne zastrzeżone! - Změny vyhrazeny! - Változtatás joga fenntartva!
- Subject to modifications - Subject to modifications - Unless modifications are made - Subject to modifications
Evo-Sales GmbH
Hastenbecker Weg33


- ) ONLY FOR DEVICES WITH BLUETOOTH FUNCTION
- DECLARATION OF CONFORMITY
- CE
- WARRANTY
- LOCATION OF KEYS
- OPERATION
- TURN ON/OFF THE UNIT
- MUTE
- FACEPLATE RELEASE
- SOUND ADJUSTMENT
- REG ON/OFF
- TA VOLUME
- LOC ON/OFF
- STEREO/MONO
- BEEP ON/OFF
- AREA
- XBASS
- EQ (EQUALIZATION)
- DISPLAY INFORMATION
- SET THE TIME
- MANUAL SETTING
- SYNCHRONIZE THE TIME FROM THE RDS STATION
- LIQUID CRYSTAL DISPLAY
- ESP FUNCTION
- AUXILIARY INPUT
- RESET FUNCTION
- RADIO OPERATION
- SWITCHING TO RADIO MODE
- SELECTING STATION
- AUTOMATIC STORING & PROGRAM SCANNING
- MANUALLY STORE STATION & RECALL PRESET STATION
- WHEN AF FUNCTION IS ON, IN THE REG ITEM OF THE SYSTEM MENU, ROTATE THE AUDIO KNOB TO TURN THE REG FUNCTION ON OR OFF. WHEN AF FUNCTION IS OFF, THE REG FUNCTION CANNOT BE SET TO OFF
- IN THE TA ITEM OF THE SYSTEM MENU, ROTATE THE AUDIO KNOB TO SWITCH ON OR OFF THE TA FUNCTION. WHEN TA MODE IS ON AND A TRAFFIC ANNOUNCEMENT IS TRANSMITTED
- THE CURRENT TRAFFIC ANNOUNCEMENT IS CANCELLED BY TURNING THE TA FUNCTION TO STOP (IN THE TA ITEM OF THE RDS MENU, WHEN
- SWITCHING TO DISC MODE
- SELECTING TRACKS/FILES
- PAUSING PLAYING
- SCAN PLAY ALL TRACKS/FILES
- REPEATING
- THE SAME
- TRACK/FILE
- PLAYING ALL TRACKS IN RANDOM
- EJECTING A DISC
- SELECT DIRECTION UP/DOWN
- SELECTING FILES BY BUTTON
- SEARCH FROM FOLDER
- SEARCH FILE NUMBER
- USB PLAY OPERATION
- SRC BUTTON TO SELECT USB MODE
- NOTE
- TF OPERATION
- SUPPORTED MP3/WMA DECODING MODES
- CAUTION
- DISC NOTES
- NOTES ON DISCS
- ATTEMPTING TO USE NON-STANDARD SHAPE DISCS (E.G. SQUARE, START, HEART) MAY
- NOTES ON CD-RS (RECORDABLE CDS)/CD-RWS (REWRITABLE CDS)
- NOTES ON MP3 FILES (MP3 VERSION ONLY)
- PAIRING
- ANSWERING / REJECTING AN INCOMING CALL
- HANG UP A CALL
- CHECKING PHONE BOOK / RECEIVED / DIALED / MISSED CALL (FOR ANDROID AND IPHONE MOBILE)
- CALL OUT
- MAKING AN OUTGOING CALL BY ENTERING THE PHONE NUMBER MANUALLY
- FUNCTION KEY & CONTROL
- SPECIFICATION
- GENERAL
- CD PLAYER
- RADIO
- FM
- AM(MW)
- TABLE OF CONTENTS
- INFORMATIE WEERGEVEN
- WYBOR KATALOGU W GORE/W DOL
- PRESS AND HOLD BUTTON (6) FOR 2 SECONDS
Brand : BLAUPUNKT
Model : Alicante 170
Category : Car radio