
IWL6014GT - Warming drawers and cabinets INVENTUM - Free user manual and instructions
Find the device manual for free IWL6014GT INVENTUM in PDF.

| Product type | Built-in warming drawer |
| Brand | Inventum |
| Model | IWL6014GT |
| Dimensions (W x D x H) | 595 x 561 x 141 mm |
| Net weight | 18 kg |
| Power supply | 220-240 V, 50-60 Hz, 1000 W |
| Capacity | 22 liters |
| Maximum load | 25 kg |
| Temperature range | 30 °C to 80 °C |
| Materials | Glass and stainless steel |
| Main functions | Warm cups/glasses, plates/dishes, keep warm, slow cooking (low temperature) |
| Controls | Touch panel with display |
| Included accessories | Non-slip mat |
| Cleaning and maintenance | Clean with a damp sponge and mild dish soap; do not use a steam cleaner or high-pressure cleaner |
| Safety | Contact safety device (heating cut off if drawer is open), soft-close mechanism |
| Installation | Built-in, must be fixed in a heat-resistant kitchen cabinet (>60°C) |
| Warranty | 2-year full manufacturer's warranty, extendable to 5 years with registration within 45 days (exchange fee 3rd-5th year) |
| After-sales service | Contact via www.inventum.eu/service-aanvraag |
Frequently Asked Questions - IWL6014GT INVENTUM
User questions about IWL6014GT INVENTUM
0 question about this device. Answer the ones you know or ask your own.
Ask a new question about this device
Download the instructions for your Warming drawers and cabinets in PDF format for free! Find your manual IWL6014GT - INVENTUM and take your electronic device back in hand. On this page are published all the documents necessary for the use of your device. IWL6014GT by INVENTUM.
USER MANUAL IWL6014GT INVENTUM
- safety instructions page 18
2.appliance description page 21 - before first use page 22
- operating the warming drawer page 22
- keeping food warm - table page 23
- low temperature cooking - meat page 24
- cleaning & maintenance page 28
8.problems & solutions page 28 - installation instructions page 29
- product fiche page 31
General terms and conditions of service and warranty page 62
Deutsch
1 safety instructions
- Please read these instructions before operating the appliance and retain for future use.
- Attention! Avoid touching hot surfaces, especially the bottom of the drawer.
- The appliance is intended solely for domestic use within the home. Do not use corrosive chemicals or vapors in this appliance. This warming drawer is especially designed for keeping warm food, heat-resistant glasses and dishes and for low temperature cooking of meat. The warming drawer is not suited for heating up cold food. It is not designed for industrial or laboratory use.
- Do not place any object between the drawer of the appliance. Don't allow soil or cleaner residue to accumulate on the sealing surfaces.
- Warning: Liquids and other foods must not be heated in sealed containers since they are liable to explode.
- It is hazardous for anyone other than a competent person to carry out any service or repairs that involve the removal of the cover.
- An electrical appliance is not a toy, and should therefore always be placed outside the reach of children. Children are not always able to understand potential risks. Teach children a responsible handling of electrical appliances.
- This appliance shall not be used by children from 0 to 8 years. This appliance can be used by children over the age of 8 and above if they are continuously supervised. This can be used by people with reduced physical, sensory or mental capabilities or lack of experience or knowledge, if they have been given supervision or instruction concerning use of the appliance in a safe way and understand the hazards involved. Keep the appliance and its cord out of reach of children aged less than 8 years.
- Cleaning and maintenance shall not be made by children.
Children must not play with the appliance. - Only use heat-resistant crockery made of glass, porcelain.
- The warming drawer should be cleaned regularly and any food deposits should be removed.
-
Bacteria can develop on the food if the temperature is set too low. Make sure that you set a high enough temperature to keep food warm. Ensure food is really hot when placed inside the warming drawer.
-
The appliance may not be cleaned with a high-pressure cleaner or a steam cleaner.
- When you see smoke, switch off and unplug the appliance. Keep the drawer closed in order to stifle any flames.
- The appliance should only be connected by a registered installer.
- Faulty parts may only be replaced by original parts. The manufacturer can only guarantee that original parts meet safety requirements.
- Damage caused by incorrect connection, incorrect fitting, or incorrect use is not covered by the warranty.
- If the connecting cable is damaged, it may only be replaced by the manufacturer, the manufacturer's service organisation or equivalently qualified persons, in order to avoid dangerous situations.
- The electrical connection must comply with national and local regulations.
- The wall plug socket and plug should always be accessible.
- The appliance should not be connected to the network via a multiplug socket or extension lead, as the safe use of the appliance can then not be guaranteed.
- The appliance must always be earthed.
- Only use and store the appliance indoors.
- Do not use the oven near water, in a wet basement/ garage or near a swimming pool.
- Do not cover any vents of the warming drawer.
- Do not let the cord hang over the edge of the table or counter and keep it away from the heated surface.
- Failure to maintain the warming drawer clean could lead to deterioration of the surface that could adversely affect the life of the appliance and possible result in a hazardous situation.
- The appliance is not intended to be operated by means of an external timer or separate remote-control system.
- Before plugging into a socket, check that the voltage in your home corresponds with the voltage printed on the appliance.
- Never unplug it from the socket by pulling on the cable.
- Always ensure that your hands are dry before handling the plug, switch or power cord.
- Should you decide not to use the appliance anymore, make it inoperative by cutting the power cord after removing the plug from the socket. We also recommend making all potentially dangerous parts of the appliance harmless, particularly for children who might be tempted to play with it.
-
Never immerse any part of the main body, lid, power cord and plug in water or any other liquid to protect against electrical hazards.
-
If the appliance is used for other purposes than intended, or is it not handled in accordance with the instruction manual, the full responsibility for any consequences will rest with the user. Any damages to the product or other things are not covered by the warranty.
- Legislation requires that all electrical and electronic equipment must be collected for reuse and recycling. Electrical and electronic equipment marked with the symbol indicating separate collection of such equipment must be returned to a municipal waste collection point.
2 appliance description
- Anti-slip mat (removable)
- Control panel
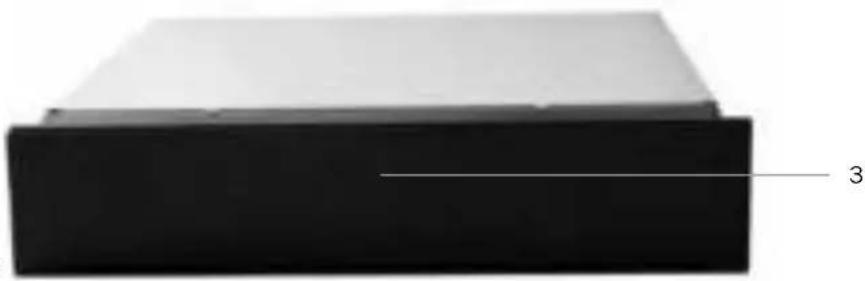
- Glass front
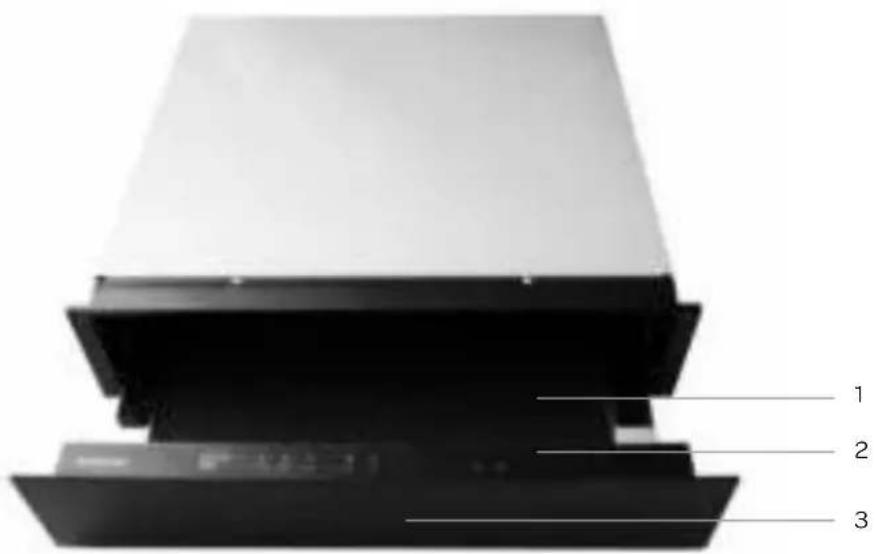
- Glass front
Note: There is no handle on the appliance. Open and close the warming drawer by pressing the middle of the front.
CONTROL PANEL

- Display
- For warming cups and glasses
- For warming plates and dishes
- For keeping food warm
- For setting the temperature
- For setting the duration
-
-
- For adjusting temperature and time
-
- Cancel key
- Start key
3 before first use
Before you use the appliance for the first time, please do as follows: Carefully unpack the appliance and remove all the packaging material, such as protective foils and sticky labels. Keep the material (plastic bags and cardboard) out of reach of children. Check the appliance after unpacking for any damage, possible from transportation. Check that the voltage in your home corresponds with the voltage printed on the appliance and plug it in a socket. Follow the installation instructions in chapter 9 for installing the warming drawer.
Remove the anti-slip mat and clean the warming drawer with a damp cloth only.
The anti-slip mat may be cleaned with warm water and a mild detergent. Rinse well and dry thoroughly. Replace the anti-slip mat in the warming drawer.
Operate the empty warming drawer for at least 2 hours to remove all traces of grease which might otherwise create unpleasant smells when preparing food. Make sure to ventilate the room during this process.
- Open the warming drawer by pressing the middle of the drawer. When opening, the drawer pops out slightly and you can pull it out towards you.
- Switch the warming drawer on by touching the start key D.
- Press the key. The following LED lights will be lit and
- Press the key and adjust the time with the keys ^- + until 2h is displayed.
- Press the start key to store the setting of the function and the time.
- Close the drawer.
The warming drawer is fitted with a softclose mechanism and a contact switch. When the drawer is not closed properly, the heating element and the fan will not function.
4 operating the warming drawer
Preheating the dishes prevents food and drinks to cool down too quickly whilst eating and drinking.
- Open the warming drawer by pressing the middle of the drawer. When opening, the drawer pops out slightly and you can pull it out towards you.
- Press the key to select the function for warming cups and glasses.
- This function starts at 40^ and is displayed.
- Press the keys + to adjust the temperature.
- Press the l key and adjust the warming time with the keys - +.
- Press the start key to save the temperature and time adjustment.
- As soon as the warming drawer is closed, you will hear a sound and the warming drawer starts warming.
Extra notes:
- Press one of the other keys, to select a different function when setting step 2.
Before closing the drawer, you can toch the cancel key to cancel the setting. The appliance will return to waiting state [0]. - To adjust the time or temperature during the process of working, open the drawer and press the key or and adjust the setting with the keys + . Then press the start key to save the new setting.
- As soon as the warming drawer is closed, it starts warming. When you want to cancel the entire setting, press the cancel key before closing.
- When there is no activity during 3 minutes whilst setting the appliance, it will return to waiting state [0].
- A sound can be heared by each efficient press of the keys.
- The buzzer will sound thrice when the set time has passed.
- Attention! When keeping food warm and warming dishes at the same time, it will take longer to warm for the dishes. They can get very hot on this function.
TEMPERATURE SETTINGS
Each function has its own temperature range. The recommended temperature are printed in bold. The temperature can be altered in 5^ steps by touching the key. The last temperature selected is automatically activated the next time the drawer is switched on, and this is shown in the display.
| Temperature °C* | ||
| 40 60 60 | ||
| 45 65 65 | ||
| 50 70 70 | ||
| 55 75 75 | ||
| 60 80 80 | ||
- Approximate temperature values, measured in the middle of the drawer when empty.
DURATION
The appliance is set for continuous operation mode. A limited duration can be selected by touching the keys and ^ - + . One touch is 1 hour (1h), two touches for 2 hours (2h), up to 5 hours.
CAPACITY
The quantity that can be loaded will depend to a great extent on the size and weight of your own crockery. Do not overload the drawer. The maximum load bearing capacity of the drawer is 25kg . Open and close the drawer gently when it is loaded heavily.
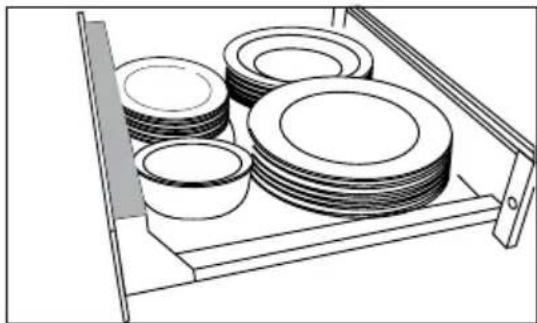
The loading example shown here, is only a suggestion - preheat dinnerware for 6 people:
-6dinner plates 26cm
-6 soup plates 23cm
-6 dessert dishes 19cm
-1ovale platter 32cm
-1 medium serving bowl 16cm
-1 small serving bowl 013cm
5 keeping food warm - table
| Food Cover the container? | Temperature for the setting | |
| Steak (rare) yes 65°C | ||
| Bake/gratin | yes | 80°C |
| Roast meat | yes 75°C | |
| Fish fingers | no | 80°C |
| Meat in a sauce | yes | 80°C |
| Vegetables in a sauce | yes | 80°C |
| Goulash | yes | 80°C |
| Mashed potato | yes 75°C | |
| Plated meal yes | 80°C | |
| Pancakes | no | 80°C |
| Pizza | no | 80°C |
| Strudel | no | 80°C |
| To warm bread | no | 65°C |
| To warm rolls | no | 65°C |
6 low temperature cooking - meat
It is any cooking procedure where the cooking temperature is at or close to the desired final core temperature. In traditional cooking, the cooking temperature always exceeds the desired ready-to-eat temperatures. With low temperature cooking meat method, meat cooks at a low temperature over a long period of time. Using this method, meat loses less liquid (less molecule breaking), maintain organoleptic characteristic (vitamins, proteins and so on) keeping freshness, flavor and juiciness intact. This cooking method is particularly suitable for large and tender pieces of meat. For precision we recommend using a proprietary food thermometer to monitor the core temperature.
CORE TEMPERATURE
Meat can be cooked to a core temperature of up to 70^ in the food warmer drawer. Meat which needs to be cooked to a core temperature higher than 70^ is not suitable for cooking in the food warming drawer.
The core temperature reading gives information about the degree of cooking in the middle of a piece of meat. The lower the core temperature, the less cooked the meat is in the middle:
45-50°C = rare
55-60°C = medium
65^ C = well done
HOW TO USE IT
- Preheat the warming drawer for 15 minutes to 70^ using the function
- Cover the meat properly with cling film. To give more flavour to the meat, you can first sear the meat.
- The cooking duration depends on the size of the individual pieces of meat - check the table for indication times.
- Put the covered meat on a plate.
COOKING TABLE
| Beef and veal | ||||
| Part Thickness | Doneness Time Searing time and indications | |||
| Whole Fillet | 50 mm | rare 1 h 35 min. | sear for 90 seconds with full power of the stove | |
| medium 2 h 35 min. | ||||
| well done 3 h 30 min. sear for 3 minutes with medium-high power of the stove | ||||
| 60 mm | rare 1 h 45 min. | sear for 90 seconds with full power of the stove | ||
| medium 2 h 50 min. | ||||
| well done 4 h sear for 3 minutes with medium-high power of the stove | ||||
| 70 mm | rare 2 h | sear for 90 seconds with full power of the stove | ||
| medium 3 h | ||||
| well done 4 h 40 min. sear for 3 minutes with medium-high power of the stove | ||||
| Medallions Rib eye T-bone Rump steak | 20 mm | rare 50 min. | sear for 90 seconds with full power of the stove | |
| medium 1 h 30 min. | ||||
| well done 2 h | sear for 3 minutes with medium-high power of the stove | |||
| 30 mm | rare 1 h 5 min. | sear for 90 seconds with full power of the stove | ||
| medium 1 h 50 min. | ||||
| well done 2 h 20 min. sear for 3 minutes with medium-high power of the stove | ||||
| 40 mm | rare 1 h 20 min. | sear for 2 minutes with full power of the stove | ||
| medium 2 h 10 min. | ||||
| well done 3 h | sear for 4 minutes with medium-high power of the stove | |||
Beef and veal
| Part Thickness | Doneness Time | Searing time and indications | ||
| Roast Beef | 60 mm | rare 1 h 45 min. | sear for 4 minutes with medium-high power of the stove | |
| medium 2 h 50 min. | ||||
| well done 4 h sear for 6 minutes with medium-high power of the stove | ||||
| 70 mm | rare 2 h | sear for 4 minutes with medium-high power of the stove | ||
| medium 3 h | ||||
| well done 4 h 40 min. sear for 6 min. | minutes with medium-high power of the stove | |||
| 80 mm | rare 2 h 20 min. | sear for 4 minutes with medium-high power of the stove | ||
| medium 3 h 30 min. | ||||
| well done 5 h 40 min. sear for 6 min. | nutes with medium-high power of the stove | |||
Pork
| Part Thickness | Doneness Time Searing time and indications | |||
| Whole Fillet | 40 mm | medium 2 h 20 min. | sear for 90 seconds with full power of the stove | |
| well done 3 h 10 min. | sear for 3 minutes with medium-high power of the stove | |||
| 50 mm | medium 2 h 35 min. sear for 90 seconds with full power of the stove | |||
| well done 3 h 25 min. | sear for 3 minutes with medium-high power of the stove | |||
| 60 mm | medium 3 h | sear for 90 seconds with full power of the stove | ||
| well done 4 h 5 min. sear for 3 minutes with medium-high power of the stove | ||||
| Boned gammon / Roulades / Whole pork loin | 30 mm | medium 1 h 50 min. | sear for 2 minutes with full power of the stove | |
| well done 2 h 40 min. | sear for 3 minutes with medium-high power of the stove | |||
| 40 mm | medium 2 h 20 min. sear for 2 minutes with full power of the stove | |||
| well done 3 h 10 min. | sear for 3 minutes with medium-high power of the stove | |||
| 50 mm | medium 2 h 35 min. | sear for 4 minutes with medium-high power of the stove | ||
| well done 3 h 25 min. sear for 6 minutes with medium-high power of the stove | ||||
| 60 mm | medium 3 h | sear for 4 minutes with medium-high power of the stove | ||
| well done 4 h 5 min. | sear for 6 minutes with medium-high power of the stove | |||
| 70 mm | medium 3 h 20 min. sear for 4 minutes with medium-high power of the stove | |||
| well done 4 h 45 min. sear for 6 minutes with medium-high power of the stove | ||||
| 80 mm | medium 3 h 40 min. sear for 4 minutes with medium-high power of the stove | |||
| well done 5 h 30 min. sear for 6 minutes with medium-high power of the stove | ||||
| Pork chop | 10 mm | medium 1 h 10 min. sear for 60 seconds with full power of the stove | ||
| well done 1 h 30 min. sear for 2 minutes with full power of the stove | ||||
| 20 mm | medium 1 h 30 min. sear for 90 seconds with full power of the stove | |||
| well done 2 h 10 min. sear for 3 minutes with full power of the stove | ||||
Poultry
| Part Thickness | Doneness Time | Searing time and indications | ||
| Chicken breast | 25 mm | medium 1 h 30 min. | sear for 60 seconds with full power of the stove | |
| well done 2 h | sear for 90 seconds with full power of the stove | |||
| 35 mm | medium 1 h 45 min. sear for 60 seconds with full power of the stove | |||
| well done 2 h 20 min. | sear for 90 seconds with full power of the stove | |||
| Duck breast | 35 mm | rare 1 h | sear for 4 minutes skin side down with medium-high power of the stove | |
| medium 1 h 30 min. | ||||
| well done 2 h | ||||
| 45 mm | rare 1 h 45 min. | |||
| medium 2 h 20 min. | ||||
| well done 3 h | ||||
| Turkey breast | 40 mm | medium 3 h | sear for 90 seconds with full power of the stove | |
| well done 4 h | sear for 3 minutes with full power of the stove | |||
| 50 mm | medium 3 h 50 min. | sear for 90 seconds with full power of the stove | ||
| well done 5 h | sear for 3 minutes with full power of the stove | |||
Lamb
| Part Thickness | Doneness Time | Searing time and indications | ||
| Rack of lamb | 40 mm | rare 1 h 20 min. | sear for 90 seconds with full power of the stove | |
| medium 2 h 10 min. | ||||
| well done 3 h | sear for 3 minutes with medium-high power of the stove | |||
| 50 mm | rare 1 h 35 min. | sear for 90 seconds with full power of the stove | ||
| medium 2 h 35 min. | ||||
| well done 3 h 30 min. | sear for 3 minutes with medium-high power of the stove | |||
| 60 mm | rare 1 h 45 min. | sear for 90 seconds with full power of the stove | ||
| medium 2 h 50 min. | ||||
| well done 4 h sear for 3 minutes with medium-high power of the stove | ||||
| Saddle of lamb | 60 mm | rare 1 h 50 min. | sear for 3 minutes with full power of the stove | |
| medium 2 h 50 min. | sear for 4 minutes with medium-high power of the stove | |||
| well done 4 h | ||||
| 70 mm | rare 2 h sear for 3 minutes with full power of the stove | |||
| medium 3 h | sear for 4 minutes with medium-high power of the stove | |||
| well done 4 h 40 min. | ||||
| 80 mm | rare 2 h 20 min. | sear for 3 minutes with full power of the stove | ||
| medium 3 h 30 min. | sear for 4 minutes with medium-high power of the stove | |||
| well done 5 h 40 min. | ||||
| Lamb | ||||
| Part Thickness Doneness Time Searing time and indications | ||||
| Boned leg of lamb | 60 mm | rare 1 h 45 min. | 2 minuten dichtschroeien op hoog vuur | |
| medium 2 h 50 min. | sear for 3 minutes with medium-high power of the stove | |||
| well done 4 h | ||||
| 70 mm | rare 2 h | sear for 2 minutes with full power of the stove | ||
| medium 3 h | sear for 3 minutes with medium-high power of the stove | |||
| well done 4 h 40 min. | ||||
| 80 mm | rare 2 h 20 min. | sear for 2 minutes with full power of the stove | ||
| medium 3 h 30 min. | sear for 3 minutes with medium-high power of the stove | |||
| well done 5 h 40 min. | ||||
| Lamb chops | 10 mm | rare 35 min. | sear for 60 seconds with full power of the stove | |
| medium 1 h 10 min. | ||||
| well done 2 h | sear for 90 seconds with full power of the stove | |||
| 20 mm | rare 50 min. | sear for 60 seconds with full power of the stove | ||
| medium 1 h 30 min. | ||||
| well done 2 h 30 min. | sear for 90 seconds with full power of the stove | |||
| Other uses | ||||
| Type of food Container Cover the | container? | Temperature Duration | ||
| Defrosting berries Plate | no 65°C | 1 hour | ||
| Defrosting frozen vegetables Plate | no 65°C | 1 hour | ||
| Proving dough Bowl | yes | 45°C 30 minutes | ||
| Making yoghurt | Yoghurt jars with lids | yes | 45°C | 6 hours |
| Melt chocolate | Bowl | no 50°C | 1 hour | |
| Infusion oil | Bowl covered with cling film | yes | 75°C | 4 hours |
| Infusion water Bowl covered with cling film | Bowl | yes | 65°C | 4 hours |
| Dry tomatoes | Plate with baking paper | no 60°C | 20 hours | |
| Dry vegetable | Plate | no 60°C | 12 hours | |
| Dry sliced fruits | Plate | no 60°C | 12 hours | |
| Dry herbs | Plate | no 70°C | 4 hours | |
| Dry bread for bread crumbs | Plate | no 80°C | 4 hours | |
| Confited fish in oil | Microwaveable Tupperware | yes - open vent | 50°C depends on the size - between 1 to 2 hours | |
| White Melba toast | Plate | no 80°C | 2 hours | |
| Slow cooking stew | Pyrex container | yes | 80°C | Between 1 to 12 hours |
7 cleaning & maintenance
Switch the appliance off before cleaning and let it cool down. Do not clean the appliance with a pressure cleaner or steam cleaner.
Interior and the front
Clean the inside of the appliance and the front after every use. If this is not done, it might become impossible to remove and could cause the surfaces to alter or discolour.
Use a damp cloth. If needed, use some washing-up liquid. Rinse well. Dry the inside with a dry cloth.
Warning! All surfaces are susceptible to scratching. Scratches on glass surfaces could even cause a breakage.
Contact with unsuitable cleaning agents can alter or discolour the surfaces.
To avoid damaging the surfaces of your appliance, do not use:
- cleaning agents containing soda, ammonia, acids or chlorides;
- cleaning agents containing descending agents;
- abrasive cleaning agents, e.g. powder cleaners and cream cleaners;
- solvent-based cleaning agents;
- stainless steel cleaning agents;
- dishwasher cleaner;
oven sprays; - glass cleaning agents;
- hard, abrasive sponges and brushes, e.g. pot scourers;
sharp metal scrapers.
Anti-slip mat
Remove the anti-slip mat from the drawer before cleaning it.
- Clean the anti-slip mat by hand only, using a solution of hot water and a little washing-up liquid, and then dry with a cloth.
Do not put the anti-slip mat back into the drawer until it is completely dry.
Do not wash the anti-slip mat in a dishwasher or washing machine.
Never place the anti-slip mat in the warming drawer to dry.
8 problems & solutions
With the help of the following guides, minor faults in the performance of the appliance, some of which may result from incorrect operation, can be put right without contacting the customer service department.
| Problem Possible cause Remedy | ||
| The appliance does not heat up. The | The appliance is not correctly plugged in. | Remove the plug and properly plug it in again. |
| The mains fuse has tripped. Reset the trip | switch in the mains fuse box. If, after resetting the trip switch, the appliance will still not heat up, contact the Inventum customer service. | |
| The food is not hot enough. The fu | ction for keeping food warm is not selected. | Select the correct function. |
| The temperature setting is too low. Select a higher temperature. | ||
| The vents are covered. Ensure that the air can circulate freely. | ||
| The food is too hot. The function for keeping food warm is not selected. | Select the correct function. | |
| The temperature is set too high. Select a lower temperature. | ||
| The crockery is not warm enough. | The function for warming plates and dishes ❶ is not selected. | Select the correct function. |
| The temperature setting is too low. Select a higher temperature. | ||
| The vents are covered. Ensure that the air can circulate freely. | ||
| The crockery has not been allowed to heat up for a sufficiently long time. | Various factors will affect how long the crockery will take to heat up. | |
| The crockery is too hot. The funct | on for warming plates and dishes ❷ or cups and glasses ❸ not selected. | Select the correct function. |
| The temperature setting is too high. Select a lower temperature. | ||
| A noise can be heard when the warming drawer is being used. | The noise is caused by the fan which distributes the heat evenly through the drawer. The fan operates at intervals when the functions for keeping food warm and low temperature cooking are being used. | This is not a fault. |
9 installation instructions
The safety during use can only be guaranteed when the oven is installed correctly and according to the regulations. The installer is responsible for any damage caused by a faulty installation.
- The electrical connection must be made by a qualified electricien. This person is aware of the national and local regulations the installation must comply with.
The manufacturer accepts no responsibility for any malfunction or damage caused by incorrect electrical installations.
- The appliance must be connected to a fixed installation and the means of disconnecting it from the fixed installation must be installed according to the installation instructions.
The connection cable must hang freely. Do not tie the power cable or pass it along sharp edges. It must be positioned so that it does not touch any of the hot parts of the appliance.
- The connection point, the wall socket and/or plug must always be accessible.
The warming drawer may only be built in combination with those appliances quoted by Inventum as being suitable. Inventum cannot guarantee trouble-free operation if the appliance is operated in combination with appliances other than those quoted as being suitable.
- When building in the warming drawer in combination with another suitable appliance, the food warming drawer must be fitted above a fixed interim shelf in the cabinet. Please ensure that the housing unit can support both its weight and that of the other appliance.
- As the combination appliance is placed directly on top of the warming drawer once it is built in, an interim shelf is not necessary between the two appliances. The combination appliance may weigh a maximum of 50kg .
The appliance must be built in so that the contents of the drawer can be seen. This is to avoid scalding from hot food spilling over. There must be enough space for the drawer to be pulled out fully.
- The cabinet into which the oven is fitted, must be heat resistant (>60^) . This also applies to the doors and the fronts of the cabinets.
- Ensure that the cabinet into which the appliance is installed is secure. For example, by mounting it to the adjoining elements.
- Damage caused by incorrect connection, incorrect use or incorrect fitting is not covered by the guarantee.
- Attention: any change to the appliance's interior, including fitting and changing the power cable, must only be performed by a qualified electricien.
INSTALLATION DIMENSIONS
In the drawing below, all the dimensions are displayed in mm.
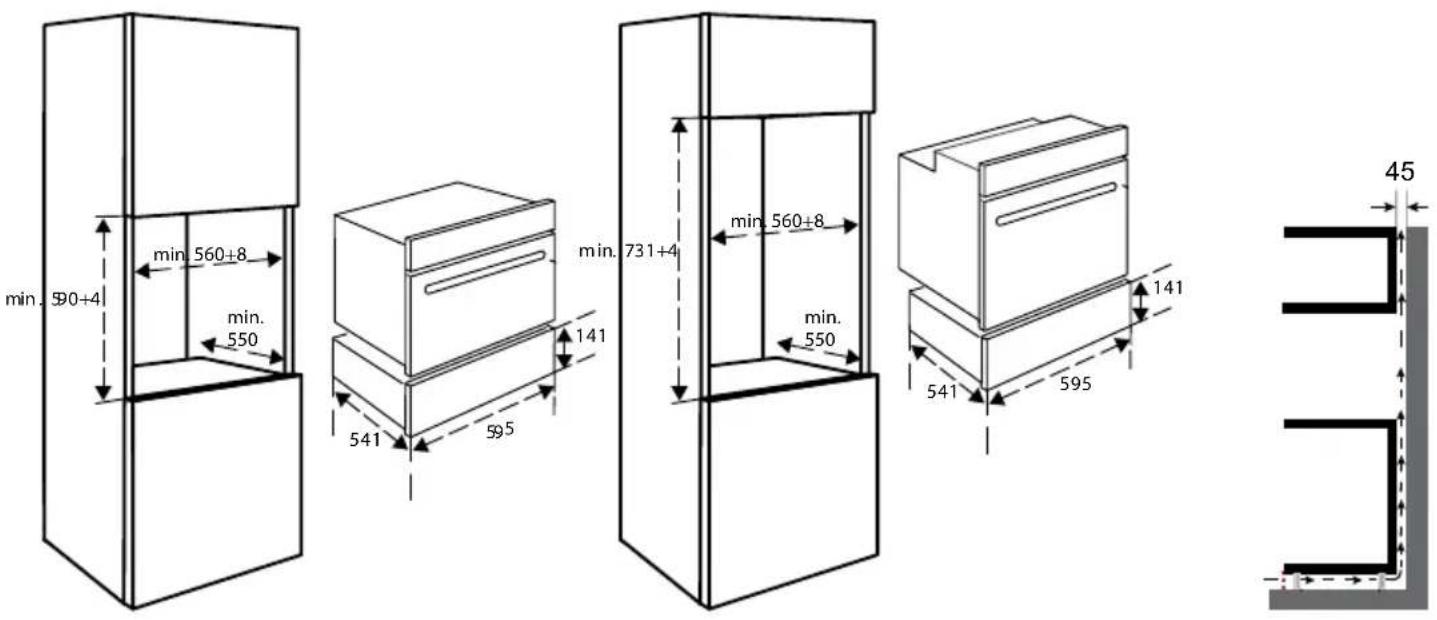
Compact appliances H: 454 mm Big oven H: 595 mm
ELECTRICAL CONNECTION
Check that the voltage in your home corresponds with the voltage printed on the appliance.
These groups in the meter must be secured with at least 16 amps each. The connection cable must have a length of at least 1.0m
When the cable is too short, you have no room to already connect the oven and place it against the wall before plugging it in.
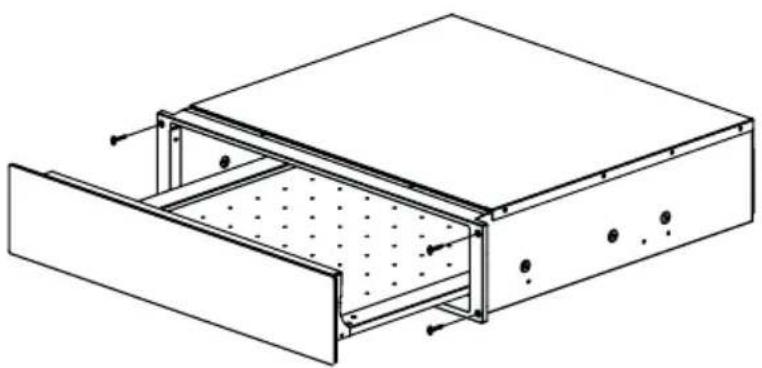
THE FITTING OF THE APPLIANCE
- Check that the cabinet and the space for the oven meet the dimension and ventilation requirements.
- Slide the warming drawer into the cabinet. Make sure the housing of the warming drawer does not come in contact with the walls of the kitchen cabinet. Make sure there is at least 2mm between the appliance casing and the walls of the kitchen cabinet. Make sure the warming drawer is centered between the walls of the kitchen cabinet. Note: Make sure the cable is not stuck and does not lie on top of the warming drawer.
- Open the drawer.
- Use screws to fasten the warming drawer to the cabinet. Take care not to over tighten and break the spacer.
- Close the drawer and plug the appliance in.
The warming drawer is now ready for use.
10 product fiche
| Manufacturer INVENTUM | |
| Model number IWL6014GT | |
| Type of appliance built in warming drawer | |
| Number of cavities 1 | |
| Heat source per cavity electric | |
| Volume per cavity 22 litres | |
| Maximum load bearing capacity of the drawer 25 kg | |
| Temperature range 30-80°C | |
| Execution | |
| Material glass and inox steel | |
| Type of control touch control | |
| Accessories anti-slip mat | |
| Technical specifications | |
| Dimensions (bxdxh) in mm 595 x 561 x 141 | |
| Nett weight in kg 18 kg | |
| Maximum loadcapacity on top of the appliance 60 kg | |
| Power consumption [W] 1000 watt | |
| Rated voltage [V] / frequency [Hz] 220-240V~ 50-60Hz | |
| Cord length [cm] 100 cm |
Remark: on the rating label - which can be found on the back of the appliance - you will find the technical specifications of the appliance.
55-60°C = medium-rosa
general terms and conditions of service and warranty
We do not need to remind you of the importance of service. After all, we develop our products to a standard so that you can enjoy them for many years, without any concerns. If, nevertheless, there is a problem, we believe you are entitled to a solution straight away. Hence our products come with an exchange service, on top of the rights and claims you are entitled to by law. By exchanging a product or part, we save you time, effort and costs.
2-year full manufacturer's warranty
- Customers enjoy a 2-year full manufacturer's warranty on all Inventum products. Within this period, a faulty product or part will always be exchanged for a new model, free of charge. In order to claim under the 2-year full manufacturer's warranty, you can either return the product to the shop you bought it from or contact the Inventum costumer service department via the form at www.inventum.eu/service-aanyvraag.
- The 2-year warranty period starts from the date the product is bought.
- In order to claim under the warranty, you must produce a copy of the original receipt.
- The warranty applies only to normal domestic use of Inventum products within the Netherlands.
5-year Inventum warranty
- Inventum offers a 5-year warranty on most large domestic appliances and a selection of small domestic appliances. This 5-year Inventum warranty consists of a 2-year full manufacturer's warranty, extended by a further 3-year warranty. The only thing you need to do to qualify for the 3-year extended warranty is to register the product within 45 days of purchase. You can read more about registering the product in the following paragraph.
- In accordance with the 5-year Inventum warranty provisions, a faulty product or part will always be exchanged for a new model during the first 2 years under the warranty. During the 3rd to 5th year under the warranty, you will only pay the costs of exchange. The current costs of exchange are listed at www.inventum.eu/omruilkosten.
- In order to claim under the 5-year Inventum warranty, you can either return the product to the shop you bought it from or contact the Inventum costumer service department via the form at www.inventum.eu/service-aanvraag.
- The 5-year warranty period starts from the date the product is bought.
- In order to claim under the warranty, you must produce a copy of the original receipt.
- The warranty applies only to normal domestic use of Inventum products within the Netherlands.
Product registration
- The 3-year extended warranty is easy to obtain, free of charge, by registering the product within 45 days of purchase, via the website www.inventum.eu/garantie- registrarie. If you did not register the product within 45 days of purchase, you can still do so up to 2 years after the purchase date. However, there will be a charge. The one-off registration charge is € 89 for each separate product. Registration is possible only for products that are subject to the 5-year Inventum warranty. Whether the product qualifies for the 5-year Inventum warranty is stated in the product user manual and in the product information sheet, on Inventum's website.
- The warranty period always starts from the date the product is bought. If the product is registered for the extended warranty at a later date, the warranty period still starts from the original date of purchase.
- The 3-year extended warranty can only be applied for if you are in the possession of a copy of the original receipt and the Inventum 5-year warranty certificate.
Large domestic appliances
- Breakdowns or faults in large domestic appliances (separate and built-in white goods) can be registered via the form at www.inventum.eu/service-aanvraag, by calling the Inventum costumer service department or in the store where you bought the device. The telephone number of the costumer service department can be found at www.inventum.eu.
- In the event of breakdowns or faults in large domestic appliances, Inventum will have the option to have a service engineer inspect the faulty device onsite at the customer in the Netherlands and to carry out repairs, there and then. The Inventum customer service department can also decide to have the device exchanged.
- If you suffer a breakdown or fault in a large domestic appliance during the first 2 years from the date of purchase, Inventum will not charge any costs for the exchange, call-out or for parts and labour.
- If you registered the product as described before at www.inventum.eu/garantie-registry-registry and you subsequently report a breakdown of a large domestic appliance in the 3rd to 5th year of the date of purchase, the 5-year Inventum warranty applies and the device will be repaired or exchanged, free of charge. In the event of a repair or exchange of the device, you only pay the costs of exchange. The current costs of exchange are listed at www.inventum.eu/omruilkosten. If you did not register the product, the 3-year extended warranty does not apply.
- When reporting a breakdown or fault, a service engineer will contact the customer within 1 working day in order to make an appointment. When the report is made in a weekend or during a public holiday, this will be the next working day.
- If you report a breakdown or fault via the form at www.inventum.eu/service-aanvraag, you will be kept informed of the progress via mobile messages and e-mail.
- The warranty period starts from the date the product is bought.
- In order to claim under the warranty, you must produce a copy of the original receipt and the Inventum 5-year warranty certificate.
- The warranty applies only to normal domestic use of Inventum products within the Netherlands.
Breakdowns or faults outside the warranty period
- Breakdowns or faults in small or large domestic appliances outside the warranty period, can be reported to the costumer services department via the form at www.inventum.eu/service-aanvraag or by calling the costumer services department.
- The costumer services department may ask you to send the product for inspection or repair. The costs of dispatch will be at your expense.
- The inspection to establish whether repair is possible involves a charge. You need to grant your permission for this, in advance.
- In the event of a large domestic appliance, Inventum, at your request, can send out a service engineer. In that case, you will be charged the call-out costs, as well as parts and labour.
- In the event of an instruction to repair, the repair costs must be paid in advance. In the event of a repair by a service engineer, the costs of the repair must be settled with the engineer onsite, preferably by means of PIN payment.
Warranty exclusions
- The following is excluded from the aforesaid warranties:
normal wear and tear;
- improper use or misuse;
insufficient maintenance;
- failure to comply with the operating and maintenance instructions;
- unprofessional installation or repairs by third parties or the customer himself;
non- original parts used by the customer;
- use for commercial or business purposes;
- removal of the serial number and/or rating label.
-
In addition, the warranty does not apply to normal consumer goods, such as:
-
dough hooks, baking tins, (carbon) filters, etc.;
- batteries, bulbs, carbon filters, fat filters etc.;
external connection cables; -
glass accessories and glass parts such as oven doors;
and similar items. -
Transport damage not caused by Inventum is also excluded. Therefore, inspect your new device before starting to use it. If you detect any damage, you must report this to the store where you purchased the product within 5 working days, or to the Inventum customer service department via the form at www.inventum.eu/service-aanvraag. If transport damage is not reported within this period, Inventum does not accept any liability in this respect.
- The following are excluded from warranty and/or replacement: faults, loss of and damage to the device as a result of an event that is normally insured under the home contents insurance.
Important to know
- The replacement or repair of a faulty product, or a part thereof, does not lead to an extension of the original warranty period.
- Parts that have been replaced, packaging material and exchanged devices are taken back by the service engineer and become the property of Inventum.
- If a complaint is unfounded, all costs arising from it will be at the customer's expense.
- Following expiry of the warranty period, all costs of repair or replacement, including administration costs, dispatch and call-out charges, will be charged to the customer.
- Inventum cannot be held liable for damage as a result of devices built in incorrectly.
- Inventum cannot be held liable for damage caused by external events, unless this liability arises from mandatory statutory provisions.
- These warranty and service provisions are governed by Dutch law. Disputes will be settled exclusively by the competent Dutch court.
twitter.com/inventum1908
facebook.com/inventum1908
youtube.com/inventum1908


- Deutsch
- safety instructions
- - Please read these instructions before operating the appliance and retain for future use.
- - Attention! Avoid touching hot surfaces, especially the bottom of the drawer.
- appliance description
- CONTROL PANEL
- before first use
- operating the warming drawer
- Extra notes:
- TEMPERATURE SETTINGS
- DURATION
- CAPACITY
- keeping food warm - table
- low temperature cooking - meat
- CORE TEMPERATURE
- HOW TO USE IT
- cleaning & maintenance
- Interior and the front
- To avoid damaging the surfaces of your appliance, do not use:
- Anti-slip mat
- problems & solutions
- installation instructions
- INSTALLATION DIMENSIONS
- ELECTRICAL CONNECTION
- THE FITTING OF THE APPLIANCE
- product fiche
- general terms and conditions of service and warranty
- 2-year full manufacturer's warranty
- 5-year Inventum warranty
- Product registration
- Large domestic appliances
- Breakdowns or faults outside the warranty period
- Warranty exclusions
- Important to know
Brand : INVENTUM
Model : IWL6014GT
Category : Warming drawers and cabinets