
MP1314 - Car stereo JENSEN - Free user manual and instructions
Find the device manual for free MP1314 JENSEN in PDF.
| Product type | CD/MP3/WMA car stereo with AM/FM tuner |
| Brand | Jensen |
| Model | MP1314 |
| Dimensions (H x W x D) | 51 x 178 x 170 mm |
| Weight | Approximately 1.5 kg |
| Power supply | 11-16 V DC, negative ground |
| Fuse | 15 A (ATO fast-blow) |
| Output power | 13 W RMS x 4 channels (4 Ω, <1% THD+N) |
| Signal-to-noise ratio (CD) | >90 dBA |
| Signal-to-noise ratio (Radio) | 70 dBA |
| FM band | 87.5-108.0 MHz (depending on region: USA/EUR/SAM) |
| AM band | 522-1710 kHz (depending on region) |
| CD player | CD, CD-R/RW, MP3, WMA |
| Station memory | 24 presets (18 FM, 6 AM) |
| RDS functions | PTY, TA, AF, PI, etc. |
| Equalizer | 5 modes: Classical, Pop, Rock, Flat, Off |
| Front panel | Detachable, with protection case |
| Audio inputs | USB, Auxiliary (3.5 mm), SD card |
| Electronic skip protection (ESP) | Yes (approximately 10 seconds buffer) |
| Speaker outputs | 4 channels (front/rear, left/right) |
| Line outputs | 2 pairs (front and rear) |
| Operating temperature | -10 °C to 60 °C |
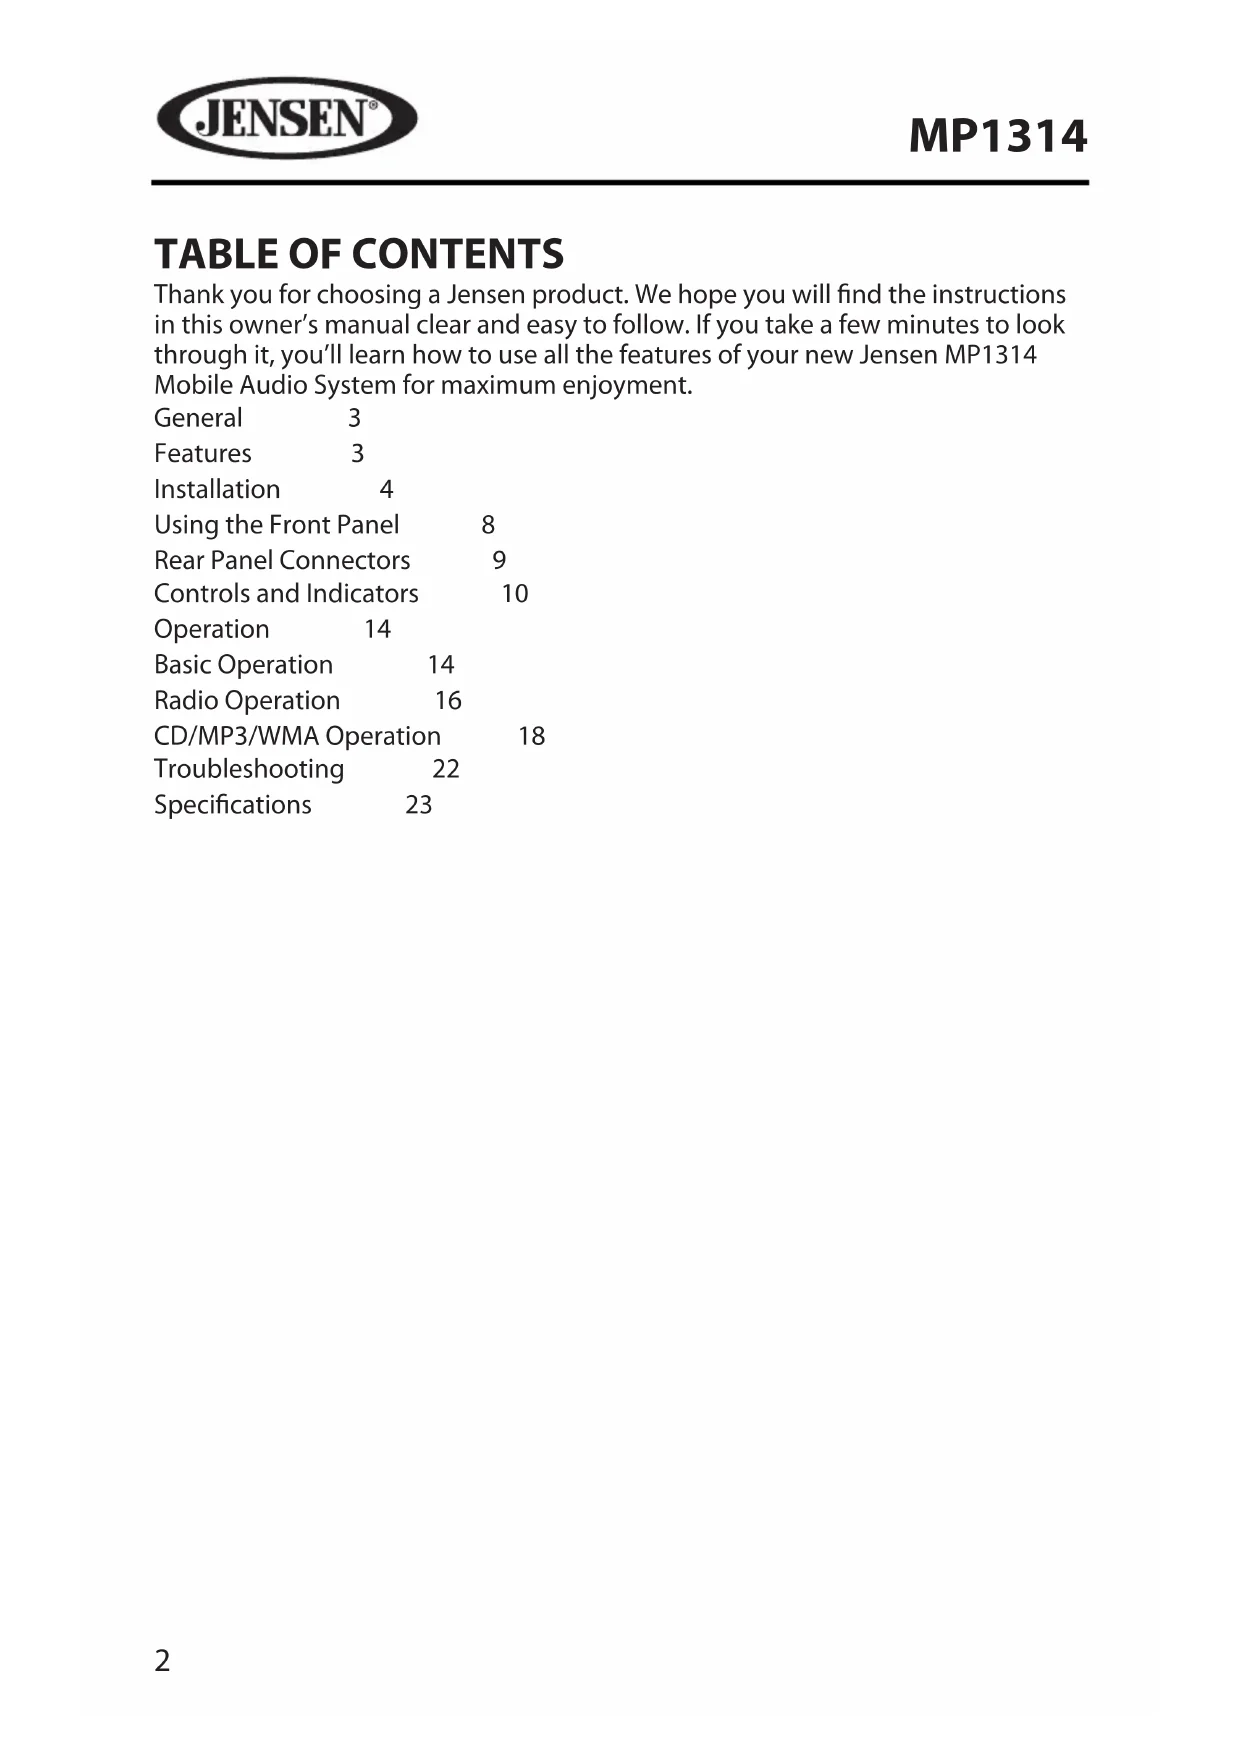
| Max. installation angle | 30° from horizontal |
Frequently Asked Questions - MP1314 JENSEN
User questions about MP1314 JENSEN
0 question about this device. Answer the ones you know or ask your own.
Ask a new question about this device
Download the instructions for your Car stereo in PDF format for free! Find your manual MP1314 - JENSEN and take your electronic device back in hand. On this page are published all the documents necessary for the use of your device. MP1314 by JENSEN.
USER MANUAL MP1314 JENSEN
Thank you for choosing a Jensen product. We hope you will find the instructions in this owner's manual clear and easy to follow. If you take a few minutes to look through it, you'll learn how to use all the features of your new Jensen MP1314 Mobile Audio System for maximum enjoyment.
General 3
Features 3
Installation 4
Using the Front Panel 8
Rear Panel Connectors 9
Controls and Indicators 10
Operation 14
Basic Operation 14
Radio Operation 16
CD/MP3/WMA Operation 18
Troubleshooting 22
Specifications 23
WARNING! Never disassemble or adjust the unit.
WARNING! To prevent injury from shock or fire, never expose this unit to moisture or water.
WARNING! Never use irregular discs.
GENERAL
Congratulations on your purchase of the Jensen MP1314 Mobile Audio System. It's a good idea to read all of the instructions before beginning the installation. We recommend having your Jensen MP1314 installed by a reputable installation shop.
PLL Synthesizer Stereo Radio
RBDS Operation
CD/MP3/WMA Player
Automatic Memory Storing
Detachable Front Panel
Preset Equalization
Electronic Shockproof (ESP) Function
Memory Card Interface
USB Interface
Auxiliary Input Function
Features
CD / MP3 / WMA
- CD-Text Compatible
• ID3 Tag Compatible - Directory Search (MP3 / WMA Only)
- Reads up to 255 MP3 and WMA Files on a CD+R / RW
• Audible Forward / Reverse Track Search (CD-DA Only)
• Random, Repeat and Intro - Play, Pause, Stop, Next Track and Previous Track
AM-FM
• USA / Europe / Latin America Frequency Spacing
• 24 Station Presets (18 FM / 6 AM)
• Auto Store / Preview Scan
INSTALLATION
Location
- Choose the mounting location where the unit will not interfere with the normal driving function of the driver.
- Before finally installing the unit, connect the wiring temporarily and make sure the unit and the system work properly.
- Use only the parts included with the unit to ensure proper installation. The use of unauthorized parts can cause malfunctions.
- Consult with your nearest dealer if installation requires the drilling of holes or other modifications of the vehicle.
- Install the unit where it does not get in the driver's way and cannot injure the passenger if there is an emergency stop.
- If installation angle exceeds 30^ from horizontal, the unit might not give its optimum performance.
- Avoid installing the unit where it would be subject to high temperature, such as from direct sunlight, or hot air, from the heater, or where it would be subject to dust, dirt or excessive vibration.
DIN Front/Rear-Mount
This unit can be properly installed either from the "Front" (conventional DIN Front-mount) or the "Rear"(DIN Rear-mount), utilizing the threaded screw holes at the sides of the unit chassis). For details, refer to the following illustrated installation methods.
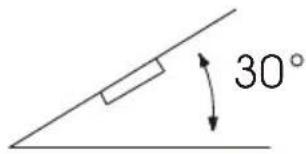
Take Out Transport Screws Before Installation
Before installing the unit, please remove the two screws.
natural_image
Technical line drawing of a rectangular mechanical part with hatched top surface (no text or symbols)Installing the unit
Be sure you test all connections first, and then follow these steps to install the unit.
-
Make sure the ignition is turned off, and then disconnect the cable from the vehicle battery's negative (-) terminal.
-
Disconnect the wire harness and the antenna.
-
Press the release button on the front panel and remove the control panel (refer to "removing the front panel").
-
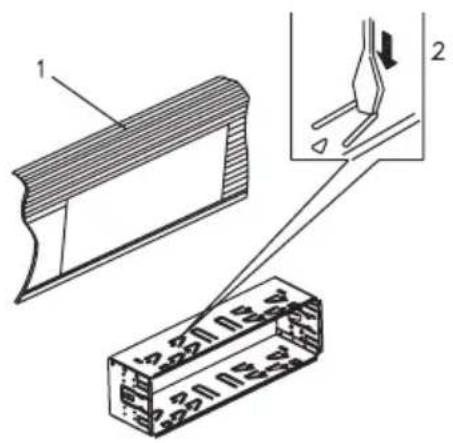
Lift the top of the outer trim ring then pull it out to remove it.
-
The two supplied keys release tabs inside the unit's sleeve so you can remove it. Insert the keys as far as they will go (with the notches facing up) into the appropriate slots at the middle left and right sides of the unit. Then slide the sleeve off the back of the unit.
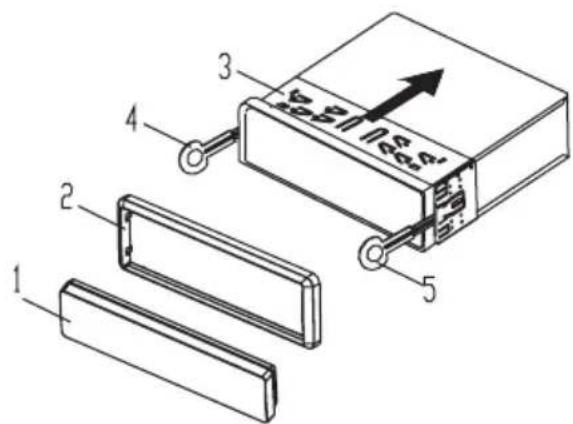
(1) Front panel; (2) Outer trim ring; (3) Sleeve; (4) L key; (5) R key
- Mount the sleeve by inserting it into the opening of the dashboard and bend open the tabs located around the sleeve with a screwdriver. Not all tabs will be able to make contact, so examine which ones will be most effective. Bending open the appropriate tabs behind the dashboard to secure the sleeve in place.
- Reconnect the wire harness and the antenna being careful not to pinch any wires or cables.
- Slide the unit into the sleeve until it locks into place.
- To further secure the unit, use the supplied metal strap to secure the back of the unit in place. Use the supplied hardware (Hex Nut, M5mm) and Spring Washer) to attach one end of the strap to the mounting bolt on the back of the unit. If necessary, bend the metal strap to fit your vehicle's mounting area. Then use the supplied hardware (Tapping Screw and Plain Washer) to attach the other end of metal strap to a solid metal part of the vehicle under the dashboard. This strap also helps ensure proper electrical grounding of the unit.
Note: Install the short threading terminal of the mounting bolt to the back of the unit and the other long threading terminal to the dashboard.
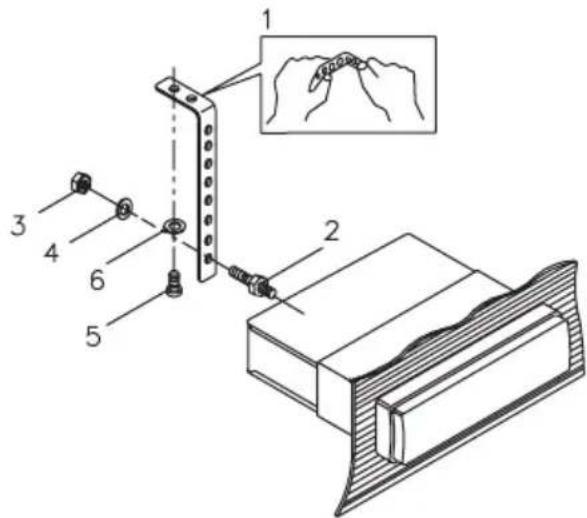
(1) Metal Strap; (2) Mounting Bolt; (3) Hex Nut; (4) Spring Washer; (5) Tapping Screw; (6) Plain Washer
- Reconnect the cable to the vehicle battery's negative (-) terminal. Then replace the outer trim ring and install the unit's front panel (refer to "Installing the front panel").
Removing the unit
- Make sure the ignition is turned off, then disconnect the cable from the vehicle battery's negative (-) terminal.
- Remove the metal strap attached the back of the unit (if attached).
- Press the release button to remove the front panel.
- Lift the top of the outer trim ring then pull it out to remove it.
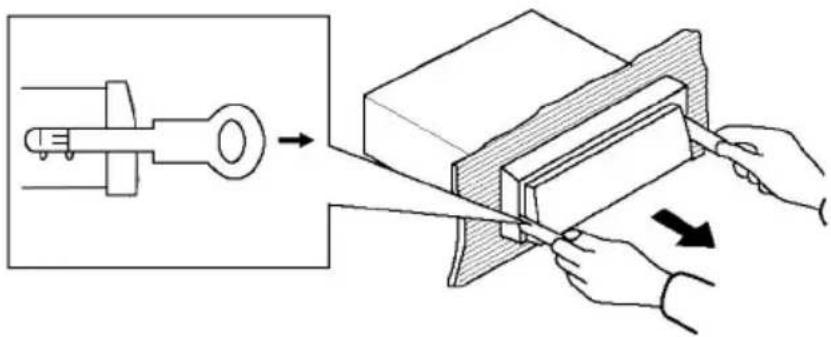
- Insert both of the supplied keys into the slots at the middle left and right sides of the unit, then pull the unit out of the dashboard.
natural_image
Illustration of a hand using a tool to cut a block, showing the process from a measuring tool to a cutting board (no text or symbols present)DIN Rear Mount (Method B)
If your vehicle is a Nissan or Toyota, follow these mounting instructions.
- Use the screw holes marked T (Toyota), N (Nissan) located on both sides of the unit to fasten the unit to the factory radio mounting brackets supplied with your vehicle.
- To fasten the unit to the factory radio mounting brackets. Align the screw holes on the bracket with the screw holes on the unit and then tighten the screws (5x5mm) on each side.
Note: The outer trim ring, sleeve and the metal strap are not used for method B installation.
USING THE FRONT PANEL
Removing the front panel
- Press the release button on the front panel and remove the front panel.
- When the panel is removed, store the panel in the protective case.
Installing the front panel
To install the front panel, insert the panel into the unit housing and make sure the panel is properly aligned. If the panel is not installed correctly the unit may malfunction or some keys may not function properly.
natural_image
Simple line drawing of a folding or folding object with an arrow indicating rotation (no text or symbols)Precautions when handling the font panel
- Do not drop the front panel.
- Do not put pressure on the display or control buttons when detaching or re-installing the front panel.
- Do not touch the contacts on the front panel or on the or the unit's main body. The contacts may be damaged which may result in a poor electrical connection.
- If any dirt or foreign substances adhere to the contacts, remove with a clean and dry cloth.
- Do not expose the front panel to high temperatures or direct sunlight.
- Do not use volatile cleaning agents (e.g. benzene, or thinners) on the front panel surface.
- Do not attempt to disassemble the front panel.
REAR PANEL CONNECTORS
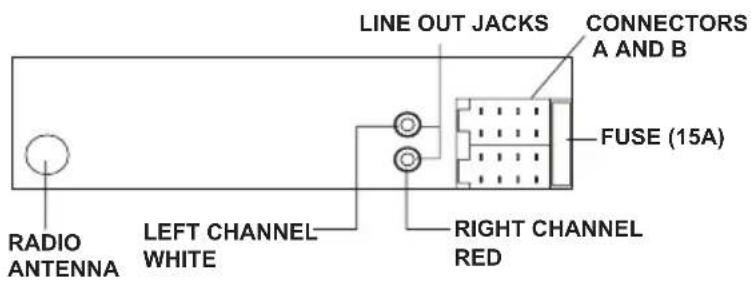
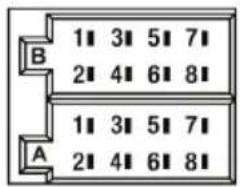
Connectors A and B
| Connector A Connector B | |
| 1. No Connection 1. REAR RIGHT SPEAKER (+) (VIOLET) | |
| 2. No Connection 2. REAR RIGHT SPEAKER (-) (VIOLET/BLACK) | |
| 3. No Connection 3. FRONT RIGHT SPEAKER (+) (GRAY) | |
| 4. MEMORY +12V (YELLOW) 4. FRONT RIGHT SPEAKER (-) (GRAY/BLACK) | |
| 5. AUTO ANTENNA OUTPUT (BLUE) 5. FRONT LEFT SPEAKER (+) (WHITE) | |
| 6. No Connection 6. FRONT LEFT SPEAKER (-) (WHITE/BLACK) | |
| 7. +12V (TO IGNITION KEY) (RED) 7. REAR LEFT SPEAKER (+) (GREEN) | |
| 8. GROUND (BLACK) 8. REAR LEFT SPEAKER (-) (GREEN/BLACK) |
CONTROLS AND INDICATORS
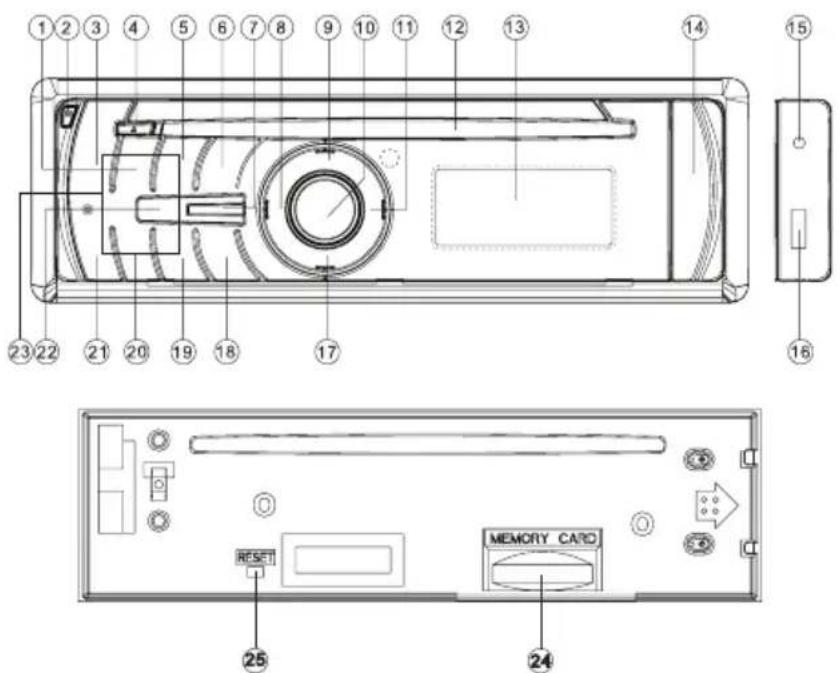
1. 2 (INT) Button
During disc play, press this button to hear the first 10 seconds of each track on the disc. INT ON appears on the display and each track is played in order. By using this option, you can quickly choose the track(s) on the disc that you prefer. When the desired track is reached, press the button again to cancel the introductory mode.
2. Release Button
This button is used to release the mechanism that holds the front panel to the chassis.
3. 1(▶)Button
Press to pause playback. Touch the button again to resume playback.
4. DISC EJECT (▲BUTTON
When pressed, disc play is stopped and the disc is automatically ejected. The CD icon will disappear from the display panel and the unit will revert to radio operation. If the disc is not removed from the unit, it will automatically be reloaded within 10 seconds to prevent accidental disc damage. The CD icon will remain displayed to indicate a disc is still loaded in the unit. If the disc eject button is pressed during radio operation, the disc is automatically ejected and radio play continues uninterrupted.
NOTE: Always remove the disc from the unit when the disc player is not to be used for an extended period of time to prevent accidental disc damage and to preserve disc life.
5. 3 (RPT) Button
When playing an audio CD press the button to continuously repeat the same track. Press the button again to turn the repeat function off. When playing MP3/WMA disc, press the button to select one of the following modes: RPT ONE (repeats the current track), REP DIR (repeats the tracks contained in the directory) and REP OFF which cancels the repeat function.
6. Next (▶) Button
During disc play, press this button to quickly select the end of a particular track in the forward direction. With each press of the button, the next higher track number will be selected as shown on the display panel. Press and hold the button to advance rapidly in the forward direction as indicated by the elapsed time display.
7. Power On/Off ( )MUTE Button
Press to turn the unit ON. Press and hold to turn the unit OFF. When listening to audio, press this button momentarily to mute the volume from the system. (MUTE will appear on the display panel). Pressing the button again or adjusting the Volume Knob will return the audio to the volume level setting in use before the mute function was activated.
8. EQ (Equalizer) Button
The Equalizer applies preset sound effects to the unit's audio output signal. Pressing the EQ button allows selection of one of five operating modes: Classic, Pop, Rock, EQ Off and Flat.
9. DISP Button
If the radio is tuned to the AM band pressing this button will display the current time setting and AM frequency. If the radio is tuned to the FM band pressing this button will display the current time setting, FM frequency and the PTY category.
10. Volume Knob
Rotate to increase or decrease the volume. When pressed the knob also performs the Select function. This is used to select the audio function (volume, bass, treble, balance or fade) to be adjusted. Pressing the volume knob once will set the unit for volume adjustment. (VOL will appear on the display panel, followed by the setting number). Pressing the volume knob additional times will select bass adjustment (BAS on display panel), treble adjustment (TRB), balance (BAL L-R), fader (FAD F-R), loudness (LOUD) and volume (VOL) again. The display will return to the normal indication 5 seconds after the last adjustment or when another function is activated.
11. PTY/ENTER Button
Press the PTY button to access the program type related search function. When the PTY function is enabled, turning the volume knob will display a category (news, sports, talk, weather, jazz, oldies, country, Top 40, classic rock, soft rock, public, etc.) The unit will search for radio programming that contains the desired topic.
The button is also used to confirm a setting (ENTER) by pressing the button.
12. DISC Slot
With the label surface facing up, fully insert a compact disc into the slot until the load mechanism engages.
NOTE: This unit is designed for play of standard 5" (12cm) Compact Discs ONLY. Do not attempt to use 3"(8cm) CD-Singles in this unit, either with or without an adapter, as damage to the player and/or disc can occur. Such damage will not be covered by the Warranty on this product
13. Liquid Crystal Display
The Liquid Crystal Display (LCD) panel displays the radio band and radio station frequency. If the station transmits music information this will also be displayed. This information usually consists of song title and artist. Also the radio can display PTY categories such as news, sports, talk etc.
14. USB Interface Connector Cover
Front panel cover which when open allows the connection of a USB device for playback of audio files.
15. Auxiliary Input Connector
Accepts a 3.5mm jack through which signals from various audio/video devices can be applied to the unit.
16. USB Port
Allows for the connection of a USB device.
17. BAND /SEARCH Button
Press to select or change the radio band (AM or FM1, FM2, or FM3). Press and hold to access the Auto-Store Tuning feature which will automatically scan and enter up to eighteen strong stations into the six preset memory locations for FM1, FM2 and FM3 and six strong stations into the six preset memory locations for AM. If you have already set the preset memories to your favorite stations, activating the Auto-Store feature will erase those stations and enter the new strong stations. This feature is most useful when travelling in an area where you are not familiar with the local stations.
18. Previous (◀) Button
During disc play, press this button to quickly select the beginning of a particular track in the backward direction. With each press of the button, the next lower track number will be selected as shown on the display panel. Press and hold the button to advance rapidly in the reverse direction as indicated by the elapsed time display
19. 6 (DIR+) Button
Used to access MP3\WMA discs with a folder hierarchy. The button will access folders in an ascending level. This button is non functional if the disc only contains individual tracks.
20. 5 (DIR-) Button
Used to access MP3\WMA discs with a folder hierarchy. The button will access folders in an descending level. This button is non functional if the disc only contains individual tracks.
21. 4 (RDM) Button
During disc play, press the button to play the tracks on the disc in a random or shuffled order (RDM ON will appear on the display panel). In Random Play mode, pressing the Next button (▶) will also select tracks in a random order instead of the normal progression. Pressing the Previous button (◀) will also select tracks in random order. The Random Play mode can be cancelled by pressing the button again (RDM OFF will appear on the display panel).
22. MODE Button
This button enables selection of either the radio, auxiliary device or disc play. When a CD is loaded, pressing this button will revert to radio operation; the disc icon (0) will still be displayed, indicating a disc is still loaded in the unit. Pressing the button again will return to disc play, but the current track will start from the point it was stopped.
23. Presets 1 through 6 Buttons
Six numbered preset buttons store and recall channels for each band. All six stored channels for the current band will appear on the display the preset button is pressed.
24. SD Card Interface Connector
The connector is located behind the front panel and is accessed when the front panel is removed. The connector is used to accept an SD card for playback of audio files.
25. RESET Button
The reset button is located behind the front panel is accessed when the front panel is removed. Press to reset the unit's settings to factory default.
OPERATION
Basic Operation
Switching On/Off The Unit
Press the ⬆MUTE button (7) to turn ON the unit. When the unit is ON, press and hold ⬆MUTE button (7) to turn OFF the unit.
Faceplate Release
Press the release button (2) to detach the removable faceplate.
Sound Adjustment
Press the volume knob (10) briefly to select the desired adjustment mode. The adjustment mode will change in the following order:
VOL
BAS
TRB
BAL
FAD
LOUD
(Volume) (Bass) (Treble) (Balance) (Fader) (Loud)
Rotating the volume knob (10) clockwise or counter-clockwise, adjusts the audio characteristics. The loud function is set to ON or OFF.
System Settings
Press and hold the volume knob (10) on the front panel to enter system setting mode. Then briefly press the volume button (10) to select the item you want to change and rotate the volume knob (10) to change the corresponding setting.
- BEEP ALL/OFF/2ND
Use the volume knob (10) to set beep sound ON, ALL, 2ND or OFF. ALL will beep when any key is pressed, 2ND setting will only beep when a key is pressed and held.
- AREA EUR/USA/SAM
Use the volume knob (10) to set the different area (Europe/USA/South America) radio frequency spacing.
NOTE: When AREA USA is selected the following four options will not be available.
- TA SEEK/ALARM
Use the volume knob (10) to set traffic announcements TA SEEK or TA ALARM.
• TA SEEK: When the TA function is enabled the unit will search for a radio station with traffic announcements.
• TA ALARM: No automatic station search. If TA is enabled and no traffic information is received then NO TP/TA is displayed on the screen.
- PI SOUND/MUTE
Use the volume knob (10) to set the program information, PI SOUND or PI MUTE function. In some cases a radio station may occupy two alternate frequencies. The PI code includes the radio station's callsign, allowing you to receive the same radio station under the alternate frequency.
- PI SOUND: To change stations the other station is played for less than one second.
• PI MUTE: The alternate station is muted.
5. RETUNE L/S
Use the volume knob (10) to set the retune short or long function. The retune short (RETUNE S) or retune long function (RETUNE L) sets the delay for the automatic search for traffic announcements and/or program information. This feature reduces gaps in radio reception during searches:
• S (short) after approximately 30 seconds;
• L (long) after approximately 90 seconds.
6. MASK DPI/ALL
Use the volume knob (10) to set the MASK DPI or MASK ALL search function. You can adjust the search function to:
- DPI: Alternative frequencies with different PI code are excluded from the search.
- ALL: Alternative frequencies with different PI code and no RDS information with high signal level are excluded from the search.
Setting the clock
- Briefly press the DISP button (9) until the clock is shown on the display.
- Hold the DISP button (9) until the clock flashes.
- Briefly press DISP button (9) to select the hours.
- Rotate the volume knob (10) to set the hours.
- Briefly press DISP button (9) again to select the minutes.
- Rotate the volume knob (10) to set the minutes.
Equalization Settings
Press EQ button (8) briefly to turn on equalization function and to select desired audio mode. There are five equalizer settings:
Press the Power On/Off (☐)/MUTE button (7) momentarily to mute the audio volume from the unit (MUTE will appear on the display panel). Pressing the Power On/Off (☐)/MUTE button (7) again or adjusting the volume level will return to the volume level setting in use before the mute function was activated.
Electronic Skip Protection (ESP) Function
The unit will absorb bumps to prevent playback skips while playing discs.
Auxiliary Input
Open the front panel cover (14) to access the auxiliary input connector (15). An external device can be connected to the unit using the auxiliary input connector (15). Plug the cable into the jack. Press the MODE button (22) on the front panel to switch to the AUX mode to access external devices. You cannot directly control external devices connected to the auxiliary input jack.
Reset Function
The reset button (25) can be activated with either a ballpoint pen or sharp metal object. The reset button is to be activated for the following reasons:
- Initial installation of the unit when all wiring is completed.
- All the function buttons do not operate.
- Error symbol on the display.
Note: if you press reset button (25), and the unit still does not operate, use a cotton swab soaked in isopropyl alcohol to clean the multi-pin connector on the front panel.
Radio Operation
Switching to Radio Mode
Press the MODE button (22) briefly to select radio mode. The radio frequency appears in the display together with the frequency memory band and.
Selecting the Frequency Band
In radio mode, press the BAND button (17) briefly to select the desired band. The reception band will change in the following order:
FM1 FM2 FM3 AM → →
Selecting a Station
Press the button (18) or button (6) briefly to activate the automatic seek function. Press for several seconds until MANUAL appears on the display, the manual tuning mode is enabled. If both buttons have not been pressed for several seconds, they will return to seek tuning mode and AUTO appears on the display.
Automatic Memory Storing
Press the BAND button (17) for several seconds, the radio searches from the current frequency and checks the signal strength until one cycle search is finished. The 6 stations with the strongest signals are stored into the corresponding preset number button.
Station Storing
Press any one of the 1 to 6 preset buttons (23) to select a station, which has been stored in memory.
Station Pre-Set Memories
To set any of the 6 pre-set memories in each band, use the following procedure:
- Turn the radio on and select the desired band.
-
Select the first station to be pre-set using the button (18) or button (6). Press for several seconds until MANUAL appears on the display, the manual tuning mode is enabled.
-
Tune to the desired station.
-
Press the pre-set button to be set and continue to hold it in for approximately 2 seconds. The pre-set number, will appear on the display panel below the frequency indication and a single beep will sound, indicating that the station is now set into that pre-set memory position. The station can now be recalled at any time by pressing that button.
-
Repeat the above procedure for the remaining 5 pre-sets on that band and for the other 3 bands on the unit
RDS Operation
Using PTY to Select Program
- Press the PTY button (11) once to enable selection of the PTY program group. Once a group is displayed, rotate the volume knob (10) to select the desired PTY program. Once the desired PTY program group is found, press the H button (18) or the ▶ button (6). The unit will search for the associated radio station and stop when a station is found.
- With PTY enabled, press the PTY button (11) again to cancel the PTY function. Note: When the unit is set to AREA EUR in system settings, whenever RDS function is enabled AF will appear on the display. With PTY enabled, press the PTY button (11) again to cancel the PTY function.
Listening to Traffic Announcements
- Press and hold the EQ button (16) and the unit will search for traffic announcements automatically. TA SEEK will appear on the display and the unit will search until the function is disabled. To disable the search for traffic announcements press and hold the EQ button (8).
CD/MP3/WMA Operation
Switching to CD Mode
If there is no CD/MP3/WMA disc inserted in the CD player:
Gently insert the disc with the printed side up into the disc slot until you feel some resistance. The disc will be drawn into the player automatically. Disc playback will begin.
If a CD/MP3/WMA disc is already inserted in the CD player:
Keep pressing the MODE button (22) briefly until the CD mode display appears.
Selecting Tracks
Press the button (18) or button (6) to move to the previous track or the next track. Each time the forward button is pressed the track is selected as shown on the display panel. Similarly, each time the backward button is pressed, the next lower track number will be selected as shown on the display panel.
Hold the button (18) or button (6) for fast reverse or fast forward. Disc play starts when you release the button.
Pausing Playing
Press the II button (3) to pause disc playback. Press the button again to resume disc playback.
Previewing Tracks
During disc play, press the INT button (1) to play the first 10 seconds of each track on the disc. INT ON will appear on the display. When a desired track is reached, press the INT button (1) and listen to the track. Press the button again to exit this mode. When playing a MP3/WMA disc, press and hold to play the first 10 seconds of each track in the current directory. INT ON will appear on the display. Press it again to exit this mode.
Repeating Tracks
Press the RPT button (5) to continuously repeat the same track. RPT ON will appear on the display. Press the button again to cancel the repeat function. When playing a MP3/WMA disc, press and hold the RPT button (5) to repeat all tracks in the current directory. RPT ON will appear on the display. Press the button again to cancel the repeat function.
Playing Tracks Randomly
Press the RDM button (19) to play all tracks on CD in random order. RDM ON will appear on the display. Press again to cancel the function.
When playing a MP3/WMA disc, press and hold the RDM button (19) to play all tracks in the current directory in random order. Press it again to exit this mode. With the random function enabled, the track select buttons button (18) or button (6) will also select tracks in the random order instead of the normal progression.
Ejecting A Disc
Press the ▲button (4) to stop disc playback and eject the disc from the disc slot (12).
Special Functions For MP3/ WMA Discs
1. Selecting a Directory
When selected for play, files and folders are accessed in the order they were written by the CD writer. Press the DIR- button (20) to select in downward direction in the folder hierarchy or the DIR+ button (19) to select in upward direction in the folder hierarchy. If the MP3/WMA disc does not contain any folders, the DIR- button (20) or DIR+ button (19) are non operational.
2. Selecting tracks using the BAND button
The BAND button (17) is assigned as Digital Audio Mode selection button during MP3 operation.
When pressed, it is activated as selecting each mode of Digital Audio.
• Searching Track Directly
Press the BAND button (17) once. The unit searches the track selected by the volume knob (10). Then press the volume button (10) to start playing the track.
• Searching Directory or File Name
Press the BAND button (17) twice. The unit searches files and directories that have the same character which is inputted by the user rotating the volume knob (2). The search function is as follows:
a. Use the volume knob (10) to select the characters A to Z, blank, 0 to 9, _, -, +.
b. Press the volume button (10) to confirm entry of each character.
c. Press the PTY/ENTER button (11) to start the title search.
• Searching From Root Directory
Press the BAND button (17) three times. The unit searches file or directory from root by the volume button (10).
Select the desired directory/songs by using the volume button (10) and then use volume button (10) to confirm. If the selected title is a song, it starts to play.
3. Display Information
Press the DISP button (9) to show the following information, such as the clock, ID3 TAG (if available: song title, directory name, and artist name.
USB Operation
The unit contains a USB interface (16). The USB interface is located on the front panel of the unit beneath the protective cover (14). You can connect an USB memory device using this interface.
- Lift the protective cover to reveal the USB connector.
- Locate the USB connector on the front of the radio.
- Insert the USB device into the USB connector. The unit will read the audio files on the USB device automatically.
- In the unit is in another mode of operation press the MODE button (22) to select USB mode.
Note: The unit can only support a standard USB memory device. When connecting an MP3 player and it uses normal batteries (non rechargeable batteries), the batteries should be removed from the MP3 player first and then connected to the USB interface. Otherwise, damage to the batteries may result.
When in USB play mode, be sure not to remove the USB driver from the USB interface.
Memory Card Operation
There is a memory card interface (24) on the housing of the unit which is accessed by removing the front panel. When you insert a memory card in the memory card interface, the unit will search the MP3 files in the card and start to play MP3 files automatically.
SD card operation is the same as the USB memory device described above. In the unit is in another mode of operation press the MODE button (22) to select the SD card mode.
Disc Notes
Notes on discs:
- Attempting to use non-standard shape discs (e.g.; square, start, heart) may damage the unit. Be sure to use round-shape CDs only in this unit.
CD-Rs (Recordable CDs)/CD-RWs (Rewriteable CDs):
- Be sure to use discs with the following marks only for play in this unit:

-
The unit cannot play a CD-R or CD-RW that is not finalized. This is also called "closing the session" in some CD-R/CD-RW software. (Please refer to the manual of your CD-R/CD-RWsoftware for more information on the finalization process.)
-
Depending on the recording status, conditions of the disc and the equipment used for the recording, some CD-Rs/CD-RWs may not be played on this unit.
- ELECTRONIC SKIP PROTECTION (ESP) The CD Player in this unit is equipped with Electronic Skip Protection (ESP) circuits. This capability enables the CD Player to project disc play approximately 10 seconds ahead of its current play position. As a result, if a severe road bump is encountered during player operation, play of the current track will not be interrupted, or result in a skip.
- Do not stick paper or tape, etc, onto the label side or the recording side of any discs, as it may cause a malfunction.
- Dirt, dust, scratches and warping discs may the CD player to malfunction.
- Depending on the recording status, conditions of the disc and the equipment used for the recording, some CD-Rs/CD-RWs may not be played on this unit. For more reliable playback, please see following recommendations:
- Use CD-RWs with speed 1x to 4x and write with speed 1x to 2x.
- Use CD-Rs with speed 1x to 8x and write with speed 1x to 2x.
- Do not play a CD-RW which has been written for more than 5 times.
Notes on MP3 files :
- The disc must be in the ISO9660 level 1 or level 2 format, or Joliet or Romeo in the expansion format.
- When naming a MP3 file, be sure the file name extension is ".MP3".
- For a non-MP3 file, even though the file name extension is ".MP3", the unit will recognize it.
TROUBLESHOOTING
Before going through the checklist, the check wiring connections. If any of the problems persist after checking the list, contact your nearest service dealer.
| SymptomCauseSolution | ||
| No power. • The car ignition switch is not on.• The fuse is blown. | • If the power supply is connected to the car accessory circuits, but the engine is not running, switch the ignition key to “ACC”.• Replace the fuse. | |
| Disc cannot be loaded or ejected. | • A disc is loaded inside the player.• The disc is inserted in the wrong direction.• Compact disc is extremely dirty or defective.• The temperature inside the car is too high.• Condensation. | • Remove the disc in the player, then insert a new one.• Insert the compact disc with the label facing upward.• Clean the disc or try to play a new one.• Let vehicle temperature cool.• Turn the player off for an hour, then try again. |
| No sound. • The volume is at minimum.• The wiring is not properly connected. | • Adjust the volume to a desired level.• Check the wiring connection. | |
| CD audio skips. | • The installation angle is greater than 30 degrees.• The disc is extremely dirty.• The disc is defective. | • Adjust the installation angle to less than 30 degrees.• Clean the compact disc.• Play a new compact disc. |
| The operation keys do not work. | • The built-in microcomputer is not operating properly due to noise. | • Press the RESET button.• The front panel is not properly installed. |
| The radio does not work. | • The antenna cable is not connected. | • Insert the antenna cable firmly. |
| The radio station automatic selection does not work. | • The signals are too weak. • Select a station manually. | |
SPECIFICATIONS
CEA Power Ratings

Power output: 13 watts RMS X 4 channels into 4-ohms @ < 1% THD+N
Signal to noise ratio: 70dBA below reference.
(Reference: 1 watt, 4-ohms)
Frequency response: 20Hz to 20kHz (-3dB),
Auxiliary input used as source reference
Reference supply voltage: 14.4VDC
CD Player
Signal-to-noise ratio: >90dBA
Frequency response: 20Hz-20kHz, -3dB
Channel separation: >55dB @ 1kHz
D/A converter: 1 Bit/CH
FM Tuner
Tuning range (USA): 87.5MHz - 107.9MHz
Tuning range (Europe): 87.50MHz-108.00MHz
Tuning range (South America): 87.50MHz-108.00MHz
Mono sensitivity: 12dBf
50dB quieting sensitivity (stereo): 16dBf
Stereo separation @ 1kHz: >35dB
Frequency response: 30Hz-17kHz. -3dB
AM Tuner
Tuning range (USA): 530 kHz - 1710kHz
Tuning range (Europe): 522kHz-1620kHz
Tuning range (South America): 530 kHz - 1710kHz
Sensitivity @ 20dB signal to noise: 30uV
Frequency response: 50Hz-2kHz, -3dB
Auxiliary Input
Input sensitivity: 400mV RMS for 1 watt RMS into 4-ohms
Frequency response: 20Hz to 20kHz, -3dB
Input impedance: 10 k-ohms
General
Power supply: 11-16 VDC, negative ground
Power Antenna (Blue): 500mAmp Max, current limited protection.
Operating Temp: -10C\~60C
Fuses: 15 amp fast blow ATO
DIN chassis dimensions: 2"H x 7"W x 6.7"D
(51mm x 178mm x 170mm)
Specifications subject to change without notice

Audiovox Electronics Corporation
Hauppauge, NY 11788
Technical Assistance: 1-800-323-4815
www.mobile.jensen.com
© 2012 Audiovox
Printed in China
MP1314 Common Replacement Parts
| Owner's Manual, Install Manual and Quick Start Guide 30613670 | |
| Wire Harness 30313670 | |
| Trim Ring 30413670 | |
| Sleeve and Mounting Brackets 30113670 | |
| Hardware Bag 30513670 | |
128-9096
MP1314
MANEARSDEIARROPIETARIO
natural_image
Technical line drawing of a mechanical component with a magnified inset showing a pin inserted into a cylindrical part (no text or symbols)
natural_image
Technical line drawing of a mechanical part with a flanged top and rectangular base (no text or symbols)(1) Panel delantero; (2) Perfil embellecedor exterior; (3) Abrazadera; (4) Llave en forma de L; (5) Llave en forma de R
(1) Fleje metálico; (2) Perno de montaje; (3) Tuerca hexagonal; (4) Arandela con resorte; (5) Tornillo autorroscante; (6) Arandela plana
natural_image
Diagram showing a tool interacting with a mechanical component, with hands holding a tool and arrows indicating direction (no text or symbols present)natural_image
Simple line drawing of a folding or folding object with an arrow indicating rotation (no text or symbols)1. 2 Botón (INT)
(Volumen) (Graves) (Agudos) (Balance
(Balance (Sonoridad)
Salida de Potencia: 13 vatios RMS X 4 canal en 4-ohmios a < 1% THD+N
Audiovox Electronics Corporation
Hauppauge, NY 11788
natural_image
Technical line drawing of a 3D rectangular object with hatched top surface and cutouts (no text or symbols)natural_image
Diagram showing a tool interacting with a mechanical component, with hands using a tool to cut the part (no text or symbols present)natural_image
Simple line drawing of a folding or folding object with an arrow indicating rotation (no text or symbols)- Touche 2 (INT) (Introduction)
7. Touche Power On/Off ( )MUTE (sourdine)
- PI SOUND/MUTE (Information de programme Son/Sourdine)
Audiovox Electronics Corporation
Hauppauge, NY 11788
Assistance technique : 1-800-323-4815
www.mobile.jensen.com
© 2012 Audiovox
Imprimé en Chine

- GENERAL
- Features
- CD / MP3 / WMA
- AM-FM
- INSTALLATION
- Location
- DIN Front/Rear-Mount
- Take Out Transport Screws Before Installation
- Installing the unit
- Removing the unit
- DIN Rear Mount (Method B)
- USING THE FRONT PANEL
- Removing the front panel
- Installing the front panel
- Precautions when handling the font panel
- REAR PANEL CONNECTORS
- CONTROLS AND INDICATORS
- 2 (INT) Button
- Release Button
- 1(▶)Button
- DISC EJECT (▲BUTTON
- 3 (RPT) Button
- Next (▶) Button
- Power On/Off ( )MUTE Button
- EQ (Equalizer) Button
- DISP Button
- Volume Knob
- PTY/ENTER Button
- DISC Slot
- Liquid Crystal Display
- USB Interface Connector Cover
- Auxiliary Input Connector
- USB Port
- BAND /SEARCH Button
- Previous (◀) Button
- 6 (DIR+) Button
- 5 (DIR-) Button
- 4 (RDM) Button
- MODE Button
- Presets 1 through 6 Buttons
- SD Card Interface Connector
- RESET Button
- OPERATION
- Basic Operation
- Switching On/Off The Unit
- Faceplate Release
- Sound Adjustment
- System Settings
- RETUNE L/S
- MASK DPI/ALL
- Setting the clock
- Equalization Settings
- Electronic Skip Protection (ESP) Function
- Auxiliary Input
- Reset Function
- Radio Operation
- Switching to Radio Mode
- Selecting the Frequency Band
- Selecting a Station
- Automatic Memory Storing
- Station Storing
- Station Pre-Set Memories
- RDS Operation
- Using PTY to Select Program
- Listening to Traffic Announcements
- CD/MP3/WMA Operation
- Switching to CD Mode
- Selecting Tracks
- Pausing Playing
- Previewing Tracks
- Repeating Tracks
- Playing Tracks Randomly
- Ejecting A Disc
- Special Functions For MP3/ WMA Discs
- Selecting a Directory
- Selecting tracks using the BAND button
- • Searching Track Directly
- • Searching Directory or File Name
- • Searching From Root Directory
- Display Information
- USB Operation
- Memory Card Operation
- Disc Notes
- Notes on discs:
- CD-Rs (Recordable CDs)/CD-RWs (Rewriteable CDs):
- Notes on MP3 files :
- TROUBLESHOOTING
- SPECIFICATIONS
- CD Player
- FM Tuner
- AM Tuner
- MP1314
- MANEARSDEIARROPIETARIO
- 2 Botón (INT)
- Touche Power On/Off ( )MUTE (sourdine)
Brand : JENSEN
Model : MP1314
Category : Car stereo