
FFB52600ZW - Dishwasher AEG - Free user manual and instructions
Find the device manual for free FFB52600ZW AEG in PDF.
| Product type | Built-in dishwasher |
| Brand | AEG |
| Model | FFB52600ZW |
| Dimensions (W x H x D) | 600 x 850 x 625 mm |
| Capacity | 13 place settings |
| Power supply | 220-240 V, 50 Hz |
| Water pressure | 0.5 to 8 bar (0.05 to 0.8 MPa) |
| Standby consumption | 5.0 W |
| Off consumption | 0.50 W |
| Wash programs | ECO, AUTO, Intensive 70°C, 30 min, Glasses 45°C |
| Options | XtraDry, TimeSaver, AirDry, Delayed start |
| Water softener | Adjustable according to hardness (levels 1 to 10) |
| Filtration system | 3-part filter: flat, cylinder, micro-filter |
| Spray arms | 2 arms (lower and middle) |
| Child safety | Yes (AirDry can be disabled to avoid opening) |
| Maintenance | Regular cleaning of filters and spray arms |
| Spare parts | Available at www.aeg.com/shop |
| Repairability | Authorized after-sales service |
Frequently Asked Questions - FFB52600ZW AEG
User questions about FFB52600ZW AEG
0 question about this device. Answer the ones you know or ask your own.
Ask a new question about this device
Download the instructions for your Dishwasher in PDF format for free! Find your manual FFB52600ZW - AEG and take your electronic device back in hand. On this page are published all the documents necessary for the use of your device. FFB52600ZW by AEG.
USER MANUAL FFB52600ZW AEG
Thank you for choosing this AEG product. We have created it to give you impeccable performance for many years, with innovative technologies that help make life simpler features you might not find on ordinary appliances. Please spend a few minutes reading to get the very best from it.
Visit our website for:

Get usage advice, brochures, trouble shooter, service information:
www.aeg.com/webselfservice

Register your product for better service:
www.registeraeg.com

Buy Accessories, Consumables and Original spare parts for your appliance:
www.aeg.com/shop
CUSTOMER CARE AND SERVICE
Always use original spare parts.
When contacting our Authorised Service Centre, ensure that you have the following data available: Model, PNC, Serial Number.
The information can be found on the rating plate.

Warning / Caution-Safety information

General information and tips

Environmental information
Subject to change without notice.
1. SAFETY INFORMATION
Before the installation and use of the appliance, carefully read the supplied instructions. The
manufacturer is not responsible for any injuries or damages that are the result of incorrect installation or usage. Always keep the instructions in a safe and accessible location for future reference.
1.1 Children and vulnerable people safety
- This appliance can be used by children aged from 8 years and above and persons with reduced physical, sensory or mental capabilities or lack of experience and knowledge if they have been given supervision or instruction concerning the use of the appliance in a safe way and understand the hazards involved.
- Do not let children play with the appliance.
- Keep detergents away from children.
- Keep children and pets away from the appliance when the door is open.
Children shall not carry out cleaning and user maintenance of the appliance without supervision.
1.2 General Safety
-
This appliance is intended to be used in household and similar applications such as:
-
farm houses; staff kitchen areas in shops, offices and other working environments;
-
by clients in hotels, motels, bed & breakfast and other residential type environments.
-
Do not change the specification of this appliance.
- The operating water pressure (minimum and maximum) must be between 0.5 (0.05) / 8 (0.8) bar (MPa)
- Obey the maximum number of 13 place settings.
- If the supply cord is damaged, it must be replaced by the manufacturer, its Authorised Service Centre or similarly qualified persons in order to avoid a hazard.
-
Put the cutlery in the cutlery basket with the sharp ends pointing down or put them in the cutlery drawer in a horizontal position with the sharp edges down.
-
Do not leave the appliance with the open door unattended to avoid stepping accidentally onto it.
- Before any maintenance operation, deactivate the appliance and disconnect the mains plug from the socket.
- Do not use high pressure water sprays and/or steam to clean the appliance.
- If the appliance has ventilation openings in the base, they must not be covered e.g. by a carpet.
- The appliance is to be connected to the water mains using the new supplied hose-sets. Old hose sets must not be reused.
2. SAFETY INSTRUCTIONS
2.1 Installation

WARNING!
Only a qualified person must install this appliance.
- Remove all the packaging.
- Do not install or use a damaged appliance.
- Do not install or use the appliance where the temperature is less than 0 °C.
- Follow the installation instruction supplied with the appliance.
Always take care when moving the appliance as it is heavy. Always use safety gloves and enclosed footwear.
2.2 Electrical connection

WARNING!
Risk of fire and electrical shock.
- The appliance must be earthed.
- Make sure that the parameters on the rating plate are compatible with the electrical ratings of the mains power supply.
Always use a correctly installed shockproof socket. - Do not use multi-plug adapters and extension cables.
Make sure not to cause damage to the mains plug and to the mains
cable. Should the mains cable need to be replaced, this must be carried out by our Authorised Service Centre.
- Connect the mains plug to the mains socket only at the end of the installation. Make sure that there is access to the mains plug after the installation.
- Do not pull the mains cable to disconnect the appliance. Always pull the mains plug.
- This appliance complies with the E.E.C. Directives.
UK and Ireland only. This appliance is fitted with a 13 A mains plug. If it is necessary to change the mains plug fuse, use only a 13 A ASTA (BS 1362) fuse.
2.3 Water connection
- Do not cause damage to the water hoses.
- Before connection to new pipes, pipes not used for a long time, where repair work has been carried out or new devices fitted (water meters, etc.), let the water flow until it is clean and clear.
- Ensure that there are no visible water leaks during and after the first use of the appliance.
- The water inlet hose has a safety valve and a sheath with an inner mains cable.
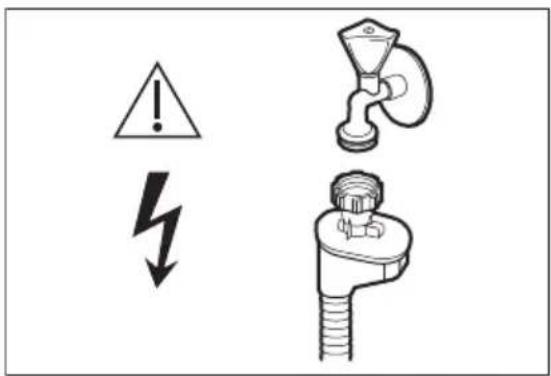

WARNING!
Dangerous voltage.
- If the water inlet hose is damaged, immediately close the water tap and disconnect the mains plug from the mains socket. Contact the Authorised Service Centre to replace the water inlet hose.
2.4 Use
- Do not sit or stand on the open door.
-
Dishwasher detergents are dangerous. Obey the safety instructions on the detergent packaging.
-
Do not drink and play with the water in the appliance.
- Do not remove the dishes from the appliance until the programme is complete. Some detergent may remain on the dishes.
The appliance can release hot steam if you open the door while a programme operates. - Do not put flammable products or items that are wet with flammable products in, near or on the appliance.
2.5 Disposal

WARNING!
Risk of injury or suffocation.
- Disconnect the appliance from the mains supply.
- Cut off the mains cable and discard it.
- Remove the door catch to prevent children and pets to get closed in the appliance.
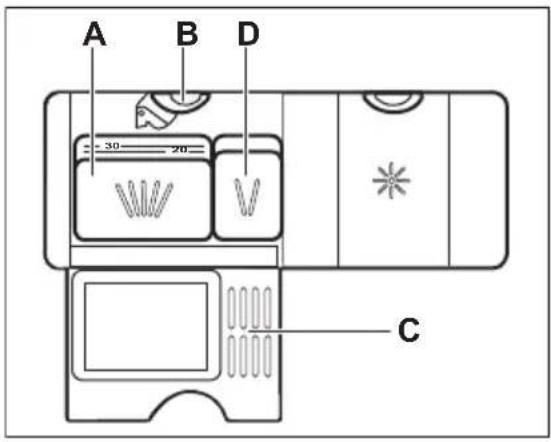
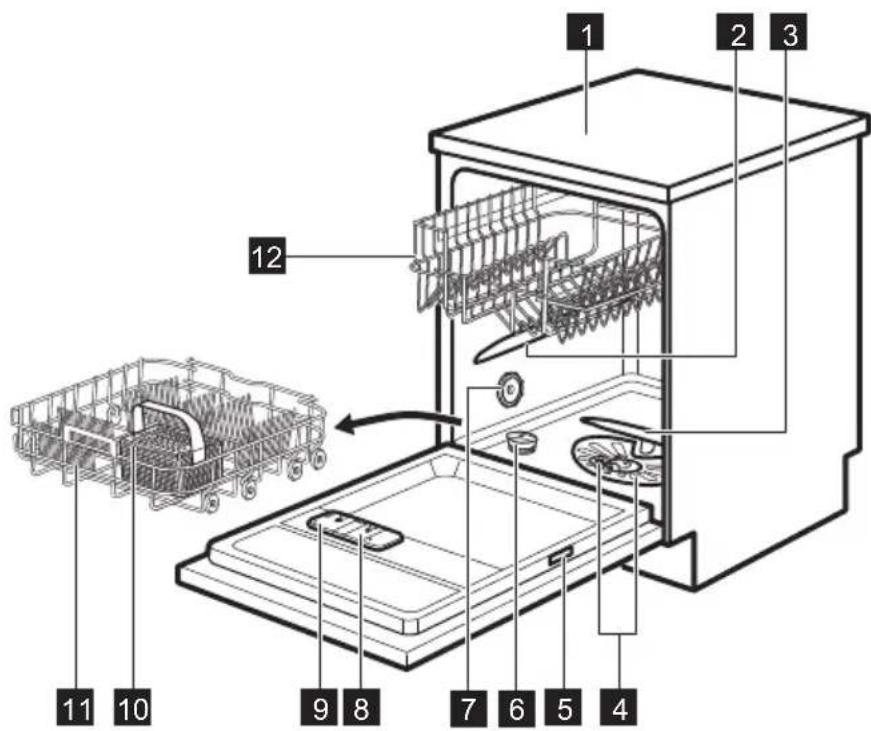
3.PRODUCT DESCRIPTION
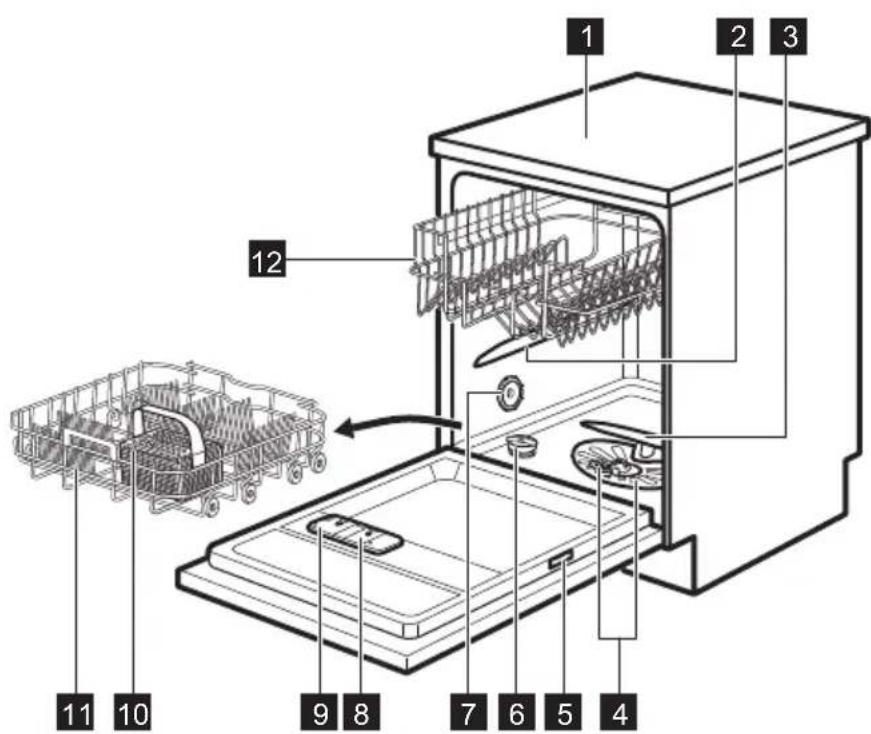
1 Worktop
3 Lower spray arm
2 Upper spray arm
4 Filters
5 Rating plate
Salt container
7 Air vent
8 Rinse aid dispenser
9 Detergent dispenser
Cutlery basket
11 Lower basket
12 Upper basket
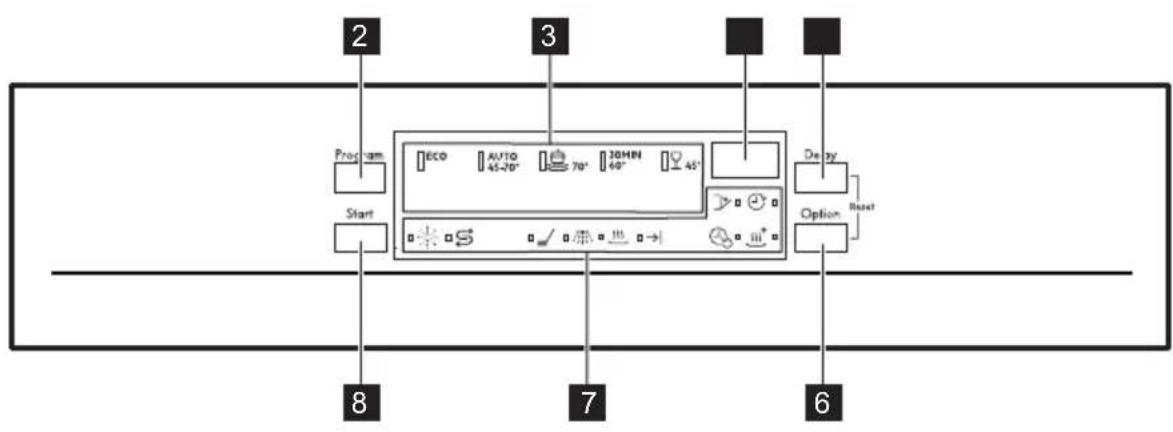
4. CONTROL PANEL

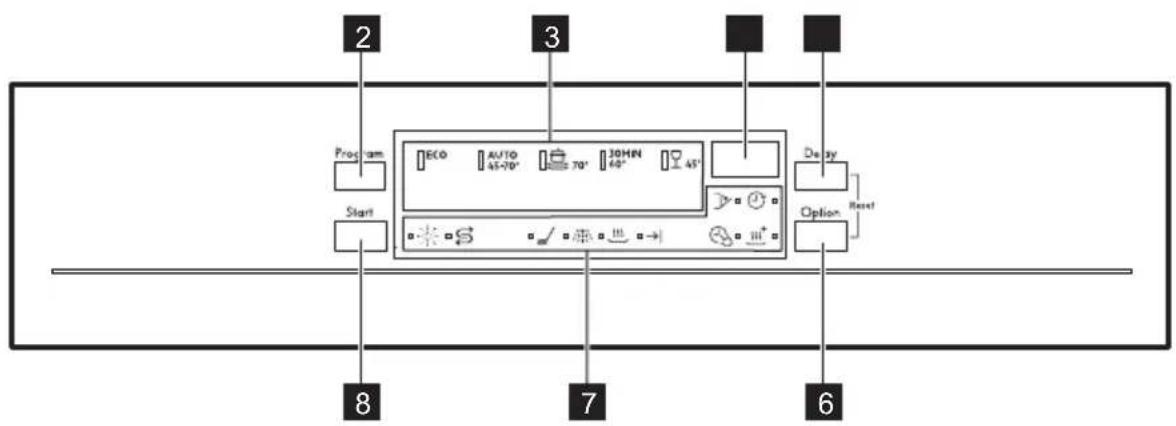
1 On/off button
2 Program button
3 Programme indicators
4 Display
5 Delay button
6 Option button
7 Indicators
8 Start button
4.1 Indicators
| Indicator Description | |
| / | Washing phase. It comes on when the washing phase operates. |
| / | Rinsing phase. It comes on when the rinsing phase operates. |
| / | Drying phase. It comes on when the drying phase operates. |
| →| | End indicator. |
| @ | TimeSaver indicator. |
| @+ | XtraDry indicator. |
| * | Rinse aid indicator. It is always off while the programme operates. |
| S | Salt indicator. It is always off while the programme operates. |
| @ | Delay indicator. |
| @+ | Door indicator. It comes on when the appliance door is open or is not correctly closed. |
5.PROGRAMMES
| Programme Degree of soil Type of load | Programme phases Options | ||
| ECO 1) | ·Normal soil ·Crockery and cutlery | ·Prewash ·Wash 50 °C ·Rinses ·Dry | ·TimeSaver ·XtraDry |
| AUTO 2) | ·All ·Crockery, cutlery, pots and pans | ·Prewash ·Wash from 45 °C to 70 °C ·Rinses ·Dry | ·XtraDry |
| 皂 | ·Heavy soil ·Crockery, cutlery, pots and pans | ·Prewash ·Wash 70 °C ·Rinses ·Dry | ·TimeSaver ·XtraDry |
| 30MIN 3) | ·Fresh soil ·Crockery and cutlery | ·Wash 60 °C or 65 °C ·Rinses | ·XtraDry |
| ♀ | ·Normal or light soil ·Delicate crockery and glass-ware | ·Wash 45 °C ·Rinses ·Dry | ·XtraDry |
1) With this programme you have the most efficient use of water and energy consumption for crockery and cutlery with normal soil. (This is the standard programme for test institutes).
2) The appliance senses the degree of soil and the quantity of items in the baskets. It automatically adjusts the temperature and the quantity of water, the energy consumption and the programme duration.
3) With this programme you can wash a load with fresh soil. It gives good washing results in a short time.
5.1 Consumption values
| Programme 1) | Water (I) | Energy (kWh) | Duration (min) |
| ECO | 9.9 | 0.920 237 | |
| AUTO | 7 - 12 | 0.7 - 1.5 | 45 - 160 |
| 皂 | 13 - 15 | 1.4 - 1.6 | 140 - 160 |
| 30MIN | 9 | 0.8 30 | |
| ♀ | 13 - 14 | 0.9 - 1.1 | 70 - 85 |
1) The pressure and the temperature of the water, the variations of the mains supply, the options and the quantity of dishes can change the values.
5.2 Information for test institutes
For all the necessary information for test performance, send an email to:
info.test@dishwasher-production.com
Write down the product number (PNC) that is on the rating plate.
6. SETTINGS
6.1 Programme selection mode and user mode
When the appliance is in programme selection mode it is possible to set a programme and to enter the user mode.
Settings available in the user mode:
The level of water softener according to the water hardness.
- Activation or deactivation of the rinse aid empty notification.
- Activation or deactivation of AirDry.
As the appliance stores the saved settings, there is no need to configure it before every cycle.
How to set the programme selection mode
The appliance is in programme selection mode when the programme indicator
ECO flashes and the display shows the programme duration.
After activation, the appliance is in programme selection mode by default. If
not, set the programme selection mode the following way:
Press and hold simultaneously Delay and Option until the appliance is in programme selection mode.
How to enter user mode
Make sure the appliance is in programme selection mode.
To enter user mode, press and hold simultaneously Delay and Option until
the indicators ECO AUTO flash and the display is blank.
6.2 The water softener
The water softener removes minerals from the water supply, which would have a detrimental effect on the washing results and on the appliance.
The higher the content of these minerals, the harder your water is. Water hardness is measured in equivalent scales.
The water softener should be adjusted according to the hardness of the water in your area. Your local water authority can
advise you on the hardness of the water in your area. It is important to set the
right level of the water softener to assure good washing results.
Water hardness
| German de-grees (°dH) | French degrees (°fH) | mmol/l Clarke de-grees | Water softener lev-el |
| 47 - 50 84 - 90 8.4 - 9.0 58 - 63 10 | |||
| 43 - 46 76 - 83 7.6 - 8.3 53 - 57 9 | |||
| 37 - 42 65 - 75 6.5 - 7.5 46 - 52 8 | |||
| 29 - 36 51 - 64 5.1 - 6.4 36 - 45 7 | |||
| 23 - 28 40 - 50 4.0 - 5.0 28 - 35 6 | |||
| 19 - 22 33 - 39 3.3 - 3.9 23 - 27 | 5 1) | ||
| 15 - 18 26 - 32 2.6 - 3.2 18 - 22 4 | |||
| 11 - 14 19 - 25 1.9 - 2.5 13 - 17 3 | |||
| 4 - 10 7 - 18 0.7 - 1.8 5 - 12 2 | |||
| <4 <7 <0.7 < 5 | 1 2) | ||
1) Factory setting.
2) Do not use salt at this level.
Whether you use a standard detergent or multi-tabs (with or without salt), set the proper water hardness level to keep the salt refill indicator active.

Multi-tabs containing salt are not effective enough to soften hard water.
How to set the water softener level
Make sure the appliance is in user mode.
- Press Program.
The indicators are off.
AUTO and
皂
The indicator
ECO still flashes.
-
The display shows the current setting: e.g. 5L = level 5 .
-
Press Program repeatedly to change the setting.
- Press the on/off button to confirm the setting.
6.3 The rinse aid dispenser
The rinse aid helps to dry the dishes without streaks and stains.
The rinse aid is automatically released during the hot rinse phase.
The rinse aid empty notification
The rinse aid helps to dry the dishes without streaks and stains.
The rinse aid is automatically released during the hot rinse phase.
When rinse aid chamber is empty, the rinse aid indicator is turned on notifying to refill rinse aid. If the drying results are satisfactory while using multi-tablets only, it is possible to deactivate the notification for refilling rinse aid.
However, for best drying performance, always use rinse aid.
If standard detergent or multi-tablets without rinse aid are used, activate the notification to keep the rinse aid refill indicator active.
How to deactivate the rinse aid empty notification
Make sure the appliance is in user mode.
1. Press Start.
The indicators and are off.
The indicator still flashes.
The display shows the current setting.
- nse aid empty notification activated.
- = iase aid empty notification deactivated.
- Press Start to change the setting.
- Press on/off to confirm the setting.
6.4 AirDry
AirDry improves the drying results with less energy consumption.

7 OPTIONS
Desired options must be activated every time before you start a programme. It is not possible to activate or deactivate options while a programme is running.
Not all options are compatible with each other. If you select non compatible options, the appliance automatically deactivates one or more of them. Only the indicators of the still active options are on.
During the drying phase, the door opens automatically and remains ajar.
CAUTION! Do not try to close the appliance door within 2 minutes after automatic opening. This can cause damage to the appliance.
AirDry is automatically activated with all programmes excluding
To improve the drying performance refer to the XtraDry option or activate AirDry.
CAUTION! If children have access to the appliance, it is advised to deactivate AirDry as opening the door may pose a danger.
How to deactivate AirDry
Make sure the appliance is in user mode.
- Press Delay.
The indicators ECO AUTO are off.
The indicator still flashes.
The display shows the current setting: AirDry activated.
- Press Delay to change the setting: = AirDry deactivated.
- Press on/off to confirm the setting.
7.1 XtraDry
Activate this option to boost the drying performance. With XtraDry on, the duration of some programmes, water consumption and the last rinse temperature can be affected.
XtraDry is a permanent option for all programmes other than ECO and need not to be selected at every cycle.
In the other programmes the setting of XtraDry is permanent and it is automatically used in next cycles. This
configuration can be changed at any time.

Every time ECO activated, XtraDry is off and needs to be chosen manually.
Activating XtraDry deactivates TimeSaver and vice versa.
How to activate XtraDry
Press Option until the indicator ^+ comes on.
If the option is not applicable to the programme, the related indicator does not come on or it flashes quickly for a few seconds and then goes off. The display shows the updated programme duration.
7.2 TimeSaver
This option increases the pressure and the temperature of the water. The
8. BEFORE FIRST USE
-
Make sure that the current level of the water softener agrees with the hardness of the water supply. If not, adjust the level of the water softener.
-
Fill the salt container.
- Fill the rinse aid dispenser.
- Open the water tap.
- Start a programme to remove any processing residuals that can still be inside the appliance. Do not use detergent and do not load the baskets.
After starting a programme, it may take up to 5 minutes for the appliance to recharge the resin in the water softener. It seems that the appliance is not working. The washing phase starts only after this procedure is completed. The procedure is repeated periodically.
washing and the drying phases are shorter.
The total programme duration decreases by approximately 50% .
The washing results are the same as with the normal programme duration. The drying results can decrease.
How to activate TimeSaver
Press Option until the indicator is on. If the option is not applicable to the programme, the related indicator is off or it flashes quickly for a few seconds and then goes out.
The display shows the updated programme duration.
8.1 The salt container

CAUTION!
Use rough salt designed for dishwashers only. Fine salt increases the risk of corrosion.
The salt is used to recharge the resin in the water softener and to assure good washing results in daily use.
How to fill the salt container
- Turn the cap of the salt container counterclockwise and remove it.
- Put 1 litre of water in the salt container (only for the first time).
- Fill the salt container with 1kg of salt (until it is full).

- Carefully shake the funnel by its handle to get the last granules inside.
- Remove the salt around the opening of the salt container.
- Turn the cap of the salt container clockwise to close the salt container.

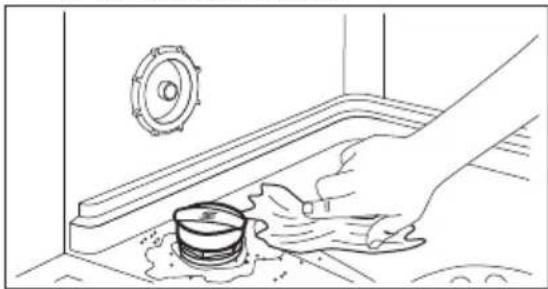
CAUTION!
Water and salt can come out of the salt container when you fill it. After you fill the salt container, immediately start a programme to prevent corrosion.
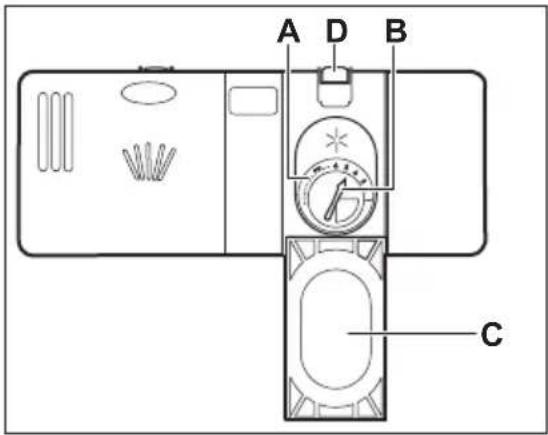
8.2 How to fill the rinse aid dispenser
9. DAILY USE
- Open the water tap.

CAUTION!
Only use rinse aid specifically designed for dishwashers.
- Press the release button (D) to open the lid (C).
- Fill the dispenser (A) until the rinse aid reaches the marking "MAX".
- Remove the spilled rinse aid with an absorbent cloth to prevent too much foam.
- Close the lid. Make sure that the release button locks into position.

You can turn the selector of the released quantity (B) between position 1 (lowest quantity) and position 4 or 6 (highest quantity).
- Press the on/off button to activate the appliance.
Make sure that the appliance is in programme selection mode.
- If the salt indicator is on, fill the salt container.
-
If the rinse aid indicator is on, fill the rinse aid dispenser.
-
Load the baskets.
-
Add the detergent.
- Set and start the correct programme for the type of load and the degree of soil.
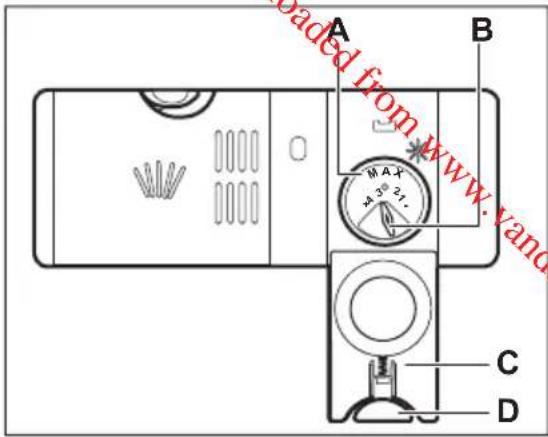
9.1 Using the detergent

CAUTION!
Only use detergent specifically designed for dishwashers.
- Press the release button (B) to open the lid (C).
- Put the detergent, in powder or tablets, in the compartment (A).
- If the programme has a prewash phase, put a small quantity of detergent in the compartment (D).
- Close the lid. Make sure that the release button locks into position.
9.2 Setting and starting a programme
The Auto Off function
This function decreases energy consumption by deactivating automatically the appliance when it is not operating.
The function comes into operation:
- 5 minutes after the completion of the programme.
After 5 minutes if the programme has not started.
Starting a programme
- Press the on/off button to activate the appliance. Make sure that the appliance is in programme selection mode and the door is closed.
- Press Program again and again until the indicator of the desired programme is on.
The display shows the programme duration. - Set the applicable options.
- Press Start to start the programme.
The indicator of the running phase is on.
The programme duration starts to decrease with steps of 1 minute.
Starting a programme with delay start
- Set a programme.
- Press Delay again and again until the display shows the desired delay time (from 1 to 24 hours).
- Press Start to start the countdown.
The delay indicator comes on to confirm the start of the countdown.
The countdown starts to decrease with steps of 1 hour. Only the last hour decreases with steps of 1 minute.
When the countdown is completed, the programme starts and the indicator of the running phase comes on. The delay indicator is off.
Opening the door while the appliance operates
Opening the door while a programme is running stops the appliance. It may affect the energy consumption and the programme duration. After closing the door, the appliance continues from the point of interruption.

If the door is opened for more than 30 seconds during the drying phase, the running programme ends. It does not happen if the door is opened by AirDry function.

Do not try to close the appliance door within 2 minutes after AirDry automatically opens it, as this may cause damage to the appliance. If, afterwards, the door is closed for another 3 minutes, the running programme ends.
Cancelling the delay start while the countdown operates
When you cancel the delay start you have to set the programme and options again.
10. HINTS AND TIPS
10.1 General
The following hints will ensure optimal cleaning and drying results in daily use and also help to protect the environment.
- Remove larger residues of food from the dishes into the waste bin.
- Do not pre-rinse dishes by hand. When needed, use the prewash programme (if available) or select a programme with a prewash phase.
Always use the whole space of the baskets. - When loading the appliance, make sure that the dishes can be completely reached and washed by
Press simultaneously Delay and Option until the appliance is in programme selection mode.
Cancelling the programme
Press and hold simultaneously Delay and Option until the appliance is in programme selection mode.
Make sure that there is detergent in the detergent dispenser before you start a new programme.
End of the programme
All buttons are inactive except for the on/off button.
- Press the on/off button or wait for the Auto Off function to automatically deactivate the appliance. If you open the door before the activation of Auto Off, the appliance is automatically deactivated.
- Close the water tap.
the water released from the spray arm nozzles. Make sure that items do not touch or cover each other.
- You can use dishwasher detergent, rinse aid and salt separately or you can use the multi-tablets (e.g. "3in1", "4in1", "All in 1"). Follow the instructions written on the packaging.
- Select the programme according to the type of load and degree of soil. With the ECO programme you have the most efficient use of water and energy consumption for crockery and cutlery with normal soil.
10.2 Using salt, rinse aid and detergent
- Only use salt, rinse aid and detergent for dishwasher. Other products can cause damage to the appliance.
- In areas with hard and very hard water we recommend to use plain dishwasher detergent (powder, gel, tablets containing no additional agents), rinse aid and salt separately for optimal cleaning and drying results.
- At least once a month run the appliance with the use of appliance cleaner which is particularly suitable for this purpose.
- Detergent tablets do not fully dissolve with short programmes. To prevent detergent residues on the tableware, we recommend that you use the tablets with long programmes.
- Do not use more than the correct quantity of detergent. Refer to the instructions on the detergent packaging.
10.3 What to do if you want to stop using multi-tables
Before you start to use separately detergent, salt and rinse aid do the following procedure.
- Set the highest level of the water softener.
- Make sure that the salt and rinse aid containers are full.
- Start the shortest programme with a rinsing phase. Do not add detergent and do not load the baskets.
- When the programme is completed, adjust the water softener according to the water hardness in your area.
- Adjust the released quantity of rinse aid.
- Activate the rinse aid empty notification.
10.4 Loading the baskets
- Only use the appliance to wash items that are dishwasher-safe.
-
Do not put in the appliance items made of wood, horn, aluminium, pewter and copper.
-
Do not put in the appliance items that can absorb water (sponges, household cloths).
- Remove remaining food from the items.
- Make soft the remaining burned food on the items.
- Put hollow items (cups, glasses and pans) with the opening down.
- Make sure that cutlery and dishes do not bond together. Mix spoons with other cutlery.
Make sure that glasses do not touch other glasses. - Put small items in the cutlery basket.
- Put light items in the upper basket. Make sure that the items do not move.
- Make sure that the spray arm can move freely before you start a programme.
10.5 Before starting a programme
Make sure that:
- The filters are clean and correctly installed.
- The cap of the salt container is tight.
- The spray arms are not clogged.
- There is dishwasher salt and rinse aid (unless you use multi-tables).
- The position of the items in the baskets is correct.
The programme is applicable for the type of load and for the degree of soil. - The correct quantity of detergent is used.
10.6 Unloading the baskets
- Let the tableware cool down before you remove it from the appliance. Hot items can be easily damaged.
- First remove items from the lower basket, then from the upper basket.

At the end of the program water can still remain on the sides and on the door of the appliance.
11. CARE AND CLEANING

WARNING!
Before maintenance, deactivate the appliance and disconnect the mains plug from the main socket.

Dirty filters and clogged spray arms decrease the washing results. Make a check regularly and, if necessary, clean them.
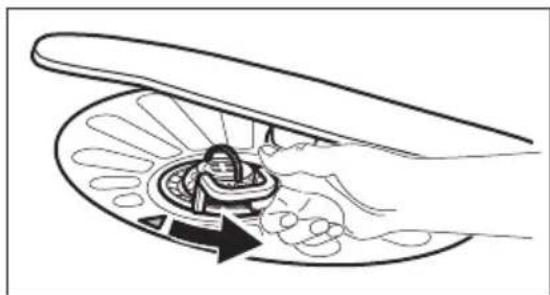
11.1 Cleaning the filters
The filter system is made of 3 parts.
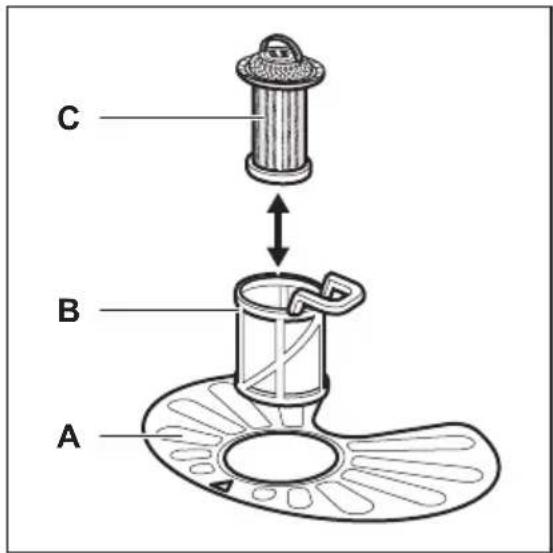
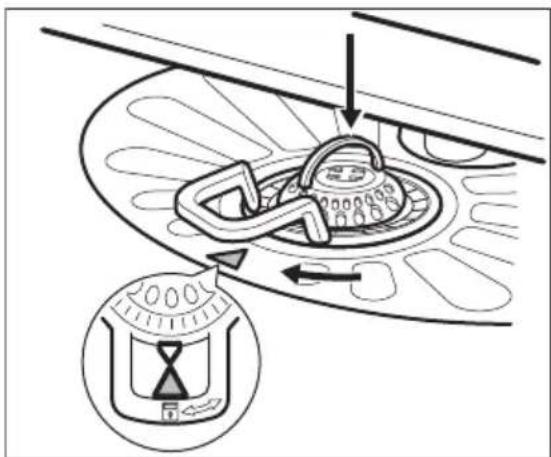
- Turn the filter (B) counterclockwise and remove it.
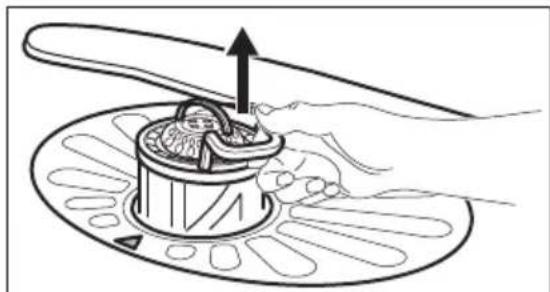
- Remove the filter (C) out of filter (B).
- Remove the flat filter (A).
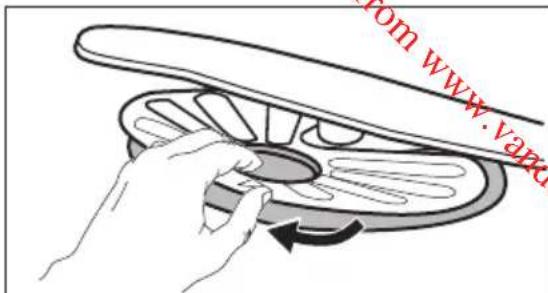
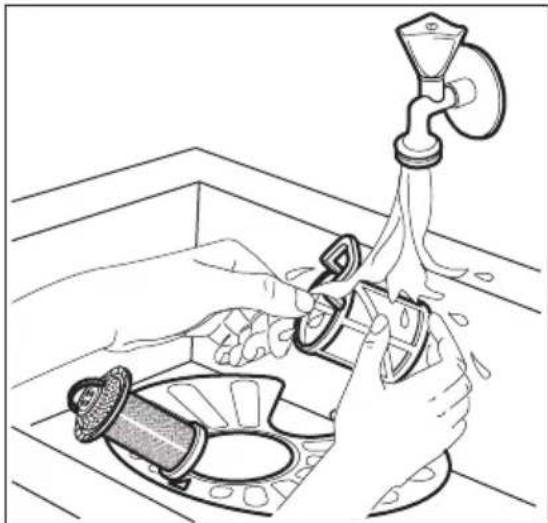
- Wash the filters.
- Make sure that there are no residues of food or soil in or around the edge of the sump.
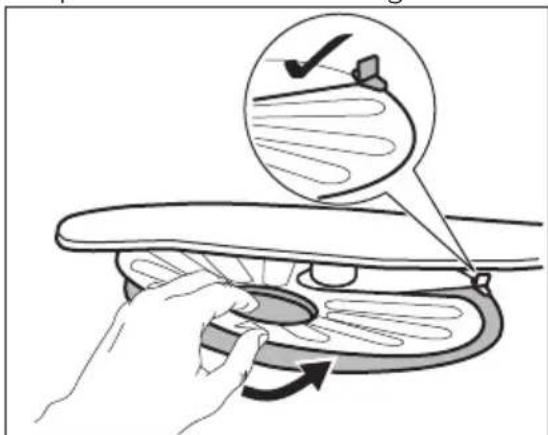
- Put back in place the flat filter (A). Make sure that it is correctly positioned under the 2 guides.
- Reassemble the filters (B) and (C).
- Put back the filter (B) in the flat filter (A). Turn it clockwise until it locks.

CAUTION!
An incorrect position of the filters can cause bad washing results and damage to the appliance.
11.2 Cleaning the spray arms
Do not remove the spray arms. If the holes in the spray arms are clogged, remove remaining parts of soil with a thin pointed object.
12. TROUBLESHOOTING
If the appliance does not start or it stops during operation, first check if you can solve the problem by yourself with the help of the information in the table or contact an Authorised Service Centre.

WARNING!
Repairs not properly done may result in serious risk to the safety of the user. Any repairs must be performed by qualified personnel.
11.3 External cleaning
- Clean the appliance with a moist soft cloth.
- Only use neutral detergents.
- Do not use abrasive products, abrasive cleaning pads or solvents.
11.4 Internal cleaning
- Carefully clean the appliance, including the rubber gasket of the door, with a soft damp cloth.
- If you regularly use short duration programmes, these can leave deposits of grease and limescale inside the appliance. To prevent this, we recommend to run long duration programmes at least 2 times per month.
To maintain the performance of your appliance at its best, we recommend to use monthly a specific cleaning product for dishwashers. Follow carefully the instructions on the packaging of the product.
With some problems, the display shows an alarm code.
The majority of problems that can occur can be solved without the need to contact an Authorised Service Centre.
Problem and alarm code Possible cause and solution
You cannot activate the appliance.
- Make sure that the mains plug is connected to the mains socket.
- Make sure that there is no damaged fuse in the fuse box.
| Problem and alarm code Possible cause and solution | |
| The program does not start. | Make sure that the appliance door is closed. Press Start. If the delay start is set, cancel the setting or wait for the end of the countdown. The appliance has started the procedure to recharge the resin inside the water softener. The duration of the procedure is approximately 5 minutes. |
| The appliance does not fill with water. The display shows,1011. | Make sure that the water tap is open. Make sure that the pressure of the water supply is not too low. For this information, contact your local water authority. Make sure that the water tap is not clogged. Make sure that the filter in the inlet hose is not clogged. Make sure that the inlet hose has no kinks or bends. |
| The appliance does not drain the water. The display shows,20 | Make sure that the sink spigot is not clogged. Make sure that the filter in the outlet hose is not clogged. Make sure that the interior filter system is not clogged. Make sure that the drain hose has no kinks or bends. |
| The anti-flood device is on. The display shows,30 | Close the water tap and contact an Authorised Service Centre. |
| The appliance stops and starts more times during operation. | It is normal. It provides optimal cleaning results and energy savings. |
| The program lasts too long. | Select the TimeSaver option to shorten the program time. If the delayed start option is set, cancel the delay setting or wait for the end of the countdown. |
| The remaining time in the display increases and skips nearly to the end of program time. | This is not a defect. The appliance is working correctly. |
| Small leak from the appliance door. | The appliance is not levelled. Loosen or tighten the adjustable feet (if applicable). The appliance door is not centred on the tub. Adjust the rear foot (if applicable). |
| The appliance door is difficult to close. | The appliance is not levelled. Loosen or tighten the adjustable feet (if applicable). Parts of the tableware are protruding from the baskets. |
| Rattling/knocking sounds from inside the appliance. | The tableware is not properly arranged in the baskets. Refer to basket loading leaflet. Make sure that the spray arms can rotate freely. |
| The appliance trips the circuit-beaker. | · The amperage is insufficient to supply simultaneously all the appliances in use. Check the socket amperage and the capacity of the meter or turn off one of the appliances in use. · Internal electrical fault of the appliance. Contact an Authorised Service Centre. |

Refer to "Before first use", "Daily use", or "Hints and tips" for other possible causes.
the problem occurs again, contact an Authorised Service Centre.
For alarm codes not described in the table, contact an Authorised Service Centre.
Once you have checked the appliance, deactivate and activate the appliance. If
12.1 The washing and drying results are not satisfactory
| Problem Possible cause and solution | |
| Poor washing results. | Refer to "Daily use", "Hints and tips" and basket loading leaflet. Use more intensive washing programmes. Clean spray arm jets and filter. Refer to "Care and Cleaning". |
| Poor drying results. • Tableware has been left for too long inside a closed appliance. • There is no rinse aid or the dosage of rinse aid is not enough. Set the rinse aid dispenser to a higher level. • Plastic items may need to be towel dried. • For the best drying performance activate the option XtraDry and set AirDry. • We recommend to always use rinse aid, even in combination with multi-tablets. | |
| There are whitish streaks or bluish layers on glasses and dishes. | The release quantity of rinse aid is too much. Adjust the rinse aid level to a lower level. The quantity of detergent is too much. |
| There are stains and dry water drops on glasses and dishes. | The released quantity of rinse aid is not sufficient. Adjust the rinse aid level to a higher level. The quality of the rinse aid can be the cause. |
| The dishes are wet. • For the best drying performance activate the option XtraDry and set AirDry. • The programme does not have a drying phase of has a drying phase with low temperature. • The rinse aid dispenser is empty. • The quality of the rinse aid can be the cause. • The quality of the multi-tablets can be the cause. Try a different brand or activate the rinse aid dispenser and use rinse aid and multi-tablets together. | |
| The interior of the appliance is wet. • This is not a defect of the appliance. it is caused by the humidity in the air that condenses on the walls. | |
| Unusual foam during washing. • Use the detergent for dishwashers only. • There is a leak in the rinse aid dispenser. Contact an Authorised Service Centre. | |
| Traces of rust on cutlery. • There is too much salt in the water used for washing. Refer to "The water softener". • Silver and stainless steel cutlery were placed together. Avoid to put silver and stainless steel items close to-gether. | |
| There are residues of detergent in the dispenser at the end of the programme. • The detergent tablet got stuck in the dispenser and therefore was not completely washed away by water. • Water cannot wash away the detergent from the dispenser. Make sure that the spray arm is not blocked or clogged. • Make sure that items in the baskets do not impede the lid of the detergent dispenser from opening. | |
| Odours inside the appliance. • Refer to "Internal cleaning". | |
| Limescale deposits on the tableware, on the tub and on the inside of the door. • The level of salt is low, check the refill indicator. • The cap of the salt container is loose. • Your tap water is hard. Refer to "The water softener". • Even using multi-functional tabs use salt and set re-generation of the water softener. Refer to "The water softener". • If lime scale deposits still remain, clean the appliance with appliance cleaners which are particularly suitable for this purpose. • Try different detergent. • Contact the detergent manufacturer. | |
| Dull, discoloured or chipped tableware. • Make sure that only dishwasher-safe items are washed in the appliance. • Load and unload the basket carefully. Refer to basket loading leaflet. • Place delicate items in the upper basket. | |

Refer to "Before first use", "Daily use" or "Hints and tips" for other possible causes.
13. TECHNICAL INFORMATION
| Dimensions Width / height / depth (mm) 600 / 850 / 625 | |
| Electrical connection 1) | Voltage (V) 220 - 240 |
| Frequency (Hz) 50 | |
| Water supply pressure Min. / max. bar (MPa) 0.5 (0.05) / 8 (0.8) | |
| Water supply | Cold water or hot water 2) max 60 °C |
| Capacity Place settings 13 | |
| Power consumption Left-on mode (W) 5.0 | |
| Power consumption Off-mode (W) 0.50 | |
1) Refer to the rating plate for other values.
2) If the hot water comes from alternative source of energy, (e.g. solar panels, aeolian energy), use the hot water supply to decrease energy consumption.
14. ENVIRONMENTAL CONCERNS
Recycle materials with the symbol. Put the packaging in relevant containers to recycle it. Help protect the environment and human health by recycling waste of electrical and electronic appliances. Do not dispose of
appliances marked with the symbol with the household waste. Return the product to your local recycling facility or contact your municipal office.
TABLE DES MATIÈRES
- INFORMATIONS DE SECURITE 22
- CONSIGNES DE SECURITE 24
3.DESCRIPTION DE L'APPAREIL 26
4.BANDEAU DE COMMANDE 27
5.PROGRAMMES. 28 - RÉGLAGES 29
7 OPTIONS 32 - AVANT LA PREMIÈRE UTILISATION 33
- UTILISATION QUOTIDIENNE 34
- CONSEILS 36
- ENTRETIEN ET NETTOYAGE 38
- EN CAS D'ANOMALIE DE FONCTIONNEMENT 40
13.CARACTERISTIQUES TECHNIQUES 44
POUR DES RÉSULTATS PARFAITS
www.aeg.com/webselfservice

www.aeg.com/webselfservice
3apernctpnpobatb cBoe n3dene dnyyueHHn o6cnyKBAHn:
www.registeraeg.com


Pnpno6peCTn DOnoHHTeNbHbIe npHaJdEeKHOCTn, paCXoHNbIe MaTePnaJIbI nФuPMeHHbIe 3anaChbIe Yactn dJa CBOero np6opa:
www.aeg.com/shop
ПОДЕРЖKA NOTPEБNTEЛЕМ CEPВИСHОЕ OБСЛУЖИBAHNE
MblpeKOMeHdyemNCNoJb3OBaTbOpnHaJIbHbIe 3aNuaCTN.
Ipn o6pauehenn B cepBnc-zeHTp cneJeT nMeTb npd pykoCJIeDyUOuyIO HΦopMaun: Moelb, KoNn3deJnna (PNC), cepHbI Homep.
Данная Информацьna HaxoДNTсЯ HabTбИчКc TExHnueckIMN daHHbIMN.
BHHMaHHe / BaXHbIe cBeJeHnI NO TexHnke 6e3OnaChOCTn.
① Ośzań uHΦopMaζη n peKOMeHdaζηn
IHHopMaunno oxpAne Okpykaiouien cpebl
IpaBO Ha n3MeHenH coXpaHaeTc.
1. CBEdENI NO TEXHnKE B3OpAChOCTN
Ipeed yctaHOBkoN n 3Kcnpyatauene np6opab BHIMATEJIbHO O3HaKOMbTeCb C npINOxEHHbIM pYKOBOCTBOM. Ipon3BOdnteJIb He Hecet OTBETCTBeHHOCTn 3a KaKne-1n6o TpaBMbl NIIu yUeP6, BO3HNI KMI BCJeDCTBHe HEnpaBnJbHOJ UCTaHOBKN NII N3KcnpyatauIN. Bcerda xpaHnte DaHHoe pyKOBoDCTBO NOd pYKO B HaJeXHOM MecTe dIra PocJeDuOJeero NCIOJIb3OBaHna.
1.1 Be3oNaChocTh DeTeH n IInC COrpaHnueHHbIMN BO3MOxHOCCTaMn
JaHbI np6op moKet 3KnIpyaTnpoBaTbcra DeTbMn, cIn Ix Bo3pact npeBbIaet 8 JeT, n IucaMn C OrpaHnueHHbIMn 0n3nueckmN, CeHCOPhbIMn IIn YMCTBeHHbIMn CnOCO6HOCTaMn iC HeIOCTaTOUHbIM ONbITOM IIn 3HaHnA Mn TOJbKO npu ycIOBn HaxOxJeHnRA NOI npNCMOrPOM IuCa, OTBeuaIoIeRo 3a Ix 6e3ONaChOcTB, INI NocJIe NOnyHeHn COOTBETCTByIOux IHCTpyKcN, PO3BOJIAOUsX IM 6e3ONaCHO 3KnIpyaTnpoBaTb 3JIeKTPoPnp6Op n DaIOxIX mI ppeDCTabLeHne o6 OnaCHoCTN, COnpJxHNOcero 3KnIpyaTaunnei.
He no3B0JaTe DeTAm nIgpaTb C npI6Opom.
XpaHnte MOUoune cpeCTBa BHe IocraeMOCTn dete.
He npdnyckaIte deTei I domaunHX XNBOTHbIX K npnbopy, kOrda erO dBepca OTKpbIta.
OuNTka I DoCTyHoe NOpb3OBaTeJIIO TexHnueCKoe 6cbnyKbAHne np6opa He doJxHO pON3BOIDtbcr DeTbMn 6e3 npncMOtpa.
1.2 O6nzne npaBnla TexHnKn 6e3oNaChocTn
-Прибор предназанец Дд Домаш Hero 6ытOBOrO n aHaNoTnHOrO римeHeHЯ, Hanpimep:
-B Cénbcknx KINbIX DoMAx; B NOMeUeHnX, Cnykaux KyxHmN dIyOBcnyKNaHOoero
NepcoHaJa B MaRa3nHax, OΦncax Ha pyrnx pa6OuNX MeCTax;
He nomeuaiTe Ha npubop,paom C HnM nnBHyTpB Heo JeKOBOCnMaMeHouOuCeBa BeueCTBa nnNn3deJnA, npOnTuHaBie JeKOBOCnMaMeHauOuMnC BBeueCTBaAM.
2.5 YTNIN3aun

BHIMAHNE!
CyueCTByeT onaCHOctb TpaBmblnn ydysb.
- OTKNIOHTe np6Op oT əNeKTPOcETn.
- OTPeTe n yTuN3npuYte Ka6eIb 3NeKTPoNTaHn.
- YdaInte 3aueJky DBepubl, TTO6bl npedotBpaTnB pNCK ee 3anipahnnpn nonadaHn BHyTpB npnbopa DeTeu NDOMaHnx XHBOTbIX.
3.ОпИСАнEиЗДЕЛЯ
1BepxHnaHeJb
2BepxHpa36pb13rNBaTeJb
3 HxKn pa36pb3rNBateJb
4 ΦnBtpbl
5 Ta6JnUka cTexHnueckIMN daHHbIMN
6 EMKoCTb dIra coJIa
7 BeHTnJIaIIOHHOe OTBepCTne
8 D03atop onoJaCKnBaTeJra
9 Oo3aTOP MOIOUeRO cpeCTBa
10 Kop3nHa dIa cToJIOBbIX np6OpOB
11 HxKnKa KOp3nHa
12BepxHjaKop3nHa
4. ПАHEЛь уравленья

1 KhoNka «BKn/BbIKn»
2 Khonka Program
3 INHdkaTopbI nporpaMM
4 Ducnnne
5 KhoNka Delay
6 Khonka Option
7 INHdkaTopbI
8 Khonka Start
4.1 Инданкоторы
Hactpoyn,doctynhble B noJb3ObaTeNbckom peXnme:
- ypOBeHb CmYrHTeJIa IJIa BOIblc yUeTOM JECTKOCTN BOIbl.
BkHoueHne Hn BbIKHoueHne yBeOMJIeHnO TOM, YTO Do3aTOp onoJaCKnBaTeJnyCT.
BknHcHne Hn BbIKHcHne H cyHKcHn AirDry.
NockoJbky np6op 3anOMnHaet coXpaHeHHbIe yCTaHOBKn, Heo6xOAnMoCTb erO HAcTPOKn NepeK KaKDbIM UKNlOM OTCyTCTByeT.
BbI3OB peKIMa Bbl6opa nporpaMMbl
Pnpbop haoonTcB peKmE Bbl6opa nporpaMMbl,ecn INHdkaTop nporpaMM
ECOMMraet, a Ha dncnnee OTo6paKaTcra npoDoJXHTeJIbHOCTb nporpaMMbl.
Iocne BkIoueHn np6op no yMOJauHIO nepexOHT B pexIM Bbl6opa nporpaMMbl. B npotNBHom cnyae 3aaiTe pexIM Bbl6opa nporpaMMbl cJeDyUoMm o6pa30m:
OndOBpeMeHHo HaxMNTe N ydepXnBaTe Delay n Option, noka
npi6op He npeiDeT B peM BbI6opa nporpaMMbl.
IepexoB IOpIb3OBaTeIbckn peXIM
Y6eIntecb, YTO npnbop HaxoNTcB B pexime Bbl6opa nporpaMMbl.
Дя BXOda B NOIb3OBaTeJIbckn peKIM OJHOBpeMeHHo HaxMnte n ydepkBaIte
Delay n Option, nOKa nHnKaTOpbIECO, ATO
MnraTb, a DnCnJIeH He NoracHeT.
6.2 CmrgntelIb IJI BODbl
CmryntelIy BODbl ydaJIeT n3
IoIaBaemB I np6Op BObl
MInHepaIbHbIe BeIeCTBa, KOTOpbIe B
IpoTINBHOM Cnyae MOJn 6bl OKa3aTb
BpeIHoe BIIINHHe Ha pe3yIbTaTbIMoIKn
nHa cam np6Op.
Yem 60JIbWe B BOe CoOpXnTcra TaKnx
MInHepaJIbHbIX BeUeCTB, TEM Bblwe
KeCTKoCTb BOIbl. XeCTKoCTb BOIbl
N3MepeTcra B COOTBeTCTByIOx
eDINHnIax.
Cmrgntelb dIra BObl Heo6xOIMHOaCTpOnTb B COOTBETCTBn C ypoBHemJXeCTKocTN BObl, IcNoIb3yEmoBBAWepeHone. HOpMaunO XeCTKocTN BObl B BaWepaHoneMOxHO pONyHTb B MeCTHOcLyX6BeBOOCha6XeHnA. Ira nOlyuHnXopoUHX pe3yNbTaTOB MOKn BaXHoPpaBnIbHO Bbl6paTb yPOBeHb HaCTpOknCMrYHTeJIa BObl.
XeCTKoCTb BOIbl
O3aTop ononacknBaTeTcNooc6CTByeT BbICyUINBaHIO NocuIbI 6e3 O6pa3OBaHnN oTeKOB nIaTeH.
OnonacknBaTeIb aBTOMaTnueCKn Do6abIeTcH a 3TaNe onoJACKnBaHnR Tropyew BDOJ.
Korda emKocTb dIЯ onOJaCKBaTeJIa OKa3bIbaeTcI NyCToI, 3aRopaETcI INHdNKaTOp ONJLackCBaTeJIa, yBeOMJIaI O Heo6xOIMOCtN Do6abHeHn OOnJLackBATEJI. B Clyuae yIOBLeTBOPHTeJIbHbIX pe3yJIbTaTOB Ipr NcNoJIb3OBAHn TOJbKO TaJIeTIPOBAHnHO MOUzero CpeDCTBa MOXHO OTKJIHChITb yBeOMJeHne O Heo6xOIMOCtN Do6abHeHn OOnJLackBATEJI. Tem He MeHee, dIЯ DOCTNXeHn ONTImaJIbHbIX pe3yJIbTaTOB
CyUKN BcERda NcNoJb3yITe ONoJaCKnBaTeJIb.
IpnncnoB3OBAHnOBbUHOro nnn Ta6JIeTnpOBaHHOro MOIOSeRo CpeDCTBa BKIOUHTe BKNIOUHTe yBeDOMJIeHne O Heo6XoDMOCtN DoabBHeHn ONoJACKnBaTeJI.
BbIKIIOUeHne OIOBeUeHnO TOM, UTO Do3aTOp ONoJaCKNbAteJI pyCT
Y6eIntecb, YTO npnbop haxoNTcB B NOJIb3OBaTeNbckOM pexnme.
-
Haxmte Ha Start.
-
INdikatopbl norachyT.


Hndkatop npoDjx
AUTO
Ha nucnnee oTo6pa3ntcTekyuaj HacTpojka.
-1d=yBEdOMneHnEOTOM,TOIO3aTOpONOJaCKnBaTeJIpyCT,BKJIOUeHO.
- d = yBéOMnEHN e O TOM, YTOДОЗaTOp OONaACKNBAteJIpyCT, BbIKJIHOyeHO.
2.ДЯИЗМЕHENHACTPOnKHaXMMTe Ha Start.
O6uay npoDOnKHTeHbHOCTb nporpaMMbl cokpaaaetc npimepHo Ha 50%
Pe3ynbTaTb MoKn COOTBcTcByoT pe3ynbTaTam nporpaMMbI cTaHdapTHo npOJnxTeJIbHOCTbIO. Pe3ynbTaTb cyuKn MOy T yxUINTBcA.
BkIoueHne TimeSaver
HaXMMTe uYdePxNBAuTe Option, noka He 3aRopntc HndnKaTOp EcnBb6paHHyO ONHIO HeJIb3r NcNoIb3OBaTb C DaHHoN IporpAMMOi COOTBeTCTByUOUsN INDnKaTOp He 3aRopNTcN IIIN 6bICTpo 3amnraeT Ha HECKoJIbKO cekyHd, a 3aTeM NoracheT. Ha Dincnlee OTo6pa3nTcN o6HOBHeHoe 3NaueHne IpOdoJXnTeJIbHOCTN nporpaMMbl.
PpeJde Yem nepeiTu K nCnOJIb3OBaHnIO MOUoIeRo CpeIcTba, COII N OOnJaCKNBAteJI NO OTDeJIbHOCTN BbINOJIHNTe CJeDyIoUyIO pOuCeDpy.
1.YctaHOBNTe MaKcMaJIbHbI ypOBeHb CMrYHTeJI DJI BObl.
2. Y6eIHTecb, yTO eMKoCTb IJIa COJIIN IO3aTOp OONJaCKnBaTeJIa 3aONJIHeHbl.
3. 3anyctte camyko kopoTKyo nporpammy, codepkauyo 3tan onolacknBaHna. He doabnyTe MOUe cpeDCTBO n He 3arpykaTe KOp3HHbl.
4. Korda nporpamma 6ydet 3aBepueHa, CKoppeKtnpyTe ypoBeHb JecTKoCTN CMrYHTeJI AIN B ODbI B COOTBETCTBnC JecTKOCTbIO BObl B Baem perNoHe.
- 3aДaITe Do3npoBky onOJaCKuBaTeJIa.
- BkIIOUHTe yBeIDOMnEHe O TOM, YTO 103aTOp ONOJaCKNbAteJIpyCT.
10.4 3arpy3ka kOp3nH
- IcnoJIb3yIte npI6Op TOnbKO dJaMbITbI npHaIeJXHocTei, pNIOHbIX dJa MbITbI B NOCyIDOMOeUHbIX MaUNHax.
He 3arpykaIte B npnbop n3dJIyra I3 DepeBa, KocTN, aIOMHHa, OLOBa IMeIN.
He nomeuaine B npnbop npedMeTbI, KOtOpBIE MOryT BnITbIBaTb BOdy (r6Kn, 6bITOBbie TkaH). - YdaJInte ocTaTkn NnC nOcyIbI.
- Pa3mrgnte npiropeBwne ocTaTKn Niun Ha nocyuDe.
3arpykaTe noIbI nepeMeTbl (yaWKn, cTaKaHbI n CKOBOpObl) OTBepCTnEM BHN3. - Y6eIITecb, yTO cTOnOBbIe np6Opbl TapeJIKN He cInnIINcB. Pa3MeaJte I0xKn BnepemExkky C dpYrIMN cTOnOBbIMn np6Opamn.
-Поверп,чTo6bl cTaKaHbI He copnKacanncB dpyr c dpyrom.
-3arpykaTe MeJKeI npeIMeTbIB KOp3nHy IJIa CToJIOBbIX pnp6OpOB. - IerKne npedMeTbI yKnaDbBaIte B BepxHIO KOp3nHy. Y6eINTeCb, YTO nocya He DBuRaETcra.
-П配电дуемзanyckaTьnporpaMMy, y6eintecb,yTO pa36pb3rNBateJIb MOKET CBO6OdHO BpauaTbcra.
10.5 Перацл лпогамьl
Y6eIuTeCb, YTO:
-ΦnIbTpbl OunuEhbl N yCTaHOBJIeHbI DOJXHBIM 6pa3OM.
KpbIka eMKoCTn dIa COJI NIOTHO 3aKpbIHa.
Pa36pbI3rNaTeJIH He 3acopeHbI.
- Nocydomoehna Maunha 3a npabHeHa coIbIO n OOnJaCKnBaTeJIeM (ecn He IcNoJIb3yeTcra TabJeTnpOBaHHOe MOUooee cpeCTBO).
- Nocya npaBnIbHo 3arpyKeHa B KOp3nHbl.
BbiphaHHa nporpaMa COOTBeTCTByeT Tnny NocydbI n CTeneHn ee 3arpy3HeHHOCTN.
- NcnoIb3OBAHO NOxOJauee KOJIuYeCTBO MOUSeIero CpeIcTBA.
10.6 Pa3rpy3ka kOp3nH
1.пекдем дocTaBaTb nocdy n3 npibopa, daite eH ocTbIb. TopryuO nocdy nerko nobpeDnTb.
2.Bhaaane BbHmMaTe nocdy N3 HxHei KOp3nHbI, Notom -N3 BepxHei.

IIO OKOHuaHn nporpaMMbHa CTeHKax n DBepue np6opa MoKeT OCTaBaTbcB Oda.
11. yXoI N OUInCTKA

BHIMAHNE!
IpeepBbINOpHeHnem OepaNIOYNCtKe I yXOy BbIKIOHTe Pnp6Op N 3BNEKITe BnKy CeTeBOrO UHypa N3 p03ETKn.

Ipy3HbIe HbTpbl
3acopeHHoCTb
pa36pb3rBaTeJe
npBODNT K yxUdSeHnIO
KaueCTBa MoIKN.
IepnoDnueckn npOBepaTe
coCTOJHne OJIbTPOB n, npi
Heo6XoDMocTn, npOBoNTe
IX ONUCTKy.
Downloaded from www.vandenborc.be
PUSCKN 71 Downloaded from www.vandenborie.be
15922411-A-352017
CC