
66608 - Pressure washer Karömat - Free user manual and instructions
Find the device manual for free 66608 Karömat in PDF.
Frequently Asked Questions - 66608 Karömat
User questions about 66608 Karömat
0 question about this device. Answer the ones you know or ask your own.
Ask a new question about this device
Download the instructions for your Pressure washer in PDF format for free! Find your manual 66608 - Karömat and take your electronic device back in hand. On this page are published all the documents necessary for the use of your device. 66608 by Karömat.
USER MANUAL 66608 Karömat
Please read this instruction manual carefully before use.
Waste electrical products should not be disposed of with household waste. Please recycle where facilities exist. Check with your Local Authority or retailer for recycling advice.
(F)

Figure 1 -Double Insulated symbol
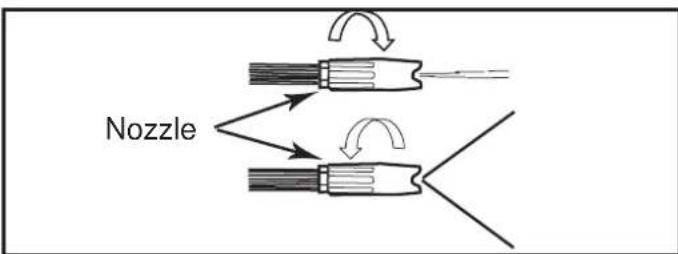
Figure 2 - Adjusting nozzle for fan pattern (not applicable on some nozzle)

Figure 3 -Narrow high impact stream

Figure 5- Insert tip cleaner in nozzle hole and move back and forth until debris is dislodged
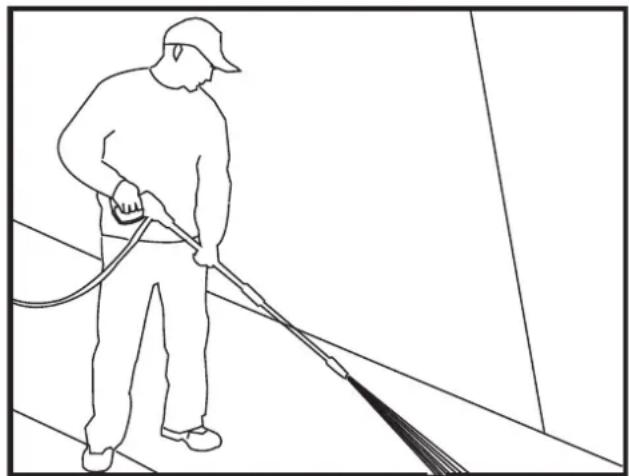
Figure 6-Optimum Angle to Cleaning Surface
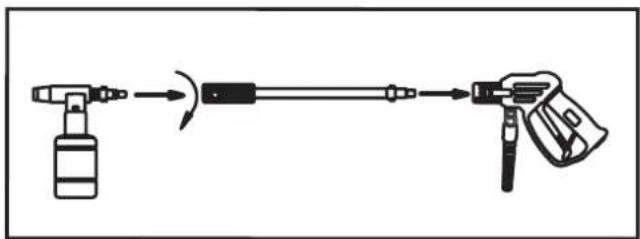
Figure 8 - Attach applicator to gun
- Prefatory notes page 23
- Technical details page 23
- Safety measures page 24
- Connections
- Pre-operation
- Operation
- Trouble shooting page 33
page 27
page 28
page 30
ATTENTION
Before using your Karömat high pressure cleaner C90, first read this manual thoroughly, so that accidents can be prevented.
1. PREFATORY NOTES
Buying your Karömat high pressure cleaner, you have become the owner of a machine with a high performance and reliability level. Correct use and regular maintenance will increase the life of the apparatus.
In this manual you will find operation and maintenance instructions. Read it carefully and keep it as a guide to your high pressure cleaner.
The high pressure cleaner has been built for cleaning vehicles, machinery, buildings, tools etc. with water, possibly with the addition of detergents. The machine can be fed with warm water up to 50^ maximum. The appliance must be used only for the purpose for which it was specifically designed. All other uses are to be considered incorrect and therefore unreasonable. The manufacturer cannot be held responsible for any damage resulting from improper, incorrect or unreasonable use.
2. TECHNICAL DETAILS
Subject to modification.
| Order number 66608 | |
| Working pressure 90 bar | |
| Working flow rate | 5 l/min. |
| Max pressure water supply | 4 bar |
| Motor capacity | 1850 W |
| Power supply voltage | 230 V/50 Hz |
| Max. water temperature | 50°C |
| Service | 80%-60 min. |
| Weight | 6 kgs |
| Dimensions | 54.5x31x27 cm |
3. SAFETY MEASURES
Automatic ON/OFF:
The motor on this pressure washer does not run continuously. It only runs when the trigger of the spray gun is squeezed. After following the start up procedures in this manual, turn the pressure washer ON and squeeze the trigger for activation. See the section of this manual entitled "Operating Instructions" for further details on this feature.
WARNING! The motor of this pressure washer will not run, it will only operate when the trigger is squeezed.
Safety Guidelines
This manual contains information that is very important to know and understand. This information is provided for SAFETY and to PREVENT EQUIPMENT PROBLEMS. To help recognize this information, observe the following symbols.
DANGER! Danger indicates an imminently hazardous situation which, if not avoided, WILL result in death or serious injury.
WARNING! Warning indicates a potentially hazardous situation which, if not avoided, COULD result in death or serious injury.
CAUTION: Caution indicates a potentially hazardous situation which, if not avoided, MAY result in minor or moderate injury.
NOTE: Information that requires special attention.
Important Safety Instructions
SAVE THESE INSTRUCTIONS
WARNING!
When using this product, basic precautions should always be followed, including the following:
- Read all instructions before using the product.
- To reduce the risk of injury, close supervision is necessary when a product is used near children.
- ALWAYS disconnect power before disassembling or repairing the unit.
- Follow all safety codes as well as the Occupational Safety and Health Act (OSHA).
- Ensure safety devices are operating properly before each use. DO NOT remove or modify any part of the gun or unit.
- Know how to stop this product and bleed pressure quickly. Be thoroughly familiar with the controls.
- Stay alert - watch what you are doing.
- Do not operate the product when fatigued or under the influence of alcohol or drugs.
-
Keep operation area clear of all persons.
-
Do not overreach or stand on unstable support. Keep good footing and balance at all times.
- Follow the maintenance instructions specified in the manual.
WARNING! Risk of injection or severe injury. Keep clear of nozzle. Do not discharge streams at persons. This product is to be used only by trained operators. Always remove lance from gun before cleaning debris from tip.
- Keep clear of nozzle. NEVER direct high pressure spray at any person, animal or self.
- Always wear safety glasses or goggles and protective clothing when operating or performing maintenance.
- Never put hand or fingers over the spray tip while operating the unit.
- Never try to stop or deflect leaks with any body part.
- Always engage the trigger safety latch in the safe position when spraying is stopped even if only for a few moments.
- Always follow detergent manufacturer's label recommendations for proper use of detergents. Always protect eyes, skin, and respiratory system from detergent use.
WARNING!
SERVICING OF A DOUBLE-INSULATED APPLIANCE
In a double-insulated product, two systemsof insulation are provided instead of grounding. No grounding means are provided for a double-insulated product, nor should grounding means be added to the product. Servicing a double-insulated product requires extreme care and knowledge of the system, and should be done only by qualified service personnel.
Replacement pars for a double-insulated product must be identical to the original parts. A double-insulated product is marked with the words "Double Insulation" or "Double Insulated." Product may also be marked with symbol shown in Figure 1.

Figure 1 -Double Insulated symbol
WARNING! Do not use pressure that exceeds the operating pressure of any of the parts (hoses, fittings, etc.) in the pressurized system. Ensure all equipment and accessories are rated to withstand the maximum working pressure of the unit.
WARNING! Explosion hazard.
NEVER spray flammable liquids or use pressure washer in areas containing combustible dust, liquids or vapors. Never operate the machine in a closed building or in or near an explosive environment.
WARNING! Do not spray electrical apparatus and wiring.
- Never disconnect the high pressure discharge hose from the machine while the system is pressurized. To depressurize machine, turn power and water supply off, then press gun trigger 2~3 times.
- Never permanently engage the trigger mechanism on the gun.
- Never operate the machine without all components properly connected to the machine (handle, gun/wand assembly, nozzle, etc.).
WARNING! Equipment damage.
- ALWAYS turn water supply "ON" before turning pressure washer "ON." Running pump dry causes serious damage.
- Do not operate the pressure washer with the inlet water screen removed. Keep screen clear of debris and sediment.
- NEVER operate pressure washer with broken or missing parts. Check equipment regularly and repair or replace worn or damaged parts immediately.
- Use only the nozzle supplied with this machine.
- Never leave the wand unattended while the machine is running.
- Never attempt to alter factory settings. Altering factory settings could damage the unit and will void the warranty.
Always hold gun and wand firmly when starting and operating the machine. - NEVER allow the unit to run with the trigger released (off) for more than one (1) minute. Resulting heat buildup will damage pump.
- You can feed the high pressure cleaner with warm water, but the water temperature may never exceed 50^ , otherwise the life of the pump will be reduced significantly.
- NEVER store the pressure washer outdoors or where it could freeze. The pump will be seriously damaged.
- Release trigger when changing from high to low pressure modes. Failure to do so could result in damage.
CAUTION: Keep hose away from sharp objects. Bursting hoses may cause injury. Examine hose regularly and replace if damaged.
Do not attempt to mend a damaged hose.
EXTENSION CORDS
DANGER! If using an extension cord, use only grounded, three wire extension cords that are in good condition. Use of an extension cord is not recommended. Use only extension cords intended for outdoor use. These are identified by the marking "Acceptable for use with outdoor appliances; store indoors while not in use." Use only extension cords having an electrical rating equal to or more than the rating of the product. Do not use damaged extension cords, Examine extension cord before using and replace if damaged. Do not abuse extension cord. Do not pull on the cord to disconnect. Keep cord away from heat and
sharp edges. Always disconnect cord from receptacle before disconnecting product fromextension cord.
DANGER! Failure to follow these instructions can result in serious injury, including death.

WARNING! To reduce the risk of electrocution, keep all connections dry and off the ground. Do not touch plug with wet hands.
4. CONNECTIONS
- Attach the high pressure hose to the pressure water outlet of the machine.
- Attach the spray handle to the high pressure hose. Prior to operating the machine please ensure that the high pressure hose has been completely uncoiled. Whilst the machine is in operation the hose MUST not loop.
- Mount the nozzle or any other equipment you want to use.
- Connect the machine to the water and power supplies.
INSTALLATION, ELECTRICAL AND WATER CONNECTIONS
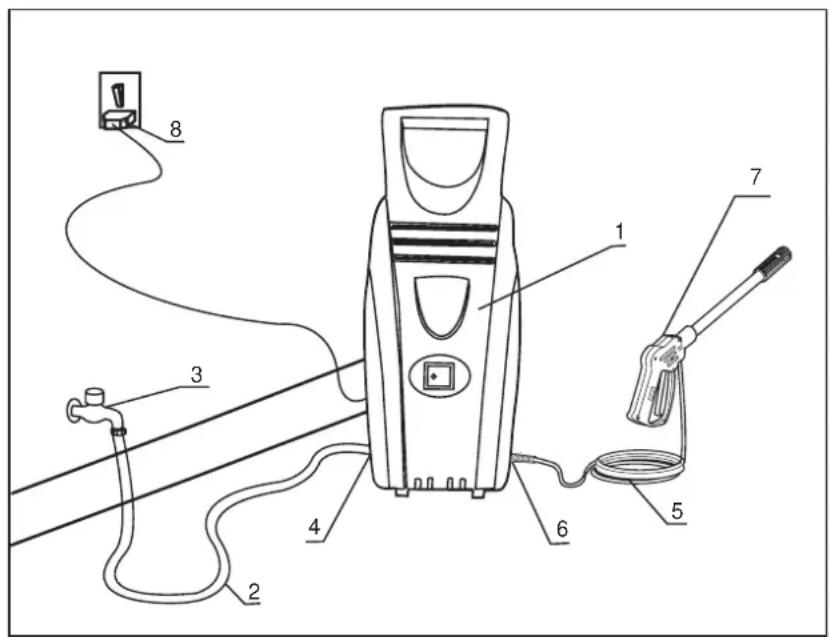
- PRESSURE CLEANER
- WATER SUPPLY HOSE (not included)
- WATER CONNECTION
- WATER INLET
- HIGH PRESSURE TUBE
- HIGH-PRESSURE, WATER OUTLET
- SPRAY GUN
- F.E.M LINE
5. PRE-OPERATION
ADJUSTING FAN PATTERN
The angle of spray coming out of the lance may be adjusted on some lances by rotating the nozzle. This will vary the spray pattern from approximately a 0^ arrow high impact stream to a 60^ wide fan spray.
(see Figure 2)
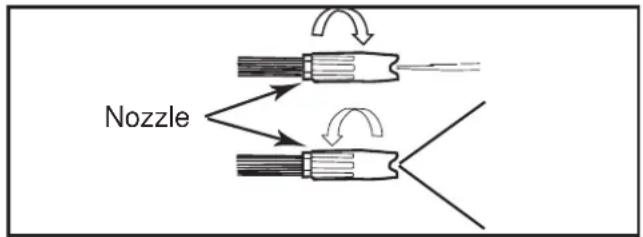
Figure 2 - Adjusting nozzle for fan pattern (not applicable on some nozzle)
A narrow stream has high impact force on the cleaning surface and results in maximum deep cleaning in a concentrated area. However, this narrow high impact spray must be used cautiously, as it may damage some surfaces.
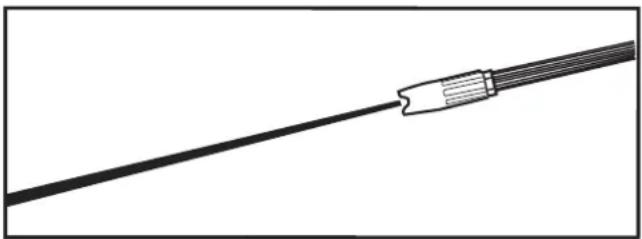
Figure 3 -Narrow high impact stream
A wide fan pattern will distribute the impact of the water over a larger area, resulting in excellent cleaning action with a reduced risk of surface damage. Large surface areas can be cleaned more quickly using a wide fan pattern.
NOZZLE CLEANING INSTRUCTIONS
A clogged or partially clogged nozzle can cause a significant reduction of water coming out of the nozzle and cause the unit to pulsate while spraying. To clean out the nozzle:
- Turn off and unplug unit.
- Turn off water supply. Relieve any pressure trapped in the hose by squeezing trigger 2-3 times.
- Separate lance from gun.
- Rotate nozzle to the narrow stream setting. This opens up the fan blades.
- Using included tip cleaner, or an unfolded paper clip, insert wire into the nozzle hole and move back and forth until debris is dislodged (see Figure 5.)

Figure 5- Insert tip cleaner in nozzle hole and move back and forth until debris is dislodged
- Remove additional debris by back-flushing water through the nozzle. To do this, place end of a garden hose ( with water running ) to end of nozzle for 30-60 seconds.
ANGLE TO THE CLEANING SURFACE
When spraying water against a surface, maximum impact is generated when the water strikes the surface "head on." However, this type of impact tends to cause dirt particles to imbed in the surface, thereby preventing the desired cleaning action. The optimum angle for spraying water against a cleaning surface if 45 degrees.

Figure 6-Optimum Angle to Cleaning Surface
Spraying water against a surface at this angle provides for the most beneficial impact force combined with efficient removal of debris from the surface.
DISTANCE FROM CLEANING SURFACE
Another factor that determines the impact force of the water is the distance from the spray nozzle to the cleaning surface. The impact force of the water is Increased as the nozzle is moved closer to the surface.
HOW TO AVOID DAMAGING SURFACES
Damage to cleaning surfaces occurs because the impact force of the water exceeds the durability of the surface. The impact force can be varied by controlling the three previously noted items. Never use a narrow high impact stream or a turbo/rotary nozzle on a surface that is susceptible to damage. Avoid spraying windows with a narrow high impact stream or turbo nozzle as this may cause breakage. The surest way to avoid damaging surfaces is to follow these steps:
- Before triggering the gun, adjust the nozzle to a wide fan pattern.
- Place the nozzle approximately 1,5 meter from and 45 degrees to the cleaning surface, and trigger the gun.
- Vary the fan pattern spray angle and the distance to the cleaning surface until optimum cleaning efficiency is achieved without damaging the surface.
TURBO NOZZLE (NOT INCLUDED WITH ALL MODELS)
A turbo nozzle, sometimes referred to as a rotary nozzle, is a very effective tool that can significantly reduce cleaning time. The turbo nozzle combines the power of a narrow high impact stream and the efficiency of a 25 degree fan pattern. This swirls the narrow high impact stream into a cone shape that cleans a larger area.
CAUTION: Since a turbo nozzle uses a narrow high impact stream, only use it in applications where the cleaning surface cannot be damaged by narrow high impact spray. Additionally, the turbo nozzle is NOT adjustable and cannot be used to apply detergent.
DETERGENTS
The use of detergents can dramatically reduce cleaning time and assist in the removal of difficult stains. Some detergents have been customized for pressure washer use on specific cleaning tasks. These detergents are approximately as thick as water. The use of thicker detergents, such as dish soap, will clog the chemical injection system and prevent the application of the detergent.
The cleaning power of detergents comes from applying them to a surface and giving the chemicals time to break down the dirt and grime. Detergents work best when applied at low pressure.
The combination of chemical action and high pressure rinsing is very effective. On vertical surfaces, apply the detergent starting at the bottom and work your way upward. This will prevent the detergent from sliding down and causing streaks. High pressure rinsing should also progress from the bottom to top. On particularly tough stains, it may be necessary to use a brush in combination with detergents and high pressure rinsing.
6. OPERATION
The following cleaning procedure will help you to organize your cleaning task, and ensure that you achieve the most beneficial results in the shortest amount of time. Remember to use the spraying/cleaning techniques previously listed.
1. Surface preparation
Before starting a pressure wash cleaning job, it is important to prepare the surface that is to be cleaned. This is done by cleaning the area of furniture, and making sure that all windows and doors are closed tight. In addition, you should make sure that all plants and trees adjacent to the cleaning area are protected by a drop cloth. This will ensure that your plants won't be sprayed by the detergents.
2. Initial High Pressure Rinse
The next step is to spray the cleaning surface with water to clear off any dirt or grime that may have collected on the surface. This will allow your detergent to attack the deep down dirt that has worked its way into the cleaning surface. Before triggering the gun, adjust the nozzle to a wide fan pattern and slowly adjust to the desired spray pattern. This will help you avoid applying too much concentrated spray to the surface which could cause damage.
3. Detergent Application
USE THE INSTRUCTIONS APPROPRIATE FOR MODEL PURCHASED
NOTE: Use only detergents formulated for pressure washers.
NOTE: Test detergent in an inconspicuous area before use.
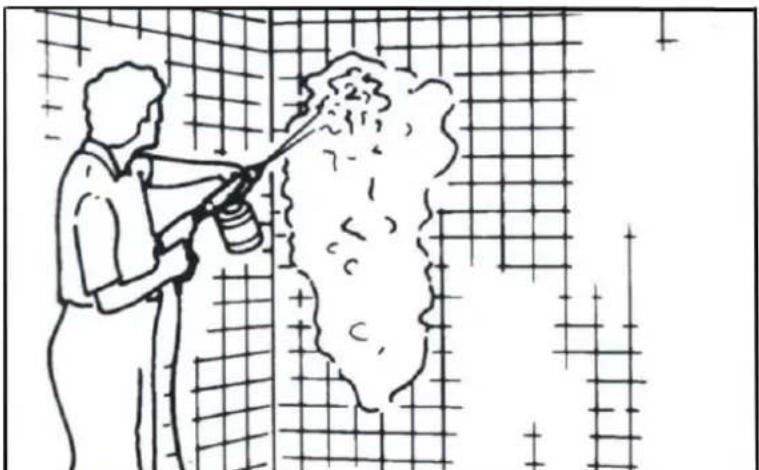
Figure 7-Detergent application
Units with Detergent Applicator Included
Follow manufacturer's label directions for mixing correct concentrations of detergent to water ratio through the pressure washer is approximately 5.4% (1 to 19).
- Unscrew to top of detergent applicator and fill applicator with detergent.
- Replace top on applicator.
- Remove lance from gun.
- Attach detergent applicator to gun. ( See Figure 8)
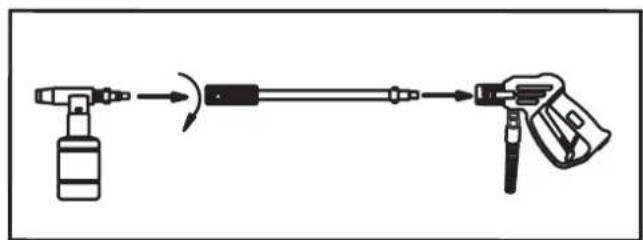
Figure 8 - Attach applicator to gun
- Apply detergent so it thoroughly covers cleaning surface. Apply from bottom to top to prevent detergent from sliding down and streaking.
- Allow detergent to remain on the surface for a few minutes. This is a good time to use a brush to lightly scrub heavily soiled areas. Never allow detergent to dry on the cleaning surface.
- Remove detergent applicator from gun and replace with the lance, or remove applicator from end of lance.
- Rinse detergent from surface.
NOTE: Flush detergent applicator with clear water following each use.
4 Final Rinse
Start final rinse at bottom an work upward. Make sure you thoroughly rinse the surface and that all detergent has been removed.
5. Shut down
1) Be sure all detergent is flushed from system.
2) Turn off motor.
3) Turn off water supply.
4) After motor and water supply are turned off, trigger gun to depressurize system.
CAUTION: NEVER turn water supply off before turning motor off. Serious damage could occur to the pump and/or motor.
WARNING! NEVER disconnect high pressure discharge hose from machine while system is pressurized. To depressurize, turn motor off, turn water supply off and squeeze gun trigger 2-3 times.
After each use, wipe all surfaces of the pressure washer with a clean, damp cloth.
Storage
Do not store pressure washer outdoors.
Do not store pressure washer where it might freeze.
TIPS FOR EXTENDING THE LIFE OF YOUR PRESSURE WASHER
- Never operate unit without water.
- The machine has the possibility to work with warm water. However, the water temperature may never exceed 50^ , because this will significantly reduce the life of the pump.
- Using detergent other than another brand may cause damage to pump components (o-rings, etc.). This also applies to chemicals such as bleach, dish soap, etc.
- Never operate unit for more than one (1) minute without spraying water. Resulting heat buildup will damage pump.
7. TROUBLE SHOOTING
| Symptom Possible cause (s) Corrective action (s) | ||
| Pressure washer does not start up. | 1. Unit is pressurized. 2. Plug is not well connected or electric socket is faulty. 3. Extension cord too long or wire size too small. 4. Main voltage supply too low. | 1. Squeeze trigger on gun. 2. Check plug, socket and fuse. 3. Remove extension cord. 4. Check that main supply voltage age is adequate. |
| Pump does not reach necessary pressure. | 1. Water inlet is clogged. 2. Pump sucking air from hose connections. 3. Nozzle worn or not correct size. 4. Unloader clogged or worn. 5. Valves clogged or worn. | 1. Clean water inlet filter. 2. Check that connections and locking ring are properly tightened. 3. Call the dealer. 4. Call the dealer. 5. Call the dealer. |
| Fluctuating pressure. | 1. Pump sucking in air. 2. Clogged nozzle. 3. Valves dirty, worn or stuck. 4. Water seals worn. | 1. Check that hoses and connections are tight. 2. Clean with tip cleaner. 3. Call the dealer. 4. Call the dealer. |
| Motor stops suddenly. | Extension cord too long or wire size too small. | Remove extension cord. |
| No detergent suction-units with tanks. | 1. Using high pressure extension hose or high pressure hose is too long. 2. Injector clogged on pump. | 1. Remove high pressure extension hose or use high pressure hose shorter than 7 meter. 2. Call the dealer. |
| No detergent suction-units with attachable applicators. | Detergent applicator clogged. 1. | Clean applicator with warm water, 2. Replace applicator. |
| Unit begins to smoke. | Overheated, overloaded or damaged motor. | Turn off unit and call the dealer. |
TABLE DES MATIÈRES FRANÇAIS

Figure 1 -Double Insulated symbol

Figure 2 - Adjusting nozzle for fan pattern (not applicable on some nozzle)

Figure 3 -Narrow high impact stream
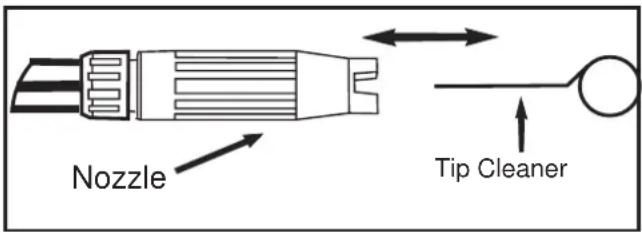
Figure 5- Insert tip cleaner in nozzle hole and move back and forth until debris is dislodged

Figure 6-Optimum Angle to Cleaning Surface

Figure 8 - Attach applicator to gun
Waste electrical products should not be disposed of with household waste. Please recycle where facilities exist. Check with your Local Authority or retailer for recycling advice.
(F)
For claims against the guarantee, please send us the machine/the apparatus with the completed guarantee certificate and invoice free of charge.
Adres/Adresse/Address/Adresse
The machine/apparatus supplied carries a twelve month guarantee, starting from the day of purchase. If any breakdowns occur within this period, caused by material or structural defects, this guarantee will cover parts as well as labour costs. This guarantee will not cover claims if:
- The instructions in this manual have not been observed.
The machine / apparatus has been modified in such a way that it no longer functions properly, not even when damaged parts are replaced with the proper components. - Damage is due to frost, dropping, impact, unauthorized disassembly, improper connection to the electricity grid etc.
- Damage is due to the use of extension leads thinner than 2,5mm^2 . This only applies to 230 volts. If the guarantee claim is accepted, the machine/apparatus will be repaired and returned free of charge. No other damages will be paid.
CONDITIONS DE GARANTIE
EC-declaration of conformity
We, Airpress, P.O. Box 114, 8900 AC Leeuwarden, The Netherlands, taking full responsibility, declare that the products
high pressure cleaners 66608
to which this declaration refers, comply with the machinery directive 98/37/EC, the EMC directive 89/336/EC, the low tension directive 73/23/EC and the directives 93/68/EC and 2000/14/EC.
The Netherlands, Leeuwarden, 28th July 2005