OKG 103 - Barbecue QLIMA - Free user manual and instructions
Find the device manual for free OKG 103 QLIMA in PDF.
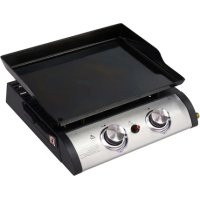
| Product type | Gas barbecue |
| Brand | Qlima |
| Model | OKG 103 |
| Power | 5.0 kW |
| Gas type | Butane (28-30 mbar) / Propane (30/37 mbar) |
| Maximum consumption | 363.8 g/h |
| Gas category | I3B/P(30) / I3+(28-30/37) |
| Usage | Outdoor use only |
| Ignition | Piezo electric with pilot light |
| Safety - Gas shut-off | Turn off gas supply after use |
| Safety - Children | Keep out of reach of children |
| Safety - Moving | Do not move the appliance while in operation |
| Safety - Storage | Do not store flammable liquids nearby |
| Burner cleaning | Use a 1.6 mm round rod to unclog the openings |
| Leak test | Check connections with soapy water |
| Recommended hose | Diameter 8-10 mm, max length 1.5 m, heat resistance >80°C |
| Gas cylinder | Height <80 cm, width <35 cm |
| Warranty | 2 years |
| Manufacturing | P.R. China |
| Assembly | Follow the provided assembly instructions |
| Preheating | 5 to 10 minutes (except first use) |
| Annual maintenance | Recommended by a competent technician |
Frequently Asked Questions - OKG 103 QLIMA
User questions about OKG 103 QLIMA
0 question about this device. Answer the ones you know or ask your own.
Ask a new question about this device
Download the instructions for your Barbecue in PDF format for free! Find your manual OKG 103 - QLIMA and take your electronic device back in hand. On this page are published all the documents necessary for the use of your device. OKG 103 by QLIMA.
USER MANUAL OKG 103 QLIMA
CONDITIONS DE GARANTIE
Only to be used outdoors.
Read the instructions before using the appliance.
Accessible parts maybe very hot, keep young children away.
Do not move the appliance during use.
Turn off the gas supply at the gas cylinder after use.
Any modification of the appliance may be dangerous.
Parts sealed by the manufacturer or his agent must not be altered by the user.
Do not modify the appliance

Attention
Some parts of this appliance become very hot,
Take special care when children or elderly are present.
For your safety
Do not store or use gasoline or mentholated fuels or any other flammable vapors and liquids in the vicinity of this or any other appliance.
Never light a gas grill with gasoline or comparable fluids!
Suggestion: user should not change the assembly that the manufacturer packaged.
Please read the following points before using your gas grill
- Read the instructions before using the appliance. If instructions are not followed it may cause problems in use.
- This gas grill accessible parts maybe very hot when being used. Keep young children away. Use protective when handling particularly hot components.
- In the event of a gas leak, Turn off the gas supply at the gas bottle, extinguish any open flames, open lid and if leak continues, check for damages, poor connections etc. Contact your local gas dealer immediately if the problem can't be solved.
- Do not move Gas grill during use.
- Do not use or store any liquids, vapors or other materials in the vicinity when operating the gas grill.
- This gas grill only to be used outdoors.
- Do not use a naked flame to check for gas leaks.
- Do not operate gas grill if there is a gas leak. Turn off the gas supply.
- Do not attempt to disconnect any gas fitting part if your gas grill is being used, on the gas grill or the gas regulator / bottle.
- Care is advised when operating your gas grill, you should never leave unattended when in use. Turn off the gas supply at the gas container after use.
- The gas grill should be cleaned after use. Don't obstruct the fire opening of the container compartment. If the fire opening is obstructed, please use 1.6mm round stick to dredge.
Take care not to enlarge burner ports or orifice/ nozzle openings when cleaning the burner or val
ves.
- Do not attempt to use this appliance in a garage or any enclosed area. Also this appliance must be keep away from flammable materials, etc. We recommend keeping a distance of at least 0.5 to 1.0 meter clear of any flammable materials.
- We would recommend that this gas grill should be serviced by your local gas retail outlet at least once a year by a competent engineer. Do not attempt to service this appliance yourself.
- Any modification of the appliance may be dangerous. Do not attempt any unauthorized interference of the main controls on this gas grill, i.e. gas taps, injectors, valves etc.

WARNING: The Handle Black Area (See Above Picture for Reference) Will Become Hot When the Gas grill In Use, BE CAREFUL! Do Not Touch The Black Area.
- Always test gas line for leaks at connector with soapy water after making connections.
- The top lid must always be open when lighting the burner.
- Use oven gloves and sturdy, long handled gas grill tools when cooking on the grill.
- Be prepared if an accident or fire should occur. Know where the first aid kit and fire extinguishers are and know how to use them.
- Keep any electrical supply cord and the fuel supply hose away from any heated surfaces.
-
Always cook with great care.
-
Do not heat any unopened glass or metal container of food on the grill. Pressure may build up and cause the container to burst, possibly resulting in serious personal injury or damage to the grill.
- Stand your gas grill on a safe level surface, away from inflammable items such as wooden fences or overhanging tree branches.
- Never use your gas grill indoors!
- Once lit do not move your gas grill or leave it unattended.
- Keep children and pets at a safe distance from the gas grill.
- Keep a fire extinguisher handy.
- The gas grill will become hot when in use, so handle lids etc. with the help of gloves.
- Ensure that the appliance has completely cooled down before storing.
- Use outdoors only!
- Read the instructions before using the gas grill.
- Assessable parts may be very hot, keep young children away!
- Do not move the gas grill during using.
- Turn off the gas supply at the gas container after use.
- Any modification of the appliance may be dangerous and be not permitted.
USAGE METHODS
1. Mounting steps
Make sure your grill is assembled properly. Detailed assembly instructions are packed with each grill giving specific assembly procedures for each model. Follow these instructions carefully to ensure the correct and safe assembly of the grill.
Caution: Although we take every effort to ensure that the assembly process is as easy as possible, it is inherent with fabricated steel parts that corners and edged can cause cuts if improperly handled during assembly procedures. Be careful while handling any parts during assembly. It is strongly recommended that you protect hands with a pair of work gloves.
2. Preparation
You will need LPG gas bottle and proper regulators under the gas pressure to operate this gas grill. The regulators should be comply with EN12864 with current version and national regulation.
See point Safety Instruction for further instructions.
Energy saving tips:
a) Reduce the opening time of the lid.
b) Turn the grill off as soon as cooking is completed.
c) Preheat the gas grill for 10 to 15 minutes only. (Except for the first use)
d) Do not preheat longer then recommended.
e) Do not use a higher setting than required.
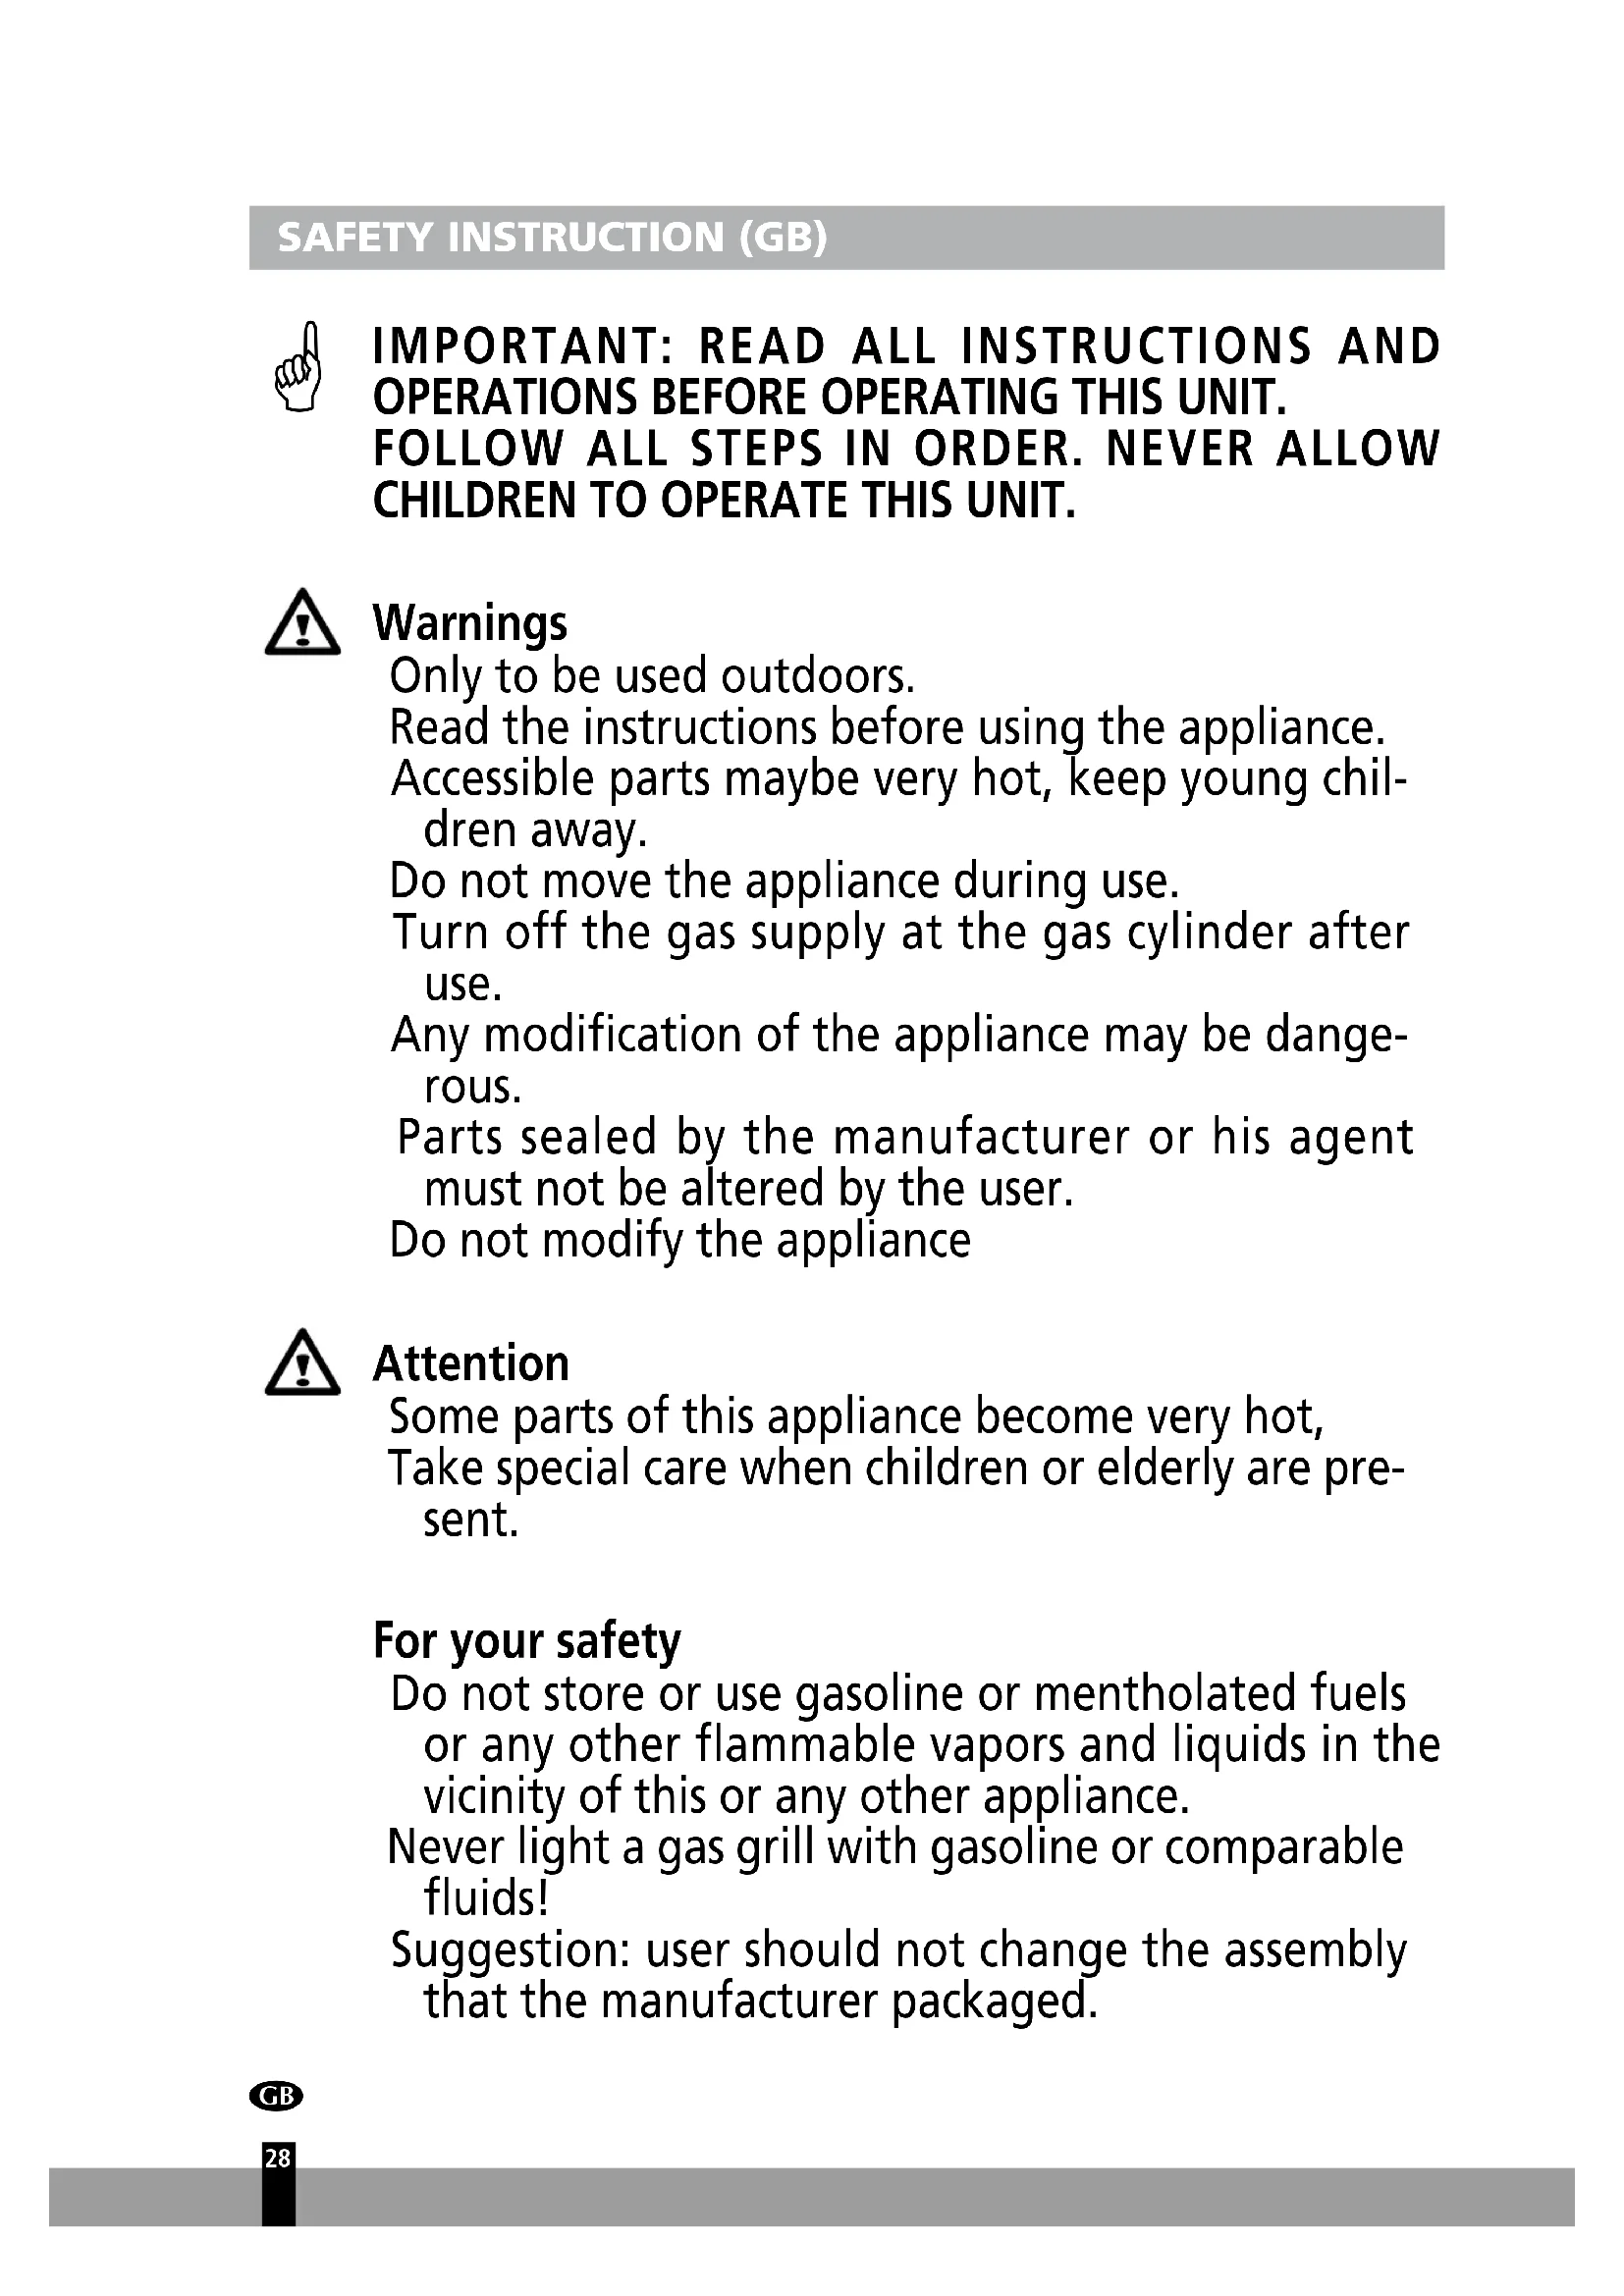
f) Connect the hose and regulator to the gas container at the left side of the gas grill. Keeping in mind that the gas container must be kept away from heat and in a safe position. The hose dimension is 8-10mm diameter. The length of hose recommended which shall not exceed 1.5m.
3. Installation
After purchasing your gas cylinder you will then be ready to set it up with your gas grill.
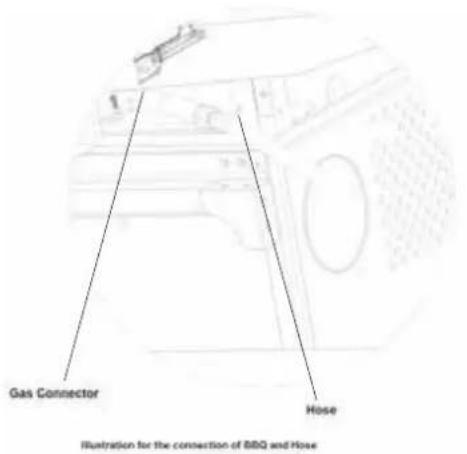
a) When changing the gas cylinder which shall be carried out away from any source of ignition. Position the gas cylinder at left side of your gas grill, should not be placed inside BBQ, keeping in mind that the bottle must be kept away from heat and in a safe position.
b) When ready to use your gas grill insert the regulator into the gas bottle valve and tight ten firmly.

Warning: Before attempting to light your gas grill you must refer to your lighting instructions and warning / safety points.
Check the hose before each use, searching for cracking, cuts or any abrasions. If the hose is found to be faulty in any way do not attempt to use your gas grill.
When changing your gas bottle ensures that there are no sources of ignition close by i.e. fires, cigarettes, naked flames etc. Make sure that the appliance is switched off.
Ensure that the hose is not subjected to twisting which will affect the gas flow when installing your gas grill. Also the hose must not have undue tension and must not touch any part of the gas grill which may be hot.
Please choose flexible hose whose heatproof higher than 80 ^ C
Flexible tube should be changed every 2 years; It's necessary to change the flexible tube when the national conditions require it.
How to change your cylinder
Note: Turn off the switch of cylinder (No spanner is required)
The height of the gas cylinder is below the 80cm and the width is within 35cm
How to connect a gas bottle
a) Turn the orange cap so that the arrow is pointing to the gap in the shroud.
b) Remove the orange safety cap by pulling the lanyard out, then out. Do not use tools. Leave the cap hanging.
c) Check that the black sealing washer is fitted inside the cylinder valve. Connect the regulator to the valve.
d) Turn the switch clockwise on gas bottle-then turn on the gas grill as instructed.

Warning: Always test gas line for leaks at connector with soap water finishing all connections.
How to disconnect a gas bottle
a) Except for twin-cylinder installations with a changeover valve, turn off the gas tap if fitted to the appliance. Wait until the burner and pilot light have gone out. For installations with a changeover valve, it is only necessary to switch off the empty cylinder.
b) Replace the orange safety cap onto the empty cylinder.
4. Lighting instructions
Caution: The lid must be open when lighting the burner! Do not stand with your face directly over the gas grill when lighting it.
Your gas grill will have following method of ignition.
Pilot Gas Control Ignition (Main burner or main burner with side burner):
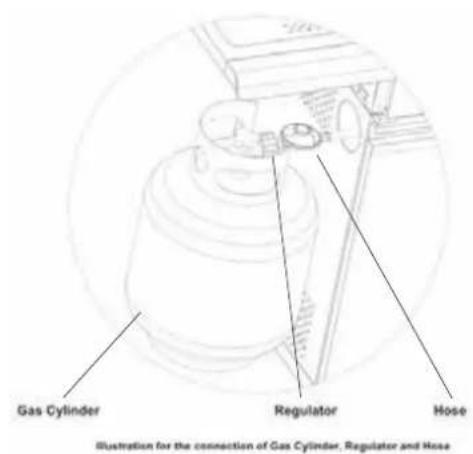
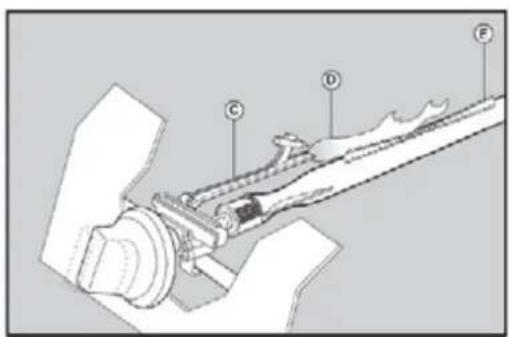
With all gas controls on the Gas grill in the "OFF" position "OFF", turn the gas cylinder valve to the on position at the regulator. To create a spark you must press the control knob (A) and hold in this position for 3-5 seconds to allow gas flow and then turn anticlockwise to "HIGH" (B). It can spark to the burner lighting tube (C). You will hear a "snap" from the igniter and you will also see a orange flame coming from the burner lighting tube at the left side of the burner (D).
Continue to hold the burner control knob in for two seconds after the "snap", this will allow gas to flow completely down the burner tube (E) and insure ignition.
When the burner is alight, adjacent burners will cross light when their controls are turned to "HIGH"
At "High" setting the burner flame should be approximately 12-20mm long with a minimum of orange flame. Turn the gas control fully anticlockwise for minimum setting.
Should you have any difficulty lighting your gas grill following the above steps, contact your dealer for advice.
If the automatic ignition can't be used, please remove the cooking grill and heat diffuser(hotplate), and turn the valve anticlockwise to 90^ , to light with BBQ lighter in the distance of 5mm to the burner fire hole. Replace the cooking grill and heat diffuser (hotplate), please wear the fireproof and heat resisting gloves.

Warning: If the burner still does not light, turn the burner control knob to "OFF" and wait 5 minutes to let the gas clear before lighting again.

STORAGE
Your gas bottle must be stored outdoors in a well ventilated area and must be disconnected from your gas grill when not being used. Ensure that you are outdoors and away from any sources of ignition before attempting to disconnect your gas bottle from your gas grill.
When you are using your gas grill after a period of storage, please ensure to check for gas leaks and check for any obstructions in the burner etc. before using. Also follow the cleaning instructions to ensure gas grill is safe.
If gas grill is stored outdoors ensure to check that all areas under the front panel are free from any obstructions (insects etc.) This area must be kept free as this may affect the flow of combustion or ventilation air.
CLEANING AND MAINTENANCE
Maintenance is recommended that every 90 days for your gas grill, but it is absolutely necessary to perform maintenance at least once a year. By doing so, you will extend the life of your gas grill.
Your gas grill is easy to clean with minimum effort, just follow these helpful hints for cleaning convenience.
| Emergencies Possible cause Prevention/ Solution | ||
| Gas leaking from cracked/cut/burned hose | Damaged hose. Turn off gas at LP tank, | if hoes is cut or cracked, replace hose.See LP tank lead test and connection regulator to the LP tank. |
| Gas leaking from LP tank | Mechanical failure due to resting or mishandling. | Turn off LP tank valve. |
| Gas leaking from LP tank valve | Failure or tank valve from mishandling or mechanical failure. | Turn off LP tank valve. Return LP tank to gas supplier. |
| Gas leaking between LP tank and regulator connection | Improper installation, connection not tight, failure of rubber seal. | Turn off LP tank valve, remove regulator from cylinder and visually inspect rubber seal for damage, see LP tank test and connection regulator to the LP tank. |
| Fire coming through control panel | Fire in burner tube section of burner due to partial blockage. | Turn off control knobs and LP tank valve. After fire is out and grill is cold, remove burner and inspect for spider nests or rust. see natural hazard and cleaning the burner assembly pages. |
| Troubleshooting: Problem | Possible cause Prevention/ Solution | |
| Grease fire or continuous excessive flames above cooking surface | Too much grease buildup in burner area. | Turn off LP Tank. Leave lid open to allow flames to die down. After cooling, clean food particles and excess grease from inside firebox area, grease cup/pan/tray, and other surfaces. |
| Burner will not light using ignitor | Gas issues 1.Trying to light wrong burner. 2.Burner not engaged with control valve. 3.Obstruction in burner. 4.No gas flow. 5.Vapor lock at coupling nut to LP tank. 6.Coupling nut ad LP tank valve not fully connected. | 1.See instructions on control panel and section in the Usage Methods. 2.Make sure valve are positioned inside of burner tubes. 3.Ensure burner tubes are not obstructed with spider webs or other matted, see cleaning section of use and care. 4.Make sure LP tank is not empty. If LP tank is not empty, refer to "sudden drop in gas flow. 5.Turn off knobs and disconnect coupling nut from LP tank. Reconnect and retry. 6.Turn the coupling nut approximately. |
| Burner will not light using ignitor | Electrical issues: 1.Electrode cracked or broken; " sparks at crack." 2.Electrode tip not in proper position 3.Wire and/or electrode covered with cooking residue. 4.Wires are loose or disconnected. 5.Wires are shorting (sparking) between igitor and electrode. 6.Push button sticks at bottom sparking between ignitor and electrode. | 1.Replace electrode. 2.Tip of electrode should be pointing toward port hole in burner. The distance should be 1/8" to 3/16". Adjust if necessary. 3 Clean wire and or electrode with rubbing alcohol and clean swab. 4.Reconnect wires or replace electrode/wire assembly. 5 replacing ignitor wire. 6.Replace ignitor. 7.Inspect wire insulation and proper connection. Replace wires if insulation is broken. |
| Burner will not mach light | See "gas issues;" on previous page. 2. Improper method of match-lighting. | 1. See "Pilot Gas Control Ignition" section of Usage Methods. |
| Sudden drop in gas flow or low flame | 1. Grease buildup. 2. Excessive fat in meat. 3. Excessive cooking temperature. | 1. Clean burners and inside of grill/ firebox. 2. Trim fat from meat before grilling. |
| Flames blow out High | or gusting winds. Low on LP gas. Excess flow valve tripped. | Turn front of grill to face wind or increase flame height. Refill LP tank. Refer to "sudden drop in gas flow" above. |
| Persistent grease fire | Grease trapped by food buildup around burner system. | Turn knobs to OFF. Turn gas off at LP tank. Leave lid in position and let fire burn out. After grill cools, remove and clean all parts. |
| Flashback...(fire in burner tube(s)) | Burner and burner tubes are blocked. Turn knobs to OFF. clean burner and/or burner tubes. See burner cleaning section of use and care manual. | |
| Flare-up 1. Grease buildup. 2. Excessive fat in meat. 3. Excessive cooking temperature. | 1. Clean burners and inside of grill/ firebox. 2. Trim fat from meat before grilling. 3. Adjust (lower) temperature. | |
| Unable to fill LP tank | Some dealers have older fill nozzles with worn threads. | Turn worn nozzles don't have enough "bite" to engage the valve. Try a second LP dealer. |
| One burner does not light from other burner(s) | Grease buildup or food particles in end of carryover tube. | Clean carry-over tube with wire brush. |
If your problem is not resolved from the information above, please contact your local gas dealer.
a) Turn the burner on for 15 to 20 minutes. Ensure appliance is cold before continuing.
b) Grids should be cleaned periodically by soaking and washing in soapy water.
c) The interior surfaces of the grill housing cover should also be washed with hot, soapy water. Use a wire brush, steel wool or a scouring pad to remove stubborn spots.
d) Periodically check the burner to see that it is free from insects and spiders which may clog the gas system, deflecting gas flow. Ensure to clean venturi pipes on burner very carefully, make sure that there are no obstructions. We recommend that you use a pipe cleaner to clean the venturi pipe area.
e) Any modifications of this appliance may be dangerous and are not permitted.
CONDITIONS OF WARRANTY
There is a two-year warranty on your grill from the date of purchase. All material or manufacturing defects will be repaired free of charge.
The following applies:
- All claims for compensation, including consequential damage, will not be entertained.
- Any repairs or replacement of components during the warranty period will not result in an extension of the warranty period.
-
The warranty will expire if any alterations have been made, not genuine components have been fitted or if the grill has been repaired by a third party.
-
Components subject to normal wear and tear are not covered by the warranty.
- The warranty is only valid on presentation of the original, unaltered, and date-stamped purchase receipt.
- The warranty does not cover damage caused by actions that deviate from those as described in the user's manual or by neglect.
- Transportation costs and the risks involved during the transportation of the grill or components shall always be for the account of the purchaser.
To prevent unnecessary expenses, we recommend that you always carefully read the user's manual first. If this does not provide a solution, take the grill to your distributor for repair.
TECHNICAL DATA
GB
FR
①
NL
E
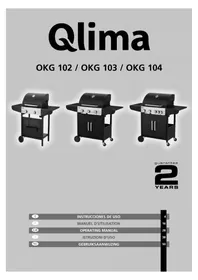
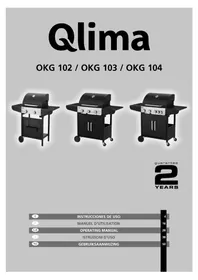
| Model name Modèle Modello | Modelo | OKG 102 - OKG 103 - OKG 104 | ||||
| Outdoor Kitchen gas | Gaz de cuisine extérieur | Cucine a gas da esterno | Butenkeulen op gas | Gas de cocina al aire libre | ||
| Power Puissance Potere Vermogen | Poder | 5.0 kW | ||||
| Gas Gaz Gas Gas | Gas | Butane 28-30 mbar // Propane 30/37 mbar | ||||
| Gas category | Catégorie de gaz | Categoria di gas Gas categorie | Categoria de gas | I3B/P(30) / I3+(28-30/37) | ||
| PIN | PIN | PIN | PIN | PIN | 0063CN7292 | |
| Consumption (max.) | Consummation (max.) | Consumo (max.) | Verbruik (max.) | Consumo (max.) | 363.8 g/h | |
| Made in Fabriqué en Fatto in Géproduced in | Producido en | P.R.C. | ||||
| Countries of Destination | ✓ | ✓ | ✓ | ✓ | ||
| FOR OUTDOOR USE ONLY - Close the valve of the gas cylinder or the regulator after use - The use of this appliance in enclosed areas can be dangerous and is PROHIBITED. - Avoid the instructions before using this appliance - The appliance must be installed in accordance with the instructions and local regulations. - For use outdoors and in well ventilated areas - A well ventilated area must have a minimum of 25% of the surface area open. - The surface area is sum of the walls surface. | POUR USAGE À L'EXTERIEUR UNIQUE-MENT - Fermez la vanne de laoustelle de gaz ou le régulatorie après utilisation. - L'utilisation de cet exercisable dans des zones termites peut être dangereux et est INTERDIT. - Une les instructions avant d'utiliser cet approil. - L'approchéodit être installé conformément aux instructions et aux ré-allementations locales. - Utilisant à l'extérieur et dans des écarts bien ventilés. - Une zone bien ventilée doit avoir au minimum 25% de sa surface ouverte. - La superficiele est la somme derisque de la surface murale. | SOLO PER USO ALL'ESTERO N - Chuidre la valvola della bombola del gas ou il régulatorie après l'luca. - L'uso de esta apparentee-chio in ambiente chusi que pas est perticolato es un METADO - Prima d'utilise quoi apparaecchio,leggere le usizioni. - L'apparechéco deve essere installetto seconde le usizioni e le nominative locale. - Utilizzazione esclusivamente all'estero in zone ben ventilati. - Una zona ben ventilata devote avoir un minimo di 25% della superficie aperta. - La superficie è la somma nella superficie delle paret. | UITSLUITEND VOOR GEBRIK BUITENSHUIS - Slui het venteil van de gazles de de regelaar na gebruik. - Het gebruik van dit toestel in afgesloten ontgeveigenen kan gestaarlijk en et's VERBODEN - Lees de instructions voor installatione en gebruik van dit toestel. - Dit toestel moet geinsta- leerd worden overveenkom-stig de instructions en de loïka regeligeven. - Voor gebruik bultershuis en goed genentieerde ruinies - Voor het bekanten van een rischhoots genentieerde ruinie moet ministers van het grondopervaklakopen zich. - Het grondopervaklak is de som ven de oppenslakte van de muret. | PARA USO EXCLUSIVO EN EXTERIORES - Cierre la valvula del cilim-dro de gas o el regulator despaíde de cada uso. - El uso de este aparato en areas cerradas可以选择 entricular peligro y ademias en PROHIBIDO. - Lea las instructiones antes de use esta aparato. - El aparato debaste Installaire en conformidad con las instructiones y las normativas de su localidad. - Para uso exclusivo en extranjeros y zonas bien ventiladas. - Un area bien ventilada deble tener un minimo del 25% de su superficie abierta. La superficie arrivaba indicada es lasuma de la superficie de las paredes. | ||
Qlima


PVG Holding B.V. PO.Box 96,5340
AB OSS, THE Netherlands
Qlima.com

IMPORTANT: PRIMA DI UTILIZZARE QUESTO APPARECCHIO, LEGGERE TUTTE LE ISTRUZIONI E IL FUNZIONAMENTO. SEGUIRE TUTTI I PASSAGGI NELL'ORDINE. NON PERMETTERE AI BAMBINI DI UTILIZZARE QUESTO APPARECCHIO.

Avvertenze
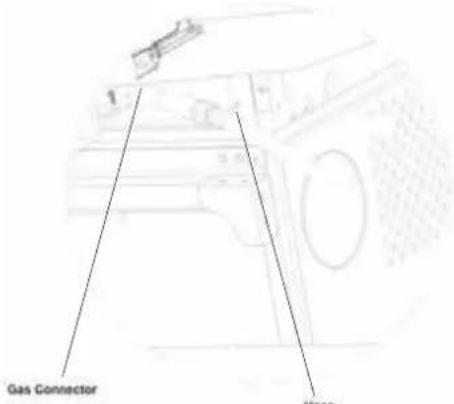
Illustration for the connection of BBQ and Hox
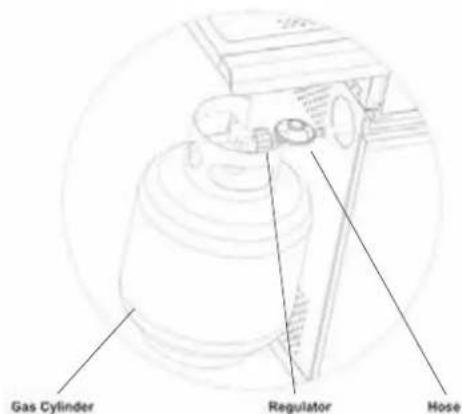
Illustration for the connection of Gas Cylinder, Regulator and Hose

Distributed in Europe by PVG Holding B.V.
Benotigen Sie weite Informationen oder treten Probleme auf, besuchen Sieitte unsere Website wwwqlima.com, oder setzen sie sich mit unserem Kundendienst in Verbindung (Telefonnummer auf www.qlima.com).
For alle yderligere oplsninger erer ved eventuelle problemer med apparatet henvises til www.qlima.com ellert lokale Kundecenter (telefonumre findes i www.qlima.com).
Si necesita informacion o si Tiene algo problema, visite nuestra pagina Web www.qlma.com, o pongase en contacto con el service客户提供 (hallar a numero de Telefono en www.qlma.com).
Si you souhaitez obtenir des informations supplémentaires ou si you rencontrez un probleme, rendez-vous sur notre site Web (www.qlma.com) ou contactez notre service client (vous trouverez l'adresse et numero de téléphone sur www.qlma.com).
Jo hau at huoapua, liattoja tai laiteen kansa tulee onglmia, tutustu verkkosivustoon oositteessa wwwqlima.com tai kysnuo a PVG kuluttajapalvelukesukksesta (www.qlima.com).
If you need information or if you have a problem, please visit the our website (www.qlima.com) or contact our sales support (you find its phone number on www.qlima.com)
Per informazioni e in caso di problemi, visitate il site Web www.qlima.com oppure contattate il Centro Assistenza Clienti (per conoscere il numero di Telefono, consultate www.qlima.com).
Hvis du trenger informasjon, eller his du har et problem med produktet, kan du gtil nettsidene wwwqlima.com. Alternativt kan du kontakte med PVG' forbrukertjeneste (telefonummeret i www.qlima.com).
Ns Alu inatme nodig hebt of al u en probleme hbt, bezok dan de onze weibite (ww.qlima.com) of neem contact op met de afdeling sales support (adres en telefoon op www.qlima.com).
Se necessitar de informacoes ou se tiver problemas, visite o Web site www.qlima.com ou contacte o Centro de Assistencia (nromo de telephone o www.qlima.com)
W przypadiu problemów i w celu uzyskania szcęgólowych informaci odwiedź strone internetowa Qlima dostepnag pod adresem www.qlima.com lub skontaku z Centrum kontaków Qlima (www.qlima.com)
Om du behover service ell information ell her problem med apparaten kan du besoka www.qlima.com eller kontakta Qlima kundtjänst (du hittar Telefonumret pa www.qlima.com).
60 Ce ze zelite dodatne informacione, obiscitte splteno mesto podjetja na naslovu www.qlima.com aliPoklicite na tefonsko (www.dlima.com).
Daha fazla bilgiye ihtiayc duyarsaniz veya bir sorunla karsilasirsaniz, www.qlma.com adesindeki Qlma Internet sitesini ziyaret edin veya ükenizde bulunan Qlma muster merkeziyle iletismurkun (telefon numarasini: www.qlma.com).