
Leopard - Mp3 player Zipy - Free user manual and instructions
Find the device manual for free Leopard Zipy in PDF.
| Product type | MP3 Player |
| Brand | Zipy |
| Model | Leopard |
| Dimensions (L x W x H) | 85.5 x 40.15 x 9.45 mm |
| Weight | Approximately 35 g |
| Screen | 1.8 inches TFT |
| Battery | Rechargeable lithium polymer |
| Battery life | Up to 11 hours of audio playback |
| Storage capacity | Expandable via TransFlash card up to 16 GB |
| Supported audio formats | MP3, WMA, WAV |
| Supported video formats | AVI, AVM (requires conversion) |
| Image formats | JPG, BMP |
| E-book formats | TXT |
| Connectivity | USB 2.0 |
| Equalizer | 7 modes: Natural, Pop, Rock, Classical, Jazz, Soft, DBB |
| FM radio | Yes (requires earphones) |
| Voice recording | Yes |
| Additional functions | Music, video, photo, e-book, radio, recording player |
| Maintenance | Clean with a damp cotton cloth; avoid chemicals |
| Safety | Do not expose to liquids, extreme temperatures, strong magnetic fields |
| Spare parts | Contact authorized after-sales service |
| Compatible operating system | Windows XP/ME/2000/WIN7/VISTA |
Frequently Asked Questions - Leopard Zipy
User questions about Leopard Zipy
0 question about this device. Answer the ones you know or ask your own.
Ask a new question about this device
Download the instructions for your Mp3 player in PDF format for free! Find your manual Leopard - Zipy and take your electronic device back in hand. On this page are published all the documents necessary for the use of your device. Leopard by Zipy.
USER MANUAL Leopard Zipy
Natural, Pop, Rock, Clásica, Jazz, Suave, DBB.
Natural, Pop, Rock, Clássica, Jazz, Suave e DBB.
Specifications techniques
CONDITIONS de GARANTIES RELATIVES AU ZIPY.
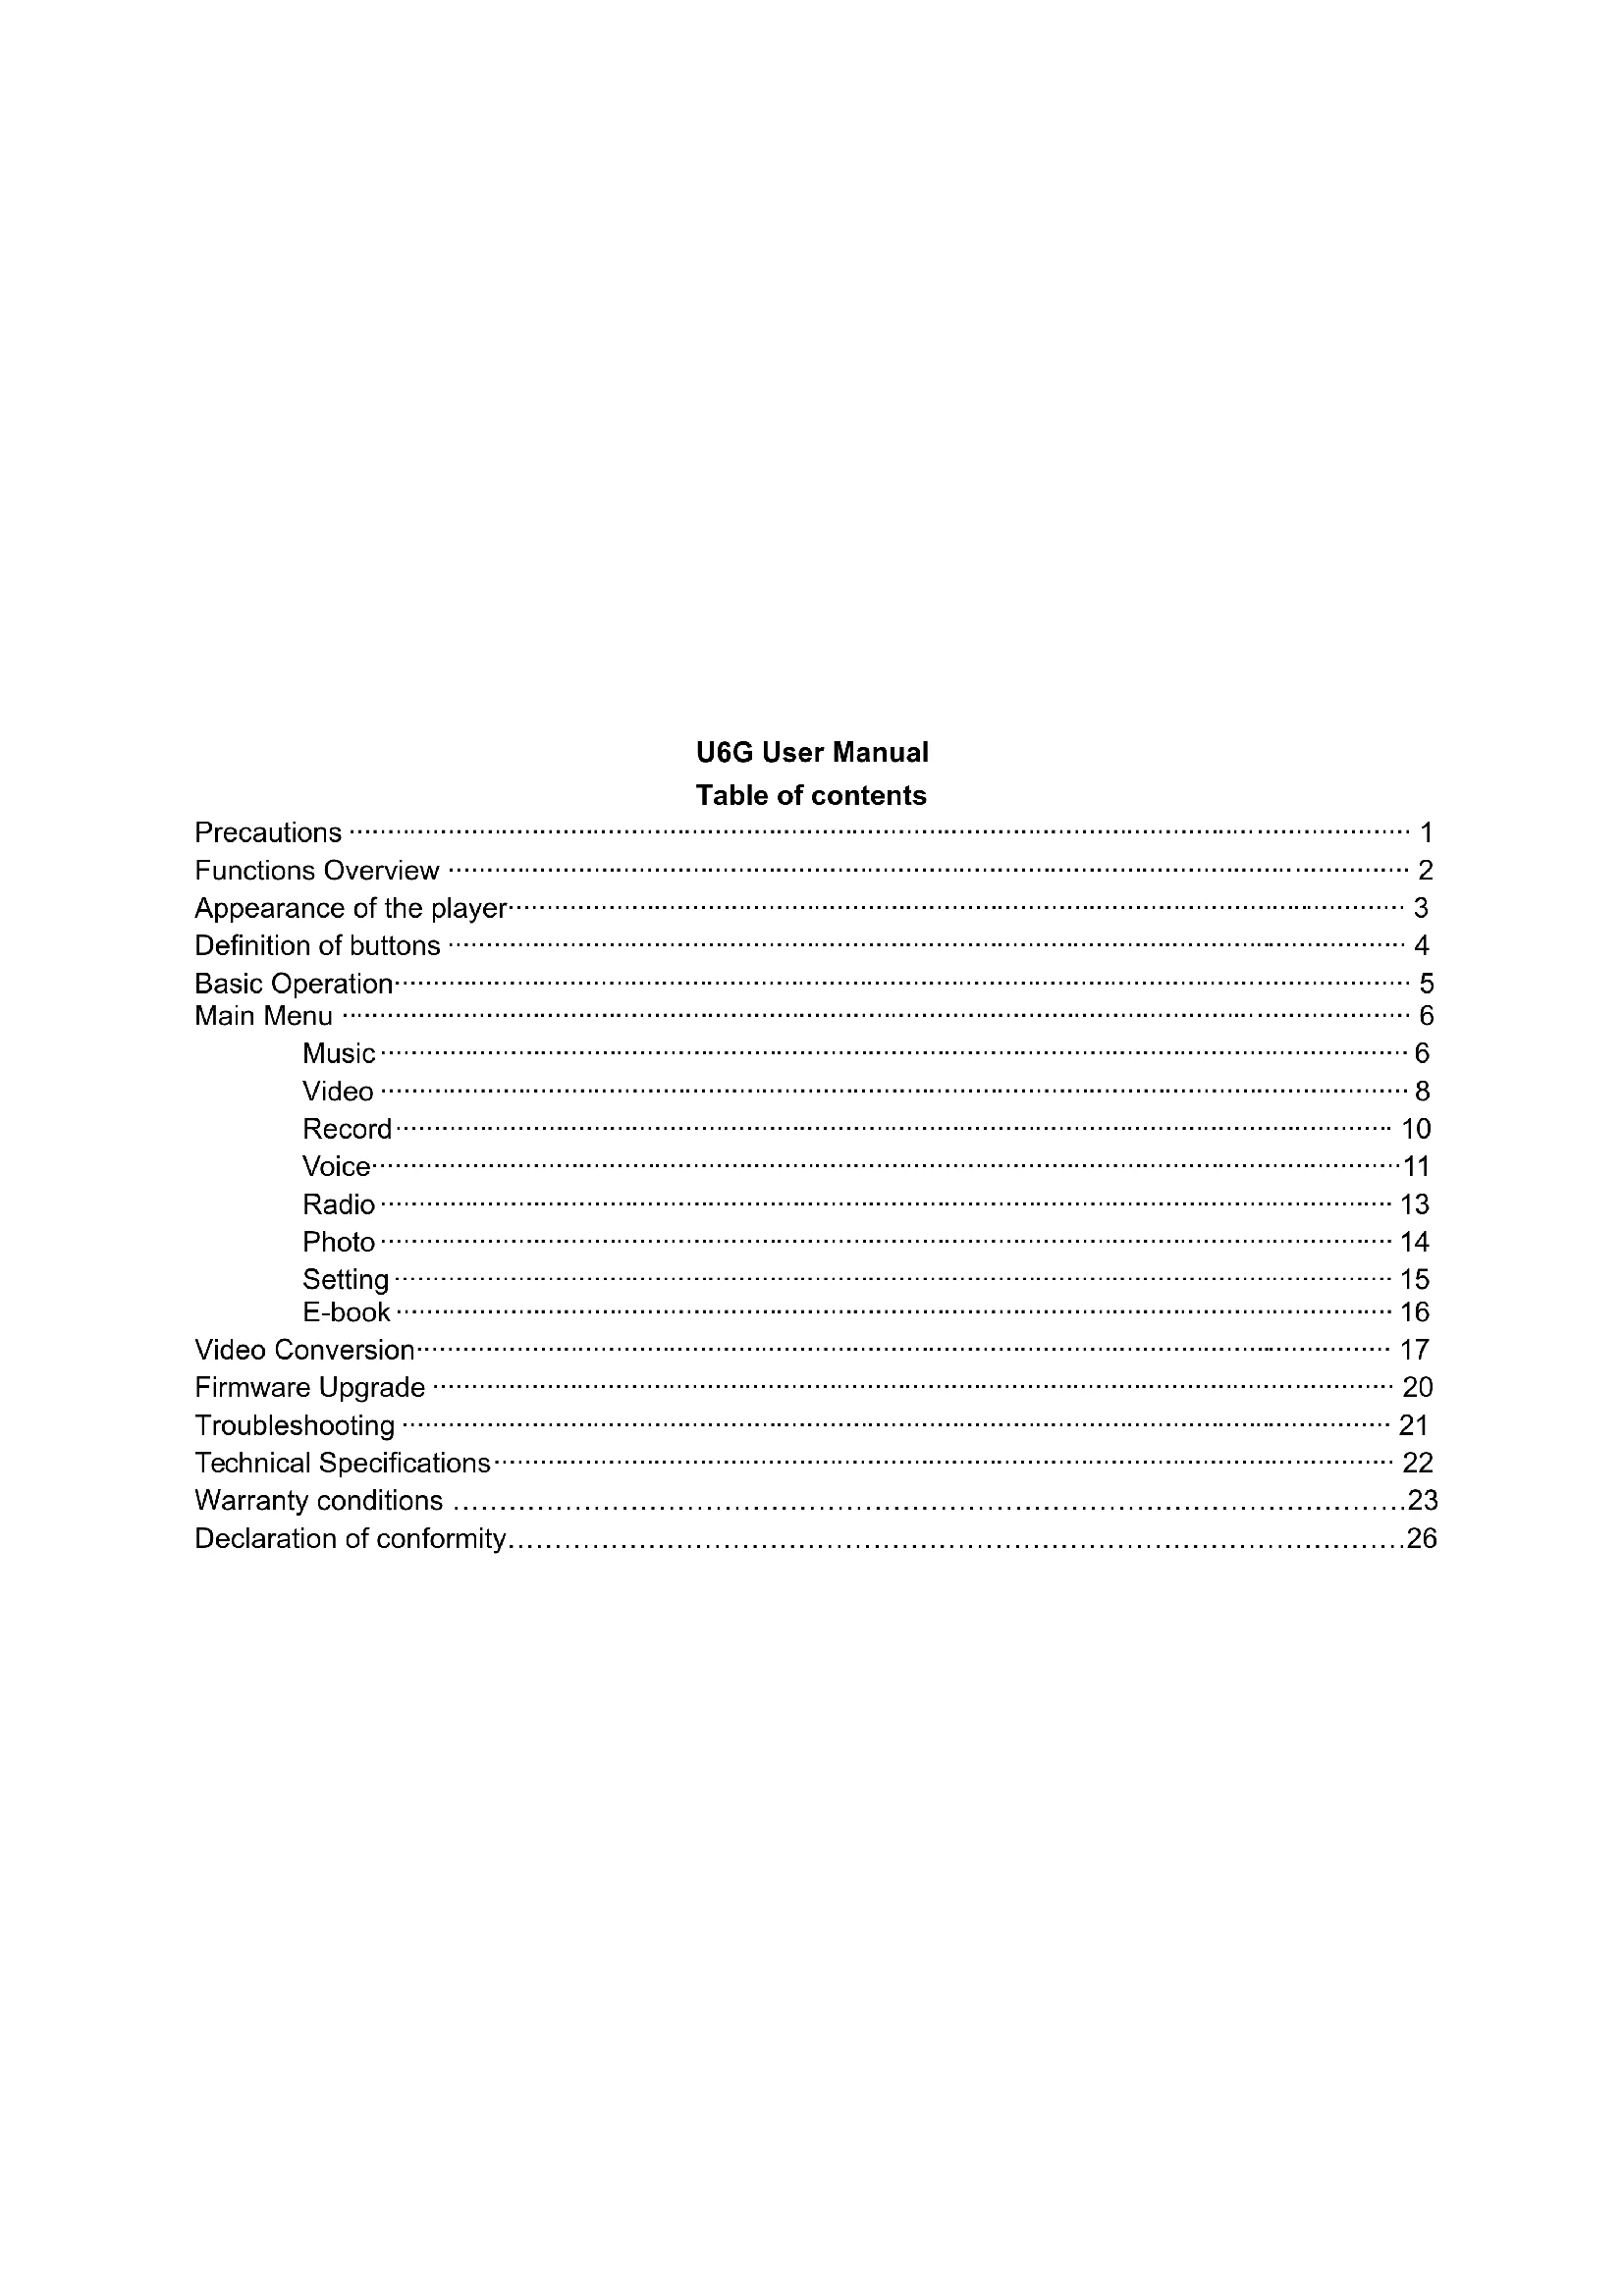
Appearance of the player 3
Definition of buttons 4
Basic Operation 5
Main Menu 6
Music 6
Video 8
Record 10
Voice 11
Radio 13
Photo 14
Setting 15
E-book 16
Video Conversion 17
Firmware Upgrade 20
Troubleshooting 21
Technical Specifications 22
Warranty conditions 23
Declaration of conformity 26
Precautions
The safety measures and information about the correct operation of this product are provided in this manual to avoid any accident, please read the manual carefully before using the player.
The player is an exactitude electronic product, so don't dismantle it at discretion.
- Do not knock at or beat the player violently.
- Do not use the player in the following conditions and environments: high temperature, low temperature, dusty condition, strong magnetic field and do not keep it in the sun directly for a long time.
Clean the housing gently with the moisturized cotton cloth. Do not clean the players with other chemical liquor.
- Keep it away from liquid or liquid containers to avoid the player being subject to the liquid.
- Please adjust the volume properly to avoid damaging your hearing.
- Only the designated battery, adapter and accessories could be used. Otherwise it would be dangerous and it cannot applied to the terms of warranty.
- Do not disconnect the player from PC directly when it's in formatting, uploading or downloading. Otherwise error would occur.
- Please dispose the disused device and parts according to the local stipulations on the environmental protection.
If there is any problem during the operation, please contact the local agent or our customer service center directly for help.
The supplier shall not be responsible for any file and memory loss caused by the wrong
operation, maintenance or other causation caused by improper operation. Please operate the product conforming to the User's Manual.
- The player is charged once it's connected to the USB port on a working PC, no matter whether the player is turned on or not.
The player need to be charged in the following conditions:
A. The battery icon displays no battery;
B. The system is powered off automatically and it would be powered off quickly even if it has been restarted.
C. The keys are not workable.
The company reserves the right to improve the product. The specifications and design may tend to be changed without prior notice.
Functions Overview
Amazing audio playing time
Music playing time up to 11 hours
Seven EQ models
Natural, Pop, Rock, Classic, Jazz, Soft, DBB.
Switch off by setting time
Can set the power off mode, make you more convenient to use.
Card Extension
TF card extension, support 16GB maximum
Photo scanning
It supports photo scanning, the photo format can be JPG and BMP
Appearance of the player
Definition of buttons
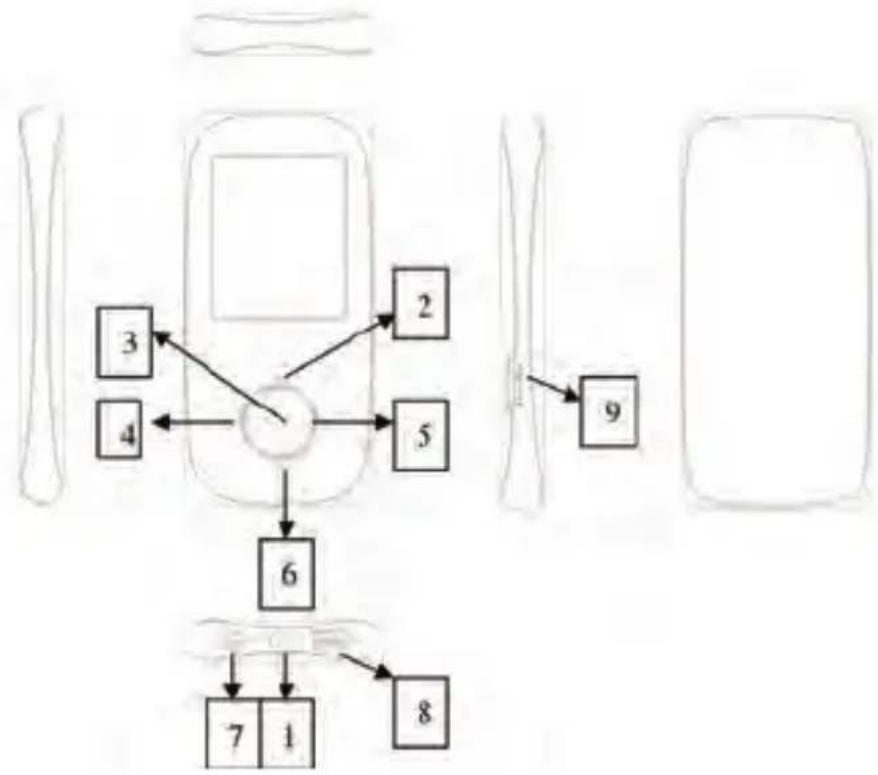
| Serial Number Keypad Definition | Keypad Instruction | |
| 1 | ON/OFF | Power switch key. Turn on the player by push the button to ON position, while the player will be power off once the key is pushed to the OFF position. |
| 2 | PLAY/PAUSE | Press the key for a long time, the player is ON/OFF; while press for a short time, the player starts to play or pause. |
| 3 | MENU | The MENU key, which is pressed for a short time to confirm, and is pressed for a long time to return to the main menu |
| 4 | PRE | The PRE key is pressed for a short time to enter the previous item, previous song, or reduce the sound volume, and the PRE key is pressed for a long time to perform the fast backward operation |
| 5 | NEXT | The NEXT key is pressed for a short time to enter the next item, next song, or increase the sound volume, and the NEXT key is pressed for a long time to perform the fast forward operation. |
| 6 | VOL | The VOL key, which is short pressed to set volume. |
| 7 | Earphone | 3.5mm jack phone jack |
| 8 | USB | 5pick USB jack |
| 9 | Card | TFstard slot |
Basic Operation
Connect and files transmission:
Connect the player to PC via the USB cable, and to charge the player or get the data transmission. When the player is connected to the PC, it can be used as a USB drive. The music files can be dragged and dropped into folders of the player without any other media.

Main Menu

a、Push the ON/OFF to ON position and then long press PLAY key to turn on the player
b、In the state of main menu interface, press PRE or NEXT key to choose the submenu.
c、Short press MENU key back to previous menu.
d、Long press MENU key to get back to the main menu interface.
Music
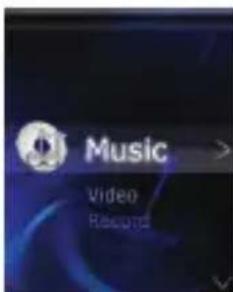
Short press MENU key to enter into the music submenu. show as below:
- Play/Pause
Short press the PLAY key to shift between pause and play, while long press the PLAY key to turn the player off.
- Select songs
Short press the PRE to play the previous song while short press the NEXT to play the next song
- Fast rewind/Fast forward
Long press PRE or NEXT key to fast rewind or fast forward of the current song
Volume adjustment
In music playing interface short press VOL key, then press PRE or NEXT key to increase or reduce the sound volume, finally press MENU key to confirm.
Equalizer
In music playing mode, short press MENU key to choose. there is Natural, Pop, Rock, Classic, Jazz, Soft, DBB.
Repeat
In music playing mode, short press MENU key to choose, there is Normal, Repeat One, Folder, Repeat Folder, Repeat All, Random, Intro.
Replay
In the music playing mode, short press MENU to choose, then press PRE or NEXT key to confirm the region which you want. Then press the PRE key to back to normal.
- Exit
In music playing mode, short press MENU key to choose, short press MENU key to return back to the music playing.
- File Select
In music pause mode, short press MENU key, short press PRE or NEXT key to select which you like, and then short press MENU key to confirm.
- Delete
In music pause mode, short press MENU key, short press Delete, using PRE or NEXT key to choose delete or not, and then short press MENU key to confirm.
- Delete all
In music pause mode, short press MENU key, short press Delete all, using PRE or NEXT key to choose delete or not, and then short press MENU key to confirm.
- Exit
In music pause mode, short press MENU key, short press Exit, return back to the music pause mode.
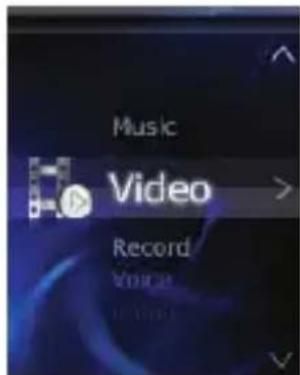
Video
- Play/Pause
Short press the PLAY key to shift between pause and play, while long press the PLAY key to turn off the player.
- Select videos
Short press PRE key to play the previous video while short press NEXT key to play the next video
- Fast rewind/Fast forward
Long press PRE or NEXT key to fast rewind or fast forward of the current video
Volume adjustment
In video playing interface short press VOL key, then press PRE or NEXT key to turn up/turn down the volume, then press MENU key to conform.
In the video pause mode, press MENU key key, there is:
- File Select
Press MENU key to choose the file, which you like to.
Repeat
there is Normal, Repeat One, Repeat all, press MENU key to confirm.
- Delete
Short press MENU key, using PRE or NEXT key to choose delete or not, and then short press MENU key to confirm.
- Delete all
Short press MENU key, short press Delete all, using PRE or NEXT key to choose delete or not, and then short press MENU key to confirm.
- Exit
Short press MENU key, short press Exit, return back to the music pause mode.
Record
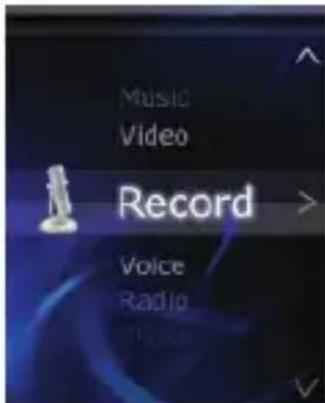
- Enter into Record
Choose "Record" at the main interface, press MENU key to enter.
- Start/Pause Recording
Short press PLAY key to start or pause recording.
- Saving record files
After voice recording, long press MENU key, then the voice files will start saving. And it saves in the Voice menu.
REC type
In the record pause mode, short press MENU key to choose REC type: Long REC, Fine REC
- Exit
In record pause mode, short press MENU key, short press Exit, return back to the record pause

MANUAL DELIUSARIA
mode.
Voice

- Enter into Record
Choose "Voice" at the main interface, press MENU key to enter.
- Play/Pause
Short press PLAY key to shift between pause and play, while long press the PLAY key to turn the player off.
- Select Voice
Short press PRE key to play the previous voice while short press the NEXT key to play the next voice
Equalizer
In the voice playing mode, short press MENU key to choose. there is Natural, Pop, Rock, Classic, Jazz, Soft, DBB.
Repeat
In the voice playing mode, short press MENU key to choose, there is Normal, Repeat One, Repeat All.
- Exit
In voice playing mode, short press MENU key to choose, short press NEXT key to return back to the voice playing.
- File Select
In voice pause mode, short press MENU key, short press PRE or NEXT key to select which you like, and then short press MENU key to confirm.
- Delete
In voice pause mode, short press MENU key, short press Delete, using PRE or NEXT key to choose delete or not, and then short press MENU key to confirm.
- Delete all
In voice pause mode, short press MENU key, short press Delete all, using PRE or NEXT key to choose delete or not, and then short press MENU key to confirm.
- Exit
In voice pause mode, short press MENU key, short press Exit, return back to the voice pause mode.
Radio
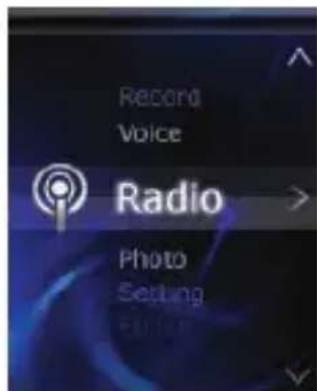
- Listen to the Radio (To realize this function earphone must be required to plug into the player): Selecting "Radio" at the main MENU, and press MENU key to enter to submenu interface of Radio.
- Auto Search
Short press MENU key, choosing Auto Search, it will be search automatically.
Save
After Auto searching, short press MENU key, and then choose Save, short press MENU key, and then save the auto channels.
- Delete
Short press MENU key to delete the chosen channel. - Delete all
Short press MENU key to delete all the saved channels.
- Record
Short press MENU key to record FM program, long press MENU key, it will be saved by itself, you can listen it in the Voice menu..
- Exit
Short press MENU key, it will return back to Radio channel.
Photo
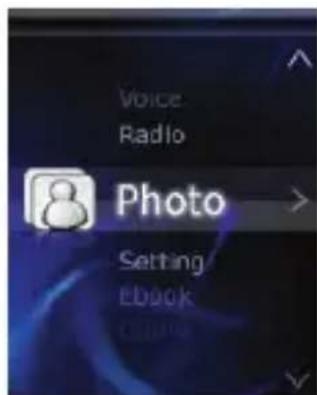
- File Select
Short press PRE key to play the previous picture file while short press NEXT key to play the next one
- Play set
Short press MENU key, there is Manual play and Auto play.
- Tempo rate
Short press MENU key, using PRE or NEXT key key to choose the time, and then press MENU key to confirm.
- Delete
Short press MENU key, using PRE or NEXT key to choose delete or not. Press MENU key to confirm.
- Delete all
Short press MENU key, using PRE or NEXT key to choose delete or not. Press MENU key to confirm.
- Exit
Short press MENU key, it will return back to the picture.
Setting
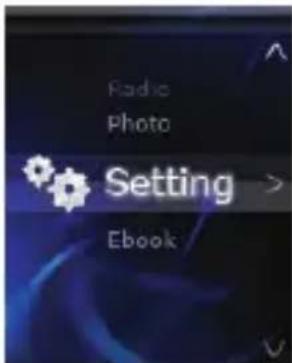
Short press MENU key, you will see"
- LCD set
Using PRE or NEXT key to choose the black level. Press Menu key to confirm.
Language
Short press MENU key to select the language, which do you want.
Power off
Using PRE or NEXT key to choose the time, and then short press MENU key to confirm.
- Memory info
It shows the present SD card.
- Exit
Short press MENU key, it will return back the main menu.
E-book


MANUAL DELIUSARIA
- File Select
Press MENU key enter to E-book, then select passage which you want to read. Press PRE or NEXT key turn to next passage.
- Play set
Short press MENU key, there is Manual play or Auto play.
- Tempo rate
Using the PRE or NEXT key to choose the tempo rate, then press MENU key to confirm.
- Exit
Short press MENU key to return back to the E-book reading.
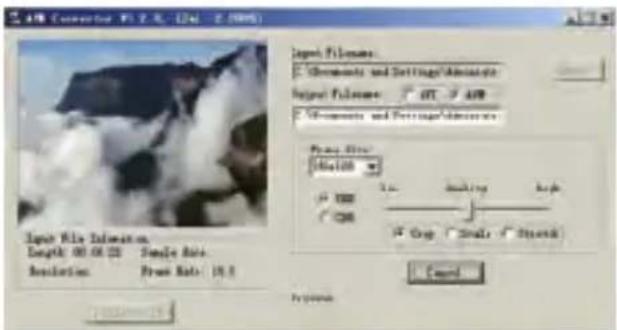
Video Conversion
Video formats can be converted via the Video Convert Tool.
- Open the installed tool to set up.
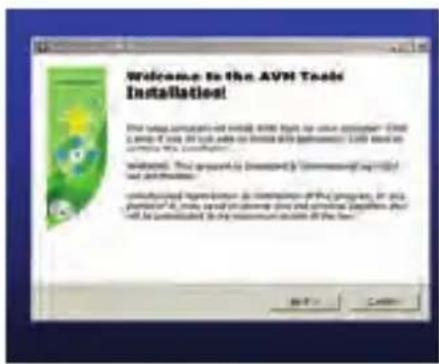
- Click "Start"----"Program"----"AVM Tools", open it.
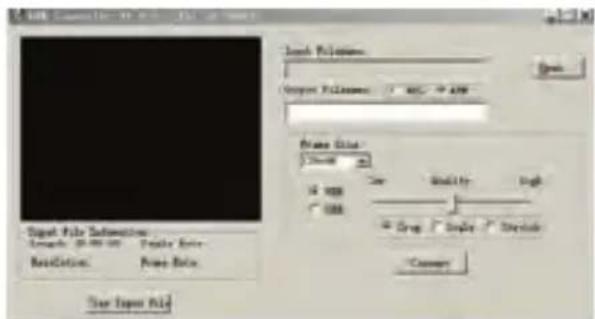
- Choose the video, which you want to convert. Click "Open", and choose "Frame size" is "160*128"
- It shows finished, as attached:
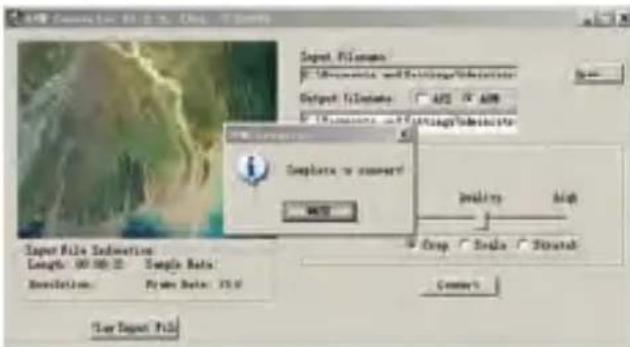
- When conversion progression reaches to 100% , it will hint conversion completion, which indicates that video conversion is successful.
Firmware Upgrade
If there is a new version of the firmware available at our website, the firmware can be updated via the following steps:
- Open Developer Tool "Upgrade tooling", choose "Add files".
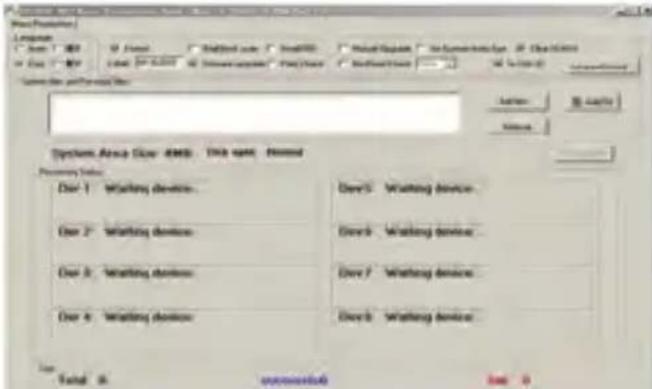
-
Click "Open" and find target file path, then add Upgrade. Choose two firmware both to upgrade.
-
After choosing ready, Connect with PC, it will upgrade automatically. When "Firmware upgraded done" has shown at interface, it means the completion of upgrading.
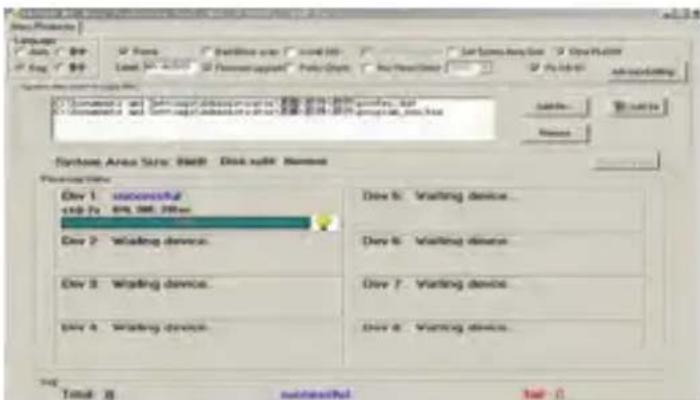
- From the escape out of "Exit", and withdraw USB from PC normally.
Troubleshooting
| The player couldn't be turned on | 1. Check whether the battery is used up;2. Check whether the player has been turned on;3. Firmware is damaged, please update the procedure of player;4. Check whether the power key is opened. If not, move it to ON position. |
| The earphone is not working | 1. Check the volume is not in “0” state and the check the connection of earphone;2. Check whether the earphone is clean; |
| 3. Check whether the file is integral, the damaged file would cause noises. | |
| Unable to upload/download file or no disk could be found on PC | 1. Check whether the procedure is damaged, please reinstall the drive;2. Check whether the connection of USB cable is in good condition. |
| The player is often frozen | Check whether the procedure has been damaged and reinstall it, if necessary. |
Technical Specifications
| Items Specifications | ||
| Size | 9.45MM*40.15MM*85.5MM | |
| Display 1.8 inches TFT screen | ||
| USB transfer USB2.0 | ||
| Power supply Polymer lithium battery | ||
| Support formats | MP3 | MP3, WMA, WAV |
| Video | AVI, AVM | |
| Photo | JPG, BMP | |
| E-book | TXT | |
| Operating System Windows XP | ME/2000/WIN7/VISTA | |
| Working temperature 0℃—40℃ | ||
ZIPWARRANTY CONDITIONS.
For information about security, compliance, recycling, information in other languages or other important information regarding your Zipy, refer to the manual accompanying the device or go to www.zipylife.com.
The warranty for this Zipy device is granted by Accesorios Inteligentes Digital S.A. (AID), however if this equipment has been sold by AID to one of its official distributors, it will be from each one of those in the country concerned which takes charge of covering this limited warranty, being included in the text as us.
The warranty of this Zipy device covers operational defects, provided that such defects are not due to negligence or exclusive fault of the user in operating the device. Materials and workmanship under conditions of normal use for two years from the date of first purchase will be covered. During the first year, if an abnormality occurs in the device and you follow the instructions for its return, at our discretion insofar as permitted by law, we will repair the device using new or reconditioned parts, replace the device with a new or a reconditioned equivalent to the device replaced, or completely or partially reimburse you the purchase price of the device. During the second year, the user must demonstrate that the failure of the device comes from a manufacturing defect. This limited warranty applies insofar as permitted by law to any spare repair or replacement of the device for the remainder of the original warranty period or for ninety days, whichever is more extensive. This warranty applies only to hardware components of the device which have not suffered external damage, such as those mentioned above. Any accessories or consumables are excluded.
For specific instructions on how to obtain this warranty service, go to: www.zipylife.com provided that it complies with the following:
-
The product has been used only in normal use for which it was intended.
-
It has not been opened, manipulated or altered by anyone outside the official technical service.
-
It has not been damaged by impacts, flood, overheating, electrical overload or any other circumstances showing a possible cause for CANCELLATION of the warranty as stated in the precautions of the manual of the device.
-
The product is to be returned to AID, protected with adequate packaging and with proof of purchase which clearly indicates the brand and type of product, the date of sale, the name and address of the dealer and the reason for the failure. For more information on shipping instructions and use of the warranty, see www.zipylife.com .
-
Before sending your device to the official technical service, you are responsible for making a backup copy of the data, software or other material that can be stored on your device, since it is possible that it will be reformatted and this information will be lost. AID guarantees the absolute confidentiality of data, but is not responsible for their loss nor will it be taken into account in the physical repair of the device.
Any of the following circumstances voids this warranty:
-
Breakage of ports (USB, headphone jack, etc.), screen or glass.
-
Loss of fluid on the screen.
-
Wear, with obvious signs of improper handling, misuse, abuse, impacts, falls, dirt, etc.
-
AID does not cover incorrect configuration or installation of software/hardware by the customer, component or peripheral, including its drivers.
-
The legislation on guarantees establishes some limitations. "The warranty does not cover additional components such as batteries, whose life is limited and conditioned
by use and recharging." These components are guaranteed for 6 months.
- The waterproof bags have a trial period of 48 hours, as indicated on the product itself, so the time after that is not covered by any warranty.
- End users will not need to send us the accessories of the equipment, especially if they are not originals, as we are not responsible for them.
Limitations:
To the extent permitted by law in each (states in the US), the warranty and rights set forth above are exclusive and replace all other warranties and rights, always with respect to the minimum requirements established by the law of each (states in the US), these being the minimum respected in any case, excluding warranties for hidden or latent defects. If we cannot legally exclude the warranties established by law or implied warranties, then insofar as permitted by law, such warranties are limited in duration to the duration of this limited warranty and to the repair or replacement service.
Some jurisdictions do not allow limitations on the duration of implied legal warranties, it is therefore possible that the above limitation does not apply in your case. We are not responsible for direct, special, or occasional damages, or those arising from breach of warranty or under any other legal theory. In some jurisdictions, the above limitation does not apply to claims for compensation for death or personal injury, or any legal liability for intentional acts or gross negligence and/or omissions, so the limitation may not apply in your case.
This limited warranty gives you specific legal rights. To the extent that it is not possible to waive those rights under applicable law in each country (states in the US), this limited warranty will not affect your rights.
To contact the technical service nearest you, inquire at: www.zipylife.com
DECLARATION OF CONFORMITY
ACCESORIOS INTELIGENTES DIGITAL S.A.
C/CARPINTEROS,6, OF-13 VILLAVICIOSA DE ODON. 28670 MADRID
We hereby declare, under our exclusive responsibility, our conformity with the product:
MP4 - LEOPARD by ZIPY, manufactured in China
To which this declaration refers with the following directives:
EN55022:2010
EN55024:2010
EN61000-3-2:2006+A1:2009+A2:2009
EN61000-3-3:2008
In compliance with the resolutions of the Directive 99/05/CE, of the European Parliament and the March 9th 1999 Council, included in the Spanish law system by El Real decreto 1890/2000, November 20th.
Issue location and date
23nd May 2012
Signed by: Miguel Fauro

ZiPy
MANUAL DEL USUARIA

Waste management for all of your containers and domestic packagings that you deposit in the recycling bin
The packaging contains removable materials in order to treat them later in waste management
Do not deposit the device or the battery in the bin. Please, put it in a recycling bin or carry it to your local nearby store
Deposit the packaging materials in the yellow bin
This device conforms to the EU directives
This unit conforms to the ROHS regulations
Symbol of frequency restriction in some countries of European Union
- CONDITIONS de GARANTIES RELATIVES AU ZIPY.
- Precautions
- Functions Overview
- Appearance of the player
- Basic Operation
- Connect and files transmission:
- Main Menu
- Music
- - Play/Pause
- - Select songs
- - Fast rewind/Fast forward
- Volume adjustment
- Equalizer
- Repeat
- Replay
- - Exit
- - File Select
- - Delete
- - Delete all
- Video
- - Select videos
- Record
- Radio
- - Record
- Photo
- - Play set
- - Tempo rate
- Setting
- - LCD set
- Language
- Power off
- - Memory info
- E-book
- Video Conversion
- Firmware Upgrade
- Troubleshooting
- ZIPWARRANTY CONDITIONS.
- Limitations:
- ZiPy
- MANUAL DEL USUARIA
Brand : Zipy
Model : Leopard
Category : Mp3 player