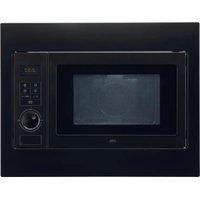
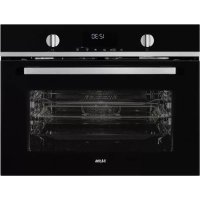
SM120RVS - Microwave Oven ETNA - Free user manual and instructions
Find the device manual for free SM120RVS ETNA in PDF.

Frequently Asked Questions - SM120RVS ETNA
User questions about SM120RVS ETNA
0 question about this device. Answer the ones you know or ask your own.
Ask a new question about this device
Download the instructions for your Microwave Oven in PDF format for free! Find your manual SM120RVS - ETNA and take your electronic device back in hand. On this page are published all the documents necessary for the use of your device. SM120RVS by ETNA.
USER MANUAL SM120RVS ETNA
The appliance identificati on card is located on the inside of the appliance.
When contacting the service department,
have the complete type number to hand.
You will find the addresses and phone numbers of the service organisation on the guarantee card.

GEBRUIKSAANWIJZING
MODE D'EMPLOI
BEDIENUNGSANLEITUNG
INSTRUCTIONS FOR USE
MAGNETRON
SM120RVS
MICROWAVE OVEN
FOUR MICROONDES
MIKROWELLENHERD
NL
Handleiding 3-25
FR
How the microwave oven works 12
Operation
Cooking 13
Childproof lock 17
Cooking tips 18
Maintenance
General 21
Faults
What to do if... 22
Installation
General 23
Placement 24
Appendix
Disposal of packaging and appliance 26
Cooking with your new microwave oven is safe and relaxing. You can have the tastiest dishes on the table in no time at all. The appliance is extremely easy to use, partly thanks to the automatic cooking and defrosting programmes.
You will find information about the installation, safety, operation and maintenance of your appliance in this instruction manual.
Read the manual thoroughly before using the appliance, and store these instructions in a safe place for future reference.
Furthermore, this manual is required for the mechanic service.
Therefore apply the enclosed information sticker in the intended frame at the back of this manual. This sticker contains all information the mechanic service needs to answer your questions adequately.
Happy cooking!
Used icons


Important
Tip
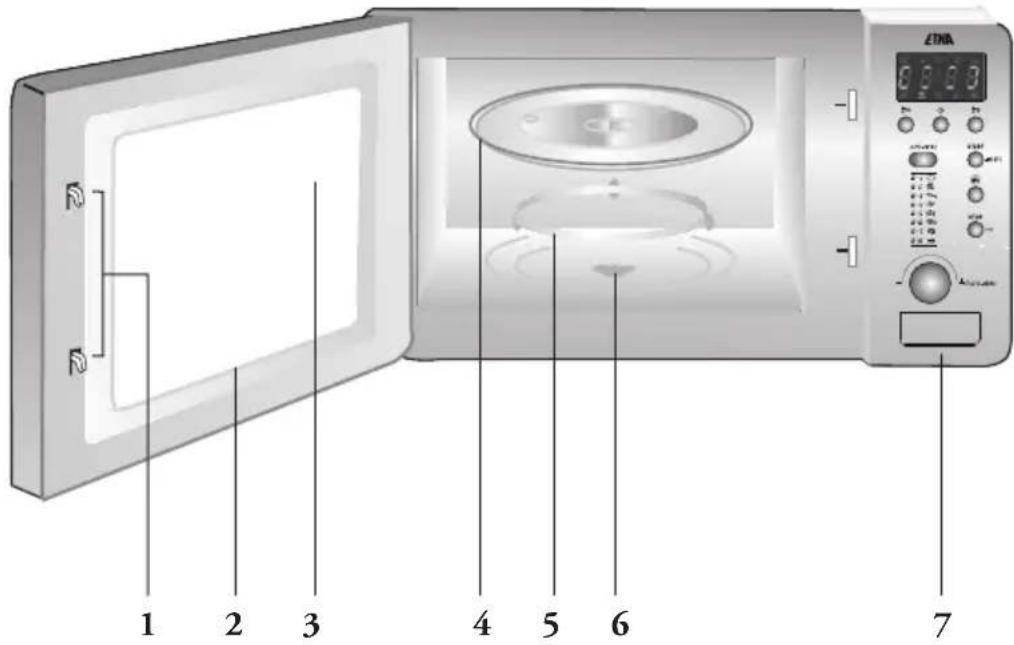
- Door lock
- Door
- Window
- Glass turntable
- Roller stay / Turntable support
- Turntable shaft
- Control panel
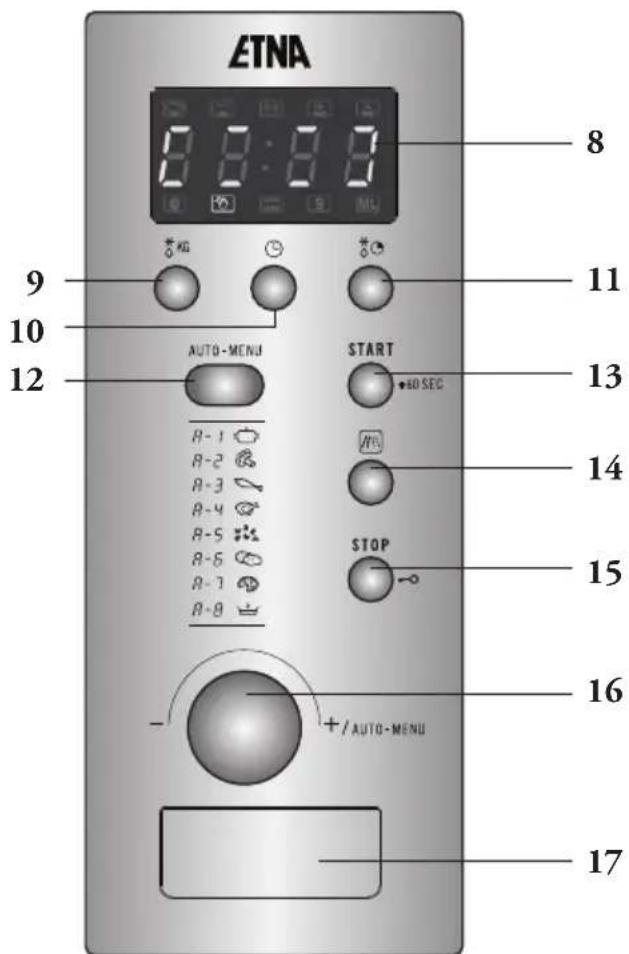
- Display
- Automatic defrost (weight)
- Clock
- Automatic defrost (time)
- Auto-menu
- Quick start
- Microwave
- Stop /clear
- Control knob
- Door release
Do not use the microwave oven without the turntable and the rollerstay. The turntable must be placed on the driving mechanism with the indentation for the driving mechanism downwards.
Be aware of the safety instructions listed below to reduce the risk of fire, electric shock, injury to persons and exposure to excessive microwave energy.
Keep the appliance clean, this will extend the lifetime of your microwave oven and prevent hazardous situations.
Th is microwave oven is designed for domestic use, and is not intended for industrial use, laboratory use, or use in the hotel and catering industry. Use this application exclusively for preparing meals. All other uses should be considered improper and dangerous. We do not accept responsibility in the event of damage due to improper, incorrect or irrational use of the appliance, these kinds of damage are not covered by the warranty.

- Precautions to avoid exposure to high voltage:
Danger! Do not disassemble this appliance. Touching internal components of this appliance can cause serious personal injury or death.
Danger! Any intervention other than cleaning and normal maintenance by the customer must be carried out by an approved service centre. For your own safety, only use the accessories and spare parts from the manufacturer which are suitable for the appliance.

- Precautions to avoid exposure to excessive microwave energy:
Caution! Your microwave oven is only safe if the door closes properly.
Caution! Never place an object in the door opening of the oven.
Caution! Do not use the microwave oven if there is any damage to the door (bent), the hinges and catch (defective or loose) or the seal.
Caution! Make sure that the door and seal are always clean.

- Warning! Microwave heating of liquids (such as water) can result in delayed eruptive boiling. Th is means that liquid starts boiling without you seeing any movement. Once removed from the oven, the liquid can start to boil rapidly and spatter out of the cup with the risk of injury. The effect of eruptive boiling can be eliminated by placing a plastic / glass spoon in the fluid before cooking it in the microwave oven.
- Warning! Only connect the device to an AC power supply, from a grounded socket, with a mains voltage as specified on the type plate of the device.
- Warning! Be sure to disconnect the microwave oven from the power supply before cleaning or repairing the appliance, preferably by removing the plug from the socket or turn the switch in the meter cupboard to zero.
- Warning! Do not use the microwave oven when the plug, the power cord or the appliance itself is damaged or when the appliance is not working properly (anymore).
- Warning! Children are not aware of the dangers that can arise when operating electrical equipment. For this reason do not allow children to use the microwave oven. Place the appliance outside of children's reach.
- Warning! Take care with baby food and jars:
Caution! The contents of feeding bottles and baby food jars must be stirred or shaken after heating.
Caution! Carefully check the temperature of the contents before consumption, in order to avoid burns. - Warning! Liquids and other foods in sealed containers may only be heated after making little holes in the seal, since the containers are liable to explode otherwise.

- Warning! Be careful with water near the appliance. Do not store or use this appliance outdoors, in damp rooms or near a water tap. Do not touch the appliance with wet hands.
- Warning! Utensils can be hot after use in the microwave oven!
- Caution! Only use utensils and dishes suitable for use in the microwave oven. Take care with dishes with metallic decorations.
Caution! Remove metallic twist-ties from paper or plastic containers/bags before placing them in the microwave oven. - Caution! Do not use the microwave oven when empty. The appliance cannot dissipate its energy and can get damaged.
- Caution! Never leave the appliance unattended when in use.
- Caution! Keep cord away from heated surface.
- Caution! Do not cover any vents on the oven.
- Caution! The appliance is not intended for use by persons (including children) with reduced physical, sensory or mental capabilities, or lack of experience and knowledge, unless they have been given supervision or instruction concerning use of the appliance by a person responsible for their safety.
- Caution! Only use the microwave oven for defrosting and cooking food and not, for example, for drying clothes or paper. Th es e can catch fire.
- Caution! If smoke or fire is observed:
Switch off or unplug the appliance.
o Keep the oven door closed in order to stiff e any fl ames.
o Remove the plug from the socket. - Caution! Do not use chemicals in this appliance.
- Caution! Do not use the oven cavity for storage purposes.
- Caution! Install the microwave oven according to the instructions.

- Caution! Never unplug the appliance from the socket by pulling on the cable.
- Caution! Avoid touching warm surfaces, especially on the outside of the microwave oven when it is operating.
- Caution! If the device does not work after it has been switched on, then a fuse may have been blown or the residual current device in the meter cabinet has been disabled. The relevant group may have been overloaded or the device that was installed is defective.
- Caution! If you decide to discontinue using the device, on account of a fault, we advise you to cut the cord after you have pulled the plug out of the socket. Take the device to the relevant municipal waste disposal unit.
Before you begin
- Open the door and remove the packaging material. Do not install the microwave oven when it is damaged, but contact the manufacturer.
- Remove the protection foil from the outside of the microwave oven.
- Clean the inside of the oven and the accessories with a damp cloth. Do not use abrasive cleaners or any strongly smelling detergents.
- Place the roller stay in the middle of the microwave oven. The turntable must be placed on the driving mechanism with the indentation for the driving mechanism downwards.
- Check if the microwave oven is working correctly. Put a glass of water inside the oven space. Switch the microwave oven on for 1 minute on its highest setting (press the start button START).
After 1 minute, the water should be hot.
Setting the clock
The clock will work as long as the oven is connected to the mains. If the time has not been set, the display will show '0:00'.
Setting the clock
- Press button. In the display the hour figure will flash.
- Turn the control knob to set the hours.
- Press button again. In the display the minute figure will flash.
- Turn the control knob to set the minutes.
- Press button again to confirm the setting. The clock is set and the ':' will flash.
Do's and don'ts
The door may be opened when the microwave oven is switched on; press button STOP, the microwave oven switches off and the cooking stops. Open the door. After closing the door, press the start button START to start the cooking again.


The microwave oven is not suitable for:
preserving food;
heating oil for deep-fat frying;
- boiling eggs in their shells, these are liable to explode (even after the microwave oven is switched off).
Not all materials are suitable for use in the microwave oven. The table below shows which materials you can use and which you cannot.
- Warning! Only use utensils and dishes suitable for use in the microwave oven. Take care with dishes with metallic decorations.
Caution! Remove metallic twist-ties from paper or plastic containers and bags before placing them in the microwave oven.
| Material Permitted | |
| Paper | Yes |
| Aluminium foil Yes | |
| Cling fi lm Yes | |
| Aluminium trays No | |
| Freezer / microwave dishes Yes | |
| Heat-resistant plastic | Yes |
| Unglazed pottery | No |
| Glazed pottery | Yes |
| Metal cooking utensils | No |
| Normal glass | Yes |
| Pyrex and other ovenproof glass and ceramics | Yes |
| Dishes with metallic decoration | No |
| Metallic twist-ties | No |
| Mercury thermometer | No |
| Sealed pots | No |
| Bottle with narrow neck | No |
| Roasting bags | Yes |
How the microwave oven works
A microwave oven is a cooking appliance that uses microwaves to heat food. Microwaves are electromagnetic waves, just like radio and television waves. A radio converts these waves into sound, whereas a microwave oven converts them into heat.
The heat arises because the microwaves cause water and fat molecules, that are always present in food, to move quickly. The molecules slide past each other quickly and friction occurs. This friction causes heat (try rubbing your hands together quickly).
The microwave oven heats food very intensively, because the microwaves penetrate the food directly. The waves do not just heat the outside of the food, as in traditional methods of cooking, but get right inside the food. Compared to conventional methods of cooking, with small quantities, the cooking time is much shorter.
Microwave power levels
You can see from the table below from which five power levels you can choose and for which foods the power levels are suitable.
| Power level Display Food | |
| High P 100 - Boiling water, reheating - Cooking chicken, fi sh, vegetables | |
| Medium-high P 80 - Reheating - Cooking mushrooms, shellfi sh - Cooking dishes containing eggs and cheese | |
| Medium P 50 - Cooking rice, soup | |
| Medium-low P 30 - Defrosting - Melting chocolate and butter | |
| Low P 10 - Defrosting sensitive/delicate foods - Defrosting irregularly-shaped foods - Softening ice cream - Allowing dough to rise | |
Cooking

- Warning! Microwave heating of liquids (such as water) can result in delayed eruptive boiling. This means that liquid starts boiling without you seeing any movement. Once removed from the oven, the liquid can start to boil rapidly and spatter out of the cup with the risk of injury. The effect of eruptive boiling can be eliminated by placing a plastic / glass spoon in the fluid before cooking it in the microwave oven.
- Warning! Take care with baby food and jars:
Caution! The contents of feeding bottles and baby food jars must be stirred or shaken after heating.
Caution! Carefully check the temperature of the contents before consumption, in order to avoid burns. - Warning! Utensils can be hot after use in the microwave oven!
The step quantities for adjusting the time are as follow:
| Adjust 0 - 1 min. | |||||
| Step | 5 sec. | 10 sec. | 30 sec. | 1 min. | 5 min. |
Example
You want to use 80% microwave power to cook for 20 minutes.
- Press button
In the display P100 will fl ash. - Turn the control knob until 'P 80' appears in the display.
- Press button again to confirm the setting. The power is set to P80
- Turn the control knob until '20:00' appears in the display.
- Press the start button START to start the cooking or press button STOP to cancel the setting.
Note
See pages 18, 19 and 20 for cooking tips and information about food.
Quick start
With just one press on the start button START you can cook for 1 minute on maximum power. By pressing the start button repeatedly you can increase the cooking time in steps of 1 minute.
Defrosting by weight
- Press buttons.
The display shows 'dEF1'. - Turn the control knob to set the weight.
The display shows the weight in grams and a 'g'. - Press the start button START to start defrosting.
Defrosting by time
- Press button . The display shows 'DEF2'.
- Turn the control knob to set the time.
- Press the start button START to start defrosting.
Inquiring function
- In states of microwave cooking, press button the current power will be displayed for 4 seconds.
- In cooking state, press button ⑨ to display the time and the time will flash for 4 seconds.
Multi-section cooking
At most 3 sections can be set for cooking. In multi-section cooking, if one section is defrosting, the item that needs to be defrosted must be placed in the first section.
Example
You want to use 20 minutes of 100% microwave power and after that 5 minutes of 80% microwave power to cook.
- Press button.
The display shows 'P 100'. -
Press button to confirm the setting. The power is set to P100 .
-
Turn the control knob until '20:00' appears in the display.
- Press button again. In the display 'P 100' will blink.
- Turn the control knob until 'P 80' appears in the display.
- Press button again to confirm the setting. The power is set to P80 .
- Turn the control knob until '5:00' appears in the display.
- Press the start button START to start cooking or press button STOP to cancel the setting.
Programme set in advance

- Set the clock first (see page 10).
- Input the cooking programme. Three stages can be set at most. Defrosting should always be set as the first stage, if it is included in the multi-level programme.
Attention: do NOT press the start button START after setting the cooking programme.
- Press button. In the display the hour figure will flash.
- Turn the control knob to set the hours.
- Press button again. In the display the minute figure will flash.
- Turn the control knob to set the minutes.
- Press the start button START to confirm the setting. If the door is closed and the programmed time arrives, the buzzer will ring twice and the cooking will start automatically.
Auto menu
- Press buttto-MENU
In the display A - 1 will blink.
- Turn the control knob to choose an automatic programme (A - 1 until A - 8).
- Press button AUTO-MENU to confirm the setting.
- Turn the control knob to set the weight.
The display shows the weight in grams and a g .
- Press the start button START to start cooking or press button STOP to cancel the setting.
In the table below, you can see which cooking programmes you can use and for which foods the programmes are suitable.
| Programme Function Weight Display | ||
| A - 1 Reheat 200g 200g | ||
| 400g 400 | ||
| 600g 600g | ||
| A - 2 Vegetables 200g 200g | ||
| 300g 300g | ||
| 400g 400g | ||
| A - 3 Fish 250g 250g | ||
| 350g 350g | ||
| 450g 450g | ||
| A - 4 Meat 250g 250g | ||
| 350g 350g | ||
| 450g 450g | ||
| A - 5 Pasta 50g | (with 450ml cold water) | 50g |
| 100g (with 800ml cold water) | 100g | |
| A - 6 Potato 200g 200g | ||
| 400g 400g | ||
| 600g 600g | ||
| A - 7 Pizza 200g 200g | ||
| 400g 400g | ||
| A - 8 Soup 200ml 200ml | ||
| 400ml 400ml | ||
Childproof lock
You can 'lock' your microwave oven, so it is no longer possible to start it.
Lock:
Press button STOP and keep it pressed for 3 seconds, until a long beep is heard.
The display will show a 'lock'. The time is no longer shown in the display and all the controls have been made inoperative.
Lock quitting:
Press button STOP and keep it pressed for 3 seconds, until a long beep is heard.
The display will show the time again and the microwave oven can be used normally again.
Heating and cooking


- The microwave oven always heats with the same intensity. The more you put in the microwave oven, the longer the cooking time.
- Wide, fl at dishes become hot more quickly than narrow, tall dishes.
- Covering dishes with cling fi lm or a suitable lid prevents spattering, shortens cooking time and helps maintaining humidity of the dish.
Caution! Remove the cling fi lm or lid carefully afterwards. The steam that comes off can be very hot!
- If necessary, moisten foods that quickly dehydrate. First soak potatoes and vegetables in cold water for a moment before placing them in the microwave oven. This prevents a skin forming on them.
- For uniform results, it is best to stir or turn meals once or twice.
- When reheating foods that have already been cooked before, always select the highest microwave power level.
- When cooking in a microwave oven, only small quantities of water, salt and seasoning are necessary. Best add salt after cooking. Th is prevents moisture being drawn out of the food.
-
Food continues to cook for some time after the microwave oven has been switched off. Keep this in mind, don't overcook your meals.
-
Caution! When heating small quantities of powdery products (such as when drying herbs), always place a glass of water in the microwave. Otherwise, due to the small quantity, there is a chance of spontaneous combustion.
Defrosting

- Always defrost large, dense pieces using the defrosting programme. The food will defrost gradually and evenly, you will not run the risk of the outside drying while the centre is still frozen.
- To speed up the defrosting process, it is recommended that after a while the food be divided up into smaller pieces.
-
For large pieces of meat and dense food, introduce a couple of breaks into the defrosting process.
-
When defrosting irregularly shaped food, halfway through the defrosting time you can cover or wrap the thin parts with aluminium foil.
Factors that affect the cooking process

- The temperature of the ingredients affects the cooking times. A cold meal will require a longer cooking time than a meal that is already at room temperature.
- Light, delicate foods cook more quickly than heavy, solid foods, such as stews and rolled meats. Take care when cooking light, delicate foods. The edges quickly become dry and tough.
- Small pieces of food are heated more evenly if you place them separately in the microwave, preferably in a circle.
- Bones and fat conduct heat better than meat. Covering chicken legs and wings with aluminium foil prevents burning these parts.
- Microwaves penetrate food to a depth of about 3cm . The centre of thick foods is heated as a result of heat from the heated part (the outside) spreading to the inside.
- Meat and poultry that is cooked in the microwave for more than about 15 minutes becomes lightly browned. Any food cooked for a shorter time can be rubbed beforehand with a 'browning' sauce, such as Worcestershire sauce, soya bean oil or barbecue sauce.
- Greaseproof paper prevents splattering. It also retains heat better.
Basic techniques

Arranging food
- Place thicker pieces on the edge on the turntable. Foods placed on the edge of the turntable receive the most microwaves.
Stirring
- By stirring dishes regularly you distribute the heat stored in them. Always stir from outside to inside, since the outside of the dish always becomes hot first.
Turning
- Turn large, thick foods frequently. They then cook more evenly and quickly.
Pricking
- Foods with a skin or shell, such as egg yolks, shellfish and fruit, burst in the microwave. You can prevent this by pricking them a few times with a fork or skewer beforehand.
Checking
- Foods cook quickly. You should therefore check them frequently. Take food out of the microwave just before it is done.
Standing
- Once you have taken it out of the microwave, let the food stand covered for, in general, 3 to 10 minutes. The food continues to cook. Foods that have a dry crust, such as cake, should not be covered.
Freezing
- When freezing foods, you can already allow for them being defrosted easily in the microwave by not using aluminium foil or trays and by freezing flatter portions.
Cooking vegetables

- Use fresh vegetables if possible. If the vegetables have become limp because they have been kept for too long, you can refresh them by soaking them in cold water for a little while.
- Use a large dish to cook vegetables, so the bottom of the dish is not covered by too thick a layer.
- Preferably cook vegetables with the water that clings to them.
- Always cover the dish with a lid or microwave cling fi lm.
- Do not add salt. The salts naturally present in the vegetables usually provide enough flavour. If you must add salt, do so after cooking.
- Cook vegetables for as short a time as possible. Allow for them continuing to cook after the microwave has been switched off.
- Check whether the vegetables are done by pricking them with a fork or skewer.
Cooking fi sh

Fish should be cooked gradually. With thin fish, fatty fish or small portions, therefore, set the power level to 30% . In other cases, you can safely set the power level a bit higher. Allow, however, for the food continuing to cook after the microwave has been switched off. Fish is done when the flesh has become opaque.
Keeping your appliance neat

- Clean the inside and outside of the oven regularly using soapy water and dry it thoroughly with a dry cloth. Make sure that the microwave distributor cover (inside the oven on the right) is clean. A cover which is not clean may cause sparking.
- Clean the inside immediately after use. Use a damp cloth to remove any condensation, liquid that has boiled over and food remains. Crumbs and liquid that remain behind absorb microwave energy and lengthen cooking times.
- Clean the accessories regularly; use soapy water and a brush and dry the accessories thoroughly with a dry cloth. The accessories may also be washed in a dishwasher.
- Odours will disappear if you put a glass of vinegar or water - with lemon juice added - in the oven space. Switch the microwave on for two minutes on full power. Then wipe with a damp cloth.
What to do if...
If the microwave oven does not cook as well as it should do, if there is sparking inside it, or if it does not start, etc., first try to find the reason for the problem yourself before calling the service department.
Check:
- Is the plug in the socket?
- Is the door closed properly?
- Have the power level and the cooking time been set properly?
- Are there any objects in the microwave oven which shouldn't be there?
- Are you using the correct cooking utensils?
- Are both the roller stay and the turntable in the microwave oven?
- Are the vents blocked?
- Has the food been defrosted sufficiently?
- Did you stir or turn the food during cooking?
- Is the childproof lock turned on?
Technical data
On the label on the inside of this equipment, you will find the total wattage, the required voltage and the frequency.
Technical specifications
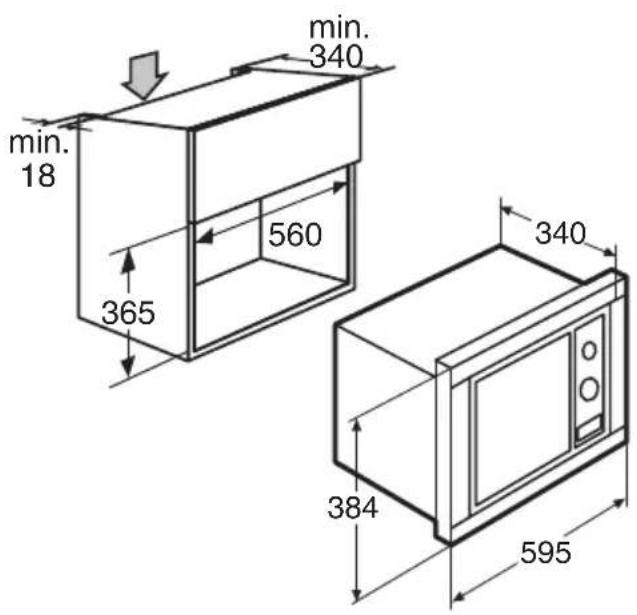
| External dimensions (wxdxh) 595 | x 340 x 384 incl. frame |
| Oven capacity 20 liter | |
| Turntable diameter 245 mm | |
| Rated Voltage 230 V / 50 Hz | |
| Rated input power 1250 W | |
| Rated output power 800 W |
Electrical connection

Th is appliance requires a mains power supply of 230V 50Hz alternating current. Th e device has a grounded power cord.
Caution! The appliance must be grounded and under no circumstances should it be connected to a direct current supply. Incorrect use could cause an electric shock.
Placement
- Danger! Do not disassemble this appliance. Touching internal components of this appliance can cause serious personal injury or death.
- Place the microwave oven on a fi rm, fl at surface.
- Make sure that there is sufficient ventilation around the microwave oven. Keep a 30~cm space free at the top. At the rear and sides keep at least 10~cm free.
- Do not cover the air vents.
Th e adjustable feet should not be removed. - Do not place the microwave oven near a heat source.
- Transmitting and receiving equipment such as radios and televisions can affect the operation of the microwave oven.
Installation dimensions
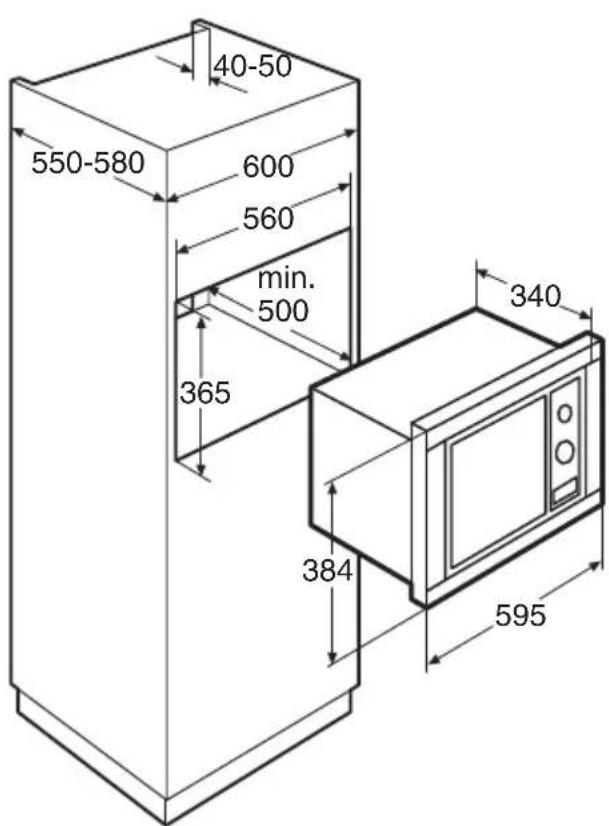
Installing
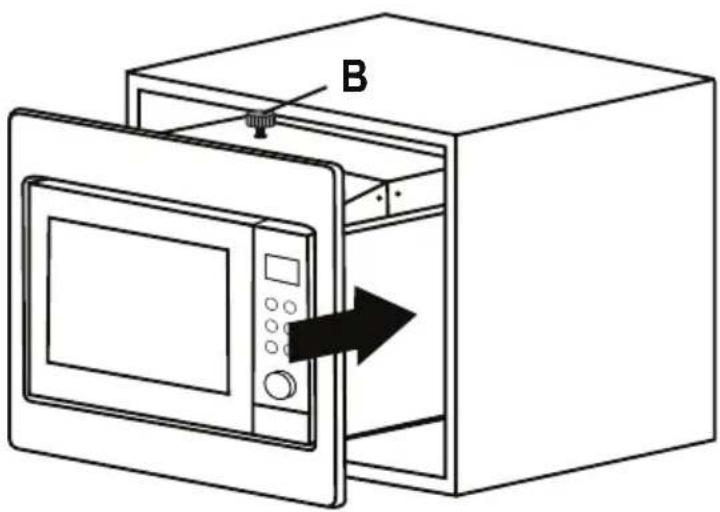
- Carefully push the microwave a little bit into the box. Turn adjusting screw B until there is 1mm left between the screw and the top of the mounting space. Now push the microwave completely into the box, making sure that it is in the centre.
- Make sure that the power cord does not get stuck.
- Open the door and screw down the microwave with the screw that was supplied.
- Finally, place the cap on top of the screw.
Disposal of packaging and appliance
In the manufacturing of this appliance durable materials were used. Make sure to dispose of this equipment responsibly at the end of its lifecycle. Ask the authorities for more information regarding this.
The appliance packaging is recyclable. The following may have been used:
cardboard;
polythene fi lm (PE);
CFC-free polystyrene (PS hard foam).
Dispose of these materials in a responsible manner and in accordance with government regulations.
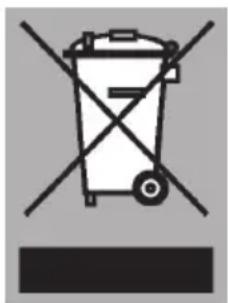
As a reminder of the need to dispose of household appliances separately, the product is marked with the symbol of a crossed-out wheeled dustbin. This means that at the end of its working life, the product must not be disposed of as urban waste. It must be taken to a special local authority differentiated waste collection centre or to a dealer providing this service.
Disposing of a household appliance separately avoids possible negative consequences for the environment and health deriving from inappropriate disposal and enables the constituent materials to be recovered to obtain signifi cant savings in energy and resources.