
SM344RVS - Microwave Oven ETNA - Free user manual and instructions
Find the device manual for free SM344RVS ETNA in PDF.

| Brand | ETNA |
| Model | SM344RVS |
| Product type | Microwave oven |
| Appliance dimensions (W x D x H) | 595 x 565 x 455 mm |
| Interior dimensions (W x D x H) | 560 x 550 x 450 mm |
| Capacity | 44 liters |
| Turntable diameter | 360 mm |
| Power supply | 230 V / 50 Hz |
| Connected power | 1650 W |
| Microwave power | 950 W (5 levels: 100, 300, 450, 700, 950 W) |
| Automatic cooking programs | 8 programs (P01-P08) |
| Automatic defrost programs | 2 programs (d01-d02) |
| Main functions | Microwave, automatic programs, defrost, timer, clock, child lock |
| Display | Digital with clock and indicators |
| Door material | Glass |
| Included accessories | Round wire shelf, turntable with drive |
| Control type | Rotary knobs and touch keys |
| Child lock | Lock by dedicated key |
| Auto shut-off | After 5 minutes of inactivity |
| Care and cleaning | Damp cloth and dish soap; avoid abrasive products and steam cleaners |
| Energy class (estimated) | Not specified |
| Repairability | Spare parts available via after-sales service |
| Weight (estimated) | Approximately 25 kg |
Frequently Asked Questions - SM344RVS ETNA
User questions about SM344RVS ETNA
0 question about this device. Answer the ones you know or ask your own.
Ask a new question about this device
Download the instructions for your Microwave Oven in PDF format for free! Find your manual SM344RVS - ETNA and take your electronic device back in hand. On this page are published all the documents necessary for the use of your device. SM344RVS by ETNA.
USER MANUAL SM344RVS ETNA
The appliance identifi cation card is located on the inside of the appliance.
When contacting the service department,
have the complete type number to hand.
You will find the addresses and phone numbers of the service organisation on the guarantee card.
natural_image
Two technical diagrams showing a circular component with internal structure and a small mechanical component (no text or symbols)natural_image
Symbol of a trash bin with crossed lines indicating no waste or discharge (no text or numbers present)| Introduction | 4 | |
| Control panel 5 | ||
| Description of the appliance 6 |
Before use
| Before first use 7Setting the clock 7Using the microwave 8 |
Use
| General | 10 | |
| Microwave settings 11 | ||
| Operation | 12 | |
| Automatic cooking programs 13 | ||
| Child lock 14 | ||
| Pause | 15 |
Cooking tips
| Warming up and cooking 16DefrostingFactors that influence the cooking process 17Basic techniques 18Cooking vegetables 19Cooking fish 19 | 16 |
Maintenance
| Keeping your appliance in good condition 20 | ||
| Faults | What should I do, if... | 21 |
Technical specifications
| Product specifications | 22 |
| Your oven and the environment | |
| Disposal of the appliance and packaging | 23 |
Introduction
Cooking in your new microwave is safe and comfortable. It takes just a few moments to create the most delicious dishes. The automatic cooking and defrost programs help make the appliance simple to operate.
This manual contains information about your microwave's installation, safety, operation and maintenance.

Please read the separate safety instructions carefully before using the appliance!
Read this manual before using the appliance and keep it in a safe place for future use.
Installation instructions are supplied separately.
Control panel
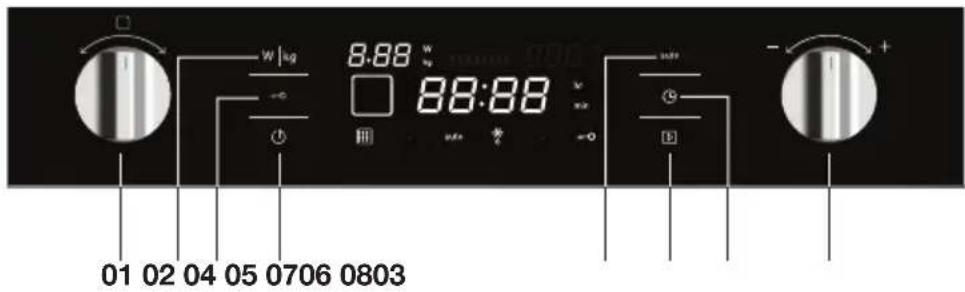
- Function dial
- Power/weight button
- Child lock
- On/Off button
- Auto menu button
- Start/Pause button
- Clock button
- Selection dial
Description of the appliance
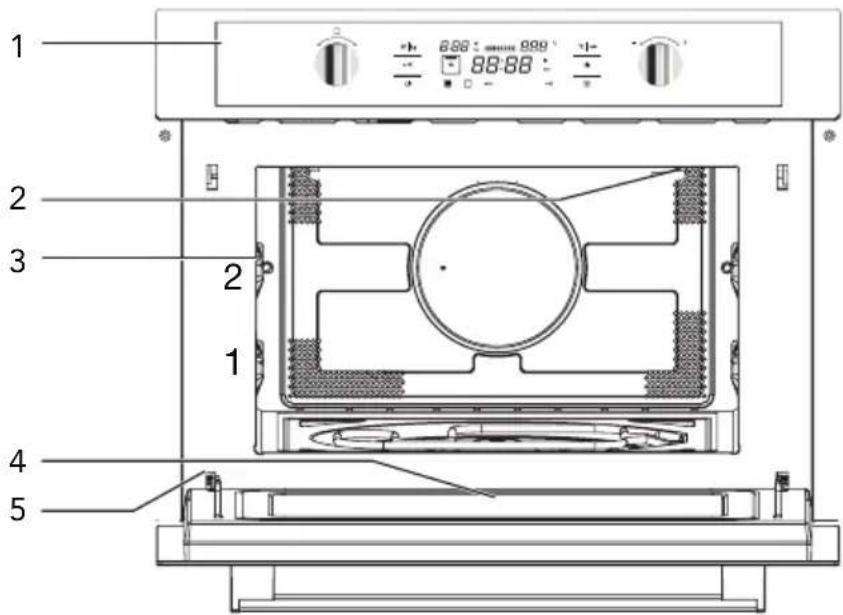
- Control panel
- Lighting
- Shelf levels
- Glass window microwave door
- Door hinge
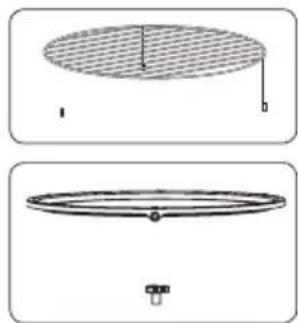
The following accessories are supplied with your oven:
natural_image
Two technical diagrams showing a circular component with internal structure and a small mechanical component (no text or symbols)- Round grille; is used mainly for oven functions. To be used for baking dishes.
- Turntable with drive shaft; Never use the microwave without the turntable. To be used to heat up and defrost dishes.
Before first use
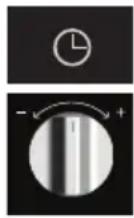
Setting the clock


- Open the door, remove the packaging and check the microwave for damage.
- Do not use the microwave if it is damaged, but contact your supplier.
- Remove the protective film from the casing.
- Clean the oven interior and accessories with a damp cloth. Do not use any abrasive cleaner or strong-smelling cleaning products.
- Place the turntable in the centre of the oven cavity with the opening for the drive shaft facing downwards. The microwave may not be used without the turntable.
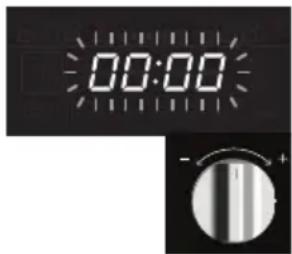
When the appliance is connected to the network for the first time, you need to set the time. '00:00' flashes in the display. The clock runs as long as the microwave is connected to the network.
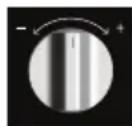
- Turn the selection dial to set the current time (between 00:00 and 23:59).
After setting you will hear a beep and the time display will stop flashing. The clock has been set.
Remarks
- If you wish to reset the time at a later stage, you must first press and hold the clock button for a few seconds. The current time will disappear and the time display will then start to flash.
- Turn the selection dial to set the new time and press the clock button again to confirm.
If you do not wish to see the time in the display, press the clock button briefly. The time display will disappear. Press the clock button briefly again to display the time again.
Using the microwave
Microwaves are high-frequency electromagnetic waves. The energy makes it possible to cook or warm up a dish without affecting the form or colour.
Cooking principle
- The microwaves which the microwave generates are spread evenly by a distribution system. This cooks the dish evenly.
- The food absorbs the microwaves to a depth of approximately 2.5 cm. Cooking then continues, because the heat is spread in the dish.
- The cooking times vary and depend on the dish you use and the properties of the food:
▶Quantity and density
▶Moisture content
▶Starting temperature (whether or not it is cooled)
Important
The dish is cooked from the inside out by means of heat distribution.
The cooking continues even when you take the dish from the oven.
Standing times in recipes and in this book should therefore be adhered to, in order to ensure:
• Even heating into the middle of the dish;
• Equal temperatures in all parts of the dish.
Guidelines for microwave cookware
Cookware that you use for the microwave function should not block the microwaves. Metals such as stainless steel, aluminium and copper reflect microwaves. For that reason, do not use metal cookware.
Cookware which is designated as microwave-safe can be used safely. For more information about suitable cookware, consult the following guidelines and always use the glass baking tray on level 1 if you use the microwave function.

| Cookware | Microwave safe | Remarks |
| Aluminium foil | √X | Can be used in small quantities to prevent certain parts of the food from overcooking. Arcing can occur if the foil is too close to the oven wall or if too much foil is used. |
| Porcelain and earthenware | √ | Porcelain, earthenware, glazed earthenware and ivory porcelain are usually suitable, unless they have a metal edge. |
| Disposable crockery made from polyester or cardboard | √ | Frozen meals are sometimes packaged in disposable tableware. |
| Fast food packaging• Polystyrene cups• Paper bags or newspaper• Recycled paper or metal edges | √ | Can be used to warm up food.Polystyrene can melt if it overheats.Can catch fi re.Can cause arcing. |
| Glassware• Oven dishes• Fine glassware• Glass jars | √ | Can be used, unless it has a metal edge.Can be used to warm up food or liquids. Thin glass can break or shatter with sudden heating.The lid must be removed. Only suitable for warming. |
| Metal | X | Can cause arcing or fi re. |
| Paper• Plates, cups, kitchen paper• Recycled paper | √ | For short cooking times and warming. For absorbing excess moisture.Can cause arcing. |
| Plastic | √ | Especially heat-resistant thermoplastic material. Other types of plastic can warp or discolour at high temperatures.Do not use melamine plastic. Can be used to hold moisture.May not touch the food. Be careful when you remove the fi lm; hot steam can escape. Only if boil-proof or ovenproof. Must not be airtight. If necessary, prick it with a fork. |
√ : Recommended
√X : Careful
X : Unsafe
General
Microwave power
In the table below you will see which of the microwave power settings you can use and for which dishes these power settings are suitable. It is possible to alter the power during use by pressing the appropriate button.
| Power output Food | |
| 950 W - Boiling water, warming up- Cooking chicken, fish and vegetables | |
| 700 W - Warming up- Cooking mushrooms and seafood- Cooking dishes containing egg and cheese | |
| 450 W - Cooking rice and soup | |
| 300 W - Defrosting- Melting chocolate and butter | |
| 100 W - Defrosting delicate/fragile dishes- Defrosting irregularly-formed dishes- Making ice-cream softer- Allowing dough to rise |
Altering the cooking time
It is possible to alter the cooking time during use. The steps for setting the cooking time are as follows (the maximum cooking time depends on the chosen mode):
| Setting 0 - 1 | min. 1 - 5 mins. | s. 5 - 15 mins. | s. 15 - 30 mins. | |
| Step 1 sec. 1 | 0 sec. 30 sec. | 1 min. |
Microwave settings
Consult the table below to select the correct microwave setting. Also read the instructions on the packaging for cooking the dish.
| Function Mode | ||||
 | Microwave Microwave |  | Microwave | Use the microwave function to cook and heat up vegetables, potatoes, rice, fish and meat. |
 | Auto - programs | P01 - P08 | Automatic cooking programsAutomatic cooking programs can be used for roasting all kinds of meat.You can choose from 8 auto programs.Select the program and the weight of the dish. | |
 | Defrosting d01 | + d02 | DefrostingYou can choose from 2 defrost programs.Select the program and the weight of the dish. | |
Note
See ‘Cooking tips’ chapter and information about dishes.
Operation

- Warning! Heating liquids in the microwave can result in delayed boiling. This means that the liquid may start to boil furiously after it is removed from the microwave, with the risk of scalding. You can offset the delayed boiling effect by placing a plastic or glass spoon in the liquid prior to heating it in the microwave.
• Warning! Take care with baby food:
Please note! Shake or stir the content of babies' bottles or pots of baby food after heating.
▶ Please note! Check the temperature of the food carefully prior to consumption to prevent scalding injuries.
Warning! Cutlery and tableware may become hot after using the microwave.

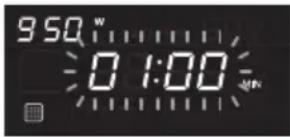

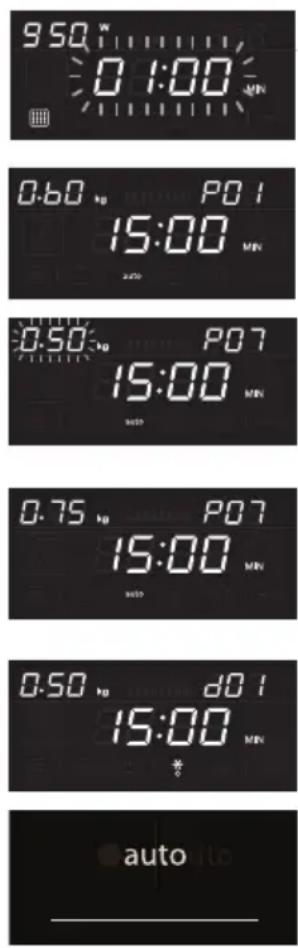
- Press the on/off button to switch on the microwave function. '01:00' flashes in the display and the microwave function icon is visible.
- Turn the selection dial to set the cooking time. The maximum cooking time depends on the power you have set.
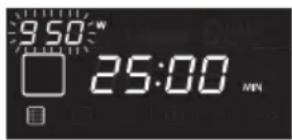
- Press the power/weight button to set the microwave power. '950' flashes in the display.
- Turn the selection dial to set the microwave power (between 100 W and 950 W). Press the power/weight button again to confirm or wait until the power stops flashing in the display. You will hear an audible signal.
- Press the start/stop button to start the cooking process.
When the cooking process is complete you will hear 5 audible signals.
The fan will continue to run for a while before switching itself off.

If the start/pause button is not pressed, the microwave will switch off automatically after 5 minutes.
Automatic cooking programs

There are 10 automatic cooking programs. All you have to do is select the program and then set the correct weight. The power and time are already set in the selected program.
| Program Weight Display | ||
| P01 - Pizza | 1 small pizza 1 | |
| 1 normal pizza 2 | ||
| 1 large pizza 3 | ||
| P02 - Meat | 200 grams 0.20 | |
| 300 grams 0.30 | ||
| 400 grams 0.40 | ||
| 500 grams 0.50 | ||
| P03 - Vegetables | 200 grams 0.20 | |
| 300 grams 0.30 | ||
| 400 grams 0.40 | ||
| 500 grams 0.50 | ||
| P04 - Pasta | 50 g (add 450 ml of cold water) 0.05 | |
| 100 g (add 800 ml of cold water) 0.10 | ||
| 150 g (add 1200 ml of cold water) 0.15 | ||
| P05 - Potatoes | 200 grams 1 | |
| 400 grams 2 | ||
| 600 grams 3 | ||
| P06 - Fish | 200 grams 0.20 | |
| 300 grams 0.30 | ||
| 400 grams 0.40 | ||
| 500 grams 0.50 | ||
| P07 - Drink | 1 cup (120 ml) 1 | |
| 2 cups (240 ml) 2 | ||
| 3 cups (360 ml) 3 | ||
| P08 - Popcorn | 100 grams 0.10 | |
| d01 (defrost) | Meat, chicken/fi sh | |
| d02 (defrost) | Bread, pastries and fruit | |

Please note!
- The microwave function is also used with the automatic cooking programs. Do not use any metal objects (see page 9 for an overview).
Selecting automatic cooking programs
- Press the on/off button to switch on the microwave. '01:00' flashes in the display and the microwave icon is visible.
- Turn the function dial 1 position (P01) or 2 positions (d01) to the right. The time, weight and first number of the automatic programs appear in the display and the defrost icon/automatic program icon is visible.
- Turn the selection dial to the right to select an automatic cooking program (see the table). The selected program is active when the symbol stops flashing. You can go back one step by turning the function dial one position to the left.
- Press the power/weight button to set the weight. The weight flashes in the display.
- Use the selection dial to set the desired weight. Press the power/weight button again to confirm. The weight you set depends on the selected program.
- Press the auto menu button to confirm or change a selected setting (for automatic cooking programs).
- Press the start/pause button to start the automatic cooking program.
When the cooking process is complete you will hear 5 audible signals.
The fan will continue to run for a while before switching itself off.
If the start/pause button is not pressed, the microwave will switch off automatically after 5 minutes.
Child lock
You can ‘lock’ your microwave so that it is no longer possible to start it accidentally (for example during cleaning the appliance).
Please note:
- The child lock can only be enabled if the microwave is switched off. The (current) time is visible in the display.

natural_image
Simple white key icon on black background (no text or symbols)Enabling the child lock:
- Press and hold the key button until a beep is heard.
A key icon appears in the display. All operational functions are disabled.
Deactivating the child lock:
- Press and hold the key button until a beep is heard.
The key icon disappears from the display. The microwave can be used again as normal.
Pause

If your microwave is in operation, you can 'pause' it.
-
Press the start/pause button. The microwave symbol starts to flash.
-
Press the start/pause button again to re-start the cooking process. The microwave symbol will stop flashing.
Warming up and cooking


• The microwave always heats with the same intensity.
The more you place in the microwave, the longer the cooking time.
- Flat, level dishes heat up more quickly than narrow, tall dishes.
- Covering dishes with microwave film or a fitting lid prevents spattering, reduces cooking time and helps retain moisture levels. After cooking remove the foil or lid carefully.
- Please note! The steam released can be extremely hot!
• Dishes that dry out quickly can be moistened.
Place potatoes and vegetables in cold water briefly before you place them in the microwave. This prevents a skin forming.
• For an even result it is best to stir or turn a dish a few times.
- For warming up dishes which have already been cooked, always use the highest microwave setting.
- You don't need much water, salt or herbs for the cooking. Salt is best added after cooking.
This prevents moisture from being withdrawn from the food.
- After the microwave is switched off, the dish continues cooking for a short time. Take this into account and don't heat up the dish for too long.
- Please note! When heating small quantities of powdery products (such as when drying herbs), always place a small cup of water in the microwave. Self-combustion is possible if small quantities are heated.
Defrosting


- Always use the defrost program to defrost large compact items. Because the dish is defrosted gradually and evenly, you don't run the risk that the outside dries out while the core is still frozen.
- To accelerate the defrosting process, it is advised to separate the item into sections after a certain amount of time.
- For large pieces of meat and compact dishes, have two breaks in the process.
- When defrosting an irregularly-formed dish you can cover thin areas halfway through the defrosting process or wrap them with aluminium foil.
- Preferably only use the oven rack for cooking food. Never place cold (frozen) dishes directly on the glass turning plate. The difference in temperature could cause this to shatter!
Factors that influence the cooking process

- The temperature of the ingredients influences the cooking time. A cold meal needs more cooking time than a meal at room temperature.
- Lighter, porous dishes cook faster than heavier and solid dishes, such as stews or rolled meats. Take care in cooking light, porous dishes.
The edges will quickly become dry and tough.
- Smaller dishes are warmed more evenly if you place them in the microwave separate from each other, preferably in a circle.
- First place the round grille on the turning plate. Then place the dish on the round grille. In this way the heat can circulate properly and your dish will be ready quickly.
- Bones and fat conduct heat better than meat. Aluminium foil blocks the microwaves. By covering thinner areas of dishes (such as chicken legs and wings) you prevent them from cooking too quickly.
- Microwaves penetrate approximately 3 cm into the food. The core of denser dishes will be heated when the heat of the heated section (the outside) spreads to the inside.
- Meat and poultry that are cooked for longer than around 15 minutes in the microwave, will become slightly brown. If dishes are to be cooked for a shorter period of time, first rub in a ‘browning’ sauce, such as Worcestershire sauce, soy sauce or barbecue sauce.
• Grease-proof paper prevents spattering and helps retain the heat.
Basic techniques

- Positioning
Place thicker pieces on the outside of the turntable. Dishes placed on the outside of the turntable receive the most microwaves.
- Stirring
Stirring dishes regularly distributes the stored heat. Always stir from the outside in, since the outside of the dish always heats up first.
- Turning over
Large, thick dishes should be turned over regularly. They then cook more evenly and quickly.
- Piercing
Food with a skin or shell bursts open in the microwave, such as egg yolks, seafood and fruit. Prevent this by pricking it before cooking a few times with a fork or satay stick.
- Checking
Dishes cook quickly. That's why you should check them regularly. Take them out of the microwave just before they're ready. In general, allow dishes to stand covered for 3 to 10 minutes after removing them from the microwave. The dishes continue to cook. Don't cover dishes with a dry crust, such as cake.
- Freezing
When freezing food you should take defrosting in the microwave into account, by not using aluminium foil or trays and by freezing in flat portions.
Cooking vegetables

- If possible, always use fresh vegetables. If vegetables have become a little limp because they've been left for too long, you can place them in cold water for a while so that they absorb moisture.
- Use a large dish to cook vegetables, so that the layer covering the dish base is not too thick.
- Do not add any more water to vegetables than that remaining after rinsing.
• Always cover the dish with a lid or microwave film. - Do not add salt. The salts present naturally in the vegetables should give sufficient flavour. If you still wish to add salt, you can do this after cooking.
- Cook vegetables for the shortest time possible. Take into account the fact that the vegetables will continue to cook.
- Check with a satay stick or fork whether the vegetables are ready.
Cooking fish

- Fish needs to cook gradually. For thin fish, oily fish or small portions set the power to 30%. In other cases you can set the power somewhat higher. Take continued cooking into account. Fish is ready when the flesh becomes opaque.
Keeping your appliance in good condition

- Please pay attention to the instructions in the manual for maintenance and cleaning.
- Salt is extremely aggressive. When this is deposited in the oven interior, rust patches can be created.
- Spicy sauces such as ketchup and mustard or salty dishes such as salted meat contain ingredients that can erode the surface. After use, you should always clean the oven interior.
- DO NOT USE any abrasive cleaners or metal scrapers to clean the glass door. This will scratch the surface which may cause the glass to break.
- DO NOT USE high pressure cleaners or steam cleaners to clean the microwave.
- If the seal of the microwave is very dirty, the door won't close properly. The front of adjacent furniture can become damaged. Keep the seal clean.

- Clean the interior and outer casing regularly; use some washing-up liquid and water and dry the oven well with a dry cloth. Ensure that the cover of the microwave distributor (right of the oven cavity) is clean. Dirt in the cover can lead to spark formation.
- Clean the interior immediately after use. Remove condensation, boiled over liquid and food remnants with a damp cloth. Remnants of crumbs and moisture absorb microwaves and increase cooking time.
- Clean the accessories regularly; use some washing-up liquid and water with a brush and dry the accessories well with a dry cloth. The accessories are also dishwasher-safe.
- Smells will disappear if you place a glass of vinegar or water with lemon in the oven cavity. Switch the microwave on at full power for two minutes. Then rub down with a damp cloth.
What should I do, if...

If the cooking results are not as desired, there are sparks in the microwave, the microwave does not start, etc., first try to discover the cause of the fault before calling the service desk.
Check:
• Is the plug in the socket?
• Is the door closed properly?
- Are the power settings and times set properly?
- Are there objects in the microwave that shouldn't be there?
• Did you use the correct kitchen utensils?
- Is the turntable in the microwave?
- Are the ventilation openings blocked?
- Has the food been defrosted sufficiently?
• Did you turn over or stir the food during cooking?
• Is the child lock activated?
The data plate on the inside of the appliance indicates the total nominal load, the required voltage and the frequency.
Product specifications
| Appliance dimensions (w x d x h) | 595 mm x 565 mm* x 455 mm |
| Installation dimensions 560 mm x | 550 mm x 450 mm |
| Microwave capacity 44 litres | |
| Diameter of turntable 360 mm | |
| Supply 230 V / 50 Hz | |
| Connected load 1650 W | |
| Microwave power 950 W |
* Depth excludes the dashboard depth of 20 mm.
Disposal of the appliance and packaging
This product is made from sustainable materials. However, the appliance must be disposed of responsibly at the end of its useful life. The government can provide you with information about this.
The packaging of the appliance can be recycled. The following materials have been used:
- cardboard
• polyethylene wrap (PE)
• CFC-free polystyrene (hard PS foam)
Dispose of these materials responsibly in accordance with legal provisions.
natural_image
Symbol of a trash bin with crossed x-marks and a blank base (no text or numbers)The product has a pictogram of a rubbish bin with a cross through it. This indicates that household appliances must be disposed of separately. This means that the appliance may not be processed via the regular waste flow at the end of its useful life. You should take it to a special municipal waste depot or a sales outlet that offers to do this for you.
Collecting household equipment separately prevents harm to the environment and public health. The materials used in manufacturing this appliance can be recycled, which provides considerable savings in energy and raw materials.
CE
Declaration of conformity
We hereby declare that our products comply with the relevant European directives, standards and regulations as well as all requirements referred to in the standards.
natural_image
Two technical diagrams showing a circular component with internal structure and a small mechanical component (no text or symbols)natural_image
Symbol of a trash bin with crossed x-marks and a blank base (no text or numbers)natural_image
Two technical diagrams showing a circular component with internal structure and a base mount (no text or symbols)natural_image
Symbol of a trash bin with crossed x-marks and a blank base (no text or numbers)
- Introduction
- Please read the separate safety instructions carefully before using the appliance!
- Control panel
- Description of the appliance
- Before first use
- Setting the clock
- Remarks
- Using the microwave
- Cooking principle
- Important
- Guidelines for microwave cookware
- General
- Microwave power
- Altering the cooking time
- Microwave settings
- Note
- Operation
- Warning! Cutlery and tableware may become hot after using the microwave.
- Automatic cooking programs
- Please note!
- Selecting automatic cooking programs
- Child lock
- Please note:
- Enabling the child lock:
- Deactivating the child lock:
- Pause
- Warming up and cooking
- Defrosting
- Factors that influence the cooking process
- Basic techniques
- - Positioning
- - Stirring
- - Turning over
- - Piercing
- - Checking
- - Freezing
- Cooking vegetables
- Cooking fish
- Keeping your appliance in good condition
- What should I do, if...
- Check:
- Disposal of the appliance and packaging
- Declaration of conformity
Brand : ETNA
Model : SM344RVS
Category : Microwave Oven