
CIR70049 - Surveillance Camera FRACARRO - Free user manual and instructions
Find the device manual for free CIR70049 FRACARRO in PDF.
| Product type | Surveillance camera |
| Brand | Fracarro |
| Model | CIR70049 |
| Sensor | 1/3" Color CCD Sony Super HAD II |
| DSP Processor | Sony Effio-E |
| Horizontal resolution | 700 TVL |
| Minimum illumination | 0.01 Lux (color), 0.003 Lux (B&W), 0.0003 Lux (DSS), 0 (IR on) |
| Lens | Varifocal 4 ~ 9 mm (external adjustment) |
| Infrared illumination | 36 LEDs 5mm, range 20-30 m (indoor) / 15-20 m (outdoor) |
| IR filter | Electronic (Auto Day/Night) |
| Protection rating | IP66 |
| Video output | Composite 1 Vpp 75 Ω on BNC |
| Power supply | 12 Vdc +/- 10% |
| Maximum consumption | 100 / 400 mA (depending on version) |
| Dimensions (L x W x H) | 228 x 97 x 82 mm |
| Weight | 550 g (without cable) / 880 g (with cable) |
| Operating temperature | -10 °C to +50 °C (Max humidity 85%) |
| Advanced functions | ATR 128x, HLC, 2DNR, Motion detection, Privacy mask, Mirror, Flip, Multilingual OSD |
| OSD settings | via integrated joystick on cable |
| Package contents | Camera with wall mount, orientation key, fixing screws, mini screwdriver for zoom/focus |
Frequently Asked Questions - CIR70049 FRACARRO
User questions about CIR70049 FRACARRO
0 question about this device. Answer the ones you know or ask your own.
Ask a new question about this device
Download the instructions for your Surveillance Camera in PDF format for free! Find your manual CIR70049 - FRACARRO and take your electronic device back in hand. On this page are published all the documents necessary for the use of your device. CIR70049 by FRACARRO.
USER MANUAL CIR70049 FRACARRO
Waterproof varifocal camera series with IR leads high resolution
Main features
Day & Night (electronic IR filter)
- IR led for night vision
- External varifocal adjustment
700TVL
Automatic Gain Control
IP66 protection
DSP Sony Effio with OSD
ATR 128x, HLC, 2DNR
- Privacy, Motion, Mirror, Flip
- Bracket with internal cable passage

Package content:
- Camera with bracket
- Tool for bracket adjustment
- Fixing screws
- Mini screw driver for zoom/focus adjustment (only varifocal version)
Technical specs:
| CIR700-3.6 CIR700 | 49 CIR700-922 | ||
| Code 918163 918164 918165 | |||
| Video specs | |||
| Standard video PAL | |||
| Image sensor 1/3" Color CCD Sony Super HAD II | |||
| DSP Sony Effio-E | |||
| Pixel 976 (H) x 582 (V) | |||
| Resolution 700 TVL | |||
| Minimum illumination @ F1.2 0.01 Lux (Day), 0.003 Lux (Night), 0.0003Lux (DSS), 0 (IR led on) | |||
| Signal to Noise ratio (S/N) > 50 dB (AGC Off) | |||
| Synchronization Internal | |||
| Video output | Composite video signal, 1 Vpp 75Ω su BNC | ||
| Functions | |||
| Wide Dynamic Range | On / Off (Level adjustable), Auto detection | ||
| Digital Noise Reduction | 2D-DNR | ||
| Electronic Shutter | 1/50 ~ 1/100,000 include Flickerless (1/120) | ||
| Digital Slow Shutter (DSS) | Off, 2~20, 40, 80, 160, 256 FLD | ||
| White Balance | Auto / Indoor / Outdoor / Manual / Push Auto | ||
| Gain Control | Auto / Manual | ||
| Back Light Comp. | On / Off (7 Areas & Smart Area, Level:0~255) | ||
| Special features | |||
| On-Screen-Display (OSD) | 8 Languages | ||
| Motion Detection | 4 Detection Blocks | ||
| Camera Title | Up to 16 characters | ||
| Mirror | Horizontal | ||
| Lens | |||
| Focal | Fixed 3.6 mm | Adjustable 4 ~ 9 mm | Adjustable 9 ~ 22 mm |
| Lens adjustment | Fixed | External manual adjustment | External manual adjustment |
| IR filter Electronic | |||
| Infrared | |||
| Number and type of led 24 (Ø 5mm) | 36 (Ø 5mm) 36 (Ø 8mm) | ||
| Projection distance | 10 - 15 m indoor 5 - 10 m outdoor | 20 - 30 m indoor 15 - 20 m outdoor | 30 - 40 m indoor 25 - 30 m outdoor |
| Checking ignition Light sensor CDS, con hysteresis 3,5 ~ 10 lux | |||
| General data | |||
| Level of protection | IP66 | ||
| Power | 12 Vdc +/- 10% | ||
| Absorption maximum | 100 / 350 mA | 100 / 400 mA | 100 / 450 mA |
| Temperature and humidity of operation | -10 ~ +50 °C (Ur 85% max) | ||
| Size (WxHxD) | 175 x 69 x 55 mm 228 x 97 x 82 mm 295 x 120 x 103 mm | ||
| Weight net/gross | 300 / 830 g 550 / 880 g 950 / 1500 g | ||
Warnings
Not orient the camera toward the sun
Direct exposure to the sun or other light sources could damage the device CCD. Handle with care - Shock improper could damage the camera
Water protection and moisture.
The camera can not be open for not reduce the seal. The plastic caps (used on the varifocal versions) should be removed only during adjustments to be immediately replaced and sealed. The cable with all its parts (Joystick OSD and connectors Video and Power) is not waterproof and must be protected from the elements in a waterproof junction box.
Power - Be sure to respect the positive and negative polarity, as 12V from symbol, in the wiring of taking power

12V
Normative - In conformity with standard EN 50130-4(European directives 2004/108/EC - EMC).
In accordance with the European Directive 2004/108/EC (EMC), the product shall be installed using devices, cables and accessories that allow to comply with this directive requirements for fixed installations
Qualified persons
The product must be installed only by qualified persons, according to the local safety standards and regulations.
Only instructed and authorized persons can open the product. In case of failure, do not try to repair it otherwise the guarantee will no longer be valid.
Installation instructions
Camera mounting
Fix the bracket by screws and adjust the camera direction using the dedicated tool for bracket screws.
- Protect the cable, the OSD joystick and the connectors (Video and Power) from the water. A waterproof box is highly recommended to protect from sun, rain and humidity all the parts aotside the bracket.
Lens adjustment (only Varifocal version)
- Remove the rubber protections and adjust the zoom/focus by the relative screws
See the table of different field of view (widht) for different target distance (D).
| Field of view (width) [m] | D = Target distance | ||||||||
| D=5 m | D=10 m | D=15 m | D=20 m | D=25 m | D=30 m | D=35 m | D=40 m | ||
| CIR700-3.6 | 3,6 mm | 6,7m | 13,3m | 20m | 26,7m | 33m | 40m | 46,7m | 53,3m |
| CIR700-49 | 4 - 9 mm | 6-2,7m | 12-5,3m | 18-8m | 24-10,7m | 30-13,3m | 36-16m | 42-18,7m | 48-21,3m |
| CIR700-922 | 9 - 22 mm | 2,7-1,1m | 5,3-2,2m | 8-3,3m | 10,7-4,4m | 13,3-5,5m | 16-6,5m | 18,7-7,6m | 21,3-8,7m |
- Select the field of view by ZOOM screw by mini screw driver
Adjust the FOCUS - Apply the rubber protection to guarantee the water and humidity protection.
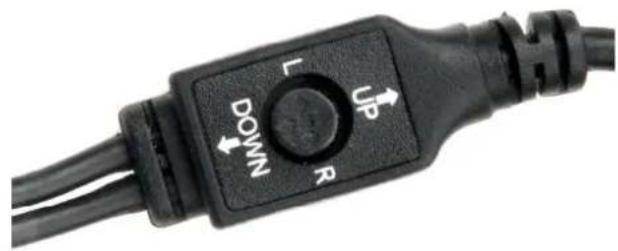
OSD MANAGEMENT
Advanced settings are available by joystick on the cable
| Up | Move up / increase values |
| Down | Move down / decrease values |
| Left | Open sub-menu |
| Right | Close sub-menu |
| Enter | Enter menu and confirm selection |
Setup item Description
| LENS | Manual Lens & Auto Iris Lens Setting |
| MANUAL | This function is for normal lens or vari-focal lens like this camera series. |
| AUTO | System automatically adjusts the iris level to control the brightness. This function is valid only for Auto Iris lens and not available with this camera series. |
| SHUTTER / AGC | Shutter speed & AGC setting, it determines the image brightness under low lux or bright condition |
| AUTO | Mode and brightness setting of the HIGH / LOW LUMINANCE |
| MANUAL | Parameter of the mode, shutter and AGC |
| WHITE BAL | White balance mode setting, it determines the way the color is produced |
| ANTI CR | Color Rolling suppress |
| MANUAL | Manually adjust the white balance |
| PUSH LOCK | Press OSD ENTER button to lock the current white balance, once it is locked, the white balance will not operate even when light temperature is changed. |
| ATW | Auto Trace White |
| PUSH | Similar to ATW, but system will force to track white balance continuously |
| USER1 | User define white balance #1 |
| USER2 | User define white balance #2 |
| BACKLIGHT | Backlight setting |
| OFF | Default Setting |
| BLC | Back light compensation |
| HLC | High light compensation |
| PICT ADJUST | Basic image adjustment such as hue, saturation, contrast, sharpness |
| MIRROR | ON/OFF, Flip image horizontally |
| BRIGHTNESS | 0-255, Brightness (Default: 0) |
| CONTRAST | 0-255, Contrast (Default: 128) |
| SHARPNESS | 0-255, Sharpness (Default: 128) |
| HUE | 0-255, Color Hue (Default: 102 for NTSC, 108 for PAL) |
| GAIN | 0-255, Color Saturation (Default: 128) |
| ATR | Adaptive tone reproduction, software WD setting |
| MOTION DET | Motion detect function, sense area, sensitivity setting |
| PRIVACY | Privacy mask, color, transparency setting |
| DAY / NIGHT | Color / Mono / Auto Mode setting |
| AUTO | Auto Mode |
| COLOR | Color mode |
| B/W | Black and White mode |
| NR | Noise Reduction setting |
| NR MODE | Noise reduction mode adjustment |
| Y LEVEL | Luminance noise reduction (Default: 4) |
| C LEVEL | Color noise reduction (Default: 4) |
| CAMERA ID | Camera ID Setting |
| CHR1/CHR2 | Default characters and User define characters (maximum of 40) |
| ←→↑↓ | Move the location of the cursors |
| CLR | Clear the highlight character & move to next character |
| POS | Use OSD UP/DOWN/LEFT/RIGHT button to adjust the ID locations |
| LANGUAGE | OSD Language Setting, total of 8 languages available |
| CAMERA RESET | Reset OSD setting |
| EXIT | Leave OSD Menu |
CIR700-3.6 CIR700-49 CIR700-922 Français
OSD Menu - English User manual
Press Enter to open the OSD menu:
SETUP MENU
| LENS | AUTO< |
| SHUTTER/AGC | AUTO< |
| WHITE BAL ATW< | |
| BACKLIGHT | OFF |
| PICT ADJUST | < |
| ATR | OFF |
| MOTION DET | |
| NEXT | < |
| EXIT< | SAVE ALL< |
SETUP MENU
Select "LENS" and confirm with Enter to open the sub-menu Autoiris. Select mode in MANUAL or AUTO.
AUTO IRIS
Sub-Menu
| TYPE | DC |
| MODE | AUTO |
| SPEED 0 - 80 | |
| RETURN <sup>1</sup> |
Main Menu
AUTOIRIS
When AUTO is selected the following parts can be selected:
| Function | Options Meanings | |
| TYPE DC | The camera uses a DC Lens | |
| MODE OPEN / CLOSE / AUTO | OPEN: The mechanical iris is fixed to open. CLOSE: The mechanical iris is fixed to close. AUTO: The mechanical iris is controlled automatically. | |
| SPEED 000 – 255 Select to set the convergence speed of the mechanical iris. | ||
→ SHUTTER/AGC
SETUP MENU
| LENS | AUTO< |
| SHUTTTER/AGC | AUTO< |
| WHITE BAL ATW< | |
| BACKLIGHT | OFF |
| PICT ADJUST | < |
| ATR | OFF |
| MOTION DET | |
| NEXT | < |
| EXIT< | SAVE ALL< |
From main OSD menu, select SHUTTER/ AGC e press Enter:
| Function Options Meanings | ||
| SHUTTER/ AGC | AUTO<\J MANUAL<\J | Press ENTER to open the sub-menu |
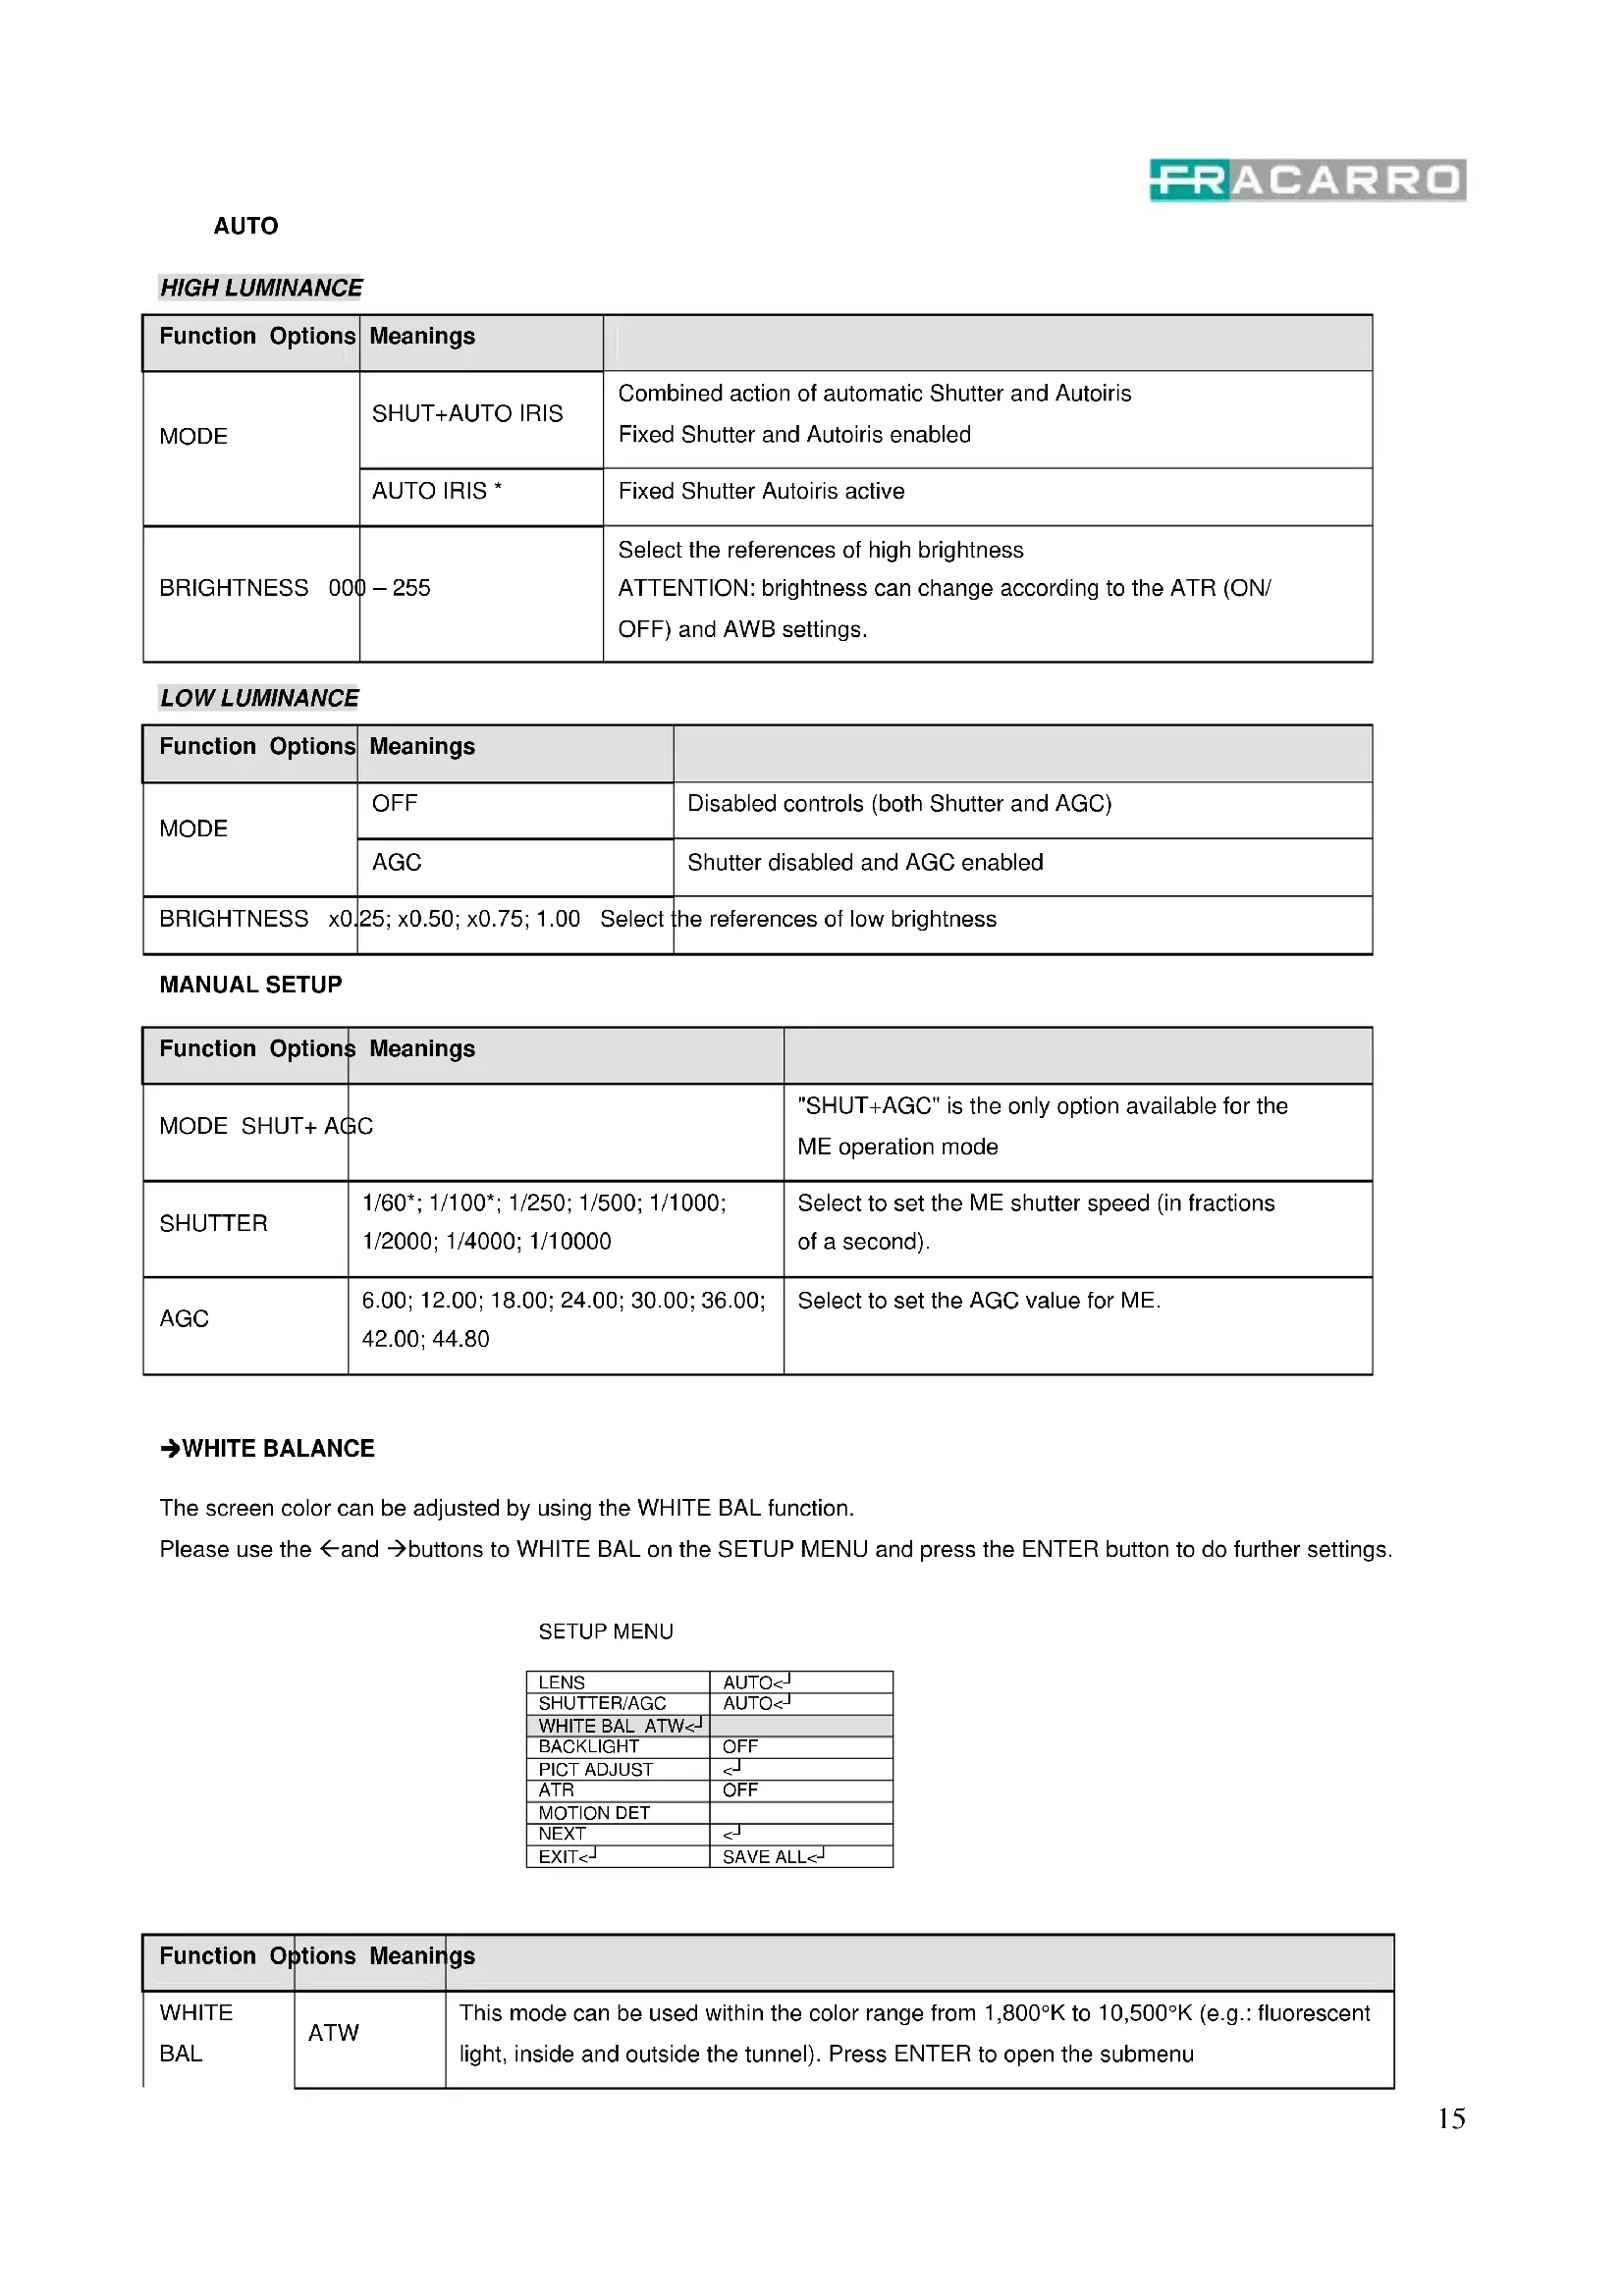
AUTO
HIGH LUMINANCE
| Function Options | Meanings | |
| MODE | SHUT+AUTO IRIS | Combined action of automatic Shutter and Autoiris Fixed Shutter and Autoiris enabled |
| AUTO IRIS * | Fixed Shutter Autoiris active | |
| BRIGHTNESS 000 | -255 | Select the references of high brightness ATTENTION: brightness can change according to the ATR (ON/OFF) and AWB settings. |
LOW LUMINANCE
MANUAL SETUP
| Function Options | Meanings | |
| MODE | OFF | Disabled controls (both Shutter and AGC) |
| AGC | Shutter disabled and AGC enabled | |
| BRIGHTNESS x0 | 25; x0.50; x0.75; 1.00 Select the references of low brightness | |
| Function Options | Meanings | |
| MODE SHUT+ AGC | "SHUT+AGC" is the only option available for the ME operation mode | |
| SHUTTER | 1/60*; 1/100*; 1/250; 1/500; 1/1000; 1/2000; 1/4000; 1/10000 | Select to set the ME shutter speed (in fractions of a second). |
| AGC | 6.00; 12.00; 18.00; 24.00; 30.00; 36.00; 42.00; 44.80 | Select to set the AGC value for ME. |
→WHITE BALANCE
The screen color can be adjusted by using the WHITE BAL function.
Please use the and buttons to WHITE BAL on the SETUP MENU and press the ENTER button to do further settings.
SETUP MENU
| LENS | AUTO<1 |
| SHUTTER/AGC | AUTO<1 |
| WHITE BAL ATW<1 | |
| BACKLIGHT | OFF |
| PICT ADJUST | <1 |
| ATR | OFF |
| MOTION DET | |
| NEXT | <1 |
| EXIT<1 | SAVE ALL<1 |
| Function Options Meanings | ||
| WHITE BAL | ATW | This mode can be used within the color range from 1,800°K to 10,500°K (e.g.: fluorescent light, inside and outside the tunnel). Press ENTER to open the submenu |
| PUSH The camera will find the best settings in any condition. | |
| USER1 | Adjust the color temperature to 3,200°K for indoor spaces lit with neon lights. Press ENTER to open the submenu and select the R and B settings manually |
| USER2 | Adjust the color temperature to 6,300°K for shooting outdoors. Press ENTER to open the submenu and select the R and B settings manually |
| ANTI CR Enable Color Rolling blanking mode | |
| MANUAL | Press ENTER to open the submenu and select the R and B level. When regulating R, the B component will also be automatically updated (color range from 1,800°K to 10,500°K). |
| PUSH LOCK | For a proper setting, point the camera to a white piece of paper and press ENTER. Select PUSH LOCK when it is dark or the color temperature is high around the object or when there is a fluorescent light around the object or when the light is constantly changing. |
ATW
| Function Options | Meanings | |
| SPEED 000-255 Select to adjust the pull-in speed of ATW. | ||
| DELAY CNT 000-255 Select to set the time-based hysteresis of ATW. | ||
| ATW FRAME x0.50; x1.00; x1.50; x2.00 Select to set the pull-in frame magnification. | ||
| ENVIROMENT INDOOR/OUTDOOR | Select to set the pull-in frame (indoor/outdoor) of ATW. | |
BACKLIGHT (Back light Compensation)
SETUP MENU
| LENS | AUTO< |
| SHUTTERT/AGC | AUTO< |
| WHITE BAL | ATW< |
| BACKLIGHT | OFF |
| PICT ADJUST | < |
| ATR OFF | |
| MOTION DET | |
| NEXT | < |
| EXIT< | SAVE ALL< |
Select to set BACKLIGHT to OFF, BLC or HLC.
By selecting the BLC, normal BLC is enabled; the light level in areas too luminous is compensated while the HLC is used to cover those overly luminous image parts with black.
PICTADJUST
SETUP MENU
| LENS | AUTO< |
| SHUTTERR/AGC | AUTO< |
| WHITE BAL | ATW< |
| BACKLIGHT | OFF |
| PICT ADJUST | < |
| ATR OFF | |
| MOTION DET | |
| NEXT | < |
| EXIT< | SAVE ALL< |
| Function Options | Meanings | |
| MIRROR OFF / ON | OFF: Normal | output ON: Horizontally flipped output |
| BRIGHTNESS 000-255 | Select to set the screen brightness | |
| CONTRAST 000-255 | Select to set the screen contrast | |
| SHARPNESS 000-255 | Select to set the screen sharpness | |
| HUE 000-255 | Select to adjust the hue | |
| GAIN 000-255 | Select to adjust the gain |
ATR (Adaptive Tone Reproduction)
SETUP MENU
| LENS | AUTO |
| SHUTTERT/AGC | AUTO |
| WHITE BAL | ATW |
| BACKLIGHT OFF | |
| PICT ADJUST | < |
| ATR | OFF |
| MOTION DET | |
| NEXT | < |
| EXIT | SAVE ALL |
| Function Options Meanings | ||
| LUMINANCE | LOW - MID - HIGH | Select to set the extent of the luminance compression |
| CONTRAST | LOW - MIDLOW - MID - MIDHIGH - HIGH | Select to set the extent of the contrast enhancement. |
MOTION DET (Motion Detection)
This item is used to set the Motion Detection function on 4 areas
SETUP MENU
| LENS | AUTO |
| SHUTTER/AGC | AUTO |
| WHITE BAL | ATW |
| BACKLIGHT OFF | |
| PICT ADJUST | < |
| ATR | OFF |
| MOTION DET | |
| NEXT | < |
| EXIT | SAVE ALL |
| Function | Options | Meanings |
| DETECT SENSE | 000-127 Select | to set the motion detection sensitivity |
| BLOCK DISP | OFF / ON | Disable the area exclusion / Set the areas to be excluded in the movement detection / Enable the signalization of movement on the image (the areas will be highlighted by luminous squares) |
| MONITOR AREA | OFF / ON | OFF: The monitoring frames are not used. ON: The monitoring frames are used |
| AREA SEL | 1/4 ; 2/4 ; 3/4 ; 4/4 | Select to deinfe the monitoring frame to be set |
| TOP 000-244 | Upper limit of the selected area in AREA SEL |
| BOTTOM 000-244 | Lower limit of the selected area in AREA SEL |
| LEFT 000-474 | Left limit of the selected area in AREA SEL |
| RIGHT 000-474 | Right limit of the selected area in AREA SEL |
→PRIVACY
This item is used to set up to 8 privacy masks. When monitoring frames are used for motion detection, the maximum number of masks which can be used is four.
SETUP MENU
| Function Options | Meanings | |
| AREA SEL | 1/8 ; 2/8 ; 3/8 ; 4/8 ;5/8 ; 6/8 ; 7/8 ; 8/8 | If the first 4 masks are used for MOTION, they will have to be used again in the same form/position. The other 4 areas can be programmed freely. |
| TOP 000-288 (PAL) | Upper limit of the selected | area in AREA SEL |
| BOTTOM 000-288 | (PAL) Lower limit of the selected area in AREA SEL | |
| LEFT 000-468 Left | limit of the selected area in AREA SEL | |
| RIGHT 000-468 Right | right limit of the selected area | in AREA SEL |
| COLOR | 1-8 | Select to set the colors of the mask frames |
| TRANSP | 0.00 ; 0.50 ; 0.75 ; 1.00 | Select to set the transparency ratio of the mask frames |
| MOSAIC OFF / ON | OFF: Mosaic function OFF ON: Mosaic function ON | |
DAY/NIGHT
SETUP MENU
Select to set DAY/NIGHT choosing from:
COLOR: The Day/Night function is set to OFF.
B&W: The NIGHT mode is established forcibly, and chroma is set to OFF.
When B/W is selected, click ENTER to bring up the B/W sub-menu for further settings.
AUTO: Day or Night is automatically identified and controlled accordingly. When AUTO is selected, click
ENTER to bring up the DAY/NIGHT sub-menu for further settings.
| Function Options | Meanings | |
| BURST ON / OFF ON: Burst signal ON OFF: Burst signal OFF | ||
| DELAY CNT 000-255 Select to set the Night/Day identification transfer time | ||
| DAY->NIGHT 000-255 Select to set the threshold for identifying the Night status from the Day status | ||
| NIGHT->DAY 000-255 Select to set the threshold for identifying the Day status from the Night status | ||
Digital Noise Reduction
SETUP MENU
Select to bring up the NR sub-menu for further settings.
| Function Options | Meanings | |
| NR MODE | OFFYYC/Y/C | Select to set the 2D NR filter modeOFF: Y and C filters OFFY: Y filter ONC: C filter ONY/C: Y and C filters ON |
| Y LEVEL 000-01 | 5 Select to set | the Y filter strength |
| C LEVEL 000-01 | 5 Select to set | the C filter strength |
CAMERA ID
Select ON and press ENTER to activate the submenu:
SETUP MENU
CAMERA ID
CAMERA
| PRIVACY | OFF |
| DAY/ NIGHT | AUTO |
| NR | |
| CAMERA ID | OFF |
| SYNC | INT |
| LANGUAGE | ENGLISH |
| CAMERA RESET | |
| BACK | |
| EXIT | SAVE ALL |
ABCDEFGHIJKLMNOPRSTUV
WXYZ0123456789-!"#$%&
()_,¥:<=?@\^*.x+/
CHR
←→↑↓
CLR
CHR2
RETURN<
SYNC - Select the synchronization internal/external.
LANGUAGE - Select the language choosing from: ENGLISH, 日本語, DEUTSCH, FRANCAIS, PYCCKIN, PORTUGUES, ESPÁNOL:
CAMERA RESET - Click to restore all the settings to the default values.
SAVE ALL - Click to save all the settings made. NOTICE: There will be no prompt windows while the settings are being saved.
EXIT - Click to exit the OSD menu.
NOTICE: Before exit the OSD menu, please click SAVE ALL to save all the settings made. Fail to do that, all the settings will not take effect once the power is reconnected
Garantito da/ Garanteed by/ Garanti par/ Garantizado por/ Garantido por/ Garantiet durch/ Zajamena od/ Garantirano od/ Garantoyano od/ Garantotowane przez / Eyyunuevo atio/ TapaHTPOBAHO Fracarro Radioindustrie S.p.A., Via Cazzaro n. 3, 31033 Castelfranco Veneto (TV) - Italy
FRACARRO
Fracarro Radioindustrie S.p.A. - Via Cazzaro n.3 - 31033 Castelfranco Veneto (TV) ITALIA - Tel: +39 0423 7361 - Fax: +39 0423 736220
Società a sociale unico.
Fracarro France S.A.S. - 7/14 rue du Fosse Blanc Bâtiment C1 - 92622 Gennevilliers Cedex - FRANCE - Tel: +33 1 47283400 - Fax: +33 1 47283421
Fracarro Iberica S.A.U. - Parque Empresarial Táctica C/2A, Nave 4 - 46980 Paterna - Valencia - ESPaña - Tel: +34/961340104 - Fax: +34/961340691
Fracarro (UK) - Ltd, Unit A, Ibex House, Keller Close, Kiln Farm, Milton Keynes MK11 3LL UK - Tel: +44(0)1908 571571 - Fax: +44(0)1908 571570
Fracarro Tecnologia e Antenas de Televisao Lda - Rua Alexandre Herculano, n°1-1°B, Edificio Central Park 2795-242 Linda-a-Velha PORTUGAL
Tel: +351 21 415 68 00 - Fax+351 21 415 68 09

- Main features
- Package content:
- Technical specs:
- Warnings
- Not orient the camera toward the sun
- Water protection and moisture.
- Qualified persons
- Installation instructions
- Camera mounting
- Lens adjustment (only Varifocal version)
- OSD MANAGEMENT
- CIR700-3.6 CIR700-49 CIR700-922 Français
- OSD Menu - English User manual
- Main Menu
- AUTOIRIS
- → SHUTTER/AGC
- →WHITE BALANCE
- ATW
- → BACKLIGHT (Back light Compensation)
- SETUP MENU
- PICTADJUST
- → MOTION DET (Motion Detection)
- →PRIVACY
- → DAY/NIGHT
- FRACARRO
Brand : FRACARRO
Model : CIR70049
Category : Surveillance Camera