
BTCity - Talkie Walkie MIDLAND - Free user manual and instructions
Find the device manual for free BTCity MIDLAND in PDF.
| Product type | Bluetooth intercom kit for motorcycle |
| Brand | Midland |
| Model | BTCity |
| Power supply | Rechargeable lithium battery (charges via mini USB) |
| Battery life | 8 hours in communication |
| Charging time | Approximately 4 hours (first charge 5-6 hours) |
| Bluetooth | Version 2.0, Headset/Handsfree/A2DP profiles |
| Intercom range | Up to 200 meters |
| PMR446 radio range | Up to 5 km (with optional cable) |
| Main functions | Intercom, phone, music, GPS, wired input |
| Voice command (VOX) | Yes, with 5 adjustable sensitivity levels |
| Noise reduction | AGC (automatic volume control) |
| Water resistance | Rain and splash resistant |
| Helmet attachment | Double-sided adhesive or clamp mount |
| Maintenance and cleaning | Clean with a soft, dry cloth. Do not use solvents. |
| Safety | Do not use at high volume to prevent hearing damage; always be able to hear road noise. |
| Spare parts | Audio kits (earpieces, microphones), mounts, cables and chargers available |
| Repairability | Repair by authorized center; 24-month warranty on device, 6 months on accessories |
| General information | User manual available in multiple languages; CE certification |
Frequently Asked Questions - BTCity MIDLAND
User questions about BTCity MIDLAND
0 question about this device. Answer the ones you know or ask your own.
Ask a new question about this device
Download the instructions for your Talkie Walkie in PDF format for free! Find your manual BTCity - MIDLAND and take your electronic device back in hand. On this page are published all the documents necessary for the use of your device. BTCity by MIDLAND.
USER MANUAL BTCity MIDLAND
Midland BTCity/BTEva 2
natural_image
Simple gray rectangular shape with a horizontal line and two vertical lines above it, no text or symbols present.Midland BTCity/BTEva
natural_image
Simple line drawing of a curved connector or connector (no text or symbols)Microfono a filo
natural_image
Technical line drawing of a mechanical device with two views (top and side), no text or symbols present.natural_image
Technical line drawing of two mechanical components with labeled parts (no text or symbols present)natural_image
Simple gray rectangular shape with a horizontal line and two vertical lines above it, no text or symbols present.natural_image
Technical line drawing of a mechanical component with no visible text or symbolsnatural_image
Technical line drawing of two mechanical components with labeled parts (no text or symbols present)natural_image
Side profile illustration of a person wearing a headset (no text or symbols)natural_image
Side profile line drawing of a person wearing a helmet and visor device (no text or symbols)natural_image
Two hand-drawn diagrams showing a mechanical or electrical component being held, with no visible text or symbols.natural_image
Technical line drawing of a mechanical component with no visible text or symbolsnatural_image
Simple gray rectangular shape with a horizontal line and two vertical lines extending upward (no text or symbols)FUNZIONALITÀ
natural_image
Pure geometric diagram with a vertical line and horizontal lines, no text or symbols presentINDEX
Midland BTCity/BTEva 2
Charging batteries....3
Description of the unit and installation brackets....3
Description of the BTGty/BTEva unit 3
Description of the Audio kit....3
Description of the installation brackets 4
Switching your Midland BTCity/BTEva on and off....5
Adjusting the volume....5
Pairing with Bluetooth devices....5
Using the features of the Bluetooth devices 5
Using the telephone feature .... 5
Using the MP3 player feature of the mobile phone....6
Paring the unit with a GPS SAT-NAV....6
Using the intercom feature....7
Resetting all paired devices....8
Using the wired audio input 8
Using an i-Pod/MP3 player 8
Using a Two Way Radio transceiver....8
Special configurations....9
Adjusting/ Disabling the VOX feature (Intercom and telephone)....9
Wired connection always on 9
Intercom and GPS 9
Recommendations for specific uses....10
Using a PMR446 transceiver....10
Using the BTSki Audio kit accessory (optional)....10
Use at your own risk....12
Warranty....12
Light and sound signal....13
Unit functions 14
Midland BTCity/BTEva
Thank you for purchasing the Midland BTCity/BTEva, the wireless intercom multimedia system for bikers. The Midland BTCity/BTEva is designed to be fitted directly on to your helmet and to be used for communications with Bluetooth devices like mobile phones, GPS SatNavs and MP3 players. If desired, it can also be paired with another Midland BTCity/BTEva unit and used as wireless Rider/Pillion Intercom system or Rider to Rider in bike-to-bike mode, within a maximum range of 200 meters. The Midland BTCity/BTEva is also supplied with a wired connection that can be used to connect an iPod/MP3 player or PMR446 transceiver, which will then enable bike-to-bike communications up to a maximum range of 5 km.
Midland BTCity/BTEva is available in two versions:
Single BTCity/BTEva Intercom kit with one unit only
BTCity/BTEva Intercom TWIN with two units
Depending on the model purchased, the package contains the following parts:
BTCity/BTEva
1 BTCity/BTEva communication unit
1 audio kit with two stereo speakers, microphone with boom and wire microphone
1 plate with bi-adhesive strip to fix the unit onto the helmet
1 clamp to fix the unit onto the helmet
1 stereo audio cable to connect an iPod/ or other models of MP3 players
1 miniUSB wall-mounting power supply
Wind Suppressing Foam Microphone Cover, Allen key and Velcro strip for assembly
BTCity/BTEva TWIN
2 BTCity/BTEva communication units
2 audio kits with two stereo speakers, microphone with boom and wire microphone
2 plates with bi-adhesive strip to fix the unit onto the helmet
2 clamps to fix the unit onto the helmet2 stereo audio cables to connect an iPod/ or other models of MP3 players
1 miniUSB wall-mounting power supply with double plug
Wind Suppressing Foam Microphone Cover, Allen key and Velcro strip for assembly
The units included in the TWIN kit are already paired and can therefore be immediately used in the Intercom mode.
Technical specifications of Midland BTCity/BTEva
General:
Bluetooth ver. 2.0 stereo (Headset/Handsfree/A2DP protocol)
AGC system automatically controls the volume in relation to background noise
Voice (VOX) or manual communications optionManual controls to enable: telephone, intercom and wire connection
Fully waterproof
Lithium battery with 8 hours talk time
Recharge time: app. 4 hours
Bluetooth connections:
Identical device for Rider to Pillion or Bike-to-Bike Intercom mode, up to a maximum range of 200 meters
Bluetooth devices
- Mobile phone with MP3 player Stereo (A2DP protocol), GPS (Garmin Zumo and TomTom Rider 1 and 2)
- PMR446 transceivers (with built-in or external Bluetooth connection) for group bike-to-bike communications
Wire connections:
For stereo audio input (iPod/MP3 player)
For PMR446 transceivers (with optional cable)
Attention: before using BTCity/BTEva for the first time, remember to recharge it for at least 5/6 hours.
Attention: Midland BTCity/BTEva is designed to withstand rain and water. However, if it is raining, always verify that the rubber caps protecting the sockets are fully fitted.
Charging batteries
Make sure that the unit is fully charged before use. Allow at least 5/6 hours for a full charge before using the unit for the first time. Normally, after the first time, it takes 4 hours for a full charge.
Charge the unit by inserting the wall-charger into the charging socket (lift the rubber cover to insert the plug).
The red LED on the unit will start flashing when charging begins.
Allow the headset to charge until the blu LED turns on.
When the charge is complete (blu LED on), release the headset from the charger.
Attention: every time the mini USB recharging plug is inserted (or detached), the device is automatically turned off. To use it while it is in charge, you should turn the device on with the plug already inserted.
Description of the unit and installation brackets

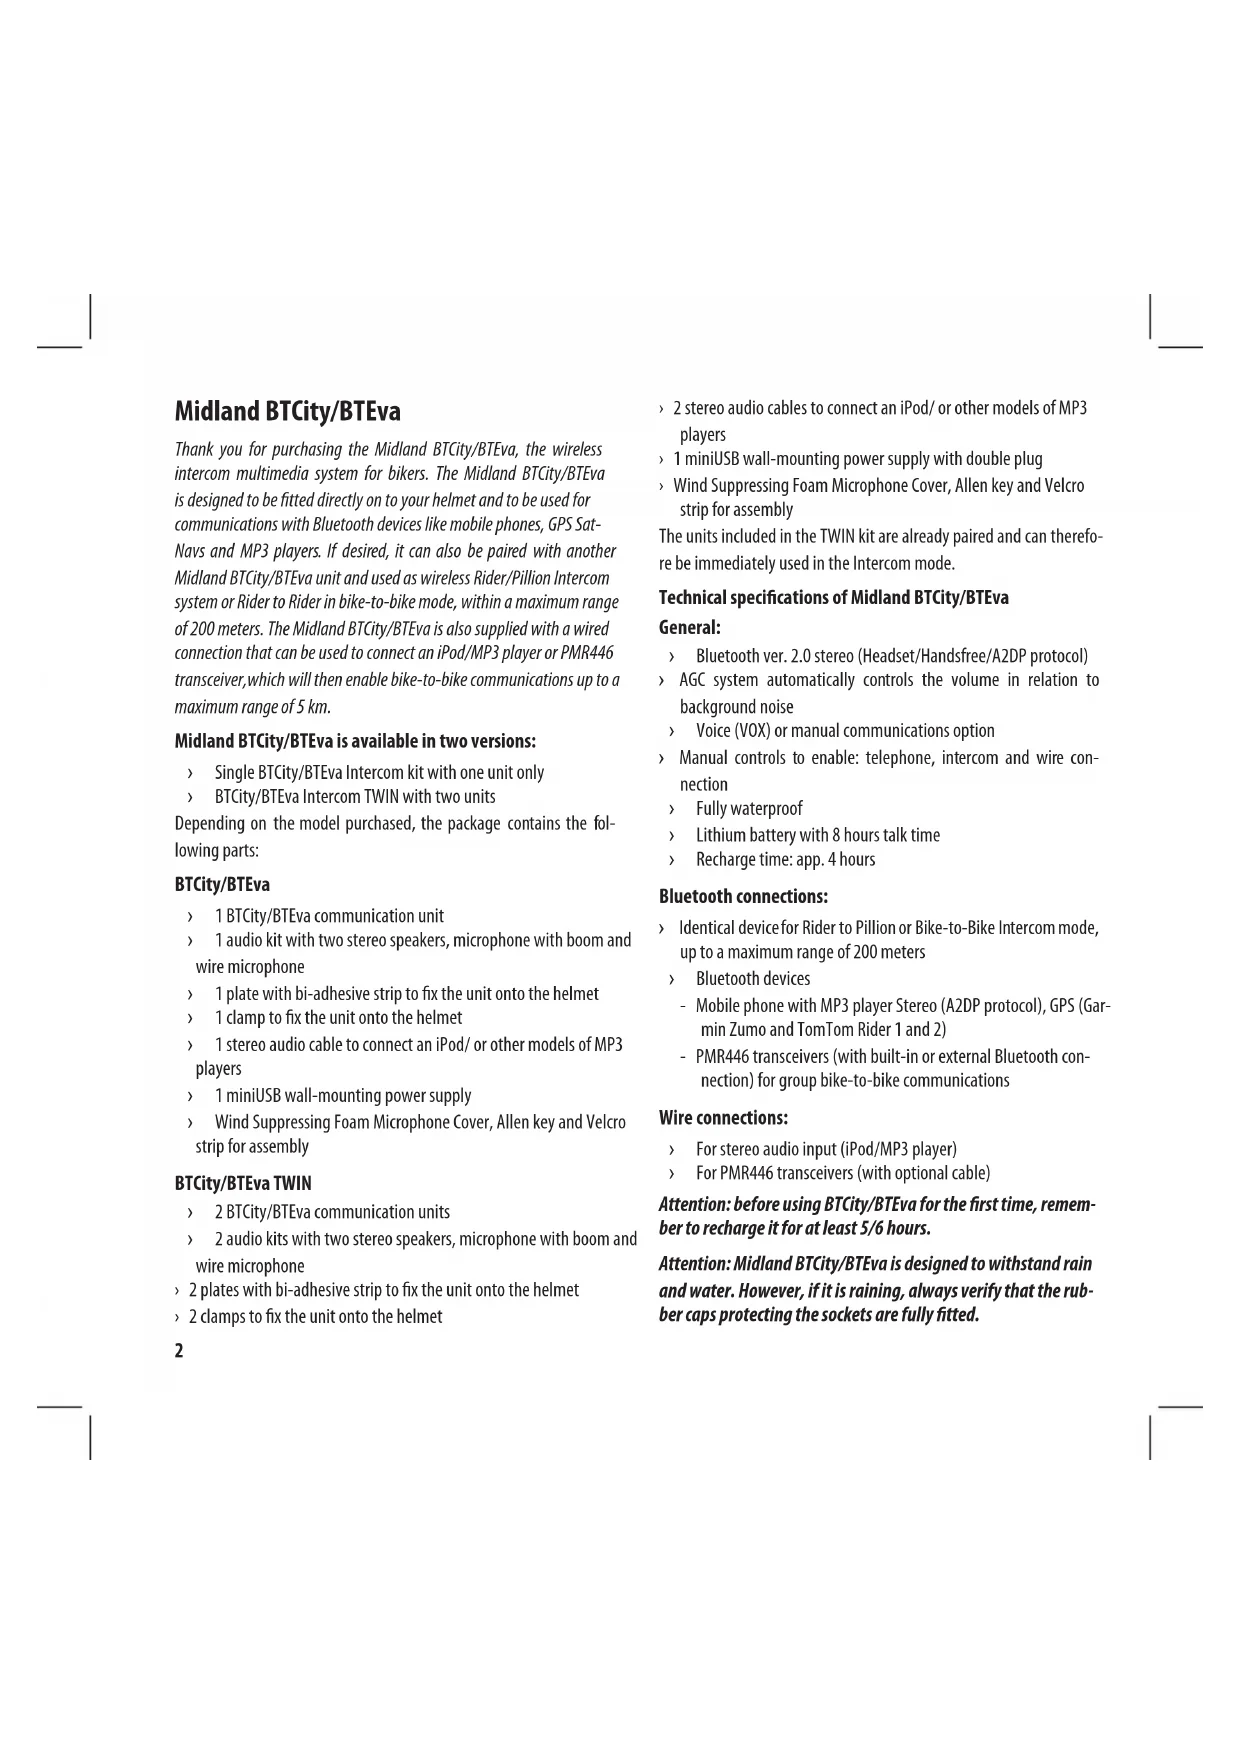
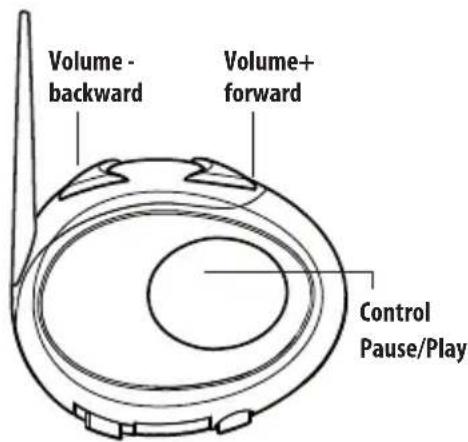
The BTCity/BTEva has 3 multifunction buttons and 3 wired connections in the lower section.
Description of the button features:
Control: can be used to enable/disable the intercom and manage mobile phone features
Volume+: enables you to increase the volume
Volume -: enables you to decrease the volume
Description of the wired connections
Charger jack: enables to recharge the unit using a standard miniUSB power supply
Audio kit jack: enable to connect an audio kit (stereo headset and microphone)
Auxiliary audio jack (AUX): can be used to connect an audio source, like a stereo iPod/MP3 player or PMR446 transceiver
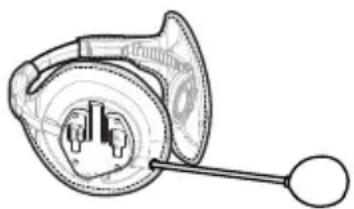
Description of the audio kit
The audio system includes two ultra-flat stereo speakers and two interchangeable microphones, which are both supplied with a bracket and wire connection.
Fixing the stereo speakers
The two stereo speakers have a Velcro/adhesive strip that aids their fixing to your helmet.
Beware to not completely cover your ear with the speakers, you must always be able to listen to the traffic sound and indication.
The microphone can be fixed onto the helmet in two ways:
Boom Microphone
Place the section with the Velcro/adhesive strip between the padding and the rigid cover of the helmet, so that the microphone is correctly positioned in front of your mouth and that the white symbol is facing
your mouth. This type of microphone is suited for Open Faced and Flip Front helmets.

natural_image
Simple line drawing of a headset with two circular sensors (no text or symbols)Wire microphone
Using the Velcro/adhesive strip, place the microphone inside the helmet in front of your mouth. This type of microphone is more suited for Full Faced helmets. The mini connector on the microphone allows you choose the microphone that best suits the helmet you are using.

Audio kit jack
The audio kit must then be connected to the central jack of the Midland BTCity/BTEva unit using the "L" shaped connector.
Description of the installation brackets
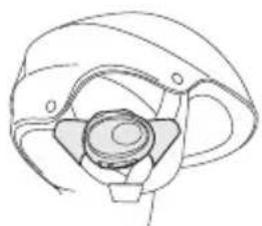
The Midland BTCity/BTEva can be fixed onto the helmet in two different ways: By either using the plate with bi-adhesive strip, or the clamp. These methods allow you to safely "fix" the BTCity/BTEva unit onto your helmet and to remove it at any time in order to recharge or store it.
Plate with bi-adhesive strip
The fixing plate has a bi-adhesive strip on one of its sides. To fix the plate in place, clean the application area on the helmet surface, remove the bi-adhesive film and place the fixing plate on the helmet by keeping it contact with the surface for a few seconds.
natural_image
Technical line drawing of a mechanical component with two views (top and side), no text or symbols present.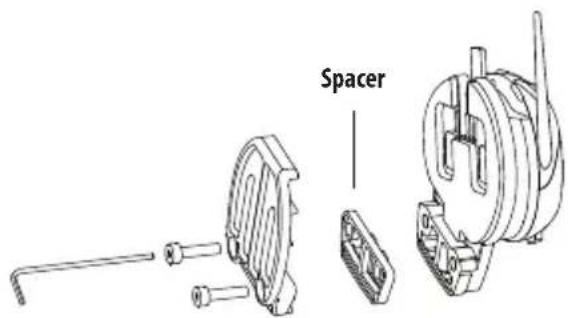
Clamp
Using the Allen Key, loosen the two screws on the clamp and place the rear plate between the helmet padding and the external rigid protection. Then, tighten the two screws in order to firmly fix the clamp in place. Inside the clamp is included a small plastic spacer, that can be removed to close tighter the clamp.
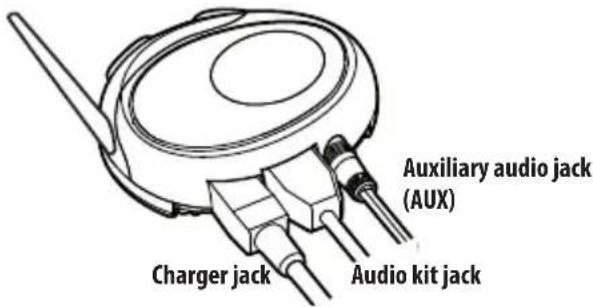
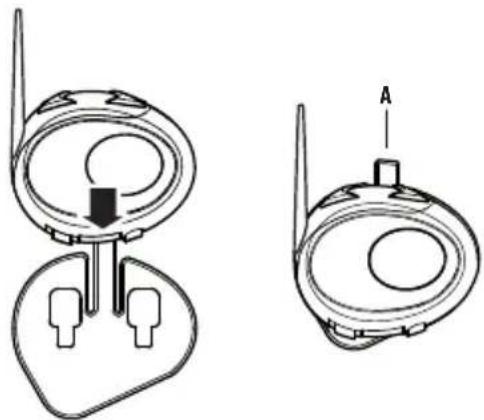
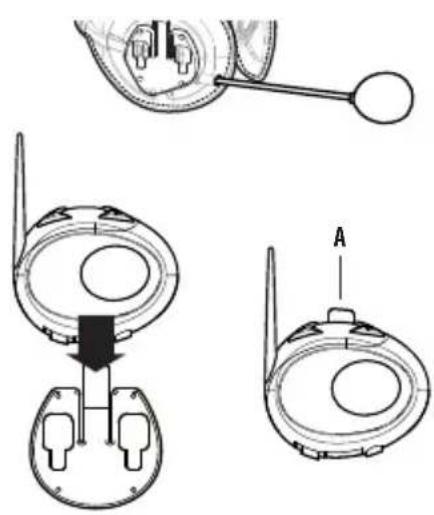
Fitting and removing your Midland BTCity/BTEva
The BTCity/BTEva can be easily fitted onto the helmet by sliding it downwards so that it fits into the slot of the selected fixing device (plate with bi-adhesive strip or clamp). BTGty/BTEva is maintained in position thanks to the fixing clip located on the upper section (A).
natural_image
Technical line drawing of two mechanical components with labeled parts (no text or symbols present)To detach the BTCity/BTEva, simply press the fixing clip and push the unit upwards.
Switching your Midland BTCity/BTEva on and off
Switching the unit on:
Press and hold "Control" button down for approximately 3 seconds until the BLUE indicator lights.
Switching the unit off:
Press and hold both "Control" and "VOL-" buttons together for approximately 3 seconds until the RED indicator flashes 3 times, thus lessening the chances that you might turn off the unit accidentally (especially whilst wearing heavy gloves).
Adjusting the volume
Your Midland BTCity/BTEva uses AGC technology, which automatically adjusts the listening volume in relation to background noises. However, it is also possible to manually adjust the volume by means of the "Volume+" and "Volume-" buttons.
Attention: volume can be adjust only when an audio connection is active.
Pairing with Bluetooth devices
Your Midland BTCity/BTEva is a Bluetooth unit that can be paired with other Bluetooth devices, such as a mobile phone or another BTCity/BTEva device for Intercom communications.
Before performing this procedure, it is necessary to set BTCity/BTEva into the Setup mode.
Setup mode
Switch off the BTCity/BTEva device. Press and hold down the central button "Control" for about 7 sec. until the red indicator switches on permanently. BTCity/BTEva is now in "Setup" mode and can therefore be paired with other devices.
Exiting from the Setup mode
To exit the Setup mode double click the "Control" button. Once the red light turns off, the blue led starts blinking. Now you can use your BTCity/BTEva.
Using the features of the Bluetooth devices
Using the telephone feature
To use the Telephone feature, be sure the units are correctly paired together.
Pairing the unit with a mobile phone
- Enable the Bluetooth device search feature on your mobile phone. As this procedure varies according to the brand and model of the mobile phone, refer to the manual supplied to your particular phone for further information.
- Set the BTCity/BTEva unit in "Setup" mode, then press the Control button on the unit until the red and blue indicators start flashing.
- After a few seconds the mobile phone will display "Midland BTCi-ty/BTEva". Select it and follow the instructions provided in your mobile phone manual to accept the pairing. When prompted, enter the pairing code, which is 0000 (four zeroes). Your mobile phone should then display a confirmation message if the pairing operation has been successfully completed
- The BTCity/BTEva will automatically exit the set up mode (red indicator on) and go to the working mode (blue light flashing).
Answering a call
When you hear the phone ring, you can answer in two different ways: Vocally:
Simply say one word to answer the call and start talking.
Remembering that you can only do this if you answer the call after the third Ring. (Be aware that some phones may not support voice answering)
Manually:
Tap the "Control" button and start speaking.
Rejecting a call
If you don't wish to answer, you can let the mobile phone ring or press the "Control" button for a few seconds (you will hear one audio confirmation tone).
Making a call
There are several ways to make a call.
From the mobile keypad:
Dial the number on the mobile keypad:
Press "Send" on the mobile phone.
To redial the last number:
Press and hold "Control" button for 3 seconds in order to redial the last number (you will hear one audio confirmation tone).
To make a voice call:
Briefly press "Control" button. If your mobile phone supports voice calls, you will be asked to speak the name of the contact you wish to call.
Priority: Calls have a high priority, which means that all other communications are temporarily disabled when a call arrives and automatically re-enabled once the call ends.
Attention: the voice call command is possible only if the BTCity/BTEva has never been connected to another BTCity/BTEva for Intercom communication.
Ending a call
There are several ways to end a call:
Wait for the called person to end the call.
Press the "Control" button for 3 seconds (you will hear an audio confirmation tone).
Press "End" button on the mobile phone.
Using the MP3 player feature of the mobile phone
Many mobile phones are now designed to be used as stereo MP3 players. The BTCity/BTEva device fully supports the A2DP and AVRCP protocols that enable you to listen to stereo music and remotely control your mobile phone's MP3 player. You can even use the buttons on the BTCity/BTEva unit to control the following play options: Play, Pause, Forward and Backward.
Available controls:
To play/pause music: double click the "Control" button.
To skip forward to the next song: keep pressed the "Volume+" button.
To skip backwards to the previous song: keep pressed the "volume-" button.
To enable your connected MP3 Player (ADP/AVRCP): press and hold down the "Volume +" and "Volume-" buttons for 3 seconds (this feature is active by default).
To disable the MP3 player: press and hold down the "Volume+" and "volume-" buttons (2 beeps will confirm it).
Priority: the music listening mode has the lowest priority. Therefore, it will always be disabled when another type of communication is enabled.
Pairing the unit with a GPS Sat-Nav
It is generally possible to pair the BTCity/BTEva unit with all GPS SatNavs that support Bluetooth earpieces.
Midland BTCity/BTEva has been successfully tested for use with GPS ZUMO Sat-Navs manufactured by Garmin and TOMTOM Rider 1 and 2 Sat-Navs.
- On your GPS Sat-Nav, enable the Bluetooth earphone search feature. As this procedure varies according to the brand and model of GPS, we recommend you refer to the manual supplied with your GPS Sat-Nav for further information.
- Ensure that the BTCity/BTEva is in Setup mode (Red light on) & Press the "Control" button on the BTCity/BTEva unit until the red and blue indicators start to flash.
- After a few seconds the GPS Sat-Nav will display "Midland BTCity-BTEva". Select it and follow the instructions provided in the GPS Sat-Nav manual to accept the pairing. When prompted, enter the pairing code, which is 0000 (four zeroes).
The GPS should then display a confirmation message if the pairing operation has been successfully completed. - The BTCity/BTEva unit returns to the Setup mode (red indicator permanently on) to indicate that it is ready to be paired with other devices.
If you pair the BTCity/BTEva unit with a GPS Sat-Nav, you will not be able to pair it with a mobile phone. This problem can be easily solved by pairing the mobile phone directly with the GPS Sat-Nav and by then pairing your GPS with the Midland BTCity/BTEva. In this case, the mobile phone features will be managed by the GPS Sat-Nav.
Using the intercom feature
To use the Intercom feature, be sure both BTCity/BTEva units are turned on and previously paired together.
The two units supplied in the Midland BTCity/BTEva TWIN Pack, are already paired and ready for use, which means that it is not necessary to perform this procedure.
If the devices are not part of the same pack, or one of the BTCity/BTEva units has been purchased separately, you need to pair them in order to be able to use the Intercom function.
Pairing with another BTCity/BTEva device
- Place both BTCity/BTEva units in Setup mode (red indicator permanently on)
-
Press the "Volume +" button on the first unit until the RED and BLUE lights begin to flash rapidly and alternately.
-
Then press the "Volume—"button on the second unit until the RED and BLUE lights begin to flash rapidly and alternately.
- Now both BTCity/BTEva units are trying to pair to each other. When successfully paired, the blue led of each device will light for 1 sec and go back to setting mode (red light always on) waiting for additional pairing or setting procedures.
- To use the two devices, exit the setting mode: Double click on the "Control" button. The red light will quit and the blue light will begin to flash. Now you can use your BTCity/BTEva.
Intercom
The Intercom feature can be enabled in two ways:
Manual activation:
Press "Control" button, on one of the two units. Communication is enabled and remains active until you press the "Control" button again. You will hear 1 audio tone when the Intercom feature is enabled and 2 audio tones when it is disabled.
Voice activation (VOX):
This is enabled by default. To start an Intercom communication, simply start talking. The communication will remain active for all the time you are talking.
Attention: the first intercom activation must be done manually with the control button. After that, the VOX activation will be available.
If there is no conversation, the Intercom is automatically closed after 20 seconds.
To re-open it, simply start talking again. When the Intercom is "VOX" activated, you can decide to disable it before the predefined time, simply by pressing the "Control" button once.
To disable the voice activation mode, follow the instructions provided in the "Special configurations" section.
Intercom and GPS
If BTCity/BTEva is connected to a GPS, the Intercom feature won't be disabled when the GPS talks. Intercom and GPS features work simultaneously. The same is for phone calls when the mobile phone is connected to the GPS.
Due to this functionality, when the phone is connected to the GPS, it can happen that not always the phone calls are managed correctly. In this case you can decide to disable the "Intercom+GPS" feature and listen to your GPS talk or phone call without interferences. (note the "Special configuration" section)
Priority:
With phone: The intercom feature is disabled during a phone call, and is automatically re-enabled as soon as these communications end.
With music: Bluetooth music is disabled when the Intercom is open.
With GPS navigator: In case of GPS navigator street indications, the intercom feature is not disable, allowing the intercom conversation to be keep open, together with the GPS indication in background.
Distance
Two Midland BTCity/BTEva units can communicate up to a maximum range of approximately 200 meters outdoors. The maximum coverage depends on the presence of obstructions in the area or on the head orientation.
Resetting all paired devices
Sometimes you may find it necessary to delete all the pairing references stored in the BTCity/BTEva unit (reset operation).
To perform this operation, switch off the BTCity/BTEva and keep pressed the "Control" button. The red led turns on.
Simultaneously press and hold down the "Volume +" and "Volume—" buttons for 4 seconds. The Blue Light will be lit on for 1 sec.
This procedure deletes all the paired Bluetooth devices stored in the memory and it is therefore possible to start a new "clean" pairing session.
Using the wired audio input
Your Midland BTCity/BTEva is also supplied with a wired audio input (labeled AUX), that can be used to connect an audio source, like an iPod (or any other MP3 Player) or a PMR446 transceiver for communications in group or for a coverage increase.
Priority: the wired audio input has the lowest priority when compared to the other Bluetooth connections (including the Intercom) and will therefore always be disabled when another Bluetooth communication is opened.
Using a i-Pod/MP3 Player
Listening to music
To listen to music from the wired input, connect the audio source using the cable supplied with the BTCity/BTEva unit. The volume level is automatically adjusted by the AGC system, which means that you only need to adjust the volume of your iPod/ MP3 player to a level that will allow you to listen to music in normal speed.
Attention: never set the volume of the MP3 Player to the maximum possible.
Hint: We recommend that you perform a few tests adjusting the volume of your iPod/MP3 player so at the normal speed the Headset volume is suited to your needs. The AGC system will automatically increase the volume on higher speed. Make a note to remember this setting for future trips.
Attention: the volume adjustment, ("Volume+" and "Volume−") buttons, cannot be used to adjust the volume of the wired audio source(eg MP3 player).
Enabling/disabling the wire input
The wire input can be enabled and disabled
Enabling: double click the "Control" button (you will hear one audio confirmation tone).
Disabling: double click the "Control" button(you will hear two audio confirmation tones).
Attention: this function is available only if there is no music active via Bluetooth.
Using a Two Way Radio transceiver
To be able to use the transceiver, it is necessary to purchase a specific cable (sold separately) in order to connect the radio to your Midland BTCity/BTEva:
Some manufacturers radios use a different pin configuration, slower limit, the RED light will not lash.
recommend that you ask your dealer as to which cable is Yes Double press the "Control" button; the Blue light will 'ash several times, in order to let you know the selected sensitivity:
To communicate via the attached radio, press the transmission of PreMOSX disabled
To Talk (PTT) button to speak and release it to listen. It is not possible by low sensitivity
to talk and listen simultaneously. Communications can be activated low sensitivity
also without pushing the PTT button, by enabling the VOX4 function medium sensitivity
5 times = high sensitivity
Default = low sensitivity
Special configurations
Some Midland BTCity/BTEva features can be configured needs:
Adjusting/ Disabling the VOX feature (Intercom and telephone)
Wired connection always on
Intercom and GPS
Adjusting/ Disabling the VOX feature (Intercom and telephone)
The Intercom feature can be enabled both manually (VOX). The VOX activation is influenced by the background therefore by the speed.
For optimum results, it is possible to choose one of the following four microphone sensitivity levels: high, medium, low and very low. The default setting of BTCity/BTEva is “low”. It is also possible to disable. This feature let you keep the wired connection always on, even when the phone or the intercom is open. This feature can be useful when you connect a PMR446 transceiver.
the VOX feature in order to activate the Intercom and phone can an-
swering features in manual mode only.
Adjusting the sensitivity of the microphone (VOX)
- Enter the Setup mode: Switch your BTCity/BTEva o. To exit the "Setup" mode double press the "Control" button. Press and hold down the central button (Control) until the setting indicator switches on permanently. Your BTCity/BTEva is now follow the same procedure up described; now the blue LED will up mode.
- Press the "Volume+" and "Control" buttons till the red indicator to exit the "Setup" mode double press the "Control" button. will turn to steady blue.
- Now, press "Volume +" or "Volume - "to increase or reduce sensitivity. Every time you press the Volume buttons the RED drag: will flash for confirmation. When you reach the end of the upper order the "Setup" mode.
To exit the "Setup" mode double press the "Control" button.
“Sethinking” is now in “Set the same procedure up described; now the blue LED will ‘ash twice
d indicateit the "Setup" mode double press the "Control" button.
Intercom and GPS
Reduce sensi- Dlsbigh:will upper ander the "Setup" mode.

Disabling the VOX feature (Intercom and telephone)
Follow all the procedure described in the previous steps and choose the option-1 (VOX disabled). You will see the blue led blinks once.
Wired connection always on
This feature let you keep the wired connection always on, even when following your phone or the intercom is open. This feature can be useful when very low. The you connect a PMR446 transceiver.
Enabling an-
Enter the "Setup" mode.
Press the "Volume+" and "Volume -" buttons for one second. The blue LED will flash once.Press the "Control" and "Volume -" buttons for one second. The blue LED will flash once.
To exit the "Setup" mode double press the "Control" button. Enabling again:
Follow the same procedure up described; now the blue LED will flash twice
To exit the "Setup" mode double press the "Control" button.
Recommendations for specific uses
The section that follows, provides a few useful suggestions on how to achieve maximum performance from your BTCity/BTEva unit.
Using a PMR446 transceiver
To be able to use the transceiver, it is necessary to purchase a specific cable (sold separately) in order to connect the radio to your Midland BTCity/BTEva:
Some manufacturers radios use a different pin configuration, so we recommend that you ask your dealer as to which cable is best suited to your needs
To communicate via the attached radio, press the transmission Press Top Talk (PTT) button to speak and release it to listen. It is not possible to talk and listen simultaneously. The cable connected to the transceiver has a PTT button that can be placed on the handlebar of your bike or held in your hand (If you are the pillion rider).
Adjust the volume of the transceiver to your needs, remembering that the volume adjustment is controlled by the automatic AGC system and that it will therefore be automatically increased in relation to background noise.
If you wish to use a PMR446 transceiver for group communications and simultaneously maintain the Intercom feature enabled between two BTCity/BTEva devices, you must remember that the Intercom feature is enabled every time you speak by means of the BTCity/BTEva's VOX feature.
Consequently, radio communications will be disabled whilst you are talking with somebody, because they have a lower priority compared to Intercom communications.
This can be prevented by enabling the "Wired connection always on" or "Disabling the VOX feature" (both explained in the previous section).
Disable the VOX feature, as explained in the previous section, to make sure that the intercom will not automatically be activated when you speak on the PMR446. To enable the Intercom feature when using this configuration, you will have to press "Control" button manually. (This operation disables radio communications that will be automatically re-enabled when the Intercom feature is disabled).
Attention! If you disable the VOX feature, you will only be able to answer incoming phone calls by pressing the "Control" button.
Using the BTSki Audio Kit accessory (optional)
This optional kit is the Bluetooth solution designed for winter sports (use without helmets or with semi rigid type ski helmets). The audio system is made up of two ultra thin stereo speakers and a boom mike, all contained in a soft material lining
The audio system includes two ultra-flat stereo speakers and one microphone with boom, all assembled into a earwarmer headset.
natural_image
Technical line drawing of a mechanical component with no visible text or symbolsFitting and removing your Midland BTCity/BTEva
The BTCity/BTEva can be easily fitted by sliding it downwards so that it fits into the slot of the fixing device.
BTCity/BTEva is maintained in position thanks to the fixing clip located on the upper section (A).
To detach the BTCity/BTEva, simply press the fixing clip and push the unit upwards.
natural_image
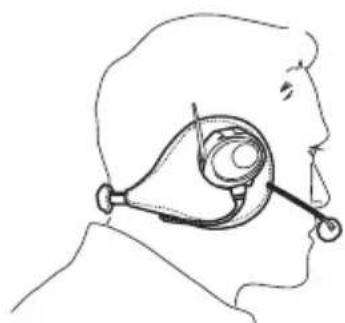
Technical line drawing of a mechanical device with labeled components (no text or symbols present)Using the BTCity/BTEva without helmet
After have fixed your BTCity/BTEva on its suitable tool and have inserted the audio kit plug into the central socket, wear your earwarmer headset as shown in the figure. Please, be sure to have placed the microphone in the right way, with the white sign oriented towards your mouth.
natural_image
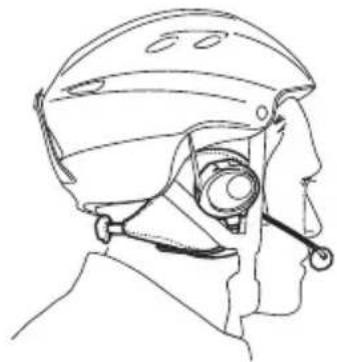
Side profile illustration of a person wearing a medical device (no text or symbols)Using the BTCity/BTEva with a semi-rigid helmet
To place the BTCity/BTEva into a semi-rigid helmet you should first of all remove the little triangular pads, used to cover the ears in most of helmets on sale, and then put your helmet directly on the earwarmer headset audio system.
Be sure the BTCity/BTEva unit is placed between the two "V" shapes strap.
natural_image
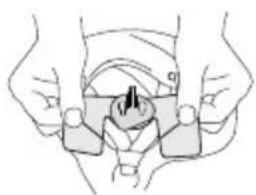
Side profile line drawing of a person wearing a helmet and visor device (no text or symbols)If your helmet is not equipped with the two removable pads, you could anyway mount your BTCity/BTEva system by using the supplied Velcro-band. Be sure to fix the Velcro-band as shown in the figure.
natural_image
Line drawing of hands holding a mechanical component (no text or symbols)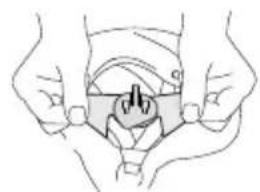
natural_image
Illustration of two hands holding a small object with a central hole, no text or symbols presentNow, fix the BTCity/BTEva on the Velcro-band. Wear your headset, insert the connection cable of the headset into the BTCity/BTEva device and wear the helmet.
natural_image
Technical line drawing of a mechanical component with no visible text or symbolsUse at your own risk
The use of the headphone-headset will impair your ability to hear other sounds and others around you.
Listening to music or speaking on a telephone may prevent you from hearing others around you and distract you from riding safely. The use of such headphone-headset while riding or skiing may endanger you and others, and its use, in some areas, could not be allowed.
Using this headset at a high volume may result in permanent hearing loss.
If you experience ringing in your ear or any other hearing related pain, reduce the volume or discontinue using this device. With continued use at high volume, your ears may become accustomed to the sound level, which may result in permanent damage to your hearing. Please use this device at a safe volume level.
Warranty
Midland will repair or replace, at its option without charge, any BT CITY/EVA device which fails due to a defect in material or workmanship within TWO Years following the initial consumer purchase.
In the event of a product defect, please return it to the authorized customer service or to the Manufacturer himself.
To make use of this warranty, it is necessary to return to the authorized service
centre:
The affected product (or accessory)
The original proof of purchase, which clearly indicates the name and address of the seller and the date and place of purchase.
This warranty does not apply to accidents of any kind, exposure to pressure, extreme temperatures (outside of -10^ to 55^ ), submersion water damage, battery leak or abuse.
This warranty does not include the cost of labor for removal or re-installation of the product.
European CE Notice Certification and Safety Approvals Information
This product is CE marked according to the RTTE Directive (99/5/EC) and is free use in all the EU countries.
Users are not permitted to make any changes or modifications to the device.
Modifications which are not expressly approved by the producer invalidate the warranty card.
For further information, please go to our website www.cte.it
LIGHT AND SOUND SIGNALS
| LED indication Status | |
| GENERAL | |
| None Unit is switched off or full charged when connected to the power supply | |
| Single Blue flash every 3 seconds Unit being turned on/ Unit in working mode | |
| Triple red flash Unit being turned off | |
| Single Red flash every 3 seconds Standby - low battery | |
| RED and BLUE (together) every 3 seconds Active (Intercom, phone call or Bluetooth connection in progress) | |
| RED and BLUE (together) and one flash of RED light every 3 seconds | Active but low battery |
| Single red flash every 2 seconds Unit in charge when connected to the power supply | |
| Steady Blue Unit in charge when connected to the power supply: full battery charge | |
| SETUP | |
| Steady Red Setup mode | |
| Rapid Red-Blue alternating flash Pairing mode (searching for devices) | |
| Steady Blue for two second Successful pairing/ Reset paired devices | |
| Audio signals Status | |
| Ascending tone (low-high) Unit being turned on | |
| Descending tone (high-low) Unit being turned off | |
| Enable/Disable the Intercom | 1 tone = enabled / 2 tones = disabled |
| 1 tone | Specific feature turned on |
| 2 tones | Specific feature turned off |
UNIT FUNCTIONS
| If you want to... ...do this | |
| GENERAL | |
| Turn on the unit Press the Control button for 3 seconds at least (start Blue flash) | |
| Turn off the unit Press the Control and VOL- buttons together for 3 seconds (triple Red flash) | |
| Increase the volume Short press the Volume Up control | |
| Decrease the volume Short press the Volume Down control | |
| MOBILE PHONE | |
| Answer a call Short press of the Control button / say a word | |
| Reject a call Long press the Control Button / remain silent until the rings stop | |
| Terminate a call Short press the Control Button | |
| Voice Dial | Short press the Control button and state the name of the person to call (only if your BTCity/BTEva has not been paired with another BTCity/BTEva device). |
| Redial Last number Long press of the Control button | |
| INTERCOM (if paired with another BTCity/BTEva device) | |
| Start using the Intercom Start talking/short press the Control button | |
| Stop using the Intercom | Stop talking (after 20 sec. you will return to stand by mode)/Short press the Control button |
| BLUETOOTH MP3 player of the mobile phone | |
| Activate the MP3 player Press and hold down the VOL+ and VOL- buttons for 3 seconds | |
| Play and Pause Double click the Control button | |
| Forward (next song) While the music play, keep pressed of the VOL+ button for 3 sec. | |
| Backward (previous song) While the music play, keep pressed of the VOL- button for 3 sec. | |
| Deactivate the MP3 Player | Press and hold down the VOL+ and VOL- buttons for 3 seconds |
| WIRED CONNECTION | |
| Activate /Deactivate Double click the Control button (only if Music via Bluetooth is disabled) | |
| SETUP/PAIRING | |
| Enter SETUP mode Press the Control button for 7 seconds while the unit is off | |
| Exit SETUP mode While in Setup mode, double click the Control button. The Red light will turn off and the Blue light starts flashing. | |
| Pairing a Phone | While in Setup mode, press the Control button until the LED light flash Red and Blue alternately |
| Pairing your BTCity/BTEva with another BTCity/BTEva device | While in Setup mode, press the Volume + on one unit (the light will flash Red and Blue alternately), press the Volume- on the other unit (the light will flash Red and Blue alternately). On a successful pairing, both light turn to Blue for one second. |
| Reset all paired devices | While in Setup mode, long press he Volume + and he Volume -. On a successful reset, the Blue light will turn on for two second. |
| SPECIAL SETUP CONFIGURATION | |
| Change VOX sensitivity or disable it | While in Setup mode, press short the Control and VOL+ buttons (blue light on). Now, press “Volume +” or “Volume-” to increase or reduce sensitivity. Double click the Control button to visualize the VOX status. Go back to the SETUP mode (Red light always on).VOX STATUS (Blue light flashing):Once = VOX disableTwice = very low sensitivity3 times = low sensitivity4 times = medium sensitivity.5 times = high sensitivity |
| Wired connection always on | Enabling: In “Setup” mode, press the “Volume+” and “Volume -” buttons for one second. The blue LED will flash once.Disabling: Follow the same procedure up described; now the blue LED will flash twice |
| Intercom and GPS | Disabling: Enter the “Setup” mode. Press the “Control” and “Volume -” buttons for one second. The blue LED will flash once. To exit the “Setup” mode double press the “Control” button.Enabling again: Follow the same procedure up described; now the blue LED will flash twice. To exit the “Setup” mode double press the “Control” button. |
CTE International herewith declares that the product complies with the essential requirements of EC Directive 99/05/EC; the declaration of conformity of the device can be consulted onto www.midlandradio.eu
INHALT
Midland BTCity/BTEva....2
Akku laden....3
Midland BTCity/BTEva
natural_image
Simple line drawing of a curved connector or connector (no text or symbols)Kabelmikrofon
natural_image
Technical line drawing of a mechanical device with two components (no text or symbols)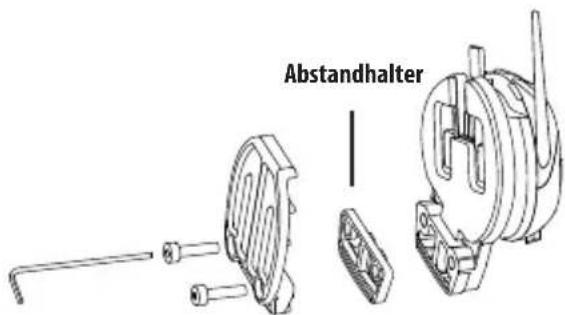
natural_image
Technical line drawing of two mechanical components with labeled parts (no text or symbols)natural_image
Technical line drawing of a mechanical component with no visible text or symbolsnatural_image
Technical line drawing of a mechanical component with two views (top and side), no text or symbols present.natural_image
Side profile sketch of a person wearing an ear canal device (no text or symbols)natural_image
Line drawing of a person wearing a helmet and holding a device (no text or symbols)natural_image
Two hand-drawn diagrams showing a person holding two objects with a circular symbol inside (no text or labels)natural_image
Technical line drawing of a mechanical component with no visible text or symbolsMidland BT City/Eva 2
natural_image
Simple line drawing of a microphone with two leads (no text or symbols)Micrófono de hilo
natural_image
Technical line drawing of a mechanical device with two components (no text or symbols)natural_image
Technical line drawing of two mechanical components with labeled parts (no text or symbols present)natural_image
Technical line drawing of a mechanical component with no visible text or symbolsnatural_image
Technical line drawing of two mechanical components with labeled parts A and B (no text or symbols beyond labels)natural_image
Side profile illustration of a person wearing a headset (no text or symbols)natural_image
Side profile line drawing of a person wearing a helmet and visor device (no text or symbols)natural_image
Illustration of two hands holding a small object with a circular mark, no text or symbols presentnatural_image
Technical line drawing of a mechanical component with no visible text or symbolsMidland BTCity/BTEva 2
Chargement batteries....3
Description du kit audio....3
Midland BTCity/BTEva
natural_image
Simple line drawing of a curved pipe or tube with two endpoints (no text or symbols)Microphone à fil
natural_image
Line drawing of a mechanical device with two components, no text or symbols present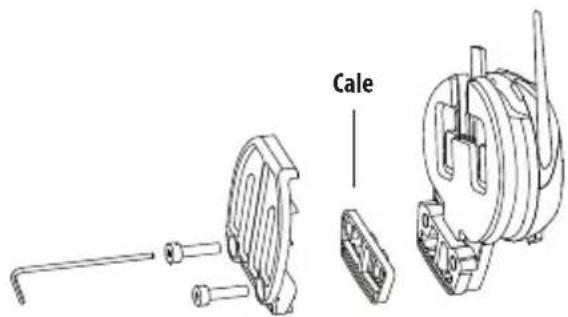
Fixation avec pince
natural_image
Technical line drawing of two mechanical components with labeled parts (no text or symbols present)Pairing with Bluetooth devices
Pairing the unit with a mobile phone
Contrôles possible:
Attention: this function is available only if there is no music active via Bluetooth.
Using a PMR446 transceiver
natural_image
Technical line drawing of a mechanical component with no visible text or symbolsnatural_image
Technical line drawing of two mechanical components with labeled parts (no text or symbols present)Utiliser le BTCity/BTEva sans casque
natural_image
Side profile sketch of a person wearing a medical device (no text or symbols)natural_image
Side profile line drawing of a person wearing a helmet and holding a device (no text or symbols)
natural_image
Two hand-drawn diagrams showing a mechanical or electrical component being held, with no visible text or symbols.natural_image
Technical line drawing of a mechanical component with no visible text or symbolsMidland BTCity/BTEva 2
Carregando as baterias ....3
Midland BTCity/BTEva
Carregando as baterias
natural_image
Simple gray rectangular shape with a small white 'P' and a vertical line on the right (no text or symbols)natural_image
Simple line drawing of a curved object with two circular ends (no text or symbols)Microfone com fio
natural_image
Technical line drawing of a mechanical device with two views (top and side), no text or symbols present.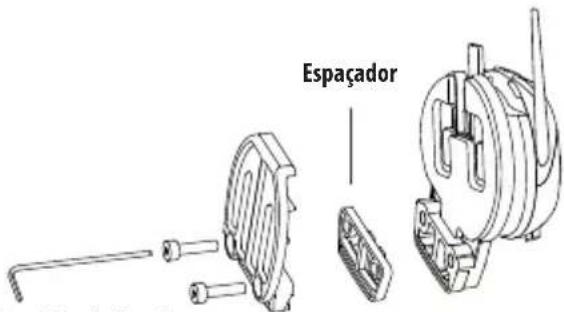
natural_image
Technical line drawing of two mechanical components with labeled parts (no text or symbols present)natural_image
Technical line drawing of a mechanical component with no visible text or symbolsnatural_image
Technical line drawing of two mechanical components with labeled parts (no text or symbols present)natural_image
Side profile illustration of a person wearing an ear canal device (no text or symbols)natural_image
Side profile line drawing of a person wearing a helmet and holding a device (no text or symbols)natural_image
Two hand-drawn diagrams showing a mechanical or electrical component being held, with no visible text or symbols.natural_image
Technical line drawing of a mechanical component with no visible text or symbols
natural_image
Simple gray rectangular shape with a small white 'P' and a vertical line on the right edge (no text or symbols)natural_image
Simple gray vertical rectangle with a small white 'P' symbol on the left side and two horizontal lines extending downward (no text or symbols)FUNÇÕES DO APARELHO
Midland BTCity/BTEva 2
MIDLAND BTCity/BTEva
natural_image
Simple line drawing of a curved pipe or tube with two endpoints (no text or symbols)Μικρόφωνο με boom
natural_image
Technical line drawing of a mechanical device with two views (top and side), no text or symbols present.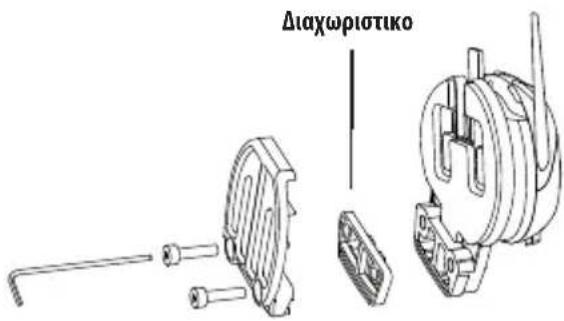
Σφιγκτήρας
natural_image
Technical line drawing of two mechanical components with labeled parts (no text or symbols present)natural_image
Technical line drawing of a mechanical component with no visible text or symbolsnatural_image
Technical line drawing of two mechanical components with labeled parts (no text or symbols present)natural_image
Side profile illustration of a person wearing an ear canal device (no text or symbols)natural_image
Side profile line drawing of a person wearing a helmet and holding a device (no text or symbols)natural_image
Illustration of two hands holding a small object with a triangular handle, no text or symbols presentnatural_image
Technical line drawing of a mechanical component with no visible text or symbolsEuropean CE Notice Certification and Safety Approvals Information
Midland BTCity/BTEva 2
Batterijen opladen 3
Midland BTCity/BTEva
natural_image
Simple line drawing of a curved pipe or tube with two endpoints (no text or symbols)Microfoon met draad
natural_image
Technical line drawing of a mechanical device with two views (top and side), no text or symbols present.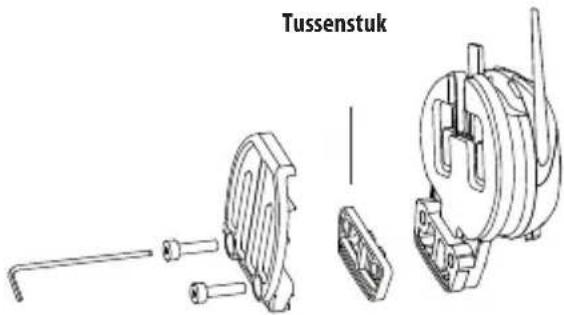
Klem
natural_image
Technical line drawing of two mechanical components with labeled parts (no text or symbols present)natural_image
Technical line drawing of a mechanical component with no visible text or symbolsnatural_image
Technical line drawing of two mechanical components with labeled parts (no text or symbols present)natural_image
Side profile line drawing of a person wearing an ear canal device (no text or symbols)natural_image
Side profile line drawing of a person wearing a helmet and holding a device (no text or symbols)natural_image
Two identical line drawings of hands holding a small object, possibly a tool or device, with no visible text, numbers, or symbols.natural_image
Technical line drawing of a mechanical component with no visible text or symbolsMidland BTCity/BTEva 2
Paristojen lataus ....3
Midland BTCity/BTEva
natural_image
Simple line drawing of a earbuds with two circular heads (no text or symbols)Lankamikrofoni
natural_image
Technical line drawing of a mechanical device with two components (no text or symbols)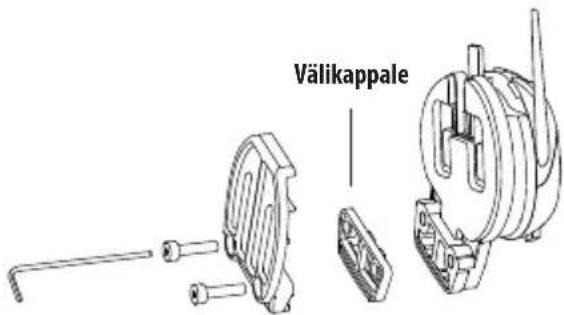
natural_image
Technical line drawing of two mechanical components with labeled parts (no text or symbols present)natural_image
Technical line drawing of a mechanical component with no visible text or symbolsnatural_image
Technical line drawing of two mechanical components with labeled parts (no text or symbols present)natural_image
Side profile line drawing of a person wearing a headset (no text or symbols)natural_image
Side profile line drawing of a person wearing a helmet and holding a device (no text or symbols)natural_image
Two hand-drawn diagrams showing a person holding two objects with labeled parts (no text or symbols present)natural_image
Technical line drawing of a mechanical component with no visible text or symbolsMidland BTCity/BTEva
natural_image
Simple line drawing of a curved connector or connector (no text or symbols)natural_image
Technical line drawing of a mechanical device with two views (top and side), no visible text or symbolsnatural_image
Technical line drawing of two mechanical components with labeled parts (no text or symbols)natural_image
Technical line drawing of a mechanical component with no visible text or symbolsФиксация устройства Midland BTCity/BTEva
natural_image
Technical line drawing of two mechanical components with labeled parts (no text or symbols present)natural_image
Side profile line drawing of a person wearing a headset (no text or symbols)natural_image
Side profile line drawing of a person wearing a helmet and holding a device (no text or symbols)natural_image
Illustration of hands holding a medical device with a central button (no text or symbols visible)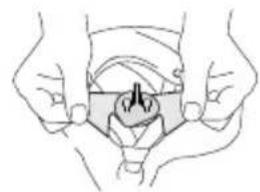
natural_image
Line drawing of two hands holding a small object, possibly a device or component (no text or symbols visible)natural_image
Technical line drawing of a mechanical component with no visible text or symbols
- Midland BTCity/BTEva
- Microfono a filo
- INDEX
- Midland BTCity/BTEva is available in two versions:
- BTCity/BTEva
- BTCity/BTEva TWIN
- Technical specifications of Midland BTCity/BTEva
- General:
- Bluetooth connections:
- Wire connections:
- Charging batteries
- Description of the unit and installation brackets
- Description of the button features:
- Description of the wired connections
- Description of the audio kit
- Fixing the stereo speakers
- Boom Microphone
- Wire microphone
- Audio kit jack
- Description of the installation brackets
- Plate with bi-adhesive strip
- Clamp
- Fitting and removing your Midland BTCity/BTEva
- Switching your Midland BTCity/BTEva on and off
- Switching the unit on:
- Switching the unit off:
- Adjusting the volume
- Pairing with Bluetooth devices
- Setup mode
- Exiting from the Setup mode
- Using the features of the Bluetooth devices
- Using the telephone feature
- Pairing the unit with a mobile phone
- Answering a call
- Rejecting a call
- Making a call
- Attention: the voice call command is possible only if the BTCity/BTEva has never been connected to another BTCity/BTEva for Intercom communication.
- Using the MP3 player feature of the mobile phone
- Available controls:
- Pairing the unit with a GPS Sat-Nav
- Using the intercom feature
- Pairing with another BTCity/BTEva device
- Intercom
- Attention: the first intercom activation must be done manually with the control button. After that, the VOX activation will be available.
- Intercom and GPS
- Distance
- Resetting all paired devices
- Using the wired audio input
- Using a i-Pod/MP3 Player
- Listening to music
- Attention: never set the volume of the MP3 Player to the maximum possible.
- Enabling/disabling the wire input
- Using a Two Way Radio transceiver
- Special configurations
- Adjusting/ Disabling the VOX feature (Intercom and telephone)
- Adjusting the sensitivity of the microphone (VOX)
- Disabling the VOX feature (Intercom and telephone)
- Wired connection always on
- Recommendations for specific uses
- Using a PMR446 transceiver
- Using the BTSki Audio Kit accessory (optional)
- Using the BTCity/BTEva without helmet
- Using the BTCity/BTEva with a semi-rigid helmet
- Use at your own risk
- Warranty
- European CE Notice Certification and Safety Approvals Information
- INHALT
- Kabelmikrofon
- Micrófono de hilo
- Microphone à fil
- Fixation avec pince
- Contrôles possible:
- Utiliser le BTCity/BTEva sans casque
- Carregando as baterias
- Microfone com fio
- Μικρόφωνο με boom
- Σφιγκτήρας
- Microfoon met draad
- Klem
- Lankamikrofoni
- Фиксация устройства Midland BTCity/BTEva
Brand : MIDLAND
Model : BTCity
Category : Talkie Walkie