
WIFIR1 - TV signal amplifier VELLEMAN - Free user manual and instructions
Find the device manual for free WIFIR1 VELLEMAN in PDF.

| Product type | Wireless-N WiFi Repeater / Access Point |
| Model | WIFIR1 |
| Brand | Velleman |
| Power supply | Integrated mains plug (100-240 VAC, 50/60 Hz) |
| Connectivity | WiFi 2.4 GHz (802.11 b/g/n), RJ45 Ethernet port 10/100 |
| LED indicators | Power, WiFi, LAN |
| Reset button | Yes (long press 10 s) |
| Main functions | WiFi repeater, access point, universal mode (AP + repeater simultaneously) |
| Wireless security | WEP 64/128 bits, WPA, WPA2 (TKIP/AES) |
| Management | Web interface (192.168.10.1), configuration wizard |
| Firmware update | Yes via web interface |
| Configuration backup/restore | Yes |
| Maintenance and cleaning | Dust with a dry cloth; avoid humidity, dust and extreme temperatures |
| Safety | Indoor use only; do not open the housing, risk of electric shock; keep out of reach of children |
| Spare parts and repairability | No user-serviceable parts; contact an authorized dealer |
| Included accessories | RJ45 cable, user manual |
| Dimensions (L x W x H) | Approximately 60 x 30 x 30 mm (plug included, estimate) |
| Weight | Approximately 50 g |
Frequently Asked Questions - WIFIR1 VELLEMAN
User questions about WIFIR1 VELLEMAN
0 question about this device. Answer the ones you know or ask your own.
Ask a new question about this device
Download the instructions for your TV signal amplifier in PDF format for free! Find your manual WIFIR1 - VELLEMAN and take your electronic device back in hand. On this page are published all the documents necessary for the use of your device. WIFIR1 by VELLEMAN.
USER MANUAL WIFIR1 VELLEMAN
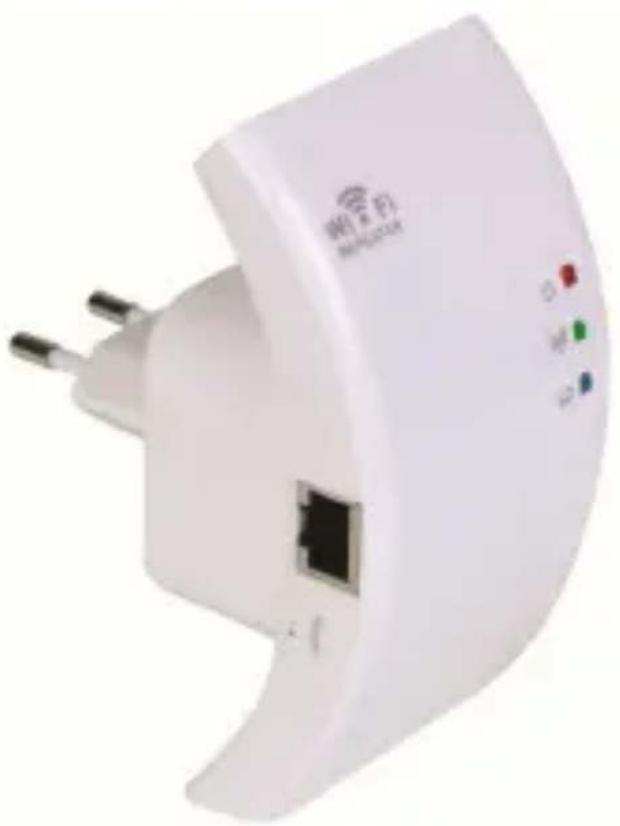
WIRELESS-N WIFI REPEATER FOR WLAN WIRELESS-N WIFI REPEATER VOOR WLAN RÉPÉTEUR WIFI WIRELESS-N POUR WLAN REPETIDOR WIRELESS-N WIFI PARA WLAN WIRELESS-N WIFI REPEATER FÜR WLAN
natural_image
White wireless router with network ports and indicator lights (no readable text or symbols)USER MANUAL
GEBRUIKERSHANDLEIDING 13
NOTICE D'EMPLOI 24
MANUAL DEL USUARIO 35
natural_image
Three white electrical plug connectors with a small terminal connector, shown from different angles (no text or symbols visible)User manual
1. Introduction
To all residents of the European Union Important environmental information about this product

natural_image
Symbol of a trash bin crossed with no text or labels, including a black rectangle below (no readable text or symbols)This symbol on the device or the package indicates that disposal of the device after its lifecycle could harm the environment. Do not dispose of the unit (or batteries) as unsorted municipal waste; it should be taken to a specialized company for recycling. This device should be returned to your distributor or to a local recycling service.
Respect the local environmental rules.
If in doubt, contact your local waste disposal authorities.
Thank you for choosing Velleman! Please read the manual thoroughly before bringing this device into service. If the device was damaged in transit, don't install or use it and contact your dealer.
2. Safety Instructions
 | Keep this device away from children and unauthorized users. |
 | Risk of electroshock when opening the cover. Touching live wires can cause life-threatening electroshocks. Do not open the housing yourself. Have the device repaired by qualified personnel. |
 | DO NOT disassemble or open the cover. There are no user-serviceable parts inside the device. Refer to an authorized dealer for service and/or spare parts. |
3. General Guidelines
Refer to the Velleman® Service and Quality Warranty on the last pages of this manual.
- Indoor use only. Keep this device away from rain, moisture, splashing and dripping liquids.
- Keep this device away from dust and extreme heat.
- Protect this device from shocks and abuse. Avoid brute force when operating the device.
- Familiarise yourself with the functions of the device before actually using it.
- All modifications of the device are forbidden for safety reasons.
WIFIR1
- Only use the device for its intended purpose. Using the device in an unauthorised way will void the warranty.
- Damage caused by disregard of certain guidelines in this manual is not covered by the warranty and the dealer will not accept responsibility for any ensuing defects or problems.
4. Overview
Refer to the illustrations on page 2 of this manual.
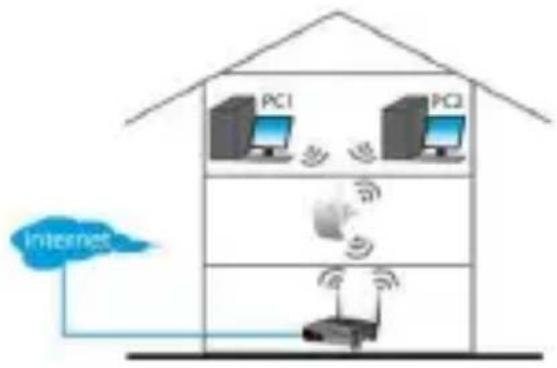
You can attach the repeater's plug horizontally or vertically so the repeater fits into any space.
- Press and hold down [A] and pull the plug to detach it.
- Place the plug back in the socket in the desired position and turn it until it snaps into place.
To reset the WIFIR1, press and hold the reset button for 10 seconds.
Note: the procedures in this manual are for the Windows® 7 operating system. Installation is similar for other Windows versions.
For more information, refer to:
http://windows.microsoft.com/en-US/windows7/Add-a-device-or-computer-to-a-network
http://windows.microsoft.com/en-US/windows7/Setting-up-a-wireless-network
http://windows.microsoft.com/en-US/windows-vista/Setting-up-a-wireless-network
5. Getting Started
flowchart
graph TD
    A["PC1"] -->|Internet| B["Router"]
    C["PC2"] -->|Internet| B["Router"]
    B -->|Wireless Signal| A
    style A fill:#f9f,stroke:#333
    style C fill:#f9f,stroke:#333
    style B fill:#ccf,stroke:#333
Wireless repeater mode:
You need WiFi AP/Router internet access. The WIFIR1 connects wirelessly to your wireless router. You can configure the WIFIR1 by connecting it to your pc using the
flowchart
graph TD
    A["PC1"] --> B["Internet"]
    C["PC2"] --> D["LAN cable"]
    B --> E["Wireless Device"]
    D --> E
    E --> F["Server"]
    style A fill:#f9f,stroke:#333
    style C fill:#f9f,stroke:#333
    style B fill:#ccf,stroke:#333
    style D fill:#ccf,stroke:#333
    style E fill:#cff,stroke:#333
    style F fill:#ffc,stroke:#333
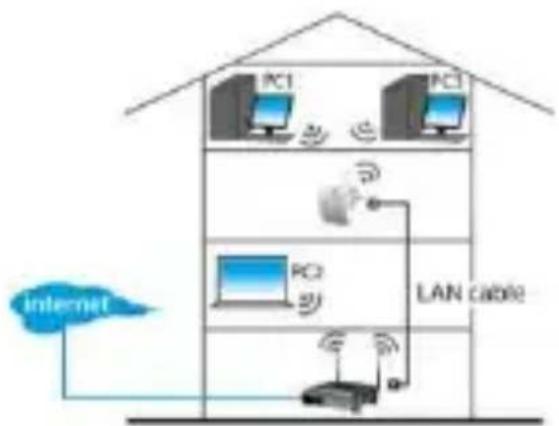
Wireless AP mode:
You need broadband router internet access. Connect the WIFIR1 to your wireless router using an RJ45 cable.
See 6.c. for configuration.
WIFIR1
included RJ45 cable (see 6.a.), or wirelessly (see 6.b.).
Caution: if you have already configured the WIFIR1 as a repeater but you want to change it to AP, you have to reset the device and start the configuration again.
6. Configuration
a. Configuring Repeater Mode Using the RJ45 Cable
a1. Plug the WIFIR1 into a wall socket and connect it to your pc using the included RJ45 cable.
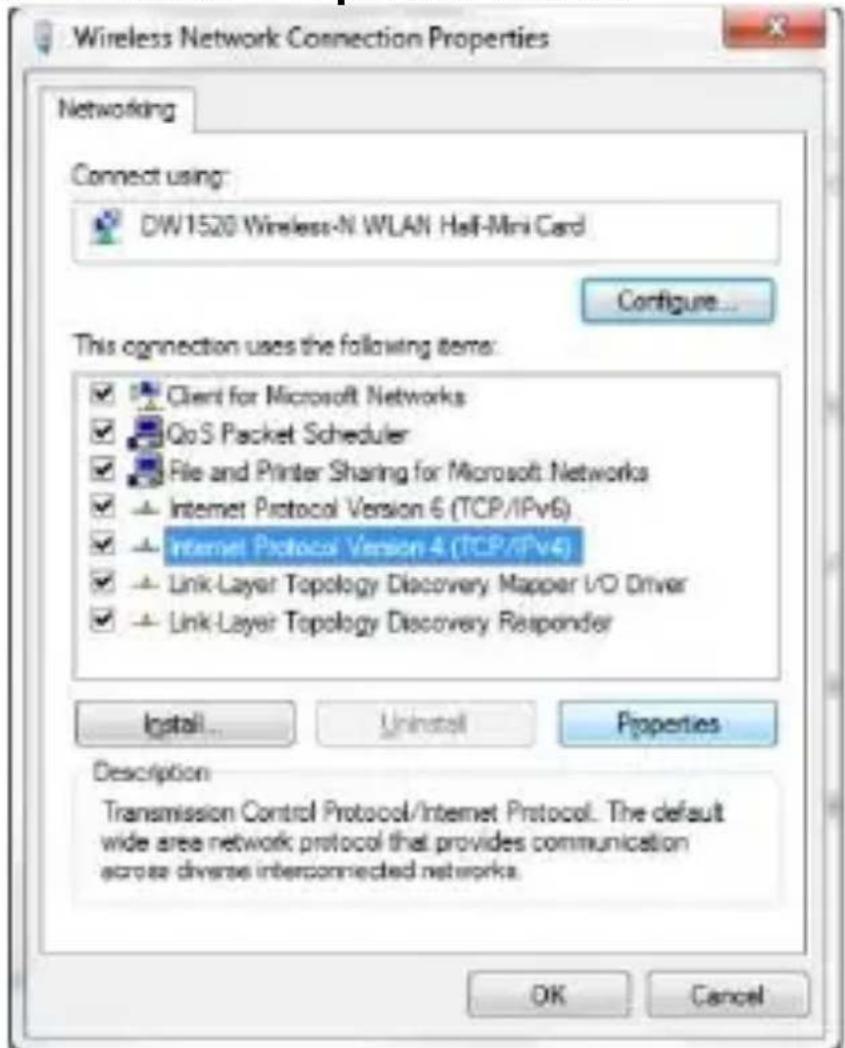
a2. On your pc, click the Start button and choose Control Panel > Network & Sharing Center.
In the list of networks, click on your network and then click the Properties button.
In the list, select Internet Protocol Version 4 (TCP/IPv4), then click the Properties button.
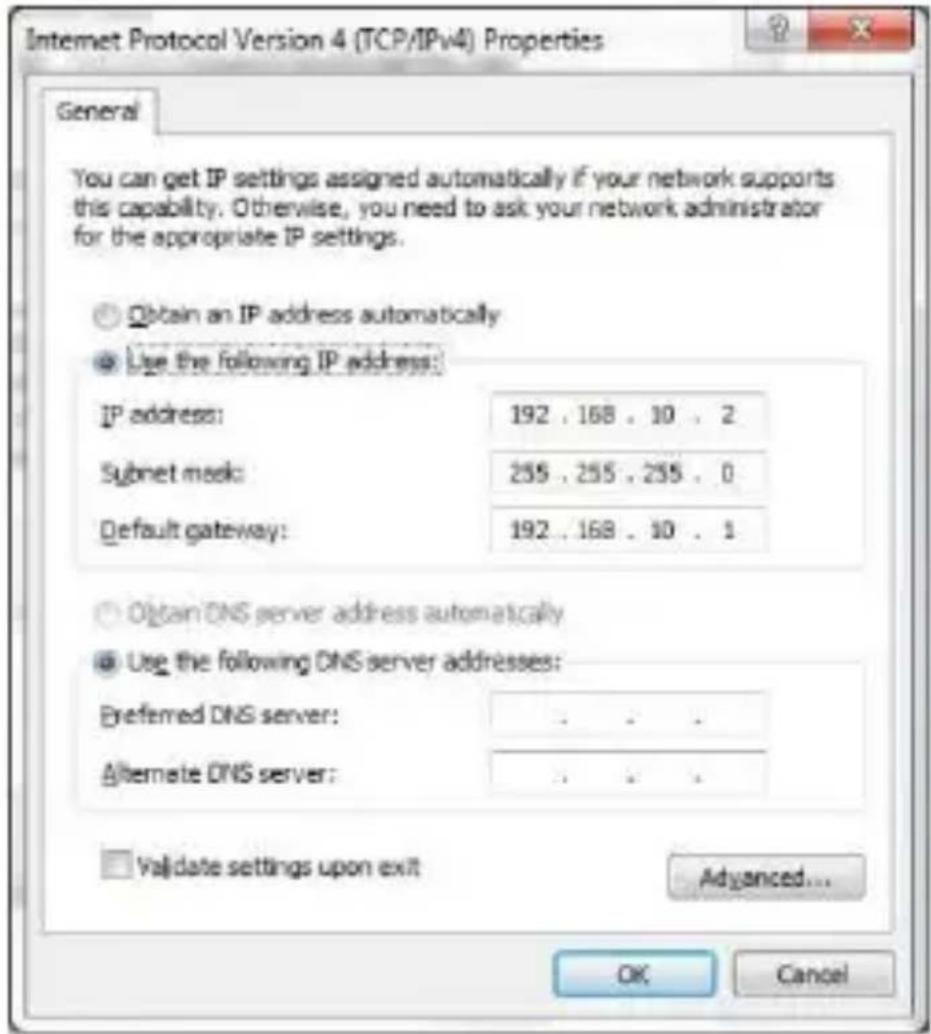
a3. In the Properties window, select Use the Following IP Address. In the IP Address box, type 192.168.10.x where
WIFIR1
'x' is a number from 2 to 254. In Subnet Mask, type 255.255.255.0
In Default Gateway, type the IP Address of your wireless router (default address is 192.168.10.1).
Click OK to confirm.
a4. Open your web browser and type http://192.168.10.1 in the browser's address box.
http://192.168.10.1/home.asp
The login window appears.
a5. Enter the user name and password and click OK to confirm (default user name and password are "admin"). The web management tool home screen appears.
WIFIR1
a6. In the menu on the left-hand side, click Setup Wizard.
Wireless Repeater Mode(Station)
Ethernet connect PC or local network, Wireless work for a WAN port connects to other wireless AP or router.


Standard Wireless AP Mode
Wireless work for access point, Ethernet connect to local network.

flowchart
graph LR
    A["UserPC"] --> B["Repeater"]
    B --> C["Router Switch"]
    C --> D["JD SL Modem"]
    D --> E["Internet"]
a7. Select Wireless Repeater Mode (Station) and click Next to continue.
a8. Click Repeater – OneKey Setting and wait until the window with the list of wireless networks appears (this may take several seconds).
Refresh List Current Connect to: Velleman Wireless ADSL : Connected
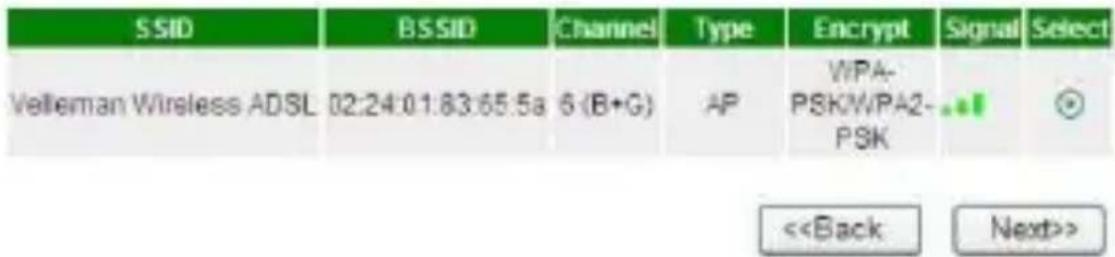
To update the list of networks, click Refresh List.
WIFIR1
a9. Select your wireless network and click Next to continue.
WIFIR1
c. Configuring AP Mode
c1. Plug the WIFIR1 into a wall socket. c2. Follow steps a2 to a6. c3. Select Wireless Repeater Mode (Station) and click Next to continue. c4. Click AP - OneKey Setting and wait until the home screen appears again (see image step a5).7. Connecting Your Laptop/PC to the Repeater
a. Wireless Connection
To connect your pc to the repeater, proceed as follows: a1. Log on to your pc. a2. Click the network icon or located at the bottom right of your screen. A list of networks appears. a3. Select the WIFIR1 network from the list and then click Connect. a4. If required, type the network password and click OK to confirm. You will see a confirmation message when you are connected to the network.b. Wired Connection
b1. Connect your pc to the WIFIR1 using the RJ45 cable. b2. Switch the pc on.8. Web Management Tool
a. Wireless Basic Settings
In your web browser, open the web management tool and select Wireless > Basic Settings.| Disable Wireless LAN Interface | If this option is selected, wireless network is switched off. |
| Mode | Supports AP and Repeater modes |
| SSID of Connect to or SSID of AP | Main Service Set Identifier. This is the name of your wireless network. |
| SSID of Extended Interface | Universal Repeater Mode (acting as AP and repeater simultaneously) |
| Band | Supports 11B/11G/11N mixed modes. |
WIFIR1
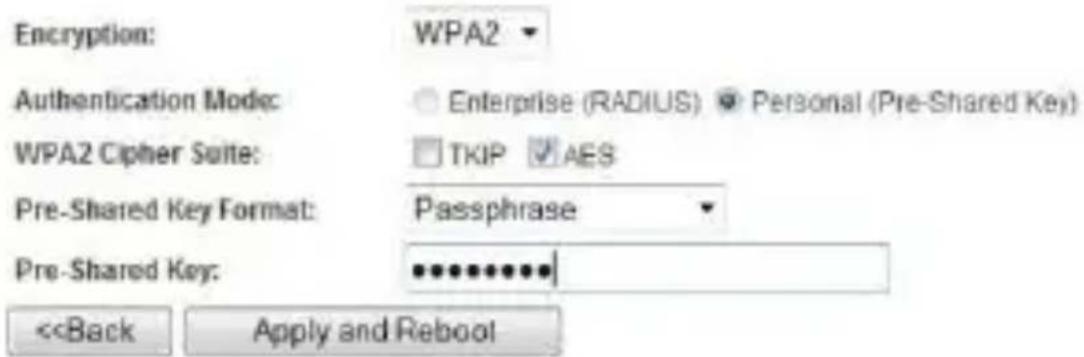
 b. Wireless Security Settings
Set up the wireless security and encryption to prevent unauthorised access and monitoring. Supported encryption methods are: 64/128-bit WEP, WPA, and WPA2. b1. Log on to the management tool and select Wireless >Security.
WIFIR1
b2. In Select SSID, you can select:| Root Client-XXXX | The password of the repeater is the same as the password of your XXXX router. |
| Repeater AP - WiFi-Repeater1 | Select this option to set up a password for the WiFi repeater. |
c. Reset, Backup and Restore
You can back up the settings of the WIFIR1 for security reasons. Also, if you use the device in different settings, you can easily save and reload the different settings. c1. Log on to the management tool and select Save/Reload Settings.  - To make a backup file of the current settings, click the Save button and choose a location for the settings file. You can save as many setting files as you need. - To upload previously saved settings, click the Browse button and select the saved settings file on your pc. Next, click the Upload button to load the settings. The current settings will be replaced with the settings in the file that you loaded. - To remove all the configuration settings you have made and reset the device to the factory defaults, click the Reset button.d. Firmware Upgrade
To upgrade the firmware of your repeater, proceed as follows: d1. Download the new firmware from our website to your pc. d2. Log on to the management tool and choose Management > Upgrade Firmware.  d3. Click the Browse button and select the downloaded firmware file on your pc. d4. Click Upload. The upgrade procedure starts automatically. Caution: Upgrading may take several minutes to complete. Never interrupt the upgrade process by closing the web browser or V. 01 - 24/07/2013 11 ©Velleman nvWIFIR1
disconnecting your pc from the router. The WIFIR1 may become unusable if you do. Interrupting the upgrade process will void the warranty.e. Changing the Password
The default password for the web management tool is "admin". For security purposes, we strongly recommend that you modify the password. e1. In the management tool, choose Management > Password.  e2. Type a user name in User Name. e3. Type a password in New Password, and type it again it in Confirmed Password. e4. Click Apply Changes to confirm. If you want to keep the original password, click Reset. Use this device with original accessories only. Velleman nv cannot be held responsible in the event of damage or injury resulted from (incorrect) use of this device. For more info concerning this product and the latest version of this manual, please visit our website www.velleman.eu. The information in this manual is subject to change without prior notice. All registered trademarks and trade names are properties of their respective owners and are used only for the clarification of the compatibility of our products with the products of the different manufacturers. Windows, Windows Vista, Windows 7 are registered trademarks of Microsoft Corporation in the United States and other countries.© COPYRIGHT NOTICE
This manual is copyrighted. The copyright to this manual is owned by Velleman nv. All worldwide rights reserved. No part of this manual may be copied, reproduced, translated or reduced to any electronic medium or otherwise without the prior written consent of the copyright holder.GEBRUIKERSHANDLEIDING
1. Inleiding
Aan alle ingezetenen van de Europese Unie Belangrijke milieu-informatie betreffende dit product
 Dit symbool op het toestel of de verpakking geeft aan dat, als het na zijn levenscyclus wordt weggeworpen, dit toestel schade kan toebrengen aan het milieu. Gooi dit toestel (en eventuele batterijen) niet bij het gewone huishoudelijke afval; het moet bij een gespecialiseerd bedrijf terechtkomen voor recyclage. U moet dit toestel naar uw verdeler of naar een lokaal recyclagepunt brengen. Respecteer de plaatselijke milieuwetgeving.Hebt u vragen, contacteer dan de plaatselijke autoriteiten betreffende de verwijdering.
Dank u voor uw aankoop! Lees deze handleiding grondig voor u het toestel in gebruik neemt. Werd het toestel beschadigd tijdens het transport, installeer het dan niet en raadpleeg uw dealer.2. Veiligheidsinstructies
 | Houd buiten het bereik van kinderen en onbevoegden. |
 | Elektrocutiegevaar bij het openen van het toestel. Raak geen kabels aan die onder stroom staan om dodelijke elektroshocks te vermijden. Open de behuizing niet zelf en laat reparaties over aan geschoold personeel. |
 | Demonteer of open dit toeste NOOIT. Er zijn geen door de gebruiker vervangbare onderdelen in dit toestel. Voor onderhoud of reserveonderdelen, contacteer uw dealer. |
3. Algemene richtlijnen
Raadpleeg de Velleman® service- en kwaliteitsgarantie achteraan de handleiding. - Gebruik het toestel enkel binnenshuis. Bescherm tegen regen, vochtigheid en opspattende vloeistoffen. - Bescherm tegen stof en extreme temperaturen. - Bescherm tegen schokken en vermijd brute kracht tijdens de installatie en de bediening van dit toestel. - Leer eerst de functies van het toestel kennen voor u het gaat gebruiken.WIFIR1
- Om veiligheidsredenen mag u geen wijzigingen aanbrengen tenzij anders aangegeven in deze handleiding. Schade door wijzigingen die de gebruiker heeft aangebracht valt niet onder de garantie. - Gebruik het toestel enkel waarvoor het gemaakt is. Andere toepassingen kunnen leiden tot kortsluitingen, brandwonden, elektrische schokken, enz. Bij onoordeelkundig gebruik vervalt de garantie. - De garantie geldt niet voor schade door het negeren van bepaalde richtlijnen in deze handleiding en uw dealer zal de verantwoordelijkheid afwijzen voor defecten of problemen die hier rechtstreeks verband mee houden.4. Omschrijving
Raadpleeg de afbeeldingen op pagina 2 van deze handleiding. De stekker van de repeater kan horizontaal of verticaal bevestigd worden zodat de repeater past in elke ruimte. - Houd [A] ingedrukt en trek aan de plug om los te koppelen. - Steek de stekker opnieuw in de plug in de gewenste positie en draai totdat u een klik hoort.Houd de resetknop ingedrukt gedurende 10 seconden om de WIFIR1 te resetten. Opmerking: de beschreven procedures zijn van toepassing voor Windows® 7. De installatie is hetzelfde als bij andere Windows-versies. Voor meer informatie, zie: http://windows.microsoft.com/en-US/windows7/Add-a-device-or-computer-to-a-network http://windows.microsoft.com/en-US/windows7/Setting-up-a-wireless-network http://windows.microsoft.com/en-US/windows-vista/Setting-up-a-wireless-network5. Van start gaan
flowchart
graph TD
    A["PC1"] -->|Internet| B["Router"]
    C["PC2"] -->|Internet| B["Router"]
    B -->|Wireless Signal| A["PC1"]
    B -->|Wireless Signal| C["PC2"]
Wireless Repeater modus:
U heeft internettoegang met WiFi AP/Router nodig. Verbind de draadloze WIFIR1 met uw draadloze router. Sluit de WIFIR1 aan op uw PC met de meegeleverde RJ-45 aansluiting om te configureren (zie 6.a.) of draadloos (zie 6.b.).WIFIR1
flowchart
graph TD
    A["PC1"] --> B["PC3"]
    B --> C["LAN cable"]
    C --> D["PC2"]
    D --> E["Internet"]
    style A fill:#f9f,stroke:#333
    style B fill:#f9f,stroke:#333
    style C fill:#ccf,stroke:#333
    style D fill:#cff,stroke:#333
    style E fill:#ffc,stroke:#333
Wireless AP modus:
U heeft internettoegang met breedbandrouter nodig. Gebruik een RJ45-kabel om de WIFIR1 met uw draadloze router te verbinden. Zie 6.c. configuratie. Opgelet: Herstart het toestel en herbegin de configuratie indien de WIFIR1 werd ingesteld in Repeater modus en u die in AP modus wil zetten.6. Configuratie
a. Repeater modus instellen met de RJ45-kabel
a1. Steek de WIFIR1 in een stopcontact en sluit aan op uw pc met de meegeleverde RJ45-kabel. a2. Klik op Start en selecteer Control Panel > Network & Sharing Center. Kies uw netwerk in de netwerklijst en klik op Properties. Selecteer Internet Protocol Version 4 (TCP/IPv4), klik daarna op Properties.WIFIR1
 a3. Kies Use the Following IP Address in het Properties-venster. Voer in het veld IP-Adres 192.168.10.x in waarbij 'x' een cijfer is tussen 2 to 254. Voer in het veld Subnet Mask 255.255.255.0 in. Voer in het veld Default Gateway het IP-adres is van uw draadloze router (standaardadres is 192.168.10.1). Klik op OK om te bevestigen.WIFIR1
 a4. Open uw webbrowser en voer in het adresveld van de browser http://192.168.10.1 in.  Het login scherm verschijnt. a5. Geef een gebruikersnaam en paswoord in en klik op OK om te bevestigen (de standaard gebruikersnaam en paswoord zijn "admin"). Het startscherm van de "web management tool" verschijnt.WIFIR1
 a6. Klik op Setup Wizard links in het menu. Wireless Repeater Mode(Station) Ethernet connect PC or local network, Wireless work for a WAN port connects to other wireless AP or router.     Standard Wireless AP Mode Wireless work for access point, Ethernet connect to local network. flowchart
graph LR
    A["UserPC"] --> B["Repeater"]
    B --> C["Router Switch"]
    C --> D["ADSL Modem"]
    D --> E["Internet"]
WIFIR1
a9. Selecteer uw draadloos network en klik op Next om verder te gaan.  b1. Steek de WIFIR1 in een stopcontact. b2. Klik op de draadloze netwerk-icon of op  linksonder in het scherm. Het signaal van de WiFi-repeater verschijnt. b3. Selecteer de WiFi-repeater en klik op Connect. b4. Volg de stappen a3 tot a13 om de repeater in te stellen.WIFIR1
c. AP-modus instellen
c1. Steek de WIFIR1 in een stopcontact. c2. Volg de stappen a2 tot a6. c3. Selecteer Wireless Repeater Mode (Station) en klik op Next om verder te gaan. c4. Klik op AP – OneKey Setting en wacht totdat het startscherm opnieuw verschijnt (zie fig. stap a5).7. Uw laptop/PC met de repeater verbinden
a. Draadloze aansluiting
Ga als volgt te werk om uw pc met de repeater te verbinden: a1. Log in op uw pc. a2. Klik op de de netwerkicoon of op rechtsonder in het scherm. Een netwerklijst verschijnt. a3. Selecteer het WIFIR1-netwerk uit de lijst en klik vervolgens op Connect. a4. Voer indien nodig het netwerkpaswoord in en klik op OK om te bevestigen. Een bevestigingsbericht verschijnt eenmaal er netwerkverbinding is.b. Draadaansluiting
b1. Sluit uw pc aan op de WIFIR1 met de RJ45-kabel. b2. Schakel uw pc in.8. Web Management Tool
a. Basisinstellingen (Wireless Basic Settings)
Open de "web management tool" in uw webbrowser en selecteer Wireless > Basic Settings.| Draadloze LAN-interface uitschakelen | Selecteer deze optie om het draadloos netwerk uit te schakelen. |
| Modus | Ondersteunt AP en Repeater modi |
| SSID van Connect to of SSID van AP | Dit is de naam van uw draadloos netwerk (Main Service Set Identifier). |
| SSID van uitgebreide interface | Universal Repeater modus (fungeert zowel als AP en repeater tegelijkertijd) |
| Band | Ondersteunt gemengde modi 11B/11G/11N. |
WIFIR1
 b. Beveiligingsinstellingen (wireless security)
Stel de draadloze beveiliging en encryptie in voor het beveiligen tegen ongewenste toegang en monitoring. Ondersteunde encrypties zijn: 64/128-bits WEP, WPA, en WPA2. b1. Log in op de management tool en selecteer Wireless >Security.
WIFIR1
b2. In Select SSID selecteert u:| Root Client-XXXX | Het paswoord van de repeater is hetzelfde als dat van uw XXXX. |
| Repeater AP - WiFi-Repeater1 | Selecteer deze optie om een paswoord in te stellen voor de WiFi-repeater. |
c. Instellingen resetten, kopiëren en terugzetten
Om veiligheidsredenen kan er een reservekopie gemaakt worden van de instellingen. Bovendien kunnen de instellingen gemakkelijk opgeslagen en herladen worden bij het gebruik van de WIFIR1 in verschillende instellingen. c1. Log in op de management tool en selecteer Save/Reload Settings.  - Klik op Save om een back-upbestand te maken van de huidige instellingen en kies een locatie voor het instellingenbestand. Sla zoveel instellingenbestanden op als nodig. - Klik op Browse om de laatst opgeslagen instellingen te uploaden, en selecteer het opgeslagen instellingenbestand op uw pc. Klik vervolgens op Upload om de instellingen te uploaden. De huidige instellingen worden vervangen door de instellingen van het geüploade bestand. - Klik op Reset om alle configuratieinstellingen ongedaan te maken en om terug te zetten naar de fabrieksinstellingen.d. Firmware-update
Ga als volgt te werk om de firmware van uw repeater te upgraden: d1. Download de nieuwe firmware vanaf de website van uw pc. d2. Log in op de management tool en selecteer Management > Upgrade Firmware.  d3. Klik op Browse en selecteer het gedownloade firmwarebestand op uw pc. V. 01 - 24/07/2013 22 ©Velleman nvWIFIR1
d4. Klik op Upload. De upgradeprocedure start automatisch. Opgel: Het upgraden kan enkele minuten duren. Onderbreek de upgradeprocedure nooit door de webbrowser te sluiten of uw pc los te koppen van de router. Hierdoor zou de WIFIR1 onbruikbaar kunnen worden en de garantie vervallen.e. Het paswoord wijzigen
Het standaard paswoord voor het "web management tool" is "admin". Om veiligheidsredenen adviseren wij u om het paswoord te wijzigen. e1. In het management tool, selecteer Management > Password.  e2. Voer in het veld User Name, een gebruikersnaam in. e3. Voer in het veld New Password, een paswoord in en herhaal dit paswoord in Confirmed Password. e4. Klik op Apply Changes om te bevestigen. Klik op Reset om het oorspronkelijke paswoord te behouden. Gebruik dit toestel enkel met originele accessoires. Velleman nv is niet aansprakelijk voor schade of kwetsuren bij (verkeerd) gebruik van dit toestel. Voor meer informatie over dit product en de meest recente versie van deze handleiding, zie www.velleman.eu. De informatie in deze handleiding kan te allen tijde worden gewijzigd zonder voorafgaande kennisgeving. Alle geregistreerde handelsmerken en handelsnamen zijn eigendom van hun respectievelijke bezitters, en zijn enkel gebruikt als voorbeeld van de compatibiliteit tussen onze producten en de producten van de verschillende fabrikanten. Windows, Windows Vista, Windows 7 zijn geregistreerde handelsmerken van Microsoft Corporation in de Verenigde Staten en andere landen.WIFIR1
© AUTEURSRECHT
Velleman nv heeft het auteursrecht voor deze handleiding.
Alle wereldwijde rechten voorbehouden. Het is niet toegestaan om deze handleiding of gedeelten ervan over te nemen, te kopiëren, te vertalen, te bewerken en op te slaan op een elektronisch medium zonder voorafgaande schriftelijke toestemming van de rechthebbende.NOTICE D'EMPLOI
1. Introduction
Aux résidents de l'Union européenne
Des informations environnementales importantes concernant ce produit
natural_image
Symbol of a trash bin crossed with no text or labelsEn cas de questions, contacter les autorités locales pour élimination.
Nous vous remercions de votre achat ! Lire la présente notice attentivement avant la mise en service de l'appareil. Si l'appareil a été endommagé pendant le transport, ne pas l'installer et consulter votre revendeur.2. Consignes de sécurité
 Garder hors de la portée des enfants et des personnes non autorisées.WIFIR1
 Risque d'électrocution lors de l'ouverture du boîtier. Toucher un câble sous tension peut causer des électrochocs mortels. Ne pas ouvrir pas le boîtier et consulter un personnel qualifié pour toute réparation.  NE JAMAIS désassembler ou ouvrir le boîtier. Il n'y a aucune pièce maintenable par l'utilisateur. Commander des pièces de rechange éventuelles chez votre revendeur.3. Directives générales
Se reporter à la garantie de service et de qualité Velleman® en fin de notice. - Pour usage à l'intérieur uniquement. Protéger contre la pluie, l'humidité et les projections d'eau. - Protéger contre la poussière et la chaleur extrême. - Protéger contre les chocs et le traiter avec circonspection pendant l'installation et l'opération. - Se familiariser avec le fonctionnement avant l'emploi. - Toute modification est interdite sauf si mentionné dans cette notice. Les dommages occasionnés par des modifications par le client ne tombent pas sous la garantie. - N'utiliser qu'à sa fonction prévue. Un usage impropre annule d'office la garantie. - La garantie ne s'applique pas aux dommages survenus en négligeant certaines directives de cette notice et votre revendeur déclinera toute responsabilité pour les problèmes et les défauts qui en résultent.4. Description
Se référer aux illustrations en page 2 de cette notice. Connectez la fiche du répétiteur horizontalement ou verticalement pour un branchement facile à la prise électrique: - Maintenez enfoncé [A] et retirez la fiche pour déconnecter. - Rebranchez la fiche dans la prise dans la position souhaitée et tournez jusqu'à ce que vous entendez un clic. Maintenez enfoncé le bouton de réinitialisation pendant 10 secondes pour réinitialiser le WIFIR1. Remarque: les procedures décrites s'appliquent au système d'exploitation Windows® 7. L'installation est similaire pour les autres éditions Windows. Pour plus d'informations, consultez: http://windows.microsoft.com/en-US/windows7/Add-a-device-or-computer-to-a-networkWIFIR1
http://windows.microsoft.com/en-US/windows7/Setting-up-a-wireless-network http://windows.microsoft.com/en-US/windows-vista/Setting-up-a-wireless-network5. Avant de commencer
flowchart
graph TD
    A["PC1"] -->|Internet| B["Router"]
    C["PC2"] -->|Internet| B["Router"]
    B -->|Wireless| A["PC1"]
    B -->|Wireless| C["PC2"]
Mode répétiteur sans fil:
Vous nécessitez une connexion Internet avec PA WiFi/routeur. Le WIFIR1 se connecte à votre routeur sans fil. Pour configurer, connectez le WIFIR1 à votre pc avec le câble RJ45 livré (voir 6.a.), ou sans fil (voir 6.b.). flowchart
graph TD
    A["PC1"] --> B["Internet"]
    C["PC2"] --> D["LAN cable"]
    B --> E["Wireless Device"]
    D --> F["Wireless Device"]
    E --> G["Computer"]
    F --> H["Computer"]
Mode PA sans fil:
Vous nécessitez une connexion Internet avec routeur sans fil à large bande. Connectez le WIFIR1 à votre routeur sans fil avec un câble RJ45. Voir 6.c. pour configuration. Attention: Si vous avez déjà configure le WIFIR1 comme répétiteur mais vous souhaitez le changer en PA, réinitialisez l'appareil et recommencez la configuration.6. Configuration
a. Configurer le mode répétiteur avec le câble RJ45
a1. Branchez le WIFIR1 dans une prise murale et connectez-le à votre ordinateur avec le câble RJ45 livré. a2. Cliquez sur Start et sélectionnez Control Panel > Network & Sharing Center. Cliquez sur votre réseau dans la liste des réseaux, ensuite cliquez sur Properties. Sélectionnez Internet Protocol Version 4 (TCP/IPv4) dans la liste, puis cliquez sur Properties.WIFIR1
 a3. Choisissez Use the Following IP Address dans la fenêtre Properties. Dans le champ IP Address, saisissez 192.168.10.x dont 'x' est un digit rangeant entre 2 et 254. Saisissez 255.255.255.0 dans le champ Subnet Mask. Introduisez l'adresse IP de votre routeur sans fil Default Gateway (adresse par défaut est 192.168.10.1). Cliquez sur OK pour confirmer.WIFIR1
 a4. Ouvrez votre navigateur web et introduisez http://192.168.10.1 dans le champ d'adresse navigateur. http://192.168.10.1/home.asp L'écran de connexion s'affiche. a5. Saisissez le nom d'utilisateur et mot de passe et cliquez sur OK pour confirmer (le nom d'utilisateur et mot de passe par défaut sont "admin"). L'écran de démarrage du "web management tool" apparaît.WIFIR1
 a6. Cliquez sur Setup Wizard sur le côté gauche de la page. Wireless Repeater Mode(Station) Ethernet connect PC or local network, Wireless work for a WAN port connects to other wireless AP or router.     Standard Wireless AP Mode Wireless work for access point, Ethernet connect to local network. flowchart
graph LR
    A["UserPC"] --> B["Repeater"]
    B --> C["Router Switch"]
    C --> D["ADSL Modem"]
    D --> E["Internet"]
WIFIR1
a9. Sélectionnez votre réseau sans fil et cliquez sur Next pour continuer.  b1. Enfichez le WIFIR1 dans une prise murale. b2. Cliquez sur l'icône de réseau sans fil de votre pc ou sur en bas à droite de votre écran. Le signal du répétiteur WiFi s'affiche. b3. Sélectionnez le répétiteur WiFi et cliquez sur Connect. b4. Suivez les étapes de a3 à a13 pour configurer le répétiteur.WIFIR1
c. Configurer le Mode PA
c1. Enfichez le WIFIR1 dans une prise murale. c2. Suivez les étapes de a2 à a6. c3. Sélectionnez Wireless Repeater Mode (Station) et cliquez sur Next pour continuer. c4. Cliquez sur AP - OneKey Setting et attendez jusqu'à ce que l'écran de demarrage se réaffiche (voir illustration étape a5).7. Connecter votre ordinateur au répétiteur
a. Connexion sans fil
Procédez comme suit pour connecter votre ordinateur: a1. Connectez-vous à votre ordinateur. a2. Cliquez sur l'icône de réseau sans fil ou sur en bas à droite de votre éran. Une liste des réseaux s'affiche. a3. Sélectionnez le réseau du WIFIR1 dans la liste et cliquez sur Connect. a4. Si nécessaire, saisissez le mot de passe du réseau et cliquez sur OK pour confirmer. Après la connexion au réseau, une notification de confirmation apparaît.b. Connexion filaire
b1. Connectez votre pc au WIFIR1 avec le câble RJ45. b2. Démarrez votre ordinateur.8. Web Management Tool
a. Réglages de base (Wireless Basic Settings)
Ouvrez le "web management tool" et sélectionnez Wireless > Basic Settings.| Désactiver l'interface LAN sans fil | Sélectionnez cette option pour désactiver le réseau sans fil. |
| Mode | Supporte les modes PA et répétiteur |
| SSID de Connect tc ou SSID de PA | Le nom de votre réseau sans fil (Main Service Set Identifier). |
| SSID de l'interface étendue | Mode répétiteur universel (fonctionne comme PA et répétiteur simultanément) |
| Bande | Supporte modes mixés 11B/11G/11N. |
WIFIR1
 b. Configuer la sécurité WiFi (Wireless Security Settings)
Configurez la sécurité WiFi et cryptage pour prévenir tout accès et surveillance non autorisés. Les méthodes de cryptages supportées sont: 64/128-bits WEP, WPA, en WPA2. b1. Connectez-vous au "management tool" et sélectionnezWireless > Security.
WIFIR1
b2. Dans le champ Select SSID, sélectionnez:| Root Client-XXXX | Le mot de passe du répétiteur est identique à celui de votre routeur XXXX. |
| Repeater AP - WiFi-Repeater1 | Sélectionnez cette option pour paramétrer le mot de passe pour le répétiteur WiFi. |
c. Réinitialiser, sauvegarder et rétablir les réglages
Il est possible de sauvegarder les réglages du WIFIR1 pour des raisons de sécurité. D'ailleurs, en utilisant des réglages différents, il sera facile de les mémoriser et de les charger. c1. Connectez -vous sur le "management tool" et sélectionnez Save/Reload Settings.  - Cliquez sur Save pour créer un fichier de sauvegarde des réglages actuels et sélectionnez une location pour le fichier des réglages. Sauvegardez tant de fichiers que vous éstimez nécessaire. - Cliquez sur Browse et sélectionnez le fichier des réglages sur votre pc pour charger les réglages sauvegardés précédemment. Ensuite, cliquez sur Upload pour charger les réglages. Les paramètres actuels seront remplacés par les réglages du fichier chargé. - Cliquez sur Reset pour annuler tous les réglages de configuration et pour rétablir les paramètres par défaut.d. Actualiser le micrologiciel
Pour actualiser le micrologiciel de votre répétiteur, procédez comme suit: d1. Téléchargez la nouvelle version du micrologiciel depuis notre site web vers votre ordinateur. d2. Connectez-vous au "management tool" et sélectionnez Management > Upgrade Firmware.  d3. Cliquez sur Browse et sélectionnez le fichier du micrologiciel téléchargé sur votre ordinateur. V. 01 - 24/07/2013 33 ©Velleman nvWIFIR1
d4. Cliquez sur Upload. La procédure d'actualisation démarre automatiquement. Attention: L'actualisation peut durer quelques minutes. N'interrompez jamais la procédure d'actualisation en fermant le navigateur web ou en déconnectant votre ordinateur du routeur. Cela pourrait rendre le WIFIR1 impropre à l'usage et annuler la garantie.e. Modifier le mot de passe
Le mot de passe par défaut pour le "web management tool" est "admin". Pour des raisons de sécurité, nous vous conseillons de modifier le mot de passe. e1. Dans le "management tool", sélectionnez Management > Password. User Name: New Password: Confirmed Password: Apply Changes Reset e2. Saisissez un nom d'utilisateur dans User Name. e3. Tapez un mot de passe dans New Password, et répétez-le dans le champ Confirmed Password. e4. Cliquez sur Apply Changes pour confirmer. Cliquez sur Reset si vous souhaitez maintenir le mot de passe initial. N'employer cet appareil qu'avec des accessoires d'origine. SA Velleman ne sera aucunement responsable de dommages ou lésions survenus à un usage (incorrect) de cet appareil. Pour plus d'information concernant cet article et la version la plus récente de cette notice, visiter notre site web www.velleman.eu. Toutes les informations présentées dans cette notice peuvent être modifiées sans notification préalable. Les marques déposées et les raisons sociales sont la propriété de leurs détenteurs respectifs, et sont uniquement utilisées dans le but de démontrer la compatibilité entre nos articles et les articles des fabricants. Windows, Windows Vista, Windows 7 sont des marques déposées de Microsoft Corporation aux Etats-Unis et dans d'autres pays.WIFIR1
© DROITS D'AUTEUR
SA Velleman est l'ayant droit des droits d'auteur pour cette notice. Tous droits mondiaux réservés. Toute reproduction, traduction, copie ou diffusion, intégrale ou partielle, du contenu de cette notice par quelque procédé ou sur tout support électronique que se soit est interdite sans l'accord préalable écrit de l'ayant droit.MANUAL DEL USUARIO
1. Introducción
A los ciudadanos de la Unión Europea
Importantes informaciones sobre el medio ambiente concerniente a este producto
natural_image
Symbol of a trash bin crossed with a diagonal line and a horizontal bar below (no text or labels)Si tiene dudas, contacte con las autoridades locales para residuos.
iGracias por haber comprado el WIFIR1! Lea atentamente las instrucciones del manual antes de usarlo. Si el aparato ha sufrido algún daño en el transporte no lo instale y póngase en contacto con su distribuidor.2. Instrucciones de seguridad
 Mantenga el aparato lejos del alcance de personas no capacitadas y niños.  Riesgo de descargas eléctricas al abrir la caja Puede sufrir una peligrosa descarga eléctrica al tocar un cable conectado a la red eléctrica. No abra la caja usted mismo y deje reparar el aparato por personal titulado.WIFIR1
 NUNCA desmonte ni abra la caja. El usuario nohabrá de efectuar el mantenimiento de ninguna pieza. Contacte con su distribuidor si necesita piezas de recambio.3. Normas generales
Véase la Garantía de servicio y calidad Velleman® al final de este manual del usuario. - Utilice el aparato sólo en interiores. No exponga este equipo a lluvia, humedad ni a ningún tipo de salpicadura o goteo. - No exponga este equipo a polvo. No exponga este equipo a temperaturas extremas. - No agite el aparato. Evite usar excesiva fuerza durante el manejo y la instalación. - Familiarícese con el funcionamiento del aparato antes de utilizarlo. - Por razones de seguridad, las modificaciones no autorizadas del aparato están prohibidas salvo mención en contra. Los daños causados por modificaciones no autorizadas, no están cubiertos por la garantía. - Utilice sólo el aparato para las aplicaciones descritas en este manual. Su uso incorrecto anula la garantía completamente. - Los daños causados por descuido de las instrucciones de seguridad de este manual invalidarán su garantía y su distribuidor no será responsable de ningún daño u otros problemas resultantes.4. Descripción
Es posible fijar la clavija tanto de manera vertical como de manera horizontal para que encaje en cualquier sitio: A natural_image
Three white electrical plug connectors with terminal pins, one showing a disassembled part (no visible text or symbols)WIFIR1
| 1 | indicador ON/OFF |
| 2 | indicador de conexión inalámbrica |
| 3 | indicador LAN |
| 4 | botón de reinicialización (reset) |
| 5 | puerto RJ45 |
5. Primeros pasos
flowchart
graph TD
    A["PC1"] -->|Wireless Link| B["Router"]
    C["PC2"] -->|Wireless Link| B
    B -->|Wireless Link| D["Internet"]
    style A fill:#f9f,stroke:#333
    style C fill:#f9f,stroke:#333
    style B fill:#ccf,stroke:#333
    style D fill:#cff,stroke:#333
Modo Repetidor Inalámbrico:
Para este modo necesitará acceso a internet por AP WiFi/Router. El WIFIR1 se conecte inalámbricamente al router inalámbrico. Hay dos maneras para configurar el WIFIR1: una conexión al PC sin utilizar cables (véase 6.b.) o una conexión con el cable RJ45 incluido (véase 6.a.).WIFIR1
flowchart
graph TD
    A["PC1"] --> B["LAN cable"]
    C["PC3"] --> B
    D["PC2"] --> B
    E["Internet"] --> B
    B --> F["Server"]
    style A fill:#f9f,stroke:#333
    style C fill:#f9f,stroke:#333
    style D fill:#ccf,stroke:#333
    style E fill:#ccf,stroke:#333
Modo AP inalámbrico:
Para este modo necesitará acceso a internet por router de banda ancha. Conecte el WIFIR1 al router inalámbrico con el cable RJ45. Véase 6.c para la configuración. iOjo! Reinicialice el WIFIR1 y vuelva a configurarlo si está en el modo repetidor pero si quiere cambiar al modo AP.6. Configuración
a. Configurar el modo « repetidor » con el cable RJ45
a1. Enchufe el WIFIR1 a una toma eléctrica adecuada y conéctelo al PC con el cable RJ45. a2. En el ordenador, haga clic en Inicio (Start) y seleccione Panel de Control (Control Panel) > Ver estado y tareas de red (Network & Sharing Center). En la lista de redes, haga clic en su red y seleccione Properties. En la lista, haga clic en Internet Protocol Version 4 (TCP/IPv4) y seleccione Properties. a3. Seleccione Use the Following IP Address. Introduzca 192.168.10.x en el espacio junto a IP Address. « x » es un número de 2 a 254. Introduzca la máscara de subred 255.255.255.0 en el espacio junto a Subnet Mask Introduzca la dirección IP del router inalámbrico en el espacio junto a Default Gateway (la dirección por defecto es 192.168.10.1). Haga clic en OK para confirmar.WIFIR1
  a4. Abra el navegador e introduzca http://192.168.10.1.  http://192.168.10.1/home.asp La ventana de login (inicio de sesión) se visualiza. a5. Introduzca el nombre de usuario y la contraseña. Haga clic en OK para confirmar (nombre de usuario y contraseña por defecto: « admin »). La pantalla principal « web management tool » se visualiza. WIFIR1
a6. Haga clic en Setup Wizard (menú de la izquierda).  flowchart
graph LR
    A["User PC"] --> B["Router"]
    B --> C["Router Switch"]
    C --> D["iOSL Modem"]
    D --> E["Internet"]
c. Configurar el modo AP
c1. Conecte el WIFIR1 a la red eléctrica. c2. Siga los pasos de a2 a a6. c3. Seleccione Wireless Repeater Mode (Station) y haga clic en Next para continuar. c4. Haga clic en AP – OneKey Setting y espere hasta que la pantalla principal se visualice de nuevo (véase a5).7. Conectar el repetidor a un ordenador de sobremesa o a un portátil
a. Conexión inalámbrica
Para conectar el PC al repetidor, siga los siguientes pasos: a1. Inicie una sesión en el PC. a2. Haga clic en el icono o (parte inferior derecha de la pantalla). Una lista de redes se visualiza. a3. Seleccione la red del WIFIR1 y haga clic en Connect. a4. Si fuera necesario, introduzca la contraseña de la red y haga clic en OK para confirmar. Un mensaje de confirmación aparecerá si está conectado a la red.WIFIR1
b. Conexión con cable
b1. Conecte el PC al WIFIR1 con el cable RJ45. b2. Active el PC.8. Web Management Tool
a. Configuración básica de la conexión inalámbrica
Abra la ventana « web management tool » y seleccione Wireless > Basic Settings en el navegador. | Disable Wireless LAN Interface | La red inalámbrica está desactivada. |
| Mode | Soporte el modo « AP » y el modo Repetidor. |
| SSID of Connect to o SSID of AP | Identificador de conjunto de servicio. Es el nombre de su red inalámbrica. |
| SSID of Extended Interface | Universal Repeater Mode (modo AP y modo repetidor simultáneamente) |
| Band | Soporte los modos mezclados11B/11G/11N. |
b. Configuración de seguridad para la conexión inalámbrica
Configure los ajustes de seguridad y la encriptación para evitar un acceso y la vigilancia no autorizados. Métodos de encriptación soportados: 64/128-bit WEP, WPA, and WPA2.WIFIR1
b1. Abra la ventana « web management tool » y seleccione Wireless > Security.  b2. En el espacio junto a Select SSID, es posible seleccionar lo siguiente:| Root Client-XXXX | El repetidor y el router XXXX tienen la misma contraseña. |
| Repeater AP - WiFi-Repeater1 | Seleccione esta opción para introducir una contraseña para el repetidor WiFi. |
c. Reinicialización, copia de seguridad y restauración
Por razones de seguridad, es posible hacer una copia de seguridad de los ajustes del WIFIR1. También es posible guardar y restaurar los ajustes fácilmente si utiliza el aparato con diferentes ajustes. c1. Abra la ventana « web management tool » y seleccione Save/Reload Settings.  \- Para hacer una copia de seguridad la configuración actual, haga clic en Save y seleccione una ubicación para el fichero. Se pueden guardar tantos ficheros como se desee. \- Para subir un fichero guardado, haga clic en Browse y seleccione el fichero con la configuración guardada. Luego, haga clic en Upload para subir la configuración. La configuración actual se sustituirá por la configuración del fichero cargado. \- Para borrar todos los ajustes y restablecer los ajustes de fábrica, haga clic Reset.d. Actualizar el firmware
Para actualizar el firmware del repetidor, proceda de la forma siguiente:WIFIR1
d1. Descargue el nuevo firmware de nuestra página web al PC. d2. Abra la ventana « web management tool » y seleccioneManagement > Upgrade Firmware.
Firmware Version: Select File: WSR2:25 Browse Upload Reset d3. Haga clic en Browse y seleccione el fichero con el firmware que ha descargado. d4. Haga clic en Upload. El procedimiento de actualización se iniciará automáticamente. Cuidado: Puede tardar algunos minutos. Nunca interrumpa el procedimiento de actualización al cerrar el navegador o al desconectar el PC del router. Es posible que el WIFIR1 se vuelva inservible. Interrumpir la actualización invalidará la garantía.e. Cambiar la contraseña
La contraseña por defecto es « admin ». Por razones de seguridad, modifique la contraseña. e1. En la ventana « web management tool », seleccioneManagement > Password.
User Name: New Password: Confirmed Password: Apply Changes Reset e2. Introduzca el nombre de usuario en el espacio junto a User Name. e3. Introduzca la contraseña en el espacio junto a New Password, y vuelva a introducirla en el espacio junto a Confirmed Password. e4. Haga clic en Apply Changes para confirmar. Si quiere guardar la contraseña original, haga clic en Reset. Utilice este aparato sólo con los accesorios originales. Velleman NV no será responsable de daños ni lesiones causados por un uso (indebido) de este aparato. Para más información sobre este producto y la versión más reciente de este manual del usuario, visite nuestra página www.velleman.eu. Se pueden modificar las especificaciones y el contenido de este manual sin previo aviso.WIFIR1
Las marcas registradas y el nombre comercial son propiedad de sus propietarios respectivos, y sólo se utilizan para mostrar la compatibilidad entre nuestros productos y los productos de los fabricantes. Windows, Windows Vista, Windows 7 son marcas comerciales o marcas registradas de Microsoft Corporation en los Estados Unidos y otros países.© DERECHOS DE AUTOR
Velleman NV dispone de los derechos de autor para este manual del usuario. Todos los derechos mundiales reservados. Está estrictamente prohibido reproducir, traducir, copiar, editar y guardar este manual del usuario o partes de ello sin previo permiso escrito del derecho habiente.BEDIENUNGSANLEITUNG
1. Einführung
An alle Einwohner der Europäischen Union Wichtige Umweltinformationen über dieses Produkt
natural_image
Symbol of a trash bin with crossed lines indicating no waste or restriction, and a solid black rectangle below (no text or symbols)WIFIR1
Wir bedanken uns für den Kauf des WIFIR1! Lesen Sie diese Bedienungsanleitung vor Inbetriebnahme sorgfältig durch. Überprüfen Sie, ob Transportschäden vorliegen.2. Sicherheitshinweise
 Halten Sie Kinder und Unbefugte vom Gerät fern.  Stromschlaggefahr beim Öffnen des Gehäuses. Das Berühren von unter Spannung stehenden Leitungen könnte zu lebensgefährlichen elektrischen Schlägen führen. Öffnen Sie das Gehäuse nicht selber und lassen Sie das Gerät nur von Fachleuten reparieren.  Demontieren oder öffnen Sie das Gerät NIE. Es gibt keine zu wartenden Teile. Bestellen Sie eventuelle Ersatzteile bei Ihrem Fachhändler.3. Allgemeine Richtlinien
Siehe Velleman® Service- und Qualitätsgarantie am Ende dieser Bedienungsanleitung. - Verwenden Sie das Gerät nur im Innenbereich. Schützen Sie das Gerät vor Regen und Feuchte. - Schützen Sie das Gerät vor Staub. Schützen Sie das Gerät vor extremen Temperaturen. - Vermeiden Sie Erschütterungen. Vermeiden Sie rohe Gewalt während der Installation und Bedienung des Gerätes. - Nehmen Sie das Gerät erst in Betrieb, nachdem Sie sich mit seinen Funktionen vertraut gemacht haben. - Eigenmächtige Veränderungen sind aus Sicherheitsgründen verboten soweit nicht anders vermerkt in dieser Bedienungsanleitung. Bei Schäden verursacht durch eigenmächtige Änderungen erlischt der Garantieanspruch. - Verwenden Sie das Gerät nur für Anwendungen beschrieben in dieser Bedienungsanleitung sonst kann dies zu Schäden am Produkt führen und erlischt der Garantieanspruch. - Bei Schäden, die durch Nichtbeachtung der Bedienungsanleitung verursacht werden, erlischt der Garantieanspruch. Für daraus resultierende Folgeschäden übernimmt der Hersteller keine Haftung.WIFIR1
4. Beschreibung
Sie können den Stecker des Repeaters sowohl horizontal als auch vertikal befestigen: natural_image
Three white electrical plug connectors with terminal pins, shown from different angles (no text or symbols visible)| 1 | EIN/AUS-Schalter |
| 2 | Anzeige der drahtlosen Verbindung |
| 3 | LAN-Anzeige |
| 4 | Reset- Taste (Rücksetzung) |
| 5 | RJ45-Anschluss |
WIFIR1
5. Erste Schritte
flowchart
graph TD
    A["PC1"] -->|Wireless Link| B["Router"]
    C["PC2"] -->|Wireless Link| B
    D["Internet"] -->|Wireless Link| B
flowchart
graph TD
    A["PC1"] --> B["Internet"]
    C["PC2"] --> D["LAN cable"]
    B --> E["Wireless Device"]
    D --> F["Wireless Device"]
    style A fill:#f9f,stroke:#333
    style C fill:#f9f,stroke:#333
    style B fill:#ccf,stroke:#333
    style D fill:#ccf,stroke:#333
    style E fill:#dfd,stroke:#333
    style F fill:#dfd,stroke:#333
Wireless-Repeater-Modus:
Sie brauchen einen WiFi/Router-Zugangspunkt. Der WIFIR1 verbindet sich drahtlos mit dem drahtlosen Router. Konfigurieren Sie den WIFIR1, um ihn über das mitgelieferte RJ45-Kabel (siehe 6.a.), oder drahtlos (siehe 6.b.) mit Ihrem PC zu verbinden.Wireless-AP-Modus:
Sie brauchen einen Zugangspunkt über Breitband-Router. Verbinden Sie den WIFIR1 über RJ45-Kabel mit dem drahtlosen Router. Siehe 6.c. für die Konfiguration. Achtung! Haben Sie den WIFIR1schon als Repeater konfiguriert, aber möchten Sie auf AP umwechseln, dann setzen Sie das Gerät zurück und starten Sie die Konfiguration wieder.6. Konfiguration
a. Den Repeater-Modus über RJ45-Kabel konfigurieren
a1. Stecken Sie den WIFIR1 in eine Steckdose und verbinden Sie ihn über das mitgelieferte RJ45-Kabel mit dem PC. a2. Auf dem PC, klicken Sie auf Start und wählen Sie Control Panel > Netzwerk & Sharing Center aus. In der Netzwerkliste, klicken Sie zuerst auf Ihr Netzwerk und dann auf Properties. In der Liste, wählen Sie Internet Protocol Version 4 (TCP/IPv4) aus und klicken Sie dann auf Properties. a3. Im Properties-Fenster, wählen Sie Use the Following IP Address aus. In das Feld IP Address tragen Sie 192.168.10.x ein. « x » ist eine Nummer zwischen 2 und 254. In das Feld Subnet Mask-Kästchen tragen Sie 255.255.255.0WIFIR1
ein. In das Feld Default Gateway tragen Sie die IP-Adresse des drahtlosen Routers ein (Standard-Adresse ist 192.168.10.1). Klicken Sie auf OK um zu bestätigen.   a4. Öffnen Sie den Internetbrowser und geben Sie http://192.168.10.1 in die Adresszeile ein.  http://192.168.10.1/home.asp Das Anmeldefenster erscheint. a5. Geben Sie den Benutzername und das Passwort ein und klicken Sie auf OK um zu bestätigen (Standard-Benutzername und -Passwort sind « admin »). Das Web-Management-Tool-Hauptfenster erscheint. WIFIR1
a6. Im linken Menü klicken Sie auf Setup Wizard.  flowchart
graph LR
    A["User PC"] --> B["Router"]
    B --> C["Router Switch"]
    C --> D["iOSL Modem"]
    D --> E["Internet"]
c. Den AP-Modus konfigurieren
c1. Stecken Sie den WIFIR1 in eine Steckdose. c2. Folgen Sie a2 bis a6. c3. Wählen Sie Wireless Repeater Mode (Station) aus und klicken Sie zum Fortfahren auf Next. c4. Klicken Sie auf AP – OneKey Setting und warten Sie bis das Hauptfenster wieder erscheint (siehe a5).7. Den Laptop/PC mit dem Repeater verbinden
a. Drahtlose Verbindung
Um eine drahtlose Verbindung zwischen dem PC und dem Repeater zu einzurichten, gehen Sie wie folgt vor: a1. Loggen Sie in den PC ein. a2. Klicken Sie auf oder (rechts unten). Eine Liste mit Netzwerken erscheint. a3. Wählen Sie das WIFIR1-Netzwerk aus und klicken Sie auf Connect. a4. Wenn nötig, geben Sie das Passwort des Netzwerks und klicken Sie auf OK um zu bestätigen. Es erscheint eine Bestätigungsmeldung wenn Sie mit dem Netzwerk verbunden sind.WIFIR1
b. Verbindung über Kabel
b1. Verbinden Sie den PC über das RJ45-Kabel mit dem WIFIR1. b2. Schalten Sie den PC ein.8. Web Management Tool
a. Basiseinstellungen für die drahtlose Verbindung
Öffnen Sie im Internetbrowser das Fenster Web Management Tool und klicken Sie auf Wireless > Basic Settings. | Disable Wireless LAN Interface | Das drahtlose Netzwerk ist ausgeschaltet |
| Mode | Unterstützt den AF- und Repeater- Modus |
| SSID of Connect to oder SSID of AP | Dienstsatzidentifizierung. Dies ist der Name des drahtlosen Netzwerkes. |
| SSID of Extended Interface | Universal Repeater- Modus (AF- und Repeater-Modus gleichzeitig) |
| Band | Unterstützt 11B/11G/11N gemischte Modi. |
b. Sicherheitseinstellungen für die drahtlose Verbindung
Konfigurieren Sie die drahtlose Sicherheitseinstellungen und die Verschlüsselung, um einen unberechtigten Zugriff und Überwachung zu vermeiden. Die Unterstützte Verschlüsselungsmethoden sind: 64/128-bit WEP, WPA, und WPA2.WIFIR1
b1. Öffnen Sie das Management Tool-Fenster und wählen Sie Wireless > Security aus.  b2. Bei select SSID, können Sie Nachfolgendes auswählen:| Root Client-XXXX | Der Repeater und der XXXX-Router haben dasselbe Passwort. |
| Repeater AP - WiFi-Repeater1 | Wählen Sie diese Option aus, wenn Sie ein Passwort für den WiFi-Repeater einstellen möchten. |
c. Rücksetzen, eine Sicherungskopie machen und Wiederherstellen
Aus Sicherheitsgründen können Sie die Einstellungen des WIFIR1 sichern. Sie können die Einstellungen auch einfach speichern und wiederherstellen wenn Sie verschiedene Einstellungen für das Gerät verwenden. c1. Öffnen Sie das Management Tool-Fenster und wählen Sie Save/Reload Settings aus.  - Um eine Sicherungskopie von den aktuellen Einstellungen zu machen, klicken Sie auf Save und wählen Sie eine Position für die Datei aus. Sie können so viele Dateien speichern wie Sie möchten. - Um gespeicherte Einstellungen hochzuladen, klicken Sie auf Browse und wählen Sie die Datei mit den gespeicherten Einstellungen aus. Klicken Sie nun auf Upload um die Einstellungen hochzuladen. Die in der Datei gespeicherten Einstellungen ersetzen nun die aktuellen Einstellungen. - Um alle Einstellungen zu löschen und das Gerät auf Werkseinstellungen zurückzusetzen, klicken Sie auf Reset.WIFIR1
d. Die Firmware aktualisieren
Um die Firmware des Repeaters zu aktualisieren, gehen Sie wie folgt vor: d1. Laden Sie die neue Firmware von unserer Website auf Ihren Computer herunter. d2. Öffnen Sie das Management Tool-Fenster und klicken Sie auf Management > Upgrade Firmware. Firmware Version: Select File: WSR2√2.5 Browse Upload Reset d3. Klicken Sie auf Browse und wählen Sie die Datei mit der heruntergeladenen Firmware aus. d4. Klicken Sie auf Upload. Das Upgrade startet automatisch. Achtung! Das Upgrade kann einige Minuten dauern. Unterbrechen Sie die Aktualisierung nie, indem Sie den Browser schließen oder den PC vom Router trennen. Der WIFIR1 könnte hierdurch unbrauchbar werden. Unterbrechen Sie den Aktualisierungsvorgang, so erlischt der Garantieanspruch.e. Das Passwort ändern
Das Standard-Passwort ist « admin ». Ändern Sie das Passwort aus Sicherheitsgründen. e1. Im Management Tool-Fenster, klicken Sie auf Management > Passwort.  e2. Geben Sie einen Benutzernamen in das Feld User Name ein. e3. Geben Sie ein Passwort in das Feld New Passwort ein und geben Sie es in das Feld Confirmed Passwort wieder ein. e4. Klicken Sie auf Apply Changes um zu bestätigen. Möchten Sie das Standard-Passwort nicht ändern, dann klicken Sie auf Reset. Verwenden Sie dieses Gerät nur mit originellen Zubehörteilen. Velleman NV übernimmt keine Haftung für Schaden oder Verletzungen bei (falscher) Anwendung dieses Gerätes. Für mehr Informationen zu diesem Produkt und die neuesteWIFIR1
Version dieser Bedienungsanleitung, siehe www.velleman.eu. Alle Änderungen ohne vorherige Ankündigung vorbehalten.
Alle registrierten Schutzmarken und Handelsnamen sind das Eigentum Ihrer jeweiligen Eigentümer und werden nur als Beispiel verwendet, um die Kompatibilität zwischen unseren Artikeln und diesen der verschiedenen Fabrikanten anzuzeigen. Windows, Windows Vista, Windows 7 sind eingetragene Warenzeichen von Microsoft Corporation in den USA und anderen Ländern.© URHEBERRECHT
Velleman NV besitzt das Urheberrecht für diese Bedienungsanleitung. Alle weltweiten Rechte vorbehalten.
Ohne vorherige schriftliche Genehmigung des Urhebers ist es nicht gestattet, diese Bedienungsanleitung ganz oder in Teilen zu reproduzieren, zu kopieren, zu übersetzen, zu bearbeiten oder zu speichern.
- User manual
- Introduction
- To all residents of the European Union Important environmental information about this product
- If in doubt, contact your local waste disposal authorities.
- Safety Instructions
- General Guidelines
- WIFIR1
- Overview
- Getting Started
- Wireless repeater mode:
- Wireless AP mode:
- Configuration
- a. Configuring Repeater Mode Using the RJ45 Cable
- b. Configuring Repeater Mode Wirelessly
- c. Configuring AP Mode
- Connecting Your Laptop/PC to the Repeater
- a. Wireless Connection
- b. Wired Connection
- Web Management Tool
- a. Wireless Basic Settings
- b. Wireless Security Settings
- Security.
- c. Reset, Backup and Restore
- d. Firmware Upgrade
- e. Changing the Password
- © COPYRIGHT NOTICE
- GEBRUIKERSHANDLEIDING
- Inleiding
- Aan alle ingezetenen van de Europese Unie Belangrijke milieu-informatie betreffende dit product
- Hebt u vragen, contacteer dan de plaatselijke autoriteiten betreffende de verwijdering.
- Veiligheidsinstructies
- Algemene richtlijnen
- Omschrijving
- Van start gaan
- Wireless Repeater modus:
- Wireless AP modus:
- Configuratie
- a. Repeater modus instellen met de RJ45-kabel
- b. Repeater modus draadloos instellen
- c. AP-modus instellen
- Uw laptop/PC met de repeater verbinden
- a. Draadloze aansluiting
- b. Draadaansluiting
- a. Basisinstellingen (Wireless Basic Settings)
- b. Beveiligingsinstellingen (wireless security)
- c. Instellingen resetten, kopiëren en terugzetten
- d. Firmware-update
- e. Het paswoord wijzigen
- © AUTEURSRECHT
- Velleman nv heeft het auteursrecht voor deze handleiding.
- NOTICE D'EMPLOI
- Aux résidents de l'Union européenne
- Des informations environnementales importantes concernant ce produit
- En cas de questions, contacter les autorités locales pour élimination.
- Consignes de sécurité
- Directives générales
- Description
- Avant de commencer
- Mode répétiteur sans fil:
- Mode PA sans fil:
- a. Configurer le mode répétiteur avec le câble RJ45
- b. Configurer le Mode répétiteur sans fil
- c. Configurer le Mode PA
- Connecter votre ordinateur au répétiteur
- a. Connexion sans fil
- b. Connexion filaire
- a. Réglages de base (Wireless Basic Settings)
- b. Configuer la sécurité WiFi (Wireless Security Settings)
- Wireless > Security.
- c. Réinitialiser, sauvegarder et rétablir les réglages
- d. Actualiser le micrologiciel
- e. Modifier le mot de passe
- © DROITS D'AUTEUR
- MANUAL DEL USUARIO
- Introducción
- A los ciudadanos de la Unión Europea
- Importantes informaciones sobre el medio ambiente concerniente a este producto
- Si tiene dudas, contacte con las autoridades locales para residuos.
- Instrucciones de seguridad
- Normas generales
- Descripción
- Primeros pasos
- Modo Repetidor Inalámbrico:
- Modo AP inalámbrico:
- Configuración
- a. Configurar el modo « repetidor » con el cable RJ45
- b. Configurar el Modo Repetidor Inalámbrico
- c. Configurar el modo AP
- Conectar el repetidor a un ordenador de sobremesa o a un portátil
- a. Conexión inalámbrica
- b. Conexión con cable
- a. Configuración básica de la conexión inalámbrica
- b. Configuración de seguridad para la conexión inalámbrica
- c. Reinicialización, copia de seguridad y restauración
- d. Actualizar el firmware
- Management > Upgrade Firmware.
- e. Cambiar la contraseña
- Management > Password.
- © DERECHOS DE AUTOR
- BEDIENUNGSANLEITUNG
- Einführung
- An alle Einwohner der Europäischen Union Wichtige Umweltinformationen über dieses Produkt
- Sicherheitshinweise
- Allgemeine Richtlinien
- Beschreibung
- Erste Schritte
- Wireless-Repeater-Modus:
- Wireless-AP-Modus:
- Konfiguration
- a. Den Repeater-Modus über RJ45-Kabel konfigurieren
- b. Den drahtlosen Repeater-Modus konfigurieren
- c. Den AP-Modus konfigurieren
- Den Laptop/PC mit dem Repeater verbinden
- a. Drahtlose Verbindung
- b. Verbindung über Kabel
- a. Basiseinstellungen für die drahtlose Verbindung
- b. Sicherheitseinstellungen für die drahtlose Verbindung
- c. Rücksetzen, eine Sicherungskopie machen und Wiederherstellen
- d. Die Firmware aktualisieren
- e. Das Passwort ändern
- Version dieser Bedienungsanleitung, siehe www.velleman.eu. Alle Änderungen ohne vorherige Ankündigung vorbehalten.
- © URHEBERRECHT
- Velleman NV besitzt das Urheberrecht für diese Bedienungsanleitung. Alle weltweiten Rechte vorbehalten.
Brand : VELLEMAN
Model : WIFIR1
Category : TV signal amplifier