
Inox Flat - Boiler Wesen - Free user manual and instructions
Find the device manual for free Inox Flat Wesen in PDF.

| Product type | Electric storage water heater (thermoaccumulator) |
| Brand and model | Wesen Inox Flat |
| Available capacities | 30, 50, 80, 100, 150, 200 liters |
| Tank material | Corrosion-resistant stainless steel |
| Power supply | 230 V single-phase |
| Power | Adjustable to 2 levels (power selector) |
| Temperature adjustment | From 35 °C to 75 °C in 5 °C increments |
| Safety functions | Safety valve, dry-run protection (E1), overheat protection (E4), sensor fault detection (E2) |
| Saving technology | ECO SELECTOR: precise temperature adjustment to reduce consumption |
| Display | Indicator lights and fault code display |
| Installation | Wall-mounted, vertical or horizontal |
| Hydraulic connection | Cold water inlet (blue) and hot water outlet (red), diameter not specified |
| Included accessories | 1 safety valve, 2 hooks (30/50 L) or 4 hooks (80-200 L) |
| Routine maintenance | External cleaning with a soft cloth or damp sponge; no abrasive products |
| Periodic maintenance | Check and replace magnesium anode every 2 years |
| Repairs | Only by the Official Technical Support Service |
| Frost protection | Drain mandatory in case of frost risk |
| Operating pressure | Up to 5 bars (pressure reducer mandatory beyond that) |
Frequently Asked Questions - Inox Flat Wesen
User questions about Inox Flat Wesen
0 question about this device. Answer the ones you know or ask your own.
Ask a new question about this device
Download the instructions for your Boiler in PDF format for free! Find your manual Inox Flat - Wesen and take your electronic device back in hand. On this page are published all the documents necessary for the use of your device. Inox Flat by Wesen.
USER MANUAL Inox Flat Wesen
prinied in recpcd paper
WESEN INOX FLAT 30, 50, 80, 100, 150, 200 L

electric water heater
EB INSTALLATION & INSTRUCTION MANUAL
F5 MANUAL DE INSTALLACION INSTRUCCIONES DE FUNCIONAMIENTO GARANTIA
FANUEL D'INSTALLATION INSTRUCTIONS D'UTILISATION
P MANUAL DE INSTALLAÇÃO INSTRUÇOÉS DE FUNCIONAMENTO

WESENINOXFLAT30,50,80,100,150,200L
TABLE OF CONTENTS
- GENERAL WARNINGS 2
- TECHNICAL CHARACTERISTICS 3
- INSTALLATION OF THE ELECTRIC WATER HEATER 4
- OPERATION 6
- MAINTENANCE, CLEANING AND REPAIR 7
1. GENERAL WARNINGS
Read this manual very carefully as it includes important instructions and warnings regarding the safe installation, operation and maintenance of the water heater.
NIELSEN CLIMA ESPANA, S.L. will not be held liable for any damage or injury resulting from failure to comply with these instructions.
The installation and repair of this electric water heater must always be carried out by a qualified technician, according to the instructions contained in this manual.
The electric water heater must not be used for any purposes other than the production and supply of sanitary hot water. The user will be liable for any incorrect or inappropriate usage, not in compliance with the instructions given here.
- Packaging material must be kept out of the reach of children. Children should not be permitted to operate the water heater by themselves.
Once the water heater has been connected to the electricity supply, it may be dangerous to touch it with bare feet or if any part of the body is wet. Flammable materials should not be stored near the water heater.
The safety relief valve supplied with the water heater must not be damaged or altered in any way. If it does not comply with current regulations and legislation, it must be replaced with a suitable alternative. - Avoid placing anything below the water heater which could be damaged by possible water leakages.
NEVER TRY TO REPAIR ANY PROBLEMS WITH THE WATER HEATER YOURSELF. ALWAYS CALL YOUR NEAREST OFFICIAL TECHNICAL SUPPORT SERVICE IMMEDIATELY SO THAT A QUALIFIED TECHNICIAN CAN CARRY OUT THE WORK.
NIELSEN CLIMA ESPANA, S.L. will not be held liable for any incorrectly installed devices.

2. TECHNICAL CHARACTERISTICS
The double tank used in this electric water heater has passed quality controls via the corresponding pressure tests. The material used for these tanks is anti-corrosive stainless steel. If excessive pressure is detected in the tanks, the safety relief valve, installed on the water inlet, will be activated to ensure the safety of the appliance.
This model has the following power settings:
| INOX FLAT 30 and 50 litres: | INOX FLAT 150 and 200 litres: |
| - Single power function: 1400 W | - Single power function: 2000 W |
| - Double power function: 2100 W | - Double power function: 3000 W |
| INOX FLAT 80 and 100 litres: | |
| - Single power function: 1600 W | |
| - Double power function: 2400 W |
The user can choose the most appropriate setting for their needs.
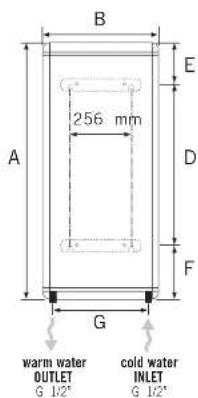
Dimensions (mm):
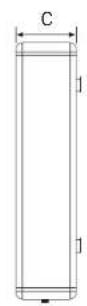
Dimensions (mm)
| Capacity | A | B | C | D | E | F | G |
| 30 L | 550 | 498 | 262 | 200 | 158 | 192 | 400 |
| 50 L | 750 | 498 | 262 | 380 | 178 | 192 | 400 |
| 80 L | 1090 | 498 | 262 | 550 | 285 | 255 | 400 |
| 100 L | 1315 | 498 | 262 | 550 | 445 | 320 | 400 |
| 150 L | 1162 | 650 | 340 | 600 | 306 | 256 | 490 |
| 200 L | 1482 | 650 | 340 | 900 | 326 | 256 | 490 |
EN
3. INSTALLATION OF THE ELECTRIC WATER HEATER
The following items are supplied with the electric water heater:
-1 safety relief valve
- 2 hook screws (for 30 and 50 l) / 4 hook screws (for 80, 100, 150 and 200 l)
This model is designed to be attached to a wall. In order to attach the water heater to the wall, first check the wall carefully to ensure that it is strong enough and use the appropriate screws and rawl plugs. Two hook screws and rawl plugs are supplied with the appliance and it is recommended that you use them.
The electric water heater should be positioned as close as possible to the place where the hot water will be used, in order to reduce the distance the hot water has to travel through the pipes and thereby maintain its temperature.
The device should be positioned with at least 60 cm of clear space below the pipe outlets, in order to facilitate any maintenance and/or repair which may need to be carried out.
Location recommendations
This device is designed to be installed inside buildings which comply with current regulations. The following warnings must be taken into consideration:
- Do not connect the device directly to electrical circuits that are unprotected from power surges.
- Do not install the device in particularly aggressive environments with acid vapors and/or dust, or in gas-saturated environments.
- Do not install the device in a location where the temperature is likely to go so low that ice could form.
This water heater can be installed vertically or horizontally.
1 When positioned vertically, the pipes should be positioned toward the ground.
2 When positioned horizontally, the pipes should be positioned toward the left so that the cold water inlet (blue) is below the hot water outlet (red).
It may be necessary to install a discharge pipe in order to remove any drops of water could be released from the safety relief valve. Under no circumstances will NIELSEN CLIMA ESPANA, S.L. be held responsible for any damage to property caused by these sible leaks.
Hydraulic connection
Connect the water heater water inlet and outlet to pressure- and temperature-resistant pipes or connectors. Water temperature can exceed 80^ ; therefore materials which are not able to withstand these temperatures should not be used. Furthermore, stop-cocks should be installed on the inlet and outlet pipes to allow the water heater to be disconnected from the water supply during repair and/or replacement.
Each water heater is equipped with a safety relief and anti-drain valve, which should be installed on the cold water inlet pipe (blue).
There may be a small amount of dripping from the safety relief valve which is normal ring the heating stage, depending on the pressure of the water supply. In order to allo dripping to drain away, an open funnel should be positioned below the valve, connected a drainage pipe flowing downwards and in a location where there is no condensation. I also recommended that the safety relief valve be manually operated periodically, in order to clean out any lime and/or mineral deposits that may have built up and thereby ens the correct functioning of the water heater.
In cases where water pressure exceeds 5 bar, it is obligatory to install a pressure reducer either before the relief valve or where the water supply enters the building - as far as from the water heater, in either case. This should be fitted with a pressure gauge, in order to regulate the reducer correctly.
In order to reduce water leakages from the relief valve as far as possible, and/or eliminate completely, an expansion tank can be installed between the water heater and the relief valve.
The steps to follow to drain the water heater are as follows:
1- Disconnect the water heater from the electrical supply
2- Close the stop-cock to shut off the water supply
3- Open the safety relief valve drainage lever
4. Turn on any hot water tap
To reconnect the device, these steps should be followed in reverse order, ending with hot water tap being turned off.
Electrical connection
The water heater is of 220/230 V single phase design. Before connecting it to the elec city supply, make sure that the mains supply and unit input features coincide. Electrical installation must always be carried out in compliance with the applicable Low Voltage Electronic Regulations.
The following volumes and instructions must be taken into consideration when installing water heaters in bathrooms or washrooms:
PROHIBITED AREA
This is the area delineated by the vertical planes that are tangent to the outer edges tub, toilet pan or shower enclosure and by a horizontal plane situated 2.25 m above t or the floor, should the units be embedded in it. No switches, power sockets or lighting equipment should be installed within the PROHI-BITED AREA. The heater must be installed outside this area.
PROTECTED AREA
This is the area delineated by the horizontal planes previously stated for the prohibited area plus two vertical ones 1 m from these.
Switches must not be installed within the PROTECTED AREA. This does not apply, how to safety power sockets.
EN
All electrical installations must incorporate an "EARTH" connection. The earthing connection for the device is obligatory as the manufacturer will not be held responsible for any damage caused by a device that is not earthed or for anomalies in the electrical supply. The use of heating, gas and water installation pipes to connect the appliance to earth is prohibited.
The use of adaptors and multiple power sockets is prohibited.
The appliance is not protected against the effects of electrical storms.
It is prohibited to connect the appliance to the electrical supply until it has been filled with water.
NOTE: The manipulation and/or substitution of any parts (including the electrical power supply cable) is strictly prohibited unless carried out by an Official Technical Support Technician.
4. OPERATION
Before connecting the water heater to the electricity supply, it must be filled with water. To do so, once the water heater has been installed, open the stopcock and turn on the hot water taps. When water starts to come out, close the outlet taps, making sure that there are no leakages. Do not connect the water heater to the electricity supply until you are sure that the tank is completely full of water.
CONTROL PANEL
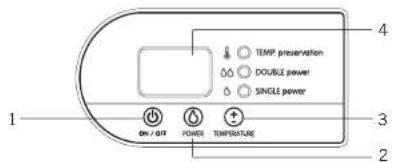
(1) On-off switch
(2) Power selection
By pressing the button (2), one or two power settings can be selected to obtain the performance described in the technical characteristics section. The selected setting will be indicated via the corresponding indicator light on the right-hand side.
(3) Temperature selection
Water temperature can be adjusted by pressing the button (3). The default setting is 35^ . Holding down the button will increase the temperature in 5 °C intervals until 75 °C is reached. In the case of going past the desired temperature, continue to 75 °C and then press the button again to return to the default setting of 35 °C.
EN
The temperature will be set automatically when the button is released at the desired temperature.
The thermostat will automatically disconnect the electrical connection when the predetermined temperature is reached. Once some water has been used and the temperature falls below the predetermined value, the thermostat will automatically reconnect the electrical supply.
(4) Fault code function
[E1] Dry heating protection to prevent the electric heater run dry
[E2] Indicates a fault in the temperature sensor
[E4] Protection against overheating
ECO SELECTOR Technology
All WEsEN water heaters allow precise and instant adjustment of water temperature, thereby ensuring significant savings in terms of electrical consumption.
If the water heater is not going to be used for a long period of time and/or if there of freezing, the device must be emptied via the safety relief valve.
Always:
-
Disconnect the device from the electrical supply
-
Close the cold water inlet stopcock
Turn on a hot water tap
We recommend that you install a thermostatic valve set to a temperature of 39-41 ^ C a flow rate of 6-8 litres per minute to obtain the best results from the appliance. This vice will protect against burns as the water from the heater can reach 70~^ C or more. user should be aware of the risks involved in exposing parts of the body to excessively temperatures and take the necessary precautions to avoid them.
5. MAINTENANCE, CLEANING AND REPAIR
The water heater does not require any special maintenance and can be cleaned with a damp cloth or sponge. Do not use abrasives or detergents.
Anode replacement
This appliance comes equipped with a magnesium anode for each electrical resistance. I recommend that you check the condition of this every two years and replace it when necessary. Remember that this anode serves to protect the appliance against corrosion.

WESENINOXFLAT30,50,80,100,150,200L
INDICE
- ADVERTENCIAS GENERALES. 8
2.CARACTERISTICAS TECNICAS 9 - INSTALLACION DEL TERMO ELECTRICO 10
- FUNCIONAMENTO 12
- MANTENIMIENTO, REPARACION Y LIMPIEZA 13
- CONDICIONES DE LA GARANTIA 14
WESENINOXFLAT30,50,80,100,150,200L
INDEX
1.AVERTISSEMENTS GENÉRAUX 16
2.CARACTERISTIQUES TECHNIQUES. 17
3. INSTALLATION DU THERMOACCUMULATEUR ELECTRIQUE 18
4. FONCTIONNEMENT 20
5. ENTRETIEN, REPARATION ET NETTOYAGE 21
1. AVENTISSEMENTS GENÉRAUX
WESENINOXFLAT30,50,80,100,150,200L
INDICE
1.ADVERTENCIAS GERAIS 22
2.CARACTERISTICASTECNCAS 23
3. INSTALAÇÃO DO TERMOACUMULADOR ELETRICO 24
4. FUNCIONAMENTO 26
5. MANUTENÇA, REPARACAO E LIMPEZA 27