
K41RG73 - Wristwatch Georg Jensen - Free user manual and instructions
Find the device manual for free K41RG73 Georg Jensen in PDF.

| Brand | Georg Jensen |
| Model | K41RG73 |
| Category | Watch |
| Movement Type | Automatic mechanical |
| Movement Origin | Swiss (Swiss Made) |
| Functions | Hours, minutes, seconds, date, GMT (second time zone), power reserve indicator |
| Power Reserve | Approximately 40 hours (daily winding recommended) |
| Water Resistance | 3 ATM (resists splashes, do not immerse) |
| Crystal | Sapphire (scratch-resistant) |
| Winding | Automatic via wrist movement or manual via crown |
| Time Setting | Crown in position 3 |
| Date Setting | Crown in position 2 (counterclockwise) |
| GMT Setting | GMT corrector (button) at position 2 |
| Care | Clean with soft cloth; avoid water, magnetism, shocks, chemicals |
| Service | Every 2-3 years by an authorized Georg Jensen center |
| Warranty | 2 years international (excluding straps, glass, batteries) |
| Manufacturer | Georg Jensen A/S, Søndre Fasanvej 7, 2000 Frederiksberg, Denmark |
Frequently Asked Questions - K41RG73 Georg Jensen
User questions about K41RG73 Georg Jensen
0 question about this device. Answer the ones you know or ask your own.
Ask a new question about this device
Download the instructions for your Wristwatch in PDF format for free! Find your manual K41RG73 - Georg Jensen and take your electronic device back in hand. On this page are published all the documents necessary for the use of your device. K41RG73 by Georg Jensen.
USER MANUAL K41RG73 Georg Jensen
• The Georg Jensen Story 02
- Product quality 03
- Caving for your watch 02
• Calling for your watch
• Servicing & Maintenance
• Georg Jensen International Warranty 05
· Environmental protection 06
2. Operating Instructions: Quartz Watches
• 2-hand / 3-hand, no date
Models: C30-ST01, C39-ST01, D42-ST01, V2HSST01, 92M-8T01, 325STST01, 3V-3F-8T01.
V39M-5T01/M2SSST01/V3L-RG01, V3M-RG01, V3S-RG01 08
• 3-hand, date
Models: K32-5T02, K32-RC08, K30-5T02/04165T02,536-5T02,3618-00202,48-67-07,0246-66-82T02 09
· 4-hand, GMT, date
Models: K41-ST04, S42-ST04, SH6-ST04 10
- Chronograph
Models: D42-ST03, D46-ST03, H2M18ST03, S9428ST03, S846-ST03 11
3. Operating Instructions: Mechanical Watches
- General instructions 13
- 3-hand, no date, manual winding
Models: K38-ST51, K38-ST52, K38-RGS2 14 - 3-hand, date, automatic winding
Models: D42-ST70, D46-ST70, H41NST70, S336ST70, S336A870, 642E770, 643ST70 15 - 4-hand, GMT, date, automatic winding
Models: D42-ST72, D46-ST72, 441-ST72, S843ST72, S46-ST72 16 - 3-hand, GMT, Power Reserve, automatic winding
Models: K41-ST73, K41-RG73, S42-SIT73, S46SST73 17
• Annual Calendar, automatic winding
Models: K41-ST74, K41-RG74, S42-6T74, S46-8T74 18 - Chronograph, automatic winding
Models: D42-ST71, D46-ST71, N01ST71, S843-ST71, S46-ST71 19
1. Introduction
The Georg Jensen story
Georg Jensen's time defying elegance rests on a unique aesthetic heritage. Georg Jensen himself trained as a sculptor but soon turned his skill to silversmithing, conjuring creations out of the metal that defied the thinking and constraints of the time. His approach was innovative, his ideas revolutionary. Yet his skill was firmly grounded in Danish design tradition - clean, minimalist - and the highest levels of meticulous, hand crafted quality.
110 years later and the singular creative vision of one man is now a globally renowned design phenomenon. Organic and sculptural, intellectual yet straightforward, always original, a Georg Jensen piece is distinctive for its complex simplicity, for its ability to transcend form and function, and its capacity to change our perceptions. Since 1969, Georg Jensen has collaborated with some of the 20th century's most influential designers to create some of the world's most compelling watches.
Defined by their design, pared down, stripped of all but the bare essentials, each collection reflects the personal ideals of the designer. Yet each tells the Georg Jensen story with clarity and purpose - a story of hand crafted quality, timelessness, elegance. It is this purity of focus that delivers timepieces of exceptional originality and watches that are unexpected, understated, bold, iconic.
We are proud to introduce our watch collections that combine the Georg Jensen spirit with cutting edge horology. These are watches that not only tell the time, but define the times.
Introduction
Product quality - Swiss Made
All Georg Jensen watches carry the famous 'Swiss Made' marking that embodies a concept of quality. This originates from Swiss watchmaking craftsmanship that has been forged over many years and enjoys a solid reputation throughout the world.
Swiss Made is a reliable indication of the technical quality of watches (accuracy, reliability, water-resistance, and shock-resistance), as well as their aesthetic quality (elegance and originality of design).
All Georg Jensen watches are supplied with genuine Swiss movements that ensure high levels of accuracy and superior reliability.
Caring for your watch
Advice on steps you can take to ensure your watch remains in peak condition
Water:
• 3 and 5 ATM rated watches: although water resistant, they should not be
submerged unnecessarily. If your watch does get wet, pot dry with a soft cloth.
• 10 & 20 ATM rated watches: these can be submerged provided the crowns are
securely closed.
• Before submerging your watch always ensure the crown is firmly pushed or screwed
into place.
• After being submerged in salt or chlorinated water, your watch should be rinsed
with warm fresh water and then patted dry.
• Crowns and chronograph pushers should never be operated underwater.
Magnetism:
- Avoid close contact with objects that emit strong magnetic fields, such as x-ray machines, smartphones, refrigerators, hi-fi speaker etc...
Temperature Changes
Avoid exposing your watch to extremes of temperature (grea ter than 6 0 °C/ 14 0 °F and less tha n0 °C /3 2 °F). Also try temperature changes.
Shocks
- Avoid extreme impacts or shocks to the watch as these may damage the movement, crystal or case.
- Your watch should not be dropped and you should consider removing it before playing certain sports like golf and tennis.
Cleaning:
- Keep your watch clean and free from dust, grime etc.
- Watch cases can be cleaned with a soft cloth dipped in soapy water, while bracelets can be cleaned with a soft brush. Your watch should be patted dry with a soft cloth and finally polished with a lint-free polishing cloth to work up a shine.
- Leather straps can be wiped clean with a damp cloth, or brushed with a soft brush.
Chemicals
- Avoid contact with chemical substances such as perfumes, solvents, detergents, chlorinated pool water and cosmetics as they can damage gaskets and erode the metals.
Leather Straps
- Avoiding contact with greasy substances such as cosmetics, solvents and detergents as they may be absorbed by the leather.
- Avoid contact with water or high humidity environments as this may discolour and prematurely age the strap.
- Avoid high heat sources, as well prolonged exposure to sunlight.
Servicing & Maintenance
Your watch is a complex, delicate instrument that requires special and regular servicing if it is to continue working properly. Servicing should be performed by an approved Georg Jensen Service Centre.
Service intervals depend on how the watch has been used and on the climate in which it exists.
Recommended service intervals are as follows :
• Battery service 2 years
+ Maintenance Service on 3 years
• Complete service 6 years
If the watch is used in hot, humid environments an annual water resistance check is recommended.
Introduction
Georg Jensen International Warranty
A Georg Jensen watch purchased from an authorised dealer or re-seller is covered by a two year international warranty starting from the date of purchase. The warranty is the assurance that the watch has been supplied in perfect condition and will remain free of material and manufacturing defects ("defects") during this two year period. The warranty comes into force when the warranty cord accompanying the watch is correctly completed, including purchase date, case number, serial number and authorized dealer's name and contact details ("valid warranty card"). All details must be clearly legible and the corresponding serial number must be clearly visible on the watch.
During the warranty period and provided the watch is accompanied a valid warranty card and original purchase receipt form the authorised Georg Jensen dealer or reseller, Georg Jensen will replace or repair any defective component resulting from a material or manufacturing defect as noted by our technical team. In the event that repairs are unable to restore the normal conditions of use of your Georg Jensen watch, Georg Jensen guarantees its replacement by a Georg Jensen watch of identical or similar characteristics.
Should a watch require repair, please bring the watch (together with valid warranty card and purchase receipt) to an authorised Georg Jensen dealer (see www.georgjensen.com for the nearest store).
It is to be noted that the International warranty does not cover:
- Straps, bracelets, sapphire crystal glass or batteries
• Surface treatments or coatings (such as PVD or gold plating)
- External parts (such as screws or diamonds)
- Normal wear and tear and aging (such as scratches on glass, or color fading and material alterations)
- Damage resulting from a lack of core, negligence, or misuse of the watch by the user
- Moisture damage resulting from improper use of the crown and/or pushers in or under water
- Defects resulting from any modifications or alterations performed by persons unauthorized by Georg Jensen
Any further claim against Georg Jensen for damages, beyond those specified in this warranty, is totally excluded, except mandatory statutory rights the purchaser may have against the manufacturer.
Georg Jensen's obligation is strictly limited to repair or replacement as expressly stated in this limited warranty. The above manufacturer's warranty is independent of any warranty that may be provided by an independent retailer, for which the retailer carries the sole responsibility.
Georg Jensen customer service ensures your watch will be maintained to the highest standard. If your watch needs maintenance, please rely on of ficial Georg Jensen outlets or official Georg Jensen authorised dealers: they can guarantee service to the Georg Jensen standards.
Georg Jensen A/S
Søndre Fasanvej 7
2000 Frederiksberg
Denmark
2014©All rights reserved.
Environmental protection
Collection and treatment of expired quartz watch batteries* Batteries should not be disposed of with ordinary household waste, represented by this symbol which indicates they should be returned to a local authorised collection system. By following this procedure, you will help conserve natural resources and contribute to the protection of the environment.

* Valid in EU member states and any country with corresponding legislation.
Operating Instructions: Quartz Watches
2. Operating Instructions Quartz Watches
A quartz watch contains a battery powered electronic movement that drives the watch hands. Quartz movements are highly accurate and efficient, requiring minimal maintenance aside from occasional battery replacements.
2-hand / 3-hand, no date
Models : C30-ST01, C39-ST01, D42-ST01, V22E-ST01, V24M-ST01, V25-ST01, V60S-ST01, V3M-ST01, V3S-ST01, V3L-RG01, V2M-RG01, V8B-RG01
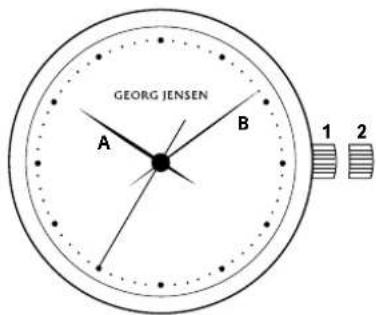
Setting the time:
-
Pull the crown to position 2.
-
Turn the crown either clockwise or anti-clockwise until the watch hands (A and B) are positioned
a: the desired time.
- When the desired time is reached push the crown back to position 1.
Operating Instructions: Quartz Watches
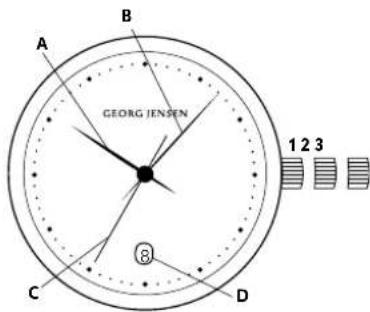
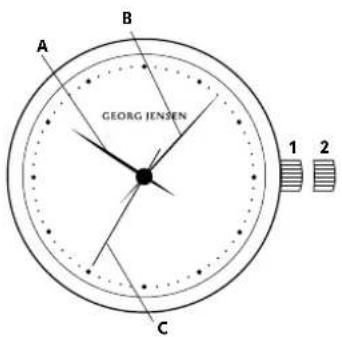
3-hand, date
Models: K32-ST02, K32-R002/X885-102K,K41-3702,3636T0102,G36-RG61/S4298,T015-S465-T02
Setting the time:
-
Pull the crown out to position 3, its maximum extension. The second hand (C) will stop moving.
-
Turn the crown either clockwise or anti-clockwise until the watch hands (A and B) are positioned at the desired time.
-
When the desired time is reached, push the crown back to position 1 and screw down if applicable. NOTE: When the hour hand passes 12 o'clock and the date changes, the watch is set at midnight. If the date does not change, it is set at noon.
Setting the date:
-
Pull the crown out to position 2.
-
Turn the crown clockwise or anti-clockwise until the desired date is shown in the date window (D).
- When the desired date is reached push the crown back to position 1 and screw down if applicable. NOTE: Do not change the date between 10pm and 20am as this may damage the movement.
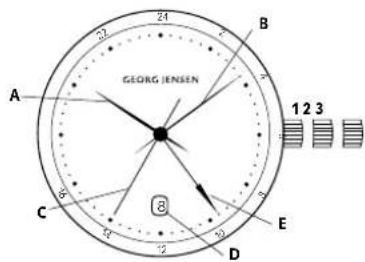
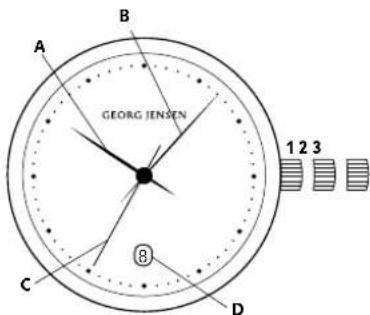
4-hand, GMT, date
Models: K41-ST04, S42-ST04, S46-ST04
Setting the time:
- Pull the crown out to position 3, its maximum extension. The second hand (C) will stop moving.
- Turn the crown either clockwise or anti-clockwise until the watch hands (A and B) are positioned at the desired time.
- When the desired time is reached push the crown back to position 1 and screw down if applicable. NOTE: When the hour hand passes 12 o'clock, the watch is set at midnight if the date changes. If the date does not change, it is set at noon.
Setting the date:
- Pull the crown out to position 2.
- Turn the crown clockwise until the desired date appears in the date window (D).
- When the desired date is reached push the crown back to position 1 and screw down if applicable. NOTE: Do not change the date between 10pm and 2am as this may damage the movement.
Setting the GMT / 2nd time zone hand(E):
- Pull the crown out to position 2.
- Turn the crown anti-clockwise to set the GWT / second time zone hand (E) to the desired time.
- When the desired time is reached push the crown back to position 1 and screw down if applicable. NOTE: The GWT hand (E) operates on a 24-hour scale. In other words, half the speed of the hour hand. Please note that only even hours are marked.
Operating Instructions: Quartz Watches
Chronograph
Models: D42-ST03, D46-ST103/K445ST03/14280103/1646-9103
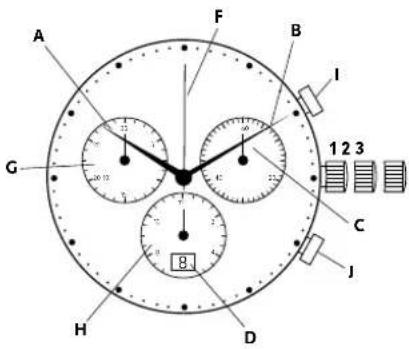
Display & control buttons
A: Hour hand
B: Minute Hand
C: Second Hand
D: Date window
F : Centre stop second
G:30-minute counter
H:12 hour counter
1: Start / stop pusher
J: Re set pusher
Setting the time:
- Pull the crown out to position 3, its maximum extension. The second hand (C) will stop moving.
-
Turn the crown either clockwise or anti-clockwise until the watch hands (A and B) are positioned at the desired time.
-
When the desired time is reached push the crown back to position 1 and screw down if applicable. NOTE: When the hour hand passes 12 o'clock, the watch is set at midnight if the date changes. If the date does not change, it is set at noon.
Setting the date:
- Pull the crown out to position 2.
- Turn the crown clockwise until the desired date appears in the date window (D).
- When the desired date is reached push the crown back to position 1 and screw down if applicable. NOTE: Do not change the date between 10pm and 20am as this may damage the movement.
Chronograph: Basic Functions (Start, Stop & Reset)
- To start timing, press the start stop pusher (I)
- To stop timing, press the start / stop pusher (I) again
- Elapsed time can be read as follows: hours: 12 hour counter (H) minutes: 30-minute counter (G) seconds: second stop hand (F)
- To reset, press the reset pusher (J)
Chronograph: Basic Functions (Start, Stop & Reset)
- To start timing, press the start stop pusher (I)
- To stop timing, press the start / stop pusher (i) again
- To resume timing, press the start/stop pusher () again
- To stop timing, press the start / stop pusher (I) again
- Elapsed time can be read as follows:
hours: 12 hour counter (H) minutes: 30-minute counter (C) seconds: second stop hand (F) - To reset, press the reset pusher (J)
NOTE: accumulated timing sessions can be continued by repeating steps 2 and 3 above
Chronograph: Interval Timing
- To start timing, press the start stop pusher (i)
- To show timing interval, press the reset pusher (J) interval timing will be displayed. Timing continues in the background.
- To show measured time, press the reset pusher (J) again, the chronograph hands will advance quickly to the measured time.
4.To stop timing, press the start / stop pusher (I) - Final time can be read as follows:
hours: 12 hour counter (H) minutes: 30-minute counter (C) seconds: second stop hand (F) - To reset, press the reset pusher (J)
NOTE: further intervals can be displayed by repeating steps 2 and 3 above
Chronograph: Adjusting the chronograph hands
Occasionally you may find that the chronograph counters do not return to zero. Follow these steps to correct them.
-
Pull out the crown to position 3
-
Simultaneously push the start/stop (i) and reset pushers (j) and hold for two seconds. The centre stop second (F) will make a fast revolution to indicate that adjustment mode has been activated.
-
Press the start/stop pusher (I) to advance centre stop second hand (F) to the desired position.
-
Press the reset pusher (J) once to activate the 12 hour counter (H)
-
Press the start/stop pusher (I) to advance 12 hour counter (H) to the desired position.
-
Press the reset pusher (J) once to activate the 30-minute counter (C)
-
Press the start/stop pusher (I) to advance 30-minute counter (G) to the desired position.
-
Once complete return crown to position 1.
Operating Instructions: Mechanical Watches
3. Operating Instructions: Mechanical Watches
Mechanical watches are driven by the power stored in a spring. In order to keep time, they need to be regularly wound, either by hand (as with manual wound models) or automatically through the inclusion of a special mechanism that uses the movements of the wearer to wind the spring (as in automatic models). All mechanical movements are composed at many minute springs, plates, screws and gears - somewhere between 50 and 300 - working in perfect synchronicity to power the watch. The sheer number and intricacy of the components makes mechanical watches highly sensitive, more so than quartz movements. However, if properly maintained, their longevity is a given.
Besides their longevity, mechanical movements are highly coveted because of their engineering - the wearer will usually have an appreciation of the high level of skill, precision and craftsmanship involved in creating each individual timepiece.
General Instructions for Mechanical Watches
- When manually winding a watch always turn the crown in a clockwise direction
- Do not force the crown when you feel the spring become tense toward the end of the winding process.
- When fully wound most mechanical watches with have a power reserve of around 40 hours. Daily winding is recommended.
- If your watch is equipped with an automatic winding mechanism, ensure that the strap or bracelet of the watch is correctly fitted to your wrist. If the watch is too loose the automatic winding function may be compromised.
• Automatic watches can also be manually wound by turning the crown clockwise in position1. It is recommended that if your watch has completely run out of power you manually wind it (with about 30 turns) before wearing. - Try to avoid exposing your watch to strong magnetic sources (for example smartphones, loudspeckers, airport metal detectors, etc...) as these may have an adverse effect on the movement. In extreme cases, this can cause your watch to stop. If this is the case, or you notice the watch losing time, take your watch to a Georg Jensen outlet or authorised Georg Jensen dealer.
3-hand / 3-hand, small second, manual wound Models : K38-STS1, K38-ST52/K88-R652
Winding the watch:
- With the crown in position 1, turn clockwise until you feel resistance. The watch is wound.
- When fully wound the watch will have a power reserve of around 40 hours. Daily winding is
recommended
IMPORTANT: When manually winding a watch always turn the crown in a clockwise direction
Do not force the crown when you feel the spring became eased toward the end of the winding process.
Setting the time:
- Pull the crown out to position 2, its maximum extension. The second hand (C) will stop moving.
- Turn the crown either clockwise or anti-clockwise until the watch hands (A and B) are positioned at the desired time.
- When the desired time is reached push the crown back to position 1.
Operating Instructions: Mechanical Watches
3-hand, date, date, automatic winding
Models: D42-ST70, D46-ST70, K44-510, 388-510, 388-510, 388-510, 388-510, 388-510, 388-510, 388-510, 388-510, 388-510, 388-510, 388-510, 388
Setting the time:
- Pull the crown out to position 3, its maximum extension. The second hand (C) will stop moving.
- Turn the crown either clockwise or anti-clockwise until the watch honds (A and B) are positioned at the desired time.
- When the desired time is reached push the crown back to position 1 and screw down if applicable. NOTE: When the hour hand passes 12 o'clock and the date changes, the watch is set at midnight. If the date does not change, it is set at noon.
Setting the date:
- Pull the crown out to position 2.
- Turn the crown clockwise or anti-clockwise until the desired date is shown in the date window (D).
- When the desired date is reached push the crown back to position 1 and screw down if applicable. NOTE: Do not change the date between 10pm and 2am as this may damage the movement.
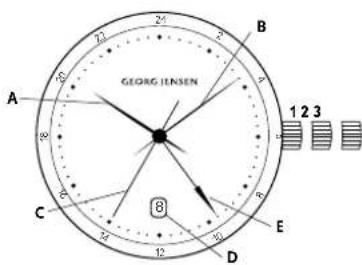
4-hand, GMT, date, automatic winding
Models: D42-ST72, D46-ST72, X44-ST72, S42-ST72, 648-ST72
Setting the time:
- Pull the crown out to position 3, its maximum extension. The second hand (C) will stop moving.
- Turn the crown either clockwise or anti-clockwise until the watch hands (A and B) are positioned at the desired time.
- When the desired time is reached push the crown back to position 1 and screw down if applicable. NOTE: When the hour hand passes 12 o'clock, the watch is set at midnight if the date changes. If the date does not change, it is set at noon.
Setting the date:
- Pull the crown out to position 2.
- Turn the crown clockwise or anti-clockwise until the desired date is shown in the date window (D).
- When the desired date is reached, push the crown back to position 1 and screw down if applicable. NOTE: Do not change the date between 10pm and 2am as this may damage the movement.
Setting the GMT / 2nd time zone hand(E):
- Pull the crown out to position 2
- Turn the crown clockwise or anti-clockwise to set the GMT / second time zone hand (E) to the desired time. The hand will advance in hour increments.
- When the desired time is reached push the crown back to position 1 and screw down if applicable. NOTE: The GMT hand (E) operates on a 24-hour scale. In other words, half the speed of the hour hand. Please note that only even hours are marked.
Operating Instructions: Mechanical Watches
3-hand, GMT, Power Reserve, automatic winding Models: K41-ST73, K401RC0723, S942-ST73, S948ST73
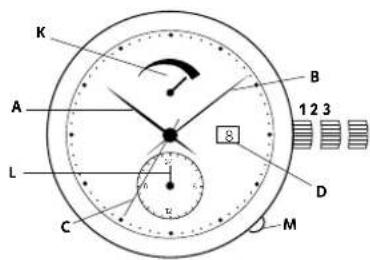
Display & control buttons
A: Hour hand
B: Minute Hand
C: Second Hand
D : Date window
K: Power reserve indicator
L: GMT / second time zone indicator
M: GMT pusher button
Setting the time:
- Pull the crown out to position 3, its maximum extension. The second hand (C) will stop moving.
-
Turn the crown either clockwise or anti-clockwise until the watch hands (A and B) are positioned at the desired time.
-
When the desired time is reached push the crown back to position 1 and screw down if applicable. NOTE: When the hour hand passes '12 o'clock, the watch is set at midnight if the date changes. If the date does not change, it is set at noon.
Setting the date:
-
Pull the crown out to position 2.
-
Turn the crown anti-clockwise until the desired date appears in the date window (D).
-
When the desired date is reached push the crown back to position 1 and screw down if applicable. NOTE: Do not change the date between 10pm and 20am as this may damage the movement.
Setting the GMT / 2nd time zone hand:
IMPORTANT: Do not operate the GMT/2nd time zone pusher (M) immediately after setting the time in an anti-clockwise direction. This may damage the movement. It is important to let the watch run for approximately 30 minutes before setting the GMT / second time zone hand.
It is recommended that you always set the time in a clockwise direction - the GMT / second time zone can then be set immediately after setting the time.
- Depress the GMT pusher button (M) several times to move the GMT / second time zone indicator (L) forward to the desired time.
NOTE: The GMT hand (L) operates on a 24-hour scale. Please note that only even hours are marked.
Annual calendar, automatic winding
Models: K41-ST74, K41-R0774,S423T74S346-5T74
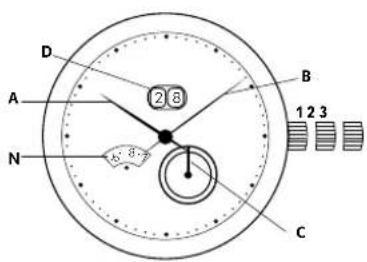
Display
A: Hour hand
B: Minute Hand
C: Second Hand
D : Date window
N: Month window
IMPORTANT: To adjust your watch successfully, please follow the steps below in consecutive order: Setting the time:
-
Pull the crown out to position 3, its maximum extension. The second hand (C) will stop moving.
-
Turn the crown clockwise until the watch hands (A and B) are positioned at the desired time.
- When the desired time is reached push the crown back to position 1 and screw down if applicable. NOTE: When the hour hand passes 12 o'clock, the watch is set at midnight if the date changes. If the date does not change, it is set at noon.
Setting the date:
IMPORTANT NOTE: It is essential that the date is not adjusted between the hours of 8pm and 2am. Setting the date within these hours may permanently damage the movement.
- Pull the crown out to position 2.
- Turn the crown anti-clockwise to advance the date (D) and month (N) in sequence until the desired date is displayed.
- When the desired date is reached push the crown back to position 1 and screw down if applicable. The Annual calendar automatically adjusts the date for each month, accounting for the cycle of 30 and 31 day months Once set, the watch will require no date adjustment until the end of February, provided it is kept wound.
Operating Instructions: Mechanical Watches
Chronograph, automatic winding
Models: D42-ST71, D46-ST71, K45-ST75, S42-ST79, 648-ST71
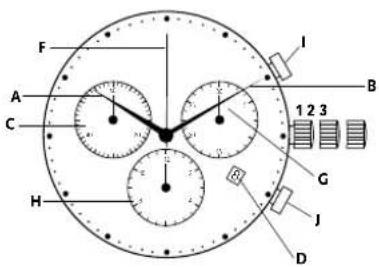
Display 6 control buttons
A: Hour band
D. M. A. H.
C: Second Hand
D : Date window
F : Centre stop second
G: 30-minute counter
H: 12 hour counter
| : start / stop pusher
J: re-set pusher
Setting the time:
-
Pull the crown cut to position 3, its maximum extension. The second hand (C) will stop moving.
-
Turn the crown either clockwise or anti-clockwise until the watch hands (A and B) are positioned at
the desired time.
- When the desired time is reached, push the crown back to position 1 and screw down if applicable. NOTE: When the hour hand passes 12 o'clock, the watch is set at midnight if the date changes. If the date does not change, it is set at noon.
Setting the date:
-
Pull the crown out to position.
-
Turn the crown clockwise until the desired date appears in the date window (D).
-
When the desired date is reached push the crown back to position 1 and screw down if applicable.
NOTE: Do not change the date between 10pm and 2am as this may damage the movement.
Chronograph: Basic Functions (Start, Stop & Reset):
-
To start timing, press the start stop p
-
To stop timing, press the start / stop pusher (i) again
-
Elapsed time can be read as follows: hours: 12 hour counter (H)/minutes: 30-minute counter
(G)/seconds: second stop hand (F)
- To reset, press the reset pusher (J)
Chronograph: Accumulated Timing:
-
To start timing, press the start stop pusher (I).
-
To stop timing, press the start / stop pusher (I) again
-
To resume timing, press the start/stop pusher (I) again
-
To stop timing, press the start / stop pusher (i) again
-
Elapsed time can be read as follows: hours 12 hour counter (H)/minutes; 30-minute counter
(G)/seconds: second stop hand (F)
- To reset, press the reset pusher (J)
NOTE: accumulated timing sessions can be continued by repeating steps 2 and 3 above
In dh old
1. Introduktion
• The Georg Jensen Story 22
- Produktkvalitet 23
• Pieje of dit ur 23
Service avondingkoides 54
• Service og vedligendelse 24
• Goorg lonsen international geranti 65
- Georg Jensen International gerändi 25
- Miljøbestemt beskyttelse 26
2. Brugervejledning: Quartzure
Temperatureendrigger
Kronografdisplay
-kontrollnapper
A: Timevisor
B: Minutviser
C: Sekundviser
D: Dotorude
F: Stopursekundviser
G 30 minutter-tøller
H: 12 timer-teller
1: Start / stop-knap
J: Nulstilling/Indstillingsknap
Indstilling of tid :
K: Power reserve indikator
L: GMT-/orden tidszoneindikator
M: GMT-knap
Indstilling af tid:
Kronograf display og
kontrolknapper
A: Timeviser
B: Minutviser
C: Sekunoviser
D: Dolorude
F: Stopursekundviser
G:30 minutter toeller
H: 12 timer-tøller
: start / stop-knap
J: Nulstilling/Indstillingsknap
Indstilling af tid:
All rights reserved.
Mijöskydd
Kronografurtavilo35
kontrollknappar:
A: Timvisare
B: Minutvisare
C: Sekundvisare
D: Datumfönster
F: Sekundstoppvisare
1: Start-/stopp-knapp
Urtavila & kontrol kersappair
A: Timvisare
B: Minutvisare
C: Sekundvisare
D: Datumfönster
K: Effektreserv-indikator
L: GMT / andre tidszon-indikator
M: GMT-tryckknapp
Ställa in tiden:
Kronograf urtavilo:6 kontrollkonnatur
A: Timvisare
B: Minutvisare
C: Sekundvisare
D: Datumförster
F: Sekundstoppvisare
G:30-minutersräknore
Modelle: K38-ST51, K38-ST52, K38HRG52 94
• 3 Zeiger, Dotumsonzeige, Automotik Modelle: D42-ST70, D46-ST70, K41-ST70, SS365ST00S, S348B070, S43-ST70, S46-ST70 95
Chronograph-Ärzeüge
und Bedienknöpfe
A: Stunderzeiger
B: Minutenzeiger
C: Sekundenzeiger
D: Datumsfenster
F: Zentrale Stoppsekunde
G: 30-Minuten-Zöhler
計時碼錄的顯示及控制按鈕
A: 拼针
B: 分针
C:秒针
D:H期窗口
F: 中央停止秒针
G:30分鐘計數器
H:12 小時計數器
1: 防始/停止按的
J:重置按的
設置時間:
顯示及控制按鈕
A: 指针
B: 分针
C:秒针
D:日期商门
K:動力儲存指針
L: GMT / 第二時區指針
M: GMT 按鈕
設定時間
計時碼錶的顯示及控制接班
A:
B. 分割
C:秒针
D:厂期窗口
F: 中央停止移针
G:30 分钟计数器
H:12 小時計數器
1:開始/停止接的
1:重置按的
設定時間:
计时秒表外观及控制推杆
A: 指针
B: 分计
C:秒针
D: 日划窗
F: 中央停止秒针
G: 30 分钟计时器
H: 12 小时计时器
1:开始/停止按钮
J:重置按钮
设置时间:
外观及控制按键
A: 时针
B: 分针
C: 秒针
D: 日期窗口
K: 动力储存指示器
L: GMT / 第二时区指示器
M: GMT 推杆按钮
设置时间
计时秒表外观及控制按钮
A: 时针
B: 分针
C: 秒针
D: 日期窗口
F: 中央等止秒针
G:30分钟计时器
H: 12 小时计时器
1: 开始 / 停止推杆
1: 重置推杆
设置时间:
クロノグラフ表示と各種ボタン
A: 時針
B: 分针
C. 秒针
D:カレンダー表示
F: クコノグラフ秒針
G:30分計
H:12 時間計
にスタート / ストップボタン
上リセットボタン
時刻の合わせ方
表示と各種ボタン
A: 時
B: 分针
C:秒针
D:カレンダー表示
K: バワーリザープ表示
L:GMT/セカンドタイムゾーンの表示
M:GMT ボタン
時刻の合わせ方
クロノグラフ表示と各種ボタン
A: 时計
B: 分针
C:秒针
D:カレンダー表示
F:クロノグラフ秒針
G:30 分计
H:12時間計
|スタートボタン / ストップボタン
トリセットボタン
時刻の合わせ方


- Operating Instructions: Quartz Watches
- Operating Instructions: Mechanical Watches
- Introduction
- The Georg Jensen story
- Product quality - Swiss Made
- Caring for your watch
- Water:
- Magnetism:
- Temperature Changes
- Shocks
- Cleaning:
- Chemicals
- Leather Straps
- Servicing & Maintenance
- Georg Jensen International Warranty
- Environmental protection
- Operating Instructions Quartz Watches
- Setting the time:
- Setting the date:
- Setting the GMT / 2nd time zone hand(E):
- Display & control buttons
- Chronograph: Basic Functions (Start, Stop & Reset)
- Chronograph: Interval Timing
- Chronograph: Adjusting the chronograph hands
- General Instructions for Mechanical Watches
- Winding the watch:
- Setting the GMT / 2nd time zone hand:
- Display
- Display 6 control buttons
- Chronograph: Basic Functions (Start, Stop & Reset):
- Chronograph: Accumulated Timing:
- Introduktion
- Brugervejledning: Quartzure
- Temperatureendrigger
- Kronografdisplay
- -kontrollnapper
- Indstilling of tid :
- Indstilling af tid:
- Kronograf display og
- kontrolknapper
- Mijöskydd
- Urtavila & kontrol kersappair
- Ställa in tiden:
- Kronograf urtavilo:6 kontrollkonnatur
- Chronograph-Ärzeüge
- und Bedienknöpfe
- 計時碼錄的顯示及控制按鈕
- 顯示及控制按鈕
- 計時碼錶的顯示及控制接班
- 计时秒表外观及控制推杆
- 外观及控制按键
- 计时秒表外观及控制按钮
- クロノグラフ表示と各種ボタン
- 表示と各種ボタン
Brand : Georg Jensen
Model : K41RG73
Category : Wristwatch