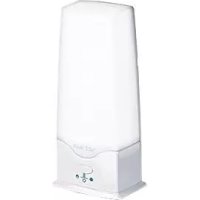
Rise & Shine VA05F - Light therapy Verilux - Free user manual and instructions
Find the device manual for free Rise & Shine VA05F Verilux in PDF.
| Product type | Natural wake-up light / Light therapy lamp |
| Brand | Verilux |
| Model | Rise & Shine VA05F |
| Dimensions (L × H × D) | 22.2 × 26 × 17.1 cm |
| Weight | 1.1 kg |
| Power supply | 120 VAC, 60 Hz |
| Bulb type | Incandescent A19 60 W max, E26 base |
| Main functions | Sunrise simulation, sleep cycle, FM radio, 4 nature sounds, 20 brightness levels, dual alarm with snooze |
| Alarm settings | Alarm 1 and 2 separately adjustable, choose between FM radio or nature sound, volume and brightness adjustable |
| Sleep cycle durations | 5, 15, 30 or 60 minutes |
| Display brightness | Off, Normal, Bright |
| Radio reception | FM with external antenna (3.5 mm jack) |
| Maintenance and cleaning | Disconnect before cleaning; use a dry or slightly damp cloth; avoid chemical solvents |
| Safety and precautions | Do not look directly at the lit bulb; use only a 60 W max bulb; do not use near water or heat sources; do not cover the bulb |
| Spare parts and repairability | Standard bulb commercially available; external FM antenna included; no user-serviceable parts |
| Operating environment | Temperature: 15 to 35 °C; relative humidity: 5 to 95% non-condensing |
| Warranty | One-year limited warranty |
| Customer service | 1-800-786-6850; www.verilux.com |
Frequently Asked Questions - Rise & Shine VA05F Verilux
User questions about Rise & Shine VA05F Verilux
0 question about this device. Answer the ones you know or ask your own.
Ask a new question about this device
Download the instructions for your Light therapy in PDF format for free! Find your manual Rise & Shine VA05F - Verilux and take your electronic device back in hand. On this page are published all the documents necessary for the use of your device. Rise & Shine VA05F by Verilux.
USER MANUAL Rise & Shine VA05F Verilux
Thank you for purchasing the Verilux Rise & Shine® Natural Wake-Up Light. You have received an innovative and quality manufactured product, backed by a one-year limited warranty.
Many other healthy lighting products are available through our catalog and online. To request a free copy of our catalog, call our toll-free number 1-800-786-6850. You may also visit us on the web at www.verilux.com to learn more about all our quality Verilux products.
As a Verilux customer, your satisfaction means everything to us. We look forward to serving you now and in the future.
Have a bright day!
Nicholas Haimor
Nicholas Harmon President, Verilux, Inc.
Table of Contents
Important Safety Instructions 4
General Precautions 5
FCC Compliance. 6
Features. 6
Set-up Instructions
Unpacking 7
Selecting a Location 7
Display and Controls. 8
Operating Instructions
Turning on the Lamp 11
Turning off the Lamp 11
Playing Natural Soundscapes 11
Setting the Clock. 11
Listening to the Radio 11
Connecting the External FM Antenna 12
Setting the Alarm and Sleep Cycle Brightness 12
Displaying Alarm Settings 13
Snoopze. 13
Sunrise Simulator 13
Starting a Sleep Cycle. 13
Display Dimmer 13
Replacing the Bulb 14
Troubleshooting
Resetting the Rise & Shine 14
Care and Maintenance
Cleaning. 15
Technical Specifications 15
Warranty 16
Important Safety Instructions
CAUTION:
THIS DEVICE MUST BE CONNECTED TO A MAINS SOCKET OUTLET WITH A PROTECTIVE EARTHING CONNECTION.
TO REDUCE THE RISK OF ELECTRIC SHOCK, DO NOT REMOVE ANY COMPONENTS. THERE ARE NO SERVICEABLE PARTS INSIDE.
TO REDUCE THE RISK OF FIRE OR ELECTRIC SHOCK, DO NOT EXPOSE THIS UNIT TO RAIN OR MOISTURE.
The lightning flash with arrowhead symbol, within an equilateral triangle, is intended to alert the user to the presence of uninsulated dangerous voltage within the system enclosure that may be of sufficient magnitude to constitute a risk of electric shock.

The exclamation point within an equilateral triangle, as marked on the system, is intended to alert the user to the presence of important operating and maintenance instructions in this installation guide.
WARNING: TO REDUCE THE RISK OF FIRE, ELECTRIC SHOCK OR PERSONAL INJURY:
- Read these instructions before using this lamp.
- Keep these instructions for future reference.
Heed all warnings. - Follow all instructions.
- Do not use this appliance near water.
Refer all servicing to qualified service personnel. - Servicing is required when the apparatus has been damaged in any way, such as power-supply cord or plug is damaged, liquid has been spilled or objects have fallen into the apparatus, the apparatus has been exposed to rain or moisture, does not operate normally, or has been dropped.
- The mains plug is used as the disconnecting device, which shall remain readily operable.
- Turn off/unplug and allow to cool before replacing bulb, cleaning or other maintenance.
- Light bulbs get HOT quickly! Do not touch the bulb while the lamp is on.
- Do not look directly at the lighted bulb.
- Do not operate the lamp in close proximity to flammable or combustible vapors, such as aerosol (spray) products or where oxygen is being administered.
- Use only the type of bulb and maximum wattage indicated by the manufacturer.
Important Safety Instructions — continued
- Never cover the bulb when it is in operation.
- Do not use this lamp in damp/humid or wet locations.
- For indoor use only.
- Clean only with dry cloth. Do not use any chemical solvents or detergents.
- Do not block any ventilation openings. Install in accordance with the manufacturer's instructions.
- Do not place near any heat sources such as radiators, heat registers, stoves or other apparatus (including amplifiers) that produce heat.
- Do not defeat the safety purpose of the polarized or grounding-type plug. A polarized plug has two blades with one wider than the other. A grounding plug has two blades and a third grounding prong. The wider blade or third prong is provided for your safety. If the provided plug does not fit in your outlet, consult an electrician for replacement of the obsolete outlet.
- Protect the power cord from being walked on or pinched, particularly at plugs, convenience receptacles and the point where they exit from the lamp.
- Only use attachments/accessories specified by the manufacturer.
- Unplug this lamp during lightning storms or when unused for long periods.
- Only use a bulb rated 120 VAC, 60 Watts.
- If the lamp has been damaged in any way, such as the power cord or plug is damaged, liquid has been spilled or objects have fallen into the lamp, the lamp has been exposed to rain or moisture, does not operate normally, or has been dropped, it should not be operated.
- Modifications not authorized by the manufacturer will void the warranty and may result in personal injury.
SAVE THESE INSTRUCTIONS
General Precautions
- Avoid placing this lamp in areas that are exposed to direct sunlight or close to heat-radiating products, such as heaters. Do not place the lamp on the top of appliances that radiate heat.
- Avoid placing the lamp in areas that are dusty, humid/moist, lack ventilation or are subject to constant vibration.
- Not for use with light dimmers, timers, motion detectors or extension cords.
- Do not use any lubricating agent in the bulb assembly.
- Close supervision is necessary when this appliance is used by or near children or disabled persons.
General Precautions - continued

WARNING: This lamp is supplied with a shade designed specifically for use with this product. Use of any other shade other than the one supplied by the manufacturer may pose a SAFETY HAZARD.
CAUTION: If outer glass of the bulb breaks, avoid touching any metal components due to potential shock. The bulb may continue to light, however, immediately discontinue use, turn power off and remove the bulb. Let bulb cool before removal to avoid potential burn.
FCC Compliance
This device complies with part 15 of the FCC Rules. Operation is subject to the following two conditions: (1) this device may not cause harmful interference, and (2) this device must accept any interference received, including interference that may cause undesired operation.
This equipment has been tested and found to comply with the limits for a Class B digital device, pursuant to part 15 of the FCC Rules. These limits are designed to provide reasonable protection against harmful interference in a residential installation. This equipment generates, uses and can radiate radio frequency energy and if not installed and used in accordance with the instructions, may cause harmful interference to radio communications. However, there is no guarantee that interference will not occur in a particular installation.
If this equipment does cause harmful interference to radio or television reception, which can be determined by turning the equipment off and on, the user is encouraged to try to correct the interference by one or more of the following measures:
- Reorient or relocate the receiving antenna.
- Increase the separation between the equipment and receiver.
- Connect the equipment into an outlet on a circuit different from that to which the receiver is connected.
- Consult the dealer or an experienced radio/TV technician for help.
Features
The Verilux® Rise & Shine® Natural Wake-Up Light aligns the body's circadian rhythms that regulate normal sleeping and waking patterns. Synchronized sleep and wake programs provide the body with cues to fall asleep naturally, sleep soundly and wake refreshed and revitalized. The harmonious blend of light and sound therapy naturally directs the body to energized waking and healthy sleep patterns.
Features — continued
Light and sound gradually increase to wake you gently, feeling refreshed and re-energized
- Wake to your choice of four natural soundscapes or your favorite FM radio station
- Select from 20 levels of light intensity
- Sleep mode feature gradually dims the light over a 5, 15, 30 or 60 minute period of time
- Dual alarms with snooze feature
Set-up Instructions
Unpacking
Please check the shipping carton for the following items:
- Verilux Rise & Shine® Natural Wake-Up Light
- External FM Antenna
- Instruction Manual
A19 120V 60W E26 Clear Bulb (located inside lamp shade)
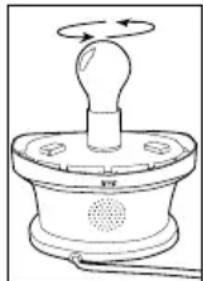
Note: With the unit not plugged into a power outlet, open the lamp shade by depressing the button on rear of lamp and gently lifting the shade off the base. Install bulb by screwing securely into socket. Replace the shade by aligning it with the base and pressing down until the shade clicks into place.
Selecting a Location
- Place your Rise & Shine on a table or other flat surface near your bedside.
- For best performance, place your Rise & Shine within two feet of a wall and avoid placing directly in a corner.
Note: Avoid placing your Rise & Shine on a metal surface, which could interfere with FM reception.
Note: Avoid placing this lamp in areas that are exposed to direct sunlight or close to heat-radiating products, such as heaters. Do not place the lamp on the top of appliances that radiate heat.
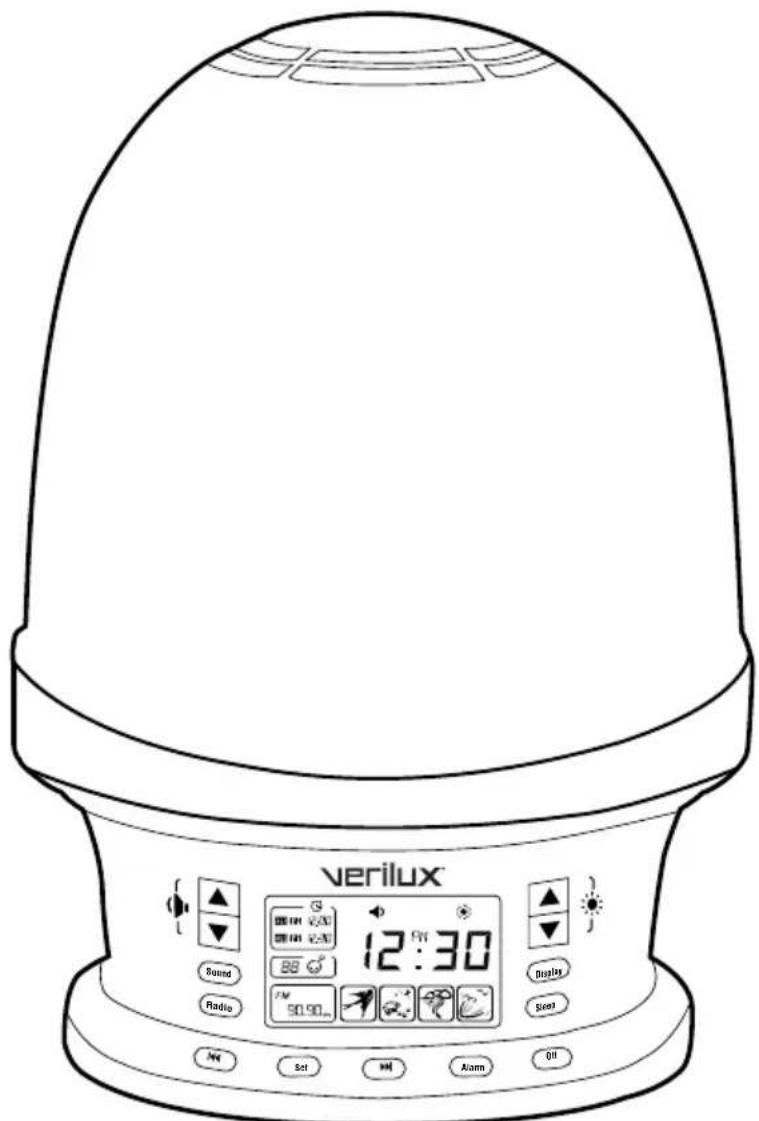
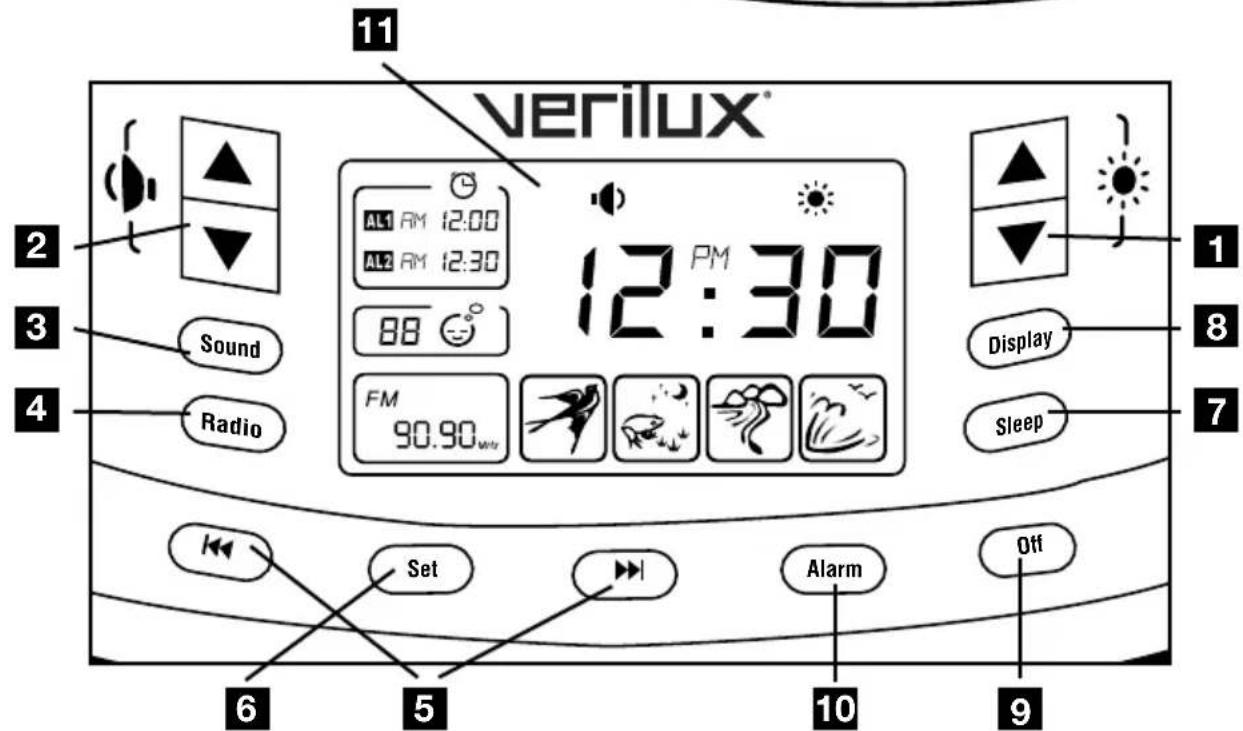
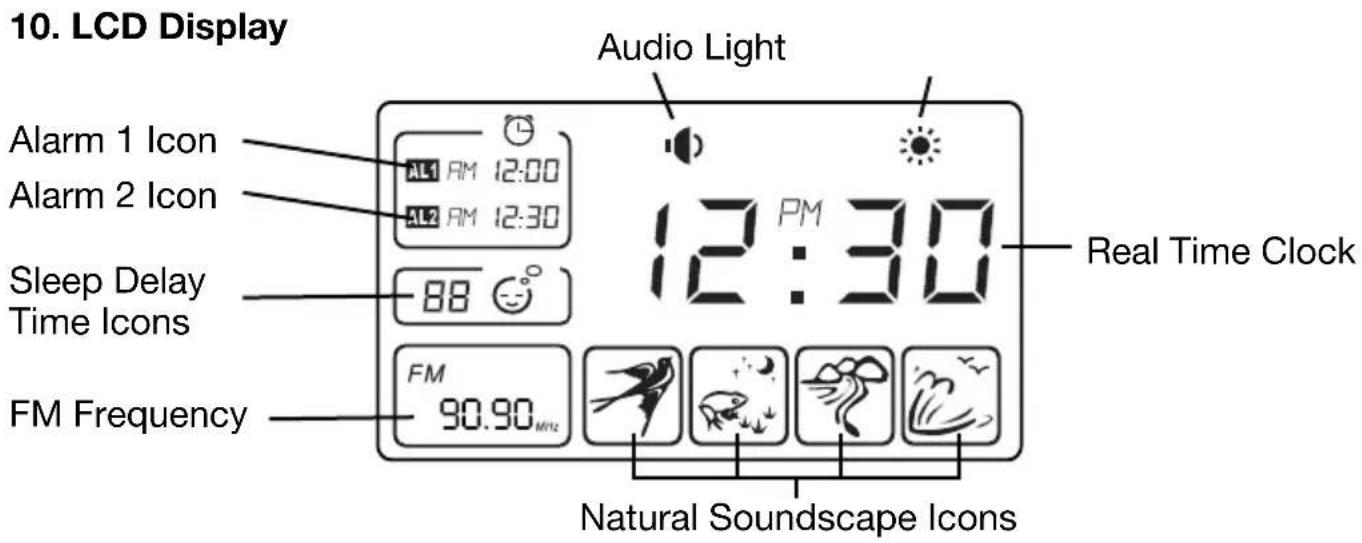
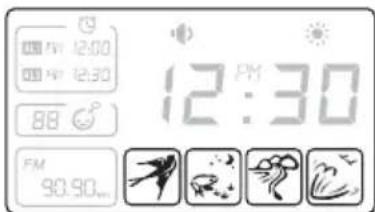
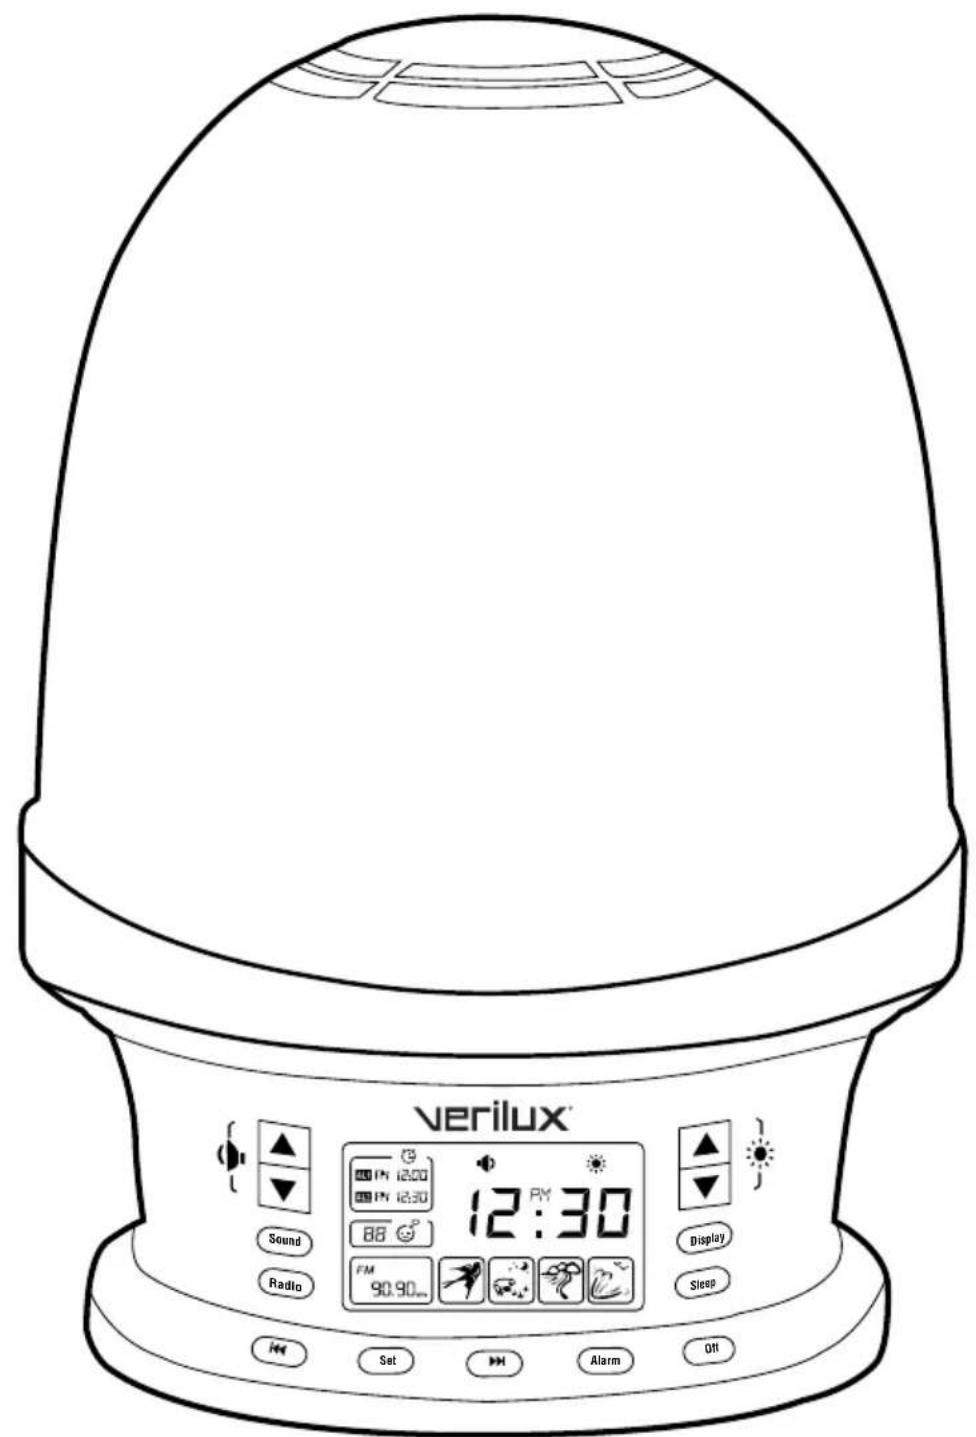
Display and Controls
- Light Brightness Buttons
- Volume Buttons
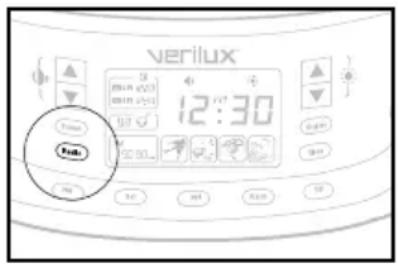
- Sound Button
- Radio Button
- Back Forward Buttons
- Set Button
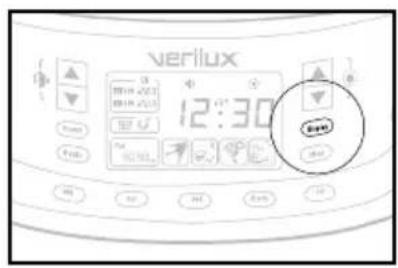
- Sleep Button
- Display Button (Off / Normal / Bright)
- Off Button
- Alarm Button
- LCD Display
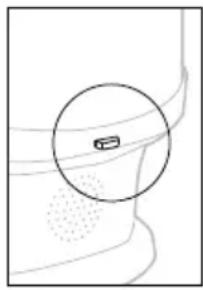
Note: External antenna jack and button to release shade are located on the rear panel of the Rise & Shine®.
Display and Controls - continued
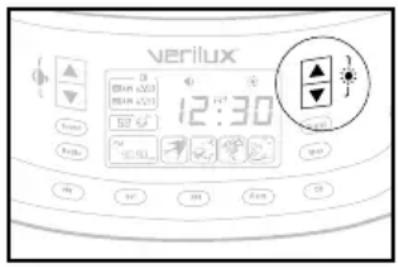
1. Light Brightness Buttons
The Up and Down light brightness buttons are used to set the highest final brightness of the Wake Cycle or the initial (highest) brightness of the Sleep Cycle. The brightness can be set to any one of 20 levels.
The brightness buttons are also used to adjust the brightness when you use the Rise & Shine® as a lamp.
2. Volume Buttons
The Up and Down volume buttons are used to set the highest final volume of the Wake Cycle or the initial volume of the Sleep Cycle. The volume can be set to any one of 20 levels.

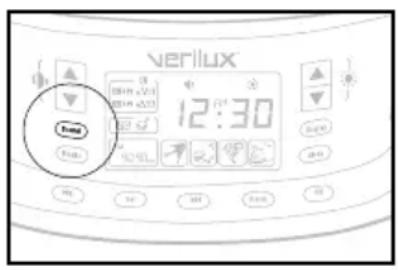
3. Sound Button
When used with other Alarm settings, the Sound button (Sound) lets you choose one of four natural soundscapes by pressing the button repeatedly to select a particular sound. If pressed when not setting an alarm, the Sound button begins playing the last selected sound. You can select a particular sound by pressing the Back and Forward buttons.
Pressing the Sound button again, or pressing the Off button Off turns off the soundscape.
4. Radio Button
The Radio button Radio turns the FM radio on or off.
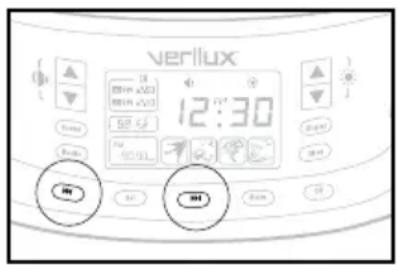
5. The Back and Forward Buttons
The Back button and the Forward button are used to set the time of day, the alarm time or to advance between options.
Display and Controls — continued
6. Sleep Button
Pushing the Sleep button begins a Sleep Cycle with a default time of 5 minutes. Pressing the Sleep button repeatedly allows you to select a Sleep Cycle length of 0 (off), 5, 15, 30 or 60 minutes. The Sleep Cycle you've chosen begins about two seconds after your final button press.
7. Display Button (Off / Normal / Bright)
The Display button controls the brightness of the Rise & Shine LCD display backlight. Press repeatedly to choose between Off, Normal and Bright. If the backlight is off, pressing any other button will momentarily set the backlight to normal.
8. Off Button
The Off button turns the FM radio, natural soundscapes and the light off. The Off button can also be used to stop a Sleep or Wake Cycle.
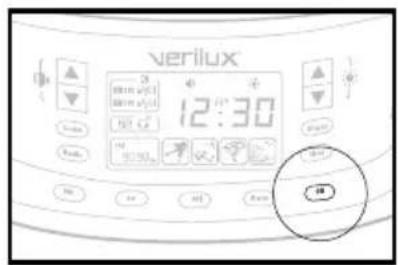
9. Alarm Button
Pressing the Alarm button (Alarm) cycles the display between:
Alarm 1 Displayed (AL1)
Alarm 2 Displayed (AL2)
- Alarm 1 and Alarm 2 Displayed (AL1 and AL2)
Operating Instructions
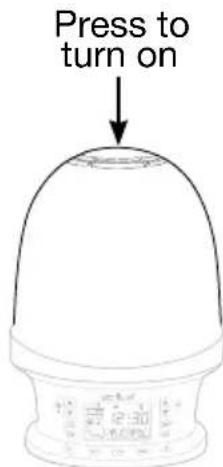
Turning On the Lamp
To turn on the lamp:
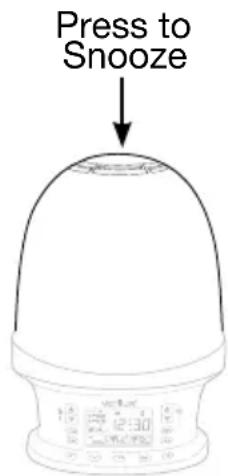
- Press the top of the Rise & Shine lamp shade on the "Light/ Snooze" label.
You may now adjust the brightness using the up and down brightness buttons located to the right of the display.
Note: Any change you make to the lamp's brightness becomes the new "default" brightness.
Turning Off the Lamp
To turn off the lamp:
- Press the top of the Rise & Shine lamp shade on the "Light/Snoopze" label.
Playing a Natural Soundscape
Press the sound button to play one of four nature sounds. Press the Back or the Forward button repeatedly to cycle between the four available sounds. If the sound button is pressed when not setting an alarm, the button begins to play the last selected sound. Pressing the sound button again or pressing the off button turns off the nature sound.
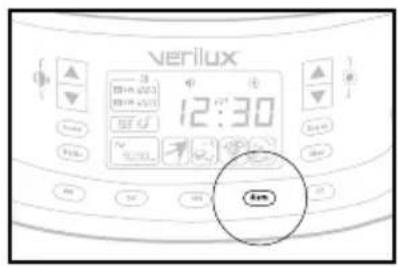
Setting the Clock
- Press and hold the Set button for 3 seconds to enter the clock setting mode. The clock digits will blink.
- Press and hold the Back button or the Forward button to adjust the time. After your last button press, the display will continue to blink for a few seconds, then display the newly set time.
Listening to the Radio
To listen to the FM radio:
- Press the Radio button to turn on the radio.
- Use the Back button or the Forward button to select a frequency. If you press and hold the Back button or the Forward button, the radio will stop on the next strongest frequency.
- Use the Up and Down volume buttons to adjust the volume.
- To turn the radio off, press the Radio button or press the Off button.

Operating Instructions — continued
To improve FM reception, you may wish to use the included external FM antenna.
Connecting the External FM Antenna:
- Plug the 3.5mm (1/8^ ) plug of the FM antenna into the EXTERNAL ANTENNA jack on the rear panel.
- Straighten the antenna and position to establish optimum reception.
Setting the Alarm
Note: It is helpful to read through the entire section on setting the alarm before you begin.
- Press and hold the Set button for 3 seconds to enter the clock setting mode. Press Set again to enter the alarm setting mode.
-
The alarm icons and sleep icon will flash on the left of the display. They are, from top down: AL1 (Alarm 1), AL2 (Alarm 2) and Sleep 🙿 You may set two alarms, each with a specific alarm time. You may also choose a brightness level for the start of the sleep cycle.
-
Select AL1 or AL2 or by pressing the Back button or the Forward button repeatedly. Press the Set button to confirm the desired selection. The chosen icon will flash.
- If AL1 or AL2 is chosen, press the Back button or the Forward button repeatedly to adjust the alarm's time. Press Set to confirm.
-
Press the Back button or the Forward button to select between FM radio mode or natural soundcape mode and press the Set button to confirm.
-
When the FM radio mode is selected, press the Back button or the Forward button repeatedly to search for the desired radio station. Then press "set" to the selected radio station.
-
When the natural soundscape mode is selected, press the Back button or the Forward button repeatedly to select bird, frog, river or wave. Then press Set to confirm the desired soundscape.
-
The Audio icon will flash and the FM Radio or selected natural soundscape will play. Press the Back button or the Forward button repeatedly to adjust the alarm volume from 0 to 20. Press Set to confirm.
- The light brightness icon will flash and the light will turn on. Press the Back button or the Forward button on the right side repeatedly to adjust the light brightness and press Set to confirm and exit.
Setting Sleep Cycle Brightness
- Press and hold the Set button for 3 seconds to enter the clock setting mode. Press Set again to enter the alarm setting mode.
Operating Instructions — continued
- Select by pressing the Back button or the Forward button repeatedly. Press the Set button to confirm the desired selection. The chosen icon will flash.
-
When the Sleep icon is chosen, the lamp brightness will increase to the last level set. Use the Back button or the Forward button to set a new final brightness level for the Sleep Cycle.
-
Press the Set button to confirm.
Displaying Alarm Settings
Press the Alarm button repeatedly to cycle between displaying:
- AL1 - Alarm 1 Setting
- AL2 - Alarm 2 Setting
- Both Alarms
Snoopze
When the alarm sounds, you may press down on the top of the Rise & Shine® – as you would a button – to Snooze.
Sunrise Simulator
Beginning 15 minutes before the alarm set time, the light will gradually increase in intensity to simulate sunrise. There are 20
possible light levels. The final brightness level, which may be any
level between 1 and 20, is set as described on page 12 under Setting the Alarm and Sleep Cycle Brightness.
Starting a Sleep Cycle
A sleep cycle simulates diminishing sunset lighting by beginning with the lamp on maximum brightness, or the highest brightness you previously set, with the light progressively dimming for the duration of the cycle until the lamp is off at the end of the cycle.
You may start a sleep cycle whenever you wish:
- Press the Sleep button to begin a sleep cycle.
- The minutes remaining in the sleep cycle are shown on the display.
- Press the Sleep button repeatedly to choose 0, 5, 15, 30 or 60 minutes.
- To manually end the Sleep cycle, press the Off Button, or press the Sleep button repeatedly until you reach "00". You will need to manually turn the lamp and/or radio on, if you wish to do so.
Display Dimmer
To adjust the LCD display brightness to Off, Normal or Bright setting, press the Display button repeatedly for the desired brightness.
Replacing the Bulb
Your Rise & Shine® uses a standard 60 Watt incandescent bulb. To replace the bulb:
- Make sure the lamp is unplugged and enough time has passed to allow the bulb to cool.
- Press the release button at the rear of the lamp shade and gently pull the shade up to remove.
- Unscrew the bulb and replace with a standard 60 Watt incandescent bulb.
- Align the shade and press down until the rear of the shade clicks into place.
Note: Do not use a bulb rated higher than 60 watts.
Troubleshooting
Resetting the Rise & Shine
| Problem | |
| The device is not working correctly. | Unplug from power, wait 30 seconds, then plug in again. |
| No light. | • Press the buttons. |
| • Replace the bulb if needed. | |
| • Verify that the lamp icon is shown on the display. If it is not shown, press down on the lamp shade to turn on the lamp. | |
| No radio or no sound. | • If the Radio icon is not shown on the display, press Radio. |
| • Increase volume. | |
| • Attach the external antenna and vary the antenna location for best reception. | |
| Alarm doesn’t function. | • Verify the correct AM/PM setting. |
| • Verify that the alarm is activated (an alarm is activated if both the alarm, AL1 or AL2, and the time are shown). |
Care and Maintenance
Cleaning
Disconnect the Rise & Shine® from the power outlet. Use only a dry, soft cloth to clean. Do not use any chemical solvents or detergents.
Technical Specifications
Rise & Shine Natural Wake-Up Light
Overall Dimensions
Weight 2.4 lbs
Dimensions 8.75'' × 10.25'' × 6.75''
LCD Display
Dimensions 2.75" x 1.75"
Environment
Operating Temperature: 15^ to 35^ ; 56^ to 95^
Storage Temperature: 0^ to 40^ ; 32^ to 104^
Relative Humidity: 5% to 95% non-condensing
Bulb
Maximum 60 Watt Incandescent
Power
Input Power: 120 VAC, 60Hz
ETL Listed
Cord/Plug
Plug Type: Polarized/USA two prong
Cord Length: 72" (6 Feet)
Intellectual Property
Patent: 6,236,622 and D553,777
Trademark: Rise & Shine®
Safety
ETL Listed
Warranty
1-Year Limited
One Year Limited Warranty
ATTENTION! ONCE OPENED, PLEASE DO NOT RETURN THIS PRODUCT TO THE STORE WHERE IT WAS PURCHASED FOR REPAIR OR REPLACEMENT!
Many questions may be answered by visiting www.verilux.com, or you may call our Customer Service Department at 800-786-6850 during normal business hours.
This limited warranty is provided by: Verilux, Inc., 340 Mad River Park, Waitsfield, VT 05673
Verilux warrants this product to be free from defects in material and workmanship for a period of one year from the date of the original retail purchase from Verilux or an authorized Verilux distributor. Proof of purchase is required for all warranty claims. During the limited warranty period, Verilux, Inc. will, at its option, repair or replace defective parts of this product, at no charge to the customer, subject to the following limitations: This limited warranty does not include any postage, freight, handling, insurance or delivery fees. This warranty does not cover damage, defect or failure caused by or resulting from accident, external destruction, alteration, modification, abuse, misuse or misapplication of this product.
This warranty does not cover damage to the product resulting from return shipping or handling. The use of shipping insurance is recommended to help protect your product.
Return Authorization is required for all returns. To obtain a Return Authorization, please contact the Verilux Customer Service Department at 800-786-6850.
If, during the first year of ownership, this product fails to operate properly, it should be returned as specified at www.verilux.com/warrantyreplacement or as instructed by a Verilux customer service representative at 800-786-6850.
Note: Verilux recommends using a quality surge suppressor on all electronics equipment. Voltage variations and spikes can damage electronic components in any system. A quality suppressor can eliminate the vast majority of failures attributed to surges and may be purchased at electronics stores.
Due to ongoing improvements, actual product may have slight variations from the product described in this manual.
Please visit our web site at www.verilux.com or call our Customer Service Department at
1-800-786-6850
Representatives are available 8 a.m. - 10 p.m. M-S, 9 a.m. - 8 p.m. Sunday EST
verilux
340 Mad River Park, Waitsfield, VT 05673
Rise & Shine®
Chere cliente/Cher client,
3. Touche Sound (son)
340 Mad River Park, Waitsfield, VT 05673