
Comfortslice 99319 - Sharpener TREBS - Free user manual and instructions
Find the device manual for free Comfortslice 99319 TREBS in PDF.
| Brand | Trebs |
| Model | Comfortslice 99319 |
| Product Type | Electric knife sharpener |
| Power Supply | 230 V, 50 Hz |
| Power | 40 W |
| Main Functions | Precision sharpening (step 1) and polishing (step 2) |
| Number of Slots | 2 (slot 1 for sharpening, slot 2 for polishing) |
| Number of Openings per Slot | 2 |
| Non-slip Suction Cups | Yes, wet before use |
| Plug Type | Polarized (one wider prong) |
| Intended Use | Household |
| Care and Cleaning | Clean exterior with non-abrasive cleaner; do not immerse |
| Debris Tanks | 2 removable tanks under the unit (empty about once a year) |
| Safety | Automatic shut-off not mentioned; do not leave unattended while in use |
| Warranty | 24 months from date of purchase |
| Customer Service | info@trebs.nl |
| Dimensions (approx.) | Not specified, compact size |
| Weight (approx.) | Not specified, lightweight |
Frequently Asked Questions - Comfortslice 99319 TREBS
User questions about Comfortslice 99319 TREBS
0 question about this device. Answer the ones you know or ask your own.
Ask a new question about this device
Download the instructions for your Sharpener in PDF format for free! Find your manual Comfortslice 99319 - TREBS and take your electronic device back in hand. On this page are published all the documents necessary for the use of your device. Comfortslice 99319 by TREBS.
USER MANUAL Comfortslice 99319 TREBS
natural_image
Exterior view of a modern office building (no signage)natural_image
Hand holding a small object next to a silver and black massage device (no visible text or symbols)(A. 1)
3. Reinigen
natural_image
Hand holding a small object into a silver and black device with a red button (no visible text or symbols)(Fig. 1)
3. Reinigung
1. General safety instrucons
PLEASE READ THESE INSTRUCTIONS CAREFULLY BEFORE USING THE APPLIANCE AND SAVE IT FOR ANY FURTHER NEED.
- Check that your mains voltage corresponds to that stated on the appliance.
- Never leave the appliance unsupervised when in use. Keep out of reach of children or incompetent persons.
- From me to me check the cord for damages. Never use the appliance if cord or appliance shows any signs of damage. In that case, all repairs should be made by a competent qualified electrician(*).
- If the power cord is damaged, it must be replaced by the manufacturer, its service or similarly qualified person in order to avoid a hazard.
- Only use the appliance for domesc purposes and in the way indicated in these instrucons.
- Never immerse the base of your appliance in water or any other liquid for any reason whatsoever. Never place it into the dishwasher.
- Never use the appliance near hot surfaces.
- Before cleaning, always unplug the appliance from the power supply.
- Never use the appliance outside and always place it in a dry environment.
- Never use accessories that are not recommended by the producer. They could constute a danger to the user and risk to damage the appliance.
- Never move the appliance by pulling the cord. Make sure the cord cannot get caught in any way. Do not wind the cord around the appliance and do not bend it.
- Stand the appliance on a table or at surface.
- Unplug the appliance when not in use.
- This kind of appliance cannot funcon connuously, it is not a professional type of appliance. It is necessary to make temporary stops. Check the secon « Important informaon » in the instrucon manual.
- It is absolutely necessary to keep this appliance clean at all mes as it comes into direct contact with food.
- Make sure the appliance is unplugged before inserng, removing or cleaning one of the accessories. It is absolutely necessary to remove the accessories before cleaning them.
- The appliance is not intended to be operated by means of external mer or separate remote control system.
- This Appliance can be used by children aged from 8 years and above and persons with reduced physical, sensory or mental capabilities or lack of experience and knowledge if they have been given supervision or instrucon concerning use of the instrucon manual appliance in a safe way and understand the hazards involved. Children shall not play with the appliance. Cleaning and user maintenance shall not be made by Children unless they are older than 8 years and supervised.
- Keep the appliance and its cord out of reach of children less than 8 years.
- This appliance is intended for household use and similar applicaons such as:
- sta kitchen areas in shops, oces and other working environments;
– farm houses;
– by clients in hotels, motels and other residential type environments;
– bed and breakfast type environments.
(*) Competent qualified electrician: aer sales department of the producer or importer or any person who is qualified, approved and competent to perform this kind of repairs in order to avoid all danger. In any case you should return the appliance to this electrician.
Informaon :
How oen should I sharpen my knives?
- Polish the knife prior to each use if you want to maintain a razor sharp edge. Aer extensive use, if you have polished the knife and it no longer slices food with ease, run the knife through both Stage 1 and Stage 2. Although unusual, there are mes when you will have to repeat Stages 1 and 2 more than once. This may occur during the rst sharpening of a knife that has been improperly sharpened by another process previously. It may also occur when sharpening knives of tempered steel which have extremely hard blades.
To sharpen these types of knives with the knife sharpener, simply connue to repeat Stages 1 and 2 until the knife cuts food easily. Depending on the condion of the knife blade, you may have to repeat the process several mes.(in extreme cases, this could be 10 mes or more.) This extended process will only be necessary the rst me you use the knife sharpener for this type of knife. Thereaer, you will be able to sharpen your knife following the normal sharpening procedure.
- To get an even edge on the knife be sure to hold the knife blade parallel with the table or counter top while sharpening. When sharpening the p of the blade, li up on the knife handle slightly as the curved poron of the blade is drawn through the blade guides.
- This sharpener is not suitable for electric serrated knives or knives serrated on both sides. To sharpen non-electric serrated knives, use only the slots in Stage 2 and only sharpen the smooth side of the knife blade (the side without the grooves). Draw the knife through the slot using very lile pressure. Note: Each me the knife is sharpened, a poron of the serraon is being removed. Over a long period of me, the serraon on the knife may be completely removed and you may have a knife with a blade similar to a ulity knife.
2. The use
- Moisten the boom of the sucon feet on the knife sharpener and place on a stable surface. Connect cord to a polarised outlet only.
As a safety feature, this appliance has a polarised plug (one blade is wider than the other).
The plug can only be used in a one way polarized outlet way. If the plus does not t in the outlet, reverse the plug. If you are sll unable to t the plug, contact/ advice a qualified electrician.
Do not aempt to alter this safety feature.
The unit can be turned on by pressing the ON/OFF switch.
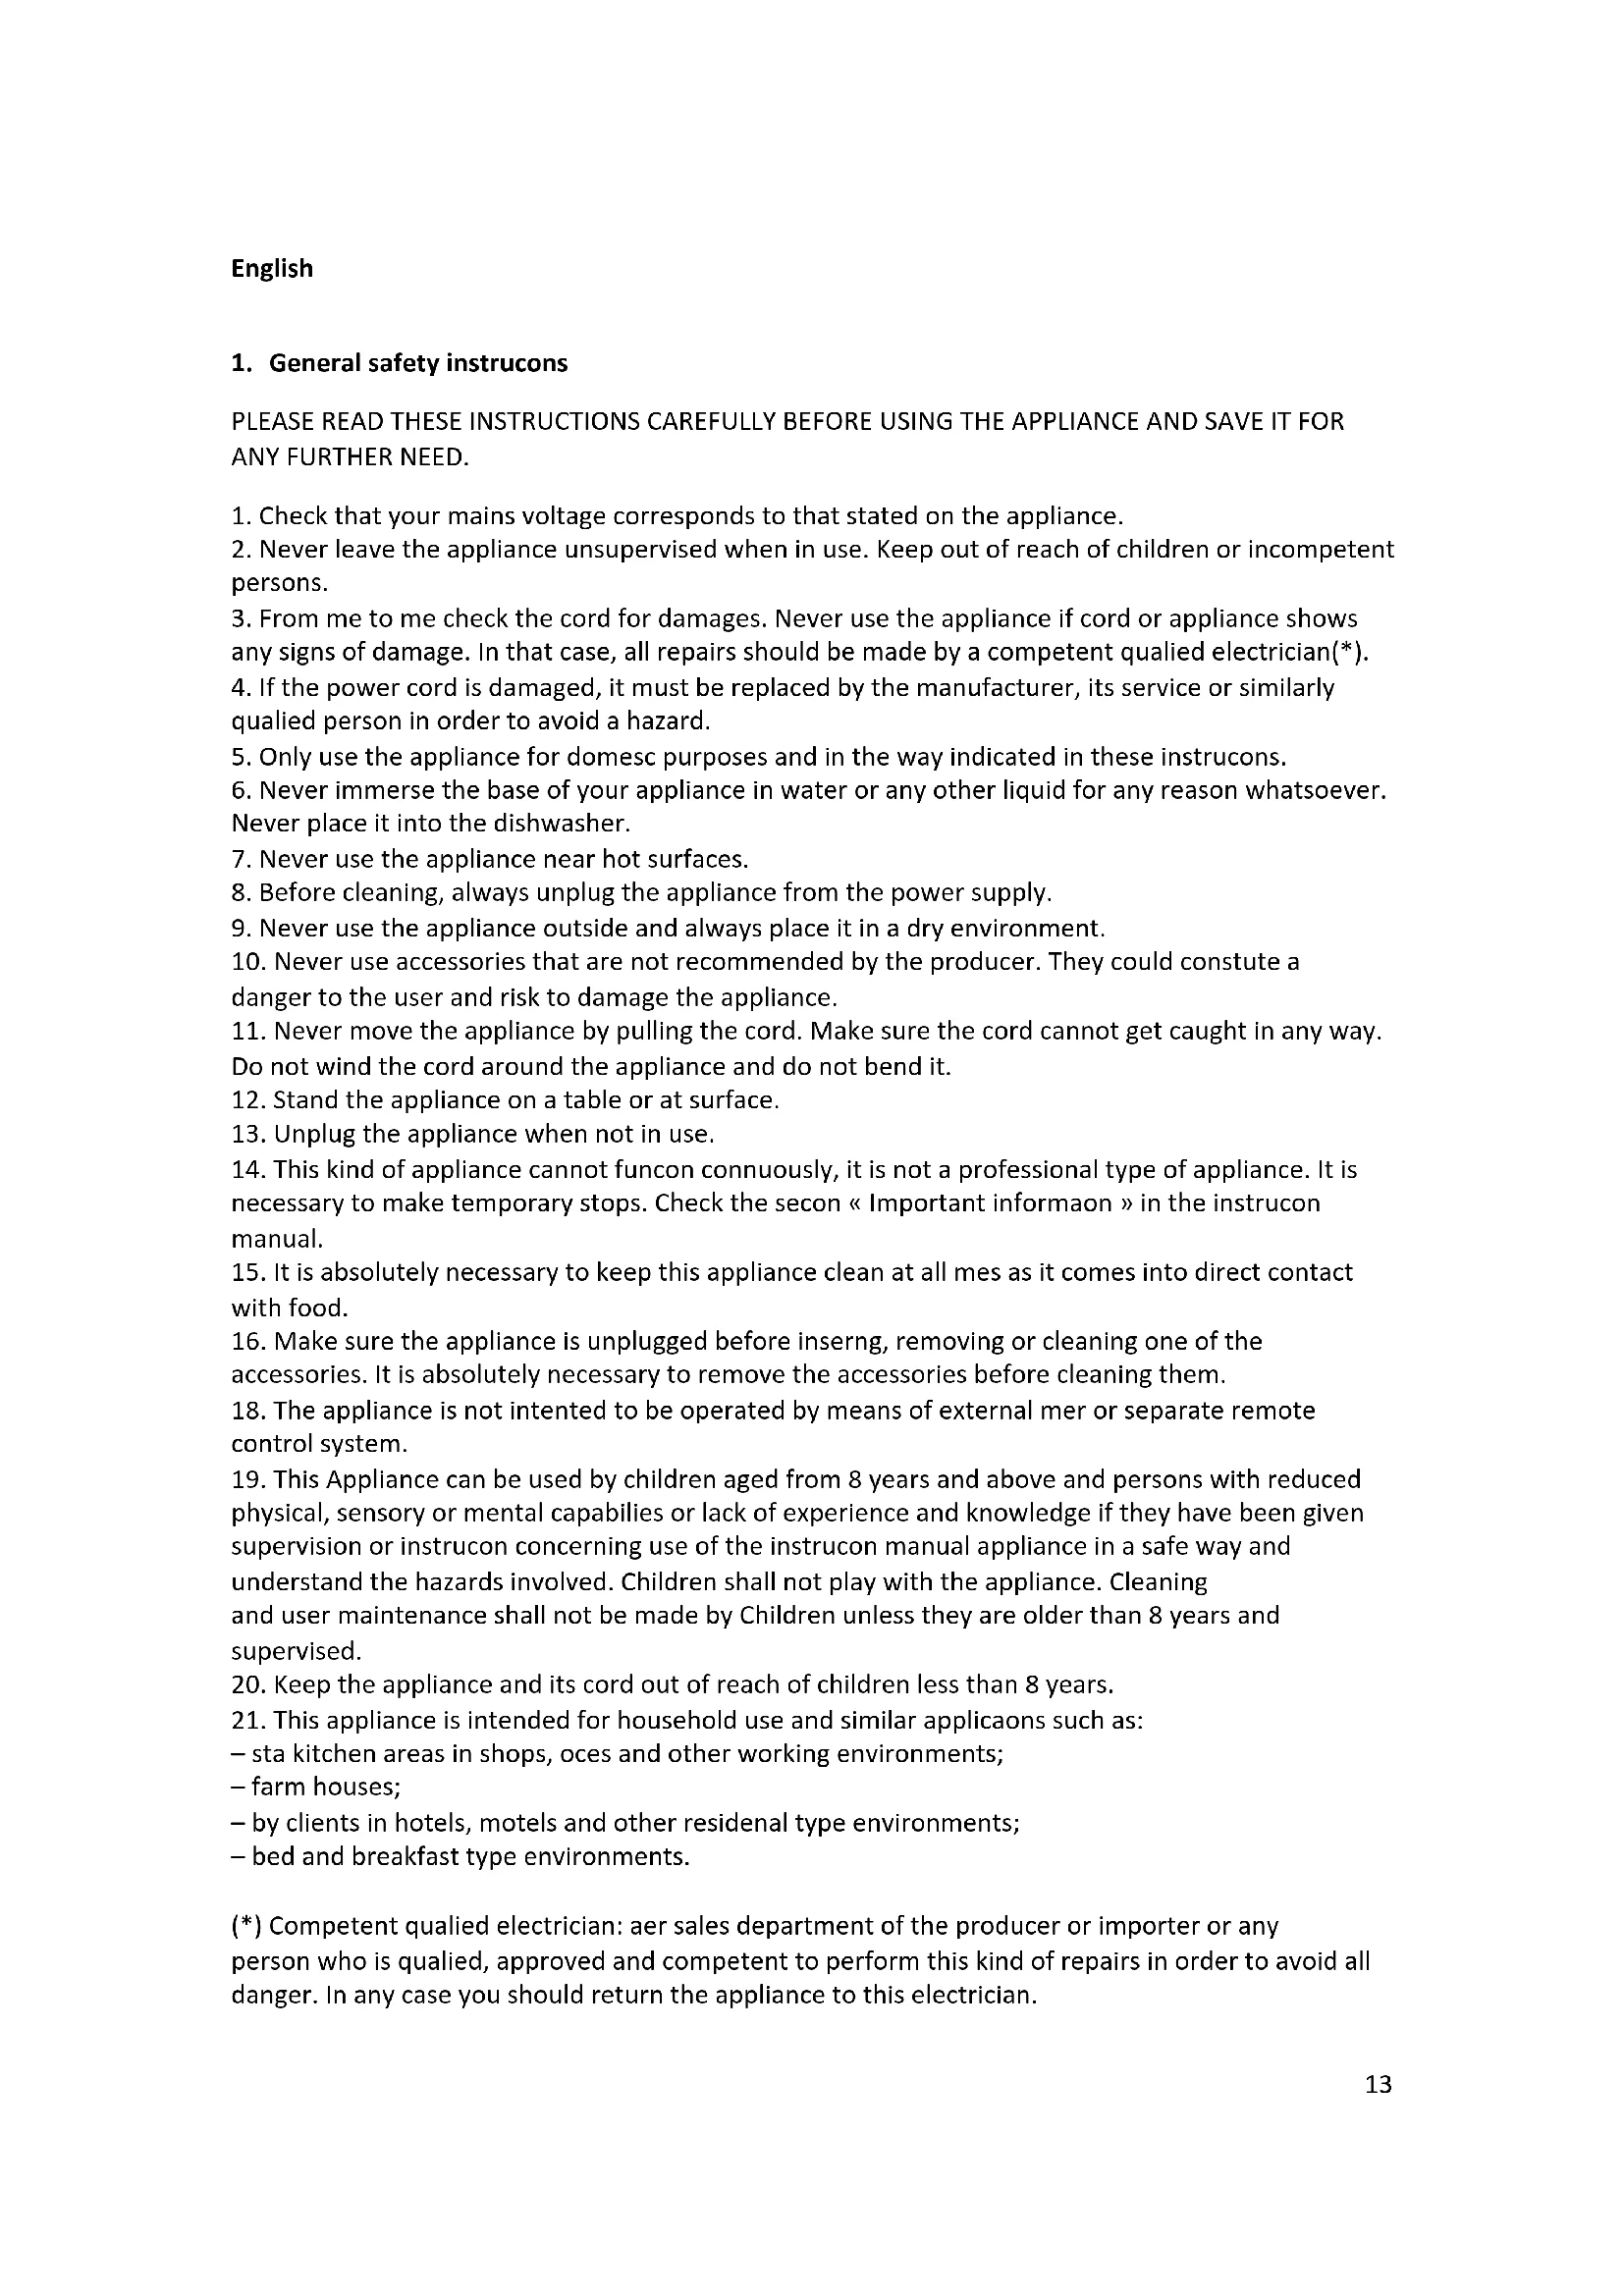
- You will noce there is a number at the base of each set of slots as illustrated on the overleaf.
The dierent sides are indicated with the number 1 and 2. Each stage is equipped with two slots, one to sharpen you knives on both sides.
When using the knife sharpener on your knives for the rst me;
Start with Stage 1 – Precision Grinding.
STAGE 1 – Precision Grinding
Begins sharpening and creates a precision angled edge. Slowly draw the knife towards you through both blade guide slots in Stage 1 (Fig 1) three mes, alternang passes between the two slots. The knife's cung edge should be kept parallel with the table or counter top (Fig 1), except when sharpening the p of the blade.
To sharpen the p, li up on the knife handle slightly as the curved poron of the blade is drawn through the blade guides. When drawing the knife through the blade guides, allow approximately one second for each two inches of blade. For example, if sharpening a knife with a 6 inch blade, you should take approximately three seconds for each pass.
STAGE 2 – Fine Polishing
Completes the knife sharpening process by honing and polishing the knife to an exact razor sharp edge. Slowly draw the knife through both blade guide slots in stage 2 (Fig1) three mes, alternang passes between the two slots. Each pass should take approximately three or more seconds, again depending on the knife blade's length. Complete the polishing process with one quick pass (approximately one second) through both slots of stage 2. Before using the knife to slice food, always wipe the knife blade with a damp cloth aer polishing. If the knife does not slice food with ease, repeat stages 1 & 2.

natural_image
Hand holding a small object into a silver and black device with a red button (no visible text or symbols)(Fig. 1)
3. Cleaning
Wipe clean only the exterior of the sharpener with a non-abrasive cleaner. Never clean the knife sharpener in water or any other liquid uencies. Do not use any type of lubrication in order to clean the sharpener.
Your knife sharpener is equipped with two special receptacles on the boom of the unit.
These receptacles can be used for collecting metal lings from your knives. This needs to be emped on a regular basis by removing the red plasc plugs on the boom of the unit. By holding the device upside down you are able to shake out the metal lings that have collected inside. This should be done about once a year under normal usage. Do not aempt any maintenance or alteraon to this item yourself. This should always be done only by a trained professional.
4. Disposal of the Old Device

Old electric and electronic devices frequently sll contain valuable materials. However, they also contain damaging substances, which were necessary for their funconality and safety. If these were put in the non-recyclable waste or were handled incorrectly, they could be
detrimental to human health and the environment. Therefore, do not put your old device into the non-recyclable waste under any circumstances.
PLEASE NOTE
- Ulize the collecon point, established in your town, to return and recycle old electric and electronic devices. If necessary, contact your town hall, local refuse collecon service or your dealer for informaon.
- Ensure that your old device is stored safely away from children until it is taken away.
5. Guarantee
- We provide a 24 month guarantee for this product, commencing from the date of sale, for faults which are attributable to producon or material faults.
- Your legal guarantee entitlements in accordance with § 439. BGB-E remain unacted by this.
- The guarantee does not include damages, which were incurred as a result of improper handling or use, as well as malfuncons which only have a minor eect on the funcon or the value of the device. Consumables, transit damages, inasmuch as we are not responsible for these, as well as damages, which were incurred as a result of any repairs that were not performed by us, are also excluded from the guarantee entlements.
- This device is designed for use in domesc situaons and has the appropriate performance levels.
- Any use in commercial situations is only covered under the guarantee to the extent that it would be comparable with the stresses of being used in a domestic situation. It is not intended for any additional, commercial use.
- In the event of jused complaints, we will repair the faulty device at our discretion or replace it with a trouble-free device.
Any pending faults must be reported within 14 days of delivery. All further claims are excluded.
To enforce a guarantee claim, please contact us prior to returning the device (always provide us with proof of purchase).
6. Technical Data
| Device | Electric knife sharpener |
| Model | 99319 |
| Main Data | 230 V, 50Hz |
| Power consumpon | 40W |
7. Service
If you have any further quesons about the product aer reading this manual, please contact the Trebs customer service: info@trebs.nl.
Trebs BV
Thermiekstraat 1a
6361 HB Nuth
Nederland
Email: info@trebs.nl
natural_image
Hand inserting a small object into a silver and black device (no visible text or symbols)(Fig. 1)