Supreme Ground Level Rectangular - Trampoline EXIT - Free user manual and instructions
Find the device manual for free Supreme Ground Level Rectangular EXIT in PDF.

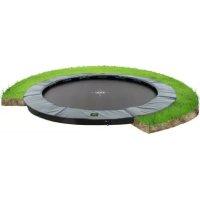
| Product type | In-ground rectangular trampoline |
| Brand | EXIT Toys |
| Model | Supreme Ground Level Rectangular |
| Frame dimensions (L x W) | 366 cm x 213 cm |
| Jumping surface (L x W) | Approximately 366 cm x 213 cm |
| Maximum user weight | 120 kg |
| Number of springs | 75 |
| Frame material | Steel |
| Jumping mat | Durable fabric with V-rings |
| Protective padding | Foam covered with a pad fixed by elastic straps |
| Usage | Domestic, leisure |
| Number of simultaneous users | 1 only |
| Power supply | None (manual) |
| Basic techniques taught | Basic jump, knee drop, seat drop |
| Advanced techniques | Advanced basic jump, hands and knees to flat back, flat back |
| Periodic maintenance | Check bolts, springs, mat and padding before each use |
| Cleaning | Clean with a damp cloth; do not use abrasive products |
| Use conditions | On grass or safety mat; not under branches or cables |
| Frame warranty | 5 years |
| Springs warranty | 5 years |
| Padding warranty | 5 years |
| Jumping mat warranty | 2 years |
| Spare parts | Available from the dealer |
Frequently Asked Questions - Supreme Ground Level Rectangular EXIT
User questions about Supreme Ground Level Rectangular EXIT
0 question about this device. Answer the ones you know or ask your own.
Ask a new question about this device
Download the instructions for your Trampoline in PDF format for free! Find your manual Supreme Ground Level Rectangular - EXIT and take your electronic device back in hand. On this page are published all the documents necessary for the use of your device. Supreme Ground Level Rectangular by EXIT.
USER MANUAL Supreme Ground Level Rectangular EXIT
Supreme Ground Level
Trampoline

Supreme Ground Level Rectangular
7H12FT / 214h366cm
English4

Deutsch24
Nederlands44
François64
1.0 Introduction
Congratulations on choosing a EXIT Supreme Trampoline!
Have fun, be active and play outdoors....
That's what keeps driving us to develop innovative, quality toys for cool kids.
We do everything possible to develop safe products for children. As our products are classed as toys, we comply with the toughest consumer safety regulations. Before launching our products onto the market, we have independent tests carried out for certification. We also continuously test our production runs and periodically have independent tests performed again as a further check. Only products which live up to the highest EXIT Toys standard are marked with and recognized by the EXIT-brand.
"We want to thank you for your custom and your confidence in this product. We're sure your kids will have as much fun as we did during development. Being open-minded, we really appreciate all comments and ideas which will help us improve our products or develop new ones. You are invited to send your ideas to us at info@exittoys.com"
Please visit www EXITtoys.com and discover more cool new products.
The EXIT Toys team
2.0 Guidelines for safe use
Using your product as instructed in this manual will eliminate virtually all hazards. However, please bear in mind that children have a natural urge to play and that this may lead to unforeseen dangerous situations for which the manufacturer cannot be held responsible. Teach your children how to use the product and point out possible dangers to them.
Before assembling and using the product, please read and observe these main warnings:

WARNING
To avoid serious injury:
- Read and understand the manual before use.
WARNING: Only for domestic use
WARNING: CHOKING HAZARD! - Small parts. Not for Children under 3 years old.
WARNING: Only one user at a time; danger of collision!
WARNING: Do not perform summersaults or other difficult jumps!
WARNING: Empty your pockets before use of the trampoline!
Continuous adult supervision is required.
Don't use the trampoline when it's wet.
The trampoline is to be assembled by an adult prior to use.
In case of missing or broken parts, please contact place of purchase for assistance.
We are not liable for any injuries that may occur when using the trampoline. Max. User weight: 120kg.
2.1Warnings for safe use:
- BEFORE YOU BEGIN USING YOUR TRAMPOLINE: Read and understand the information provided in this manual. As with all physical sports and activities there is the risk of participants receiving an injury. To ensure your future enjoyment and the prevention of injury, be sure to follow appropriate safety rules and tips.
- ALWAYS CONSULT A DOCTOR/PHYSICIAN BEFORE PERFORMING ANY KIND OF PHYSICAL ACTIVITY.
- ALWAYS CHECK YOUR TRAMPOLINE BEFORE USE, PAYING SPECIFIC ATTENTION TO ALL THE BOLTS, JUMP MAT AND PADS POSITION. DON'T USE IF ANY PARTS ARE MISSING OR LOOK LIKE THEY SHOW WEAR AND TEAR.
- ALWAYS ENSURE THAT THE TRAMPOLINE IS USED BY ONLY ONE PERSON AT A TIME.
- ALWAYS ENSURE THAT WHENEVER THE TRAMPOLINE IS USED BY ANYONE AT ANY SKILL LEVEL THAT DO SO UNDER SUPERVISION.
- Stop exercising immediately should you feel unwell or if you feel pain in your joints and muscles. Dizziness is a sign of fatigue and you should stop bouncing and lay down on the ground should you feel dizzy.
- When using this trampoline ensure appropriate clothing is worn, preferably sports wear and socks .NEVER WEAR SHOES ON THE MAT.
- Please be warned that trampoline is spring based and will allow the user to jump to a greater height than that on the ground, so please bear this in mind and ensure that you are comfortable bouncing at low heights first.
- Proper assembly, care and maintenance of product, safety tips, warnings, and proper techniques for jumping on your trampoline are included in this manual for your safety and an extended product life span. All users and supervisors should therefore familiarize themselves with these instructions. Anybody who chooses to use the trampoline must be aware of their own limitations with regards to performing skills on this trampoline.
- Trampoline should be assembled on grass or BSI approved safety matting.
2.2 Use of the trampoline
INITIALLY, you should get accustomed to your trampoline and understand how much spring is in each bounce. The focus at this point should be body position and technique until each skill can be completed with ease and control.
BEFORE YOU TRY TO JUMP TOO HIGH the technique for stopping should be learnt as this will help prevent injury should you feel you are jumping out of control.
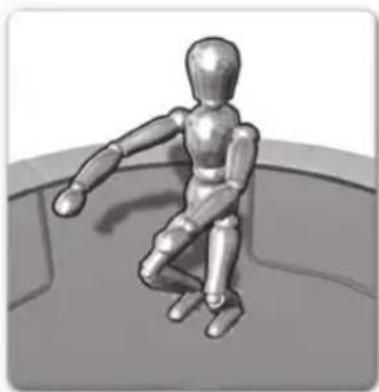
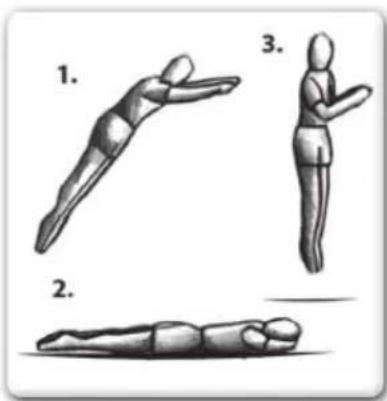
- As the user lands on the bed, the knees should be bent so that they stop and absorb the spring in the mat. The position is shown in the image to the left. Arms are held out for increased level of balance.
- This skill is used when the trampoline user wishes to stop bouncing on the trampoline due to fatigue, loss of control, etc.
SOMERSAULTS (FLIPS): DO NOT PERFORM somersaults of any type (backwards or forwards) on this trampoline. If you make a mistake when trying to perform a somersault, you could land on your head or neck. This will increase your chances of your neck or back being broken, which could result in death or paralysis
FOREIGN OBJECTS : DO NOT hold any foreign objects in your hand and DO NOT place any objects on the trampoline while in use. DO NOT place the trampoline under overhanging objects like tree branches, wires, etc as these will increase your chances of being injured.
POOR MAINTENANCE OF TRAMPOLINE: A trampoline in poor condition will increase your risk of being injured. Please inspect the trampoline before each use for bent steel tubes, torn mat, loose or broken springs and overall stability of the trampoline.
WEATHER CONDITIONS: Please be aware of the weather conditions when using the trampoline. Don't use the trampoline when it's wet. If it is too windy, the user could lose control.
2.3 Tips to reduce the risk of accidents
In order to reduce the risk of accident the "TRAMPOLINE USER" should:
- Always remain in control of their jumps and body position at all times.
- Not attempt to perform skills that are beyond their own level of competence.
- Read and understand the jump by taking off and landing in the middle of the trampoline.
- Always control their jump by taking off and landing in the middle of the trampoline.
- Always jump vertically and refrain from bouncing towards the springs in any direction.
- Always consult a professionally certified trampoline instructor before attempting anything beyond basic techniques.
In order to reduce the risk of accident the "SUPERVISOR" should:
- Fully understand and enforce all the safety rules and guidelines.
- Advise the trampoline user and provide knowledge in what they are doing right and wrong to ensure the safety of trampoline user.
- Be aware and advise the trampoline user of all the safety warnings.
IMPORTANT: If the Trampoline can not be supervised there should be a method for securing it and preventing anyone from using the product until supervision is available.
2.4 Trampoline Safety Instructions
ADVISORY PRECAUTIONS WHILST USING THE TRAMPOLINE
- Do not use trampoline if you have consumed alcohol or narcotic substances
- Never jump onto or off the trampoline and never use the trampoline as a means to bounce onto or into another object.
- Always learn the basic bounce and master each type of bounce before trying more difficult types of bounces. Review the basic skills section to learn how to do the basics.
To stop your bounce, flex your knees when you land on your feet. - Always be in control when you are bouncing on the trampoline. A controlled jump is when you land at the same spot that you took off from. If at any time you feel out of control, stop bouncing immediately.
- Do not jump or bounce for prolonged periods of time of too high for a number of jumps. Keep your eyes on the mat to maintain control. If you do not, you could lose your balance.
- Never have more than 1 person on the trampoline at any one time.
ADVISORY PRECAUTIONS WHILST SUPERVISING TRAMPOLINE
IMPORTANT: Familiarise yourself with the basic jumps and safety rules. To prevent and reduce the risk of injuries, ensure that all safety rules are enforced and the new users learn the basic bounces before trying more advanced techniques.
- ALL USERS need to be supervised, regardless of skill level or age.
- Never use the trampoline when it is wet, damaged, dirty or wore out. The trampoline should be inspected before use.
- Keep all objects that could interfere during use away from the trampoline at all times. Be aware of what is overhead, underneath and around the trampoline.
- To prevent unsupervised and unauthorized use, the trampoline should be secured at all time.
2.5 Accident classification & identification
USE OF ALCOHOL OR DRUGS:
DO NOT consume any alcohol or take any drugs (this includes medication that could affect the users co-ordination) when using this trampoline. This is considered highly dangerous since these foreign substances impair your judgements, reaction time and overall physical co-ordination.
MULTIPLE USERS:
If you have multiple users (more than one person on the trampoline at any one time), you increase the chance of being injured. Injuries can occur when you fly off the trampoline, lose control, collide with other jumper(s), or land on the springs.
STRIKING THE SPRING FRAME:
When playing on the trampoline, STAY in the centre of the trampoline mat. This will reduce the risk of being injured by landing on the spring frame. Always keep the frame pads covering the frame of the trampoline. DO NOT jump or step onto the frame pad directly since it is not intended to support the weight of a person.
LOSS OF CONTROL:
DO NOT try difficult maneuvers until you have mastered the basics. If you do not follow these guidelines, you increase the risk of someone being injured.
3.0 Trampoline techniques
Basic Skills
BASIC SKILL 1: The basic bounce
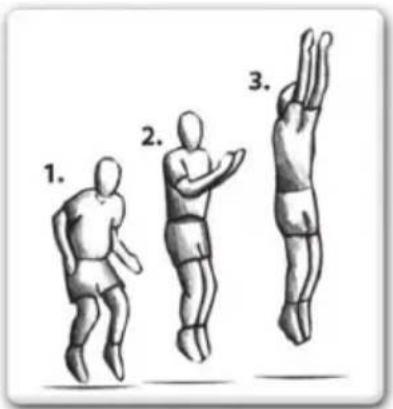
- Start from a standing position, with feet shoulder width apart head up and eyes on the trampoline bed.
- Swing arms forward and up above head in a circular motion.
- Bring legs and feet together in mid-air position and point toes.
- Land back on the mat with feet shoulder width apart (same as start position).
- Why not try moving onto the next skill once comfortable and proficient.
BASIC SKILL 2: The Knee Drop
- Start with a low basic bounce (as detailed in BASICSKILL1).
- Land on knees shoulder width apart, keeping back straight and a strong body position using arms out to the side or in front to maintain balance.
- Bounce back to basic bounce position by using bounce momentum and swinging arms above head.
Once mastered at this height try bouncing a little higher, but remember to always stay in control of your height.
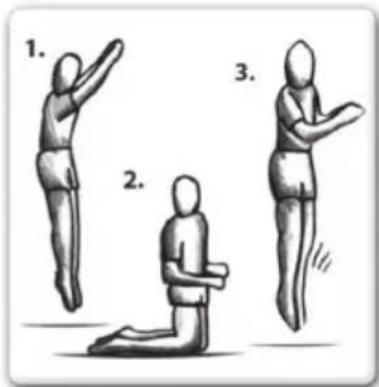
BASIC SKILL 3: The Seat Drop
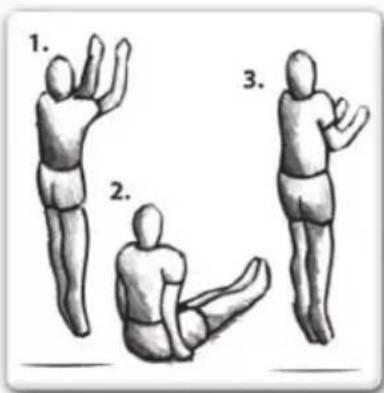
- Start with a low basic bounce (BASIC SKILL 1) in the normal position.
- Land with legs out straight in front of you, with hands either side of your hips and back straight in a strong body position.
- Use the bounce momentum aided with a push from hands to return to a standing position.
Once mastered at this height try bouncing a little higher, but remember to always stay in control of your height.
IMPORTANT: Please consult a trained trampoline instructor before attempting any more advanced skills to ensure highest possible safety levels are
Advanced Skills
ADVANCED SKILL 1: The basic bounce
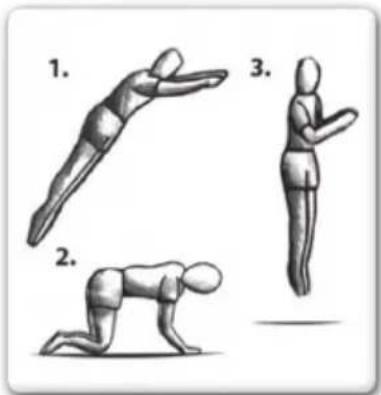
- Start with a low basic bounce (BASIC SKILL1) in the normal position.
- Land on your hands and knees at the same time, ensure that back is horizontal to the bounce mat and hands & legs are shoulder width apart also.
- Use the momentum of bounce and push off hands to regain the standing position.
Once mastered at this height try bouncing a little higher, but remember to always stay in control of your height. - Try moving onto the next skill once comfortable and proficient.
ADVANCED SKILL 2: Hands and Knees to Front Drop
- Land on your hands and knees at the same time, ensure the back is horizontal to the bounce mat and hands & legs are shoulder width apart also.
- Maintain strong body position with back horizontal to mat and straighten legs behind and fold arms in front of face in mid-air ready to land on the mat in a lying down position.
- Ensure the landing is done with all of body touching the mat at same time.
- Push off hands and recover the standing position.
- Once mastered at this height try bouncing a little higher, but remember to always stay in control of your height. Trying moving onto the next skill once comfortable and proficient.
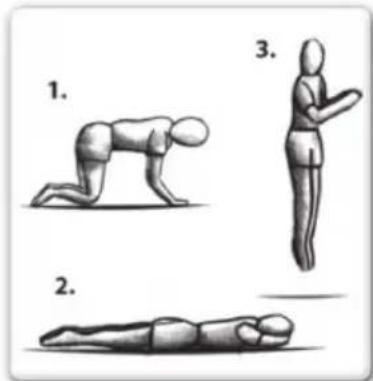
ADVANCED SKILL 3: The Front Drop
- Start with a low basic bounce (BASIC SKILL 1) in the normal position.
- Maintain strong body position with back horizontal to mat and straighten legs behind and fold arms in front of face in mid-air ready to land on the mat in a lying down position.
- Ensure the landing is done with all of body touching the mat at the same time.
- Push off hands and recover the standing position.
- Once mastered at this height try bouncing a little higher, but remember to always stay in control of your height.
IMPORTANT: Should you wish to progress any further and learn more advanced techniques for trampoline, please consult a qualified and registered instructor.
4.0 General Information
- It is not necessary to break-down the trampoline during winter.
- Self-securing nuts and screws are suitable only for one time setting-up, and must be replaced after breakdown of the trampoline and/or safetynet.
- It is recommended to place the trampolines on a flat and level surface with at least 2m distance to other superstructures, or barriers, e.g. fence, garage, house, tree branches, washing lines, or electrical cables.
- The trampoline shall not be placed over hard surfaces like asphalt, concrete etc.
- Exchange defective parts according to the supplier's recommendation.
- Changes to the trampoline (e.g. addition of an accessory) must be done according to the supplier's instruction.
5.0 Trampoline Assembly
STEP BY STEP CONSTRUCTION
Only assemble by adult.
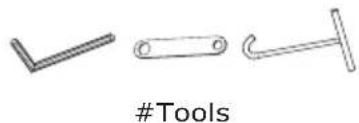
To assemble this trampoline all you need is our special spring loading tool provided with this product. During periods of non-use, this trampoline can be easily disassembled and stored. Please read the assembly instructions before beginning to assemble the product.
Please refer to the table for part descriptions and numbers. The assembly instruction use these descriptions and numbers as reference.
Make sure you have all parts listed. If you are missing any parts, please contact place of purchase.
Please use gloves to protect your hands from pinch points during assembly. When you are ready to start, make sure that you have plenty of space and a clean dry area for assembly.
Parts list
| Part.Nr. | Description # | |
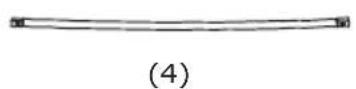
| 1 Middle tube (includes two middle tubes 1-A, two middle tubes 1-B) | 4 | |
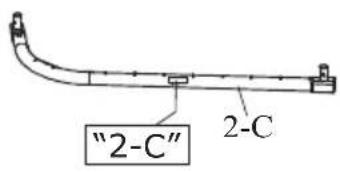
| 2 Corner tube (includes two corner tubes 2-C, two corner tubes 2-D) | 4 | |
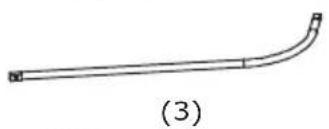
| 3 Corner leg 4 | ||
| 4 Middle leg 4 | ||
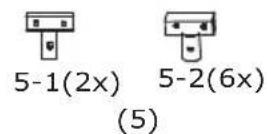
| 5 T-joint (includes two adjustable T-joints 5-1, six T-joints 5-2) 8 | ||
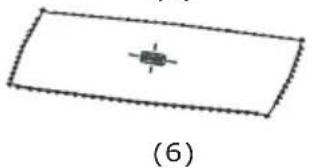
| 6 Mat 1 | ||
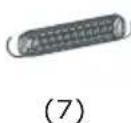
| 7 Spring 76 | ||
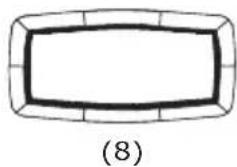
| 8 Pad 1 | ||
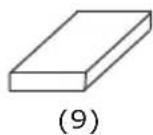
| 9 Foam 24 | ||
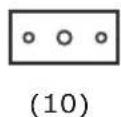
| 10 Iron plate 8 | ||
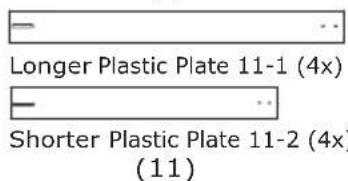
| 11 Plastic plate 8 | ||
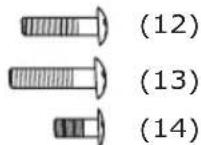
| 12 M8x40 mm bolt 16 | ||
| 13 M8x50 mm bolt 8 | ||
| 14 M8x20 mm bolt 16 | ||
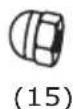
| 15 M8 nut | 24 | |
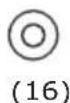
| 16 M8 washer | 24 | |
| # | Tools | |
Enclosed are the current specifications and product features available at time of printing, however, changes may be made in equipment, availability, specifications and features without notice.
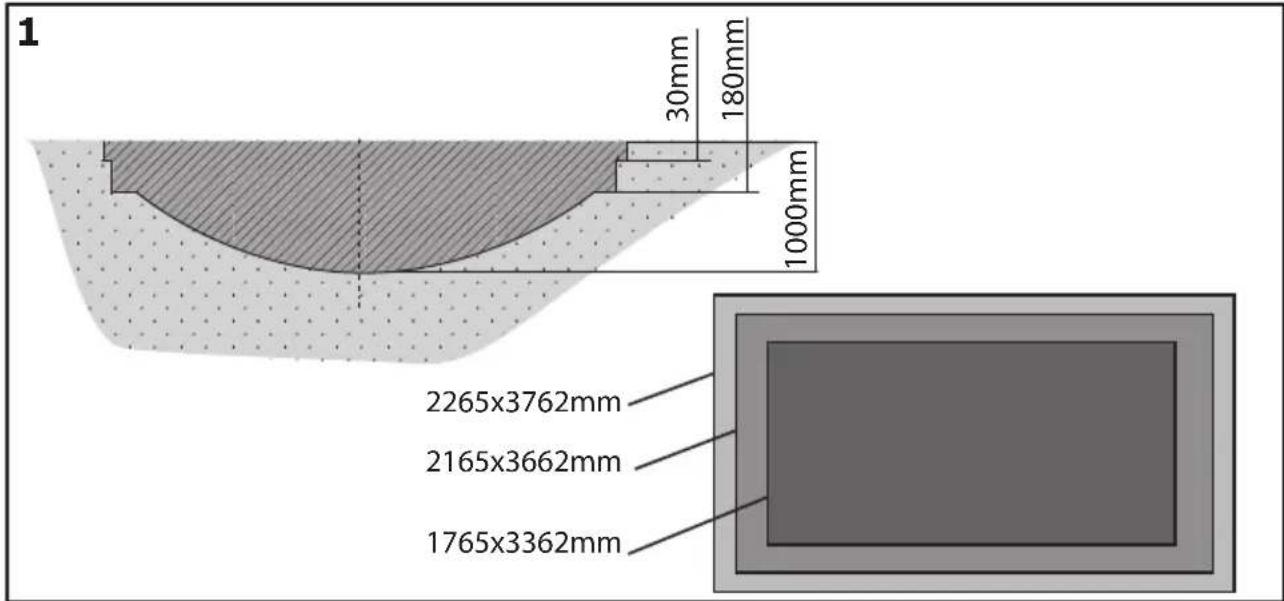
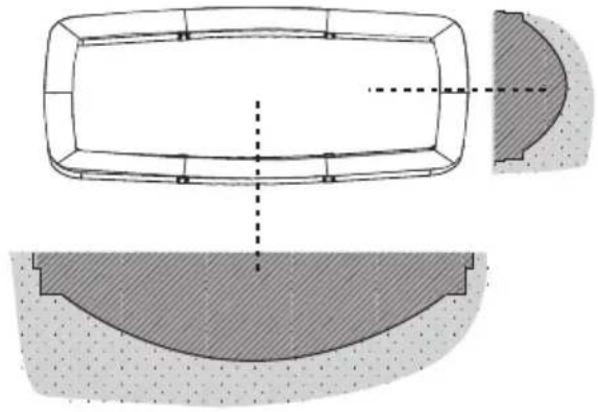
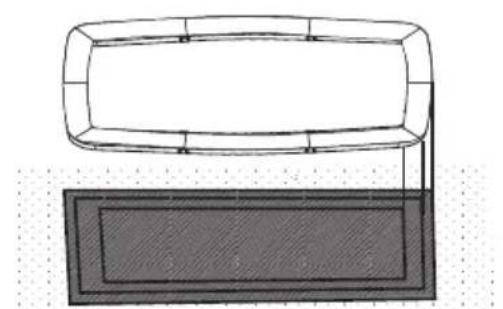
STEP1
Before assembling your trampoline, dig a pit suitable for your trampo-line. Please refer to the table 1 for the further information.
STEP 2
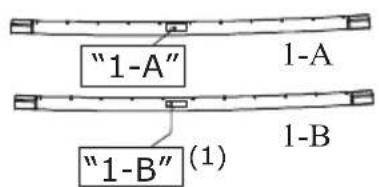
Insert the Middle tube (1-B) into Corner tube (2) as shown.
Repeat this step to assemble the remaining Corner tubes (2) and one Middle tube (1).

STEP3
Place the assembled tubes and two middle tubes (1-A) on the ground as shown. Insert the middle tube (1-A) into corner tube (2) as shown.

STEP4
Place the mat (6) on the ground inside the frame.
Make sure the back side of the mat is facing up.
Caution: It is wise to wear leather gloves while attaching the springs. Be careful where you place your hands as the springs and frame joints can pinch.
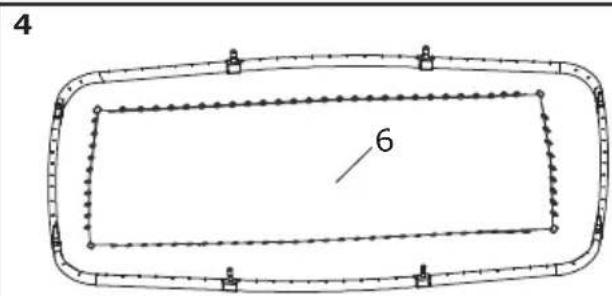
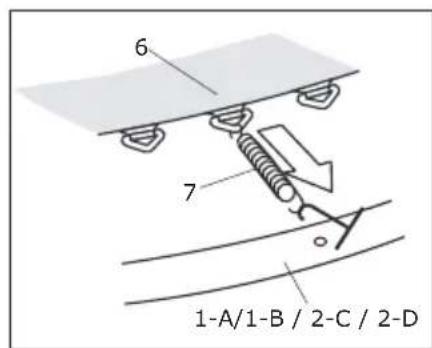
Attach the spring(7) as follows:
- Hook one end of a spring into a V-ring sewn on the jump mat.
- Hook a spring tool shown in the inset drawing into the free end of the spring.
- Pull it by using the spring tool until it reaches the frame.
- Push the end of the spring into a hole in the frame. Unhook the spring tool.
4.1
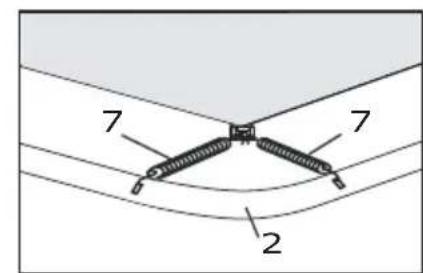
Attach the D-ring sewn to the corner of the mat to the corner tube by two springs (7) as shown. You will then have eight springs that are attached. Two springs to each corner.
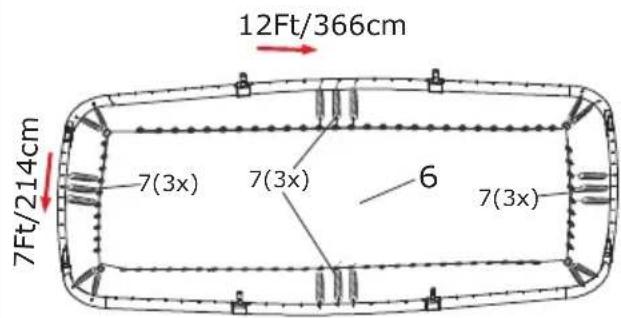
4.2
Count exactly 10 frame holes and 10 V-rings in the 12ft direction. Attach 3 springs. Repeat on the opposite 12ft side of the trampoline.
Count exactly 5 frame holes and 5 V-rings in the 7ft direction. Attach 3 springs. Repeat on the opposite 7ft side of the trampoline. You should now have 16 springs attached.
Continue to attach the remaining springs.
Note: The spring has a large hook that attaches to the frame and a small hook that attaches to the mat ring.
Note: As you attach springs, carefully count the V-rings and frame holes. If a V-ring or a hole is skipped, re-attach the spring in the proper position.
STEP 5
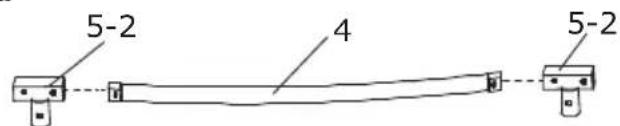
a.
Insert the Middle Leg (4) into the two T-joints (5-2) as shown.
Repeat this step to assemble another Middle Leg (4).
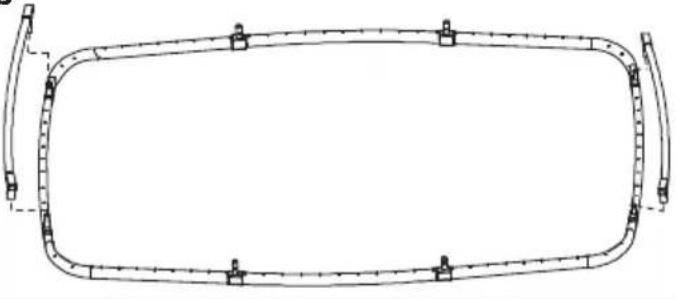
b.
Insert the two assembled Middle Legs into the T-joints on the short side of frame
a
b
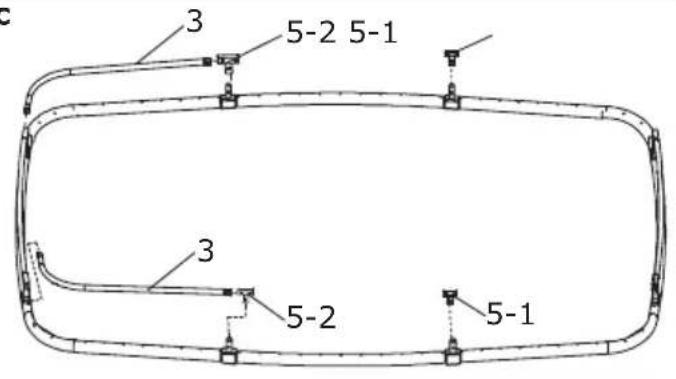
C.
Insert the corner leg (3) into T-joint (5-2) as shown.
Then insert the T-joint into the frame.
Insert the adjustable T-joints (5-1) into the frame as shown.
C
d.
Insert the remaining two middle legs (4) and two corner legs (3) into the T-joints (5-2) and the adjustable T-joints (5-1) as shown.
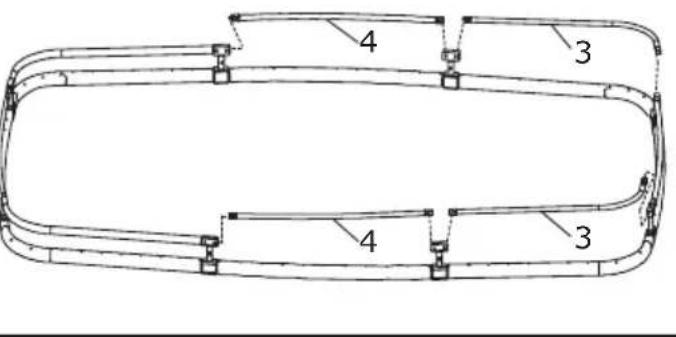
d
e.
Secure the leg to the T-joint with M8x40mm bolts (12), M8 nuts (15) and M8 washers (16) as shown.
Tighten with the wrench as shown.

m = 311
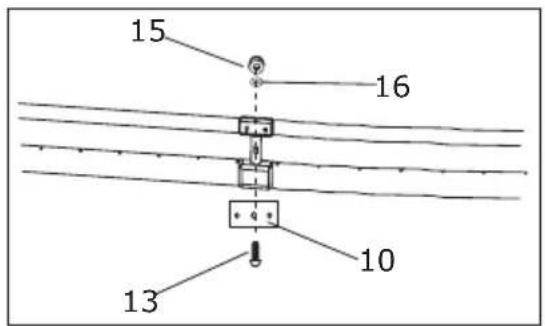
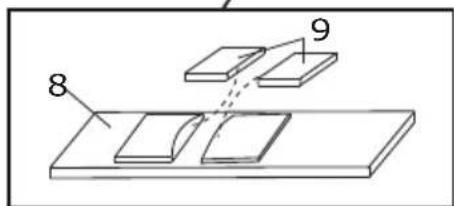
STEP6
Put the iron plate (10) on the T-joints as shown.
Secure the iron plate (10) with an M8x50mm bolt (13), M8 washer (16) and M8 nut (15) as shown.
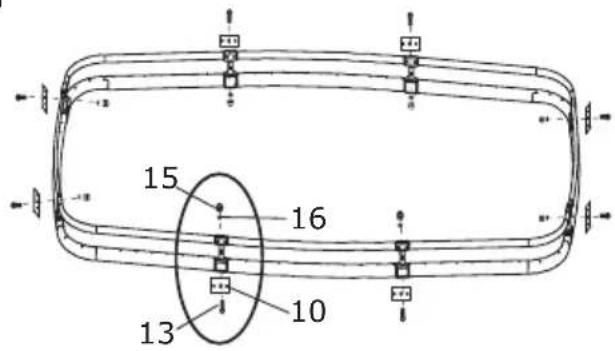
6
STEP7
Reverse the trampoline so that the top side is facing up as shown.
7
STEP 8
Insert the foam (9) into pad (8) as shown.
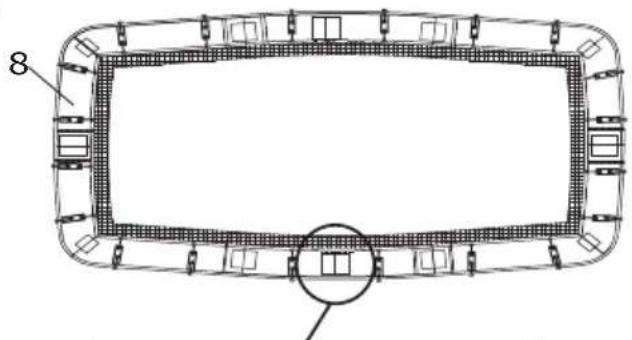
8
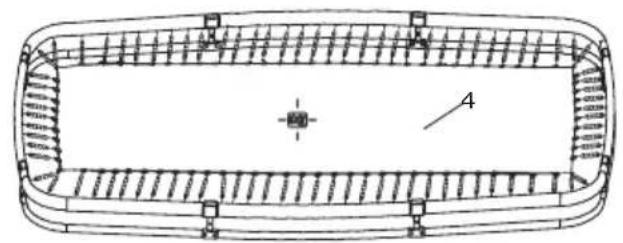
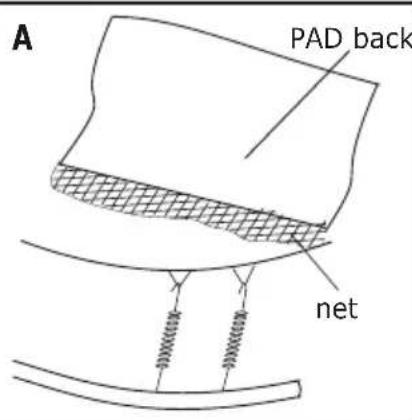
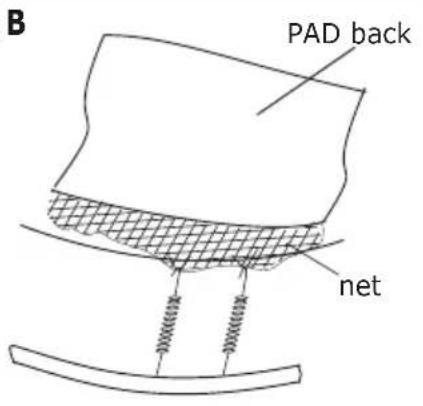
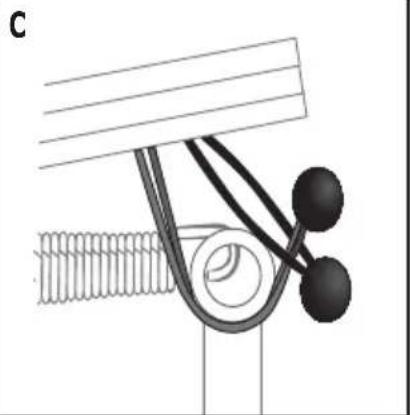
STEP 9
Lay the pad (8) on your trampoline.
Look from the underside of the pad. The spring should be attached to the net and pad as shown in inset drawing A and B.
Attach pad to the frame using the elastic straps with balls as shown in inset drawing C.
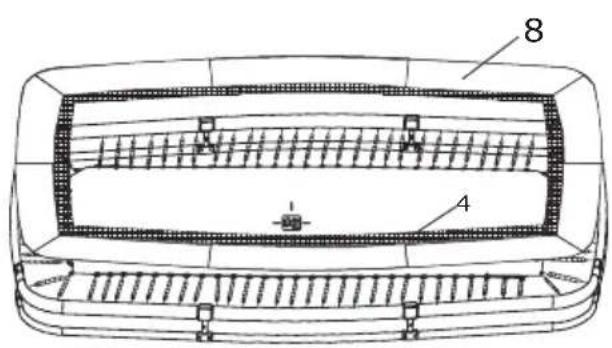
9
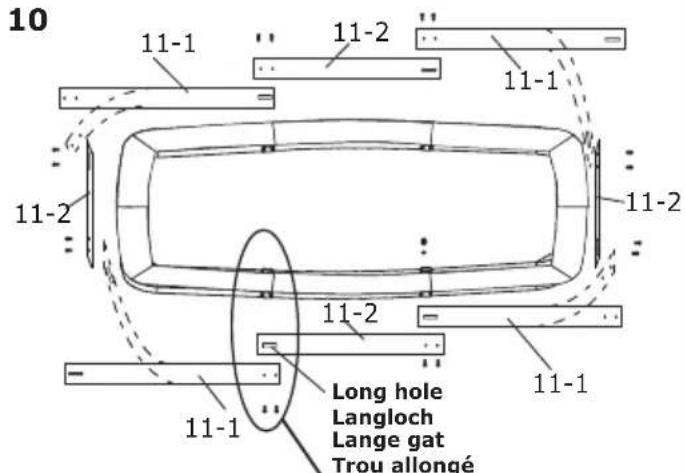
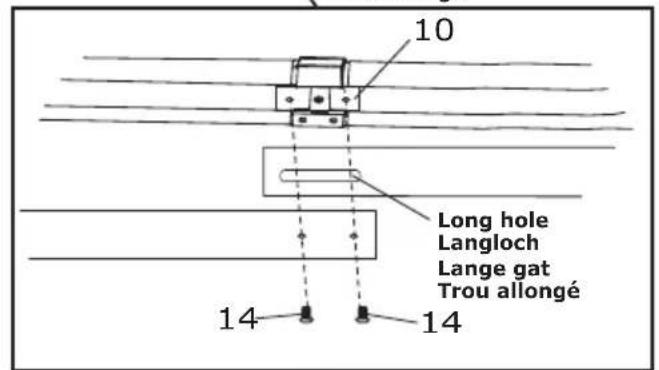
STEP 10
Put the plastic plates (11) on the iron plates (10) as shown.
Make sure that the long hole in the plastic plate (11) is next to the iron plate (10).
Then secure with M8x20mm (14) bolts as shown.
STEP 11
Place your trampoline in the pit.
Make sure that the center of the mat and pit are aligned.
Finally, fill the gap between trampoline and ground with soil.
11
Congratulations! Your trampoline is now fully assembled (put together).

6.0 CARE AND MAINTENANCE
This trampoline was designed and manufactured with quality materials and craftsmanship. If proper care and maintenance is provided, it will provide all jumpers with years of exercise, fun, and enjoyment as well as reduce the risk of injury. Please follow the guidelines listed below:
This trampoline is designed to withhold a certain amount of weight and use. Please make sure that only one person at any one time uses the trampoline. Jumpers should either wear socks, gymnastics shoes, or be barefoot when using the trampoline. Please be aware that street shoes or tennis shoes should NOT be worn while using the trampoline. In order to prevent the trampoline mat from getting cut or damaged please do not allow any pets onto the mat. Also, jumpers should remove all sharp objects from their person prior to using the trampoline. Any type of sharp or pointed objects should be kept off the trampoline mat at all times.
Maintenance instructions
It is particularly important to follow the following maintenance instructions at the beginning of each season and periodically during the use season:
It is necessary to determine whether all nuts and bolts are tight, and if necessary they are tightened;
- It shall be verified that all spring-loaded connections (locking pin) are undamaged and not move while playing;
- Any cover screws and sharp edges must be checked and replaced if necessary;
- The maintenance manual shall be kept
Always inspect the trampoline before each use for worn, abused or missing parts. A number of conditions could arise that may increase your chances of getting injured. Please be aware of:
- Punctures, holes, or tears in the trampoline mat
- Sagging trampoline mat
- Loose stitching or any kind of deterioration of the mat
- Bent or broken frame parts, such as the legs
- Broken, missing, or damaged springs
- Damaged, missing, or insecurely attached frame pad
- Protrusions of any types (especially sharp types) on the frame, springs, or mat
IF YOU FIND ANY OF THE PREVIOUS CONDITIONS, OR ANYTHING ELSE THAT YOU FEEL COULD CAUSE HARM TO ANY USER, THE TRAMPOLINE SHOULD BE DISASSEMBLED OR SECURED FROM USE UNTIL THE CONDITION(S) HAS BEEN RESOLVED.
7.0 Warranty
-
After the date of the purchase invoice, the owner of the EXIT Toys Supreme has a:
-
5-year warranty on the frame
- 5-year warranty on the springs
- 5-year warranty on the protective surround pad
-
2-year warranty on the jump mat.
-
The warranty applies only to the material and construction defects with respect to this product or its components.
-
The warranty becomes defunct if:
-
This product is used incorrectly and/or carelessly and is used in such a way that it does not comply with its purpose.
- This product is not assembled and maintained according to the instruction booklet.
- Technical repairs to this product are not carried out professionally.
- Parts, which are mounted afterwards, do not comply with the technical specifications of the product concerned or are mounted incorrectly.
- Defects are a result of climatic influences such as corrosion, UV rays or normal disintegration.
-
The product is rented out or was made available to various unspecified persons in any other manner.
-
EXIT Toys will repair or replace according to its choice all material and construction defects that have been ascertained by EXIT Toys during the warranty period.
- The owner of the EXIT Toys Trampoline is only entitled to the warranty by presenting the product for inspection at a EXIT Toys dealer. It should be handed to the EXIT Toys dealer, accompanied by the original purchase invoice.
- In case of material and construction defects that have been ascertained by EXIT Toys, the product or its components will be repaired or replaced - according to its choice - free of charge during the warranty period mentioned in Article 1.
- If the claim for warranty is not justifiable, all the costs are at the expense of the owner.
- This warranty cannot be transferred to third parties.
- The trampoline is designed for personal use. It is not permitted to rent out or place the trampoline in public areas like schools or day-care centres. The guarantee and any other liabilities shall expire if the playhouse is rented out or used in public areas.
1.0 Einführung
Supreme Ground Level
Trampoline
Contact:
Dutch Toys Group
Fabriekstraat 17^e
P.O. Box 369, 7000 AJ Doetinchem
info@exittoys.com
www.exittoys.com
EXIT is a registered trade mark of Dutch Toys Group