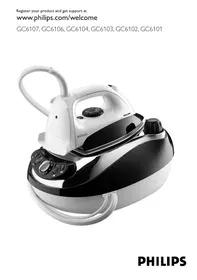
USER MANUAL GC6107 PHILIPS
Supply hose, Temperature light, Temperature dial and indicator, Steam activator and lock - D1 Lock - D2 Activator, Cap of steam tank, Iron stand, Steam tank, Mains cord, Steam-ready light (GC6107 only), Steam tank switch with power-on light, Steam control (GC6107/GC6104 only), Iron switch with power-on light, 'Steam tank empty' light (GC6107 only), Soleplate
Important
Read this user manual carefully before you use the appliance and save it for future reference.
Danger
- Never immerse the iron or the steam tank in water.
Warning
- Check if the voltage indicated on the type plate corresponds to the local mains voltage before you connect the appliance.
- Do not use the appliance if the plug, the mains cord, the supply hose or the appliance itself shows visible damage, or if the appliance has been dropped or leaks.
- If the mains cord or the supply hose is damaged, you must have it replaced by Philips, a service centre authorised by Philips or similarly qualified persons in order to avoid a hazard.
- Never leave the appliance unattended when it is connected to the mains.
- This appliance is not intended for use by persons (including children) with reduced physical, sensory or mental capabilities, or lack of experience and knowledge, unless they have been given supervision or instruction concerning use of the appliance by a person responsible for their safety.
- Children should be supervised to ensure that they do not play with the appliance.
- Do not let the mains cord and supply hose come into contact with the hot soleplate of the iron. If steam escapes from under the steam tank cap when the appliance heats up, switch off the appliance and tighten the steam tank cap. If steam continues to escape when the appliance is heating up, switch off the appliance and contact a service centre authorised by Philips.
- Do not remove the steam tank cap from the steam tank when the steam tank is still under pressure.
- Do not use any other cap on the steam tank than the cap that has been supplied with the appliance, as the steam tank cap also functions as a safety valve.
Caution
- Only connect the appliance to an earthed wall socket.
- Check the mains cord and the supply hose regularly for possible damage.
- Always place and use the iron and the steam tank on a stable, level and horizontal surface. Do not put the steam tank on the soft part of the ironing board.
- The iron stand and the soleplate of the iron can become extremely hot and may cause burns if touched. If you want to move the steam tank, do not touch the stand.
- When you have finished ironing, when you clean the appliance, when you fill or empty the steam tank and also when you leave the iron even for a short while: put the iron on the iron stand, set the iron switch and the steam tank switch to 'off' and remove the mains plug from the wall socket.
- Rinse the steam tank regularly according to the instructions in the chapter 'Cleaning and maintenance'.
- This appliance is intended for household use only.
Electromagnetic fields (EMF)
This Philips appliance complies with all standards regarding electromagnetic fields (EMF). If handled properly and according to the instructions in this user manual, the appliance is safe to use based on scientific evidence available today.
Before first use
1 Remove any sticker or protective foil from the soleplate and clean the soleplate with a soft cloth. 2 Fully unwind the mains cord and supply hose. 3 Place the steam tank on a stable, level surface. 4 Place the iron on the iron stand.
Preparing for use
Filling the steam tank
Never immerse the steam tank in water.
Do not open the cap when the iron and the steam tank are still hot.
1 Remove the mains plug from the wall socket.


2 Slowly unscrew the cap of the steam tank.
You may hear a sound when you remove the cap. This sound is caused by the vacuum or residual pressure inside the steam tank and is perfectly normal.
3 Pour water into the steam tank (max. 1 litre).
Use tap water to fill the tank.
If the tap water in your area is very hard, we advise you to use 50% distilled water and 50% tap water.
Do not put perfume, vinegar, starch, descaling agents, ironing aids or other chemicals in the steam tank.
4 Screw the cap tightly onto the filling aperture of the steam tank.
Fast refill
1 Keep the appliance plugged into the mains and make sure the iron is on. Then set the steam tank switch to 'off'.
Press the steam activator until you no longer hear any steam escaping from the appliance.
3 Keep the steam activator pressed in and slowly unscrew the cap of the steam tank by turning it anticlockwise. This will depressurise the steam tank.
Make sure there is no steam left in the steam tank. Place a piece of cloth over the cap when unscrewing it.
4 Remove the mains plug from the wall socket.
5 Fill the steam tank as described in section 'Filling the steam tank' and let the appliance heat up again.
Setting the temperature
Always place the steam tank on a stable, level and horizontal surface. Do not put the steam tank on the soft part of the ironing board.
1 Put the iron on the iron stand.
Do not put the hot iron on the supply hose or the mains cord. Make sure the cord does not come into contact with the hot soleplate.

2 Set the required ironing temperature by turning the temperature dial to the appropriate position.
Check the laundry care label for the required ironing temperature:
| Symbol on laundry care label | Type of fabric | Temperature setting | Steam setting |
| 品 | Synthetic fabrics (e.g. acetate, acrylic, viscose, polyamide, polyester) and silk | ● | MIN (see 'Ironing without steam') |
| 品 | Wool | ●● | Low to medium |
| 品 | Cotton, linen | ●●● | Medium to MAX |
| 品 | Please note that ≈ on the label means that the article cannot be ironed. | - | - |

If you do not know what kind(s) of fabric(s) an article is made of, determine the right ironing temperature by ironing a part that will not be visible when you wear or use the article.
Silk, woollen and synthetic materials: iron the reverse side of the fabric to prevent shiny patches.
Start ironing the articles that require the lowest ironing temperature, such as those made of synthetic fibres.
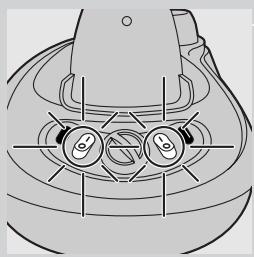
3 Put the mains plug in an earthed wall socket and set both the steam tank switch and the iron switch to 'on'. The steam tank and the soleplate will now heat up.
The iron is hot enough when the temperature light goes out. During steam ironing the temperature light goes on from time to time. This indicates that the iron is heating up to the right temperature. If you have been ironing at a high temperature and subsequently set the temperature dial to a lower setting, wait until the temperature light goes on again before you continue ironing. This will prevent damage to your fabrics.
Tips
- If the fabric consists of various kinds of fibres, always select the temperature required by the most delicate fibre, i.e. the lowest temperature. For example: if an article consists of 60% polyester and 40% cotton, it should be ironed at the temperature indicated for polyester ( • ) and without steam.
- When steam ironing woolen fabrics, shiny patches may occur. You can prevent this by using a dry pressing cloth or by turning the article inside out and ironing the reverse side.
- Velvet and other fabrics that tend to acquire shiny patches should be ironed in one direction only (along with the nap) while applying very little pressure.
- Do not use steam when you are ironing coloured silk. This could cause stains.
Using the appliance
Steam ironing
1 Make sure that there is enough water in the steam tank. Steam ironing is only possible at higher ironing temperatures (temperature settings • to MAX). 2 Select a steam setting suitable for the selected ironing temperature:
- Select steam setting MIN (no steam) for temperature setting • (see 'Ironing without steam').
- Select a low to medium steam setting for temperature setting • •
- Select a medium to MAX steam setting for temperature settings • • • to MAX.
3 The steam tank and the soleplate will now heat up.
- Cold start: the soleplate takes approximately 2 minutes to heat up and the steam tank takes approximately 8 minutes to heat up.
- Quick reheat: if you refill the steam tank during the ironing process, the water in the steam tank will take approximately 6 minutes to heat up.
As soon as the water in the steam tank is hot enough for steam ironing, the steam tank power-on light goes out (GC6106, GC6104, GC6103, GC6102 only). The steam-ready light goes on (GC6107 only). During steam ironing the steam-ready light goes on from time to time. This indicates that the steam tank is being heated up to the right temperature. 5 Keep the steam activator pressed in while you are steam ironing.
If you want to use the steam function continuously, slide the steam activator lock to the locking position. 6 To stop steaming, release the steam activator lock.
If you have not used the steam function for some time, the steam that was still present in the supply hose will have condensed into water. When you start steam ironing again, this may cause some spluttering in the appliance and a few droplets of water may escape from the soleplate.
Note: To prevent droplets from falling onto your garments, hold the iron over an old cloth and press the steam activator until the steam production has normalised before you start steam ironing again.
Ironing without steam
1 Select the recommended ironing temperature (see chapter 'Preparing for use').
Do not press the steam activator while ironing.

Some steam will escape if you press the steam activator by accident while you are ironing. To avoid this, you can simply set the steam tank switch to 'off' to cut off the steam supply completely. If the steam tank is empty or has not heated up yet, you will hear a clicking sound inside the tank. This phenomenon is caused by the opening of the steam valve and is perfectly harmless.
Features
Vertical steam ironing

- Hanging curtains and clothes (jackets, suits, coats) can be steam ironed by holding the iron in vertical position. 1 Press the steam activator. If you want to use the steam function continuously, use the steam activator lock.
Never direct the steam at people.
Variable steam (GC6107 and GC6104 only)
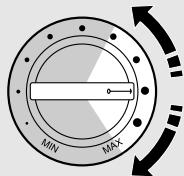
The steam control is continuously adjustable and can be set to any position between MIN and MAX (see chapter 'Preparing for use').
'Steam tank empty' light (GC6107 only)
When the water in the steam tank runs out during use, the 'steam tank empty' light goes on.
1 Refill the steam tank with water (see chapter 'Preparing for use').
Steam-ready light (GC6107 only)
When the steam tank is ready for steam ironing, the steam-ready light goes on.
Cleaning and maintenance
After ironing

1 To depressurise the steam tank, set the iron switch to 'on' and the steam tank switch to 'off'.


2 Depressurise the steam tank by pressing the steam activator until you no longer hear any steam escaping from the appliance. 3 Remove the mains plug from the wall socket. 4 Put the iron on the iron stand, set the steam control to MIN and let the appliance cool down before you start cleaning it.
Iron
1 Clean the iron with a damp cloth. 2 Wipe scale and any other deposits off the soleplate with a damp cloth and a non-abrasive (liquid) cleaner.
Never immerse the iron in water nor rinse it under the tap.
Steam tank
Rinse the steam tank once a month or after you have used the appliance approximately 10 times.
1 Carefully remove the cap of the steam tank.
Let the appliance cool down sufficiently before removing the cap.
2 Rinse the steam tank with 500 ml of fresh water. Pour out the water by holding the steam tank upside down over the sink. 3 Screw the cap back onto the steam tank.
Storage
Make sure the iron has cooled down sufficiently before you put it away.
1 Remove the mains plug from the wall socket and let the iron cool down. 2 Empty the steam tank. 3 Regularly check if the mains cord and the supply hose are still undamaged and safe.
Environment

- Do not throw away the appliance with the normal household waste at the end of its life, but hand it in at an official collection point for recycling. By doing this, you help to preserve the environment.
Guarantee & service
If you need information or if you have a problem, please visit the Philips website at www.philips.com or contact the Philips Customer Care Centre in your country (you find its phone number in the worldwide guarantee leaflet). If there is no Customer Care Centre in your country, go to your local Philips dealer or contact the Service Department of Philips Domestic Appliances and Personal Care BV.
Troubleshooting
This chapter summarises the most common problems you could encounter with your iron. Please read the different sections for more details. If you are unable to solve the problem, please contact the Philips Customer Care Centre in your country (you will find its phone number in the worldwide guarantee leaflet). If there is no Customer Care Centre in your country, turn to your local Philips dealer or the nearest Philips service centre.
| Problem | Cause | Solution |
| Some smoke comes out of the appliance after it has been switched on for the first time. | This is normal. Some parts of the iron have been greased lightly in the factory. | This phenomenon will cease after a short while. |
| Dirt particles come out of the soleplate of the new iron. | This is normal with a new iron. | These particles are harmless and they will stop coming out of the soleplate when you have used the iron a few times. |
| Droplets of water escape from the soleplate. | The temperature dial has been set to a temperature that is too low for steam ironing. | Select an ironing temperature that is suitable for steam ironing (temperature settings ●● to MAX). |
| The iron is not switched on. | Set the iron switch to ‘on’ and wait until the iron is hot. |
| The steam tank has been placed on an unstable and/or uneven surface. | Put the steam tank on a stable and even surface. |
| When you start steam ironing, the hose is cold. Steam condenses in the hose, causing droplets of water to escape from the soleplate. | This is normal. Hold the iron over an old cloth and press the steam activator. The cloth will absorb the drops. After a few seconds the steam production will have normalised. |
| The appliance does not produce any steam. | The steam tank and/or the iron has/ have not been switched on. | Set both the iron switch and the steam tank switch to ‘on’. |
| The steam tank is not hot enough to produce steam. | Wait 6 to 8 minutes for the steam tank to heat up. |
| There is no steam coming out of the soleplate. | Superheated (i.e. high-quality) steam is hardly visible, especially when the temperature dial has been set to maximum position and even less so when the ambient temperature is relatively high. | To check if the iron is really producing steam, hold a (cold) mirror in front of the soleplate vents. |
| The soleplate is dirty. | Impurities or chemicals present in the water have deposited on the soleplate. | Clean the soleplate with a damp cloth. |
| You have been ironing at too high temperatures. | Clean the soleplate with a damp cloth. Select the recommended ironing temperature. |
| Symbol on laundry care label | Type of fabric | Temperature setting | Steam setting |
| 品 | Synthetic fabrics (e.g. acetate, acrylic, viscose, polyamide, polyester) and silk | ● | MIN (see ‘Ironing without steam’) |
| 品 | Wool | ●● | Low to medium |
| 品 | Cotton, linen | ●●● | Medium to MAX |
| 品 | Please note that ≥ on the label means that the article cannot be ironed. | | |
Set the temperature

- Never immerse the iron or the steam tank in water.
Warning
1 Remove any sticker or protective foil from the soleplate and clean the soleplate with a soft cloth. 2 Fully unwind the mains cord and supply hose. 3 Place the steam tank on a stable, level surface. 4 Place the iron on the iron stand.
Preparation
Filling the steam tank
Never immerse the steam tank in water.
1 Remove the mains plug from the wall socket.


2 Slowly unscrew the cap of the steam tank.
Do not put perfume, vinegar, starch, descaling agents, ironing aids or other chemicals in the steam tank.
4 Screw the cap tightly onto the filling aperture of the steam tank.
Fast refill
4 Remove the mains plug from the wall socket. 5 Fill the steam tank as described in section 'Filling the steam tank' and let the appliance heat up again.
Set the temperature
1 Put the iron on the iron stand.

| Symbol on laundry care label | Type of fabric | Temperature setting | Reguição do vapor |
| E | Synthetic fabrics (e.g. acetate, acrylic, viscose, polyamide, polyester) and silk | ● | MIN (see 'Ironing without steam') |
| L | Lã | ● ● | Low to medium |
| A | Algodão, linho | ● ● ● | Medium to MAX |
| B | Please note that ≈ on the label means that the article cannot be ironed. | - | - |
Silk, woollen and synthetic materials: iron the reverse side of the fabric to prevent shiny patches.
Start ironing the articles that require the lowest ironing temperature, such as those made of synthetic fibres.
6 To stop steaming, release the steam activator lock.
Vertical steam ironing

The steam control is continuously adjustable and can be set to any position between MIN and MAX (see chapter 'Preparing for use').
Empty steam tank indicator light (GC6107 only)
1 Clean the iron with a damp cloth. 2 Wipe scale and any other deposits off the soleplate with a damp cloth and a non-abrasive (liquid) cleaner.
Never immerse the iron in water nor rinse it under the tap.
Steam tank
Rinse the steam tank once a month or after you have used the appliance approximately 10 times.
1 Carefully remove the steam tank cap. Let the appliance cool down sufficiently before removing the cap. 2 Rinse the steam tank with 500 ml of clean water. Turn the steam tank upside down and pour the water out into the sink. 3 Screw the cap back onto the steam tank.
Storage
1 Unplug the appliance and let the iron cool down. 2 Empty the steam tank. 3 Regularly check if the mains cord and the supply hose are still undamaged and safe.
Environment


| Symbol on laundry care label | Type of fabric | Temperature setting | Regulacao do vapor |
| 品 | Synthetic fabrics (e.g. acetate, acrylic, viscose, polyamide, polyester) and silk | ● | MIN (see 'Ironing without steam') |
| 品 | Lã | ● ● | Low to medium |
| 品 | Algodão, linho | ● ● ● | Medium to MAX |
| 品 | Please note that ≈ on the label means that the article cannot be ironed. | | |
Store in a cool place