
Venus Comfort - Car seat Ramatti - Free user manual and instructions
Find the device manual for free Venus Comfort Ramatti in PDF.

| Product type | Child car seat |
| Brand | Ramatti |
| Model | Venus Comfort |
| Weight group | Group 1 (9 to 18 kg) |
| Orientation | Forward-facing |
| Safety standard | ECE R44/03 |
| Recline positions | 5 positions |
| Harness height adjustment | 3 positions |
| Harness type | 5-point harness |
| Vehicle belt installation | 3-point seatbelt required |
| Estimated dimensions (L x W x H) | 45 x 40 x 65 cm |
| Estimated weight | ~5 kg |
| Shell material | Molded plastic |
| Cover material | Washable fabric |
| Cover care | Hand wash at <30°C, mild detergents |
| Plastic parts care | Warm water and mild soap |
| Warranty | 24 months |
| Use with airbag | Prohibited on seats with active airbag |
| Spare parts | Contact the point of sale |
Frequently Asked Questions - Venus Comfort Ramatti
User questions about Venus Comfort Ramatti
0 question about this device. Answer the ones you know or ask your own.
Ask a new question about this device
Download the instructions for your Car seat in PDF format for free! Find your manual Venus Comfort - Ramatti and take your electronic device back in hand. On this page are published all the documents necessary for the use of your device. Venus Comfort by Ramatti.
USER MANUAL Venus Comfort Ramatti
natural_image
Abstract logo with red, yellow, and green wavy shapes forming a stylized 'R' (no text or symbols)RAMATTI

natural_image
Blue children's car seat with white seatbelt and red logo (no text or symbols visible)VENUS Comfort
GB Instruction manual Warranty
D Bedienungsanleitung Garantie
NL Gebruiksaanwijzing Garantie
E Modo de empleo Garantía
I Istruzioni d'uso Garanzia
F Mode d'emploi Garantie
PL Instrukcja obstugi Gwarancja
!

text_image
Diagram of a car seat with numbered parts for identification and positioning reference.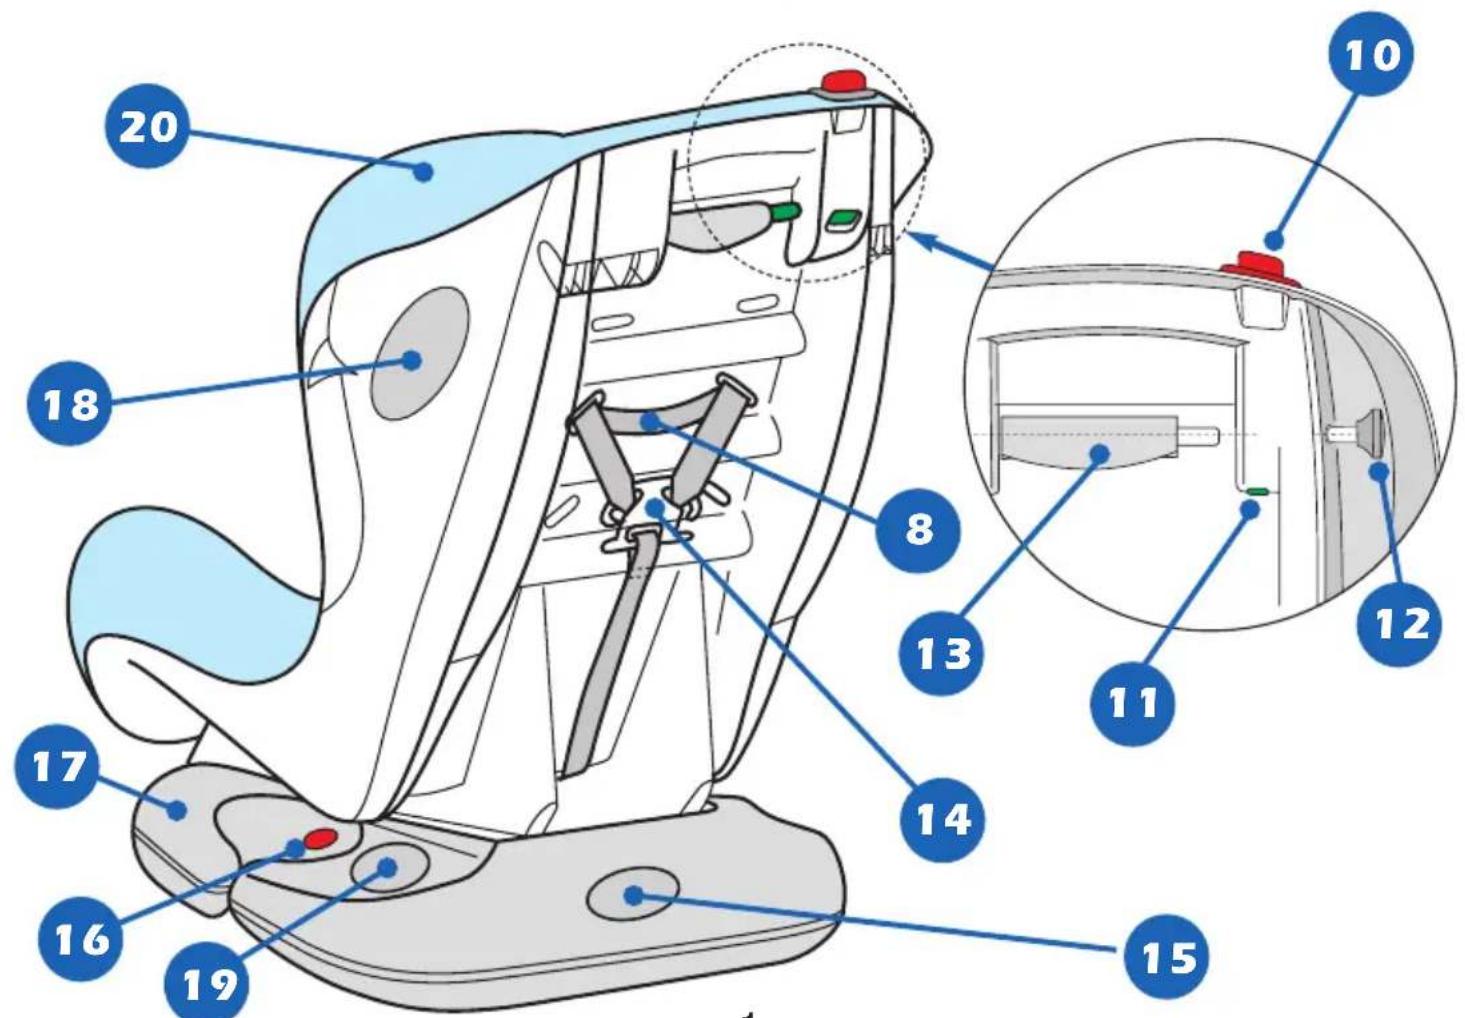
text_image
Diagram of car seat components with numbered labels pointing to specific parts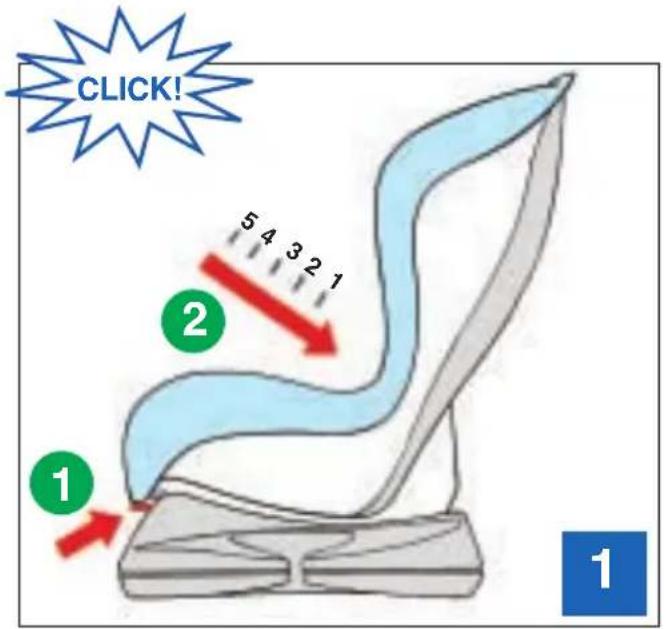
text_image
CLICK! 2 5 4 3 2 1 1 1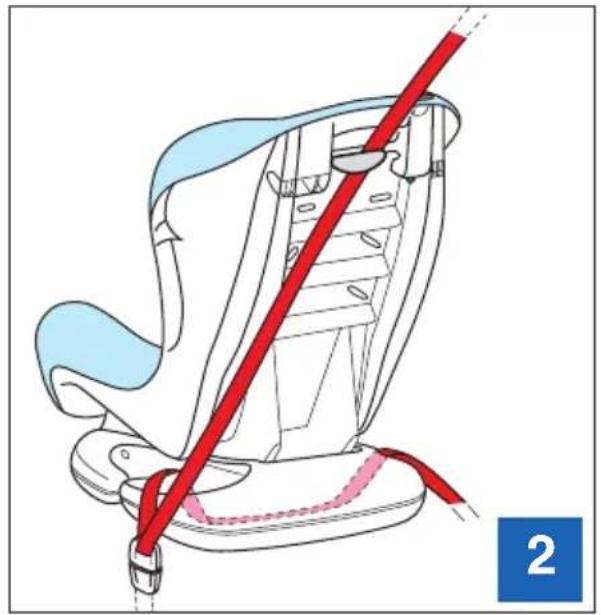
natural_image
Illustration of a car seatbelt with a red diagonal cord and blue seat cover, no text or symbols present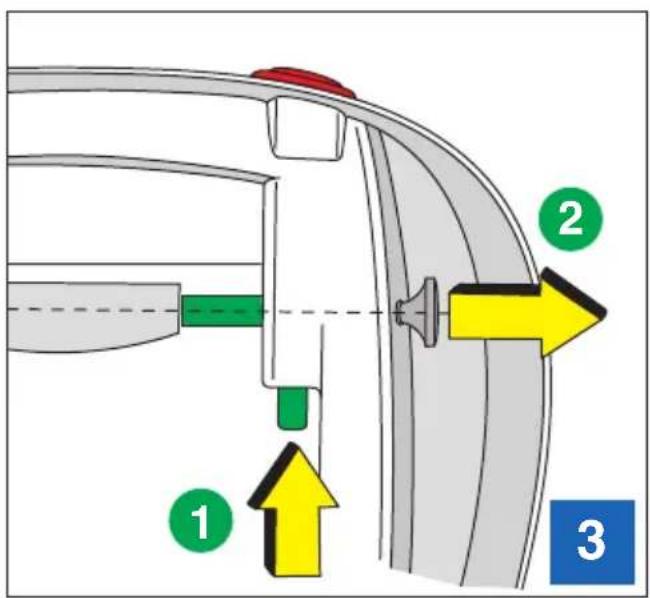
text_image
Diagram of a mechanical or fluid system with numbered components and directional arrows indicating flow or movement.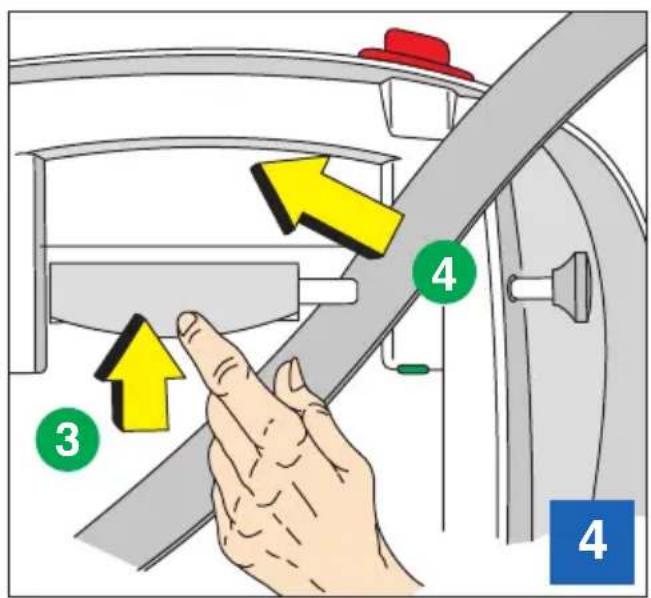
text_image
Diagram showing a hand pressing down on a car's side panel with numbered arrows indicating movement or adjustment.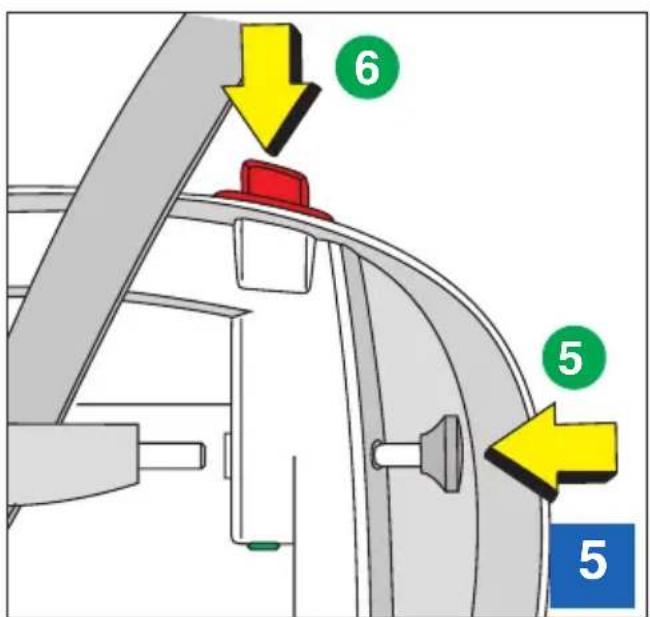
text_image
Diagram of a vehicle steering wheel with labeled components and directional arrows indicating movement or force directions.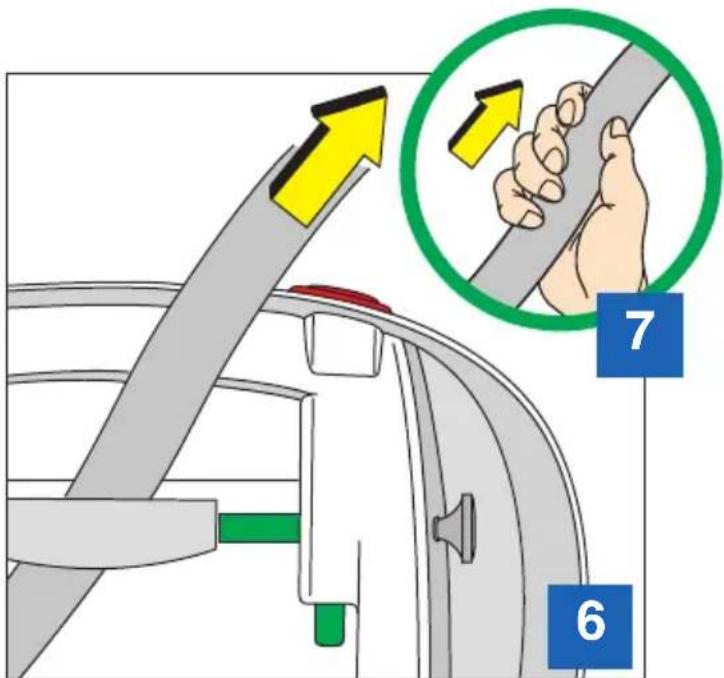
text_image
Diagram illustrating car seatbelting with numbered instructions and directional arrows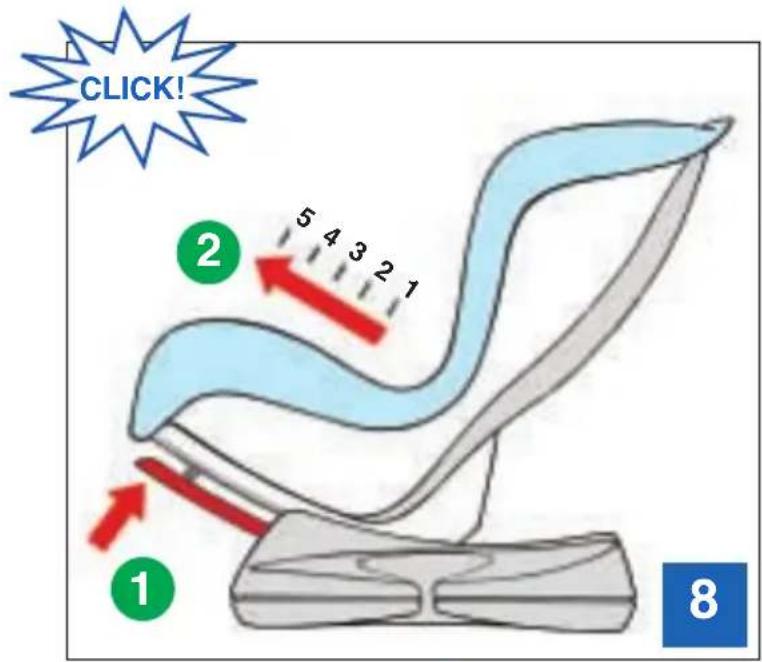
text_image
CLICK! 2 5 4 3 2 1 1 8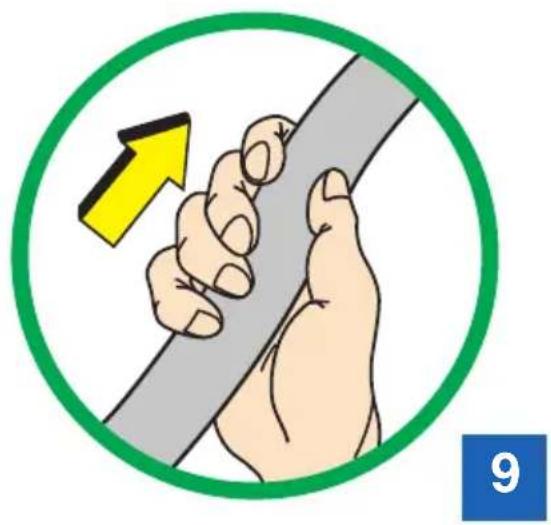
natural_image
Illustration of a hand gripping a cable with a yellow arrow indicating compression (no text or symbols)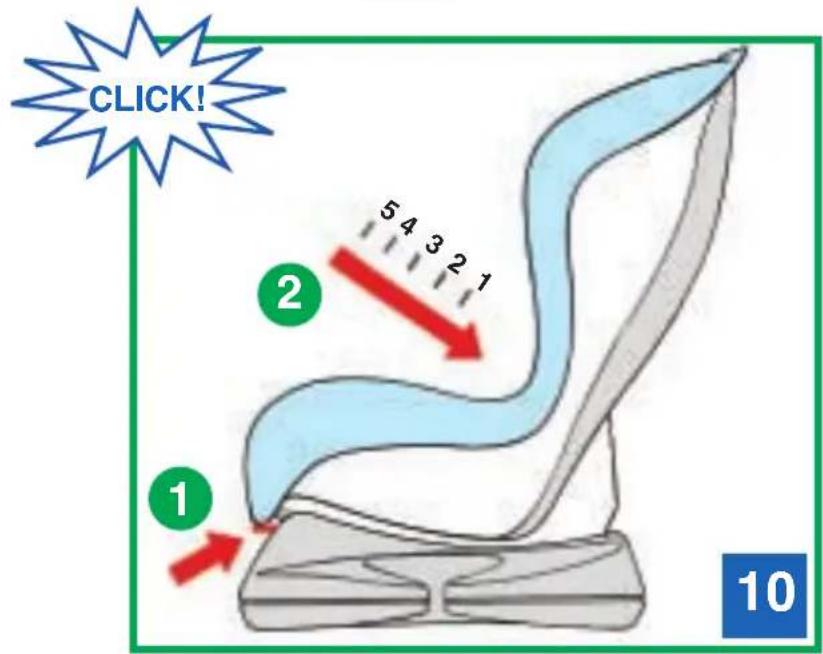
text_image
CLICK! 2 5 4 3 2 1 1 10ATTENTION!

text_image
CLICK! 2 5 4 3 2 1 1 11
natural_image
Illustration of a person sitting in a car seat with a hand holding a vertical bar, showing a red cable and yellow directional arrow (no text or symbols)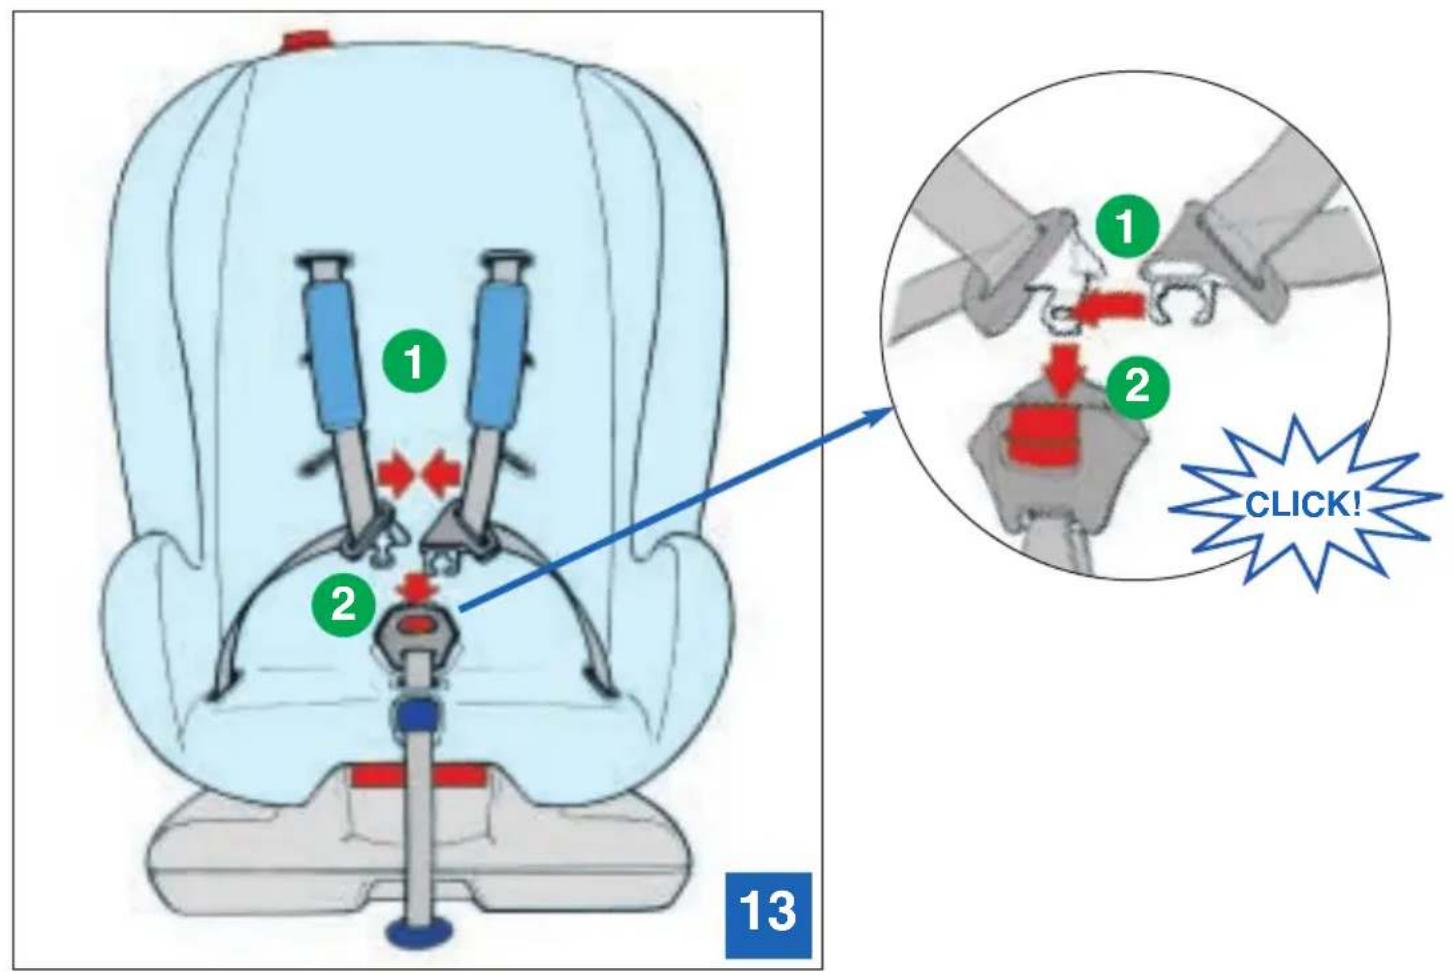
text_image
1 2 13 1 2 CLICK!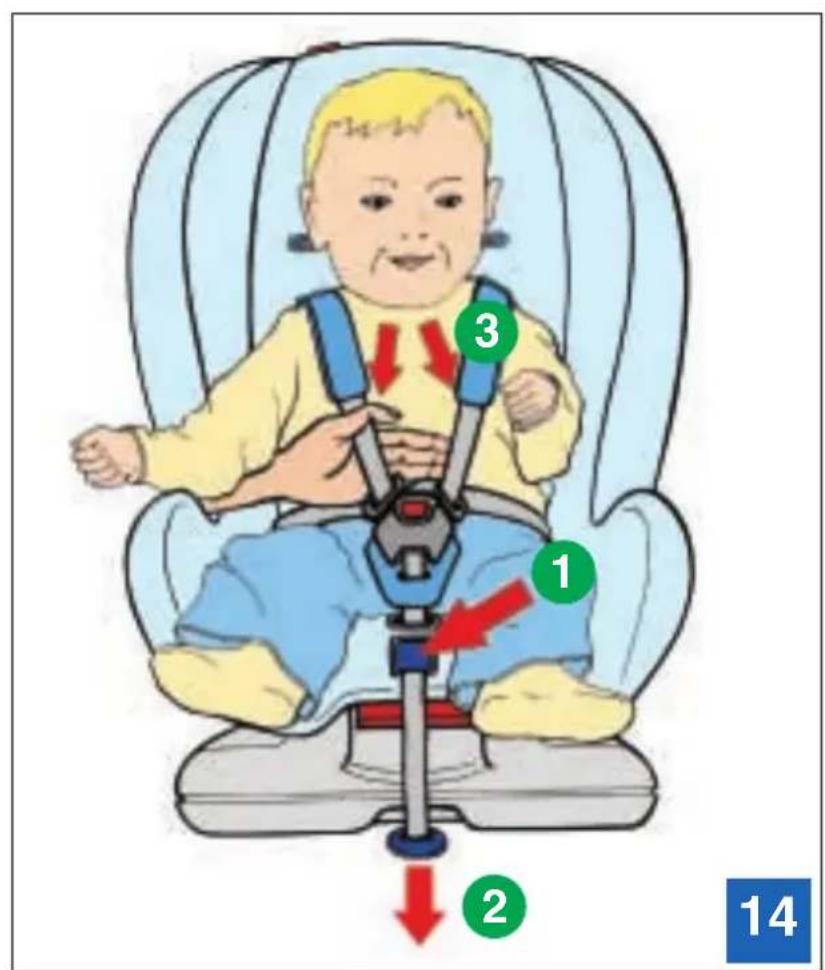
text_image
1 2 3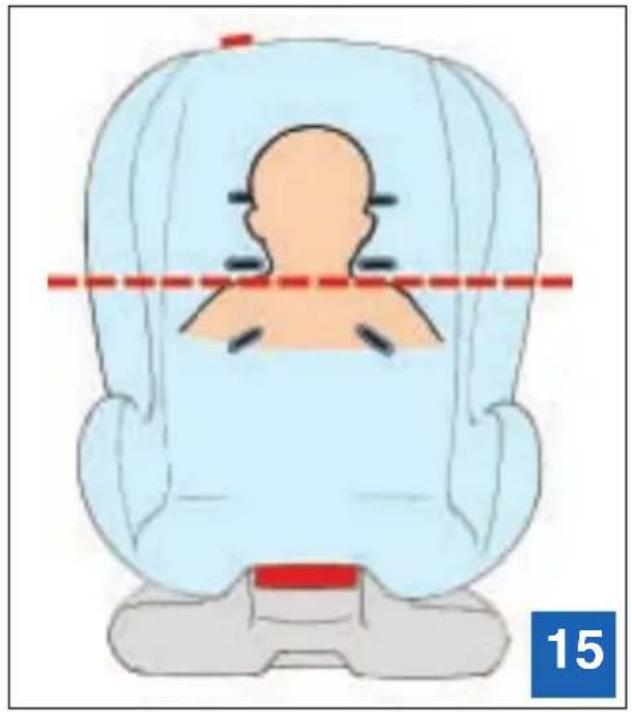
natural_image
Illustration of a person in a medical or rehabilitation setting with a red dashed line and blue number 15 (no text or symbols on the diagram itself)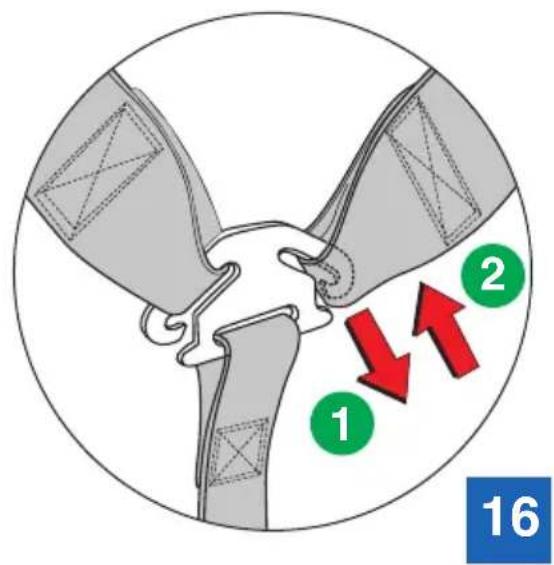
text_image
1 2 16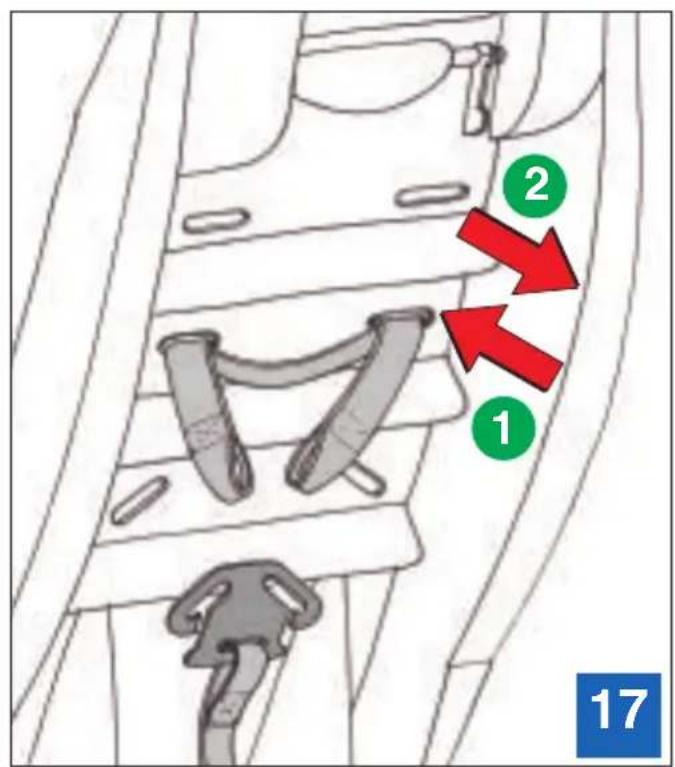
text_image
1 2 17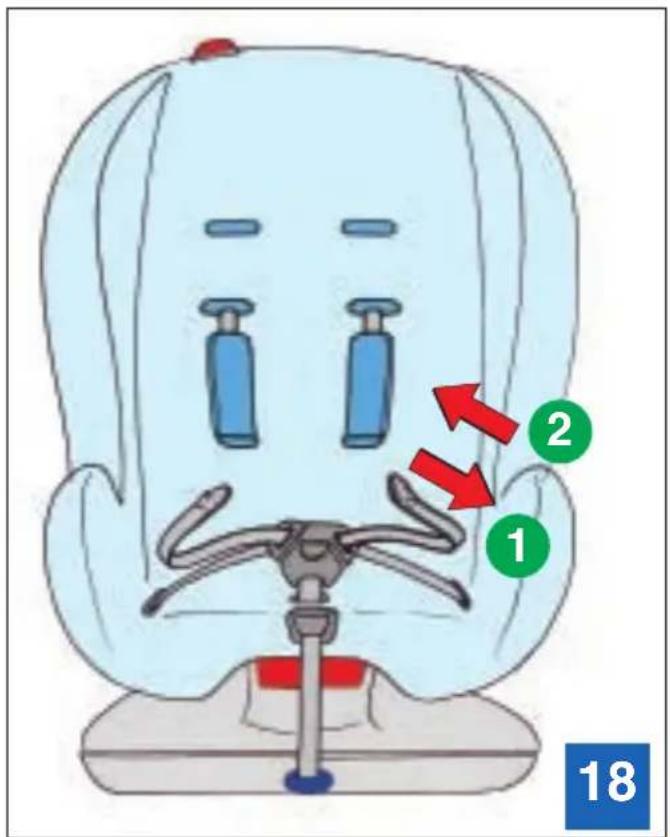
text_image
1 2 18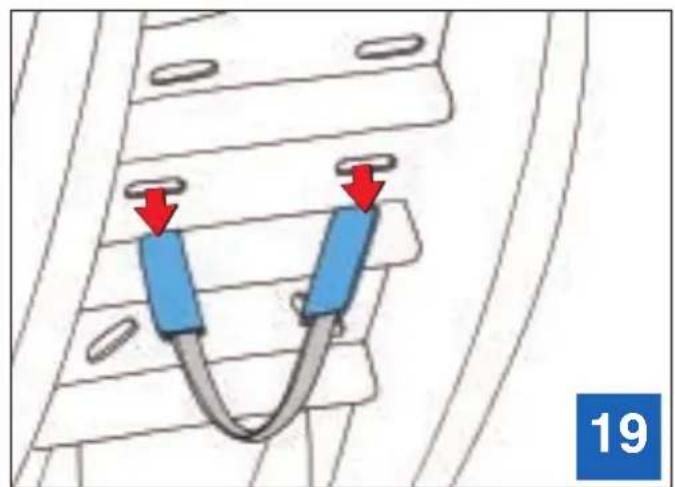
natural_image
Diagram of a car interior with two blue plastic clips and red arrows indicating movement or force, no text or symbols present.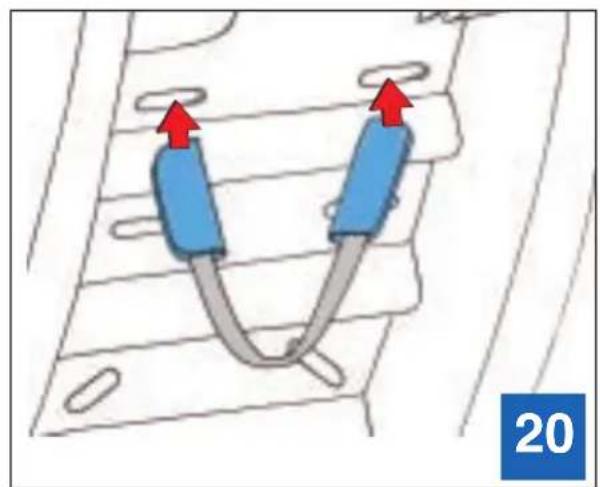
natural_image
Diagram of two blue cylindrical sensors connected in a U-shaped tube, with red arrows indicating direction (no text or symbols)IV.
natural_image
Diagram of a rope buckle being lifted, showing two arms and a red arrow indicating compression (no text or symbols present)21
natural_image
Diagram of a vehicle seatbelt with numbered compartments and a red arrow pointing to one compartment (no text or symbols present)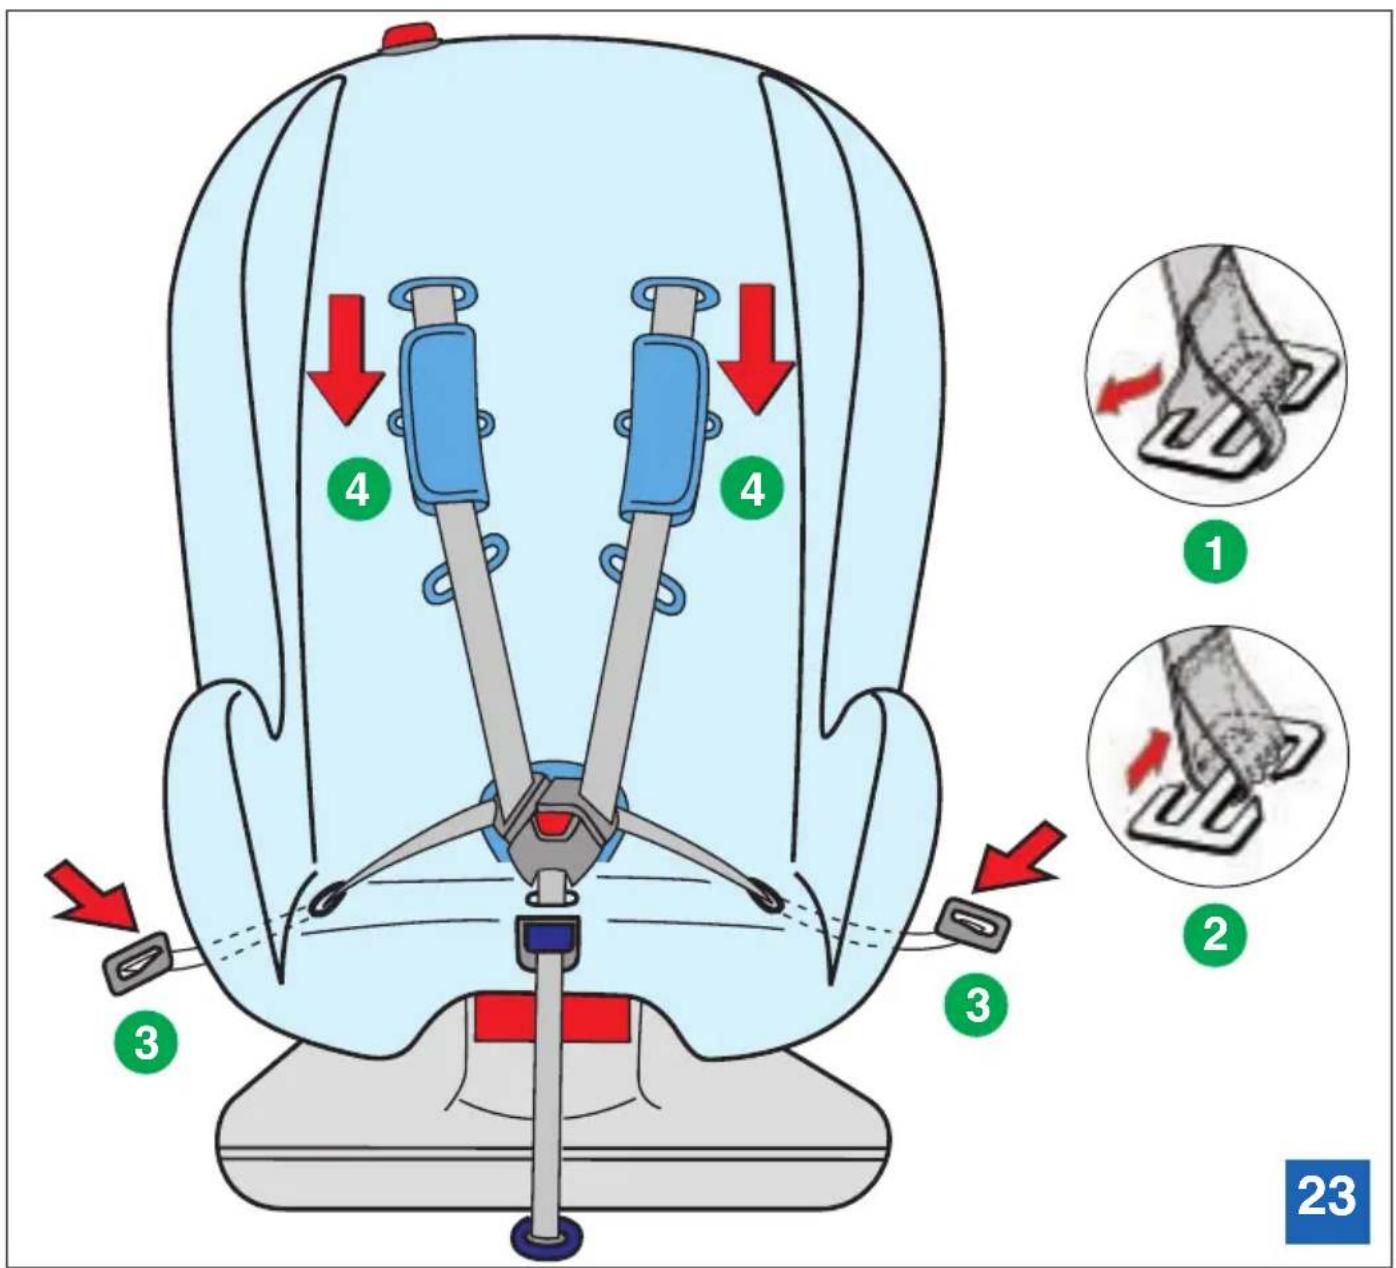
text_image
4 3 2 1 2 3 23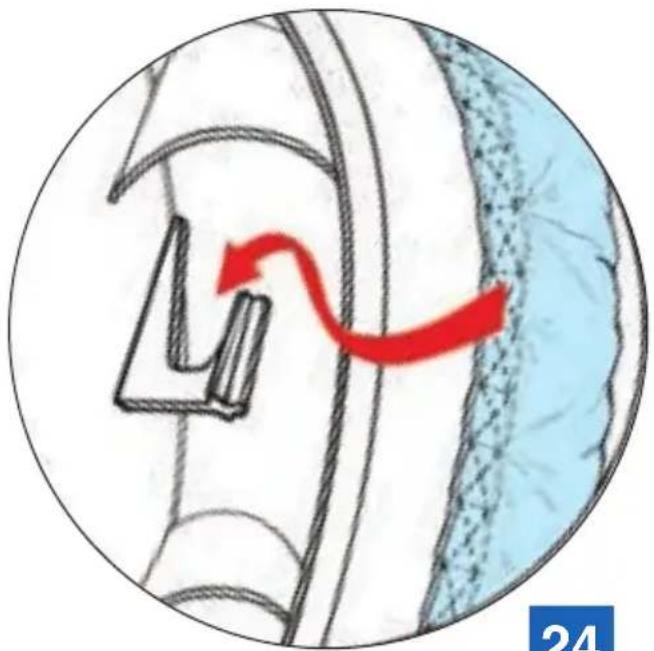
natural_image
Diagram showing a red curved arrow pointing to a mechanical component inside a circular frame, with no visible text or symbols.24
text_image
Diagram illustrating fluid flow around a red valve with directional arrows and numbered labels (1, 2)
natural_image
Illustration of a blue car seat with red directional arrows indicating movement or force (no text or symbols)Dear Parents!
Thank you for purchasing this VENUS Comfort car safety seat. Your child will be really safe in it. In order to meet all safety requirements, please carefully read and apply the information included in this manual. Keep this manual in your car for future reference.
I. IMPORTANT GUIDELINES
The car safety seat guarantee safety only when mounted properly and used accordingly to this manual.
- Please read this instruction carefully and apply all information included in it, keep this manual for future reference.
- Use the safety seat even for a short drive, statistics show that most accidents happen during short trips.
- Attention! The red button must be always in.
- Never leave your child restrained in unattended vehicle.
- The safety seat should always be attached using a car seatbelt, also the harnesses should be locked and adjusted properly even when there is no child in it.
- Stiff or plastic parts of the child restraint should be located so as to avoid being squeezed by vehicle's adjustable seats or doors during everyday use.
- After a car crash the safety seat should be replaced because it may no longer guarantee the full safety level.
- Please be sure not to place any loose items on the rear seat as well as on the car's rear shelf as they may injure the child while emergency braking.
- The cover is an integral part of the seat, do not use the safety seat without the cover.
- Do not make any changes to the construction of the seat.
- During warm, sunny weather, when the car is parked, it is advisable to cover your safety seat to protect it from getting hot.
- Please observe the assembly instructions, printed on stickers located on both sides of the child seat. Never remove these stickers.
II. ASSEMBLY OF THE CHILD SEAT WITHIN THE CAR
Group 1
Weigh of the child: from 9 kg to 18 kg. Position: facing the front of the car.
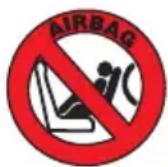
CAUTION! Extreme danger!
Do not use in cars equipped with air bags.
II.1 Placing the child restraints
The child restraints should face the direction of driving and be placed vertically on the rear seat – fig. 1. Use the lever – marked with color, located at the front of the child seat, between the seat and its base. Lift up the lever located under the front part of the seat to set the seat in
the desired position – fig. 1 – 1, simultaneously pulling the seat forward – fig. 1 – 2. Lower the lever in the desired position and wait until a distinct clickis heard.
II.2 Inserting of automotive seat belts
The child restraint can be used only in vehicles featuring three-point seat belts with a retractor, certified by ECE as per Regulation 16. Pull out the full length of the seat belt, insert its waist part through the base of the seat—fig. 2ee: red color, also the oval stick-er located on both sides of the child seat – belt path – red color).
Fasten the seat belt buckle. The chest part of the car belt should be inserted in the following way (see the user's manual label showing the way to fasten the belt on both sides of the baby chair):
- fig. 3 – press the green safety button upwards – 1,
- move the grey safety grip to the right - 2;
- fig. 4 – unlock the blockade by pressing – 3,
- place the seat belt through the opening behind the seat belt blocking mechanism - 4;
- fig. 5 – move the grey safety grip to the left – 5,
- press the red safety button of the child seat down - 6;
- fig. 6 the shoulder part of the seat belt is fastened;
- fig. 7 – firmly pull the seat belt upwards to activate the seat belt blocking mechanism;
- fig. -8 put the restraints horizontally;
- fig. -9 once again pull up the safety belts;
- fig. 10 Place the restraints vertically and safely fix the child restraints on the seat.
Verify that the belts are not twisted or damaged and that they are properly tensioned.
Attention!
- The red button must be always in.
- Each time we change the restraints position to horizontal – fig. 11 – the breast part of the safety belt has to be pulled up – fig. 12.
II.3 Removing the child restraints
To remove the restraints from the car:
- fig. 3 – put the green safety button upwards – 1,
- move the grey safety handle to the right - 2;
- fig. 4 – release the belts locks by pressing it – 3,
- remove the breast safety belt from the lock;
- remove the hip belt from the restraints' base;
- unlock the safety buckle of the safety belt.
III. SAFETY SEAT HARNESSES
III.1 Locking and unlocking the harnesses
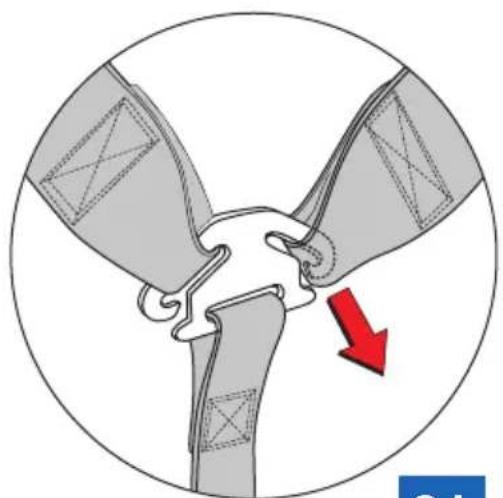
The buckle of the harnesses comprises 3 parts: 2 side parts and 1 central – fig. 13. Side parts should be put one on another – fig. 13 – 1, and when joined, slide them into the central part
- fig. 13 - 2. The clamp is secured after you hear the click. When a child is sitting in the safety seat, you must frequently check whether the clamp is still secured. To open the clamp, press the red button located on the clamp.
III.2 Adjustment of the length of harnesses
In order to better protect your child, after you fix it in the safety seat and lock the clamp, you should tighten the harnesses so they are snug and flat against the child's body. They should never be twisted or loose. The hip strap should be placed as low as possible to restrain rigidly the child's pelvis. To tighten the harnesses press the colourful button located on the lock between the child's legs – fig. 14 – 1 and at the same time pull the harness coming out from the lock with your other hand – fig. 14 – 2.
To lengthen the harnesses press the colourful button located on the lock between the child's legs – fig. 14 – 1 and pull the two harnesses simultaneously in your direction with your other hand – fig. 14 – 3. When doing this, hold the harnesses, not their protective cover.
III.3 Adjusting the lenght of the shoulder straps
The shoulder straps can be set in 3 positions according to the child's size. The height of straps should be adapted to the child's size, so that the child's shoulders are at the same level as the straps coming out the backrest – fig. 15
III.4 Changing the height of the shoulder straps
To change the height of the shoulder straps:
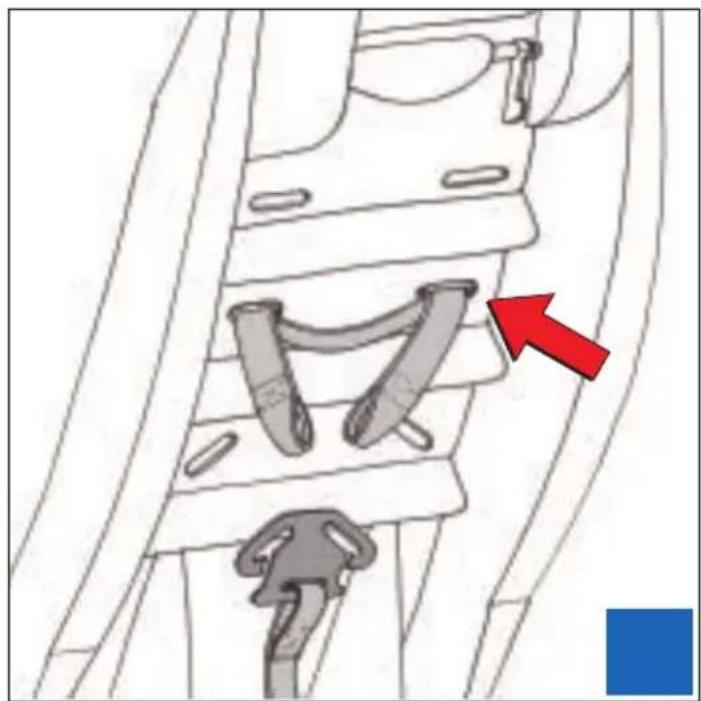
- remove the shoulder straps from the fastener located on the rear part of the restraints – fig. 16 - 1;
- put the straps through the holes in the restraints to the front of the seat – fig. 17 – 1;
- remove the shoulder straps from the guards – fig. 18 – 1;
- relocate the straps' guards to the rear of the backrest – fig. , 19d then through the holes to the front of the backrest at the required level – fig. ;20
- pull the shoulder straps through the guards – fig. 18 – 2;
- pull the shoulder straps through the holes in the restraints at the required level;
- put the shoulder straps to the fastener – fig. 18 – 2. Otherwise, the shoulder straps will not meet the safety requirements.
IV. MAINTENANCE AND REMOVAL OF THE SAFETY SEAT COVER
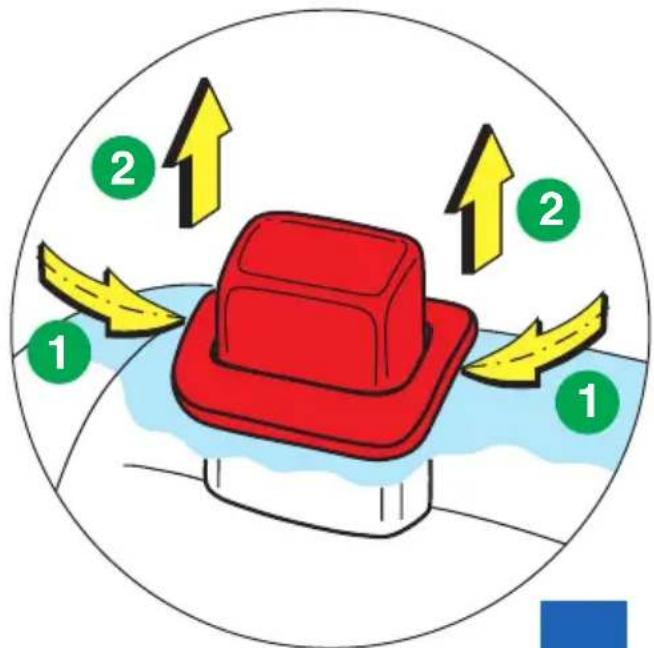
IV.1 Removing the seat cover
In order to remove the child seat cover, perform the following actions:
- remove the shoulder belts from the belt clip located behind the child seat – fig. 21;
- insert the shoulder belts through openings in the child seat towards the front of the seat – fig. 22d fig. - 4:23
- remove the belt tips, plastic safety mechanisms located on the left and right sides of the seat – fig. 23 – 1 and 2;
- pull the tips through the lower side openings of the seat – fig. 23 – 3;
-
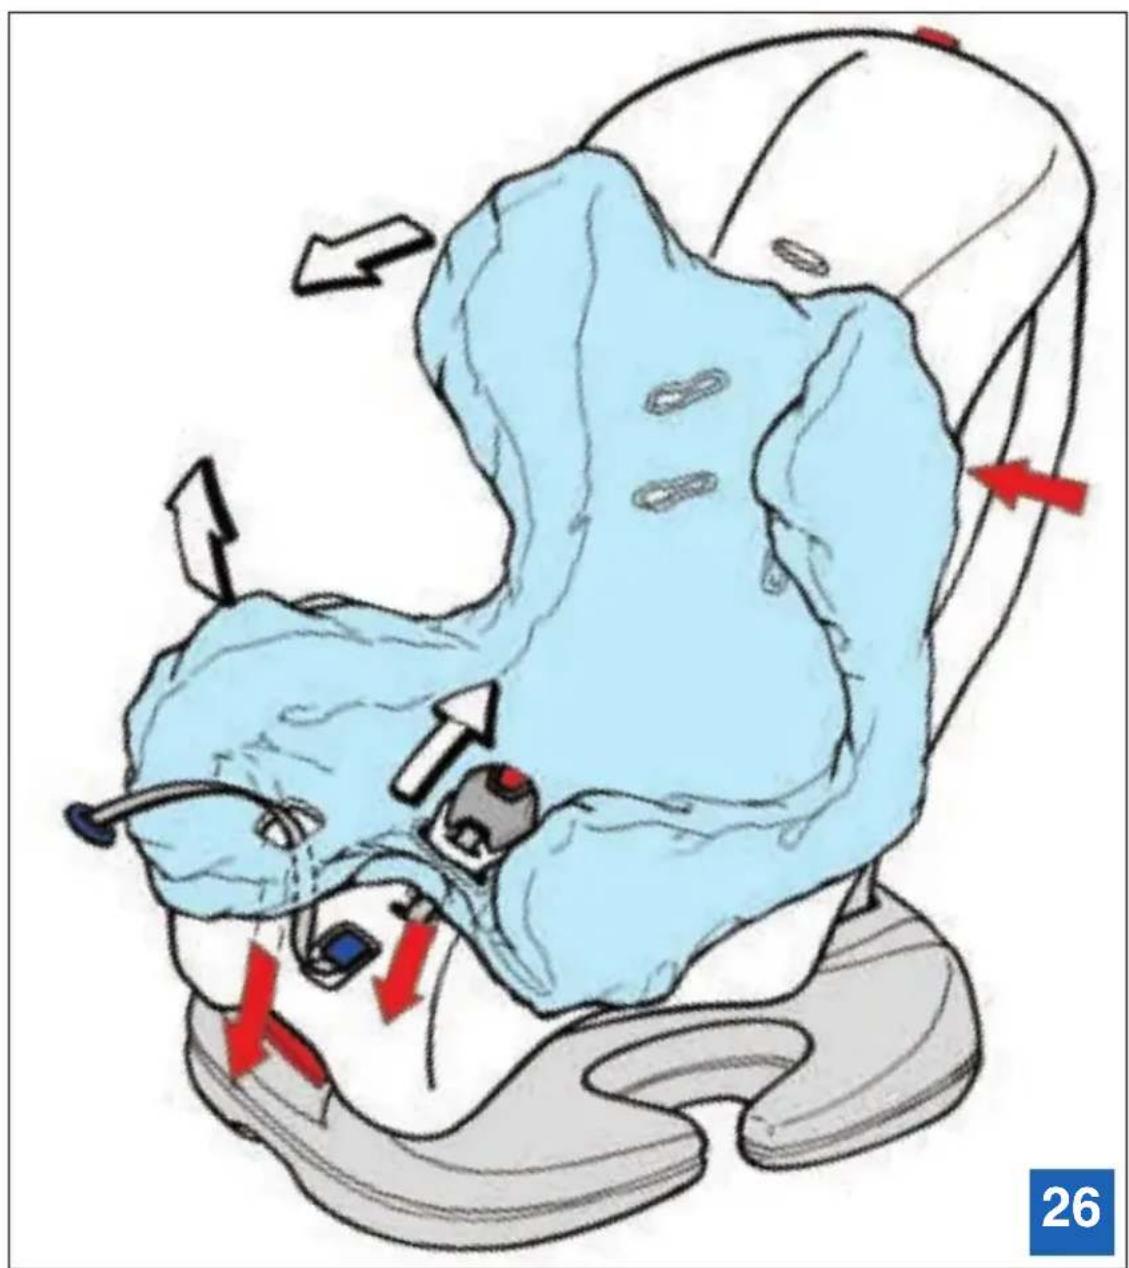
unfasten the cover from snaps located beneath the arm rests of the seat – fig. 24 & 25;
-
pull the crotch belt with the open central part of the buckle and the belt used to regulate lenght through the opening in the cover – fig. ;26
- remove the cover.
The cover can only be washed by hand, in a temperature not exceeding 30^ C, using mild detergents – preferably washing liquid. Do not spin. Do not place in a dryer.
IV.2 Safety seat maintenance
A part of the safety seat is made of plastic and it can be cleaned using slightly warm water with soap. Do not use aggressive cleaning agents.
IV.3 Putting on the cover
In order to put the cover back on, please follow the same steps as when removing the cover – paragraph IV.1 – but in reverse order.
After careful placement of the cover on the seat, attach the rubber finished edges in internal hooks located under the back-rest, as shown on fig. 24 & 25
V. ADJUSTING THE POSITION OF THE SAFETY SEAT
For the child's convenience the VENUS Comfort safety seat may be set in five positions. To set the desired position, press upward the lever under the frontal part of the seat and simultaneously pull forward or backward the main body of the safety seat. Release the lever when the desired position has been reached and push until you hear a clear clicking sound – fig. - 8d . 10
VI. WARRANTY
The VENUS Comfort car seat conforms to the most restrictions European safety standards ECE R 44/03 and is suitable for the weigh of children: from 9 to 18 kg (group 1).
- The warranty is granted for the period of 24 months from the date of purchase.
- The warrantor ensures a good quality and appropriate performance of the product when used in accordance with the manufacturer's intention and instruction manual.
- The warranty is granted only to the first user and cannot be transferred to other persons.
- Warranty claims due to faulty products are accepted by retail outlets.
- In case of malfunction, please take the product to a retail outlet together with the warranty card signed by a dealer, and with the receipt or any other proof of purchase.
The warranty is not granted when:
• The product was not delivered to the manufacturer together with the original proof of purchase.
- The defects were caused by improper usage or maintenance, carried out in different manner from that described in the instruction manual.
• The defects were caused by a car crash.
• The product was repaired by a third party.
• The serial number located on the seat part was damaged or removed.
Liebe Eltern!
e-mail: ramatti@ramatti.com.pl
www.ramatti.com.pl