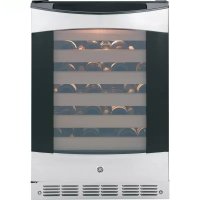
Profile PCR06WATSS - Wine cellar GE - Free user manual and instructions
Find the device manual for free Profile PCR06WATSS GE in PDF.


| Product Type | Wine Cellar / Beverage & Wine Cooler |
| Brand | GE |
| Model | Profile PCR06WATSS |
| Dimensions (H x W x D) | 87.6 x 60.3 x 64.8 cm |
| Cutout Dimensions (H x W x D) | 87.6-88.9 x 61 x 61 cm |
| Capacity | Holds up to 57 bottles (5 upper drawers x 9 bottles + 2 lower drawers x 6 bottles) |
| Power Supply | 120 V, 60 Hz, 15 or 20 A, 3-prong grounded outlet |
| Temperature Range (Beverages) | 4.4 °C to 13 °C |
| Temperature Range (Wine) | 4.4 °C to 18.3 °C |
| Preset Wine Settings | Red Wine (13 °C), White Wine (7 °C) |
| Drawer Front Material | Unfinished beech wood (can be stained) |
| Interior Lighting | 15 W bulb, ON/OFF switch for continuous or automatic operation |
| Reversible Door | Yes, right or left hinge |
| Installation Type | Freestanding or built-in |
| Cleaning | Interior: warm water and baking soda; exterior: mild soap; stainless steel: specific cleaner |
| Bulb Replacement | 15 W appliance bulb |
| Warranty (parts and labor) | 1 year |
| Sealed System Warranty (Profile) | 5 years |
| Safety | Grounding required, do not use extension cord, child entrapment risk (remove doors before disposal) |
| Number of Drawers | 5 upper drawers (full extension) + 2 lower drawers (full extension) |
| Glass Shelves | Yes, removable (for beverage cooler) |
Frequently Asked Questions - Profile PCR06WATSS GE
User questions about Profile PCR06WATSS GE
0 question about this device. Answer the ones you know or ask your own.
Ask a new question about this device
Download the instructions for your Wine cellar in PDF format for free! Find your manual Profile PCR06WATSS - GE and take your electronic device back in hand. On this page are published all the documents necessary for the use of your device. Profile PCR06WATSS by GE.
USER MANUAL Profile PCR06WATSS GE
Profile Beverage Center and Wine Chiller
Safety Instructions .....2, 3
Operating Instructions
Beverage Center
Glass Shelves 4
Loading Tips and Suggestions .....4
Temperature Control ....4
Wine Chiller
Inserting Wine Bottles .....5
Loading Tips and Suggestions .....5
Temperature Control ....5
Beverage Center and Wine Chiller
Interior Light and Switch .....6
Removing Full
Extension Drawers ....6
Wood Drawer Fronts 6
Care and Cleaning .....7
Installation Instructions ...8-12
Leveling....12
Location 8,9
Reversing Door Swing .....11
Troubleshooting Tips .....14, 15
Normal Operating Sounds .....13
Consumer Support
Consumer Support......Back Cover
Product Registration .....17, 18
Warranty (Canada)....20
Warranty (U.S.) 19
Write the model and serial numbers here:
Model # ____
Serial # ____
Find these numbers on a label on the ceiling inside the beverage center and wine chiller.
Owner's Manual and Installation Instructions
PCR06BATSS
PCR06WATSS
Refroidisseur
à boissons et vin
197D7188P001 49-60466 05-06 JR
IMPORTANT SAFETY INFORMATION.
READ ALL INSTRUCTIONS BEFORE USING.
⚠ WARNING!
Use this appliance only for its intended purpose as described in this Owner's Manual.
ATTENTION CONSUMER!
This appliance is designed for storing and cooling beverages. Do not store perishable foods in this unit.
SAFETY PRECAUTIONS

When using electrical appliances, basic safety precautions should be followed, including the following:
This appliance must be properly installed and located in accordance with these instructions before it is used.
Do not allow children to climb, stand or hang on the shelves or full-extension drawers in the appliance. They could damage the appliance and seriously injure themselves.
Do not store or use gasoline or other flammable vapors and liquids in the vicinity of this or any other appliance.
Before replacing a burned-out light bulb, the appliance should be unplugged in order to avoid contact with a live wire filament. (A burned out light bulb may break when being replaced.)
- Keep fingers out of the "pinch point" areas; clearances between the doors and between the doors and cabinet are necessarily small. Be careful closing doors when children are in the area.
■ Unplug the appliance before cleaning and making repairs.
NOTE: We strongly recommend that any servicing be performed by a qualified individual. - Do not store or install this appliance outdoors.
▲ DANGER! RISK OF CHILD ENTRAPMENT
PROPER DISPOSAL OF THE BEVERAGE CENTER OR WINE CHILLER
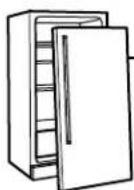
Child entrapment and suffocation are not problems of the past. Junked or abandoned refrigeration products are still dangerous... even if they will sit for "just a few days." If you are getting rid of your old appliance, please follow the instructions below to help prevent accidents.
Before You Throw Away Your Old Refrigeration Product:
Take off the door.
Leave the shelves and drawers in place so that children may not easily climb inside.
Refrigerants
All refrigeration products contain refrigerants, which under federal law must be removed prior to product disposal. If you are getting rid of an old refrigeration product, check with the company handling the disposal about what to do.
DO NOT USE AN EXTENSION CORD WITH THIS APPLIANCE.
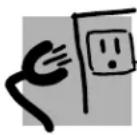
HOW TO CONNECT ELECTRICITY
Do not, under any circumstances, cut or remove the third (ground) prong from the power cord. For personal safety, this appliance must be properly grounded.
The power cord of this appliance is equipped with a 3-prong (grounding) plug which mates with a standard 3-prong (grounding) wall outlet to minimize the possibility of electric shock hazard from this appliance.
Have the wall outlet and circuit checked by a qualified electrician to make sure the outlet is properly grounded.
If you have only a standard 2-prong wall outlet, it is your personal responsibility and obligation to have it replaced with a properly grounded 3-prong wall outlet.
NOTE: GFI (ground fault interrupter) is not recommended.
The appliance should always be plugged into its own individual electrical outlet which has a voltage rating that matches the rating plate.
This provides the best performance and also prevents overloading house wiring circuits which could cause a fire hazard from overheated wires.
Never unplug your appliance by pulling on the power cord. Always grip plug firmly and pull straight out from the outlet.
Repair or replace immediately all power cords that have become frayed or otherwise damaged. Do not use a cord that shows cracks or abrasion damage along its length or at either end.
When moving the appliance away from the wall, be careful not to roll over or damage the power cord.

READ AND FOLLOW THIS SAFETY INFORMATION CAREFULLY.
SAVE THESE INSTRUCTIONS
Controls and features—Beverage Center.
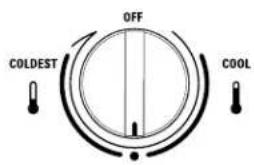
Temperature Control
The operating temperatures of the beverage center range from the low forties to the mid fifties. This appliance is not a refrigerator and does not maintain temperatures like a refrigerator (below 41°F).
Do not install the beverage center where the temperature will go below 55°F (13°C) or above 90°F (32°C).
As with any refrigeration-type product, there is a slight temperature variance at different locations within the cabinet.
The coolest area will be in the lower part of the cabinet.
The cooler area will be in the middle section.
The upper part of the cabinet is the warmest section.
When the temperature is adjusted, allow 24 hours for the unit to stabilize.
To set the control, turn it to the midpoint setting (approximately 45^ F). Once the beverage center is loaded, allow at least 24 hours before making any adjustments to the initial setting.
NOTES:
- This unit is designed for storing and cooling beverages. It is not intended for the storage of perishable foods.
- The lowest temperatures are found on the lower shelves/racks and toward the rear of the shelves/racks.
natural_image
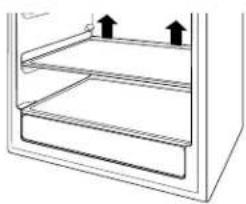
Diagram of a storage or rack system with two upward arrows indicating flow direction (no text or symbols)To remove, lift up on the back of the shelf
Glass Shelves
Tempered glass shelves in the beverage center unit are removable for easy cleaning or for storing larger items.
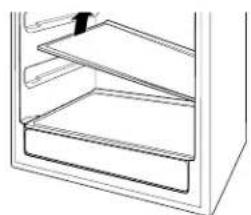
To remove a shelf, open the door completely to avoid potential damage to the gasket. Lift up on the back of the shelf slightly. Tilt the shelf to one side at an angle while pulling forward.
natural_image
Line drawing of a refrigerator interior showing two compartments (no text or symbols)Tilt the shelf at an angle while removing or replacing
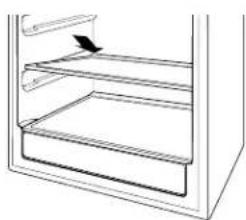
To replace a shelf, open the door completely to avoid potential damage to the gasket. Tilt the shelf to one side at an angle and slide toward the back wall, placing one side onto the shelf support. Place the other side onto the opposite shelf support. Ensure rear locking tabs are engaged. When installed properly, the shelf will not slide forward when gently pulled.
natural_image
Line drawing of a refrigerator interior showing shelves and a handle (no text or symbols)Place in slots when replacing the shelf
natural_image
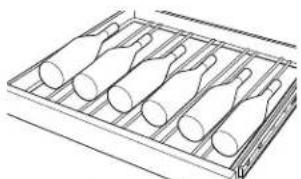
Line drawing of a tray with four identical bottles, no text or symbols presentBottom drawer arrangement 4
Loading Tips and Suggestions
- The bottom two full extension drawers hold six bottles each and are loaded with necks facing the rear. Tall bottles should not be loaded on the bottom drawer because they may prevent the door from closing.
- Do not allow children to climb, stand or hang on the beverage center shelves or full extension drawers. They could seriously injure themselves and possibly cause damage to the beverage center.
Controls and features—Wine Chiller. ge.com
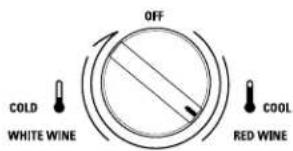
Temperature Control
The temperature range of the wine chiller is from the low forties to the mid sixties. This appliance is not a refrigerator and does not maintain temperatures like a refrigerator (below 41°F).
Do not install the wine chiller where the temperature will go below 55°F (13°C) or above 90°F (32°C).
The RED WINE setting will provide a temperature of approximately 55^ F ( 13^ C), which is the optimum storage temperature for red wine.
The WHITE WINE setting will provide a temperature of approximately 45^ F ( 7^ C), which is the optimum serving temperature for white wine.
As with any refrigeration-type product, there is a slight temperature variance at different locations within the cabinet.
Temperatures at the bottom of the cabinet will be cooler than temperatures at the top of the cabinet.
Position your wine inventory accordingly (i.e. white wines in the cooler zones and red in the warmer zones).
To set the control, turn it to the RED WINE setting. Once the bottles are loaded, allow at least 24 hours before making any adjustments to the initial setting.
NOTE: This unit is designed for storing and cooling beverages. It is not intended for the storage of perishable foods.
Suggested storing and serving temperatures for wine
- If you plan to drink the wine in less than 2 months, use the appropriate red or white setting based on the wine type.
- If you plan to store the wine for more than 2 months, use the storing and serving guide below.
| Red Wine White Wine | ||
| Storing 55°F (13°C) 55°F (13°C) | ||
| Serving Room Temperature65°F to 72°F 45°F to 55°F(18°C to 22°C) (7°C to 13°C) | ||
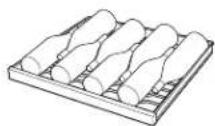
8 bottle arrangement
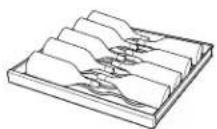
9 bottle arrangement
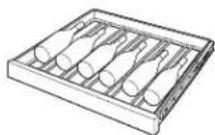
Bottom two drawers
Inserting Wine Bottles
The top five full extension drawers each hold eight bottles, two deep with the necks alternating front to back or nine bottles, alternating with necks pointing inward.
The bottom two full extension drawers hold six bottles each and are loaded with necks facing the rear. Tall bottles should not be loaded on the bottom drawer because they may prevent the door from closing.
Loading Tips and Suggestions
- The bottles on the top full extension drawer, directly under the light, will be exposed to a slightly higher temperature when the light is on. Position your wines accordingly and remember to turn off the light when it is no longer needed.
- Keep wines that you plan to use for everyday drinking and entertaining on the front half of the full extension drawers where labels are completely visible. Place wines for aging or longer term storage in the rear.
- Do not allow children to climb, stand or hang on the wine chiller full extension drawers. They could seriously injure themselves and possibly cause damage to the wine chiller.
Controls and features—Beverage Center and Wine Chiller.
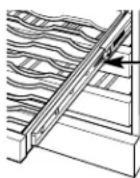
Tab (push tab down on right drawer guide, pull tab up on left drawer guide)
Removing Full Extension Drawers
All of the full extension drawers pull out so bottles can be conveniently added or removed.
Any of the full extension drawers can be removed to store larger bottles.
NOTE: Make sure the tabs on the full extension drawer guides are fully engaged before loading any bottles. Pull the drawers out all the way to the STOP position and push back in several times to make sure locking tabs are properly engaged.
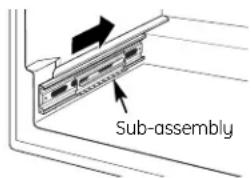
To replace, push drawer slide arm back into unit
To remove:
- Pull the full extension drawer out to the STOP position.
- Push the tab on right drawer guide down while pulling the tab on left guide up, and pull the drawer out.
To replace:
- Push the drawer slide arm back into the unit.
- Pull the small slide sub-assembly completely forward.
- Insert the sides of the drawer back into the guides.
- Push until the tabs lock into place.
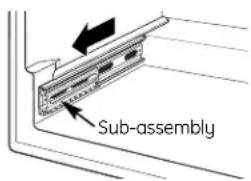
Pull small slide sub- assembly completely forward
Wood Drawer Fronts
The full extension drawer fronts on the beverage center and wine chiller are unfinished beech wood. During use, oil from hands may accumulate and stain the wood.
- The drawer fronts may be stained and sealed to match adjacent cabinetry. The tinted glass will make the stained wood appear darker. A true color match can be seen only when the door is opened.
- Apply the stain and sealer according to the manufacturer's instructions. To avoid unpleasant odor, keep the door open to ventilate and allow the stain/sealer to dry completely before using the product.
NOTE: Natural wood may vary slightly in grain and color.
Interior Light and Switch
The interior light makes it easy to view your wine and/or beverage labels and enhances the display of your collection.
When the switch is in the OFF position, the light comes on only when the door is opened. When the switch is in the ON position, the light remains on continuously for your maximum viewing pleasure. For best viewing, do not store a bottle on the top shelf directly under the light. Remember to turn off the light when it is no longer needed.
Cleaning the Outside
IMPORTANT: Unplug the beverage center or wine chiller before cleaning.
Keep the outside clean. The cabinet can be washed with mild soap and water. Rinse thoroughly with clean water. Never use abrasive scouring powders.
Use a glass cleaner or mild soap and water and a soft cloth to clean the glass door. Do not use any abrasive powders.
Wipe the controls with a damp cloth. Dry thoroughly. Do not use cleaning sprays, large amounts of soap and water, abrasives or sharp objects on the panel—they can damage it. Some paper towels can also scratch the control panel.
Do not wipe the beverage center or wine chiller with a soiled dishcloth or towel.
These may leave a residue that can erode the paint. Do not use scouring pads, powdered cleaners, bleach or cleaners containing bleach because these products can scratch and weaken the paint finish.
Stainless steel. Regularly clean and polish the stainless steel areas (on some models) with a commercially available stainless steel cleaner such as Stainless Steel Magic ^® to preserve and protect the fine finish. Stainless Steel Magic ^® is available through GE Parts and Accessories, 800.626.2002, or ge.com. Order part number WX10X15.
Do not use appliance wax or polish on the stainless steel.
Cleaning the Inside
IMPORTANT: Unplug the beverage center or wine chiller before cleaning.
The vinyl door gasket may be cleaned with mild soap and water or a baking soda solution. Rinse well.
After cleaning the door gasket, apply a thin layer of paraffin wax or petroleum jelly to the door gasket at the hinge side. This helps keep the gasket from sticking and bending out of shape.
Use a slightly damp cloth or sponge when cleaning around switches, lights or controls.
Use warm water and baking soda solution—about a tablespoon (15 ml) of baking soda to a quart (1 liter) of water. This both cleans
and neutralizes odors. Thoroughly rinse and wipe dry.
Other parts of the beverage center or wine chiller unit—including the full extension drawers and glass shelves—can be cleaned the same way.
Avoid cleaning cold glass shelves with hot water because the extreme temperature difference may cause them to break. Handle glass shelves carefully. Rough handling of tempered glass can cause it to shatter.
Do not use detergents, scouring powders, spray cleaners or other harsh chemicals to clean the interior.
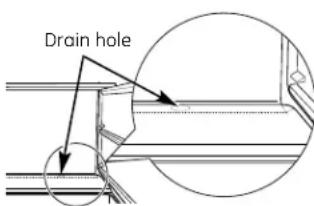
Drain Hole
Periodically check the drain hole and channel for any debris. If the drain is blocked, condensation will not drain properly.
To check and clean the drain hole, remove the bottom two glass shelves or bottom two full extension drawers. Sweep a damp cloth along the channel in the back of the beverage center. Use a finger to sweep away any debris from the drain hole.
Light Bulb Replacement
Unplug the beverage center or wine chiller before replacing the light bulb.
To remove the light shield, push in the tab on the left side of the shield and lower it. Replace with a 15 watt appliance bulb.
In the Event of a Power Failure
If the power fails, open the door as infrequently as possible to maintain the temperature.
Do not store or use gasoline or other flammable vapors and liquids in the vicinity of this or any other appliance.
Installation Instructions
Beverage Center and Wine Chiller
Questions? Call 800.GE.CARES (800.432.2737) or Visit our Website at: ge.com
BEFORE YOU BEGIN
Read these instructions completely and carefully.
- IMPORTANT – Save these instructions for local inspector's use.
- IMPORTANT – Observe all governing codes and ordinances.
- Note to Installer – Be sure to leave these instructions with the Consumer.
- Note to Consumer – Keep these instructions for future reference.
- WARNING – This appliance must be properly grounded. See "Electrical Supply."
- If you received a damaged beverage center or wine chiller, you should immediately contact your dealer or builder.
- Skill Level – Installation requires basic mechanical skills. Proper installation is the responsibility of the installer. Product failure due to improper installation is not covered under the GE Appliance Warranty.
WARNINGS:
- Use this appliance only for its intended purpose.
- Immediately repair or replace electrical service cords that become frayed or damaged.
- Unplug the unit before cleaning or making repairs.
• Repairs should be made by a qualified service technician.
PRODUCT CLEARANCES
The beverage center and wine chiller is factory set for a 110° door swing.
When installed in a corner:
- Allow 4"min. clearance on the hinge side for the 90° door swing and to allow racks to slide out.
- Allow 10" minimum clearance on the hinge side for a full 110° door swing.
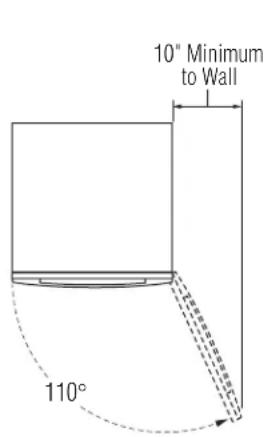
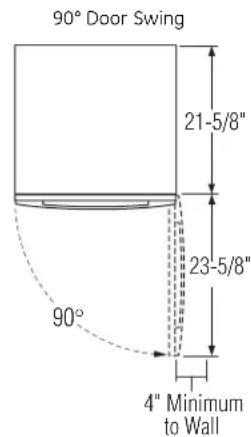
- The door swing is reversible on all models. If desired, change the door swing before installation.
Choose the location:
• These products may be closed in on the top and three sides as long as the front is unobstructed for air circulation and proper access to the door.
- Do not install these products where the temperature will go below 55°F (13°C) or above 90°F (32°C).
- Do not install where it will be subject to direct sunlight, heat or moisture.
• These products are not designed to be stacked one over the other.
THE INSTALLATION SPACE
The beverage center and wine chiller can be a free-standing model or it can be built in using the cut-out dimensions below.
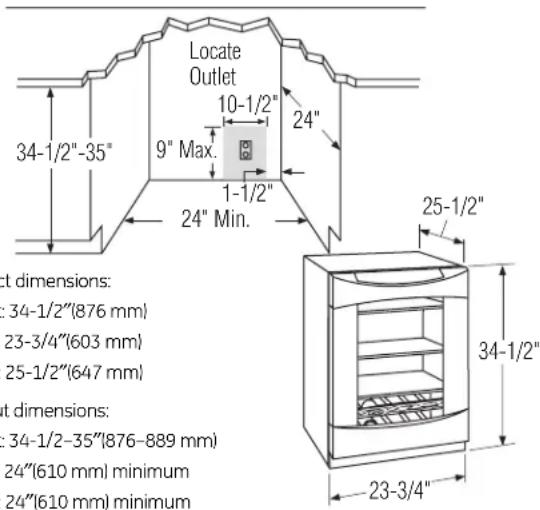
Product dimensions:
Height: 34-1/2"(876 mm)
Width: 23-3/4"(603 mm)
Depth: 25-1/2"(647 mm)
Cut-out dimensions:
Height: 34-1/2-35"(876-889 mm)
Width: 24"(610 mm) minimum
Depth: 24"(610 mm) minimum
The cutout depth should be 24"
The cutout dimensions shown allow for a full door swing and access to the pull-out racks when installed as a built-in in standard 24" deep cabinets.
- The door should protrude 2-1/4" beyond the surrounding cabinets. For easy reference, the back edge of the pocket handle should protrude a minimum of 5/8" beyond the front edge of the countertop.
- If installing between frameless cabinets, a 1/2" wide filler strip or side panel may be needed on hinge side. The filler strip will act as a spacer between the case and adjacent cabinet door swing. The width of the opening must include the filler panels. NOTE: The door should protrude 2-1/4" beyond the surrounding cabinets.
- The beverage center and wine chiller can be installed freestanding.
Additional Specifications
- A 120 volt 60Hz., 15 or 20 amp power supply is required. An individual properly grounded branch circuit or circuit breaker is recommended. Install a properly grounded 3-prong electrical receptacle recessed into the back wall as shown. Electrical must be located on rear wall as shown. NOTE: GFI (ground fault interrupter) is not recommended.
SIDE-BY-SIDE INSTALLATIONS
Increase storage capacity by installing two beverage centers or wine chillers together. Or, for a complete refreshment center, install any two of these units together.
- A side-by-side installation requires at least a 47-1/2" wide opening. No trim kits required.
- Products must operate from separate, properly grounded receptacles.
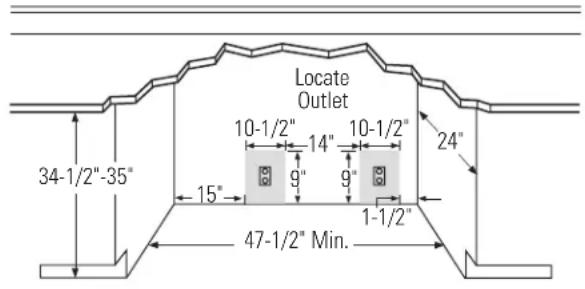
TOOLS REQUIRED
• #2 Phillips screwdriver
- Adjustable wrench
PARTS SUPPLIED
• Hardware for changing door swing
• Left and right side hinge covers
- Top screw hole cover
GROUNDING THE BEVERAGE CENTER AND WINE CHILLER
IMPORTANT— Please read carefully.
FOR PERSONAL SAFETY, THIS APPLIANCE MUST BE PROPERLY GROUNDED.
The power cord of this appliance is equipped with a three-prong (grounding) plug which mates with a standard three-prong (grounding) wall receptacle to minimize the possibility of electric shock hazard from this appliance.
Have the wall outlet and circuit checked by a qualified electrician to make sure the outlet is properly grounded.
Where a standard 2-prong wall outlet is encountered, it is your personal responsibility and obligation to have it replaced with a properly grounded 3-prong wall outlet.
DO NOT, UNDER ANY CIRCUMSTANCES, CUT OR REMOVE THE THIRD (GROUND) PRONG FROM THE POWER CORD.
DO NOT USE AN ADAPTER PLUG TO CONNECT THE REFRIGERATOR TO A 2-PRONG OUTLET.
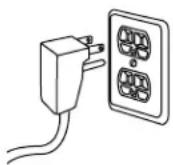
DO NOT USE AN EXTENSION CORD WITH THIS APPLIANCE.
STAINING WOOD DRAWER FRONTS
The drawer fronts are unfinished beech wood. During use, oil from hands may accumulate and stain the wood.
- The drawer fronts may be stained and sealed to match adjacent cabinetry. The tinted glass will make the stained wood appear darker. A true color match can be seen only when the door is opened.
- Apply the stain and sealer according to the manufacturer's instructions. To avoid unpleasant odor, keep the door open to ventilate and allow the stain/sealer to dry completely before using the product.
1 REMOVE PACKAGING
- Remove corner blocks and foam drawer stops.
- Remove all packing material, tape and protective plastic coverings.
CAUTION: Small objects are a choke hazard for children. Remove and discard any parts not used.
2 REVERSE DOOR SWING
SKIP THIS STEP IF DOOR SWING SUITS THE INSTALLATION
Parts Included:
- Top left case hinge
- Bottom left case hinge
- Left and right side decorative hinge cover
• Decorative hinge screw hole cover - Torx® driver bit
Tools Required:
• Phillips screwdriver
- Electric drill
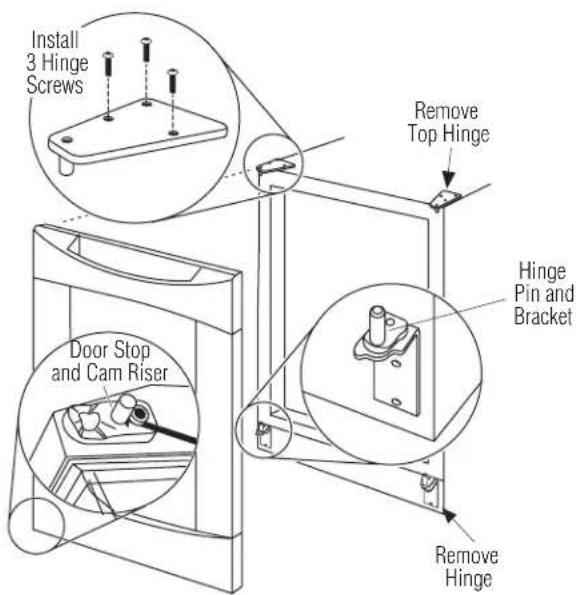
To remove the door:
- Flatten the shipping carton to use as a pad.
- Remove the 2 screws and the toekick. Set aside the screws and toekick for final installation.
- Use the supplied Torx® bit and electric drill to remove the 3 screws holding the top case hinge. Lift off the hinge. (Screws will be used to install the new hinge.)
- Lift the door off the bottom case hinge.
- Remove the bottom case hinge pin and bracket.
To reinstall the door:
-
Remove the door stop and cam riser on the bottom right side of the door.
-
Remove the bottom fill plug on the bottom left side of the door.
-
Reinstall the original door stop and cam riser onto the bottom left side of the door.
-
Reinstall the bottom fill plug on the bottom right side of the door.
-
Remove the top fill plug on the top left side of the door.
-
Reinstall the top fill plug on the top right side.
-
Install the new supplied bottom case hinge pin and bracket onto bottom left side. Ensure plastic cam riser is on the case hinge pin.
-
Place the door onto the bottom case hinge.
-
Install the supplied left-hand top case hinge with the 3 original screws.
-
Select the hinge cover marked with an "L".
-
Peel backing off the tape inside the decorative hinge cover.
-
Press and snap the hinge cover into place.
-
Snap the screw hole cover into place on the opposite side.
IMPORTANT: Check to be sure screws are tight and that the door is straight and does not sag. The door should swing freely.
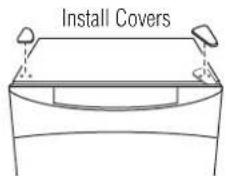
Install Toekick
The toekick has a cutout on the left and right sides.
-
Remove the plug on the left side and reinstall on the right side.
-
Install original screws and spacers.
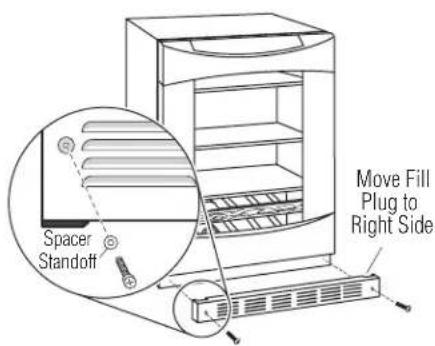
Install screws through the spacer standoff, toekick and into the base as shown.
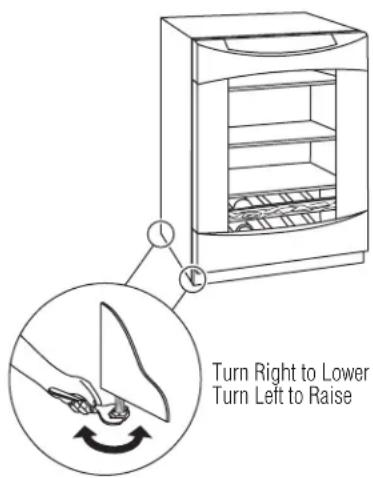
3 LEVEL
- Use an adjustable wrench to turn the leveling legs and raise or lower the product.
- Adjust carefully; the product should be level and plumb with cabinetry, and should align with adjacent toekick height.
If you skipped Step 2:
- Select the hinge cover marked "R" or "L", depending on door swing.
- Peel backing off the tape inside the decorative hinge cover. Press and snap into position.
4 CONNECT POWER
- Connect power cord plug to a properly grounded receptacle.
- Make sure power is on by opening the door to see if interior light turns on.
5 SLIDE PRODUCT INTO THE CUTOUT
- Carefully slide the unit into the opening. Be careful not to entangle power cord.
- Make certain that the door protrudes 1" beyond the surrounding cabinets.
- Check again to be sure the unit is level.
6 SET TEMPERATURE CONTROLS
- The temperature controls are preset. Refer to the Temperature Control section for more information. Allow 24 hours for temperature to stabilize.

Newer appliances sound different from older appliances. Modern appliances have more features and use newer technology.
Do you hear what I hear? These sounds are normal.
HUMMM... WHOOSH...
The new high efficiency compressor may run faster and longer than your old appliance and you may hear a high-pitched hum or pulsating sound while it is operating.
■ Sometimes the appliance runs for an extended period, especially when the doors are opened frequently.
■ You may hear a whooshing sound when the doors close. This is due to pressure equalizing within the appliance.
WHIR!

■ You may hear the fans spinning at high speeds. This happens when the appliance is first plugged in, when the doors are opened frequently or when large amounts of beverages are added to the appliance. The fans help maintain desired temperatures.
■ If door is open for over 3 minutes, you may hear the fans come on in order to cool the appliance.
■ The fans change speeds in order to provide optimal cooling and energy savings.
CLICKS, POPS, CRACKS and CHIRPS
■ You may hear cracking or popping sounds when the appliance is first plugged in. This happens as the appliance cools to the correct temperature.
■ Expansion and contraction of cooling coils during and after defrost can cause a cracking or popping sound.
WATER SOUNDS

■ The flow of refrigerant through the appliance cooling coils may make a gurgling noise like boiling water.
■ A water dripping noise may occur as water from the evaporator flows into the drain pan.
■ Closing the door may cause a gurgling sound due to pressure equalization.
Before you call for service...
Troubleshooting Tips
Save time and money! Review the charts on the following pages first and you may not need to call for service.
Problem Possible Causes What To Do
| Appliance does not operate cycle. 30 minutes | Appliance may be in defrost when in defrost cycle. | This is normal. Compressor does not operate for about |
| Appliance is unplugged. Push the plug completely into the outlet. | ||
| The circuit breaker is tripped/the fuse is blown. | Replace fuse or reset the breaker. | |
| GFI outlet is tripped. Reset outlet. | GFI outlet is not recommended. | |
| Vibration or rattling (slight vibration is normal) | Appliance is on an uneven surface. | Adjust the leveling legs as shown in the Installation Instructions. |
| Motor operates for long periods or cycles on and off frequently | Normal when appliance is first plugged in. | Wait 24 hours for the appliance to completely cool down. |
| Often occurs when large amounts of wine or beverages are placed in the appliance. | This is normal. | |
| Door left open. | Always make sure that the door is closed after opening.Check to see if a bottle is holding door open. | |
| Hot weather or frequent door openings. | This is normal. | |
| Temperature control set at the coldest setting. | Allow 24 hours for temperature to change. | |
| Compartment too warm | Normal when appliance is first plugged in. | Wait 24 hours for the appliance to completely cool down. |
| Often occurs when large amounts of wine or beverages are placed in the appliance. | This is normal. | |
| Temperature control not set cold enough. | See Temperature Control section. | |
| Warm weather or frequent door openings. | See Temperature Control section. | |
| Door left open. | Always make sure that the door is closed after opening.Check to see if a bottle is holding door open. | |
| Appliance has odor | Interior needs cleaning. | See Care and cleaning.Keep open box of baking soda in appliance; replace every 3 months. |
| Door not closing properly | Door gasket is sticking or folding over. | Apply petroleum jelly or paraffin wax to the face of the gasket. |
| The door is hitting an internal component inside the appliance. | Adjust internal components to prevent interference. | |
| Problem Possible Causes What To Do | ||
| Moisture forms on outside of appliance of high humidity. will evaporate in time. | Not unusual during periods | • If bothersome, wipe surface dry; otherwise, moisture |
| Door left open. | • Always make sure that the door is closed after opening.• Check to see if a bottle is holding door open. | |
| Frost or moisture collects inside door openings. | Too frequent or too long | • Appliance will dissipate moisture in time. |
| In humid weather, air carries • Appliance will dissipate moisture in time. | ||
| moisture into appliance when door is opened. | If bothersome, wipe surface dry. | |
| Temperature control set at coldest setting. | • See Temperature Control section. | |
| Interior light does not operate | Appliance is unplugged. | • Push the plug completely into the outlet. |
| The circuit breaker is tripped/the fuse is blown. | • Replace fuse or reset the breaker. | |
| Light bulb needs replacing. | • See Care and Cleaning section. | |
| GFI outlet is tripped. | • Reset outlet.• GFI outlet is not recommended. | |
| Hot air from bottom of appliance | Normal air flow cooling motor. | • In the refrigeration process, it is normal for heat to be expelled in the area under the appliance. Some floor coverings are sensitive and will discolor at these safe and normal temperatures. |
| Appliance never shuts off but temperatures are OK | Adaptive defrost keeps compressor running during door openings. | • This is normal. The appliance will cycle off after the door remains closed for two hours.• Normal operation in extreme temperatures. |
Instructions
Operating
Care and Cleaning Safety Instructions
Tips
Troubleshooting
Consumer Support
| Consumer Support | Troubleshooting Tips | Installation Instructions | Care and Cleaning | Safety Instructions | Operating |
Notes.
GE Service Protection Plus™
GE, a name recognized worldwide for quality and dependability, offers you Service Protection Plus™—comprehensive protection on all your appliances—No Matter What Brand!
Benefits Include:
- Backed by GE
- All brands covered
- Unlimited service calls
- All parts and labor costs included
- No out-of-pocket expenses
- No hidden deductibles
• One 800 number to call
We'll Cover Any Appliance. Anywhere. Anytime.\*
You will be completely satisfied with our service protection or you may request your money back on the remaining value of your contract. No questions asked. It's that simple.
Protect your refrigerator, dishwasher, washer and dryer, range, TV, VCR and much more—any brand! Plus there's no extra charge for emergency service and low monthly financing is available. Even icemaker coverage and food spoilage protection is offered. You can rest easy, knowing that all your valuable household products are protected against expensive repairs.
Place your confidence in GE and call us in the U.S. toll-free at 800.626.2224 for more information.
*All brands covered, up to 20 years old, in the continental U.S.

Cut here
Please place in envelope and mail to:
General Electric Company Warranty Registration Department P.O. Box 32150 Louisville, KY 40232-2150
Consumer Product Ownership Registration
Dear Customer:
Thank you for purchasing our product and thank you for placing your confidence in us.
We are proud to have you as a customer!
Follow these three steps to protect your new appliance investment:
1
Complete and mail
your Consumer
Product Ownership
Registration today.
Have the peace of mind of knowing we can contact you in the unlikely event of a safety modification.
2
After mailing the
registration below,
store this document
in a safe place. It contains
information you will need
should you require
service. Our service
number is 800.GE.CARES
(800.432.2737).
3
Read your Owner's
Manual carefully.
It will help you
operate your new
appliance properly.
Model Number Serial Number

natural_image
Two identical horizontal line segments with tick marks, no text or symbols presentImportant: If you did not get a registration card with your product, detach and return the form below to ensure that your product is registered, or register online at ge.com.

Cut here
Consumer Product Ownership Registration

Model Number Serial Number

natural_image
Two identical horizontal lines with tick marks, no text or symbols present





GE Consumer & Industrial
Appliances
General Electric Company
Louisville, KY 40225
ge.com
* Please provide your e-mail address to receive, via e-mail, discounts, special offers and other important communications from GE Appliances (GEA).
□ Check here if you do not want to receive communications from GEA's carefully selected partners.
FAILURE TO COMPLETE AND RETURN THIS CARD DOES NOT DIMINISH YOUR WARRANTY RIGHTS.
For information about GEA's privacy and data usage policy, go to ge.com and click on "Privacy Policy" or call 800.626.2224.
Beverage Center or Wine Chiller Warranty. (for customers in the U.S.)
All warranty service provided by our Factory Service Centers, or an authorized Customer Care® technician. To schedule service, on-line, 24 hours a day, visit us at ge.com, or call 800.GE.CARES (800.432.2737). Please have serial number and model number available when calling for service.
Staple your receipt here. Proof of the original purchase date is needed to obtain service under the warranty.
For The Period Of: GE Will Replace:
GE and GE PROFILE MODELS:
| One YearFrom the date of theoriginal purchase and related service to replace the defective part. | Any partof the beverage center or wine chiller which fails due to a defect in materials or workmanship. During thislimited one-year warranty, GE will also provide,free of charge, all labor |
GE PROFILE MODELS ONLY:
| Five Years Any part of the sealed refrigerating system (the compressor, condenser, evaporator (GE Profile models only) From the date of the original purchase | and all connecting tubing) which fails due to a defect in materials or workmanship. During this limited five-year sealed refrigerating system warranty, GE will also provide, free of charge, all labor and related service to replace the defective part in the sealed refrigerating system. |
What GE Will Not Cover:
■ Service trips to your home to teach you how to use the product.
■Improper installation, delivery or maintenance.
Failure of the product if it is abused, misused, or used for other than the intended purpose or used commercially.
Loss of wine due to spoilage.
■ Replacement of house fuses or resetting of circuit breakers.
■ Damage caused after delivery.
■ Replacement of the light bulbs, if included, or water filter cartridge, if included.
■ Damage to the product caused by accident, fire, floods or acts of God.
■Incidental or consequential damage caused by possible defects with this appliance.
■ Product not accessible to provide required service.
EXCLUSION OF IMPLIED WARRANTIES—Your sole and exclusive remedy is product repair as provided in this Limited Warranty. Any implied warranties, including the implied warranties of merchantability or fitness for a particular purpose, are limited to one year or the shortest period allowed by law.
This warranty is extended to the original purchaser and any succeeding owner for products purchased for home use within the USA. If the product is located in an area where service by a GE Authorized Servicer is not available, you may be responsible for a trip charge or you may be required to bring the product to an Authorized GE Service location for service. In Alaska, the warranty excludes the cost of shipping or service calls to your home.
Some states do not allow the exclusion or limitation of incidental or consequential damages. This warranty gives you specific legal rights, and you may also have other rights which vary from state to state. To know what your legal rights are, consult your local or state consumer affairs office or your state's Attorney General.
Warrantor: General Electric Company. Louisville, KY 40225
Beverage Center or Wine Chiller Warranty. (for customers in Canada)
All warranty service provided by our Factory Service Centers, or an authorized Customer Care® technician. To schedule service, on-line, 24 hours a day, visit us at geappliances.ca, or call 1.800.361.3400. Please have serial number and model number available when calling for service.
Staple your receipt here. Proof of the original purchase date is needed to obtain service under the warranty.
For The Period Of: Mabe Will Replace:
GE and GE PROFILE MODELS:
| One Year From the date of the original purchase all labor and related service to replace the defective part. | Any part of the beverage center or wine chiller which fails due to a defect in materials or workmanship. During this limited one-year warranty, Mabe will also provide, free of charge, |
GE PROFILE MODELS ONLY:
| Five Years Any part of the sealed refrigerating system (the compressor, condenser, evaporator (GE Profile models only) From the date of the original purchase | and all connecting tubing) which fails due to a defect in materials or workmanship. During this limited five-year sealed refrigerating system warranty, Mabe will also provide, free of charge, all labor and related service to replace the defective part in the sealed refrigerating system. |
What Mabe Will Not Cover:
■ Service trips to your home to teach you how to use the product.
■Improper installation, delivery or maintenance.
Failure of the product if it is abused, misused, or used for other than the intended purpose or used commercially.
Loss of wine due to spoilage.
■ Replacement of house fuses or resetting of circuit breakers.
■ Damage caused after delivery.
■ Replacement of the light bulbs, if included, or water filter cartridge, if included.
■ Damage to the product caused by accident, fire, floods or acts of God.
■Incidental or consequential damage caused by possible defects with this appliance.
■ Product not accessible to provide required service.
EXCLUSION OF IMPLIED WARRANTIES—Your sole and exclusive remedy is product repair as provided in this Limited Warranty. Any implied warranties, including the implied warranties of merchantability or fitness for a particular purpose, are limited to one year or the shortest period allowed by law.
This warranty is extended to the original purchaser and any succeeding owner for products purchased for home use within Canada. In-home warranty service will be provided in areas where it is available and deemed reasonable by Mabe to provide.
WARRANTOR IS NOT RESPONSIBLE FOR CONSEQUENTIAL DAMAGES.
Warrantor: MABE CANADA INC.
natural_image
Diagram of a refrigerator interior showing two horizontal shelves with upward arrows indicating direction (no text or symbols)natural_image
Line drawing of a refrigerator interior showing two compartments with one shelf open (no text or symbols)natural_image
Diagram of a refrigerator interior showing three shelves with one shelf highlighted by an arrow (no text or symbols)natural_image
Line drawing of a wooden abacus with five round bollages arranged in a row (no text or symbols)Please place in envelope and mail to:

For Canadian
Customers
CUT ALONG THIS LINE AND RETURN CARD—THANKS
| OWNERSHIP REGISTRATION CERTIFICATE - FICHE D'INSCRIPTION DU PROPRIÉTAIRE | |||||
| Please register your product to enable us to contact you in the remote event a safety notice is issued for this product and to allow for efficient communication under the terms of your warranty, should the need arise. | Veuillez enregistrer votre produit afin de nous permettre de communiquer avec vous si jamais un avis de sécurité concernant ce produit était émis et de communiquer facilement avec vous en vertu de votre garantie, si le besoin s'en fait sentir. | ||||
| REGISTER ON-LINE: www.geappliances.ca ENREGISTREMENT SUR INTERNET À: www.electromenagersge.ca | MAIL TO: P.O. BOX 1780, MISSISSAUGA POSTER À: ONTARIO, L4Y 4G1 | ||||
| ☐ MR./M ☐ MRS./MME.☐ MISS/MLLE. ☐ MS. | FIRST NAME/PRÉNOM | LAST NAME/NOM | |||
| STREET NO/N° RUE | STREET NAME/RUE | APT. NO / APP./RR# | |||
| CITY/VILLE | PROVINCE | POSTAL CODE/POSTAL | |||
| AREA CODE/IND. RÉG. | TELEPHONE | ||||
| DID YOU PURCHASE A SERVICE CONTRACT FOR THIS APPLIANCE? AVEZ-VOUS ACHETÉ UN CONTRAT DE SERVICE POUR CET APPAREIL? YES/OUI ☐ Y/A ☐ IF YES/SI OUI: EXPIRATION NO/NON ☐ D/J | |||||
| NAME OF SELLING DEALER/NOM DU MARCHAND | MODEL/MODÈLE | ||||
| INSTALLATION DATE/DATE D'INSTALLATION Y/A ☐ M ☐ D/J | CORRESPONDENCE ☐ ENGLISH CORRESPONDANCE ☐ FRANÇAIS | SERIAL/SÉRIE | |||
| ☐ I do not wish to receive any promotional offers regarding this product.☐ Je ne désire pas recevoir d'offres promotionnelles concernant ce produit. | |||||
Garant : General Electric Company. Louisville, KY 40225
natural_image
Diagram of a refrigerator interior with two upward arrows indicating measurement or support points (no text or symbols present)natural_image
Line drawing of a refrigerator interior showing three shelves (no text or symbols)natural_image
Line drawing of a three-tiered storage unit or shelf with a handle, no text or symbols presentnatural_image
Line drawing of a wooden abacus with five balls arranged in a row (no text or symbols)Luz interior e interruptor
General Manager, Customer Relations
GE Appliances, Appliance Park
Louisville, KY 40225
En Canadá: geappliances.ca, o escriba a: Director, Consumer Relations, Mabe Canada Inc.
Suite 310, 1 Factory Lane
Moncton, N.B. E1C 9M3
Registre su electrodoméstico
En EE. UU.: ge.com
Have a question or need assistance with your appliance? Try the GE Appliances Website 24 hours a day, any day of the year! For greater convenience and faster service, you can now download Owner's Manuals, order parts or even schedule service on-line. In Canada: geappliances.ca
Schedule Service In the U.S.: ge.com
Expert GE repair service is only one step away from your door. Get on-line and schedule your service at your convenience 24 hours any day of the year! Or call 800.GE.CARES (800.432.2737) during normal business hours. In Canada, call 1.800.361.3400
Real Life Design Studio In the U.S.: ge.com
GE supports the Universal Design concept—products, services and environments that can be used by people of all ages, sizes and capabilities. We recognize the need to design for a wide range of physical and mental abilities and impairments. For details of GE's Universal Design applications, including kitchen design ideas for people with disabilities, check out our Website today. For the hearing impaired, please call 800.TDD.GEAC (800.833.4322).
In Canada, contact: Manager, Consumer Relations, Mabe Canada Inc.
Suite 310, 1 Factory Lane
Moncton, N.B. E1C 9M3
Extended Warranties In the U.S.: ge.com
Purchase a GE extended warranty and learn about special discounts that are available while your warranty is still in effect. You can purchase it on-line anytime, or call 800.626.2224 during normal business hours. GE Consumer Home Services will still be there after your warranty expires. In Canada, call 1.888.261.2133
Parts and Accessories In the U.S.: ge.com
Individuals qualified to service their own appliances can have parts or accessories sent directly to their homes (VISA, MasterCard and Discover cards are accepted). Order on-line today, 24 hours every day or by phone at 800.626.2002 during normal business hours.
Instructions contained in this manual cover procedures to be performed by any user. Other servicing generally should be referred to qualified service personnel. Caution must be exercised, since improper servicing may cause unsafe operation.
Customers in Canada should consult the yellow pages for the nearest Mabe service center, or call 1.888.261.3055.

Contact Us In the U.S.: ge.com
If you are not satisfied with the service you receive from GE, contact us on our Website with all the details including your phone number, or write to: General Manager, Customer Relations
GE Appliances, Appliance Park
Louisville, KY 40225
In Canada: geappliances.ca, or write to: Director, Consumer Relations, Mabe Canada Inc.
Suite 310, 1 Factory Lane
Moncton, N.B. E1C 9M3
Register Your Appliance
In the U.S.: ge.com
Register your new appliance on-line—at your convenience! Timely product registration will allow for enhanced communication and prompt service under the terms of your warranty, should the need arise. You may also mail in the pre-printed registration card included in the packing material. In Canada: geappliances.ca

- Profile Beverage Center and Wine Chiller
- Operating Instructions
- Beverage Center
- Wine Chiller
- Beverage Center and Wine Chiller
- Installation Instructions ...8-12
- Troubleshooting Tips .....14, 15
- Consumer Support
- Refroidisseur
- IMPORTANT SAFETY INFORMATION.
- READ ALL INSTRUCTIONS BEFORE USING.
- ⚠ WARNING!
- ATTENTION CONSUMER!
- SAFETY PRECAUTIONS
- ▲ DANGER! RISK OF CHILD ENTRAPMENT
- PROPER DISPOSAL OF THE BEVERAGE CENTER OR WINE CHILLER
- Before You Throw Away Your Old Refrigeration Product:
- Refrigerants
- DO NOT USE AN EXTENSION CORD WITH THIS APPLIANCE.
- HOW TO CONNECT ELECTRICITY
- Controls and features—Beverage Center.
- Temperature Control
- NOTES:
- Glass Shelves
- Loading Tips and Suggestions
- Controls and features—Wine Chiller. ge.com
- Suggested storing and serving temperatures for wine
- Inserting Wine Bottles
- Controls and features—Beverage Center and Wine Chiller.
- Removing Full Extension Drawers
- To remove:
- To replace:
- Wood Drawer Fronts
- Interior Light and Switch
- Cleaning the Outside
- Cleaning the Inside
- Drain Hole
- Light Bulb Replacement
- In the Event of a Power Failure
- Installation Instructions
- BEFORE YOU BEGIN
- WARNINGS:
- PRODUCT CLEARANCES
- When installed in a corner:
- Choose the location:
- THE INSTALLATION SPACE
- The cutout depth should be 24"
- Additional Specifications
- SIDE-BY-SIDE INSTALLATIONS
- TOOLS REQUIRED
- PARTS SUPPLIED
- GROUNDING THE BEVERAGE CENTER AND WINE CHILLER
- IMPORTANT— Please read carefully.
- STAINING WOOD DRAWER FRONTS
- REMOVE PACKAGING
- REVERSE DOOR SWING
- SKIP THIS STEP IF DOOR SWING SUITS THE INSTALLATION
- Parts Included:
- Tools Required:
- To remove the door:
- To reinstall the door:
- Install Toekick
- LEVEL
- CONNECT POWER
- SLIDE PRODUCT INTO THE CUTOUT
- SET TEMPERATURE CONTROLS
- Do you hear what I hear? These sounds are normal.
- HUMMM... WHOOSH...
- WHIR!
- CLICKS, POPS, CRACKS and CHIRPS
- WATER SOUNDS
- Before you call for service...
- GE Service Protection Plus™
- Benefits Include:
- We'll Cover Any Appliance. Anywhere. Anytime.\*
- Consumer Product Ownership Registration
- Follow these three steps to protect your new appliance investment:
- 1
- 2
- 3
- Model Number Serial Number
- Important: If you did not get a registration card with your product, detach and return the form below to ensure that your product is registered, or register online at ge.com.
- Beverage Center or Wine Chiller Warranty. (for customers in the U.S.)
- For The Period Of: GE Will Replace:
- What GE Will Not Cover:
- Beverage Center or Wine Chiller Warranty. (for customers in Canada)
- For The Period Of: Mabe Will Replace:
- What Mabe Will Not Cover:
- Luz interior e interruptor
- Registre su electrodoméstico
- Schedule Service In the U.S.: ge.com
- Real Life Design Studio In the U.S.: ge.com
- Extended Warranties In the U.S.: ge.com
- Parts and Accessories In the U.S.: ge.com
- Contact Us In the U.S.: ge.com
- Register Your Appliance
Brand : GE
Model : Profile PCR06WATSS
Category : Wine cellar