5300 - Thermostat Cepra - Free user manual and instructions
Find the device manual for free 5300 Cepra in PDF.

Frequently Asked Questions - 5300 Cepra
User questions about 5300 Cepra
0 question about this device. Answer the ones you know or ask your own.
Ask a new question about this device
Download the instructions for your Thermostat in PDF format for free! Find your manual 5300 - Cepra and take your electronic device back in hand. On this page are published all the documents necessary for the use of your device. 5300 by Cepra.
USER MANUAL 5300 Cepra
natural_image
White digital water meter with a digital display showing 0.46 and 21, no visible text or symbols on the device body.CEPRA
Instructions manual 30
Manual 5300.qxd 18/06/04 11:28 Página 2

natural_image
Pure geometric lines and crosshair markers without any text, numbers, or symbolsCEPRA


CEPRA
MANUEL D'INSTRUCTIONS
IMPORTANT
Congratulations. You have chosen a crono-thermostat that thanks to its simplicity, will allow you, by properly adjusting its functions, to make the most of its installation possibilities.
ADJUSTING THE CURRENT DAY AND HOUR
- Press the SET key to go to the main screen.
• Press the flashing. DIA Y HORA key. The day of the week starts - With the keys - + adjust the day.
• Press DIA Y HORA. The hour starts flashing. - With the keys - + adjust the hour.
• Press DIA Y HORA. The minutes start flashing. - With the - + keys adjust the minutes.
- Press the SET key to finish the programming and go back to the main screen.
PROGRAMMING
In the crano-thermostat CEPRA 5300 you can establish a daily programming (every day of the week have the same daily program) or a weekly program (different programs for each day of the week).
By default, the crono-thermostat has the following daily programming:
| Slot | Start time | Consignment temperature |
| P1 | 7:00 | 20°C |
| P2 | 9:00 | 17°C |
| P3 | 12:30 | 20°C |
| P4 | 15:00 | 19°C |
| P5 | 17:30 | 22°C |
| P6 | 23:00 | 17°C |
For the CEPR A 5300 to adopt the established program, it is necessary that the time program is increasingly ordered, being the minimum time for the first period P1, 00:00 and the maximum time for the last period P6, 23:50.
The start time of each slot and the consignment temperature can be modified in the following way. Daily programming
(The same programming from Monday to Sunday)
- Press the SET key to go to the main screen.
- Press the SET key and keep pressing it, then
press PROG LU-DOM to go to the programming.
3:0

CEPRA
In the upper part of the screen, the days of the week start flashing.
- With the MAR MIE keys, select the group of days : LUN JUE VIE SAB DOM.
- Press the PROG LU-DOM key to confirm the programming block.
1) Then the hour of the first slot P1 starts flashing.
- With the help of the keys set the start hour of the first slot. The time can be set in steps of 10 minutes.
- Press the PROG LU-DOM key.
2) The consignment temperature of the first slot starts flashing.
- With the help of the keys set the desired temperature. The temperature can be set in steps of 1 degree.
- Press the PROG LU-DOM key to confirm the programming and going to the next slot. Repeat the steps 1 and 2 until you have programmed the 6 slots.
Finish the programming by pressing the SET key.
If you want to modify the programming for any day, do the following:
Weekly Programming
- Press the SET key to go to the main screen.
- Press the SET key and keep pressing it, then
press the PROG LU-DOM to go to the programming.
In the upper part of the screen, the days of the week start flashing.
- With the keys, select the day you want to modify: LUN ... DOM. The programming will automatically become weekly, and the modified day is adopted within the programming.
- Press the PROG LU-DOM to confirm the day.
1) Then the hour of the first slot P1 starts flashing.
- With the help of the keys set the start hour of the first slot. The time can be set in steps of 10 minutes.
- Press the PROG LU-DOM key.
2) The consignment temperature of the first slot starts flashing.
- With the help of the keys set the desired temperature. The temperature can be set in steps of 1 degree.
- Press the PROG LU-DOM key to confirm the programming
Chronothermostat 5300
and going to the next slot. Repeat the steps 1 and 2 until you have programmed the 6 slots.
Finish the programming by pressing the SET key. Repeat this process if you want to modify the programming of any other day.
DISPLAYING THE SET PROGRAMMING
- Press the SET key to go to the main screen.
- Press the PROG LU-DOM key.
— If you use a daily programming:
- In the upper part of the screen, the seven days of the week LUN MAR MIE JUE VIE SAB DOM are displayed, and in the lower part the screen displays the start time and temperature of the first slot P1.
- By pressing the PROG LU-DOM key several times, the screen will display the start time and consignment temperature of every one of the following slots: P2, P3, P4, P5 and P6.
— If you use a weekly programming:
Programming the current day:
- In the upper part of the screen it displays the current day indicator and in the lower part it displays the start time and the temperature of the first slot P1 of that day.
- By pressing the LU-DOM several times, the screen will display the start time and consignment temperature
of every one of the following slots: P2, P3, P4, P5 and P6.
Programming any other day of the week different from the current day:
- With the help of the keys select the day of the week you want to check LUN ... DOM. In the lower part of the screen the start time and consignment temperature for the first slot P1 are displayed.
- By pressing the PROG LU-DOM key several times, the screen will display the start time and consignment temperature of every one of the following slots: P2, P3, P4, P5 and P6.
- If you want to check the programming for any other day, repeat the steps above.
- To go back to the main screen, press the SET key. HOW TO MANUALLY CHANGE THE CONSIGNMENT TEMPERATURE
The manual variation of the consignment temperature may be done in four different ways:
- Until the next slot.
- During a certain number of hours (selectable from 1 to 9 hours).
- During a certain number of days (selectable from 1 to 99 days).
- Permanently.
CEPRA
HOW TO CHANGE THE CONSIGNMENT TEMPERATURE UNTIL THE NEXT SLOT
- Press the SET key to go to the main screen.
- Press the +7 key to increase the consignment value.
- Press the value. - key to decrease the consignment
NOTE: To cancel the temperature manual variation and then go back to the temperature adjusted by the program, press the SET key.
When a manual variation is done in the consignment temperature until the next slot, in the screen, alternatively, the time remaining until the next slot is displayed, and together with the consignment temperature indication, it displays the word MANUAL.
HOW TO CHANGE THE CONSIGNMENT TEMPERATURE DURING A CERTAIN NUMBER OF HOURS
- Press the SET key to go to the main screen.
- Press the ↓ key to increase the consignment value.
- Press the value. = key to decrease the consignment
- Press the DIA Y HORA key to enter the number of hours. - With the (from 1 keys select the number of hours to 9 hours) during which you want to modify the programming.
NOTE: To cancel the temperature manual variation and
then go back to the temperature adjusted by the program, press the SET key.
When you make a manual variation of the consignment temperature during a certain number of hours, the screen alternatively displays the time remaining until the next slot together with a consignment temperature indicator, and the word COMFORT.
Once in the slot you want to modify, by pressing the keys you can modify the temperature again as you want.
HOW TO CHANGE THE CONSIGNMENT TEMPERATURE DURING A CERTAIN NUMBER OF DAYS.
- Press the SET key to go to the main screen.
- Press the FUAR key.
- With the keys adjust the desired temperature.
- Press the FIJAR key during and keep pressing it during 3 seconds to enter the number of days in the programming.. The screen displays the letter "d" and the number of days is flashing.
- With the (from 1 keys select the number of days to 99 days) during which you want to modify the programming.
NOTE: To cancel the temperature manual variation and then go back to the temperature adjusted by the program, press the SET key.


Chronothermostat 5300
When you make a manual variation of the consignment temperature during a certain number of days, the screen alternatively displays the time remaining until the next slot together with a consignment temperature indicator, and the word FIJAR.
HOW TO CHANGE THE CONSIGNMENT TEMPERATURE PERMANENTLY
- Press the SET key to go to the main screen.
- Press the key to increase the consignment value.
- Press the value. - key to decrease the consignment
- Pres the FNAR key to keep the temperature permanently.
NOTE: If you want to cancel the temperature manual variation and go back to the temperature adjusted in the program, press the SET key.
When you make a manual permanent variation of the consignment temperature, the screen displays the word FUAR besides the consignment temperature indicator.
OPERATING TIME
The crono-thermostat includes different historical reports with the operating times:
- Operating time during the current day.
- Operating time during the day before.
- Operating time during the current week.
- Operating time during the week before.
- Total operating time.
To display the operating times:
- Press the SET key to go to the main screen.
- When you press for the first time the screen displays the operating time the current day. TIEMPO key, the FUNC. during
- When you press for the second time the screen displays the operating time during the day before.
- When you press for the third time the TIEMPO key, the screen displays the operating time during the week in which you make the query. The indicator SUN starts flashing.
- When you press for the fourth time the TIEMPO key, the screen displays the operating time during the week before you make the query. The indicator with the days of the week stays fixed.

CEPRA
- When the TIEMPO FUNC. key is pressed for the fifth time, the operating hours of the previous week plus the current week are displayed on the screen. All of the days of week will be blinking.
IMPORTANT: If you keep pressing the TIEMPO FUNC key during more than three seconds, the counters reset to zero. HOW TO DELETE THE PROGRAMMING By pressing the BORRAR key you will delete all the adjustments entered in the crano-thermostat. When this happens, the crano-thermostat makes a check-up of all the segments of the screen, it recovers the default standard program and the clock displays the 00:00 hours of the Sunday. The screen remains flashing until you press any key.
HOW TO ADJUST THE COMMUTATION DIFFERENTIAL - Press the SET key to go to the main screen.
- Pres the TEMP INTERV key to display the upper limit of the commutation HI.
- Press the TEMP INTERV key again to display the lower limit of the commutation LO.
To modify the adjusted value: - Press the SET key. Keep pressing it and press the TEMP INTERV key. The screen displays HI and its current value is flashing.
- With the upper keys select the new value for the limit HI. (See the equivalency table).
- Press the TEMPER LO y su key again. En la pantalla aparece valor actual parpadeando.
- By using the lower limit keys select the new value for the LO. (See the equivalency table).
- To finish with the adjustment, press the SET key. In the following table you will find the equivalency between the adjusted values HI and LO and the corresponding temperatures.
| Upper limit | Value | Equivalence | Lower limit | Value | Equivalence |
| Hi 0 | 0 | 0 | Lo 0 | 0 | 0 |
| Hi 1 | +1 | +0,5 | Lo 1 | -1 | -0,5 |
| Hi 2 | +2 | +1,0 | Lo 2 | -2 | -1,0 |
| Hi 3 | +3 | +1,5 | Lo 3 | -3 | -1,5 |
| Hi 4 | +4 | +2,0 | Lo 4 | -4 | -2,0 |
| Hi 5 | +5 | +2,5 | Lo 5 | -5 | -2,5 |
| Hi 6 | +6 | +3,0 | Lo 6 | -6 | -3,0 |
| Hi 7 | +7 | +3,5 | Lo 7 | -7 | -3,5 |
| Hi 8 | +8 | +4,0 | Lo 8 | -8 | -4,0 |
| Hi 9 | +9 | +4,5 | Lo 9 | -9 | -4,5 |
NOTE: The minimum commutation differential is 0.5K.
Chronothermostat 5300
INSTALLATION
Warnings:
The crono-thermostat must be installed by skilled personnel according to the valid law. You must look for a place with a representative temperature in the room you want to control, far from heat sources, air flows or the direct influence of the solar radiation or heating systems. Before making any connection, make sure that you have switched the central power supply off.
Assembly:
- Open the front cover to get to the inside part of the crono-thermostat.
• In the lower part, there is another cover for the battery holder. - Open that cover, pressing on the symbol € and sliding it to the right.
- Remove the batteries if you have already installed them.
- Unscrew the screw
- Remove the cover by pulling outwards. This way you will get to the connection terminals and to the holes for the assembly.
• Fix the frame to the wall or to the machinery case with the screws and slabs supplied.
• Fix the base of the crono-thermostat to the frame with the screw.
- Make the electrical connection depending on the appliance. Make sure that the cables are the proper ones.
- Put the front cover of the crono-thermostat. Put the screws again and place the batteries in their correct position.
- Put the cover for the battery holder and switch the central power supply on.
When you connect the crono-thermostat it makes an auto-check-up of the segments of the screen and then the screen starts flashing. by pressing any key the screen will be stabilized and you can proceed programming according to the instructions given below.
MAIN APPLICATIONS
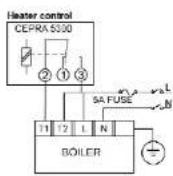
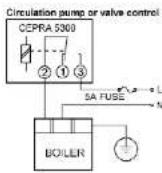
CEPRA
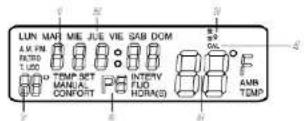
DATA DISPLAYED IN THE SCREEN
-
Current time indication (operating time).
-
Day of the week indication.
-
Heating connected indication symbol.
-
Operating mode indication.
-
Room temperature indication (indicating the need to change the battery when the "Ia" symbol is flexion)
change the battery when the symbol is flushing; 6. Active programme indication (this reading alternates
with that of the comfort schedule every 30 seconds!
- Assigned temperature indication
TECHNICAL DATA
Adjustment of Set temperature: 7 to 35 °C, with intervals
of TK.
Operating temperature: 0 to 45°C.
Storing temperature: -10 to 50°C.
Temperature sensor: internal NTC
Supply: 2 alkaline batteries LR6, 'AA', 1.5 V.
Differential: Adjustable, minimum 0.5 K.
Contact: change-over.
Switching current: 8 (3,5) A to 250 V AC.
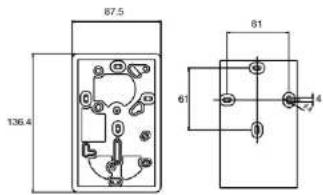
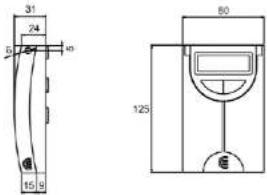
DIMENSIONS

Manual 5300.gxd 18/06/04 11:29 Página 38

natural_image
Pure geometric lines and crosshair markers without any text, numbers, or symbolsManual 5300.qxd 18/06/04 11:29 Página 39