174250 - Slicer BARTSCHER - Free user manual and instructions
Find the device manual for free 174250 BARTSCHER in PDF.

| Product type | Electric slicer with inclined blade |
| Brand | Bartscher |
| Model | MSD-250 (Code 174250) |
| Dimensions (W x D x H) | 430 x 510 x 375 mm |
| Net weight | 15.2 kg |
| Power supply | 230 V ~ 50 Hz, 240 W |
| Blade diameter | 250 mm |
| Blade rotation speed | 282 rpm |
| Cutting length | 210 mm |
| Cutting height | 170 mm |
| Slice thickness | 1 to 12 mm (continuously adjustable) |
| Housing material | Aluminum |
| Supplied accessories | 1 cleaning brush |
| Cutting options | Cold cuts, boneless meats, hard cheeses, vegetables, bread |
| Prohibited uses | Frozen meat, bones, fish bones, non-food products |
| Safety devices | Switch with emergency stop, blade guard, sharpener as top protection, carriage locking system, pusher guard |
| Connection | Single-phase socket with grounding, minimum 16A |
| Cleaning | Disassemble carriage, blade, blade guard and sharpener for cleaning with hot water and neutral detergent |
| Maintenance | Regular lubrication of the carriage shaft with natural lubricant |
| Repairability | Original spare parts, maintenance by qualified professional |
| Operating ambient temperature | +5 °C to +32 °C |
| Ambient humidity | Below 70% |
| Warranty | CE conformity, manufacturer's warranty according to terms |
Frequently Asked Questions - 174250 BARTSCHER
User questions about 174250 BARTSCHER
0 question about this device. Answer the ones you know or ask your own.
Ask a new question about this device
Download the instructions for your Slicer in PDF format for free! Find your manual 174250 - BARTSCHER and take your electronic device back in hand. On this page are published all the documents necessary for the use of your device. 174250 by BARTSCHER.
USER MANUAL 174250 BARTSCHER
natural_image
Exterior view of a Bertscher S�edewater slicing machine (no text or symbols visible on the device itself)174195 174220 174250 174275 174300
natural_image
Circular mechanical component with central hole and flange (no text or symbols)Brot-Messer, Wellenschliff
| Passendzu Model: | MSD-195 | MSD-220 | MSD-250 | MSD-275 | MSD-300 | |
| Durchmesser: | 195 mm | 220 mm | 250 mm | 275 mm | 300 mm | |
| Gewicht: | 0,64 kg | 0,67 kg | 1,17 kg | 1,47 kg | ||
| Art.-No: | 01741952 | 01742202 | 01742502 | 01742752 | 01743002 | |

natural_image
Circular mechanical component with central hole and four holes, no visible text or symbolstext_image
Technical diagram of a lathe machine with numbered components for identificationAbb. 3
natural_image
Line drawing of a person operating a machine with a tool (no text or symbols)Richtige Position
natural_image
Illustration of a person operating a machine with a crossed-out diagonal line (no text or symbols)Falsche Position
Abb. 5

natural_image
Technical line drawing of a mechanical component with labeled part 'd' (no text or symbols beyond label)Abb. 9
natural_image
Technical line drawing of a mechanical device with labeled component 11 (no text or symbols beyond label)Abb. 12
Messerschärfer
natural_image
Technical line drawing of a mechanical device with gears and levers (no text or symbols)Abb. 14
of the original instruction manual
Read these instructions before using and keep them available at all times!
1. General information 22
1.1 Information about the instruction manual 22
1.2 Key to symbols 22
1.3 Liability and Warrantees 23
1.4 Copyright protection 23
1.5 Declaration of conformity.... 23
2.Safety 24
2.1 General information.... 24
2.2 Safety instructions for use of the device 24
2.3 Intended use 25
3. Transport, packaging and storage.... 26
3.1 Delivery check 26
3.2 Packaging 26
3.3 Storage.... 26
4. Technical data 27
4.1 Overview of parts 27
4.2 Technical specification 28
5. Installation and operation.... 30
5.1 Safety instructions....30
5.2 Installation and connection.... 31
5.3 Operation 32
6. Cleaning and maintenance.... 36
6.1 Safety advice 36
6.2 Cleaning 36
6.3 Safety instructions for maintenance 39
7. Possible Malfunctions .... 39
8. Waste disposal 40
Bartscher GmbH
1.1 Information about the instruction manual
This instruction manual contains information about the installation, operation and maintenance of the device and should be consulted as an important source of information and reference guide.
Awareness of the safety instructions and instructions for use in this manual will ensure the safe and correct use of the device.
In addition to the information given here, you should comply with any local Health and safety Controls and generally applicable safety regulations.
The instruction manual forms part of the product and should be kept near the device and easily accessible for anyone carrying out the installation, servicing, maintenance or cleaning.
1.2 Key to symbols
In this manual, symbols are used to highlight important safety instructions and any advice relating to the device. The instructions should be followed very carefully to avoid any risk of accident, personal injury or material damage.

WARNING!
This symbol highlights hazards, which could lead to injury. Please follow the instructions very carefully and proceed with particular attention in these cases.

WARNING! Electrical hazard!
This symbol draws attention to potential electrical hazards. If you do not follow the safety instructions, you may risk injury or death.

CAUTION!
This symbol highlights instructions, which should be followed to avoid any risk of damage, malfunctioning and/or breakdown of the device.

NOTE!
This symbol highlights tips and information, which have to be followed for an efficient and trouble-free operation of the device.
1.3 Liability and Warrantees
All the information and instructions in this manual take into account standard safety regulations, current levels of technical engineering as well as the expertise and experience we have developed over the years.
The instruction manual was translated with all due care and attention. However, we do not accept liability for any translation errors. The German version of this instruction manual is definitive.
If the delivery consists of a special model, the actual scope of delivery may differ from the descriptions and illustrations in this manual. This is also the case for special orders or when the device has been modified in line with new technology.

NOTE!
Read this manual carefully and thoroughly before any operation of the device, and especially before turning it on!
Manufacturer is not liable for any damages or faults caused by:
- violation of advice concerning operation and cleaning;
- use other than designed;
- alterations made by user;
- use of inadequate spare parts.
We reserve the right to make technical changes for purposes of developing and improving the useful properties.
1.4 Copyright protection
The instruction manual including any texts, drawings, images or other illustrations is copyright. No part of this publication may be reproduced, transmitted or used in any form or by any means without permission in writing from the manufacturer. Any person who commits any unauthorized act in relation to this publication shall be liable to claims for damages. All rights reserved.

NOTE!
The contents, texts, drawings, pictures and any other illustrations are copyright and subject to other protection rights. Any person unlawfully using this publication is liable to criminal prosecution.
1.5 Declaration of conformity

The device complies with the current standards and directives of the EU. We certify this in the EC declaration of conformity. If required we will be glad to send you the according declaration of conformity.
2.Safety
This section provides an overview of all important safety aspects.
In addition every chapter provides precise safety advice for the prevention of dangers which are highlighted by the use of the above mentioned symbols.
Furthermore, attention should be paid to all pictograms, markers and labels on the device, which must be kept in a permanent state of legibility.
By following all the important safety advice you gain an optimal protection against all hazards as well as the assurance of a safe and trouble-free operation.
2.1 General information
This device is designed in accordance with the presently applicable technological standards. However, the device can pose a danger if handled improperly and inappropriately.
Knowing the contents of the instruction manual as well as avoiding mistakes and thus operating this device safely and in a fault-free manner is very essential to protect yourselves from the hazards.
To prevent hazards and to ensure optimum efficiency, no modifications or alterations to the device that are not explicitly approved by the manufacturer may be undertaken.
This device may only be operated in technically proper and safe condition.
2.2 Safety instructions for use of the device
The specifications regarding the industrial safety are based on the Regulations of the European Union applicable at the time of manufacturing the device.
If the device is used commercially, the user is obliged to ensure that the said industrial safety measures concur with the state of the rules and regulations applicable at the time in question for the entire period of use of the device and to comply with the new specifications.
Outside the European Union, the industrial safety laws applicable at the place of installation of the device and the regional territorial provisions must be complied with.
Besides the industrial safety instructions in the instruction manual, the general safety and accident prevention regulations as well as environment protection regulations applicable for area of application of the device must be followed and complied with.
! CAUTION!
The device is not intended for use by individuals (including children) with physical or mental disabilities, insufficient experience, and/or insufficient knowledge unless such persons are under the care of a person responsible for their safety or have received instructions regarding appropriate use of the device.
○ Children should be observed to ensure that they are not playing with the device.
- Please keep these instructions and give them to future owners of the device.
- All people using the device should follow the instructions and tips contained in these instructions.
○ Only use the device indoors.
2.3 Intended use
Safe operation is only guaranteed when using the device for its intended purpose.
Any technical interventions, as well as assembly and maintenance are to be made by a qualified customer service only.
The slicer has been designed to cut the following types of food only:
- sausages (cooked, raw, smoked);
- boned meat (raw or cooked);
- chilled cheese (only kinds meant to be cut);
- vegetables (all kinds);
- bread.
You must not cut the following with the slicer:
- frozen meat;
- meat and fish with bones;
- products which are not food.

CAUTION!
Any use going beyond the intended purpose and/or any different use of the device is forbidden and is not considered as conventional.
Any claims against the manufacturer or his authorized representative as a consequence of experiencing damages resulting from unconventional use are impossible.
The operator is liable for all damages resulting from inappropriate use.
3. Transport, packaging and storage
3.1 Delivery check
Please check the delivery upon completeness and transport damage immediately after receipt. In case of visible damage do not accept or accept the delivery with reservation only.
Note the extent of damage on the carrier's bill of delivery. Trigger off the complaint. Hidden damages should be reclaimed immediately after notice, as claims for damages can only be asserted within the effective period for complaints.
3.2 Packaging
Please do not throw away the covering carton of your device as it might be useful for storage purposes, when moving or, in case of damages, when the device must be sent back to a repair center. The outer and inner packing material should be removed completely from the device before installation.

NOTE!
If you liked to dispose the packing, consider the regulations applicable in your country. Supply re-usable packing materials to the recycling.
Please inspect the device upon completeness. In case any part is missing please contact our customer service center immediately.
3.3 Storage
Keep the package closed until installation and under consideration of the outside indicated positioning- and storage markings.
Packages should be stored under consideration of the following:
- Do not store outdoors.
- Keep it dry and dust-free.
- Do not expose it to aggressive media.
- Do not expose it to direct sunlight.
- Avoid mechanical shocks and vibration.
- In case of longer storage (> 3 months) make sure you check the state of the packaging and the parts regularly. If required refresh or renew.
4. Technical data
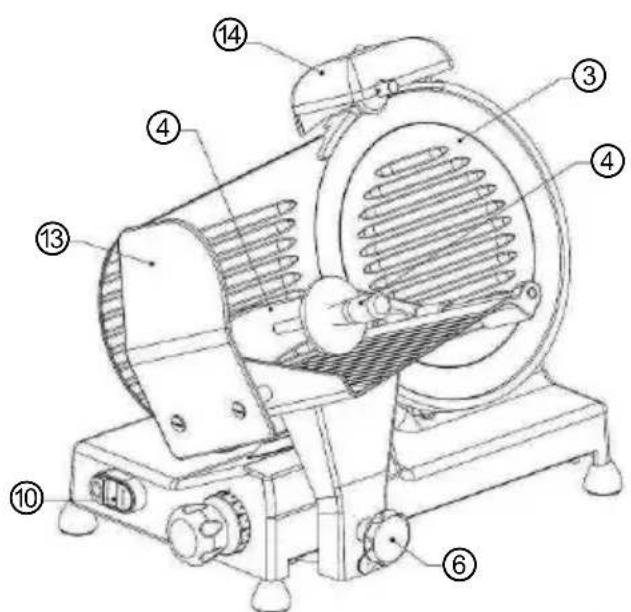
4.1 Overview of parts

text_image
1 2 3 4 5 6 7 8 9 10 11 12 13 14 Deutscher Fig. 1Fig. 1
① Knife
② Knife protective ring
③ Knife cover
④ Pusher handle
⑤ Food carriage tray
⑥ Carriage adjustment
⑦ Food carriage
⑧ Slice thickness adjustment
⑨ Adjustable feet
⑩ ON-/OFF button
⑪ Slice tray
⑫ Cut thickness movable wall
⑬ Pusher cover
⑭ Sharpener
⑮ Cleaning brush
ON-/OFF button

text_image
Black STOP button White START button Fig.Fig. 2
4.2 Technical specification
| Description | Electric slicers | ||||
| Code-no.: | 174195 | 174220 174 | 250 17427 | 5 174300 | |
| Model: | MSD-195 | MSD-220 M | SD-250 MSD | -275 MSD- | 300 |
| Finish Gravity slicer | |||||
| Material body: aluminium | |||||
| Power: 150 W 240 W | 240 W 240 | W 380 W | |||
| Voltage: 50 Hz 230 V | |||||
| Knife diameter, ∅: 195 mm 220 mm | 250 mm 275 mm 300 mm | ||||
| Knife revolution: | 430 min ^-1 | 282 min ^-1 | 282 min ^-1 | 282 min ^-1 | 280 min ^-1 |
| Cut length (mm): | 155 | 205 | 210 | 210 | 255 |
| Cut height (mm): | 150 | 155 | 170 | 185 | 200 |
| Slice thickness (mm) | 1–12 | 1–12 | 1–12 | 1–12 | 1–15 |
| Dimensions (mm): | W 360D 420H 330 | W 410D 475H 360 | W 430D 510H 375 | W 410D 540H 390 | W 480D 595H 450 |
| Weight: | 11.4 kg | 14.4 kg | 15.2 kg | 16.0 kg | 20.6 kg |
| Equipment: | 1 cleaning brush | ||||
We reserve the right to make technical changes!
Additional accessories (not included in the delivery!)

natural_image
Circular metallic disc with central hole and flange (no text or symbols)Bread knife, with serrated blade
| For models: | MSD-195 | MSD-220 | MSD-250 | MSD-275 | MSD-300 | |
| Diameter: 195 | mm 220 mm | 250 mm | 275 mm | 300 mm | ||
| Weight: | 0.64 kg | 0.67 kg | 1.17 kg | 1.47 kg | 2.13 kg | |
| Code-no.: | 01741952 | 01742202 | 01742502 | 01742752 | 01743002 | |

natural_image
Circular mechanical component with central hole and four holes (no text or symbols visible)Knife, non-stick coated,
perfect for cutting cheese
| For models: | MSD-195 M | MSD-220 MSD- | 250 MSD-275 | MSD-300 | |
| Diameter: 195 mm | 220 mm | 250 mm 275 mm | 300 mm | ||
| Weight: | 0.64 kg | 0.67 kg | 1.17 kg | 1.47 kg | 2.13 kg |
| Code-no.: | 01741950 01 | 742200 01742 | 2500 01742750 | 01743000 |
5. Installation and operation
5.1 Safety instructions
- Never allow the power cable to come into contact with heat sources or sharp edges. The power cable should not hang over the side of the working surface. Ensure that no one can step on or trip over the cable.
- The power cable must not be folded, bent or tangled, and must always remain fully unrolled.
- Never place the device or other objects on the power cable.
- Do not lay the cable over carpets or heat insulations. Do not cover the cable. Keep away the cable from operating range and do not dunk it into water.
- Do not use the device in case it does not function properly, has been damaged or dropped.
- Do not use any accessory or spare parts that have not been recommended by the manufacturer. These can be dangerous for the user or lead to damages of the device or personal injury, and further, the warranty expires.
- Do not move or tilt the device when in operation.
• Never leave the device unattended when in use.
Protective elements
text_image
Technical diagram of a lathe machine with numbered parts for identificationFig. 3
⑭ Sharpener as the upper knife cover;
③ Knife cover;
④ Pusher handle;
⑥ Carriage locking device
(models 174220, 175250, 174275, 174300 – carriage adjustment, model 174195 – special bolt);
⑩ ON-/OFF button (in case of power supply interruption the slicer may be restarted only by pressing the white START button again);
⑬ Pusher cover.
5.2 Installation and connection
- Discard the complete packing material after unpacking the device. - Place the device on top of an even and safe surface which supports the weight of the device and make sure it cannot tilt at any time.
- Place the device at height of approx. 80 cm.
- Not at any time should you place the device on an inflammable surface.
- Put the device in a room with maximum 70% moisture level, where the temperature ranges from +5 °C do +32 °C.
- Leave space around the device and keep away from other devices and equipment in order to ensure the correct operations of the slicer.
- Put the slicer in such a way that the person operating it could stand straight and stable in front of the device. The operator has to constantly be able to see the slice adjustment and the off button.
• Always keep the workplace clean and tidy.

WARNING! Hazard via electrical current!
The device can cause injuries due to improper installation!
Before installation the local power grid specification should be compared with that of the device (see type label). Connect the device only in case of compliance!
The device must only be connected to a properly installed single socket with protective contact.
Never remove the power cable by pulling the cable itself; always grab the plug housing.
- The electrical circuit of the socket must be secured to at least 16A. Only connect the device to a wall outlet; do not use any extension cords or power strips.
- Place the device so that the plug is easily accessible so as to quickly disconnect the device if the need arises.
5.3 Operation

CAUTION!
The device can only be used by a qualified operator who is aware of safety issues mentioned in this manual.
Before use
- Clean the device before use (see chapter 6.2 „Cleaning“).
- Before start check the following aspects (fig. 4):

text_image
Fig. 4- connection of the device to the grounded, single socket;
- adjustment of the carriage with use of carriage adjustment;
- carriage motion (7), no obstacles for its motion and no objects on its tray (5);
- lifting and lowering of the pusher handle (4) without any obstacles;
- hole of the cut thickness movable wall (12) with the slice thickness adjustment (8), rotating it clockwise and counterclockwise;
- correct fixing of the sharpener (14) and possibility of removing it without any problems.
Device operation (figs. 4, 5)
- Connect the device to the grounded, single socket.
- Turn the device on by pressing the START button (10). Leave the device on for 2-3 minutes in order to make sure it operates correctly. Turn the device off by pressing the STOP button (10).
- Set the slice thickness adjustment (8) in position „0“.
- Lift the pusher handle (4) and put the sliced product on the food carriage tray (5) so that it will be between the movable slice thickness wall (12) and the pusher handle (4).

WARNING! Possible cuts danger!
In order to avoid accidents, always use the pusher handle (4) to push the sliced product to the cut thickness movable wall (12)!
- Adjust slice thickness: turn the slice thickness adjustment (8) counterclockwise until it reaches the desired position.
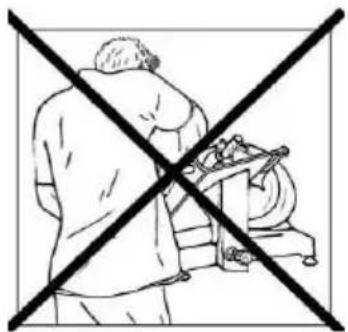
- In order to avoid an accident assume correct stance at the slicer (fig. 5). Put right hand on the pusher handle, left next to the slice tray (11) so as not to touch the knife; the body is to be vertical in reference to the workplace.

natural_image
Line drawing of a person operating a lathe machine (no text or symbols present)Correct stance

natural_image
Line drawing of a person operating a machine with a crossed-out diagonal line (no text or symbols)Incorrect stance
Fig. 5

WARNING! Possible cuts danger!
Never assume a position when hands, fingers or other parts of the body might come into contact with the knife!
- Turn the device on by pressing the START button (10).
- Slowly and uniformly move the carriage (7) towards the knife (1), using the pusher handle (4).
- The best slicing results are obtained when the pusher handle (4) is slightly pushed towards the cut thickness movable wall (12).
- The sliced product comes into contact with the knife (1); the slice falls on a tray (11) positioned behind the movable slice thickness wall (12).
- Do not remove the pusher handle (4) unless the sliced food is of unusual size or shape.
- After cutting the carriage (7) is to be put into initial position and the slice thickness adjustment (8) should be set to „0“ position.
- Turn the device off by pressing the STOP button (10). Do not allow the device to run idle.
• The slices can be now taken.

WARNING! Possible cuts danger!
Never operate the device with wet or moist hands.
Never put hands between the knife (1) and the pusher handle (4) or the movable slice thickness wall (12), until it is safely fixed – slice thickness adjustment (8) set to “0”).
During operation keeps your hands away from the knife in order to avoid cuts and accidents. Use the pusher (4) and carriage handle.

CAUTION!
Never use the device for more than 15 minutes in order to avoid overheating of the engine. After a short break the device can be turned on and used again.

NOTE!
If the engine stops working (jammed) while cutting dry products (i.e. bread), the carriage has to be moved back in order to avoid engine overheating; the cutting operation can be resumed afterwards.
Knife sharpening
- If the surface of sliced product becomes frayed or coarse and the cutting operations become cumbersome, the knife is to be sharpened.
- Pull the plug from the socket and before sharpening clean the knife edges with use of alcohol in order to degrease it.
- Loosen the fixing screw (a) of the sharpener (14) on the back side of the device (fig. 6).
- Remove the sharpener (14) and turn it by 180°.
- Put the sharpener (14) into the special rail and tighten the fixing screw (a) again.
• Make sure that the surface of the sharpener is close to the edge of the knife. Correct the positioning if required.
- Connect the device to the grounded single socket and start it with use of white START button.
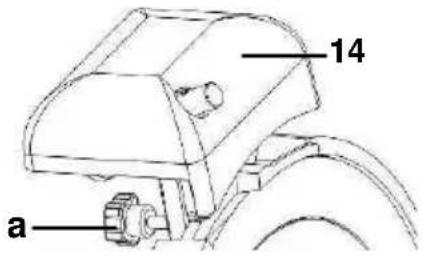
text_image
14 aFig. 6

text_image
a b c 14Fig. 7
- Hold the depressed button (b, fig. 7) of the sharpener on the back of the sharpener (1) and leave the device turned on for approx. 30-40 seconds, until the burr appears on the knife.
- Then hold button (c) in the front and button (b) on the back of the sharpener simultaneously for approx. 3-4 seconds to sharpen the knife and remove the burr. Release both buttons simultaneously.

CAUTION!
Do not exceed the above mentioned sharpening time of 3-4 seconds so as not to cause the so called „zero grind“.
- Stop the device and check whether the knife is sharpened enough. Continue until desired grind is reached.

WARNING! Possible cuts danger!
The knife is very sharp, so when checking the grind one must be very cautious. Always use protective gloves!
- After sharpening clean the knife and sharpener elements. In order to ensure it will operate correctly, keep the sharpener in a good condition. Follow the instructions from chapter 6.2 „Cleaning“.
- Put the sharpener back to its initial position. Follow the installation instruction in reverse order.

WARNING! Injuries danger!
Only start the device with the sharpener assembled correctly! The sharpener is used as the knife cover in the upper part of the device.

CAUTION!
In order to keep the knife in the optimum condition and maintain safety it should be replaced, when its height is reduced by approx. 5-7 mm.
6. Cleaning and maintenance
6.1 Safety advice
Before beginning with repair or cleaning works make sure the device has been disconnected from power supply and has cooled down.
- Do not use any acid agents and make sure no water ingresses the device.
To protect yourself from electric shock, never immerse the device, its cables and the plug in water or other liquids.

CAUTION!
The device is not suited for direct washing via water jets. Therefore, you must not use any kind of pressure water jet for cleaning the device!
6.2 Cleaning
- Clean the device every day or more frequently when required.
○ Unplug the device before cleaning operation (remove the plug!) and check whether the slice thickness adjustment (8) is set to „0“.
○ Move the carriage (7) towards the slice thickness adjustment (8) (fig. 8). - The elements having contact with food products should be cleaned especially thoroughly with use of neutral cleaning agent.
- Clean the device, following the instructions for the individual subassemblies below:
Carriage and pusher handle
○ In order to clean it remove the carriage (7) with the pusher handle (4). To do this, loosen the carriage adjustment (6), rotating it counterclockwise, and remove the carriage itself (7) (fig. 8).
CAUTION! Model 174195 has no carriage adjustment. In order to remove the carriage unscrew both bolts under the tray (5), using appropriate flat wrench.
○ Wash the carriage (7) with cover (13), pusher (4) and carriage tray (5) using warm water, soft cloth and a neutral cleaning agent. Rinse with clean water to remove the cleaning agent residuals.

text_image
Technical diagram of a lathe machine with numbered parts for identificationFig. 8
Knife and knife cover

WARNING! Possible cuts danger!
The knife is very sharp, under no circumstances one may touch knife blade with bare hands! Wear metal gloves during knife cleaning in order to avoid possible cuts.
○ Remove the sharpener from the device. (Fig. 6).
○ In order to remove the knife cover (3) for cleaning loosen the fixing screw (d) on the back side of the device (fig. 9) and push it towards the knife cover.
Remove the knife cover.

natural_image
Technical line drawing of a mechanical component with labeled part 'd' (no text or symbols beyond label)Fig. 9
○ In order to remove the knife loosen three adjustment screws (e) with use of appropriate screwdriver (fig. 10) and carefully take the knife away.
○ Wash the knife cover (3) and knife (1) with warm water and neutral cleaning agent. Use the sponge, supplied cleaning brush or soft cloth. Rinse in clean water.
○ Wash the knife protective ring (2) in warm water and small amount of cleaning agent. Rinse in clean water.

text_image
1 e 2Fig. 10
- Leave the washed parts for drying or wipe them with dry cloth.
○ After cleaning install the knife (1) with use of three adjustment screws (e), maintaining correct stance, and the knife cover (3) with use of screw (d).
Knife protecting device
○ Loosen the screws (f) of the protective device (g) on the back of the slicer, using appropriate screwdriver. (Fig. 11).
○ Wash the protective device (g) in warm water with neutral cleaning agent. Rinse in clean water. After cleaning dry it completely.
○ Reinstall the protective device (g) on the slicer and tighten screws (f).

text_image
f gFig. 11
Slice tray and housing
○ Wash the slice tray (11) and housing with use of moist, soft cloth and the neutral cleaning agent, dry completely after cleaning.
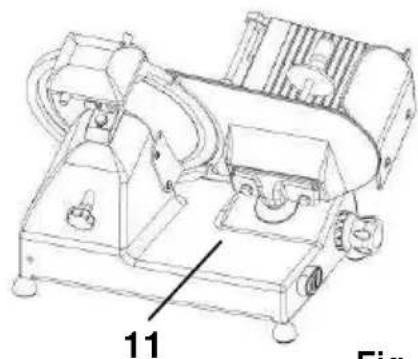
natural_image
Technical line drawing of a mechanical device with labeled component 11 (no text or symbols beyond label)Fig. 12
Sharpener
- Remove the sharpener as a whole from the device (fig. 6).
○ After sharpening clean the sharpener elements (h) with the cleaning brush soaked in alcohol (fig. 13).

text_image
hFig. 13

ATTENTION!
Never use the dishwashing machine for cleaning the removable elements.
- Never use chemical or corrosive cleaning agents.
- In order to avoid rust never clean the device with AkoPads or similar, or the wire washcloth.
○ Always use a soft cloth and never use coarse cleaning agents that could damage or scratch the surface of the device. - After cleaning operations wipe and polish the device with a dry cloth.
6.3 Safety instructions for maintenance
- Inspect the power cable regularly for damage. Never use the device if the cable is damaged. If the power cable is damaged, have an authorised service center or qualified electrician replace it.
- In case of damage or malfunction, please contact your stockist or our customer service centre. Pay attention to the troubleshooting tips in pt. 7.
○ Only a qualified technician and using original spare parts and accessories should carry out repairs and maintenance of the device. Do not attempt to repair the device yourself.
Regular greasing
The carriage is to be greased regularly with a natural technical grease. In order to do so put the slicer on its side and grease both ends of the carriage axle (i) (Fig. 14). Move the carriage forward and backward in order to distribute the grease evenly. Remove the excess grease with a cloth.

natural_image
Technical line drawing of a mechanical assembly with no visible text or symbolsFig. 14
7. Possible Malfunctions
| Problem Cause Solution | |
| The knife does not cut or the slices are fuzzy and/or irregular. | • Knife is not sharp• Knife is excessively worn |
| Knife sharpening is not satisfactory | • Sharpener elements are worn |
| The sharpener does not work | • Position is incorrect• Sharpener elements are dirty |
| The carriage moves incorrectly | • Carriage axle not greased enough • Grease the carriage axle |
The problems described above should be considered as examples only. In case of the same or similar problems turn off the device and stop using it. In order to check and repair it contact the qualified personnel or dealer.
8. Waste disposal
Discarding old devices
At the end of its service life the discarded device has to be disposed in accordance with the national regulations. It is advisable to contact a company which is specialized in waste disposal, or just contact the local disposal service in your community.

WARNING!
To exclude any abuse and the dangers involved make the waste device unfit for use before disposal. For that purpose disconnect device from mains supply and remove mains connection cable from the device.

NOTE!

For the disposal of the device please consider and act according to the national and local rules and regulations.
Bartscher GmbH
4.2 Indications techniques
natural_image
Circular metallic disc with central hole and four evenly spaced holes (no text or symbols)natural_image
Circular mechanical component with central hole and four holes (no text or symbols visible)text_image
Technical diagram of a lathe machine with numbered parts for identificationFig. 3
natural_image
Line drawing of a person operating a machine with tools (no text or symbols)Position correcte

natural_image
Illustration of a person operating a machine with a crossed-out diagonal line (no text or symbols)Position incorrecte
Fig. 5

AVERTISSEMENT ! Risques de blessures !
natural_image
Technical line drawing of a mechanical assembly with labeled component 'd' (no text or symbols beyond label)Abb. 9
natural_image
Technical line drawing of a mechanical device with labeled component 11 (no text or symbols beyond label)Fig. 12
Affûteur
natural_image
Technical line drawing of a mechanical device with no visible text or symbolsFig. 14
text_image
Labeled diagram of a Swiss brand microwave oven with numbered components for identificationAfb. 1
natural_image
Close-up of a USB flash drive (no visible text or symbols)Witte START-knop
Afb. 2
4.2 Technische Gegevens
| Naam Elektrische snijmachines | |||||
| Art.-nr.: | 174195 | 174220 174 | 250 17427 | 5 174300 | |
| Model: | MSD-195 | MSD-220 M | SD-250 MSD | D-275 MSD- | 300 |
| Uitvoering: gekanteld snijvlak | |||||
| Mareriaal behuizing: | aluminium | ||||
| Vermogen: 150 W 240 W 240 W 240 W 380 W | |||||
| Aansluitwaarde: 50 Hz 230 V | |||||
| Diameter mes, ∅: 195 mm 220 mm 250 mm 275 mm 300 mm | |||||
| Toerental mes: | 430 min ^-1 | 282 min ^-1 | 282 min ^-1 | 282 min ^-1 | 280 min ^-1 |
| Snijlengte (mm): | 155 | 205 | 210 | 210 | 255 |
| Snijhoogte (mm): | 150 | 155 | 170 | 185 | 200 |
| Plakdikte (mm): | 1–12 | 1–12 | 1–12 | 1–12 | 1–15 |
| Afmetingen (mm): | B 360D 420H 330 | B 410D 475H 360 | B 430D 510H 375 | B 410D 540H 390 | B 480D 595H 450 |
| Gewicht: | 11,4 kg | 14,4 kg | 15,2 kg | 16,0 kg | 20,6 kg |
| Uitrusting: | 1 reinigingsborstel | ||||
natural_image
Circular metallic disc with central hole and four mounting holes (no text or symbols)natural_image
Circular mechanical component with central hole and concentric rings (no text or symbols)Mes, antikleeflaag,
text_image
Technical diagram of a lathe machine with numbered components for identificationAfb. 3
natural_image
Line drawing of a person operating a large machine (no text or symbols visible)Juiste houding

natural_image
Line drawing of a person operating a machine with a crossed-out black cross (no text or symbols)Onjuiste houding
Afb. 5

text_image
Technical diagram of a lathe machine with numbered parts labeled for identification.Afb. 8
Mes en mesbeschermer

natural_image
Technical line drawing of a mechanical component with labeled part 'd' (no text or symbols beyond label)Afb. 9
natural_image
Technical line drawing of a mechanical device with labeled component '11' (no text or symbols beyond label)Afb. 12
Slijper
natural_image
Technical line drawing of a mechanical device with no visible text or symbolsAfb. 14
natural_image
Close-up of a button or connector with two arrows pointing to the left side (no visible text or symbols)natural_image
Circular metallic disc with central hole and four mounting holes (no text or symbols)natural_image
Circular mechanical component with central hole and four holes (no text or symbols visible)text_image
Technical diagram of a lathe machine with numbered components for identificationRys. 3
natural_image
Line drawing of a person operating a mechanical device (no text or symbols present)Prawidłowa pozycja

natural_image
Illustration of a person operating a machine with a crossed-out black cross (no text or symbols)natural_image
Technical line drawing of a mechanical component with labeled part 'd' (no text or symbols beyond label)Rys. 9

text_image
1 e 2Rys. 10
natural_image
Technical line drawing of a mechanical device with labeled component 11 (no text or symbols beyond label)Rys. 12
Ostrzałka
natural_image
Technical line drawing of a mechanical assembly with gears and shafts (no text or symbols)Rys. 14