
WX15RT - Milling machine WORX - Free user manual and instructions
Find the device manual for free WX15RT WORX in PDF.

| Product type | Router |
| Brand | Worx |
| Model | WX15RT |
| Rated voltage | 230 V ~ 50 Hz |
| Power | 1500 W |
| No-load speed | 11500 – 28000 rpm |
| Cutter diameter | 8 mm and 12 mm |
| Double insulation | Yes |
| Weight | 4.3 kg |
| Sound pressure level | 86 dB(A) |
| Sound power level | 97 dB(A) |
| Vibration value | < 2.5 m/s² |
| Speed variator | Yes, 6 positions |
| Depth adjustment | Micrometric and macrometric |
| Depth stop | Yes (for multiple passes) |
| Dust extraction adapter | Included |
| Parallel guide | Included |
| Copy ring | Included |
| Centering needle | Included |
| Guide roller | Included |
| Safety switch | With lock |
Frequently Asked Questions - WX15RT WORX
User questions about WX15RT WORX
0 question about this device. Answer the ones you know or ask your own.
Ask a new question about this device
Download the instructions for your Milling machine in PDF format for free! Find your manual WX15RT - WORX and take your electronic device back in hand. On this page are published all the documents necessary for the use of your device. WX15RT by WORX.
USER MANUAL WX15RT WORX
Original instructions EN
- Not all the accessories illustrated or described are included in standard delivery.
TECHNICAL DATA
| WX15RT WX15RT.2 WDX15RT.1 WX16 RT WX16RT.1 | ||
| Rated voltage 230V~50Hz | ||
| Rated power 1500W 1800W | ||
| Rated no load speed | 11500~28000/min | |
| Collet size | Ø8 &12mm | |
| Double insulation | ☐ | |
| Machine weight | 4.3kg | |
NOISE AND VIBRATION DATA
| A weighted sound pressure 86dB(A) | |
| A weighted sound power 97dB(A) | |
| KPA & KWA | 3.0dB(A) |
| Wear ear protection when sound pressure is over | 80dB(A) |
VIBRATION INFORMATION
| Vibration total values (triax vector sum) determined according to EN 60745: | |
| Typical weighted vibration Vibration emission value < 2.5m/s2 |

WARNING: The vibration emission value during actual use of the power tool can differ
from the declared value depending on the ways in which the tool is used dependant on the living examples and other variations on how the tool is used:
How the tool is used and the materials are cut or drilled.
The tool being in good condition and well maintained
The use the correct accessory for the tool and ensuring it is sharp and in good condition.
The tightness of the grip on the handles and any anti vibration accessories are used.
And the tool is being used as intended by its design and these instructions.
This tool may cause hand-arm vibration syndrome if its use is not adequately managed.

WARNING: To be accurate, an estimation of exposure level in the actual conditions of use
should also take account of all parts of the operating cycle such as the times when the tool
is switched off and when it is running idle but not actually doing the job. This may significantly reduce the exposure level over the total working period.
Help to minimize your vibration exposure risk.
ALWAYS use sharp chisels, drills and blades.
Maintain this tool in accordance with these instructions and keep well lubricated (where appropriate).
If the tool is to be used regularly then invest in anti vibration accessories.
Avoid using tools in temperatures of 10^ or less.
Plan your work schedule to spread any high vibration tool use across a number of days.
ACCESSIONS
| WX15RT WX15RT.2 | WX15RT.1 W | WX16RT WX16RT.1 | |
| Parallel guide 1 pc 1 pc 1 pc 1 pc | |||
| Spanner 1 pc 1 pc 1 pc 1 pc | |||
| Collet 8mm 1 pc 12mm 1pc | |||
| Dust adapter 1 pc 1 pc 1 pc 1 pc | |||
| Roller guide 1 pc 1 pc 1 pc 1 pc | |||
| Template guide 1 pc 1 pc 1 pc 1 pc 1 pc | |||
| Centering pin with ring screw | 1 pc 1 pc 1 pc 1 pc | ||
| Router bits | 12mm 6 pcs | ||
We recommend that you purchase your accessories from the same store that sold you the tool. Use good quality accessories marked with a well-known brand name. Choose the type according to the work you intend to undertake. Refer to the accessory packaging for further details. Store personnel can assist you and offer advice.
ADDITIONAL SAFETY RULES FOR YOUR ROUTER
- Hold tool by insulated gripping surfaces when performing an operation where the cutting tool may contact hidden wiring. Contact with a "live" wire will make exposed metal parts of the tool "live" and shock the operator.
- Use clamps or another practical way to secure and the workpiece to a stable platform. Holding the work by hand or against your body leaves it unstable and may lead to loss of control.
- Always wear a dust mask.
- Wear protective glasses and hearing protection.
- For long hair, wear hair protection. Work only with closely fitting clothes.
- If the mains cable is damaged or cut through while working, do not touch the cable. Never use the machine with a damaged cable.
- Do not operate the machine in rain or high moisture conditions.
- Always direct the cable to the rear away from the machine.
- Contact with electric lines can lead to fire and electric shock. Damaging a gas line can lead to explosion. Penetrating a water line causes property damage or may cause an electric shock.
- When working with the machine, always hold it firmly with both hands.
- Secure the workpiece. A workpiece clamped with clamping devices or in a vice is held more secure than by hand.
- Before putting into operation, check the routing tool for firm seating.
- Never route over metal objects such as nails or screws.
- Keep hands away from rotating router bits.
- After finishing work, guide the machine back into the upper starting position by actuating the clamping lever and switch the machine off.
- Always switch the machine off and wait until it has come to a standstill before placing it down.
-
Protect tools from impact and shock.
-
Never allow children to use the machine.
- Do not use blunt or damaged router bits. Blunt or damaged router bits cause increased friction, can become jammed and lead to imbalance.
- The allowable speed of the router bit must be at least as high as the maximum speed listed on the power tool. Accessories that rotate faster than permitted can be destroyed.
- Never touch the bit during or immediately after the use. After use the bit is too hot to be touched by bare hands.
-
WARNING: Some dust particles created by power sanding, sawing, grinding, drill and other construction jobs contain chemicals known to cause cancer, birth defects or other reproductive harm. Some examples of these chemicals are:
-
Lead from lead-based paints.
- Crystalline silica from bricks and cement and other masonry products.
- Arsenic and chromium from chemically treated lumber.
Your risk from these exposures varies, depending upon how often you do this type of work. To reduce your exposure to these chemicals:
Work in a well-ventilated area.
Work with approved safety equipment, such as those dust masks that are specially designed to filter microscopic particles.
SYMBOLS

To reduce the risk of injury, user must read instruction manual

Warning

Double insulation

Wear eye protection

Wear ear protection

Wear dust mask
Waste electrical products should not be disposed of with household waste. Please recycle where facilities exist. Check with your Local Authority or retailer for recycling advice.

OPERATING INSTRUCTIONS

NOTE: Before using the tool, read the instruction book carefully.
INTENDED USE
The machine is intended for routing grooves, edges, profiles and elongated holes as well as for copy routing in wood, plastic and light building materials, while resting firmly on the workpiece.
1. INSERT THE ROUTER BIT
Router bit selection
Depending on processing and application, router bits are available in many different designs and qualities:
Router bits made of high-speed steel (HSS) is suitable for the machining of soft materials, e. g. softwood and plastic.
Carbide tipped router bits (HM) is particularly suitable for hard and abrasive materials, e. g. hard wood and aluminum.

WARNING:Use only routing tools with an allowable speed matching
at least the highest no load speed of the machine. The shank diameter of the router bit must correspond with the rated diameter of the collet.
Inserting router bits (See A)
Before any work on the machine itself, disconnect the mains plug. It is recommended to wear protective gloves when inserting or replacing router bits.
Press spindle lock button (14) and keep depressed. If required, turn the spindle by hand until the lock engages.
Press the spindle lock button only when at a standstill.
Insert router bit. The shank of the router bit must be inserted at least 20mm (shank length).
Tighten the tightening nut (13) with the spanner (19) (size 22mm ). Release the spindle lock button.

Do not tighten the tightening nut of the collet without a router bit
inserted.
HOW TO FIT THE 6.35 mm /1/4" COLLET (See A) (WX15RT, WX16RT)
This router is supplied with a 6.35mm(1/4^ ) collet as an accessory.
To fit the 6.35mm(1/4^ ) collet (b) simply slide it into the 12.7mm collet (a) fitted to the collet nut.
The 6.35mm(1/4^ ) collet has a flange coller to ensure insertion to correct depth.
NOTE: 1. Do not attempt to remove the 12.7mm collet from the collet nut.
2. Always wear safety gloves when changing the router bits.
2. MOUNTING THE EXTRACTION ADAPTER (See B)
To connect the vacuum cleaner via a suction hose, you must fasten dust adapter (20) to base plate (10) with both screws and nuts (25).

When mounting the extraction adapter, ensure correct mounting
position!
- For dust extraction, the vacuum hose can be connected directly to the extraction adapter.
- Clean the dust adapter (20) regularly to ensure optimum dust extraction at all times.
- The vacuum cleaner must be suitable for the material to be worked.
- When vacuuming dry dust that is especially detrimental to health or carcinogenic, use a special vacuum cleaner.
3. ON AND OFF SWITCH a) LOCK-ON SWITCH
Depress to start and release to stop your tool. Depress on/off switch (18) then lock on button (16), release on/off switch first and lock-on button second. Your switch is now locked on for continuous use. To switch off your tool just depress and release the on/off switch.
b) LOCK-OFF SWITCH
For starting operation of the machine, actuate the lock-off button (12) first, then press and hold the On/Off switch (18) afterwards. To switch off the machine, release the On/Off switch (16).
For safety reasons the On/Off switch of the machine cannot be locked; it
must remain pressed during the entire operation.
Speed pre-selection
The required speed can be pre-selected with the thumb-wheel (17) (also whilst running).
1 - 2 = low speed
3 - 4 = medium speed
5 - 6 = high speed
The required speed is dependent on the material and can be determined by practical testing.
After longer periods of working at low speed, allow the machine to cool down by running it for approx. 3 minutes at maximum speed with no load.
Speed table
| Material | Router bit-Ø Speed stages | |
| Hardwood (Beech) | 4 - 10mm 5-6 | |
| 12 - 20mm 3-4 | ||
| 22 - 40mm 1-2 | ||
| Softwood (Pine) | 4 - 10mm 5-6 | |
| 12 - 20mm 3-6 | ||
| 22 - 40mm 1-3 | ||
| Particle board | 4 - 10mm 3-6 | |
| 12 - 20mm 2-4 | ||
| 22 - 40mm 1-3 | ||
| Plastic 4 - 1 | 5mm 2-3 | |
| 16 - 40mm 1-2 | ||
| Aluminum | 4 - 15mm 1-2 | |
| 16 - 40mm | 1 | |
The values shown in the chart are standard values. The necessary speed depends on the material and the operating conditions, and can be determined by practical testing.
Constant electronic control and soft start (Only for WX16RT and WX16RT.1)
Constant electronic control maintains the speed constant at no-load and under most working conditions. Soft start delays the
increase in motor speed to reduce the motor "kick" or torque effect to improve operator comfort and safety.
4. SETTING THE DEPTH-OF-CUT
Depending on the cutting operation, the depth-of cut can be preset in several steps.

The adjustment of the depth-of-cut may only be carried out when
the router is switched off.
Coarse adjustment of the depth-of-cut
Place the router on the work-piece to be machined.
Set the fine adjustment for depth-of-cut in the center position with fine-adjustment knob (1); to do this, turn the fine-adjustment knob until the markings (23) on the backside of the router are in alignment, as shown. Afterwards turn scale (2) to "0" (See C). Set step buffer (9) to the lowest position; the buffer snaps-in noticeably.
Loosen locking screw (7), so that depth stop (6) can be moved freely.
Release the clamping lever (3) by turning in clockwise direction and slowly lower the router until the router bit touches the surface of the workpiece. Lock the router in position by turning the clamping lever in anti-clockwise direction.
Press depth stop downwards until it touches the stop buffer (9). Adjust the depth stop (6) to the required routing depth and tighten the wing screw (7). Release the clamping lever and guide the router back up again.
The coarse adjustment of the depth-of-cut should be checked by a trial cut and corrected, if necessary.
Fine adjustment of the depth-of-cut
After a trial cut, fine adjustment can be carried out by turning the fine adjustment knob (1 scale mark = 0.1 mm/1 rotation = 2.0 mm). The maximum adjustment is approx. + / - 8mm
Example: Slide router upwards again and measure the depth-of-cut (set value = 10.0 mm; actual value = 9.8mm
Lift up router and underlay guide plate (11) in such a manner that the router can plunge
freely without the router bit touching the workpiece. Lower the router again until the depth stop touches the step buffer (9).
Afterwards set scale (2) to "0".
Loosen wing screw.
With the fine adjustment (1), advance the depth-of-cut in clockwise direction by 0.2mm/2 scale marks (=) difference between required value and actual value).
Retighten wing screw again.
Slide router upward again and check depth-of-cut by carrying out another trial cut.
After setting the depth-of-cut, the position of the index mark (26), on the depth stop should not be changed anymore so that the currently adjusted setting can always be read off the scale.
5. USAGE OF THE STEP BUFFER
a) Dividing the cutting procedure in several steps
For deep cuts, it is recommended to carry out several cuts, each with less material removal. By using the step buffer, the cutting process can be divided into several steps.
Set the required depth-of-cut with the lowest step of the step buffer. Afterwards, the higher steps can be used for the last two cuts.
b) Pre-adjustment of varying depth-of-cuts
If several different depth-of-cuts are required for the machining of a work-piece, these can also be preset by using the step buffer.
6. DIRECTION OF FEED (See b, c)
The feed motion of the router must always be carried out against the rotation direction of the router bit (up-grinding).
When milling in the direction with the rotation of the router bit (down cutting), the router can break loose, preventing control by the user.
7. ROUTING PROCESS
Adjust the depth-of-cut as previously described.
Place the router on the work-piece.
Release the clamping lever by turning in clockwise direction and slowly lower the router until the depth stop runs against the step buffer. Lock the router in position by
turning the clamping lever in anti-clockwise direction, then switch on. Carry out the cutting procedure with uniform feed. After finishing the cutting process, slide the router upwards again and switch off.
8. ROUTING WITH GUIDE BUSHING
The guide bushing (24) enables template and pattern routing on work-pieces.
Place the guide bushing over the hole in the center of the base plate, and align the two through holes in the bottom of the base plate with the countersunk holes in the guide bushing. Fasten the guide bushing with the nuts and screws provided.(See D)
9.Routing PROCESS (See E)

Choose a router bit with a smaller diameter than the inner diameter
of the guide bushing.
Set the router with guide bushing against the template. Release the clamping lever by turning in clockwise direction and slowly lower the router toward the work-piece until the adjusted depth-of-cut is reached.
Guide router with projecting guide bushing along the template, applying light sideward pressure.
NOTE: The template must have a minimum thickness of 8mm due to the projecting height of the guide bushing.
10. SHAPING OR MOLDING APPLICATIONS
For shaping or molding applications without the use of a parallel guide, the router must be equipped with a pilot or a ball bearing. Lead the router sideward to the workpiece and allow router bit to engage until the pilot or the ball bearing of the router reach the corner of the workpiece being machined. Guide the router alongside the workpiece corner using both hands, ensuring proper seating of the base plate. Too much pressure can damage the edge of the workpiece.
11. ROUTING WITH PARALLEL GUIDE (Accessory - See F,G)
- Slide the parallel guide (21) with the guide rods(27) into the base plate (10) and tighten at
the required measure with the wing bolts (12).
- Guide the machine with uniform feed and sideward pressure on the parallel guide (21) along the edge of the workpiece.
12.Routing CIRCULAR ARC PROFILES (See H, I)
- Reverse the parallel guide (facing surfaces point upwards) and insert the guide rods into the base plate. Fasten centring pin (22) to parallel guide (through hole) with wing bolt (28).
- Puncture centring pin into marked centre of the circular arc and guide router with consistent feed across the workpiece surface.
13. ROUTING WITH THE ROLLER GUIDE (See J,K)
Slide the parallel guide with the guide rods into the base plate. Fasten the roller guide with the guide roller mounted to the parallel guide.
- Guide the machine along the workpiece edge with light sideward pressure.
MAINTENANCE
Remove the plug from the socket before carrying out any adjustment, servicing or maintenance.
Your power tool requires no additional lubrication or maintenance.
There are no user serviceable parts in your power tool. Never use water or chemical cleaners to clean your power tool. Wipe clean with a dry cloth. Always store your power tool in a dry place. Keep the motor ventilation slots clean. Keep all working controls free of dust. Occasionally you may see sparks through the ventilation slots. This is normal and will not damage your power tool.
If the supply cord is damaged, it must be replaced by the manufacturer, its service agent or similarly qualified persons in order to avoid a hazard.
ENVIRONMENTAL PROTECTION

Waste electrical products should not be disposed of with household waste. Please recycle where facilities exist.
Check with your local authorities or retailer for recycling advice.
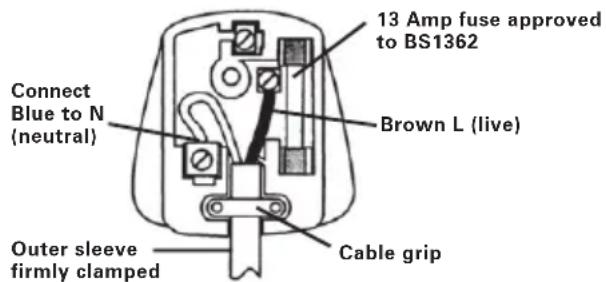
PLUG REPLACEMENT (UK & IRELAND ONLY)
If you need to replace the fitted plug then follow the instructions below.
IMPORTANT
The wires in the mains lead are colored in accordance with the following code:
BLUE =NEUTRAL
Brown = Live
As the colors of the wires in the mains lead of this appliance may not correspond with the colored markings identifying the terminals in your plug, proceed as follows. The wire which is colored blue must be connected to the terminal which is marked with N. The wire which is colored brown must be connected to the terminal which is marked with L.
WARNING: Never connect live or neutral wires to the earth terminal of the plug. Only fit an approved 13ABS1363/A plug and the correct rated fuse.
NOTE: If a moulded plug is fitted and has to be removed take great care in disposing of the plug and severed cable, it must be destroyed to prevent engaging into a socket.
EC DECLARATION OF CONFORMITY
We,
POSITEC Germany GmbH
Declare that the product,
Description
WORX Router
Type WX15RT WX15RT.1 WX15RT.2
WX16RT WX16RT.1
Function Cutting slots into or shaping the edge of various materials
Complies with the following directives,
EC machinery directive 2006/42/EC
EC low voltage directive
2006/95/EC
EC electromagnetic compatibility directive
2004/108/EC
Standards conform to
EN 55014-1
EN 55014-2
EN 61000-3-2
EN 61000-3-3
EN 60745-1
EN 60745-2-17
The person authorized to compile the technical file,
Name Russell Nicholson
Address Positec Power Tools (Europe)
Ltd, PO Box 152,Leeds,LS10 9DS,UK
Jaky
2011/04/21
Jacky Zhou
POSITEC Quality Manager
Typ WX15RT WX15RT.1 WX15RT.2
WX16RT WX16RT.1
INFORMATIONS RELATIVE AUX VIBRATIONS
(Accessory - See F,G)
Responsible qualite POSITEC
- MANOPOLA PER LA REGOLAZIONE FINE DELLA PROFONDITA DI TAGLIO
- SCALA DI REGOLAZIONE FINE DELLA PROFONDITA DI TAGLIO
- LEVA DI FISSAGGIO
- IMPUGNATURA SINISTRA
- SCALA DI REGOLAZIONE GenerICA DELLA PROFONDITA DI TAGLIO
- LIMITATORE PROFONDITA
- VITE DI FISSAGGIO PER LIMITATORE PROFONDITA
- COLONNE DI SUPPORTO MACCHINA
- BATTUTA FINECORSA A GRADINI
- PIASTA
- PIASTA DR GUIDA
- VITE DI FISSAGGIO PER BARRA DELLA GUIDA
- DADO DI FISSAGGIO CON ANELLO DI SERRAGGIO
- TASTO DI BLOCCO ALBERINO
- IMPUGNATURA DESTRA /CON INTERRUTTORE D'ACCENSIONE/SPEGNIMENTO)
- INTERRUTTORE DI BROCC08/INTERRUTTORE DI BROCCO
- ROTELLA PER PRE-SELEZIONE DELLA VELOCITA
- INTERRUPTORE D'ACCENSIONE/SPEGNIMENTO
- CHIAVE
- ADATTATORE ASPIRAPOLVERE
- GUIDA PARALLELA (Si veda la figura F)
- PERNO DI CENTRAGGIO (Si veda la figura H)
- LIVELLO ZERO (Si veda la figura C)
- BOCCOLA DI GUIDA (Si veda la figura D)
- VITI E DADI (Si veda la figura B)
- SCALA METRICA
- BARRE DI GUIDA (Si veda la figura H)
- MANOPOLA (Si veda la figura H)
- PUNTA FRESATRICE*
- GUIDA A RULLO (Si veda la figura J)
DATI TECHNICI
Codice WX15RT WX15RT.1 WX15RT.2
WX16RT WX16RT.1
Tipo WX15RT WX15RT.1 WX15RT.2
WX16RT WX16RT.1
Type WX15RT WX15RT.1 WX15RT.2
WX16RT WX16RT.1
Type WX15RT WX15RT.1 WX15RT.2
WX16RT WX16RT.1
POSITEC Quality Manager
- JYRSINSYVYYDEN HIENOSÄTÖNUPPI
- JYRSINSYVYYDEN HIENTOSÄTÖASTEIKKO
- KIRISTYSSALPA
- VASEN KAHVA
- JYRSINSVYYDEN KARKEASÄTÖASTEIKKO
- SVVYYSRAJOITIN
- SVVYYSRAJOITTIMEN SIIPIMUTTERI
- PÖLYSUOJAT
- VAIHEVASTIN
- POHJALEVY
- OHJAINLEVY
- OHJAINTANGON LUKKORUUVI
- KIRISTYSMUTTERI JA TYÖKALUNPIDIN
- KARANLUKITUSNUPPI
- OIKEA KAHVA (JOSSA VIRTAKATKAISIN 19)
- KYTKIMEN LUKITUSNUPPI /LUKITUKSEN VAPAUTUSNUPPI
- NOPEUSSÄADÖN PEUKALOPYÖRÅ
- KÄYNNISTYS-/PYSÄYTYSKYGTKIN
- AVAIN
- POLYNPOISTOLIITÄNTÄ
- SUUNTAISOHJAIN (Ks. F)
- KESKITYSTAPPI (Ks. H)
- NOLLAUSMERKIT (Ks. C)
- KOPIOHYLSY (Ks. D)
- RUUVI JA MUTTERIT (Ks.B)
- ASTEIKKO
- OHJAINTANGOT (Ks. H)
- SIIPINUPIT (Ks. H)
- JYRSINTERÄ*
-
RULLAOHJAIN (Ks.J)
-
Kuvissa esitetyt ja selostetut lisävarusteet eivät aina kuulu toimitukseen.
TEKNISET TIEDOT
| WX15RT WX15RT.2 Wx15RT.1 WX16RT WX16RT.1 | ||
| Nimellisjännite 230V~50Hz | ||
| Nimellisteho 1500W 1800W | ||
| Nimellisnopeus Kuormittamattomana | 11500~28000/min | |
| Työkalunpidin | Ø8 &12mm | |
| Kaksoiseristetty | ☐ | |
| Koneen paino | 4.3kg | |
MELU- JA TÄRINAARVOT
Type WX15RT WX15RT.1 WX15RT.2
WX16RT WX16RT.1
EC machinery directive 2006/42/EC
EC low voltage directive
2006/95/EC
EC electromagnetic compatibility directive
2004/108/EC
POSITEC Quality Manager
- RATT FÜR FININSTÄLLNING AV FRÄSDJUP
- SKALA FÖR FININSTÄLLNING AV FRÄSDJUP
- KLÄMSPAK
- VANSTER HANDTAG
- SKALA FÖR GROVINSTÄLLNING AV FRÄSDJUP
- DJUPSTOPP
- VINGMUTTER FÖR DJUPSTOPPET
- DAMMANSCHETT
- STEGBUFFERT
- FOTPLÄT
- STYRPLÄT
- LÄSSKRUV FÖR STYRSTÄNG
- ÅTDRAGNINGSMUTTER MED SPÄNNHYLSA
- LASKNAPP FÖR AXEL
- HÖGER HANDTAG (MED STRÖMBRYTARE TILL/FRÄN 18)
- KILIIT ACMA KAPAMA DÜGMESİ / UPPLÄSNINGSKNAPP
- TUMHJUL FÖR VARVTALSREGLERING
- PÅ/AV-KNAPP
- SKRUVNYCKEL
- TILLSATS FÖR DAMMSUG
- PARALLELLSTYRNING (Se F)
- CENTRERINGSTAPP (Se H)
- MARKERINGAR FÖR NOLL-ÄTERSTÄLLNING (Se C)
- STYRBUSSNING (Se D)
- SKRUVAR OCH MUTTRAR (Se B)
- SKALA
- STYRSTÄNGER (Se H)
- VRED (Se H)
- FRAS*
- RULLGUIDE (Se J)
TEKNISKA DATA
| WX15RT WX15RT.2 Wx15RT.1 Wx16RT WX16RT.1 | ||
| Spanning 230V~50Hz | ||
| Effek 1500W 1800W | ||
| Hastighetutan belastning | 11500~28000/min | |
| Verktygsfäste | Ø8 &12mm | |
| Dubelisolering | ☐ | |
| Maskinvikt | 4.3kg | |
LJUD-OCH VIBRATIONSDATA
| WX15RT WX15RT.2 | WX15RT.1 W | WX16RT WX16RT.1 | ||
| Parallellstyrning 1 st 1 st 1 st | 1 st | |||
| Skruvnyckel 1 st 1 st 1 st | ||||
| Spännhylsa 8mm 1 st 12mm | 1 st | |||
| Dammadapter 1 st 1 st 1 st 1 | st | |||
| Rullguide 1 st 1 st 1 st | ||||
| Mallguide 1 st 1 st 1 st 1 st | ||||
| Centreringstapp med ringskruv | 1 st 1 st 1 | st 1 st | ||
| Fräsbits | 12mm 6 sts | |||
Tipi WX15RT WX15RT.1 WX15RT.2
WX16RT WX16RT.1
Adress Positec Power Tools (Europe)Ltd,
PO Box 152,Leeds,LS10 9DS,UK
Janky Zhou

2011/04/21
Jacky Zhou
Túrços WX15RT WX15RT.1 WX15RT.2
WX16RT WX16RT.1
Axiomega Slots otyn konn n


- Original instructions EN
- TECHNICAL DATA
- NOISE AND VIBRATION DATA
- VIBRATION INFORMATION
- ADDITIONAL SAFETY RULES FOR YOUR ROUTER
- SYMBOLS
- OPERATING INSTRUCTIONS
- INTENDED USE
- INSERT THE ROUTER BIT
- Router bit selection
- Inserting router bits (See A)
- HOW TO FIT THE 6.35 mm /1/4" COLLET (See A) (WX15RT, WX16RT)
- NOTE: 1. Do not attempt to remove the 12.7mm collet from the collet nut.
- Always wear safety gloves when changing the router bits.
- MOUNTING THE EXTRACTION ADAPTER (See B)
- When mounting the extraction adapter, ensure correct mounting
- position!
- ON AND OFF SWITCH a) LOCK-ON SWITCH
- b) LOCK-OFF SWITCH
- For safety reasons the On/Off switch of the machine cannot be locked; it
- must remain pressed during the entire operation.
- Speed pre-selection
- Constant electronic control and soft start (Only for WX16RT and WX16RT.1)
- SETTING THE DEPTH-OF-CUT
- The adjustment of the depth-of-cut may only be carried out when
- the router is switched off.
- Coarse adjustment of the depth-of-cut
- Fine adjustment of the depth-of-cut
- USAGE OF THE STEP BUFFER
- a) Dividing the cutting procedure in several steps
- b) Pre-adjustment of varying depth-of-cuts
- DIRECTION OF FEED (See b, c)
- ROUTING PROCESS
- ROUTING WITH GUIDE BUSHING
- 9.Routing PROCESS (See E)
- Choose a router bit with a smaller diameter than the inner diameter
- of the guide bushing.
- SHAPING OR MOLDING APPLICATIONS
- ROUTING WITH PARALLEL GUIDE (Accessory - See F,G)
- 12.Routing CIRCULAR ARC PROFILES (See H, I)
- ROUTING WITH THE ROLLER GUIDE (See J,K)
- MAINTENANCE
- Remove the plug from the socket before carrying out any adjustment, servicing or maintenance.
- ENVIRONMENTAL PROTECTION
- PLUG REPLACEMENT (UK & IRELAND ONLY)
- IMPORTANT
- BLUE =NEUTRAL
- Brown = Live
- EC DECLARATION OF CONFORMITY
- WORX Router
- WX16RT WX16RT.1
- 2006/95/EC
- 2004/108/EC
- INFORMATIONS RELATIVE AUX VIBRATIONS
- (Accessory - See F,G)
- DATI TECHNICI
- TEKNISET TIEDOT
- MELU- JA TÄRINAARVOT
- TEKNISKA DATA
- LJUD-OCH VIBRATIONSDATA
Brand : WORX
Model : WX15RT
Category : Milling machine