
STBTK150 - Karaoke system Sunstech - Free user manual and instructions
Find the device manual for free STBTK150 Sunstech in PDF.
| Product Type | Column Karaoke System |
| Brand | Sunstech |
| Model | STBTK150 |
| Power Supply | DC 20V 1.2A (power adapter included) |
| Power Consumption | 30 W |
| Audio Power | 2 x 20 W RMS |
| Speaker Impedance | 8 ohms, 25 W each |
| FM Receiver | Yes, 87.5 - 108.0 MHz |
| Bluetooth | Yes, built-in, range 10 m |
| Connections | USB, AUX IN (RCA), LINE IN 3.5 mm, FM antenna |
| Mic Inputs | 2 mic jacks 6.35 mm |
| Microphones Included | 2 wired microphones |
| Remote Control | Yes, CR2025 button cell included |
| Display | LED |
| Settings | Volume, echo, balance, bass/treble |
| Equalization Modes | Music, Movie, Voice |
| Sleep Timer | 5, 10, 15, 30, 60, 90 minutes |
| Clock and Alarm | Yes |
| Stabilization Base | Included with fixing screw |
| Cables Provided | RCA audio cable, power adapter |
| Warranty | 2 years |
| Country of Manufacture | China |
| Care and Cleaning | Unplug before cleaning; use a dry, soft cloth |
| Safety | Do not expose to water or heat; keep out of reach of children |
Frequently Asked Questions - STBTK150 Sunstech
User questions about STBTK150 Sunstech
0 question about this device. Answer the ones you know or ask your own.
Ask a new question about this device
Download the instructions for your Karaoke system in PDF format for free! Find your manual STBTK150 - Sunstech and take your electronic device back in hand. On this page are published all the documents necessary for the use of your device. STBTK150 by Sunstech.
USER MANUAL STBTK150 Sunstech
natural_image
Line drawing of a vertical cylindrical device with control panel and two side handles (no text or symbols)STBTK150
PLEASE READ REFORE OPERATING THIS EQUIPMENT. INSTRUCTION MANUAL
Safety precautions
Read the following recommended safety precautions carefully.
Power Source
Before plugging in for the first time, read the following section carefully.
This device should be operated only from a 220-240V AC, 50 Hz outlet.
Be sure that the power supply voltage of the area be used meets the required voltage and you select the correct voltage setting for your device.
Power Cord
Do not place the set, a piece of furniture, etc on the power cord or pinch the cord. Handle the power cord by the plug. Do not unplug the appliance by pulling from the power cord and never touch the power cord with wet hands as this could cause a short circuit or electric shock.
Never make a knot in the cord or tie it with other cords. The power cord should be placed in such a way that they are not likely to be stepped on. A damaged power cord can cause fire or give you an electric shock. When it is damaged and needs to be replaced, it should be done by qualified personnel.
Moisture and Water

Do not use this device in a humid and damp place (avoid the bathroom, the sink in the kitchen, etc). Do not expose this device to rain or water, as this may be dangerous and do not place objects filled with liquids, such as flower vases, on top.
If any solid object or liquid falls into the cabinet, unplug the connected device(s) immediately and have it checked by qualified personnel before operating it any further.
Cleaning

Before cleaning, unplug this device from the wall outlet. Do not use an aggressive liquid or aerosol cleaners. Use a soft and dry cloth.
Ventilation
The slots and openings on the device are intended for ventilation and to ensure reliable operation. To prevent overheating, these opening must not be blocked or covered in anyway. When installing this unit make sure to leave space sufficient around the unit to ensure the ventilation to improve heat radiation.
Do not expose the unit to extreme conditions of heat, cold or moisture.
Heat and Flames

The device should not be placed near to open flames or sources of intense heat such as an electric heater. Ensure that no open flame sources, such as candles, are placed on top of the device. Batteries should not be exposed to excessive heat such as sunshine, fire or the like.
Lightning

In case of storm and lightning or when going on holiday, disconnect the power cord from the wall outlet.
Replacement Parts
When replacement parts are required, make sure that the service technician has used replacement parts, which are specified by the manufacturer or have the same specifications as the original one. Unauthorized substitutions may result in fire, electrical shock or other hazards. Please contact the brand or manufacturer that will redirect you to the nearest technical service which will supply or change the replacement parts
Servicing
Please refer all servicing to qualified personnel of the brand. Do not remove the cover yourself as this may result in an electric shock.
Risk of electric shock
The lightning flash with arrowhead symbol, within an equilateral triangle, is intended to alert the user to the presence of not insulate, “dangerous voltage” within the product’s enclosure that may be of sufficient magnitude to constitute a risk of electric shock of persons.
The exclamation point within an equilateral triangle is intended to alert the user to the presence of important operating and maintenance (servicing) instructions in the literature accompanying the appliance.

Waste Disposal
Instructions for waste disposal:
- Packaging and packaging aids are recyclable and should principally be recycled. Packaging materials, such as a plastic bag, must be kept away from children.
- Batteries, including those which are heavy metal-free, should not be disposed of with household waste. Please dispose of used batteries in an environmentally friendly manner. Find out about the legal regulations which apply in your area- Do not try to recharge batteries, can have a danger of explosion. Replace batteries only with the same or equivalent type.
This symbol on the product or on its packaging means that your electrical device should be disposed at the end of its service life, separately from your household wastes. There are separate collection systems for recycling in the EU. For more information, please contact the local authority or the dealer where you purchased the product.

Symbol for equipment Symbol for batteries
Disconnecting the Device
The mains plug is used to disconnect the device from the mains and therefore it must remain readily operable.
Headphone Volume
In your device has headphones jack, please note that excessive sound pressure from earphones and headphones can cause hearing loss.
Installation
To prevent injury, this device must be securely attached to the wall in accordance with the installation instructions when mounted to the wall (if the option is available).
Warning:

Do not leave your device in standby or operating mode when you leave your house. The Standby / On button does not fully switch off this product. Moreover the device continues to consume power in standby mode. In order to separate the device completely from mains, the mains plug has to be pulled from the mains socket. Because of that the device should be set up in a way,
that an unobstructed access to the mains socket is guaranteed, so that in case of emergency the mains plug can be pulled immediately. During periods of prolonged non-use, the device should be disconnected from the mains power supply.
Electrical device not in the hands of children
Never let children use electrical devices unsupervised. Children cannot always recognize any possible dangers. Batteries / accumulators can be life threatening when swallowed. Store batteries out of the reach of children. In case of swallowing a battery, medical aid has to be sought immediately. Also keep the packaging away from children as there is danger of suffocation.
Warnings and Precautions
CAUTION: TO PREVENT ELECTRIC SHOCK, MATCH WIDE BLADE OF PLUG TO WIDE SLOT, FULLY INSERT.
WARNING: To reduce the risk of fire or electric shock, do not expose this apparatus to rain or moisture.
CAUTION: Use of any controls or adjustments or performance of procedures other than those herein specified may result in hazardous radiation exposure.
WARNING: Changes or modifications to this unit not expressly approved by the party responsible for compliance could void the user's authority to operate the equipment.
WARNING: Do not place this unit directly onto furniture surfaces with any type of soft, porous, or sensitive finish. As with any rubber compound made with oils, the feet could cause marks or staining where the feet reside. We recommend using a protective barrier such as a cloth or a piece of glass between the unit and the surface to reduce the risk of damage and/or staining.
WARNING: Use of this unit near fluorescent lighting may cause interference regarding use of the remote. If the unit is displaying erratic behavior move away from any fluorescent lighting, as it may be the cause.
CAUTION: Danger of explosion if battery is incorrectly replaced. Replace only with the same or equivalent type.
WARNING: The battery, batteries, and battery pack shall not be exposed to excessive heat such as sunshine, fire, or the like.
WARNING: Lithium batteries, like all rechargeable batteries are recyclable and should be recycled or disposed of in normal household waste. Contact your local government for disposal or recycling practices in your area. They should never be incinerated since they might explode.
WARNING: Shock hazard - Do Not Open.
AVIS: RISQUE DE CHOC ÉLECTRIQUE - NE PAS OUVRIR
Mains Plug or Direct plug-in adapter is used as disconnect device and it should remain readily operable during intended use. In order to disconnect the apparatus from the mains completely, the Mains Plug or Direct plug-in adapter should be disconnected from the mains socket outlet completely.
NO USER-SERVICEABLE PARTS INSIDE.
REFER SERVICING TO QUALIFIED SERVICE PERSONNEL.

The lightning flash with arrowhead symbol, within an equilateral triangle, is intended to alert the user to the presence of uninsulated "dangerous voltage" within the product's enclosure that may be of sufficient magnitude to constitute a risk of electric shock to persons.

The exclamation point within an equilateral triangle is intended to alert the user to the presence of important operating and maintenance (servicing) instructions in the literature accompanying the appliance.
Important Safety Instructions
- Read these Instructions.
- Keep these Instructions.
- Heed all Warnings.
- Follow all instructions.
- Do not use this apparatus near water.
- Clean only with a dry cloth.
- Do not block any ventilation openings. Install in accordance with the manufacturer's instructions.
- Do not install near any heat sources such as radiators, heat registers, stoves, or other apparatus (including amplifiers) that produce heat.
- Do not defeat the safety purpose of the polarized or grounding - type plug. A polarized plug has two blades with one wider than the other. A grounding type plug has two blades and a third grounding prong. The wide blade or the third prong is provided for your safety. When the provided plug does not fit into your outlet, consult an electrician for replacement of the obsolete outlet.
- Protect the power cord from being walked on or pinched particularly at plugs, convenience receptacles, and the point where they exit from the apparatus.
- Only use attachments/accessories specified by the manufacturer.
- This symbol indicates that this product incorporates double insulation between hazardous mains voltage and user accessible parts. Use only with a cart, stand, tripod, bracket, or table specified by the manufacturer, or sold with the apparatus. When a cart is used, use caution when moving thecart/apparatus combination to avoid injury from tip-over.

- Unplug this apparatus during lightning storms or when unused for long periods of time.
- Refer all servicing to qualified service personnel. Servicing is required when the apparatus has been damaged in any way, such as power-supply cord or plug is damaged, liquid has been spilled or objects have fallen into the apparatus, the apparatus has been exposed to rain or moisture, does not operate normally, or has been dropped.
Special note: When placing your unit on a lacquered or natural finish, protect your furniture with a cloth or other protective material.
Additional Warnings
The apparatus shall not be exposed to dripping or splashing and that no objects filled with liquids, such as vases, shall be placed on apparatus.
This symbol indicates that this product incorporates double insulation between hazardous mains voltage and user accessible parts.
IN THE BOX
- A Tower Speaker
• VDE Power Adaptor - RCA Audio Cable
-
Remote Control: (CR2025 Battery pre-installed)
-
Line-in Cable
- A piece of base
- Two pieces of microphone
- Instruction Manual
• A piece of screw ∅10×28mm
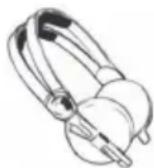
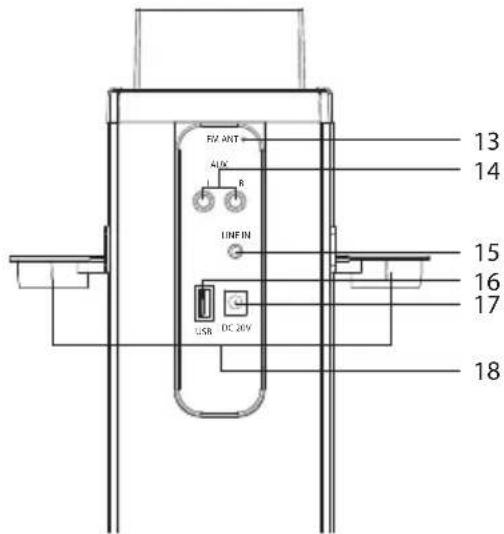
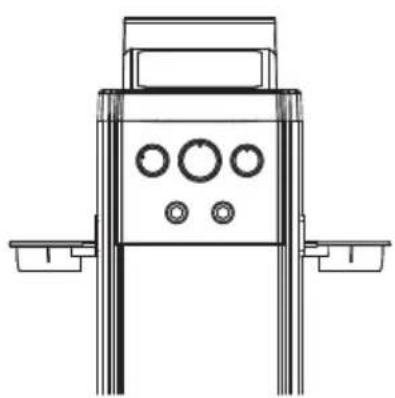
TOP PANEL- LOCATION OF CONTROLS
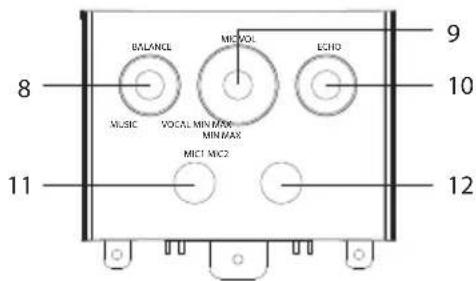
- LED display
- SOURCE button: Touch repeatedly to select the audio inputs to BT (Bluetooth receiver), USB, AUX, LINE in or FM.
- POWER button: • Hold 3 second to select 12 or 24 hour in the standby.
- Touch to turn the tower speaker off or on.
- TUN-: In FM mode, one touch to navigate down radio frequency. Touch and hold a second to switch to auto-search radio station.
• In USB mode and in bluetooth mode, one touch to backward track.
- VOLUME -: Touch to decrease the volume.
- TUN +: In FM mode, one touch to navigate down radio frequency. Touch and hold a second to switch to auto-search radio station.
• In USB mode and bluetooth mode, one touch to forward track.
- VOLUME +: Touch to increase the volume.
- BLANCE: Rotate the BALANCE knob to adjust L/R track volume.
- MIC VOL: Rotate the MIC knob to adjust the mic volume.
- ECHO: Rotate the ECHO knob to adjust the echo level.
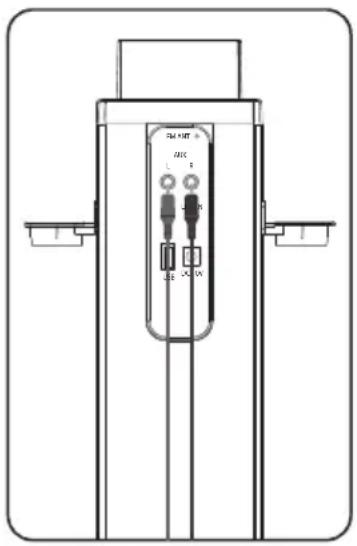
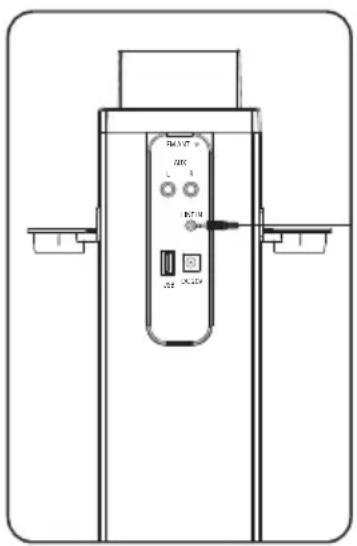
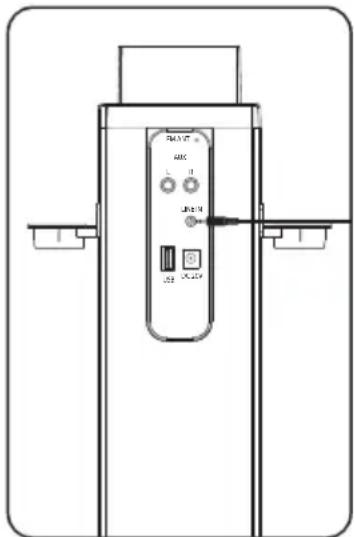
- MIC 1 jack.
- MIC 2 jack.
- FM antenna.
- AUX L/R IN jacks.
- 3.5mm LINE IN jack.
- USB IN port.
- DC jack in. (20V)
- Microphone bracket.
EFFECTIVE DISTANCE OF REMOTE TRANSMITTER
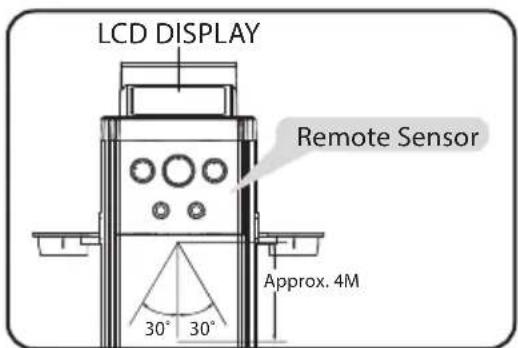
NOTES:
- When there is an obstacle between the unit and the transmitter, the transmitter may not operate.
- When direct sunlight, an incandescent lamp, fluorescent lamp or any other strong light shines on the REMOTE SENSOR of the unit, the remote operation may be unstable.
REMOTE CONTROL – LOCATION OF CONTROLS
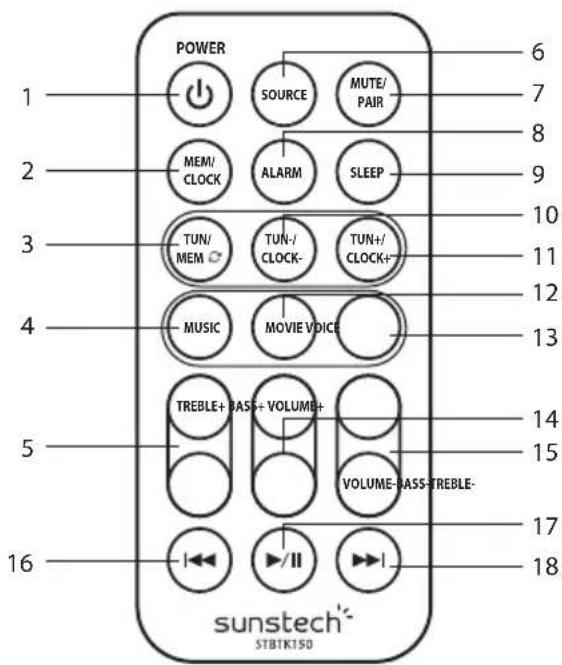
- POWER button: Press to turn the unit on or off.
-
MEM/CLOCK button (In standby):
-
Press to cycle through saved radio stations.
-
Press to set the time.
-
TUN/MEM ≈ button:
-
Press 3 seconds to search automatically and save FM stations.
-
Press key enter call-out saved radio stations.
-
MUSIC button: Press to switch to the EQ optimized for music.
-
TREBLE buttons: Press to adjust the treble up or down at MUSIC mode.
- SOURCE button: Press to switch to Bluetooth, USB, AUX in, LINE in or FM.
- MUTE/PAIR button: Press to mute the sound, press again to resume, press 3 seconds to exit bluetooth.
- ALARM button:
- Press to set the alarm. (In standby) • Hold press to on alarm icon or off alarm icon.
-
SLEEP button: Press repeatedly to set the sleep time.
-
TUN-/CLOCK-button:
-
Press backward to adjust radio frequency. • Press backward to adjust the time.
-
Press backward to select those saved stations.
-
TUN+/CLOCK+ button:
-
Press to navigate up radio frequency. • Press to navigate down the time.
-
Press forward to select those saved stations.
-
MOVIE button: Press to switch to the EQ optimized for movie sound.
- VOICE button: Press to switch to the EQ optimized for dialogue.
- BASS buttons: Press to adjust the bass up or down at MUSIC mode.
- VOLUME buttons: Press to adjust the volume.
- SKIP ◀◀ : In Bluetooth mode and in USB mode, press to skip forward track.
- Play/Pause: In Bluetooth mode, press to play or pause a track.
- SKIP ▶▶: In Bluetooth mode in USB mode, press to skip backward track.
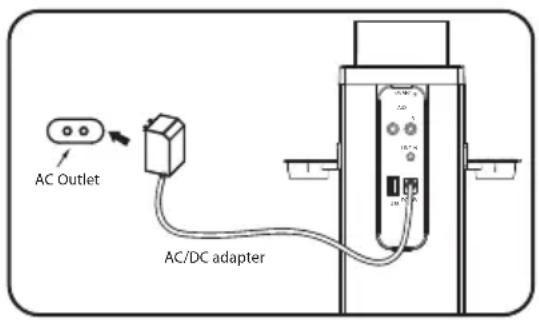
Insert the small plug from the supplied AC/DC adapter to the DC in jack on the unit. Insert the AC/DC adapter to DC in jack on the unit.
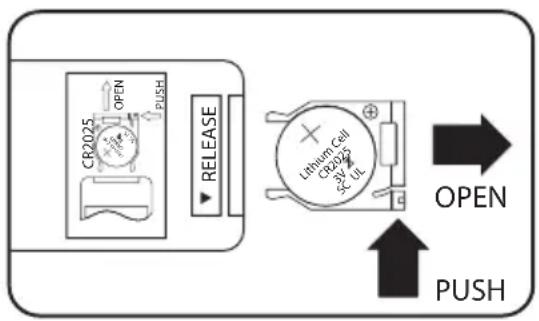
BATTERIES INSTALLATION (REMOTE CONTROL)
To replace the button cell:
-
Push the tab, then slide out the battery tray as the figure on the right.
-
Replace the old button cell by a new CR 2025 button cell as the polarity markings on the remote control.
-
Close the battery tray.
BATTERY PRECAUTIONS:
Follow these the size and type of battery specified.
- Use only the size and type of battery specified.
- Be sure the follow the correct polarity when installing the battery as indicated in the battery compartment. A reversed battery may cause damage to the device.
-
If the battery in the device is consumed or the device is not to be used for a long period of time, remove the batteries to prevent damage or injury from possible battery leakage.
-
Do not try to recharge the battery not intended to be recharged; it can overheat and rupture.
-
The batteries shall not be exposed to excessive heat such as sunshine, fire or the like.
-
Clean the battery contacts and also those of the device prior the battery installation.
-
Do not mix different types of batteries together (e.g. Alkaline and Carbon-zine) or old batteries with fresh ones.
AUTOMATIC POWER OFF FUNCTION
The tower speaker will turn to standby mode after 60 minutes if an external device connecting to LINE in, RCA or BT is disconnected or the volume is too close to mute.
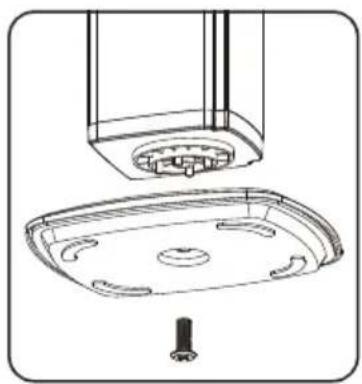
INSTALLING THE BASE TO THE TOWER
natural_image
Technical line drawing of a ceiling-mounted appliance with a central sink and mounting base (no text or symbols)- Take out the base and a piece of screw ∅10×28mm (supplied).
- Matches those pillars of the tower (at the bottom) with the appropriate holes from the base.
- Screws up with screw ∅10×28mm.
natural_image
Technical line drawing of a mechanical device with control panel and mounting brackets (no text or symbols)
natural_image
Technical line drawing of a handheld electronic device with two speakers and three buttons (no text or symbols)Insert the microphone plug into MIC JACK 1 and MIC JACK 2.
Connecting external devices and operating with AUX in and LINE in.
(1) Listening from AUX IN jack:
- Connect the Aux out jack from the external audio player (such like DVD player, TV, VCR ...etc.) to the AUX IN jacks on the rear of tower speaker by the supplied RCA connection cable as the figure below:
- Connect the tower speaker to the power as previous procedures. The Standby indicator will turn on.
- Press the POWER button on the tower speaker or Remote Control to power on the tower speaker.
- Press the SOURCE button on the unit repeatedly or the Remote Control to turn to AUX mode.
-
Power on the connected external player and start playback as usual.
-
Press the volume buttons to adjust volume level.
- Press the TREBLE buttons on the Remote Control to adjust treble as desired.
- Press the BASS buttons on the Remote Control to adjust BASS as desired.
- Press the EQ preset mode buttons MUSIC; MOVIE or VOICE to turn on the preset EQ effect as desired.
- Press the MUTE button to turn off the sound, press again to resume.
- When finished listening, press POWER button on the tower speaker or Remote Control to power Off (Standby mode) the Speaker.
(2) Listening from 3.5mm LINE in jack:
- Connect the Headphone/Earphone; Line out jack from the external audio player such like MP3 player; Discman ... etc) to the LINE IN jacks on the rear of tower speaker by the supplied Line In connection cable as the figure below:
- Connect the tower speaker to the power as previous procedures. The Standby indicator will turn on.
- Press the POWER button on the tower speaker or Remote Control to power on the tower speaker.
- Press the SOURCE button on the unit repeatedly to turn to LINE mode.
- Power on the connected external player and start playback as usual.
- Other operations are same as AUX IN mode.
(3) Listening from USB in jack:
- Insert the USB device to the USB port on the rear of tower speaker.
- Connect the tower speaker to the power as previous procedures. The Standby indicator will turn on.
- Press the POWER button on the tower speaker or Remote Control to power on the tower speaker.
- Press the SOURCE button on the unit repeatedly to turn to USB mode.
- Power on the connected external player and start playback as usual.
- Other operations are same as AUX IN mode.
(4) Setting up bluetooth pairing:
Initial pairing:
- Switch on the tower speaker. Press the SOURCE button and select Bluetooth mode.
- LED display Bluetooth icon "BT" will blink non-stop in searching for device.
- When a device is found, it will show the name "STBTK150" If the device require a password, enter "0000" to pair with the tower speaker.
Re-pairing:
- Switch on the tower speaker. Press the SOURCE button and select Bluetooth mode.
- Bluetooth icon "BT" will blink 3 seconds and it is automatically finding the last device it was paired with. When the device is found, it can play back directly.
- If there is no device found, the Bluetooth icon "BT" will continue to blink non-stop. Enter password to start with or press SOURCE button to select FM, AUX in or LINE in.
(Bluetooth SET UP) NOTE:
- If Tower has Bluetooth connected to a device, you can press and hold the MUTE/PAIR button 3 seconds to exit this device in order to pair the device with another Bluetooth device.
- The maximum transmission between the Bluetooth speaker and a device is 10 meters or 32 feet.
- Interference may occur during playback when using the Bluetooth function near other wireless devices. If playback through Bluetooth is problematic, move the Bluetooth speaker and the playback device to a different location, or use the
3.5mm audio cable jack instead of the Bluetooth function.
(5) Listening and setting up FM radio:
FM Antenna
Adjust the FM Wire Antenna at the rear panel to get the best reception signal.
Tuning the FM radio
- Press the POWER button to turn the tower speaker on.
- Press the SOURCE button to switch to FM radio mode.
- Press the TUN+/CLOCK+ or TUN-/CLOCK- buttons on the remote to tune the FM radio.
- There are 30 preset stations available.
Automatically saving radio stations
- Press the POWER button to turn the tower speaker on.
- Press the SOURCE button to switch to FM radio mode.
- Press and hold TUN/MEM button 2 seconds on the remote to start auto-searching radio stations. After finish searching, it will automatically save available radio stations. The saving sequence is P01.....030.
- Press the TUN/MEN button on the remote control to enter the preset mode.
- Press the remote TUN+/CLOCK+ and TUN-/CLOCK- button to select a preset station.
Manually saving radio stations
- Follow the instructions and tune the FM radio.
- Touch the TUN+ or TUN- one the top panel. Or press the TUN+/CLOCK+ or TUN-/CLOCK- buttons on the remote to adjust a desired radio frequency.
- Press and hold 2 seconds the MEM/CLOCK button on the remote control. Display will flash with preset station location, e.g. P01....P02... etc. Press the TUN+/CLOCK+ or TUN-/CLOCK- button to assign a station location. Press MEM/CLOCK again to confirm its location until finish all settings.
- Press the TUN/MEN button on the remote control to enter preset mode.
- Press the remote TUN+/CLOCK+ and TUN-/CLOCK- button to select a preset station.
(6) Setting the clock:
- Press the POWER button to switch off the unit.
- Press and hold 2 seconds the POWER button on the remote control or touch it on unit top panel to select 12 or 24 hour.
- Press and hold 3 seconds MEM/CLOCK button on the remote control to set the time.
-
Press the TUN+/CLOCK + or TUN-/CLOCK- button on the remote control to adjust up or down the hour.
-
Press MEM/CLOCK button again on the remote control to confirm the setting and it will automatically go to minute setting.
- Press the TUN+/CLOCK + or TUN-/CLOCK- button on the remote control to adjust up or down the minute.
- Press MEM/CLOCK button again on the remote control to confirm the setting.
(7) Setting SLEEP timer:
- Press the POWER button to switch on the unit.
- Press the SLEEP button repeatedly to select the preset set timer. Time presets available are 5, 10, 15, 30, 60, 90 minute.
- After the set sleep time has expired, the tower bar will automatically power off.
(8) Setting the alarm:
- Press the POWER button to turn the tower speaker on.
- Press the POWER button and select the FM mode on the remote control. Press the TUN+/CLOCK + or TUN-/CLOCK- button to select the desired radio frequency.
- Press the POWER button on the remote control to switch off the power.
- Press the ALARM button on the remote control to set the alarm.
- The time on the LCD display will begin blinking.
- Press the TUN+/CLOCK + or TUN-/CLOCK- button on the remote control to adjust up or down the hour.
- Press MEM/CLOCK button again on the remote control to confirm the setting and it will automatically go to minute setting.
- Press the TUN+/CLOCK + or TUN-/CLOCK- button on the remote control to adjust up or down the minute.
- Press the ALARM button again on the remote control to confirm the setting.
- After the set sleep time has expired, the ALARM will ring the preset radio station.
- Press the ALARM button on the remote control to switch on or off the alarm setting.
- Press and hold ALARM button to on alarm icon or off alarm icon.
| Problem What to do | |
| No power | Check the connection of the AC/DC adapter between the tower speaker and wall outlet. |
| No sound | Check that the volume control is NOT at minimum |
| Check that it is NOT set to mute. | |
| The remote control won't work | Inspect or replace the battery. |
| Make sure there are no obstacles obscuring the front of the tower speaker. | |
| No sound from in BT mode | Check if you have pairing or not. It needs to pair the external BT player and the tower speaker with password "0000" before 1st time listening. |
GENERAL SPECIFICATIONS
Power Source: DC = 20V 1.2A, ⊖ ⊕ ⊕
Power Source of Remote Control:......DC = 3V, 1X CR 2025 battery (Included)
Power Consumption: 30W
Audio Power:
Left Channel....20W(RMS)
Right Channel....20W(RMS)
Radio Coverage.....FM 87.5-108.0 MHz
Impedance of Speakers:
Left Channel....8 Ohm, 25W
Right Channel....8 Ohm, 25W
Made in China
Warranty conditions
- The warranty of this product is for 2 years since the purchase date.
- The warranty will exclude breakdowns caused by bad use of the product, wrong installation or installation in not desirable places for a proper maintenance of the product, rips, updates of the product that are not the supplied by the brand, pieces wore away for its use or for not domestic or inappropriate use. Also are excluded breakdowns caused for manipulations of the products by people or companies alien to our company.
- For any request regarding the warranty terms, the purchase receipt must be attached.

Correct disposal of this Product
(Waste Electrical & Electronic Equipment(WEEE)
Your product is designed and manufactured with high quality materials and components which can be recycled and reused.
This symbol means that electrical and electronic equipment, at their end of life should be disposed of separately from your household waste.
Please dispose of this equipment at your local community waste collection/recycling centre.
In the European Union there are separate collection systems for useelectrical and electronic products. Please help us to conserve the environment we live in!
DECLARATION OF CONFORMITY
Council Directive(s) to which conformity is declared:
Directive (2014/53/EU) - R&TTE
Directive (2014/30/EU) - EMC
Directive (2014/35/EU) - LVD
Directive (2011/65/EU) - RoHS
Application of the Standards:
EN 55013:2013
EN 55020:2007+A11:2011
EN 61000-3-2:2006+A1:2009+A2:2014
EN 61000-3-3:2013
EN 300 328 V1.9.1(2012-06)
EN 62479:2010
EN 60065:2014
EN 301 489-1 V1.9.2(2011-09)
EN 301 489-17 V2.2.1(2012-09)
Manufacturer's name:
AFEX SUNS, S.A.
Manufacturer's address:
c/Metall 6-8, 08110, Montcada i Reixac
Type of equipment:
Sound Tower
Trade:
SUNSTECH
Model no.:
STBTK150
We, the undersigned, hereby declare under our sole responsibility that the specified equipment is in conformity with the above Directive(s) and Standard(s)
Place: Barcelona
(Signature)
Víctor Planas Bas
(Full name)
Date: 12 - May - 2016
General Manager
(Position)
sunstech ^1
BLUETOOTH+ ALTAVOZ DE TORRE DE KARAOKE

natural_image
Line drawing of a vertical cylindrical device with three side handles and a central control panel (no text or symbols)STBTK150
NOTAS:
natural_image
Technical line drawing of a ceiling-mounted appliance with a central sink and mounting base (no text or symbols)natural_image
Technical line drawing of a mechanical device with control panel and mounting brackets (no text or symbols)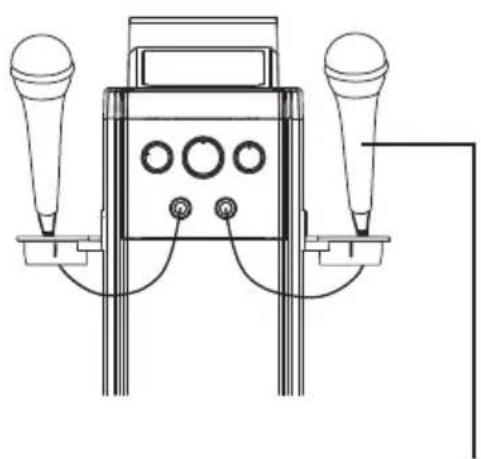
natural_image
Technical line drawing of a handheld electronic device with two speakers and three buttons (no text or symbols)DC = 3V, 1X CR 2025 battery (Included)
natural_image
Line drawing of a vertical cylindrical device with three side handles and a central control panel (no text or symbols)STBTK150
VEUILLEZ LIRE CES INSTRUCTIONS ATTENTIVEMENT AVANT DE METTRE EN SERVICE CET ÉQUIPEMENT.
MODE D'EMPLOI
Mesures de sécurité
NOTES:
natural_image
Technical line drawing of a ceiling-mounted appliance with a central sink and mounting base (no text or symbols)natural_image
Technical line drawing of a mechanical device with control panel and mounting brackets (no text or symbols)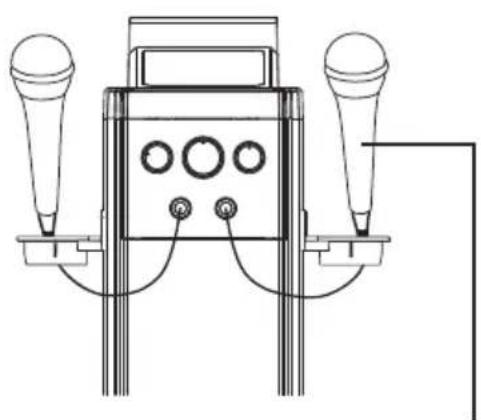
natural_image
Technical line drawing of a handheld electronic device with two speakers and control knobs (no text or symbols)natural_image
Technical line drawing of a vertical cylindrical device with internal components and mounting brackets (no text or symbols)natural_image
Technical line drawing of a vertical control panel with buttons and ports, no text or symbols presentnatural_image
Technical line drawing of a vertical control panel with buttons and ports, no text or symbols presentDC = 3V, 1X CR 2025 battery (Included)
DÉCLARATION DE CONFORMITÉ
Directive (2011/65/EU) - RoHS
natural_image
Line drawing of a vertical cylindrical device with three side handles and a central control panel (no text or symbols)STBTK150
LEIA ANTES DE USAR ESTE EQUIPAMENTO.
MANUAL DE INSTRUÇÕES
NOTAS:
natural_image
Technical line drawing of a ceiling-mounted appliance with a central tray and mounting base (no text or symbols)- Retire a base e o parafuso de ∅10×28mm (fornecido).
- Encaixe as bases da torre (no fundo) nos buracos correspondentes da base.
- Aperte com parafuso de ∅10×28mm.
CONECTAR O MICROFONE
natural_image
Technical line drawing of a mechanical device with control panel and mounting brackets (no text or symbols)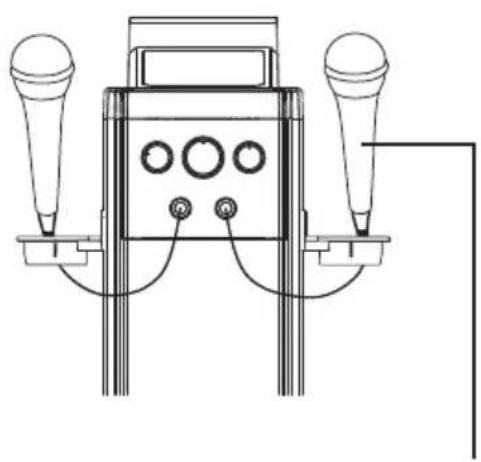
natural_image
Technical line drawing of a handheld electronic device with two speakers and three buttons (no text or symbols)natural_image
Technical line drawing of a vertical mechanical or electrical component with labeled ports and terminals (no readable text or symbols)natural_image
Technical line drawing of a vertical control panel with buttons and ports (no text or symbols)natural_image
Technical line drawing of a vertical control panel with buttons and ports (no text or symbols)Directive (2011/65/EU) - RoHS
- STBTK150
- Safety precautions
- Power Source
- Before plugging in for the first time, read the following section carefully.
- Power Cord
- Moisture and Water
- Cleaning
- Ventilation
- Heat and Flames
- Lightning
- Replacement Parts
- Servicing
- Risk of electric shock
- Waste Disposal
- Disconnecting the Device
- Headphone Volume
- Installation
- Warning:
- Electrical device not in the hands of children
- Warnings and Precautions
- Important Safety Instructions
- Additional Warnings
- IN THE BOX
- TOP PANEL- LOCATION OF CONTROLS
- EFFECTIVE DISTANCE OF REMOTE TRANSMITTER
- NOTES:
- REMOTE CONTROL – LOCATION OF CONTROLS
- BATTERIES INSTALLATION (REMOTE CONTROL)
- BATTERY PRECAUTIONS:
- AUTOMATIC POWER OFF FUNCTION
- INSTALLING THE BASE TO THE TOWER
- Listening from AUX IN jack:
- Listening from 3.5mm LINE in jack:
- Listening from USB in jack:
- Setting up bluetooth pairing:
- Initial pairing:
- Re-pairing:
- (Bluetooth SET UP) NOTE:
- Listening and setting up FM radio:
- FM Antenna
- Tuning the FM radio
- Automatically saving radio stations
- Manually saving radio stations
- Setting the clock:
- Setting SLEEP timer:
- Setting the alarm:
- GENERAL SPECIFICATIONS
- Warranty conditions
- Correct disposal of this Product
- DECLARATION OF CONFORMITY
- Directive (2014/53/EU) - R&TTE
- Directive (2014/30/EU) - EMC
- Directive (2014/35/EU) - LVD
- Directive (2011/65/EU) - RoHS
- sunstech 1
- NOTAS:
- Mesures de sécurité
- DÉCLARATION DE CONFORMITÉ
- CONECTAR O MICROFONE
Brand : Sunstech
Model : STBTK150
Category : Karaoke system