
Avance Collection HR3866 - Food Processor PHILIPS - Free user manual and instructions
Find the device manual for free Avance Collection HR3866 PHILIPS in PDF.

| Brand | Philips |
| Model | Avance Collection HR3866 |
| Appliance type | Food processor / High-speed blender |
| Bowl capacity | 2 liters (max liquid) |
| Number of speeds | 10 manual speeds + Pulse mode |
| Automatic programs | Smoothie, Frozen dessert, Soup, Nuts, Crush ice |
| Rated power | 1400 W (estimated) |
| Noise level | 89 dB(A) |
| Bowl material | Resistant plastic (Tritan) |
| Blade material | Stainless steel |
| Safety | Safety lock, automatic shut-off after 4 min, overheat protection |
| Display | Digital timer (M:SS) |
| Maximum ingredient temperature | 40°C |
| Minimum ingredient quantity | 250 ml |
| Cleaning | Dishwasher-safe parts (except motor base), quick clean with soapy water |
| Included accessories | Pusher, measuring cup, lid (depending on model) |
| Power supply voltage | 220-240 V, 50-60 Hz |
| Repairability | Philips Authorized Service Center |
Frequently Asked Questions - Avance Collection HR3866 PHILIPS
User questions about Avance Collection HR3866 PHILIPS
0 question about this device. Answer the ones you know or ask your own.
Ask a new question about this device
Download the instructions for your Food Processor in PDF format for free! Find your manual Avance Collection HR3866 - PHILIPS and take your electronic device back in hand. On this page are published all the documents necessary for the use of your device. Avance Collection HR3866 by PHILIPS.
USER MANUAL Avance Collection HR3866 PHILIPS
56 Manual delivery 00
25.10.19.14
1
text_image
HR3668 ① ② ③ ④ ⑤ ⑥ ⑦ ⑧ ⑨ ⑩ ⑪ ⑫ ⑬ ⑭ ⑮ ⑯ ⑰ ⑱ ⑲ ⑳ ㉑ ㉒ ㉓ ㉔ ㉕ ㉖ ㉗ ㉘ ㉙ ㉚ ㉛ ㉜ ㉝ ㉞ ㉟ ㉳ ㉟ ㉟a ㉟b ㉟c ㉟d ㉟e ㉟f ㉟g ㉟h ㉟i ㉟j ㉟k ㉟l ㉟m ㉟n ㉟o ㉟p ㉟q ㉟r ㉟s ㉟t ㉟u ㉟v ㉟w ㉟x ㉟y ㉟z2

text_image
Illustrated step-by-step cooking process for a blender, showing steps from adding to adding liquid and drying.3 5
text_image
Illustrated steps of a cleaning or cleaning procedure with numbered instructions and labeled diagrams4
5 HR3869
text_image
Illustrated guide showing a step of cooking or cleaning steps with numbered instructions and illustrations.6

text_image
Six-panel comic strip with labeled illustrations and checkmarks, showing a shopping scene with a bag, clock, and food items.7
| KG(MAX) | |||
| 2 L | 1 min. | ||
| 2 L | 1 min. | ||
| 2 L | 10 | 1 min. | |
| 1.8 L | 10 | 1 min. | |
| 14 x 5 | 30 sec | ||
| 17 L | 5 min. | ||
| 1.7 L | 4 min. | ||
| 200 g MIN300 g MAX | 30 sec x3 | ||
| 500 g | 2 min | ||
| 600 g | 10 | 3 min. | |
| 600 g | 10 | 30 sec |
1 Welcome
Congratulations on your purchase and welcome to Philips! To fully benefit from the support that Philips offers, register your product at www.philips.com/welcome.
Read this user manual carefully before you use the appliance and save it for future reference.
Warning
- Do not touch the sharp blades when the appliance is plugged in. If the blades get stuck, unplug the appliance before you remove the ingredients. Be careful when handling the sharp cutting blades, emptying the bowl and during cleaning.
- Switch off and unplug the appliance from the power supply before:
- Removing it from the stand, changing accessories or approaching parts that move in use.
- Assembling, disassembling or cleaning it.
-
It is left unattended.
-
Do not immerse the appliance in water or any other liquid.
- Check if the voltage indicated on the appliance corresponds to the local mains voltage before you connect the appliance.
- Do not use the appliance if the plug or the mains cord is damaged or has visible cracks. If the mains cord is damaged, you must have it replaced by Philips, a service centre authorized by Philips or similarly qualified persons in order to avoid a hazard.
• Make sure the lid and measuring cup are properly assembled to the blender jar before you use the appliance. -
This appliance shall not be used by children. Keep the appliance and its cord out of reach of children.
-
This appliance can be used by persons with reduced physical, sensory or mental capabilities or lack of experience and knowledge if they have been given supervision or instruction concerning use of the appliance in a safe way and if they understand the hazards involved.
• Children should be supervised to ensure that they do not play with the appliance. - Never assemble or disassemble the blender jar to the motor base while the power is on.
- This appliance is intended for household use only.
- Read the cleaning procedure from “User Manual” before use.
- In order to avoid a hazard due to inadvertent resetting of the thermal cut-out, this appliance must not be supplied through an external switching device, such as a timer, or connected to
a circuit that is regularly switched on and off by the utility.
- Do not put the jar on the main unit if the motor coupling is still running.
- Do not take out the jar from the main unit if the blade is not totally stopped.
- The blender can not be used without load or with a minimum quantity of ingredient or liquid (250 ml). Putting too less ingredients or liquid can cause damage to the blender.
- The blender must be operated with the rubber pad. Do not remove the rubber pad on top of the motor unit
Caution
- Never use any accessories or parts from other manufacturers or that Philips does not specifically recommend. If you use such accessories or parts, your guarantee becomes invalid.
- Do not exceed the maximum indication on the blender jar.
- Do not exceed the maximum quantities and processing times indicated in the relevant table (Fig. 7).
- If food sticks to the wall of the blender jar, switch off the appliance and unplug it. Then use a spatula to remove the food from the wall.
- Never fill the blender jar with ingredients hotter than 40 °C.
- The appliance can only be switched on if the blender jar is assembled on the motor unit correctly.
Blender
Warning
- Never reach into the blender jar with your fingers or an object while the appliance is running.
- If the blade unit gets stuck, unplug the
appliance before you remove the ingredients that block the blades.
Caution
- To prevent spillage, do not put more than 2 litres of liquid in the blender jar, especially when you process at a high speed. Do not put more than 2 litres in the blender jar when you process liquids or ingredients that tend to foam.
- Do not operate the appliance for multiple batches of recipes. Let the appliance to cool down for 30 minutes before you continue operating again.
• Always make sure the lid is properly closed/ assembled on the jar and the measuring cup is inserted properly in the lid before you switch on the appliance. - Noise level: Lc = 89 dB [A]
Electromagnetic fields (EMF)
This Philips appliance complies with all standards regarding electromagnetic fields (EMF). If handled properly and according to the instructions in this user manual, the appliance is safe to use based on scientific evidence available today.
Recycling

This symbol means that this product shall not be disposed of with normal household waste (2012/19/EU). Follow your country's rules for the separate collection of electrical and electronic products. Correct disposal helps prevent negative consequences for the environment and human health.
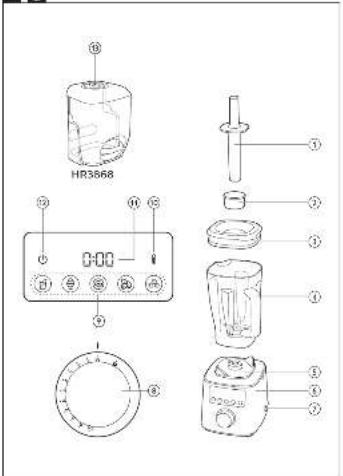
2 Overview (Fig. 1)
Main unit
① Tamper
② Measuring cup
③ Blender lid
④ Blender jar
⑤ Rubber pad
⑥ Motor unit
⑦ Power switch
Control panel
⑧ Speed selector (Rotary knob)
0: switch off the blender
1-10: switch on the blender and select a blending speed setting
P: pulse setting
⑨ Program LED and button
Smoothie
Frozen dessert
Soup
Nuts
Ice crushing
⑩ Overheat warning LED
⑪ Timer (M:SS)
⑫ Sleep LED
⑬ Dome (HR3868 only)
3 Before first use
Before you use the blender for the first time, thoroughly clean the parts that come into contact with food.
If the timer shows “---”, turn the rotary knob to speed 0 and place the jar on the motor unit.
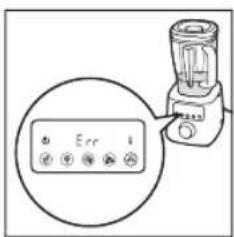
Built-in safety lock
This feature ensures that you can only switch on the appliance if you have put the blender jar correctly on the motor unit. If the blender jar is put correctly, the built-in safety lock is unlocked.
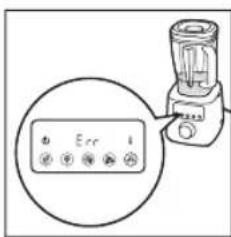
When the blender jar is not placing well on the motor unit during blending, the message “Err” displays.
To reset your blender in this case, follow the steps below:
1 Switch off the blender. Make sure the rotary knob is at "0".
2 Switch on the blender.
Auto stop
Your blender will be automatically turned off after 4 minutes of continuous operation. This can avoid potential problems due to prolonged usage.
Overload protection
The overheat warning LED (thermometer icon) flashes when the blender is overloaded. If the blender continues working with heavy load, the message “Hot” displays when it is fully overloaded. The blender will automatically stop working. Note: if the temperature of the appliance is too high or the appliance is overused, the message “Hot” displays directly and the blender will also stop working.
To reset your blender in case of overload and auto stop protection, follow the steps below:
1 Switch off the blender and then unplug it.
2 Remove some of the ingredients to reduce the load.
3 Allow the appliance to cool down for 30 minutes.
4 Connect the power plug to the wall outlet and switch on the blender.
Blender jar
The jar is designed for processing various recipes like smoothie, juice, sauce, grain milk, soup, puree, frozen dessert, ice crushing, nut butter, chopping or grinding dry ingredients. If the jar is used for grinding dry ingredients, the jar wall will be scratched and become cloudy. There is no negative impact on the blending performance and no food safety concern. It is still safe to use.
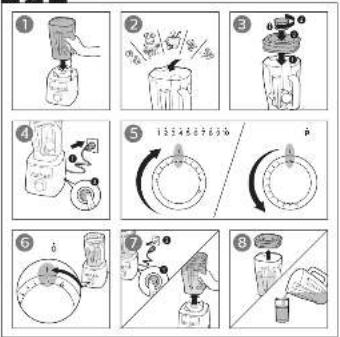
4 Preset blending mode (Fig. 2)
1 Assemble your blender jar as indicated.
2 Put the ingredients in the jar.
3 Insert the measuring cup and close the lid.
4 Put the plug in the wall outlet and switch on the blender.
→ The timer shows 0:00 and program LEDs turn on. The appliance is ready to use.
5 Select a program by pressing a program button on the panel.
→ The blender starts blending as programmed.
→ The timer starts counting down.
• See table 1 for purposes and blending time of different programs.
- To stop the current blending program, press the selected program button again.
- To switch to manual blending mode during the blending process, turn the knob to a speed setting as needed.
- To switch to pulse mode during the blending process, turn the knob to P several times.
6 Switch off the blender and unplug it after blending.
→ The blender stops blending when the timer reaches 0:00.
7 Remove the blender jar from the motor unit.
8 Open the lid and pour out the ingredients from the blender jar.
5 Manual blending mode (Fig. 3)
1 Assemble your blender jar as indicated.
2 Put the ingredients in the jar.
3 Insert the measuring cup and close the lid.
4 Put the plug in the wall outlet and switch on the blender.
5 Turn the knob to a speed setting as needed.
→ The blender starts blending.
→ The timer starts counting up.
- To switch to pulse blending mode during the blending process, turn the knob to P several times.
6 Turn the knob to speed 0 to stop blending.
→ Let the blender cool down for 5 minutes after blending.
7 Switch off the blender and unplug it. Then remove the blender jar from the motor unit.
8 Open the lid and pour out the ingredients from the blender jar.
6 Sleep mode
Your blender will go into sleep mode after 3 minutes when there is no operation and sleep LED (power LED) is on. You can wake up the appliance and start manual blending by turning rotary knob to a speed setting needed.
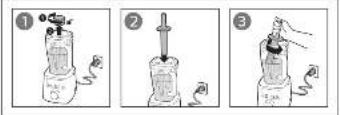
7 Use the tamper (Fig. 4)
You can use the tamper to process very thick mixtures or recipes with less liquid which cannot be processed well in a normal blender, e.g. nut butters, frozen dessert or puree vegetables. The tamper helps circulation by preventing air formed.
The tamper is used to stir and push ingredients into the blades when the blender is on.
Note: Use the tamper only when the lid is assembled correctly to the jar to avoid tamper hitting the blades.
Tips: You can move the tamper up and down, turn around or push it toward the side or corner of the jar to help ingredients circulate.
8 Use the dome (HR3868 only) (Fig. 5)
You can use the dome to reduce the noise during blending.
Follow the steps to assemble and use the dome as indicated in fig. 5.
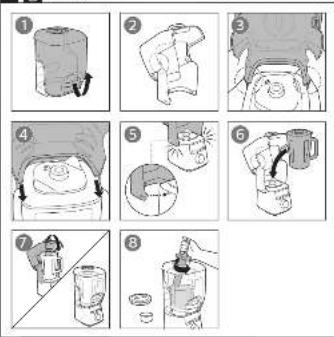
9 Cleaning (Fig. 6)

Warning
• Before you clean the appliance, unplug it.
• Refer to Fig. 6 for information on cleaning the parts with water, dishwashing machine and/or moist cloth.
- Do not remove the rubber pad on top of the motor unit.

Caution
• Make sure that the cutting edges of the blades do not come into contact with hard objects. This may cause the blade to get blunt.
- The cutting edges are sharp. Be careful when you clean the blade units.
1 Clean the motor unit with a moist cloth.
2 Clean the other parts in hot water (< 60°C) with some washing-up liquid or in a dishwasher.
3 Store the appliance and accessories in a dry place after cleaning.
Quick cleaning
Follow the steps below to clean the blender jar easier.
1 Pour lukewarm water (not more than 1 liters) and a few drops of washing-up liquid into the blender jar.
2 Insert the measuring cup and close the lid.
3 Turn the knob to speed 10. Let the blender run for 30 seconds or until the blender jar is clean.
4 After use, switch off the blender and then unplug the appliance.
5 Remove the blender jar and rinse it with clean water.
10 Guarantee and service
If you have a problem, need service, or need information, see www.philips.com/support or contact the Philips Consumer Care Center in your country. The phone number is in the worldwide guarantee leaflet. If there is no Consumer Care Center in your country, go to your local Philips dealer.
Table 1
| Program | Smoothie | Frozen dessert | Soup | Nuts | Ice crushing |
| Purpose Blend anything like fruits, vegetables, frozen fruits, yoghurt, oat, seeds, herbs into thick and creamy smoothie | Blend frozen fruits and yoghurt into delicious frozen dessert | Blend vegetables into silky soup | Grind whole nuts into finely chopped result | Crush ice cubes within few pulse | |
| Blending time | 1 min 2 min 4 min | 30 sec 30 sec | |||
| Suggested recipe | Spinach with pineapple and banana smoothie | Frozen strawberry with yoghurt ice cream | Creamy tomato soup | Grinding almond | Mango and orange with crushed ice |
Recipe
| Ingredients:950g minced pork20g scallion | Procedure:1. Put the minced pork and scallion into jar.2. Blend the recipe for 10 seconds at speed 10. |
11 Troubleshooting
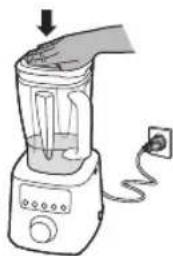
The blender cannot be used without load which can cause damage to the blender.
When the jar is filled with less than 250 ml of ingredients, please press and hold the jar lid firmly (as indicated) to stabilize the blender while processing.
In the event that display will show "Err" message due to jar wobbling out of its position, please follow below instructions:
natural_image
Illustration of a blender with a power cord and outlet tube, no text or symbols present1 Switch OFF the blender.
2 Make sure the rotary knob is set at "0".
3 Switch ON the blender.
text_image
Err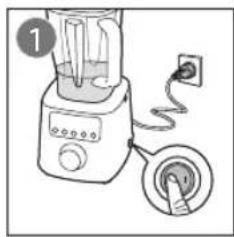
natural_image
Illustration of a blender with an electrical outlet connected to a plug (no text or symbols)
text_image
2 I o P o o o o
natural_image
Illustration of a blender with a plug inserted, showing internal components and a numbered label (3), no text or symbols present.| Problem Solution | |
| Why does the jar become scratched and cloudy? | If the jar is used for grinding dry ingredients, the jar wall will be scratched and become cloudy. There is no negative impact on the blending performance and no food safety concern. It is still safe to use. |
| Why do the ingredients become warm after blending? | This is a high speed blender so processing time is faster than a normal blender. You can use the preset blending mode or shorten the blending time under manual blending mode to avoid over blending and warming. |
| When the blender stops working and the message “Hot” displays, what does it mean? | The overheat warning LED (thermometer icon) flashes when the blender is overloaded. If the blender continues working with heavy load, the message “Hot” displays when it is fully overloaded. The blender will automatically stop working.Note: if the temperature of the appliance is too high or the appliance is overused, the message “Hot” displays directly and the blender will also stop working.To reset your blender in case of overload and auto stop protection, follow the steps below:1 Switch off the blender and then unplug it.2 Remove some of the ingredients to reduce the load.3 Allow the appliance to cool down for 30 minutes.4 Connect the power plug to the wall outlet and switch on the blender. |
1 Willkommen!
natural_image
Illustration of a blender with a power cord and outlet tube (no text or symbols)natural_image
Illustration of a blender with a plug inserted into a socket (no text or symbols)Protection anti- surcharge
natural_image
Illustration of a blender with a plug and power outlet, no text or symbols presentnatural_image
Illustration of a blender with a power outlet connected to a plug (no text or symbols)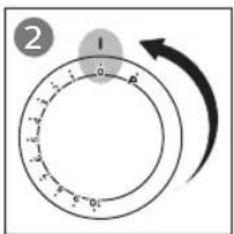
text_image
2 I 0 P 0 0 0 0 0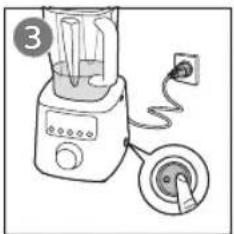
text_image
Diagram showing a blender with labeled parts and an electrical plug, likely illustrating a power or circuit connection.natural_image
Illustration of a blender with a handle and power outlet, no text or symbols presenttext_image
Diagram of a blender with control panel and icon buttons, showing 'Err' text and icons for menu or function.
natural_image
Illustration of a blender with a plug inserted into it, showing electrical connections (no text or symbols)
text_image
2 I 0 P 0 0 0 0 0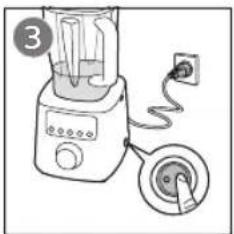
text_image
③ 电芯充电Problema Soluzione
9 Schoonmaken (afb. 6)

Waarschuwing
natural_image
Illustration of a blender with a handle and power outlet, no text or symbols presenttext_image
Diagram showing a blender with control panel labeled 'Err' and a magnified view of its display.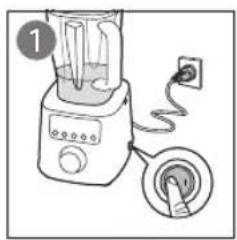
natural_image
Illustration of a blender with a power outlet connected to a plug (no text or symbols)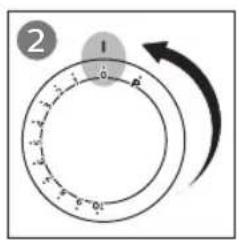
text_image
2 1 0 P 6 0 0 0 0 0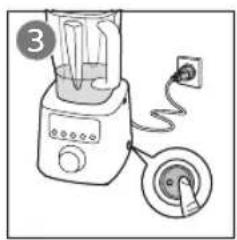
text_image
③Probleem Oplossing
natural_image
Illustration of a blender with a power outlet and a downward arrow indicating action (no text or symbols)1 Sæt blenderen på OFF.
2 Sørg for, at drejeknappen står på "0".
3 Sæt blenderen på ON.

text_image
Ecc 1
text_image
Diagram showing a blender with labeled parts and an electrical outlet, likely illustrating a power or circuit connection.
text_image
2 I o P 01
natural_image
Illustration of a blender with an electrical plug inserted, showing the blade and socket (no text or symbols)natural_image
Illustration of a blender with a power cord and outlet tube (no text or symbols)text_image
Diagram showing a blender with labeled parts and an electrical outlet, likely illustrating a cooking or cleaning process.
text_image
2 I 0 P 0 0 0 0 0 0 0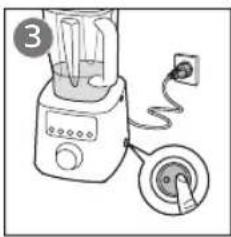
text_image
Diagram showing a blender with a plug inserted into it, labeled with number 3 and an electrical socket symbol.natural_image
Illustration of a blender with a power outlet and a downward arrow indicating action (no text or symbols)1 Slå hurtigmikseren AV.
2 Kontroller at den roterende bryteren står på 0.
3 Slå hurtigmikseren PÅ.
text_image
Ecc
text_image
Diagram showing a blender with labeled parts and an electrical outlet, likely illustrating a cooking or cleaning process.
text_image
2 I 0 P 0 0 0 0 0 0 0
text_image
Diagram showing a blender with a plug inserted into it, labeled with number 3 and an electrical socket symbol.natural_image
Illustration of a blender with a power outlet and a downward arrow indicating action (no text or symbols)text_image
Diagram showing a blender with labeled parts and a plug inserted into a socket, likely illustrating a cooking or cleaning process.
text_image
2 I 0 P 0 0 0 0 0 0
text_image
Diagram showing a blender with a plug inserted into a socket, labeled with number 3natural_image
Illustration of a blender with a power cord and outlet tube (no text or symbols)text_image
Diagram showing a blender with a power outlet connected to a plug, labeled with number 1
text_image
2 I o P o o o
natural_image
Illustration of a blender with a plug and power outlet, no text or symbols presentnatural_image
Illustration of a blender with a plug and power outlet, no text or symbols presenttext_image
Diagram showing a blender with labeled parts and an electrical outlet, likely illustrating a power or circuit connection.
text_image
2 I 0 P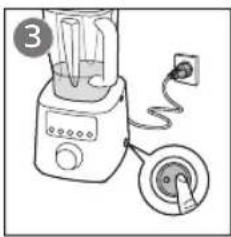
natural_image
Illustration of a blender with a plug inserted into it, showing internal components and wiring (no text or symbols)Problema Solución