
Espremio EX6200 - Coffee maker TEFAL - Free user manual and instructions
Find the device manual for free Espremio EX6200 TEFAL in PDF.
Frequently Asked Questions - Espremio EX6200 TEFAL
User questions about Espremio EX6200 TEFAL
0 question about this device. Answer the ones you know or ask your own.
Ask a new question about this device
Download the instructions for your Coffee maker in PDF format for free! Find your manual Espremio EX6200 - TEFAL and take your electronic device back in hand. On this page are published all the documents necessary for the use of your device. Espremio EX6200 by TEFAL.
USER MANUAL Espremio EX6200 TEFAL
TEFAL RECOMMENDS SAFETY FIRST
Congratulations on the purchase of your new Tefal espresso machine. At Tefal we are very safety conscious and request that you exercise caution and care when using this appliance. Please read the following instructions before commencing use of your appliance.
To ensure that your machine meets our safety and quality standards, your machine has been checked and tested using real ground coffee. Every care has been taken to ensure that your appliance has been thoroughly cleaned, however, there maybe some traces of coffee and drops of water within the machine. Tefal guarantees that your machine is brand new.
You have just purchased the latest innovation in terms of espresso machines. Your machine is equipped with a filter holder that has three exclusive systems:
- The first is for the progressive compression of the ground coffee when positioning the filter holder (OPTIPRESS System).
The second is for ejecting the used coffee. - The last is for the use of E.S.E. (Easy Serving Espresso) pods or flexible pods.
The filter holder can also be removed so that you can clean it regularly to keep it in perfect working order. For your safety, the filter holder is fitted with a locking system so that it remains in place when the pressure rises.
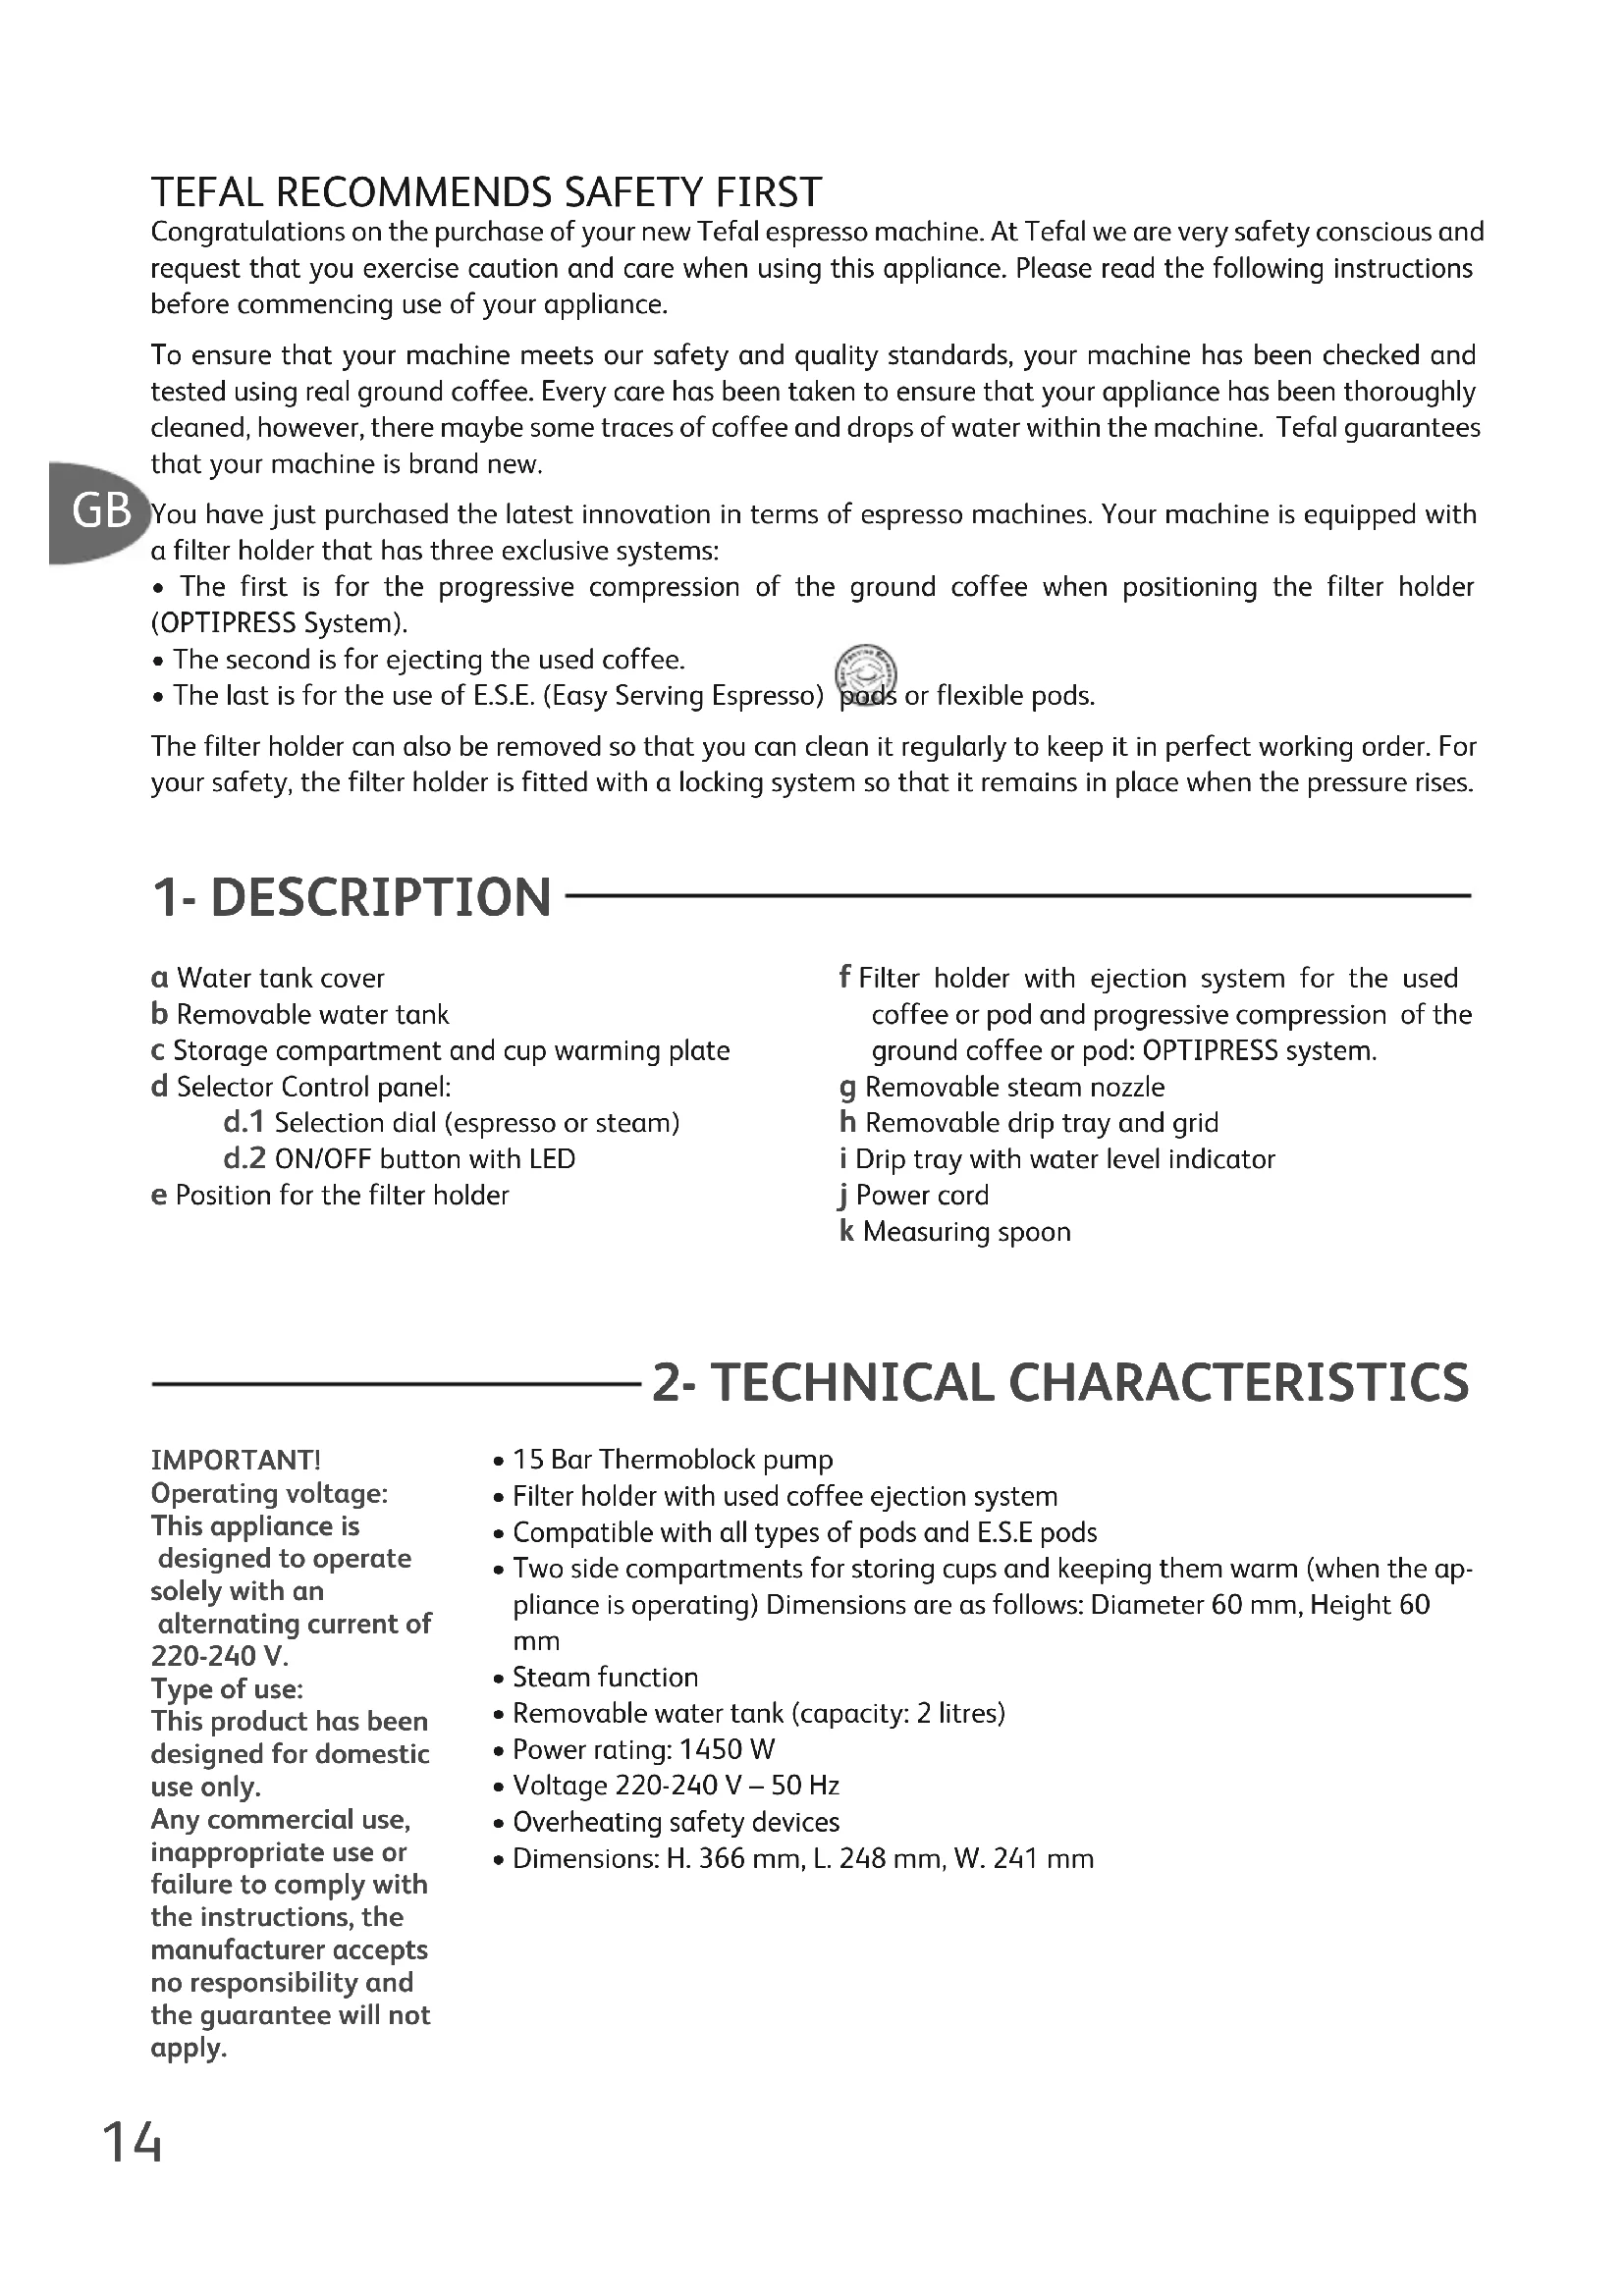
1- DESCRIPTION
a Water tank cover
b Removable water tank
c Storage compartment and cup warming plate
d Selector Control panel:
d.1 Selection dial (espresso or steam)
d.2 ON/OFF button with LED
e Position for the filter holder
f Filter holder with ejection system for the used coffee or pod and progressive compression of the ground coffee or pod: OPTIPRESS system.
g Removable steam nozzle
h Removable drip tray and grid
i Drip tray with water level indicator
j Power cord
k Measuring spoon
2- TECHNICAL CHARACTERISTICS
IMPORTANT!
Operating voltage:
This appliance is designed to operate solely with an alternating current of 220-240 V.
Type of use:
This product has been designed for domestic use only.
Any commercial use, inappropriate use or failure to comply with the instructions, the manufacturer accepts no responsibility and the guarantee will not apply.
15 Bar Thermoblock pump
- Filter holder with used coffee ejection system
- Compatible with all types of pods and E.S.E pods
- Two side compartments for storing cups and keeping them warm (when the appliance is operating) Dimensions are as follows: Diameter 60 mm, Height 60 mm
- Steam function
- Removable water tank (capacity: 2 litres)
Power rating: 1450 W
Voltage 220-240 V - 50 Hz
Overheating safety devices
- Dimensions: H. 366 mm, L. 248 mm, W. 241 mm
3. SAFETY INSTRUCTIONS
- Before using your espresso machine, please read the instructions carefully.
- This appliance is for household use only.
- Do not use this appliance for other than its intended use. Do not use outdoors.
- This appliance is not designed to be used by persons (including children) with reduced physical, sensorial or mental capacities or persons with no experience or knowledge unless they are under supervision.
- Young children should be supervised to ensure they do not play with the appliance.
- Do not leave the appliance unattended when in use.
- Do not place your espresso machine on or near hot gas or electric burner, or where it could touch a heated oven.
- Always use the appliance on a dry, level surface.
- Do not let the cord hang over the edge of a table or counter, touch hot surfaces or become knotted.
- Do not immerse the cord, plug or espresso machine in water or any other liquid.
- Always switch the appliance to "OFF", switch the power off at the power outlet and remove the plug when the appliance is not being used and before cleaning.
- Only plug the appliance in a socket with an earth pin. Check that the voltage on the rating plate of the appliance matches that of your electrical installation.
- Avoid contact between the power cord and your hands with the hot parts of the appliance (cup warming compartment, filter holder, and steam nozzle).
- Regularly inspect the power supply cord and do not use the appliance if it is damaged or if the power cord has been damaged. If found damaged in any way, immediately cease use of the espresso machine and return the entire unit to your nearest authorised Tefal Service Centre for examination, replacement or repair. Under no circumstances should you open the appliance yourself.
- The accessories and removable parts of the appliance are NOT dishwasher safe.
SPECIAL SAFETY INSTRUCTIONS
- Only use cold water in the tank. Do not use any other liquid.
- Never use the machine without water in the water tank.
- Do not use the appliance unless the drip tray and the grill are fitted.
- Ensure the filter holder is securely fitted when using the espresso machine.
- Never remove the filter holder during the brewing operation as the machine is under pressure.
- Follow the instructions for descending operations.
4. PRACTICAL ADVICE
IMPORTANT!
Before first use, after prolonged periods of non-use or after.
descaling,
the appliance must
be cleaned as
described in
the paragraph: "FIRSTUSE
- To release the filter holder while pressing the "EJECT" button lightly before removing it from the appliance (fig. 1).
- Do not fill your filter holder to the top, use the measuring spoon (1 spoon per cup).
- Remove any excess ground coffee from the edge of the filter holder.
- It is recommended that you empty the water tank daily after use.
- Before removing the tank to fill or empty it, always remember to switch off the appliance.
- To obtain optimal temperature of your cup, Tefal recommends you keep the cups warm in the compartments provided.
Water Flow:
If you are making an espresso, you must make sure that the water flows through the espresso machine at the correct rate. If it is too slow, the coffee will be over extracted – too dark and very bitter, with an uneven crema. If it flows too quickly, the coffee will be under-extracted – the proper aroma and flavour would not have had time to develop. You can adjust the coffee tamping by turning the filter head from left to right.
Coffee
It is recommended that you use pre-ground coffee as it ensures a richer and flavoursome coffee. Pre-ground coffee will retain its flavour for up to 1 week, if preserved in a tightly sealed container and stored in a cool, dark area. Do not store the ground coffee in a refrigerator or freezer. Pre-ground coffee stored in a container will keep up to 1 month prior to going stale.
The Grind
If using pre-ground coffee, ensure you purchase an espresso grind. The grind should be fine, but not too fine otherwise it will affect the taste and the rate of water that flows through it. Too fine a grind means the coffee will not flow through even under pressure. If the grind is too coarse, the water will flow too quickly, preventing a flavoured extraction.
5. FIRST USE
Rinsing before first use
Before using your coffee machine, clean all of the accessories in mild detergent and water. Rinse thoroughly and then dry them.
- Ensure the Power switch and Selector control are set to 'OFF' position. Turn off at the power outlet and unplug the power cord. Lift up the water tank and fill with cold water to the maximum mark and place in the machine, pressing down firmly so that it is secure. Close the water tank lid.
- Switch on the appliance by pressing the ON/OFF button d2.
- The temperature light flashes, once the flashing stops the appliance is ready for use (fig. 2).
- Insert the filter holder (without ground coffee) into the appliance: turn it towards the right as far as possible (fig. 3).
- Place a large container with a volume of more than 1/2 litre underneath the filter holder (fig. 4). Turn the selector dial d1 to the position (coffee) (fig. 5).
- Let the water run from the tank. To stop the flow of water, turn the selector dial d1 to the position "0" (fig. 6) and unplug the appliance.
- Remove the tank, empty it and rinse it carefully. Then securely place it back into the appliance (fig. 7 and 8).
6. PREPARING AN ESPRESSO
IMPORTANT!
If the espressomachine is being used for the first time, the appliance must be cleaned as described in section 5 "FIRST USE".
With ground coffee
- Before removing the removable tank, place the selector dial d1 in the "0" position (fig. 6).
- Fill the tank with cold water and securely fit it back into the appliance (fig. 7 et 8).
- Switch on the appliance by pressing the ON/OFF button d2.
- The LED flashes while the machine is warming up, and once ready it remains lit, it is now ready for use.
For best results, we recommend warming up the accessories beforehand (filter holder and cups) without adding any ground coffee. Proceed as follows:
- Securely fit the empty filter holder and place the espresso cups directly underneath it. As soon as the appliance has reached the right temperature, the orange LED stops flashing.
- Press the 2 cup or 1 cup button according to what you require.
- Once the cup(s) are filled with hot water, move the selector back to the "0" position.
- Release the filter holder by pressing the "EJECT" button lightly and turning it towards the left (fig. 1). Using the measuring spoon, place the ground coffee into the filter holder: one measuring spoon (filled to the top) per cup for a good espresso (fig. 9). It is important to use the correct amount of coffee as the filter perforations have been constructed for optimal pressure build up in the machine.

The type of ground coffee that you use will determine the strength and taste of your espresso: the finer your coffee is ground, the stronger the espresso.
"ESE" for "Easy Serving Espresso" is a pod (44 mm in diameter) of 7g of coffee that has been selected, ground and compacted between two filter papers especially designed to make Italian style espresso ("ristretto" short coffee). This system permits easy, simple, clean and comfortable use of your machine.
- Distribute the coffee evenly and remove the excess ground coffee from the edge of the filter holder (fig. 9). Wipe away any excess coffee from the rim of the filter holder to ensure a correct fit under the brew head. If there is too much coffee, the flow of water may become blocked.
- Place the filter holder underneath the brew head and turn it towards the right (fig. 3) until the desired compression of the ground coffee is reached. The more it is compressed, the stronger the espresso.
- Place a cup on the grill of the drip tray under the brew head (fig. 10).
- Turn the selector d1 to the position coffee) (fig. 5).
After a few moments, the coffee stars to flow. - When your cup is as full as you want, move the selector d1 to the position "0" (fig. 6).
- Remove the cup.
- Release the filter holder: press the "EJECT" button lightly while turning the filter holder towards the left and remove it from the appliance. Throw away the used coffee using the ejection system by pressing the "EJECT" button on the handle fully (fig. 11). Wash the filter holder under running water, while pressing the "EJECT" button to eliminate the remains of ground coffee (see also paragraph 8.B for deeper cleaning).
To eliminate the pressure build up within the system, it is normal that at each time the control selector dial d1 returns to the "0" position. At this position there water and steam will be running, which may create some noise.
Once you have prepared your first espresso and the appliance is hot, you can keep your cups at the right temperature
With an E.S.E Espresso Pod
- Before removing the water tank, remember to place the selector dial d1 in the "0" position.
- Fill the tank with cold water and securely fit it back into the appliance (fig. 7 and 8).
- Switch on the appliance by pressing the ON/OFF button d2.
- The LED flashes during preheating, once ready it, then remains lit. The appliance is then ready for use.
For best results, we recommend warming up the accessories beforehand (filter holder and cups) without adding any ground coffee. Proceed as follows:
- Fit the empty filter holder, and place the espresso cups underneath it. As soon as the appliance has reached the right temperature, the orange LED stops flashing.
- Press the 2 cup or 1 cup button according to what you desire.
- Once the cup(s) are filled with hot water, move the selector dial back to the "0" position
- Release the filter holder by pressing the "EJECT" button lightly and turning it towards the left (fig. 1). If required, remove the paper around the pod following the dotted lines (fig. 12). Place the E.S.E pod with the red writing facing downwards (fold the corners of the filter paper back). Ensure that the paper is placed inside the filter, otherwise this could cause it to leak.
For a creamier and thicker crema, the E.S.E pod must be positioned correctly. The pod is designed to make one cup of coffee. The use of 2 E.S.E pods on top of one another is not recommended.
- Insert the filter holder into the appliance tightening it by turning it towards the right as far as possible (fig. 3).
- To prepare your espresso, follow the same procedure as for the preparation of an espresso with ground coffee.

Your machine is also compatible with soft pods (generally 60 mm in diameter). As this type of pod is not specifically designed for espresso machines, you will obtain a weaker espresso than with an E.S.E. pod.
With a Flexible Pod
- Before removing the water tank, remember to place the selector dial d1 in the "0" position.
- Fill the tank with cold water and fit it back onto the appliance (fig. 7 and 8).
- Switch on the appliance by pressing the ON/OFF button d2.
- The LED flashes during preheating, and once ready, it then remains lit.
- Fit the empty filter holder, and place the espresso cups underneath it. As soon as the appliance has reached the right temperature, the orange LED stops flashing.
- Press the 2 cup or 1 cup button according to what you desire.
- Once the cup(s) are filled with hot water, move the selector dial back to the "0" position
- Release the filter holder by pressing the "EJECT" button lightly and turning it towards the left (fig. 1). Place a soft pod into the filter holder. The pod is designed to make one cup of coffee. The use of 2 pods on top of one another is not recommended.
- Insert the filter holder into the appliance tightening it by turning it towards the right (fig. 3). The more it is compressed, the stronger the espresso will be.
- To prepare your espresso, follow the same procedure as for the preparation of an espresso with ground coffee.
7. PREPARING THE STEAM
The steam is used to froth the milk (for example when preparing cappuccinos or hot chocolate) and heating water (for tea and other hot beverages).
- Turn the selector dial d1 to the position ffig. 13) (to obtain more steam, the temperature needs to be higher than when making coffee).
- The ON/OFF button LED flashes again then remains lit. The appliance is then ready for use.
- Place the liquid to be heated into a recipient. For best results, we recommend pouring the liquid to be heated or frothed into a container with a narrow neck (a small jug for example).
- Immerse the steam nozzle into the milk.
- Turn the selector dial d1 to the position (steam) (fig. 14): the steam pours into the milk.
- In order to obtain good frothy milk, we recommend using fresh cold milk.
- Place your hand at the sides and bottom of the jug and use circular movements and move from top to bottom. The pump operates intermittently, this is normal. (fig. 15).
- During operation, it is normal for the temperature light of the ON/OFF button to light up and then turn off.
- When the liquid is hot and/or frothy, switch off the appliance (select dial d1 in the "0" position).
- When the selector dial d1 is in the "0" position, the appliance cools down automatically.
- During the cooling down phase, the LED of the ON/OFF button flashes, and hot water runs into the drip tray.
- When the optimal temperature for preparing an espresso is reached, the LED remains lit.
IMPORTANT!
Once the steam has been stopped, clean the steam nozzle immediately using a damp sponge (to avoid residues from sticking) and allow more steam to run through it to free air to rinse the inside of the nozzle.
WARNING!
The steam nozzle is still hot!
Be careful not to burn yourself.
8. CLEANING AND MAINTENANCE
The accessories and removable parts of the appliance are not dishwasher proof.
Before cleaning, ensure the selector dial Control is in the "OFF" position. Switch off at the power outlet, then unplug the power cord and the unit to cool. Do not use abrasive agents or cloths which can scratch the surfaces.
A. The Appliance
- Clean the outside of the appliance from time to time with a damp cloth or sponge. Wash the tank, the drip tray and its grill regularly and dry them.
- Rinse the inside of the tank regularly.
- When a fine white film obscures the tank, carry out a descending operation.
- (see section 9. DESCALING).
- Do not use alcohol or solvent based cleaning products.
- Once the appliance has been unplugged, clean the hot water grill and the seal regularly, using a damp sponge (fig. 16).
B. The filter holder
The espresso machine is equipped with a removable filter ejecting holder, which we recommend that you clean after each use. After each use, remove the used coffee grounds.
These removal/fitting operations must be carried out when the machine has cooled down.
-
Removal of the filter holder:
-
Remove the filter holder from your machine.
- Dispose of the used coffee or pod by pressing the eject button (fig. 11).
- Rinse under running water.
- Hold the bottom of the filter holder between your thumb and index finger.
- Place pressure on it with the thumb and index finger at the same time, then pull it downwards (fig. 17).
2. Cleaning and rinsing the filter holder:
The filter holder may then be cleaned using a household detergent and a normal dishwashing brush, but must be rinsed afterwards with running water. For best results, you may press down the eject button several times while rinsing.
We recommend shaking the filter holder vigorously in order to release any water that may have collected inside.
3. Fitting the filter holder:
First inset the bottom of the filter holder into the slot provided for this purpose, then push it in until you hear a "click" which ensures that it is locked into place (fig. 18).
C. The drip tray
The drip tray should be removed, emptied and cleaned at regular intervals, particularly when the level gauge appears indicating the drip tray is full. The drip tray must be emptied after first removing the grill (fig. 19 and 20). The presence of water is normal and is not the sign of a leak. If required, clean the drip tray and its grill with water and a little non-abrasive detergent before rinsing and drying.
D. Steam Wand
After frothing milk the steam wand should be cleaned with a damp sponge.
- Briefly set the selector control to the "Steam" position to clear any remaining milk from the steam wand,
- If the steam wand becomes blocked, wait for the machine to cool before using a needle or paper clip to unblock the opening.
9. DESCALING
- After regular use, hard water can cease limestone build up in and on many of the components, reducing the brewing flow, power of the machine, and affecting the quality of coffee. It is recommended that you decalcify your machine on a regular basis using a liquid decalcifying agent. To make this clearer, please find below a summary table of the frequencies of the descending operations according to the hardness of water and use:

| DESCALING FREQUENCY | |||
| Av. number of coffees per week | Soft water (<19°th) | Hard water (19-30°th) | Very hard water (>30°th) |
| Less than 7 Once a year Every 8 months Every 6 months | |||
| From 7 to 20 Every 4 months Every 3 months Every 2 months | |||
| More than 20 Every 3 months Every 2 months Every month | |||
- During the operation, do not stand your appliance on a marble surface. The descaler agent could damage it.
- The water tank should never be removed or completely emptied during decalcifying.
The warranty will be void if you do not undertake regular descaling and allow scale build up. If in doubt, we recommend carrying out a descaling operation every month.
A. Descaling of the coffee function
- Make sure the selector dial is on in the 'OFF' position and that the plug is disconnected from the power outlet.
- Place the filter holder (without ground coffee) into the brew head and lock it into place by turning it towards the right as far as possible (fig. 3).
- Place a large container under the filter holder (fig. 4).
- Check that the selector dial d1 is in the "0" position.
- Empty the tank and place it back securely in position.
- Fill the tank with a mixture of three parts water to one part vinegar or citric/sulphamic acid.
- Switch on the appliance.
- When the temperature light of the ON/OFF button remains lit, you can then switch to the position (flee) (fig. 5).
- Let the mixture flow through.
- Wait for 2 minutes then repeat the operation twice.
- Turn the selector dial to the "0" position.
- Now follow the instructions for descaling the steam function.
B. Descaling the steam function
- Place a large container under the steam nozzle.
- Turn the selector dial d1 to the position (fig. 13) (to obtain steam, the temperature must be higher than that required for coffee).
The LED of the ON/OFF button flashes then remains lit. - Turn the selector dial d1 to the position (Fig. 14): the steam pours into the liquid.
- Let the rest of the mixture flow for 2 minutes.
- During the operation, it is normal for the water temperature light to light up and then turn off.
After a few moments, stop the appliance ("0" position). - When the selector dial d1 is in the "0" position, the appliance cools down automatically.
- During the cooling down phase, the ON/OFF LED button flashes and hot water runs into the drip tray.
- After decalcifying, rinse the water tank thoroughly and re-fill with fresh cold water. To rinse the machine, run half the water through the brewing head and half through the steam wand.
The machine is then ready for use
C. Rinsing
IMPORTANT!
After descending, rinse 2-3 times with clear water (without ground coffee), as described in section "First use".
- Don't forget to rinse the steam nozzle. The appliance is descaled and ready to use again.
This appliance comes with a 12 month repair warranty. This warranty will be considered void due to incorrect connection, handling or use other than those described in the instructions.
This appliance has been designed solely for domestic use, any other type of use invalidates the warranty. No repairs due to scale build up are covered by the warranty.
For any after sales or spare parts problems, contact your dealer or an approved service centre.
11. TROUBLESHOOTING
| Problems Possible causes | Solutions | |
| The filter holder is blocked. The "EJECT" button is too stiff to move. | You have forgotten to release the filter holder. | Move the filter holder slightly to the right before pressing the "EJECT" button. |
| The coffee is not dry after the water has passed through. | You have not tightened the filter holder correctly. | Tighten the filter holder more. |
| The espresso flows too slowly. | You have over tightened the filter holder | Untighten it |
| The coffee is too finely ground, too oily or powdery. | Choose a more coarsely ground coffee. | |
| The filter holder is dirty. | Clean your filter holder according to the instructions in paragraph 8.B. | |
| The water grill is dirty. | When the appliance has cooled down, clean the water grill with a damp sponge (fig. 16). | |
| Water flows from the filter holder after the espresso has been made. | The selection knob has not been placed in the position "0". | Switch off the appliance by moving the selection knob D1 to the "0" position (fig. 6). |
| Premature formation of scale due to very hard water. | Descale the espresso machine according to the instructions (paragraph 9). | |
| Ground coffee in the cup. The filter holder is dirty. | Clean the filter holder with hot water. Press the "EJECT" button to eliminate any remaining coffee. Shake it to get rid of any water (also refer to paragraph 8.B. | |
| The coffee is too finely ground. | Use a more coarsely ground coffee. | |
| Poor crema The coffee is too old. | Use a more recently ground coffee. | |
| The coffee is not suited to making espresso. | Use a more finely ground coffee. Need to tamp it properly by turning the Optipress tighter. | |
| There is not enough coffee in the filter holder. | Add more coffee. | |

| Problems Possible causes | Solutions | |
| The water tank leaks when it is moved. | The valve at the bottom of the tank is dirty or faulty. | Wash the water tank and actuate the valve at the bottom of the tank with your finger. |
| The valve is blocked by scale | Descale the appliance as described in paragraph 9. | |
| Water leaking underneath the appliance. | Inside leak. Check that the tank is fitted | correctly. If the problem continues, do not use the appliance, contact an approved service centre. |
| Cracking noises are heard from the filter holder. | This is normal: safety lock on the filter holder. | |
| The pump is abnormally noisy. | No water in the tank. Switch off the appliance ( “0” position), fill the water tank and switch back on. | |
| The cups are not filled equally. | The filter holder is dirty. Refer to paragraph 8.B for the maintenance of the filter holder. | |
| The espresso leaks from the sides of the filter holder. | The filter holder is not fitted correctly. | Fit the filter holder in place and lock it (turn it from left to right as far as possible) (fig. 3). |
| The edge of the filter holder has coffee on it. | Remove the excess coffee (fig. 9). | |
| Espresso has a bad/bitter taste. | After descaling, the appliance has not been rinsed correctly. | Rinse the appliance according to the instructions (paragraph 8). |
| The appliance will not work. | The pump has been drained due to lack of water. | Fill the water tank and restart the pump (see paragraph 5. "FIRST USE"). Avoid emptying the water tank completely. |
| The removable water tank is not fitted correctly. | Push the water tank firmly to fit it correctly. | |
| The steam nozzle does not froth the milk. | The steam nozzle is blocked or scaled. | Descale the steam nozzle as described in the paragraph "DESCALING" or unblock it with a needle (fig. 21). |
| The milk is too warm or not fresh. | Use cold/fresh milk. | |
| The container is not the right shape. | Use a small jug. | |
| You are using skim milk. | Preferably use whole or semi-skimmed milk. |
If the cause of the problem cannot be determined, contact an approved service centre. Do not dismantle the appliance yourself! (If dismantled, this will void the warranty).
12. ELECTRICAL OR ELECTRONIC PRODUCT TO BE DISPOSED OF
Do your part to protect the environment!
① Your appliance contains many materials that may be re-used or recycled. Please take it to a local civic waste collection point
- Montering of filterholdersen
h Galler droppbricka
i Droppbricka med niväindikator
j Sladd
k Matskopa
2-TEKNISKA DATA
VIKTIGT!
6. ESPRESSON VALMISTUS
TÄRKEAAI!
1400g 15k0 g 1500g (15000000000000000000000000000000000
()
(K)jlllalolla jil jai jie Jy 2 pae
0 d1
1
J 1 (c) 1 J 1 J 1 J 1 J 1 J 1 J 1 J 1
gall lglll jic k 100
(0.5,11) (84)
A
0"
1
J
- p
yill allj! ioc
1 1
S APQ = S AQP + S_ PQR
S ACD = S COD + S DCE - S CDE.
"JgJlJoo
aag Jua 2
1
jale 9
JL
1
1
()()()
()
JLwlljI (12 Jk) (JzI) d1 1
i
Lg Ll 1
(0)gall)
L.
a a a a a a a a a a a a a a a a a a a
i j 10000000000000000000000000000000000000000000000
a
(E.S.E)
a a a a a a a a a a a a a a a a a a a a a a a a a a a
-
EJECT"
(1)
jill0.
.(jlaie kJ aalg aalto) waiall aaleo Jaauiol, gaiy all jiaill iIola 3a2
Jlll lolal 1s jilj
Jll Jc 1aai Jlaui Sii, aiai ai Ka o Lall jzj j
令 S_4 = 4 · 2^4
aagaae
JSLsIgaiLwjnlllbckc,aa,ggell jn JgJgJgJgJgJgJgJgJgJgJgJgJgJgJgJgJgJgJgJgJgJgJgJgJgJgJgJgJgJgJgJgJgJgJgJgJgJgJgJgJgJgJgJgJgJgJgJgJgJgJg
a_1 = 2
JyJ1
JaeuWy Pseo s jg
Kill jlaoc g
aLs
:
"JgJlJaaW

1 1
: Lgj j 0s a j 1abj j j j j j
()jllolg sic jlll
Jaaal j
(g)E.S.EJ 1
1
i 1
1
jlllloLggo e
aIgJooioll jIy pIe g Jilal o f 1001 p: uIgJnI y IaIbIg
·
g
huiui iuiui iuii h
5 1
1.
uilllo k
a
15 15 15 b
C
ii
b
()-d1
g 2
aaiiaolgall-1
10:abg
Jaaasall jll 1j! piae jlaaL
E.S.E
()
p_1 = 7 - 8 = 1 2p = 8 + 2p = 10
(j:aull)≤jllgallllojj
100
jia 0. -1alga rε. -rF.: jaiial jaiil
b#iill i#iill #oXll o
plo 1 1 1 plo 1 1 1 plo 1 1 1 e 1:
!p
1
Jaa 1
1 1
12g3 2
JL
Jaaaiuuii iiaiiin po
Jaiw! j! jia
山
J.
s y dulgmo Joo
aai
iiill j 1

= GOO_1
-4.
(20 1
y
S OBC = S AOB + S_ BOC
.
1.2
okiwosui
g aai
ooloool
.
B
.
()()()()d1
()
LED
()()d1
(0° Cuaa) 1.0kuius
J 0 d1 4d
LLED

1
L
olsios.A
J 100
A
iigii"LiJ01jj0jJ
.()
15
(19)
B
41JSLoc jgjgluws kol 4c wcl jul g jil ooiy piuoy 20. lOy JLaS
jai jai olaol jra jil jil a 1
100 100
:ii 0i j1.45 i j s1.
- 1.2.3.4.5.6.7.8.9.10.11.12.13.14.15.16.17.18.19.20.
EJECT
(1V)
j000g
s
Lai
juiuuiuuiuui.
K
(1)
C
(90g19ygl)d 11,13,14,15,16,17,18,19,20,21,22,23,24,25,26,27,28,29,30,31,32,33,34,35,36,37,38,39,40,41,42,43,44,45,46,47,48,49,50,51,52,53,54,55,56,57,58,59,60
iiS
1200-9

BgA
1
g 1
:
LED 1
JL W L W L W L W L W L W L W L W L W L W L W L W L W L W L W L W L W L W L W L W L W L W L W L W L W L W L W L W L W L W L W L W L W L W L W L W L W L W L W L W L W L W L W L W L W L W L W L W L W L W L W
LjJ Laiol
90"yoo) p j 1
J. (jz jia J
yj yj jn j
s yj
sws sK
JyJ
JyJ
E.S.E J
.
1-
1
1 1
i 1
j 1
k j 1
l j 1
o j 1
p j 1
q j 1
r j 1
s j 1
t j 1
1.
1 1234567890
())
1.2gao 1
()()
ai = 12ai - 1 + ( i - 1) × j
LED
1
p 100
Joo 50
( 56,0)
14 1 d1
1
10
yUHT yj
111 ≤ ( 1a + 1b - 1c) ( p - 1)
jia jia jia jia jia jia jia jia jia jia
sK 1 sJg jyj g y Jg Jg Jg Jg Jg Jg Jg Jg Jg
j j j j j j j j j j j j j j j j j j j j j j j j j j j j j j j j j j j j j j j j j j j j j j j j j j j j j j j j j j j
jiaobao kiosu
1 1
Lacog-
EJECT
(1)
gssaaagwysaal aagj 1d5 pksao ggs, gbso ygwsy
jS jS jS jS o0 jS S g S g S g S g S g S g S g S g S g S g S g S g S g S g S g S g S g S g S g S g S g S g
.
15j
.
1j j 1j1.0000000000000000000000000000
·
1 1
在 Rt ABD 中:
jabobotarjbrjbrjbrjbrjbrjbrjbrjbrj
1 4 4 4 4 4 4 4 4 4 4 4 4 4 4 4 4 4 4 4 4 4 4 4 4 4 4 4 4 4 4 4 4 4 4
ydsjdy
1,2,3,4,5,6 S
J 1
gjglbdo jy
jai jai jai jai
yolkws,slsjw
1
S BCD = S COD + S BDO - S BOC

J_1 = 12
()-d1
LEDU/2
i#L i-
1-10:
jE.S.E, 1g lJgS
(0kssjSjS k) jj jnssy
10 < 14 < 20
jya 00g40-40:Jus
jol jol jol jol
141 141 141 141 141 141 141
1 - a + b = c
:Jg
4.15
40-40 1
10 15
0s
1
4.2.10.2.11.2.12
Jg Js
Lii. (S) Lii. (S)
la = ( lb + l_c) s = xs^
.

FR p.5 - 13
ENG p.14 - 22
DE p.23 - 31
DK p. 32 - 40
NO p. 41 - 49
Sp.50-58
FIN p.59 - 67
AR p.76-68
FAp.85-77
