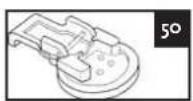
HSM5657A - Sewing machine Aigger - Free user manual and instructions
Find the device manual for free HSM5657A Aigger in PDF.

| Product type | Sewing machine |
| Brand | Aigger |
| Model | HSM5657A |
| Power | 85 W |
| Rated voltage | 220-240 V ~ |
| Rated frequency | 50 Hz |
| Number of stitches | 10 basic stitches + stretch stitches |
| Main functions | Straight stitch, zigzag, automatic buttonhole, zipper foot, invisible hems, button sewing, embroidery, smocking |
| Adjustable stitch length | 0 to 4 mm, SS position (stretch stitch) |
| Stitch width (zigzag) | Adjustable via stitch selector |
| Reverse sewing | Yes, push button |
| Free arm | Yes, with removable extension table |
| Lighting | 15 W lamp (replaceable) |
| Feed mechanism | Feed dogs, foot control |
| Included accessories | Feet (buttonhole, invisible zipper, zipper, hem, button), 3 bobbins, needles, screwdriver, seam ripper, oil, embroidery plate |
| Approximate weight | 8 kg |
| Approximate dimensions | 40 x 20 x 30 cm |
| Maintenance | Regular cleaning of bobbin case and feed dogs, lubrication at indicated points |
| Safety | On/off switch, safety stop for bobbin winder, unplug before maintenance |
| Warranty | 24 months (domestic use) |
| Reparability | Parts available at authorized dealers, after-sales service at www.aigger.com |
Frequently Asked Questions - HSM5657A Aigger
User questions about HSM5657A Aigger
0 question about this device. Answer the ones you know or ask your own.
Ask a new question about this device
Download the instructions for your Sewing machine in PDF format for free! Find your manual HSM5657A - Aigger and take your electronic device back in hand. On this page are published all the documents necessary for the use of your device. HSM5657A by Aigger.
USER MANUAL HSM5657A Aigger
Names of the parts 23
Safety regulations 23
Switching on the device 25
The maintenance 37
Solving problems 38
Your Guarantee card 39
Technical data 39
GEBRAUCHSANLEITUNG
Das Produkt 41
INSCHAKELEN VAN HET APPARAAT
This HSM5657A sewing machine is a reliable partner for starters. The sewing programme ranges from the variable straight stitch via zigzag sewing for finishing edges to the automatic blind stitch. With this machine you can easily sew in zippers, sew on buttons and sew buttonholes.
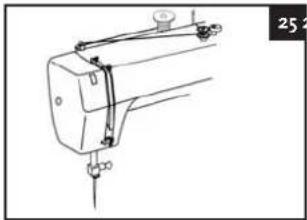
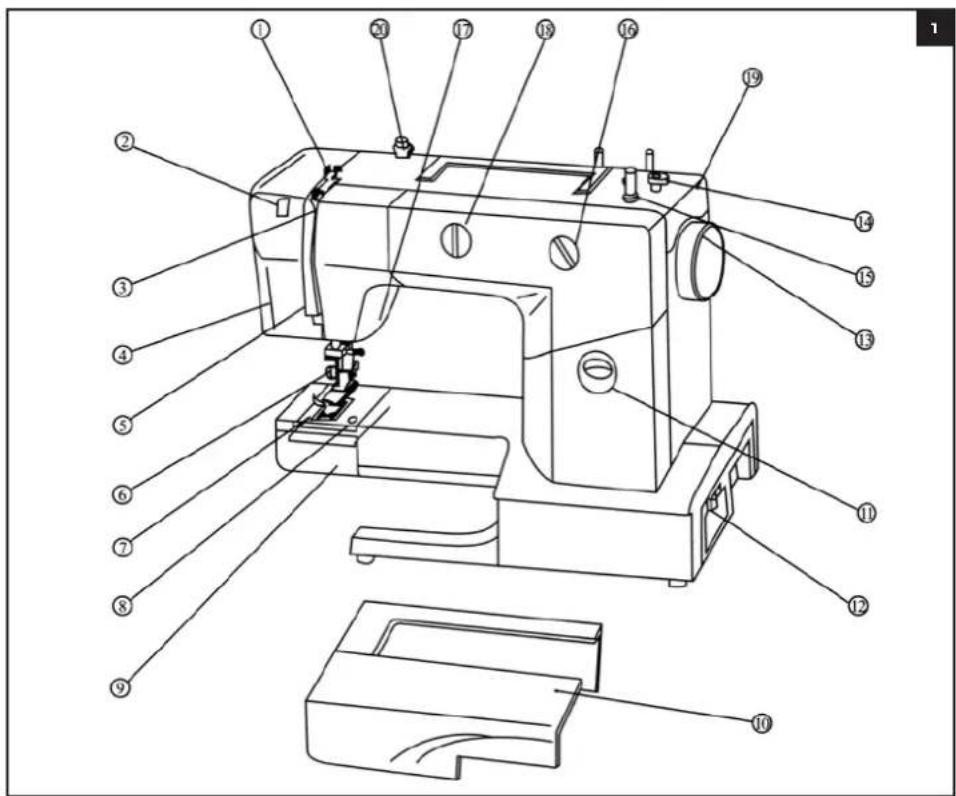
NAMES OF THE PARTS (Illustration 1)
1 Upper thread guide
2 Thread feed
3 Tension discs
4 Protective cover
5 Thread disc
6 Needle
7 Foot pedal
8 Needle plate
9 Protective cover for spool house
10 Arm
11 Reverse sew button
12 On/off switch
13 Fly-wheel
14 Safety stop device for spool winder
15 Spool winder
16 Stitch length selection button
17 Foot pedal lever
18Stitch selection button
19 Protective cover
20 Upper thread stretcher and guide
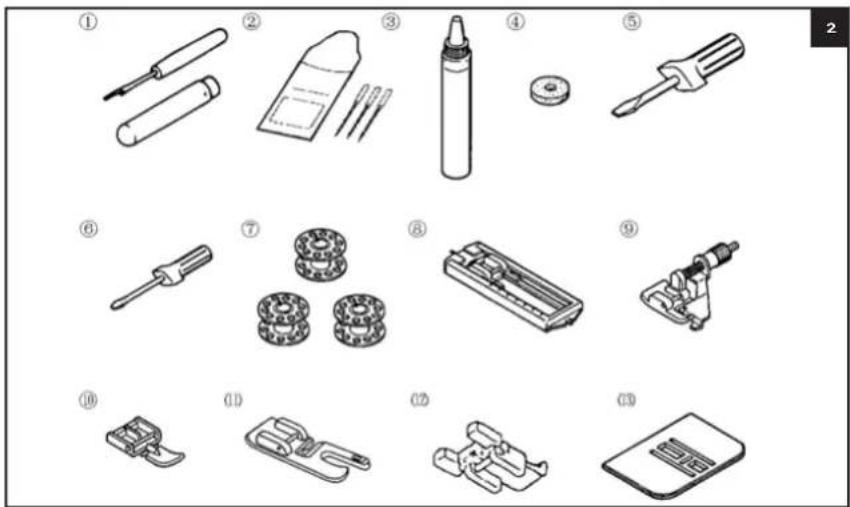
Pedal and accessories (illustration 2)
1 Unstitch knife
2 Needles
3 Oil
4 Felt
5 Screwdriver (large)
6 Screwdriver (small)
7 Bobbins
8 Buttonhole foot
9 Blind stitch foot
Zip foot
11 Hem foot
12 Button foot
13 Embroidery plate
SAFETY REGULATIONS
1 Please first read these directions for use carefully.
2 Use the machine for domestic purposes only.
3 Keep the sewing machine outside the reach of children; also when the device is switched off.
4 Only use this device for its intended purpose as described in these directions for use. Do not use any accessories that are not recommended by the supplier, especially not accessories that have not been supplied with the device.
5 Check regularly whether the device is intact. Do not use the device if the power cable or the device show any damages.
6 If the sewing machine does not work, or if something is not right, you must switch the device off and send it back to the point of sale.
7 When pulling the plug from the wall socket, take the plug in your hand. Do not pull it by the power cable.
8 Never use the sewing machine with one or more blocked vents. Always keep the ventilation openings of the sewing machine and the pedal free.
9 Never let any objects fall into openings and never put any objects into an opening.

10 To switch the machine off, you must see that the switch is set to "O", which means OFF. Then you take the plug from the connection.
11 Always keep your fingers away from moving parts. Special attention is required around the needle of the sewing machine and the bobbin housing.
12 Always use the right needle plate. Using a wrong plate may cause the needle to break.
13 Never use a bent or damaged needle.
14 Never push or pull the material during sewing. This may cause the needle to break. The machine automatically transports the material at the right speed.
15 See to it that the switch of the machine is in "O", which means OFF and take the plug from the connection when making any adjustments around the needle.
16 Check whether the mains voltage corresponds with the type plate of the equipment (see bottom), before using it.
17 See to it that the on/off switch is in "O" position, when you put the plug in the wall socket.
18 Do not use the sewing machine with an extension cord, unless this extension cord has been checked and tested by a qualified mechanic.
19 See to it that the power cable does not touch any hot surfaces.
20 Place the sewing machine on a stable and flat surface.
21 Never immerse the machine, the plug, the pedal or the power cable in water or in any other liquid.
22 Do not place any objects on the pedal.
SWITCHING ON THE DEVICE
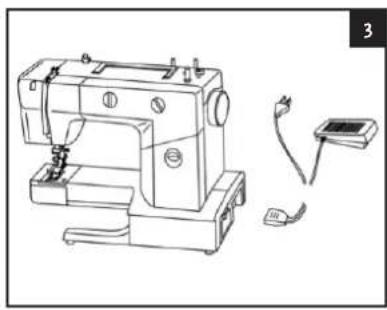
Connect the power cable to the sewing machine. Place pedal on the floor and then put the plug into the wall socket. (illustration 3)
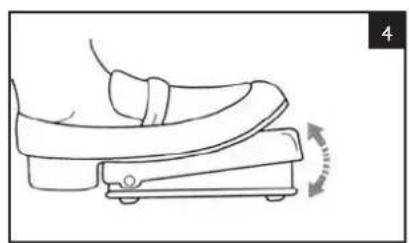
The use of the pedal
The speed of sewing can be controlled with the pedal. The harder you push the pedal, the faster the machine will run. When you let go of the pedal, the machine stops automatically. (illustration 4)
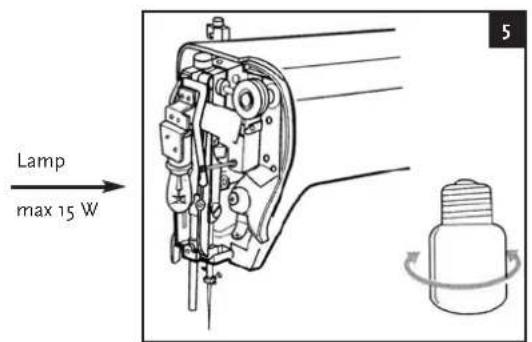
Exchanging the lamp
Unscrew the guard with the supplied screw driver. Take off the guard, exchange the lightbulb and fasten the guard again. Never use the device with an open guard. (illustration 5)
Needle and thread
| MATERIALS THREAD NEEDLE | ||||
| Lightweight Batist Cotton thread 60-80 g or 11 | ||||
| Crépe georgette Synthetic thread | 60-80 | |||
| Challis, satin | Silk thread | 50 - 80 | ||
| Middle weight | Popeline | Cotton thread 60 - 80 | ||
| Tafeta silk | Synthetic thread | 60 - 80 | ||
| Flanel, Gabardine | Silk thread | 50 - 80 | 11 or 14 | |
| Heavy weight | Denim | Cotton thread 30 - 50 | ||
| Corduroy | Synthetic thread | 50 | ||
| Tweed | Silk thread | 50 | 11 or 16 | |

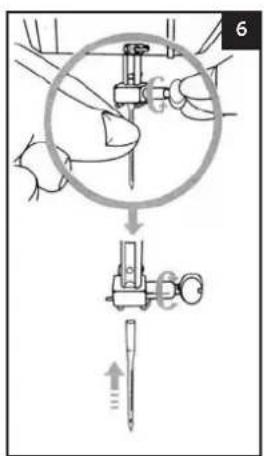
Exchanging the needle
1 Pull the plug from the wall socket.
2 Turn the flywheel until the needle is in its highest position.
3 Turn the needle clamp loose as shown in the picture. (Illustration 6)
4 Take the needle from the needle holder.
5 Insert a new needle.
6 Then screw the needle clamp as tight as possible.
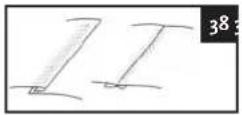
Check the needles at regular intervals. The needle must be straight and sharp as is shown in pictures a and b. Do not use any needles that are bent or blunt, as in pictures c, d, e or f. (illustration 7)
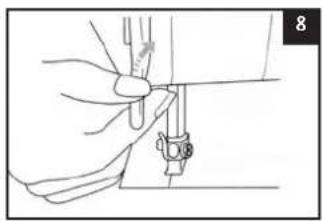
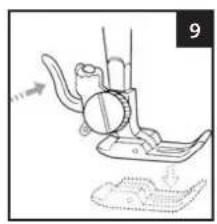
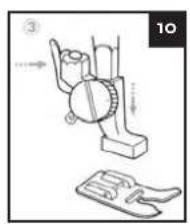
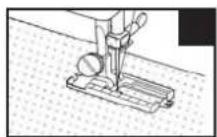
Removing and placing the pressure foot (illustration 8, 9 & 10)
1 Turn the wheel until the needle is at its highest position. Lift the pressure foot up by moving the pressure foot lever upwards.
2 By pressing the foot interlocking the sewing foot automatically falls from its holder.
3 Insert the foot under the holder in such a way that the pen of the foot is under the notch in the holder. By then taking the pressure foot lever down and pressing the foot interlocking, the foot automatically clicks into its holder.
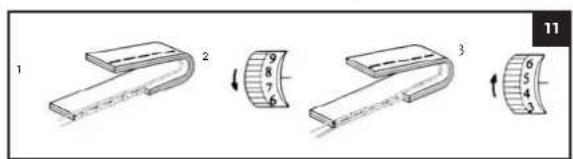
Controlling the thread tension (illustration 11)
1 The upper thread and the bobbin thread must interlace with each other in the middle of the two layers of material.
2 If the top thread tension is too low (this is visible when the interlacing is at the bottom of the two layers of material), you can raise this by turning down the top tension control button (1 > 9) .
3 When the top thread tension is too high (this is visible if the interlacing is at the top of the two layers of material), you lower this by turning the top tension control button upwards (9 > 1) .
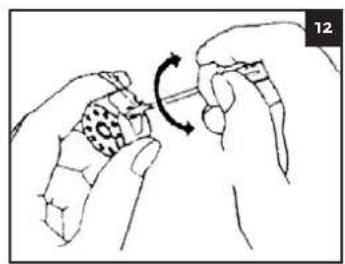
Controlling the bobbin thread tension (illustration 12)
If you do not succeed in controlling the top thread tension to get the interlacing in the right position, you can try this by adjusting the bottom thread tension. To increase the tension, you turn the tension screw in the direction as indicated in the picture.
To lower the tension you turn the tension screw in the opposite direction.
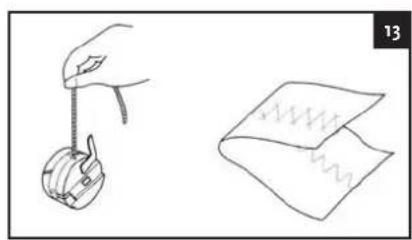
To check the tension you take the thread as indicated in the picture, now the bobbin housing must drop down 3 to 4cm . (Illustration 13)
To get a fine zigzag stitch the top tension must be set a little slacker than with a straight lock stitch. The needle thread must be slightly visible at the bottom of the material.
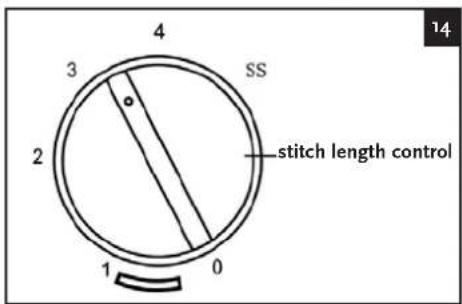
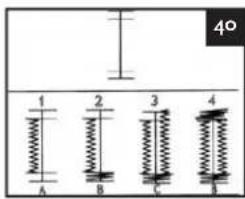
Stitch length control (illustration 14)
1 The numbers on the stitch length selection button approximately correspond with the stitch length in mm.
2 You can select the desired stitch length with this button. In the picture this is set to a stitch length of 2 mm.
3 When sewing extensible seams you set the stitch length to SS (stretch stitch).
AIGGER
English
Button for sewing backwards (illustration 15)
Push the button down to sew backwards. The material is then automatically transported backwards. You can use this function to strengthen the sewing.
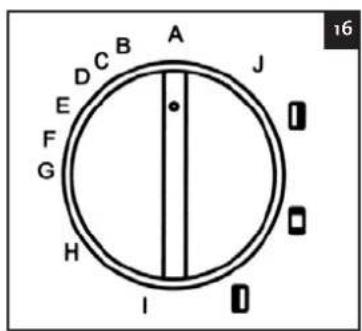
Stitch selection button (illustration 16)
Ensure the needle is in the highest position. This is done by turning the fly-wheel. Turn the selection button to the required stitch.
Once you have set the stitch length between 0 and 4, you can choose between 10 different stitches, which will have the same colours as the 0-4 numbers of the stitch length.
Once you have set the stitch length button to SS, you can sew stretched stitches by way of selecting the stitches with the same colour as the SS symbol (A-J).
Exchanging the bobbin
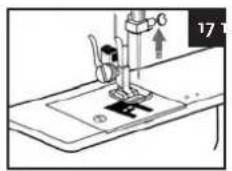
1 Bring the needle to the highest position
2 Bring the pressure foot up by lifting the pressure foot lever upwards. (Illustration 17)
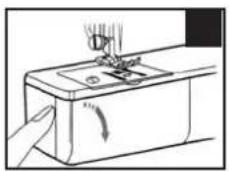
3 Then open the protecting cover of the bobbin housing. (illustration 18)
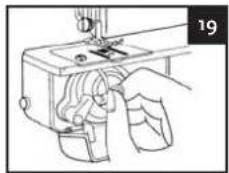
4 Open the lock of the bobbin housing and then take the bobbin housing out of the machine together with the bobbin. (Illustration 19)
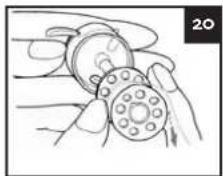
5 Hold the bobbin housing with one hand and remove the bobbin with your other hand. (illustration 20)
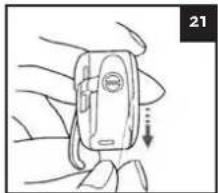
6 Insert a new bobbin. (Illustration 21)
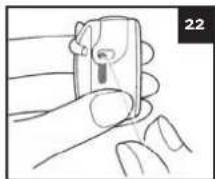
7 Put the thread in as indicated in the picture. (Illustration 22)
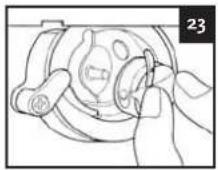
8 You can now place back the bobbin housing by keeping the lock open and pushing it inwards over its pin. (Illustration 23)
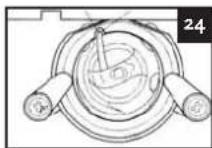
9 See that approximately 15cm of thread sticks out of the bobbin. (illustration 24)
Winding bobbins
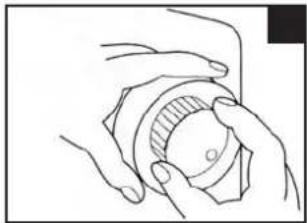
1 Turn the motor interlocking loose by turning the button towards yourself. (illustration 25 and 26)
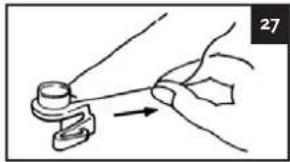
2 Thread the yarn in as is indicated in the picture. (Illustration 27)
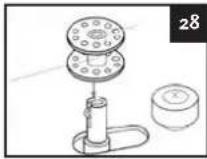
3 Pull the end of the thread through the hole in the bobbin as indicated in the picture. (illustration 28)
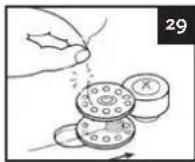
4. Place the bobbin on the bobbin winder and move this to the right until it clicks. When the bobbin has been wound a little bit, you remove the thread end. (Illustration 29)
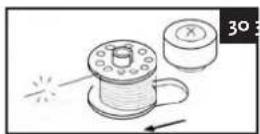
5 You can now continue winding, until the bobbin winder stops automatically. (illustration 30)
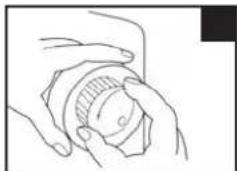
6 Turn the motor interlocking to the right position. (Illustration 31)
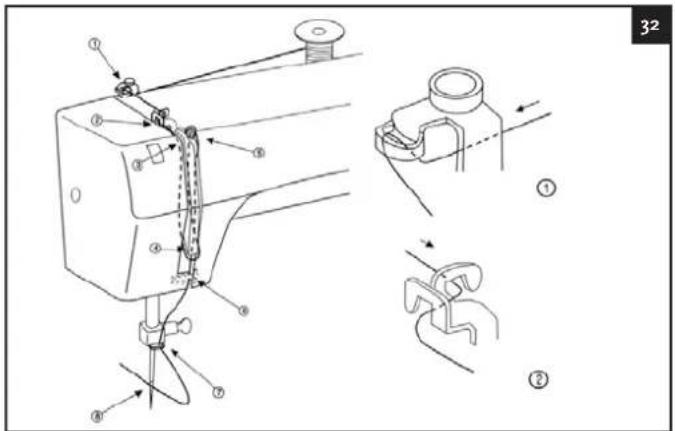
Threading the thread (illustration 32)
1 Place the top thread spool on to the holder that is there for this purpose. Turn the needle to the highest position so that guide 4 becomes visible. Lift the pressure foot holder up by moving the pressure foot holder upwards.
2 Then thread the yarn along the guides 1 and 2.
3 Lead it via the tension control 3 to guide 4, to thread guide number 5.
4 Then lead the thread via thread guide number 6 to the needle and put the thread through the needle from front to back.
Bringing the bobbin thread up (illustration 33)
1 When you have threaded the upper thread through the needle you can bring the bobbin thread up by turning the flywheel towards yourself. Turn so far until the needle has made an upward movement in once and the needle is again in its highest position.
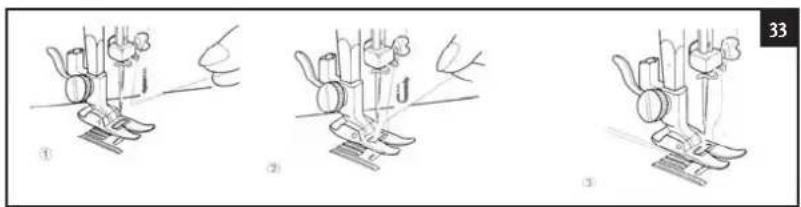

2 Then pull the upper thread until you see the bobbin thread come up.
3 Pull both the top and the bobbin thread backwards 15cm as is shown in picture 3.
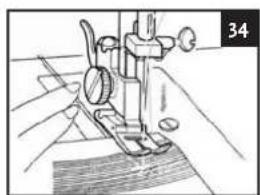
Straight stitch and zigzag stitch
PRESSURE FOOT CHOICE OF PATTERN STITCH LENGTH Zigzag foot "A" - "J" 0.3 - 4
1 Turn the wheel until the needle is in its highest position and lift the pressure foot up.
2 While holding the threads with your left hand, you turn the wheel towards yourself to get the needle in the material at the right spot. Here you begin to sew.
3 Sew a number of stitches backwards by keeping the button for "sewing backwards" depressed.
4 Stop the machine and turn the wheel to bring the needle down into the material. Lift the pressure foot up.(illustration 34)
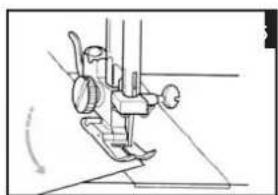
5 Turn the material around the needle to get the desired direction. (illustration 35)
6 Lower the pressure foot and continue sewing.
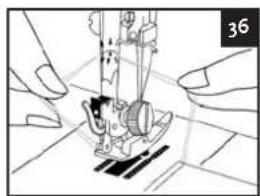
7 To remove the material, you bring the needle to the highest position, you lift the pressure foot up and pull the material away from you.
8 Use the thread cutter at the back of the pressure foot holder, as is shown in the picture. (Illustration 36)
9 Leave about 15cm of yarn length on the work.
Tricot stitch
PRESSURE FOOT CHOICE OF PATTERN STITCH LENGTH Zigzag foot "H" () 0.3-4
Place the material under the pressure foot so that there is a narrow edge on the right hand side of the pressure foot. Guide it so that the stitches fall on the edge of the material. (Illustration 37)
Forked stitch
PRESSURE FOOT CHOICE OF PATTERN STITCH LENGTH Zigzag foot "ss"
With this manner of sewing, seams are elastic and materials can be joined together firmly. Use the forked stitch for example for sewing bathing suits and as a decorative stitch.
Smock stitch (illustration 45, 46 & 47)
PRESSURE FOOT CHOICE OF PATTERN STITCH LENGTH Zigzag foot "H" "ss"
The decorative stitch achieved by stitching or embroidering over pleats is called the "smock stitch". This allows you to embellish the front of blouses or cuffs. The smock stitch will give the material more texture and elasticity.
AIGGER
English
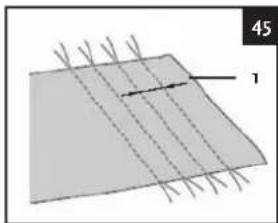
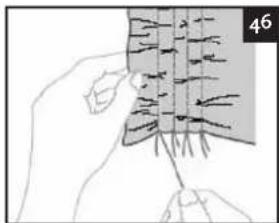
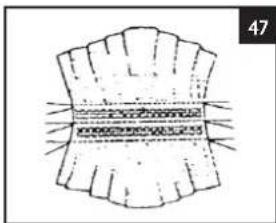
- Secure the zigzag foot.
- Select the right stitch, set the stitch length to 4mm and lower the thread tension.
- Sew parallel stitches with 1 cm intervals. TAKE NOTE: you do not need to sew reverse/strengthening stitches or cut off the thread.
- Pull the lower thread to create pleats. Iron the pleats with an iron.
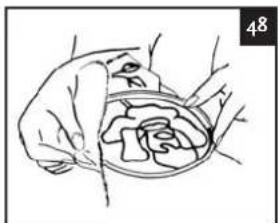
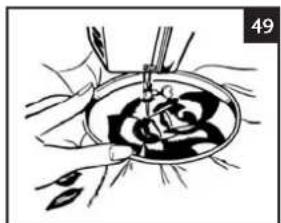
Embroidering (illustration 48 & 49)
PRESSURE FOOT CHOICE OF PATTERN STITCH LENGTH
None Zigzag stitch All
- Place the embroidery plate on the needle plate.
- Set the choice of pattern button to the required zigzag stitch.
- Tighten the material as much as possible between the embroidery rings (not supplied, can be obtained at speciality shops) with the inside of the material to the underside of the inner ring.
- Place the work underneath the needle and lower the foot lever without using the foot pedal.
- Turn the fly-wheel and pull the lower thread up through your work at the starting point. Make a few attachment stitches.
6 Pick the ring up between the thumb and index finger of both hands and apply pressure to the material with your middle and ring fingers. You can then use your little finger for support on the outside of the ring.
COMMENTS:
a. Stitch around the outline of your design by moving the embroidery ring.
b. You can now fill your design by first sewing from the outside to the inside and then from the inside back to the outer edge, until the entire design is completed. Ensure the stitches run alongside each other.
c. You can create a long stitch by moving the embroidery ring quickly. A short stitch is achieved by moving the ring slowly.
d. Sew a few straight stitches at the end to finish off.
Making buttonholes (illustration 38)
PRESSURE FOOT CHOICE OF PATTERN STITCH LENGTH
Buttonhole foot () () 0.3~1

PREPARATION
1 Determine the length of the buttonhole
2 Draw the centre line with a piece of chalk.
REMARK
Try this first on a piece of the same material, before you actually set to work. (Illustration 39)
Setting to work
1 Place the material and see to it that the middle of the pressure foot runs even with the line that was drawn on the piece of material. Then move the plate of the pressure foot and let the opening of the pressure foot run even with the drawn hole.
2 Set the button for the choice of pattern to A. Stop sewing when you reach the marked chalk
AIGGER
English

line and the needle finds itself on the left-hand side.
3 Turn the flywheel and let the needle come out of the material, set the button for choice of pattern to B. After you have stitched both sides 5 or 6 times on both sides, you stop when the needle is on the right-hand side.
4 Turn the flywheel and let the needle come out of the material, then set the button to C. The needle is located on the right-hand side. Then stitch the right-hand side of the buttonhole.
5 Turn the flywheel, see to it that the needle leaves the material and then set the button to B. The needle is located on the left-hand side. After you have stitched both sides 5 or 6 times on both sides, you stop when the needle is on the right-hand side. (illustration 40)
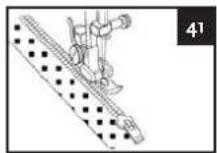
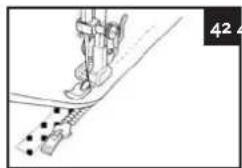
Sewing zippers
PRESSURE FOOT CHOICE OF PATTERN STITCH LENGTH
Zipper foot "A" 1-4
1 Attach the zipper foot to the pressure foot as is described on page 29. (Illustration 41)
2 Pin or tack the zipper to the material and then place it in the right position under the pressure foot.
3 Then sew the zipper into the article of clothing. (illustration 42)
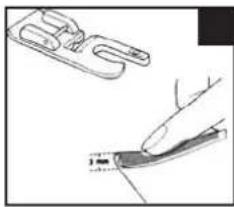
Hemming
PRESSURE FOOT CHOICE OF PATTERN STITCH LENGTH
Hemming foot "A" 1-4
1 Place the hemming foot on the machine as described on page 29.
2 Fold the material about 3mm from the edge and place it under the hemming foot.(illustration 43)
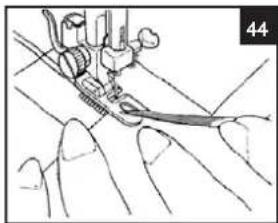
3 Fold the material during sewing and guide it in the hemming foot.
4 See to it that the material under the right half of the foot does not move. Guide the material properly through the foot as is shown in the picture.(illustration 44)
Sewing on buttons
PRESSURE FOOT CHOICE OF PATTERN STITCH LENGTH
Button foot "C" ~ "G" o
1 Place the button foot as is described on page 29.
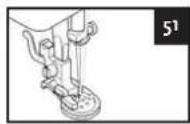
2 Tack or pin the button on to the spot you have marked. (illustration 50)
3 Adjust the machine to the correct stitch width (stitch selection button 3-7).
4 Test whether the needle falls into each hole, if necessary adjust the stitch width. (illustration 51)
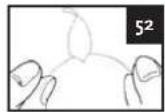
5 Let the foot drop.
6 Then sew the button on. (Illustration 52)
Sewing of (blind) hems
PRESSURE FOOT CHOICE OF PATTERN STITCH LENGTH
Blind hemming foot "I" 1-3
AIGGER
English

1 Place the blind hemming foot, as is described on page 29.
2 Guide the material properly through the foot as is shown in the picture.
3 You can use the adjusting screw to set the right hem width. (Illustration 53)
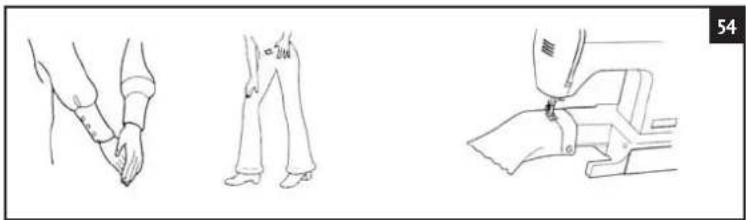
Free arm machine (illustration 54)
This machine disposes of a free arm. By removing the arm you can turn this machine into a free-arm machine, which makes it easier to work on tubular pieces, such as trouser-legs and sleeves.
Slide the part that you want to sew on to the arm and sew from the top. When you have finished sewing with the free arm, you put the arm in its place again.
THE MAINTAINANCE
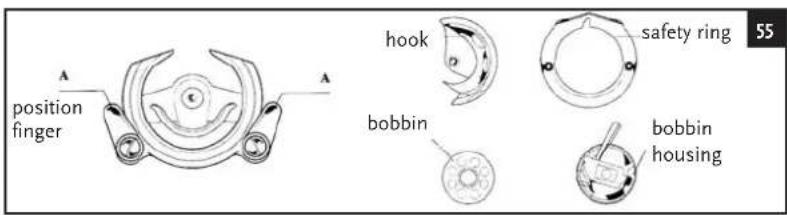
Cleaning the bobbin housing (illustration 55)
1 Set the on / off switch to "O" (OFF).
2 Remove the power cable from the sewing machine and take the plug out of the wall socket.
3 Bring the needle to the highest position.
4 Remove the bobbin housing (see page 31 bobbin replacement).
5 Turn the position finger outwards and remove the safety ring.
6 Remove the hook by taking it in the middle and pulling the whole outwards.
7 Remove any dust and thread from the safety ring, hook, drive and grab track with a brush.
8 With a cloth that you have moistened with sewing machine oil, dust and other rests can be removed from the grab track.
9 Clean the bobbin housing.
10 Mount the hook again with the notch at the top and push the position fingers back into the right position to keep the safety ring in its place.
WARNING When exchanging the light bulb, remove the plug from the wall socket. To prevent burns, you must be extremely careful when exchanging the light bulb. Light bulbs are available from the sewing machine specialist shop. Use a 15W light bulb. If you use a light bulb with a higher wattage the guarantee expires.
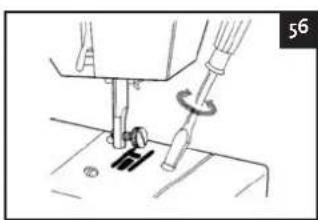
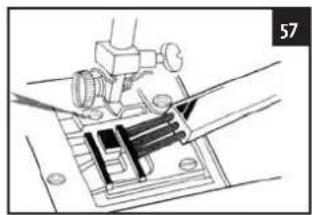
Cleaning the transporter
1 Set the on / off switch to "O" (OFF).
2 Remove the power cable from the sewing machine and take the plug out of the wall socket.
3 Remove the screw on the left-hand side of the needle plate with the screw driver. Remove the needle plate.
4 Clean the transporter with a brush.
5 Place the needle plate back in its place.(illustration 56 and 57)
Oiling the machine (illustration 58)
The arrows in the picture show which points in the machine must be oiled. Before you apply the oil, these spots must be cleaned. Apply one or two drops of sewing machine oil of a good quality. Should the machine not function properly after it has not been used for a long time, you must apply a few drops of oil at the marked spots. Then you allow the machine to run fast for a few minutes with all the lids closed. Sewing machine oil is available at the sewing machine specialist shop.
WARNING! Do not forget after oiling the machine to sew on a piece of waste material first, to catch any superfluous sewing machine oil.
SOLVING PROBLEMS
If the power cable of the device is damaged, immediately take the plug from the wall socket. The power cable must only be replaced by indicated representatives of the supplier.
| PROBLEM POSSIBLE CAUSE SOLUTION PAC.The needle thread The thread is there is something wrong with the needle. Excha too thin for the material. Select a thread that is 19the thread is not properly placed in Put the 20the needle.The bobbin thread The bobbin thread has not been threaded 31The bobbin thread properly. 31Dust has assembled in the bobbin housing. Clean the bobbin housing. | A cause solution PAC.The upper thread is not properly threaded. The combination of material, thread and needle is not correct.The needle is bent or blunt.The needle is not properly installed.Dust has assembled under the needle plate or in the bobbin housing. | A change the needle. 29suitable for the 27sort of material that you are sewing. 31thread in properly. 31the bobbin thread properly. 31Clean the bobbin housing. | 3127292939 |
| Stitches are being skipped. | |||
| The material is wrinkled. | The upper thread is not properly threaded, or the bobbin is not properly installed. and The combination of material, thread and needle is not correct.The needle is bent or blunt.When you sew thin materials, the stitch is too large.The thread tension is not correct. | Thread the upper thread properly SELECT a thread and needle that are suit- able for the sort of material that you sew Replace the needle. Install the needle properly Remove the needle plate and clean the bobbin housing. | 31272939 |
| The needle breaks.You are pulling the material too hard.The pressure foot that you use, is not suitable for the sort of stitch that you want to sew.The needle has not been installed properly. | Guide the material loosely Attach the right pressure foot for the sort of stitch that you want to sew.Install the needle properly. Attach the right pressure foot for the stitch that you want to sew. Adjust the tension of the upper threadRemove the entangled thread.If the thread in the bobbin housing is entangled, then clean the bobbin housing. | 3127292939 | |
| The stitch is not sewn properly. is not 32The pressure foot that you use, 33suitable for the sort of 44stitch that you want to sew.The thread tension is not correct.The thread is entangled, for example in the bobbin housing. | |||
| The device makes a lot of noise. le plate or 54the machine does 65not work. | Dust has assembled under the need- 66in the bobbin housing.The sewing machine is not switched on.The On / off switch is not set to on. | Clean the bobbin housing.Switch the machine on.Switch the on / off switch to "on". | 392727 |
YOUR GUARANTEE CARD
This guarantee card covers your device for a period of 24 months as from the date of purchase as to service charges and replacement of parts on condition that you have used the device correctly as described in the directions for use. This guarantee card does not prejudice the national legislation that may exist in the country of purchase in the field of guarantee obligations. Guarantee is granted and parts are available in all countries where the product is officially sold.
This device is only intended for domestic use. Damage and / or malfunctions by industrial use are excluded from guarantee.
You can not make use of the guarantee if:
- You do not possess a valid proof of purchase or this has been changed or made illegible in any way;
- The service form has not been filled in clearly and completely;
- The model or serial number on the product has been changed, removed, deleted or made illegible;
- Repairs have been executed by unauthorized repair workshops or unauthorized persons:
- The damage can be blamed on a cause that is alien to the device, such as: fire damage, water damage, transport damage, atmospheric discharges, insufficient or improper maintenance;
- The device requires adjustments to let it function in another country than for which it has been designed, approved, released and produced, as well as if a defect occurs as a result of such a change and/or adjustment.
- The device has not been used according to the directions for use that are supplied with the product.
Should your device not function properly despite our careful quality control, then you can appeal to our service. To appeal to our service we request you to send us a clearly completed service form.
For us to be able to guarantee a quick settlement, we advise you to use the service form at our website: www.aigger.com. Going by your service form we shall contact you as soon as possible.
To prevent any inconveniences, we advise you to carefully read the directions for use prior to contacting us.
TECHNICAL DETAILS
Model number HSM5657A
Power 85 W
Voltage 220 - 240V
Frequency 50Hz
Agger is a registered brand name of :
Van den Berg Products BV
Platinawerf 2of
6641 TL Beuningen
The Netherlands
www.vdbergproducts.com
DAS PRODUKT
Pied zigzag "A"-"J" 0.3-4
Pied zigzag "H" () 0.3~4
Pied zigzag "H" "ss"