
CH 2850 G - Heating EINHELL - Free user manual and instructions
Find the device manual for free CH 2850 G EINHELL in PDF.

| Brand | Einhell |
| Model | CH 2850 G |
| Category | Heating |
| Product type | Convection heater (radiator) |
| Heating power | 2850 W |
| Fuel consumption | 235 g/h |
| Tank capacity | 3.81 liters |
| Autonomy per full tank | Approximately 12 hours |
| Recommended fuel | Liquid fuel for mobile heating devices (kerosene, paraffin) |
| Ignition | Automatic by spark plug, powered by 2 R20 batteries (1.5 V) |
| Dimensions (L x W x H) | 48 x 32 x 53 cm |
| Weight | 11.5 kg |
| Heated area min./max. | 32 m² / 38 m² |
| Heated volume min./max. | 75 m³ / 95 m³ |
| Main functions | Flame height adjustment, automatic shut-off, fuel level indicator, removable tank |
| Maintenance and cleaning | Weekly wick cleaning, checking automatic shut-off, battery replacement |
| Safety | Automatic shut-off in case of shock, protective grille, emergency stop, mandatory ventilation |
| Spare parts and repairability | Wick, spark plug (2.5 V DC, 1 A), tank, R20 batteries |
| Warranty | 12 months |
Frequently Asked Questions - CH 2850 G EINHELL
User questions about CH 2850 G EINHELL
0 question about this device. Answer the ones you know or ask your own.
Ask a new question about this device
Download the instructions for your Heating in PDF format for free! Find your manual CH 2850 G - EINHELL and take your electronic device back in hand. On this page are published all the documents necessary for the use of your device. CH 2850 G by EINHELL.
USER MANUAL CH 2850 G EINHELL
-
Description of the oil heater
-
Fuel
-
Unpacking and setting up
-
Filling in the fuel, 15
-
Filling in the lid
-
Automatic ignition
-
Engine oil injection
-
Turning off the oil heater, servicing the wick
-
Cleaning the wick (soot and carbon deposits)
-
Checking the automatic ignition
-
Checking the automatic cut-out
-
Storing the oil heater for extended
periods of time
- Special safety precautions
14.What to do in case of a trouble,20
Table des matieres
Instruction
Read the operating instructions carefully before starting up your Comfort Heater for the first time. The instructions will tell you
how to set up, operate, and service your heater, and - most importantly - how to use it safely and efficiently. Keep the operating
Instructions in a safe place to have them handy In case of any trouble.
Important information
Caution!
Risk of explosion! Risk of fire!
- Never use any fuel other than liquid fuel for mobile heaters authorized by your country's national standards.
- Never fill this type of oil heater with fuels such as gasoline, benzene, solvents, or other substances.
- Never refill your oil heater with liquid fuel is still in operation or while it is still hot.
- Never use the oil heater in rooms which pose a fire or gas explosion hazard.
- Never refill the oil heater in closed rooms. Always refill it outdoors.
- Store and transport the fuel only in metal or plastic canisters which...
- are specially designed for fuels.
- are marked with a label identifying the coas, Liquid Fuel for Mobile Heaters" in accordance with your country's national standards.
- Never store fuel in your living quarters. All fuel must be stored in a cool place outside any living quarters. The oil heater gets extremely hot during operation. Keep children, clothes, furniture and other objects away at a distance of at least 1 meter.
Never use gasoline (fire hazard).
Beware of fires and air pollution. Restrict your use of the oil heater to rooms with good air circulation. Never use the oil heater in small or windowless rooms.
Each room in which the oil heater will be used must have sufficient air inflow and outflow (an inlet and an outlet opening with a minimum cross section of 50~cm^2
- Never use the oil heater in rooms with insufficient air circulation or In basement rooms.
- Never use the oil heater for heating or boiling water or for cooking food.
- Never lift out the refill tank while the heater is still in operation or while it is still hot. Never use the cartridge to transport or store fuel or other flammable substances.
During start-up, you may notice an odd sound coming from the refill tank: This sound is caused by fuel running from the tank into the bottom container to saturate the wick. This sound is perfectly normal.
Important!
Failure to comply with the installation, maintenance or operating instructions may lead to burns and/or injuries. In this case, the manufacturer shall not be held liable for any damages.
N.B.: The warnings and instructions contained in this operating manual cannot possibly cover all situations imaginable. The use of any type of heater, especially oil heaters, requires a sensible and careful approach and compliance with the safety precautions. Risk-free operation
of this heater is subject to the observation of these rules.
In the event of problems, we advise you to notify your specialist dealer, salesperson, or customer service department.
- Never leave the oil heater burning if you plan on leaving for longer or even brief periods of time. Make sure that the heater is really turned off before leaving the room.
- Never leave the heater unsupervised during operation.
- Never use the heater to dry objects.
- Never place objects on top or in front of the heater.
- Never use the convection heater on a boat, in a camping trainer, or a cockpit.
Caution! Risk of burns!
Do not use the heater unless the safety grille is completely closed. To close the grille, insert the pin in the housing frame.
Room temperature control
The room temperature should be comfortable. If it gets too warm, ventilate the room by opening a window. Do not manipulate the wick knob. Trying to reduce the heat by manipulating the wick knob will only lead to insufficient combustion which may cause unpleasant odors and health hazards.
KEEP THE OPERATING
INSTRUCTIONS IN A SAFE PLACE!!!

1. PREFACE
Read the operating Instructions carefully. They contain all the information you need for correct operation and safe and efficient set-up of the oil heater. Only a thorough knowledge of the operating instructions will allow you to enjoy all the advantages this heater has to offer.
2. TECHNICAL DATA
| Model number CH 2750 CH 2850 G CH 3600 GC | |||
| Convector type Reflector Reflector | |||
| Filament wattage 2,750 W 2,850 W | 3,600 W | ||
| Fuel consumption 230 g/h 235 g/h | 300 g/h | ||
| Daily capacity approx. 12 hours approx. | 12 hours | ||
| Fuel tank removable removable | |||
| Fuel tank capacity | 3.81 liters | 3.81 liters | 3.81 liters |
| Ignition | 2 x R20 batteries | 2 x R 20 batteries | 2 x R 20 batteries |
| Air exhaust control | included | included | included |
| Dimensions | 48 x 32 x 53 cm | 48 x 32 x 53 cm | 67 x 33 x 53 cm |
| Weight | 11 kg | 11.5 kg | 13.5 kg |
| Area of room | min. 30 m2max. 36 m2 | min. 32 m2max. 38 m2 | min. 42 m2max. 50 m2 |
| Volume of room | min. 75 m3max. 90 m3 | min. 75 m3max. 95 m3 | min. 105 m3max. 120 m3 |
GB
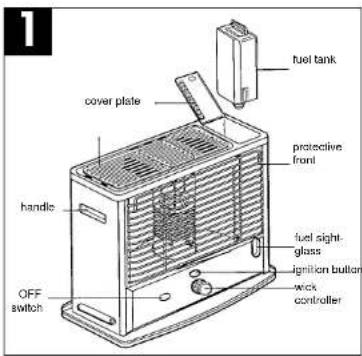
3.DESCRIPTION OF THE OIL HEATER
5. UNPACKING AND SETTING UP THE OIL HEATER
a) Take the oil heater and the packed parts out of the box (Figure 2).
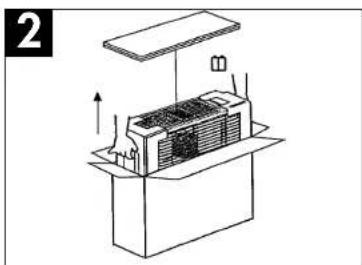
N.B.: Keep the box and packaging materials for later storage.
b) Open the safety grille at the right hand side of the heater (lift it up and pull it towards you). Take the burner out of the protective packaging (Figure 3).
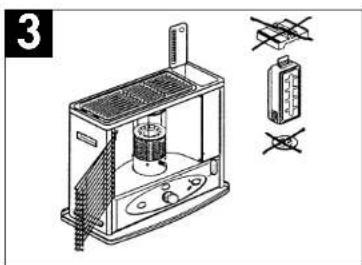
c) Open the lid of the fuel tank compartment on top of the heater and remove the protective foam rubber from the top and the protective carton from the bottom (Figure 3).
d) Keep the packaging materials in the original box.
e) To close the heater, first insert it in the slots at the top and then in the slots at the bottom. Never start up the heater if the grille is not properly locked in place and closed.
f) Insert the batteries at the rear side of the heater (Figure 4).

Unscrew the recessed head screw and remove the battery compartment lid.
- Insert the two R 20 batteries (supplied with the heater) in the battery compartment located on the rear side of the appliance. Watch out for the (+) and (-) polarities of the batteries.
- Whenever the heater is not in use, or when its operation is interrupted for an extended period of time, be sure to take out the batteries.
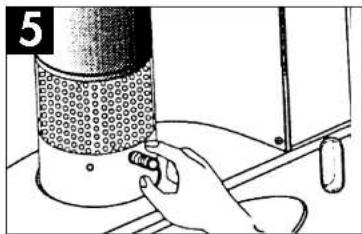
g) Burner position (Figure 5)
- Position the burner on top of the wick controller.
- To make sure that the burner is in the right place, turn the burner knob back and forth three or four times until the burner settles properly on the wick controller.
h) Check the automatic cut-out
Using the wick controller, turn the wick all the way to the top.
- Press the OFF button. The wick must now move all the way to the bottom.
To check if the wick has really gone all the way down, test whether the wick can be lowered any further with the wick controller. The automatic cut-out is working correctly if it is impossible to move the wick down any further. Never start up the heater if this safety system is not working properly.
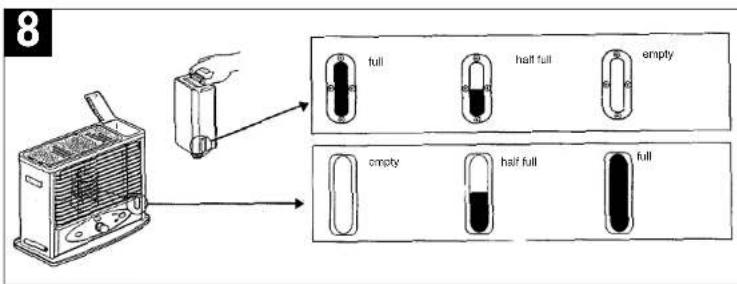
6. FILLING THE HEATER WITH FUEL
CAUTION: Never lift out the fuel tank or fill it while the heater is in operation or still hot.
Never fill the fuel tank in your living quarters. This should be done strictly out of doors. To fill the oil heater with fuel, first take the removable tank, the fuel, and the manual pump outdoors. How to use the manual pump: Insert the rigid tube in the fuel storage canister and the flexible tube in the tank opening (Figure 6). Squeezing the bellows of the manual pump will transport the fuel from the canister into the tank. During the filling operation, always keep an eye on the fuel gauge to check the fuel level. When the tank is full, unscrew the cap on the siphon pump. This will interrupt the fuel flow. Then re-close.

Do not allow the fuel tank to overflow. The manual pump must be completely drained before pulling the pipes out of the tank and fuel canister. Make sure that the screw caps of the tank and fuel storage canister are properly closed.
Insert the tank into the fuel compartment. The fuel gauge must be visible at the front side of the heater. (If the tank is not inserted correctly, the tank compartment lid will not close. Figure 7)
N.B.: Do not wait until the tank is completely empty before refilling it. Do not take the tank out for refilling if the heater is still in operation or while it is still hot.
Important note for filling in fuel for the first time: When starting up the heater for the first time, make sure that at least two hours elapse between filling in the fuel and igniting the heater. This waiting period is necessary to allow the wick to be become saturated with fuel.
Important note for igniting the convection heater for the first time:
We strongly advise you to start up the convection heater for the first time outdoors so that the oils used during the manufacturing process are combusted out of doors and not inside your living quarters.
N.B.: Switch off the heater and refill the tank before it is completely empty.
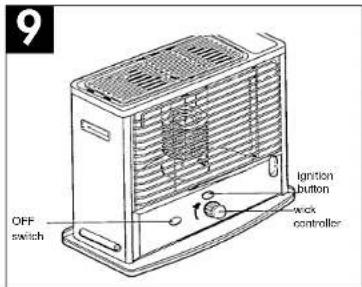
7.AUTOMATIC IGNITION
The convection heater is equipped with an automatic ignition system for added safety and comfort.
Two (2) R 20 batteries are included with the heater to supply the automatic ignition system with the power required to light up the wick. For this purpose, the wick must be in its uppermost position.
Start-up
- Make sure that the batteries are properly in place. (Figure 4)
Turn the wick controller in clockwise direction until the wick has moved all the way to the top. (Figure 9) - Press the ignition button so that the ignition touches the wick and lights it.
Once the wick starts to burn, release the ignition button. This will cause the combustion chamber to be lowered automatically onto the wick. - Turn the burner back and forth a few times to ensure that the burner is seated correctly on top of the wick. (Figure 5)
- Then follow the steps outlined in the next section.
GB
8. TURNING OFF THE OIL HEATER
To turn off the heater, press the left-hand button (Figure 9). This will cause the wick to be lowered. If this fails to lower the wick completely, turn the wick in counterclockwise direction with the wick controller until it is fully lowered. After about 2 or 3 minutes, lift the burner by the burner handle and check that the burner has indeed gone out.
Inspection and regular maintenance of your heater
Important! Never manipulate any of the following parts:
Automatic cut-out
-Fuel gauge
Check to make sure that the oil heater is
clear
All parts of the oil heater must be cleaned of lubricants and oil residues. To avoid smells, be sure to remove any fuel residues spilled when inserting the fuel tank.
- Inspect the fuel tank on a regular basis.
Lift out the tank and check it to make sure that it is not dented or leaking and that it is in perfect condition. Also, inspect the tank for rust spots. If the tank is damaged in any way, it must be replaced immediately.
- Inspect the wick control system for soot
deposits.
Scrape off any soot or carbon deposits on the wick ring with a flat screwdriver. Do not allow any carbon deposits to drop onto the burner.
Check the automatic ignition system.
If the automatic ignition system fails to work correctly, check to see whether the ignition wire is fractured or bent. Minor deformations can be corrected with a small nail. If the ignition wire is pulled apart or fractured, it must be replaced. CAUTION: Take out the batteries prior to replacing the wire.
Check the batteries.
If, during ignition of the wick, the ignition wire fails to heat up sufficiently to produce a normal flame, the batteries must be replaced.
Check the wick ring.
Check the wick prior to every use. Make sure that the wick is free of soot and carbon deposits. If the wick is soiled with soot or carbon, it must be cleaned promptly.
If you encounter any problems with the wick:
IMMEDIATELY!
9. CLEANING THE WICK (SOOT AND CARBON DEPOSITS)
Carbon and soot deposits accumulate on the top of the wick ring when the heater has been in operation a certain time. It is important to remove these deposits in order to ensure good combustion and correct extinguishing.
Check the upper part of the wick once the heater has consumed 2 or 3 tanks of fuel. If it is rigid and brittle, this is a sign of carbon deposits. In some instances, soot will also have accumulated on the wick's tip.
The wick is in perfect condition if its upper tip is flexible.
Other signs indicating carbon deposits on the wick:
- the wick control knob is hard to turn
- the heater is difficult to start up
IMPORTANT: Carbon deposits must be removed out of doors.
The oil heater will not function perfectly unless the wick is tended to on a regular basis. For this purpose, the carbon deposits which accumulate on the upper part of the wick must be removed.
Cleaning the wick is accompanied by an unpleasant smell. It is essential, therefore, to take the heater out of doors, e.g. under a canopy or a similar well ventilated place.
Removing the carbon deposits
- Keep the oil heater going, even if the tank is practically empty. Alternatively you can remove the tank cartridge and let the residual oil in the wick container burn away completely. Once the wick container is completely empty, the flames will go out slowly. Now turn the wick up all the way and let it continue to burn until it goes out completely.
Wait for 30 minutes after the flame has gone out. Re-light the wick and again let it burn until it goes out completely.
Once the wick has cooled down completely, remove any residual ash using a small brush or an old toothbrush.
- All the carbon deposits which have accumulated on the wick will be removed by this brushing. When you are finished brushing, the wick should have regained its original flexibility and look like new. If you find that certain areas on the upper part of the wick are still rigid, bend these areas of the wick with pliers, which will break up the residual carbon into small particles. After you have cleaned the wick once, check to see if you need to repeat the cleaning procedure in order to get completely rid of all the carbon deposits. If it turns out that the wick needs to be cleaned another time, fill the container with a small
GB
amount of fuel and repeat the above procedure. When you are finished with the cleaning, fill the tank and wait another 30 minutes before turning the heater back on.
We recommend you to clean the heater one week after starting it pu for the first time.
Thereafter you should repeat this cleaning procedure on a regular basis to prevent the wick from getting hard again and to avoid new carbon deposits.
During the winter heating season, the wick should be cleaned at least once a week, if possible. Be sure to inspect the wick frequently in order not to miss an essential cleaning interval.
10. CHECKING THE AUTOMATIC IGNITION SYSTEM
Observe the following instructions to ensure proper operation:
R 20 batteries: The battery compartment is located on the rear side of the heater. Replace the batteries.
Flame spark plug: Should the automatic ignition still not work, even after the batteries have been replaced, take out the flame spark plug. If the wire is fractured or bent, or if it does not ignite while the ignition button is being pushed, the spark plug needs to be replaced. IMPORTANT: Be sure to use a 2.5 V DC, 1 A spark plug.
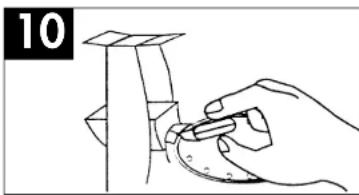
Replacing the flame spark plug (Figure 10)
- Remove the batteries.
Open the safety grille and take out the burner.
Press the ignition button in order to raise the flame spark plug.
Press the flame spark plug and turn it in counterclockwise direction. - Insert a new spark plug (2.5 V DC, 1 A only) and turn it in clockwise direction.
- Reinsert the burner, close the saftey grille, and replace the batteries.
Lowering the wick by hand
Pressing the OFF button while holding the wick control knob and then releasing it slowly will
decrease the combustion speed of the wick. This way, fuel smells can be avoided if the OFF button of the oil heater was pushed inadvertently.
11. CHECKING THE AUTOMATIC CUT-OUT
During the oil heater's main season in use, the automatic cut-out must be checked at least once a week. After turning off the heater, use the wick controller to turn the wick all the way to the top. Take the heater by the safety grille and shake it vigorously. If the automatic cut-out is working correctly, you will hear a loud sound as the clamping device unsnaps and the tension spring lowers the wick into the
housing. To make sure that the wick is fully lowered, tum the wick controller in clockwise direction. If the system is working properly, the wick must be fully lowered. If it is not possible to lower the wick any further with the wick controller, you need to have it replaced by your specialist dealer.
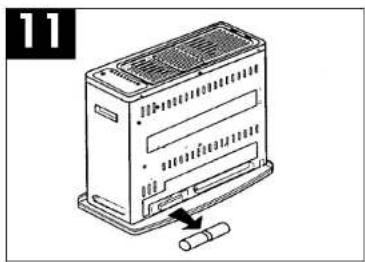
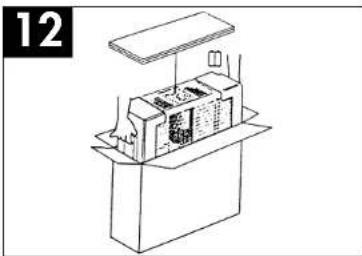
12. STORING THE OIL HEATER FOR EXTENDED PERIODS OF TIME
If you follow the following instructions exactly, your oil heater will continue to work just as efficiently and reliably during the next heating season (Figure 11 / Figure 12).
- Swill a small amount of fuel around in the tank and rinse it out. Never mix any water with the fuel as this will cause the tank to rust on the inside. Remove the last traces of fuel from the heater (by burning away the fuel).
Once the tank is empty, re-light the heater. Turn the wick all the way to the top and allow it to burn down completely (this takes about 1 hour). This procedure must be done outdoors.
Take out the batteries. Allow the fuel tank to dry well on the inside. Remove any traces of carbon or soot which may have accumulated on the wick controller, the wick guide or the burner with a screwdriver and/or a small brush. - To avoid corrosion, remove the batteries before putting the oil heater away for storage.
Before putting the heater away for storage, make sure that the wick is in the lowest possible position and that the automatic cut-out is unlocked.
GB
How to operate the comfort heater?
-Read the operating instructions carefully before using the heater.
After igniting the wick in accordance with the operating instructions, inspect it to make sure that it is burning properly. If the wick is too high or if the burner is too far up, combustion may be abnormal and even dangerous. An incorrectly adjusted wick may cause the smoke, smells, insufficient combustion and the accumulation of carbon deposits on the wick, and it may even shorten wick life.
Use the heater only in well ventilated rooms.
- Never use the heater in rooms which contain flammable vapors or gases.
- Never use the heater to dry clothes.
- Never transport the heater while it is still in operation.
- Never use the heater to heat up or cook food
- Never touch the top plate or the safety front grille while the heater is still in operation as these surfaces become burning hot.
- Never leave the heater unsupervised during operation. Make sure that the heater is really off before retiring for the night.
If it is impossible to turn off the heater with the automatic cut-out, take out the tank immediately. If the flame keeps on burning in a normal way, the heater can be kept going until the fuel has burned away completely and the flame dies out. If the flames in the burner appear abnormal, i.e. if they are blazing out over the burner while it is impossible to turn of the burner with the automatic cut-out, the fire must be extinguished with an A-B-C powder fire extinguisher. After such an incident, the heater must not be started up again until it was inspected and repaired in a specialist workshop.
Use only fuel types authorized by your country's national standards.
- Never place the burner in water (risk of rusting).
Inspection and maintenance of the comfort
heater
Consult your specialist dealer if you encounter any problems!

GB
- WHAT TO DO IN CASE OF TROUBLE
| PROBLEM SOLUTIONS The heater suddenly stops generating heat. Ventilate the The automatic cut-out is activated. Never attempt to rest | room and lower the room temperature. Wait for about 10 or 15 minutes, then restart the heater. start the heater immediately after switching it off. |
| The heater does not start up: 1. The tank is empty. 1. Fill the tank with authorized fuel. 2. The fuel contains water. 2. Empty the tank. Have the 3. The automatic ignition system is not working. 3. Replace 4. The ignition is touching the side of the wick. 4. Turn the wick all the way down with the wick controller until the spark plug touches the tip of the wick. | wick replaced by your specialist dealer. Then refill the tank with authorized fuel. replace the batteries. Replace the flame spark plug. Check to see if the ignition wire is torn or disconnected. See section 12. wick all the way down with the wick controller until the spark plug touches the tip of the wick. |
| Smoke and odor formation: 1. The flame is burning too high. 1. Turn the wick down with the wick controller to reduce the flame. 2. Excessive air intake in the heater. 2. Remove the heat 3. The burner is not completely horizontal. 3. Turn the burner back and forth with the burner knob until it settles in a proper horizontal position above the wick. 4. Soot or tar deposits on the wick. 4. See section 11. 5. Old fuel. 5. Empty the tank. Have the wick replaced by your specialist dealer. Then refill the tank with authorized fuel. | with the wick controller to reduce the flame. er from the draft. ner back and forth with the burner knob until it settles in a proper horizontal position above the wick. your specialist dealer. Then refill the tank with authorized fuel. |
| The flame is flickering or going out: 1. The fuel contains water. 1. Empty the tank. Have the wick replaced by your specialist dealer. Then refill the tank with authorized fuel. 2. Soot or tar deposits on the wick. 2. Have the wick replaced by your specialist dealer. See section 11. | wick replaced by your specialist dealer. Then refill the tank with authorized fuel. placed by your specialist dealer. See section 11. |
| The wick is burning down too fast: 1. Caution! The fuel you are using is mixed with 1. Empty unauthorized, liquid, and dangerous fuel. | the tank and clean it out. • Have the wick replaced by your specialist dealer. • Fill the tank with authorized fuel. |
| The wick is difficult to adjust: 1. The fuel contains water. 2. Carbon or tar deposits. | 1. Empty the tank. Have the wick replaced by your specialist dealer. 2. Follow the instructions in the operating manual. |
| The heater is on fire: | • Empty the tank. Have the wick replaced by your specialist dealer. • Call the fire brigade. • Extinguish the flames with a fire extinguisher. Alternately, use blankets and pour water on top of the blankets. Never pour water directly onto the heater. |
F
The guarantee period begins on the sales date and is valid for 1 year.
Responsibility is assumed for faulty construction or material or functional defects.
Any necessary replacement parts an necessary
repair work are free of charge.
We do not assume responsibility for
Your customer service partner
EINHELL-GARANTIE
EINHELL GARANTIBEVIS
Eschenstraße 6 - D-94405 Landau/Isar (Germany)
Ersatzstell-Abt.: Telefon (0 99 51) 942 356 • Telefax (0 99 51) 52 50
Reparatur-Abot: Telefon (0 99 51) 942 357 - Telefax (0 99 51) 26 10
- Craven Court Winwick Quay
Warrington, Cheshire, WA2 8QU
Agence Bellut Prudent, Service Acres-Vente
- allée, Joseph Cugnot, Z.L. du Phare
F-33700 Merignac
Danish Trading Co. Silkeborg ApS
(5)Rodelundvej 11 - Rodelund
DK-8653 Them
Technical changes subject to change

- Table des matieres
- Important information
- Caution!
- Important!
- Caution! Risk of burns!
- Room temperature control
- KEEP THE OPERATING
- INSTRUCTIONS IN A SAFE PLACE!!!
- PREFACE
- TECHNICAL DATA
- GB
- 3.DESCRIPTION OF THE OIL HEATER
- UNPACKING AND SETTING UP THE OIL HEATER
- g) Burner position (Figure 5)
- h) Check the automatic cut-out
- FILLING THE HEATER WITH FUEL
- 7.AUTOMATIC IGNITION
- Start-up
- TURNING OFF THE OIL HEATER
- Inspection and regular maintenance of your heater
- Check to make sure that the oil heater is
- - Inspect the fuel tank on a regular basis.
- - Inspect the wick control system for soot
- Check the automatic ignition system.
- Check the batteries.
- Check the wick ring.
- IMMEDIATELY!
- CLEANING THE WICK (SOOT AND CARBON DEPOSITS)
- The wick is in perfect condition if its upper tip is flexible.
- IMPORTANT: Carbon deposits must be removed out of doors.
- Removing the carbon deposits
- CHECKING THE AUTOMATIC IGNITION SYSTEM
- CHECKING THE AUTOMATIC CUT-OUT
- STORING THE OIL HEATER FOR EXTENDED PERIODS OF TIME
- F
- EINHELL-GARANTIE
- EINHELL GARANTIBEVIS
Brand : EINHELL
Model : CH 2850 G
Category : Heating