ES173 A - Saw DOLMAR - Free user manual and instructions
Find the device manual for free ES173 A DOLMAR in PDF.


Frequently Asked Questions - ES173 A DOLMAR
User questions about ES173 A DOLMAR
0 question about this device. Answer the ones you know or ask your own.
Ask a new question about this device
Download the instructions for your Saw in PDF format for free! Find your manual ES173 A - DOLMAR and take your electronic device back in hand. On this page are published all the documents necessary for the use of your device. ES173 A by DOLMAR.
USER MANUAL ES173 A DOLMAR
Owner's and Safety Manual
for Electric Chain Saws (pages 2 - 23)
Read and understand this Manual. Always follow safety precautions in the Owner's and Safety Manual.
Improper use can cause serious injury!
Preserve this Manual carefully!
ATTENTION!
Thank you for your trust in our product
We congratulate you on your new DOLMAR electric chain saw. We are convinced that you will be satisfied with this modern machine.
DOLMAR electric chain saws are characterized by their robust, high-efficiency motors and high chain velocities which allow an excellent cutting efficiency. They are equipped with numerous state-of-the-art safety devices, are light, handy and can be put into operation immediately wherever electric power is provided.
In order to guarantee the optimal function and performance of your electric chain saw and to ensure your personal safety we would request you to perform the following:


Read and understand this instruction- and safety manual carefully before putting the electric chain saw into operation for the first time. Strictly observe the warnings and safety regulations! Failure to do so can result in serious injury to the operator and/or bystanders!
This electrically powered saw is classified by CSA as a Class 2C saw. It is intended for infrequent use by homeowners, cottagers, and campers, and for such general applications as clearing, pruning, cutting firewood, etc. It is not intended for prolonged use. Prolonged periods of operation can cause circulatory problems in the use's hands due to vibration. For such use, it may be appropriate to use a saw having an anti-vibration feature.
Table of contents Page
Packing 2
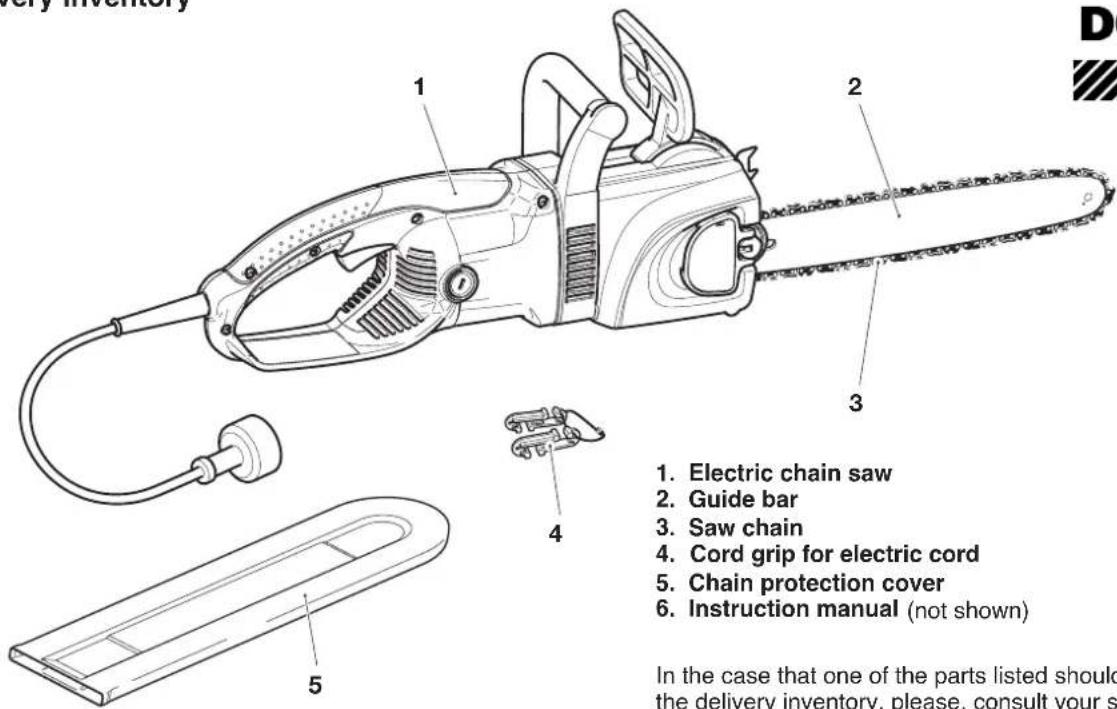
Delivery inventory 3
Symbols 3
SAFETY INSTRUCTIONS 4-6
Use of extension cord 6
Chain saw nomenclature 7
Mounting the guide bar and saw chain 8-9
Tightening the saw chain 9
Checking the chain tension 10
Chain brake 10
Saw chain oil 11
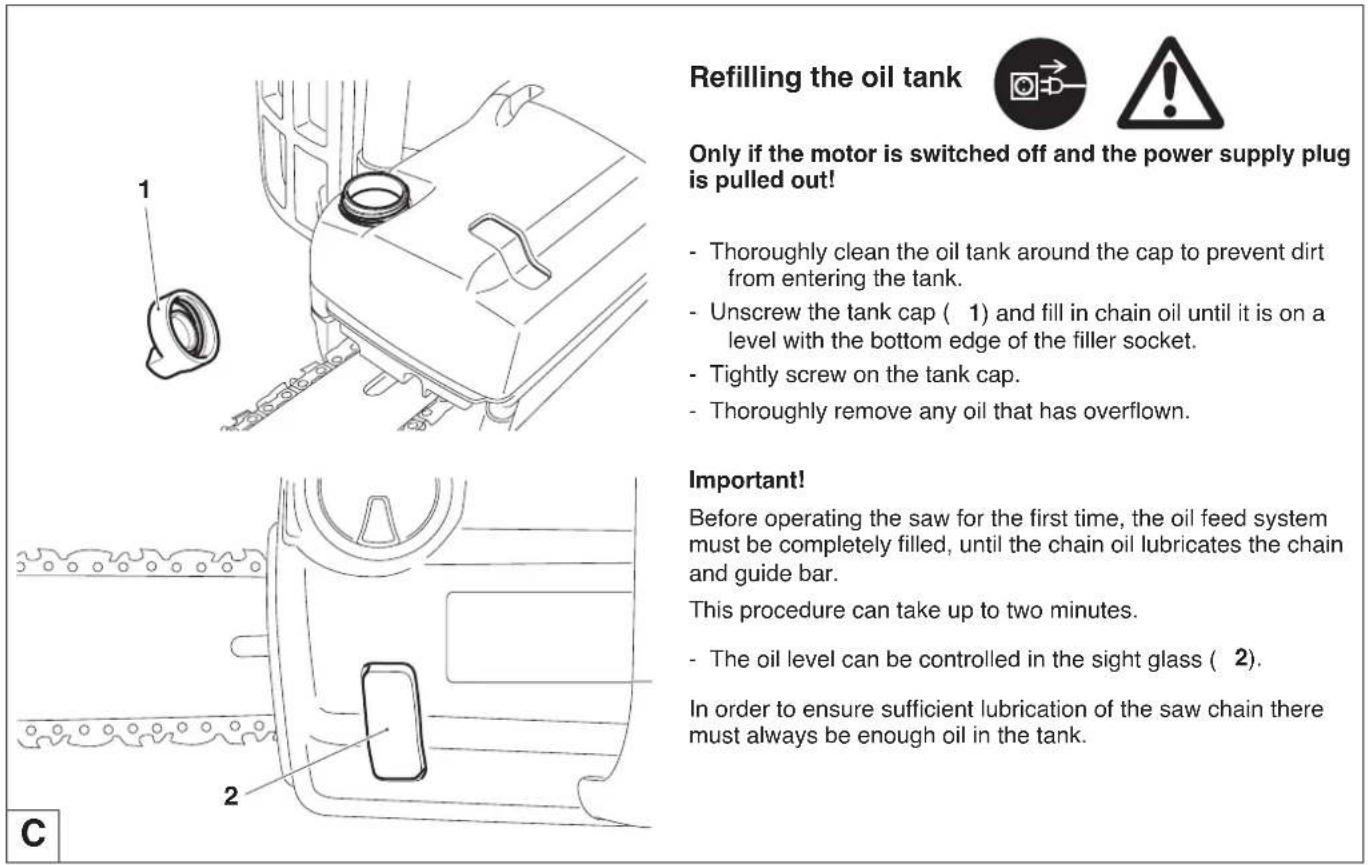
Refilling the oil tank 12
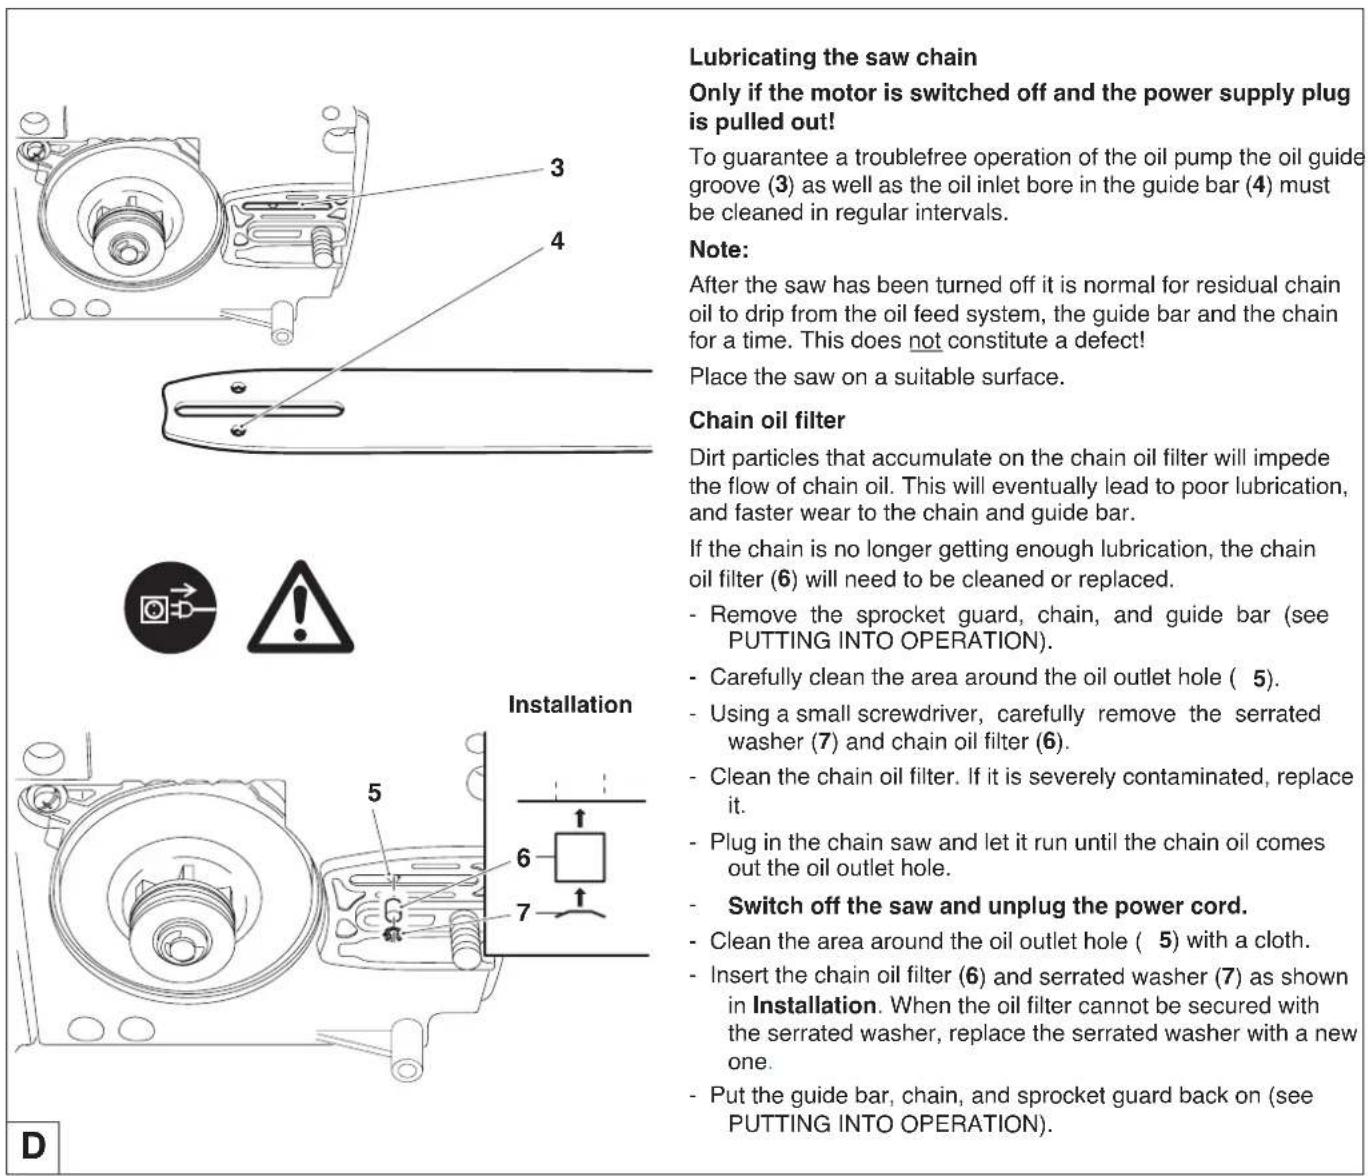
Lubricating the saw chain 12
Plug in the saw 13
Switching on the motor 13
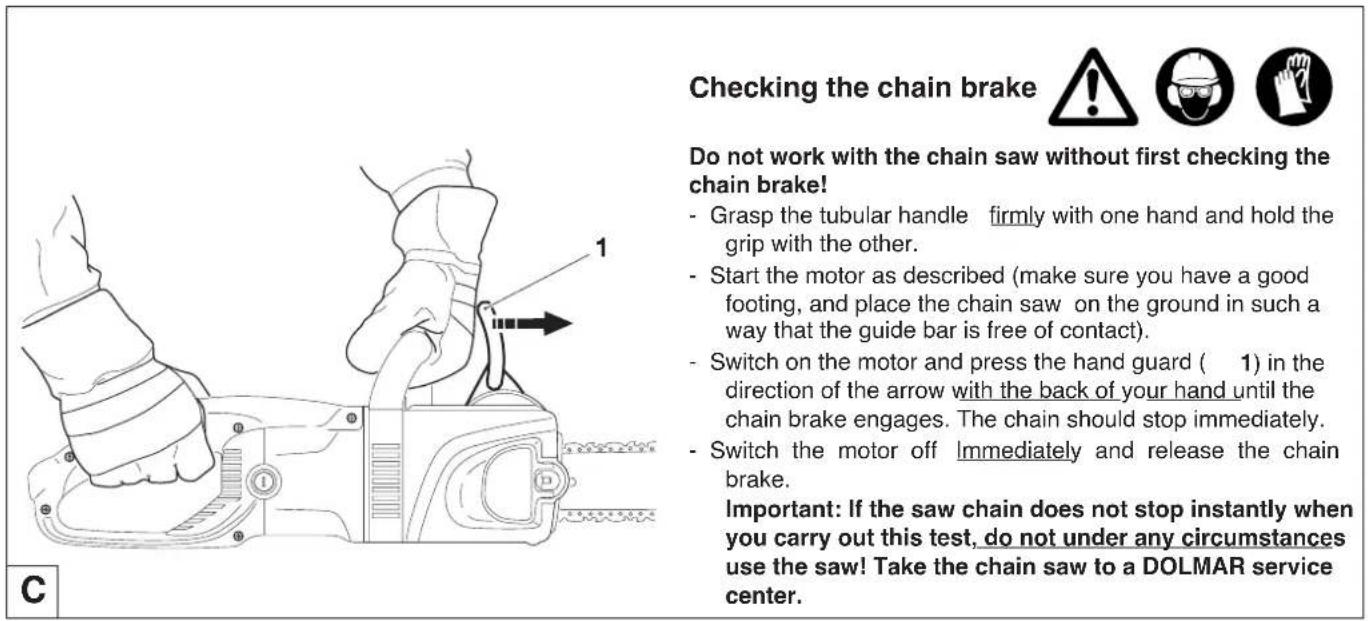
Checking the chain brake 14
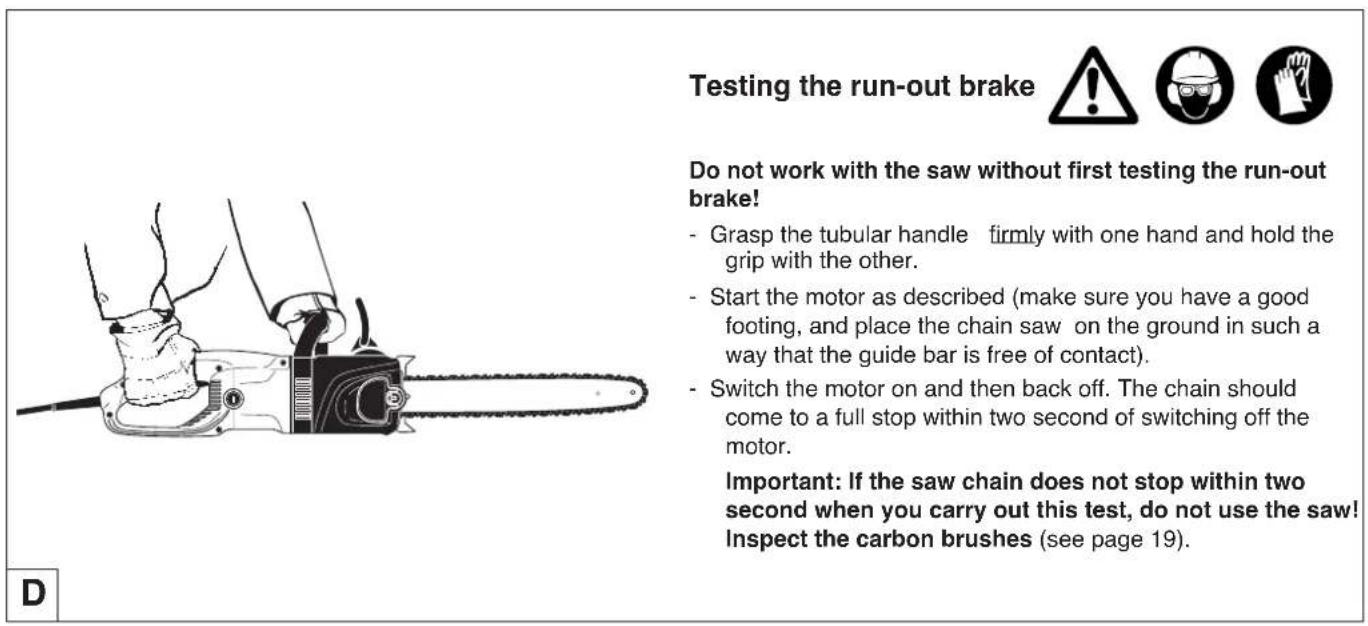
Checking the run-out brake 14
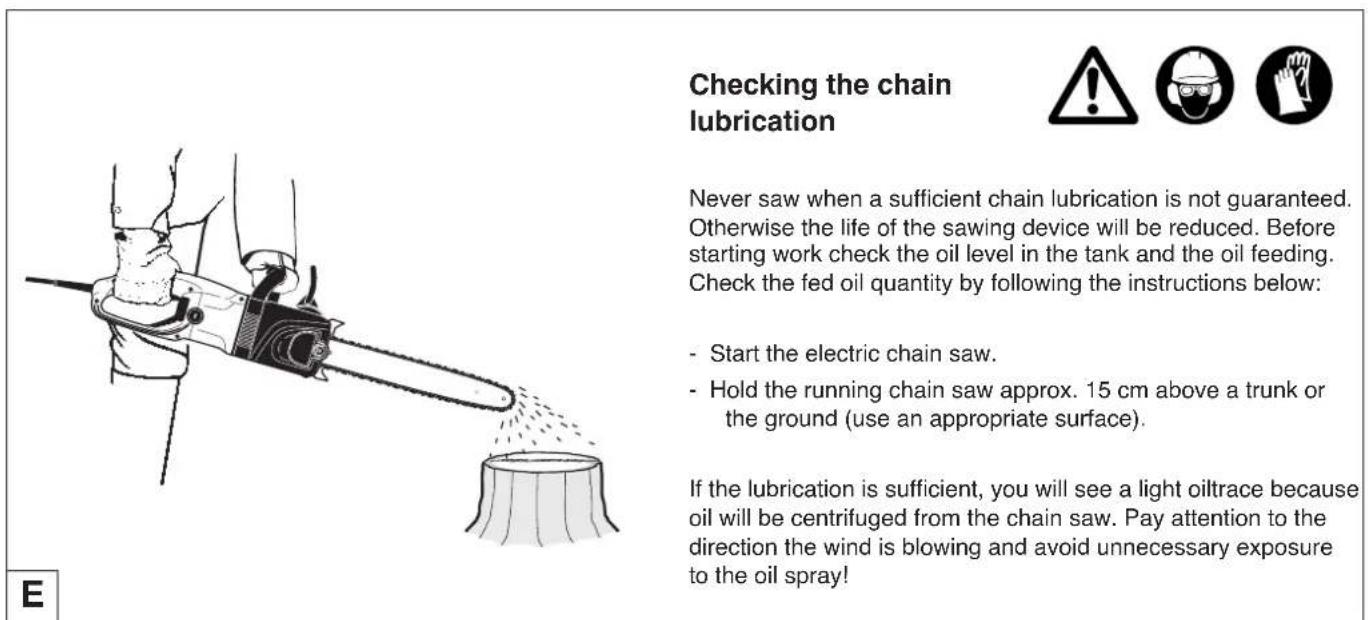
Checking the chain lubrication 14
Felling a tree 15-16
MAINTENANCE
Sharpening the saw chain 17-18
Cleaning the guide bar/lubricating the sprocket nose.....18
Replacing the saw chain 19
Inspecting and replacing the carbon brushes 19
Troubleshooting 20
Instructions for periodic maintenance 20
Service, spare parts and guarantee 21
Technical data 22
Extract of spare parts list 23
Accessories 23
Packing
The DOLMAR electric chain saw will be delivered in a protective cardboard box to prevent transport damages.
Cardboard is a basic raw material and is therefore consequently reusable or suitable for recycling (waste paper recycling).

Symbols
You will notice the following symbols on the chain saw and in the instruction manual:
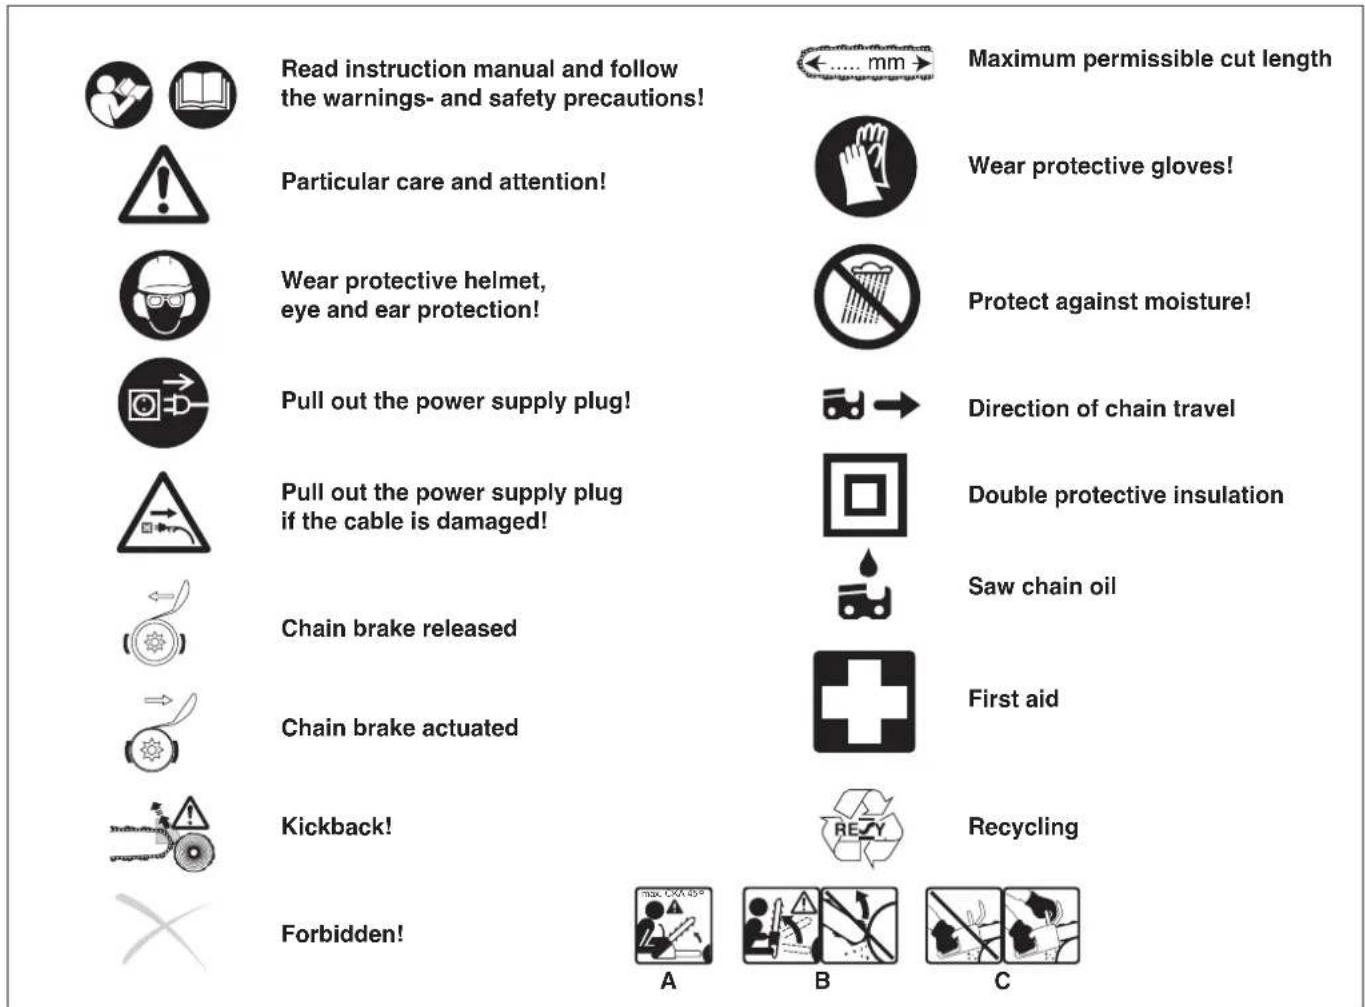
A) Maximum Computed Kickback Angle (CKA) without using the chain brake when using the recommended bar and chain combinations.
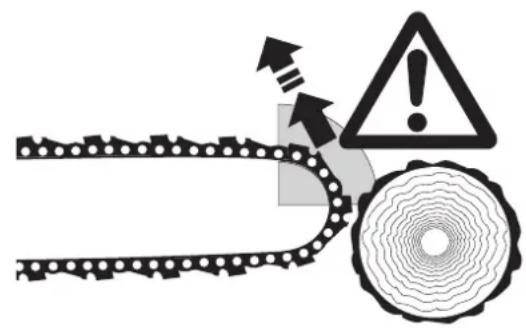
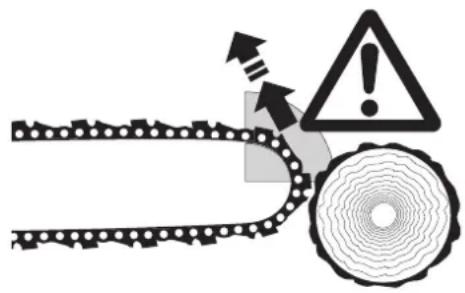
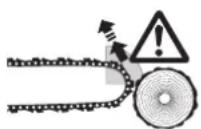
B) Contact of the guide bar tip with any object should be avoided! Tip contact may cause the guide bar to move suddenly upward and backward, which may cause serious injury!
C) Always use two hands when operating the chain saw!
IMPORTANT SAFETY INSTRUCTIONS
WARNING: WHEN USING AN ELECTRIC CHAIN SAW, BASIC SAFETY PRECAUTIONS SHOULD ALWAYS BE FOLLOWED T REDUCE THE RISK OF FIRE, ELECTRIC SHOCK, AND INJURY TO PERSONS, INCLUDING THE FOLLOWING:
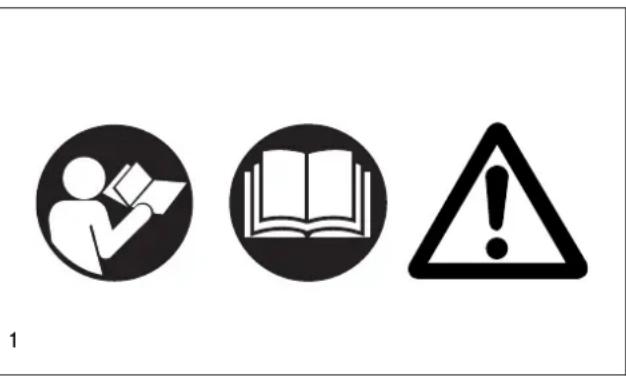
READ ALL INSTRUCTIONS (1)
- Keep Work Area Clean
Cluttered areas invite injuries. Do not start cutting until you have a clear work area, secure footing, and a planned retreat path from the falling tree.
- Consider Work Area Environment
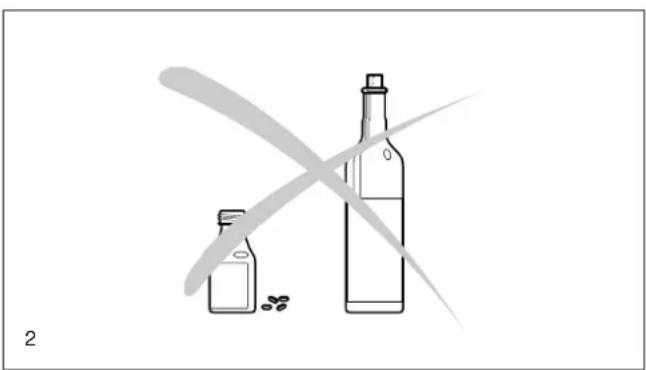
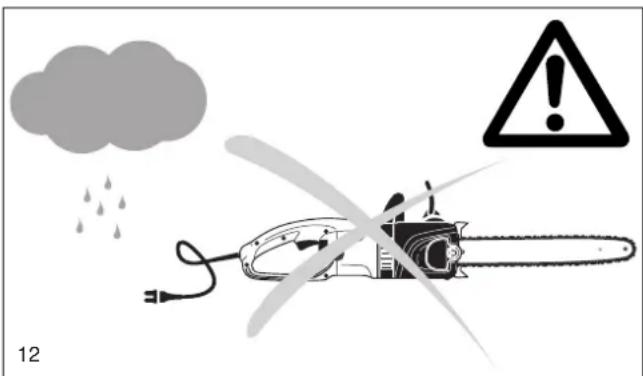
Use extreme caution when cutting small size brush and saplings because the slender material may catch the saw chain and be whipped toward you or pull you off balance. Do not operate a chain saw in a tree unless specifically trained to do so. When cutting a limb that is under tension be alert for spring back so that you will not be struck when the tension in the wood fibers is released. Don't expose chain saw to rain (3). Don't use chain saw in damp or wet locations. Do not use chain saw in presence of flammable liquids or gases.
Guard Against Electric Shock
Prevent body contact with grounded surfaces. For example: metal pipes, wire fences.
- Keep Children Away
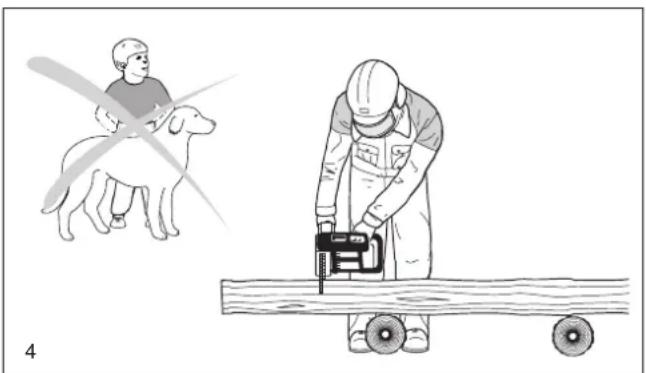
Do not let visitors contact chain saw or extension cord. All visitors should be kept away from work area (4).
- Store Idle Chain Saw
When not in use, chain saws should be stored in a dry and high or locked up place-out of the reach of children. When storing saw, use a scabbard or carrying case.
- Don't Force Chain Saw
It will do the job better and safer at the rate for which it was intended.
- Use Right Tool
Cut wood only. Don't use chain saw for purpose not intended - for example - Don't use chain saw for cutting plastic, masonry non-wood building materials.
- Dress Properly
Do not wear loose clothing or jewelry. They can get caught in moving parts. Rubber gloves and non-skid footwear are recommended when working outdoors. Wear protective hair covering to contain long hair.
- Use Safety Glasses
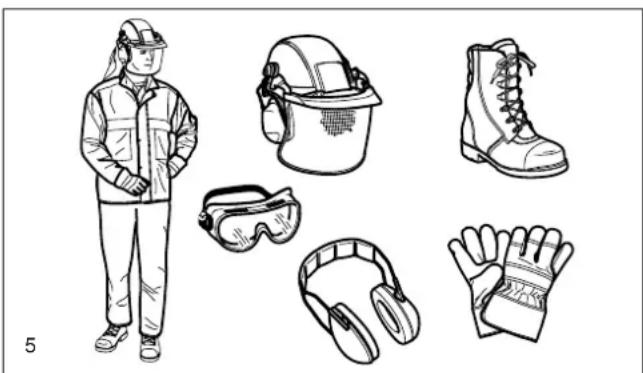
Also use safety footwear; snug fitting clothing; protective gloves; hearing and head protection (5).
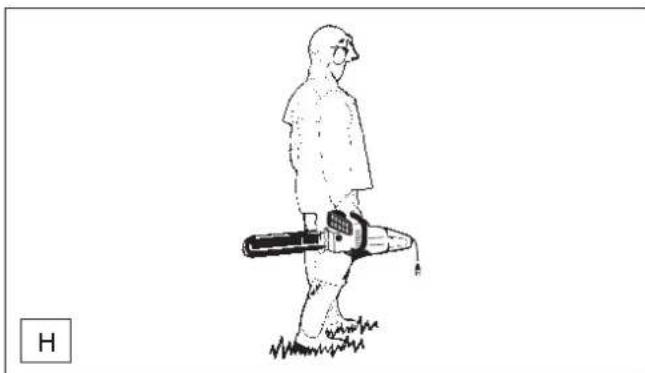
- Carrying Saw
Carry the chain saw by the front handle with the saw stopped, finger off the switch, the guide bar and saw chain, covered with the chain protection, to the rear.
- Maintain Chain Saw With Care
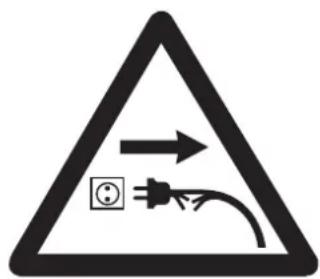
Inspect chain saw cords periodically and if damaged, have repaired by authorized service facility. Keep cord clear of the chain and operator at all times. Never carry saw by the cord or pull it to disconnect from receptacle.
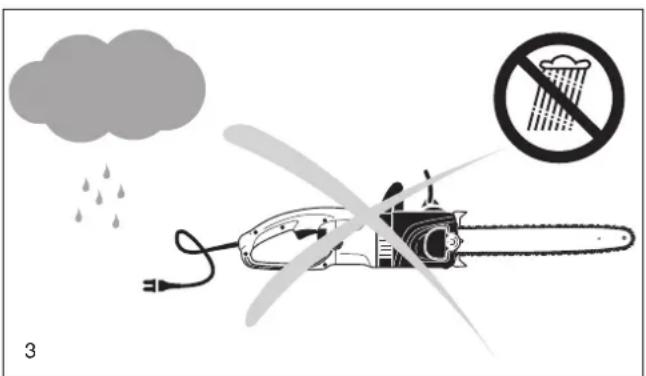
Keep cord from oil and sharp edges. Inspect extension cords periodically and replace if damaged. Keep tools sharp and clean for better and safer performance. Follow instructions for lubricating and changing accessories. Keep handles dry, clean, and free from oil and grease.
- Disconnect Chain Saw
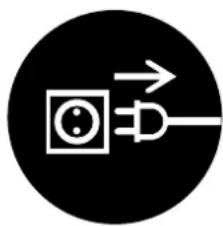
Disconnect chain saw when not in use, before servicing, and when changing accessories and attachments, such as saw chain and guard (6).
- Outdoor Use Extension Cords
Use only extension cords intended for use outdoors and so marked.
Route the power cord in such a way that in cannot get caught in branches or other objects during sawing.
- Stay Alert
Watch what you are doing. Use common sense. Do not operate chain saw when you are tired. Keep all parts of the body away from the saw chain when the motor is operating. Before you start the saw, make sure the saw chain is not contacting anything.
- Check Damaged Parts
Before further use of the chain saw, a guard or other part that is damaged should be carefully checked to determine that it will operate properly and perform its intended function. Check for alignment of moving parts, binding of moving parts, breakage of parts, mounting, and any other conditions that may affect its operation. A guard or other part that is damaged should be properly repaired or replaced by an authorized service center unless otherwise indicated elsewhere in this instruction manual. Have defective switches be replaced by authorized service center. Do not use chain saw if the switch does not turn the saw on and off. Do not operate a chain saw that is damaged, improperly adjusted, or is not completely and securely assembled (7). Be sure that the saw chain stops moving when the trigger is released.
Guard Against Kickback
WARNING: KICKBACK may occur when the nose or tip of the guide bar touches an object (8), or when the wood closes in and pinches the saw chain in the cut. Tip contact in some cases may cause a lightning fast reverse reaction, kicking the guide bar up and back towards the operator. Pinching the saw chain along the top of the guide bar may push the guide bar rapidly back towards the operator. Either of these reactions may cause you to lose control of the saw which could result in serious injury to user. The following precautions should be followed to minimize kickback:
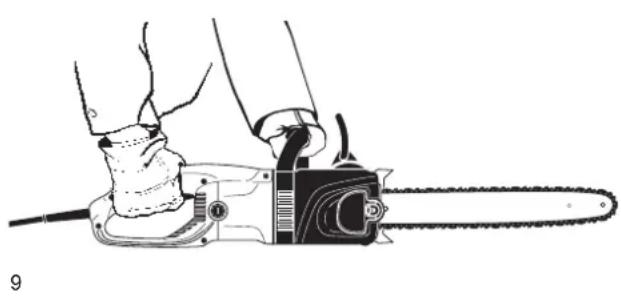
- Always grip each handle with the thumb and fingers encircling the handle as illustrated in (9). If a manual oiler control is provided additional or modified instructions regarding its use shall be provided.
- Do not over reach.
- Keep proper footing and balance at all times.
- Don't let the nose of the guide bar contact a log, branch, ground, or other obstruction.
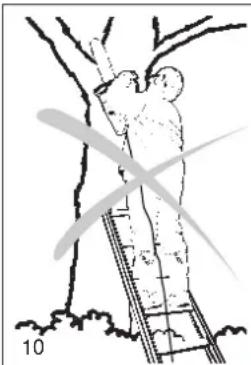
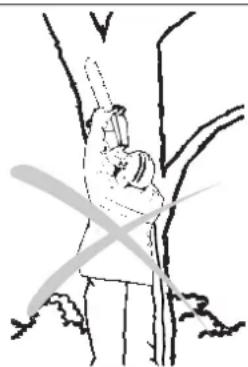
- Don't cut above shoulder height (10).
- Use devices such as low kickback chain, chain brakes and special guide bars that reduce the risks associated with kickback.
- Only use replacement bars and chains specified by the rnafterumer.
6
device malfunction
maintenance
- refill oil
- sharpen the saw chain
stop
transport
shutdown
7
8
- Power Supply
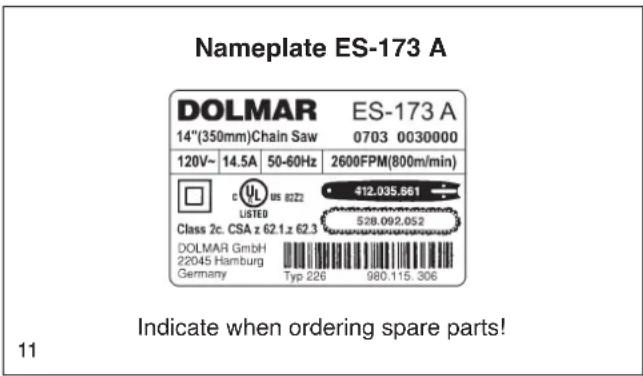
Connect chain saw to correct voltage, that is, be sure that the voltage supplied is the same as that specified on the nameplate of the tool (11).
- Replacement Parts
When servicing, use only identical replacement parts (11).
- Polarized Plugs
To reduce the risk of electric shock, this equipment has a polarized plug (one blade is wider than the other). This plug will fit in a polarized outlet only one way. If the plug does not fit fully in the outlet, reverse the plug. If it still does not fit, contact a qualified electrician to install the proper outlet. Do not change the plug in any way.
- Wear ear protectors during operation.
- Before making a felling cut, remove dirt, stones, loose bark, nails, staples and wire from the tree.
- Secure the log so that it will not rol or move suddenly during operation.
- AVOID UNINTENTIONAL STARTING. Don't carry plugged-in tool with finger on switch. Be sure switch is OFF when plugging in.
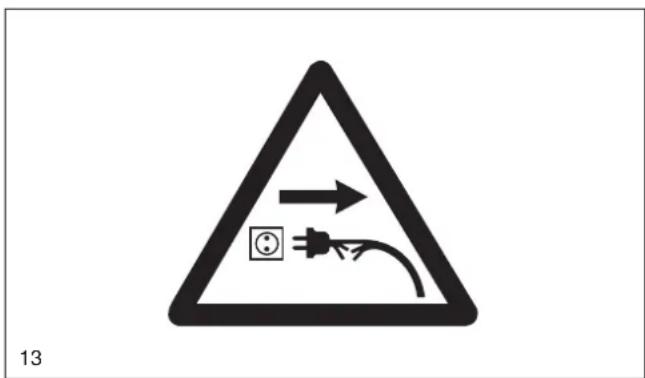
- Attention! Do not expose this tool to rain (12) and pull plug immediately if the supply cable is damaged or cut (13).
- The chain saw must not be left outdoors during rain and it must not be used when wet.
VOLTAGE WARNING:
Before connecting the tool to a power source (receptacle outlet, etc.) be sure the voltage supplied is the same as that specified on the nameplate of the tool. A power source with voltage greater than that specified for the tool can result in SERIOUS INJURY to the user - as well as damage to the tool. If in doubt, DO NOT PLUG IN THE TOOL. Using a power source with voltage less than the nameplate rating is harmful to the motor.
Use of Extension Cord
If the extension cord is intended to be used outdoors, the cord shall be marked with the suffix W-A following the cord type designation, for example - SJTW-A, to indicate it is acceptable for outdoor use. Use an extension cord heavy enough to carry the current the tool will draw. Undersized cord will cause a drop in line voltage resulting in loss of power and over-heating. Make sure the extension cord is in good condition before using. Keep the cord away from the cutting area and to position cord so that it will not be caught on branches, and the like, during cutting. Use the table below to determine the proper wire size required in the extension cord.
Contact DOLMAR Authorized or Factory Service Center if a proper extension cord cannot be found.
| Ampere rating (on nameplate) | 0-5.0 5.1- | 10.0 10.1-1 | 3.0 13.1-1 | 5.0 |
| Ext. Cord Length | Wire Size (American Wire Gauge) | |||
| 25 Ft. | 18 | 18 | 16 | 14 |
| 50 Ft. | 18 | 16 | 16 | 14 |
| 75 Ft. | 18 | 16 | 14 | 14 |
| 100 Ft. | 16 | 14 | 12 | 12 |
| 125 Ft. | 16 | 12 | 12 | 12 |
| 150 Ft. | 16 | 12 | 12 | - |
SAVE THESE INSTRUCTIONS!
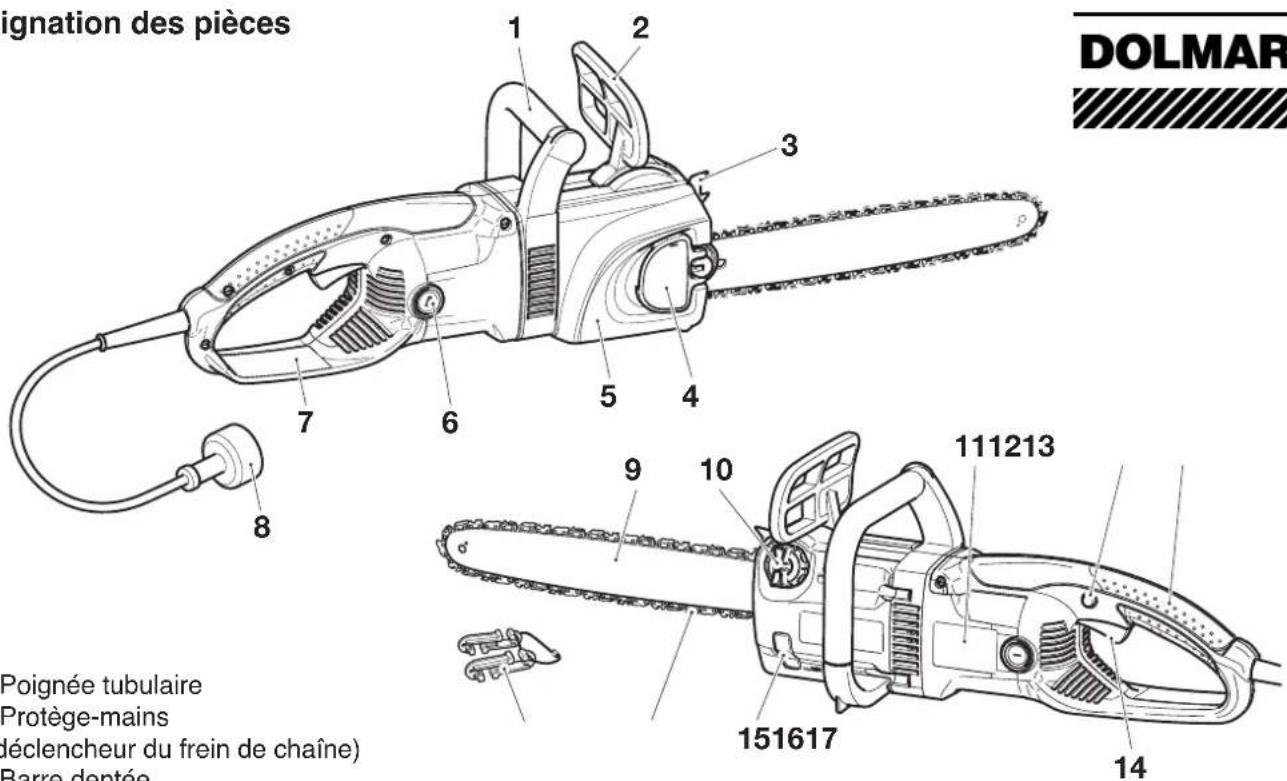
Chain Saw Nomenclature

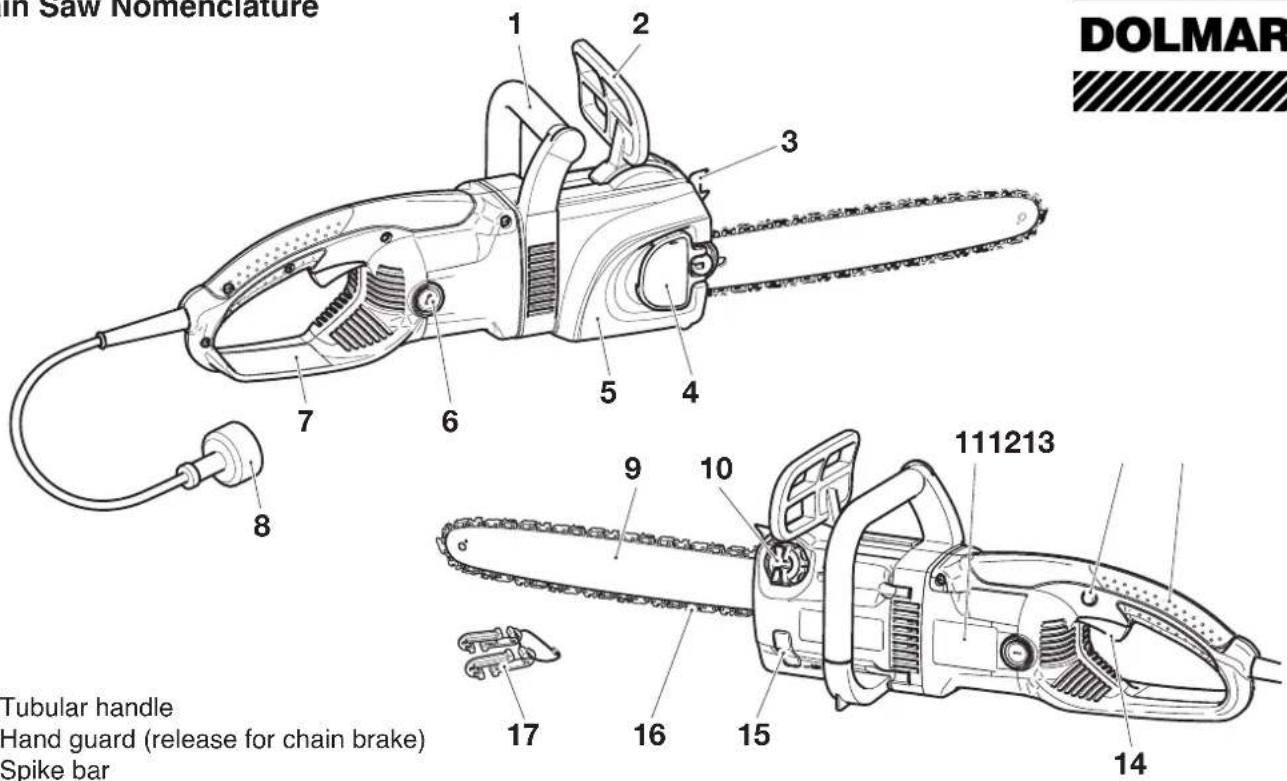
1 Tubular handle
2 Hand guard (release for chain brake)
3 Spike bar
4 Sprocket guard quick tightener
5 Sprocket guard, chain brake
6 Carbon brush cover
7 Back hand guard
8 Power cord with plug
9 Guide bar
10 Oil tank cap
11 Identification plate
12 Locking button
13 Rear handle
14 Power switch
15 Sightglass for oil level
16 Saw chain
17 Cord grip for electric cord (pull relief)
Bucking: The process of cross cutting a felled tree or log into lengths.
Chain Brake: A device used to stop the chain saw.
Chain Saw Powerhead: A chain saw without the saw chain and guide bar.
Clutch - A mechanism for connecting and disconnecting a driven member to and from a rotating source of power.
Drive Sprocket or Sprocket: The toothhead part that drives the saw chain.
Felling - The process of cutting down a tree.
Felling Back Cut : The final cut in a tree felling operation made on the opposite side of the tree from the notching undercut.
Front Handle: The support handle located at or toward the front of the chain saw.
Front Handle Guard: A structural barrier between the front handle of a chain saw and the guide bar, typically located close to the hand position on the front handle and sometimes employed as an activating lever for a chain brake.
Guide Bar: A solid railed structure that supports and guides the saw chain.
Kickback: The backward or upward motion, or both of the guide bar occurring when the saw chain near the nose of the top area of the guide bar contacts any object such as a log or branch, or when the wood closes in and pinches the saw chain in the cut.
Kickback, Pinch: The rapid pushback of the saw which can occur when the wood closes in and pinches the moving saw chain in the cut along the top of the guide bar.
Kickback, Rotational: The rapid upward and backward motion of the saw which can occur when the moving saw chain near the upper portion of the tip of the guide bar contacts an
object, such as a log or branch.
Low-Kickback Chain: A chain that complies with the kickback performance requirements of ANSI B175.1 when tested on a representative sample of chain saws.
Normal Cutting Position: Those positions assumed in performing the bucking and felling cuts.
Notching Undercut: A notch cut in a tree that directs the tree's fall.
Oiler Control: A system for oiling the guide bar and saw chain.
Rear Handle: The support handle located at or toward the rear of the saw.
Reduced Kickback Guide Bar: A guide bar which has been demonstrated to reduce kickback significantly.
Replacement Saw Chain: A chain that complies with the kickback performance requirements of ANSI B175.1 when tested with specific chain saws. It may not meet the ANSI performance requirements when used with other saws.
Saw Chain: A loop of chain having cutting teeth, that cut the wood, and that is driven by the motor and is supported by the guide bar.
Spike Bar (Spike): The pointed tooth or teeth for use when felling or bucking to pivot the saw and maintain position while sawing.
Switch: A device that when operated will complete or interrupt an electrical power circuit to the motor of the chain saw.
Lock-Off Button: A movable stop that prevents the unintentional operation of the switch until manually actuated.


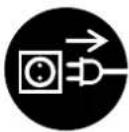
CAUTION: When working on the guide bar or saw chain always wear protective gloves and pull out the power supply plug.
CAUTION: Switch on the electric chain sawonly after having assembled it completely and inspected!
A
B
Mounting the guide bar and saw chain
Put the electric chain saw on a stable surface and carry out the following operations for mounting the bar and chain:
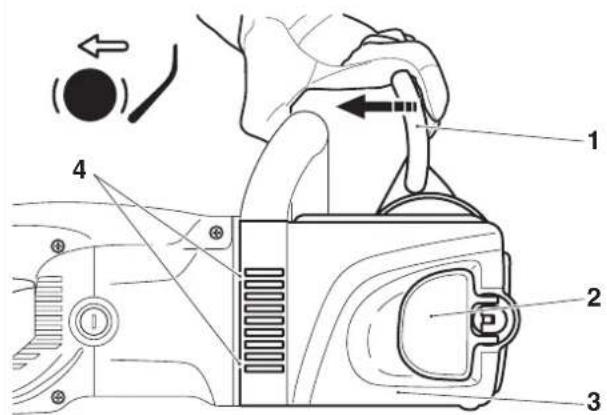
Release chain brake. To do this, pull the hand guard (1) in the direction of the arrow.
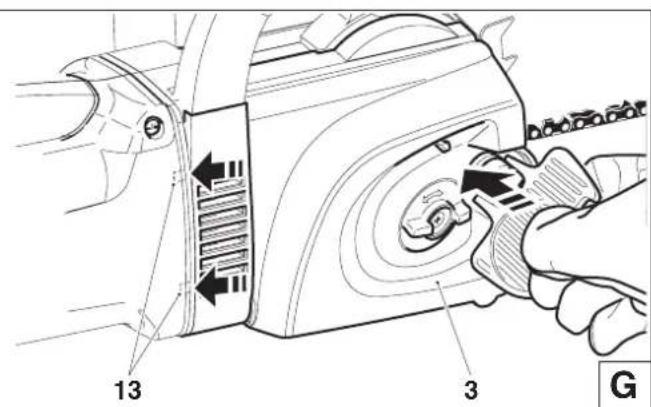
Flip up the sprocket guard quick tightener (2) (see also Fig. G).
Push in the sprocket guard quick tightener firmly against spring pressure, and slowly turn it counter-clockwise until you feel it engage. Keep pushing in, and turn it as far as possible counter-clockwise.
Release the sprocket guard quick tightener (remove pressure) and now turn it clockwise to its original position. Repeat this procedure until the sprocket guard (3) is unscrewed.
Pull the sprocket guard (3) up slightly, pull out of the rear fittings (4) and remove.
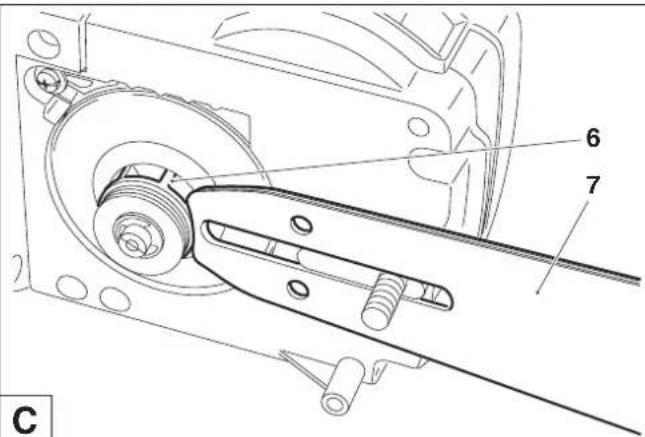
Position the guide bar (7) and push it against the sprocket (6).
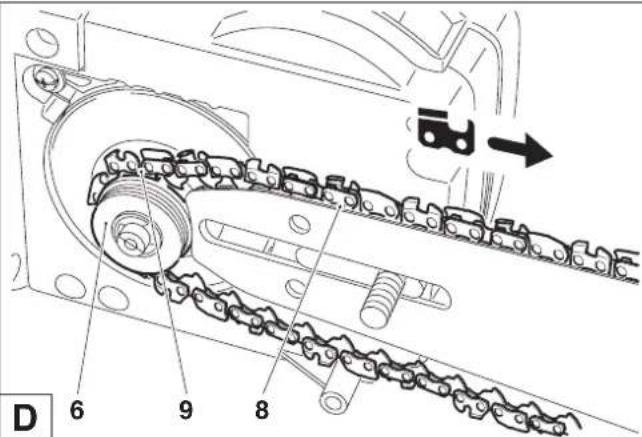
Place the saw chain (9) on the sprocket (6). Using your right hand, guide the saw chain into the upper guide groove (8) of the guide bar.
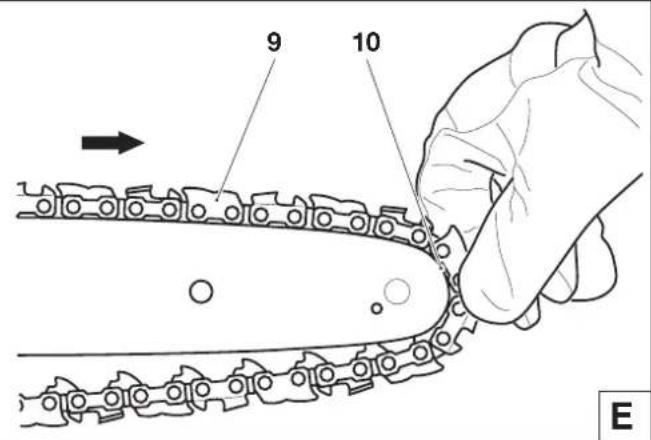
The cutting edges of the saw chain on the top of the guide bar must point in the direction of the arrow!
Using your left hand, lightly press the guide bar against the holder on the housing and guide the saw chain (9) around the nose sprocket (10) on the guide bar. While doing this, pull the saw chain slightly in the direction shown by the arrow.
Line up the hole in the sprocket guard with the threaded pin (11).
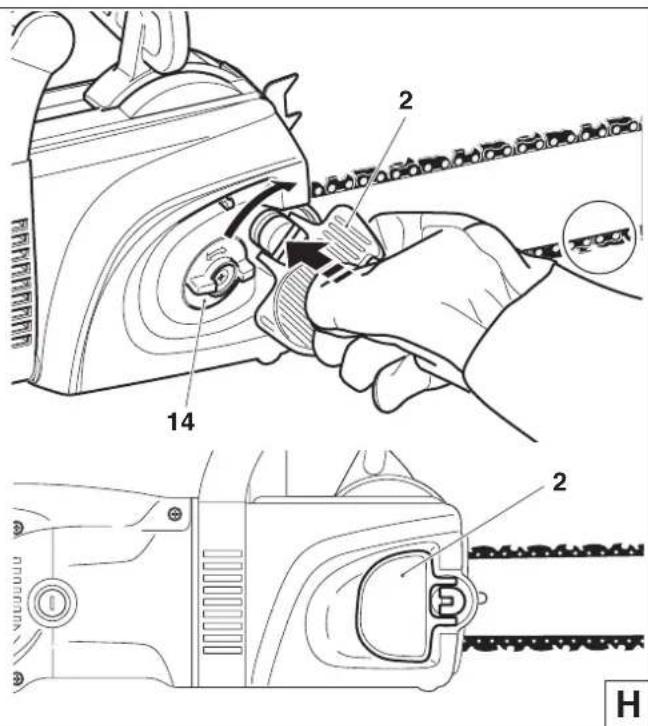
Turn the chain tensioning screw (H/14) to align the chain tensioning pin (12) with the hole in the guide bar.

First press the sprocket guard (3) into the mounting (13) and then push it onto the threaded pin (F/11).
Tightening the saw chain
Firmly push in and simultaneously turn the sprocket guard quick tightener (2, clockwise) in order to screw on the sprocket guard (3), but do not tighten it yet.
Lift the tip of the guide bar slightly and turn the chain tensioner (14) clockwise until the saw chain engages in the guide groove on the lower side of the guide bar (see the circle).
Push in the sprocket guard quick tightener (2) again and tighten by turning clockwise.
Release the sprocket guard quick tightener (2) (remove pressure) until it turns freely, then fold it in as shown in the illustration.

Checking the chain tension
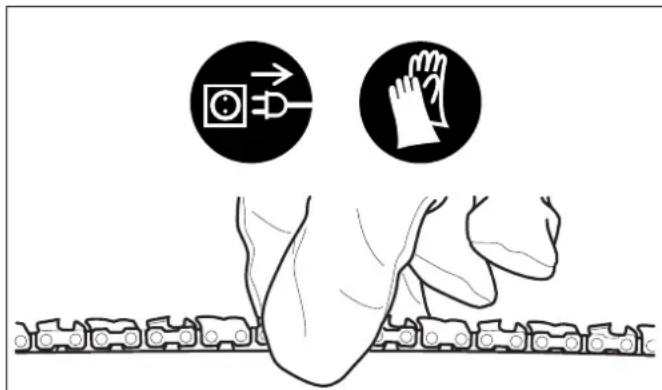
The chain has the proper tension when it lies against the bottom edge of the guide bar and can be easily pulled by hand about 2-4 mm (about 1/8'' ) up from the guide bar.
Check the chain tension frequently - new chains tend to get longer during use!
When checking the chain tension the motor must be switched off and the power supply plug pulled out. If the chain is too loose: Loosen the sprocket guard quick tightener by about a quarter turn. Tighten the chain as described under "Tightening the saw chain."
HINT:
Use 2 or 3 saw chains alternately for even wear of the chains, sprocket and guide bar running surfaces.
In order to guarantee a uniform wear of the groove in the bar the bar should be turned over whenever replacing the chain.

SERVICE
Chain brake
The electric chain saw comes with an chain brake as standard equipment. Kickback occurs due to contact of the guide bar tip with wood (see SAFETY PRECAUTIONS, page 5).
Run-out brake
The electric chain saw come with a run-out brake as standard equipment.
The run-out brake ensures that the chain comes to a stop immediately when the ON/OFF switch is released, thus preventing the chain from continuing to run and presenting a hazard.
Testing of the run-out brake is described on page 14.
Chain and run-out brake maintenance
The brake systems are very important safety features, and like any other part they are subject to a certain amount of wear. Regular inspection and maintenance is important for your personal safety, and can be properly performed only by a DOLMAR service center.

Engaging the chain brake (braking)
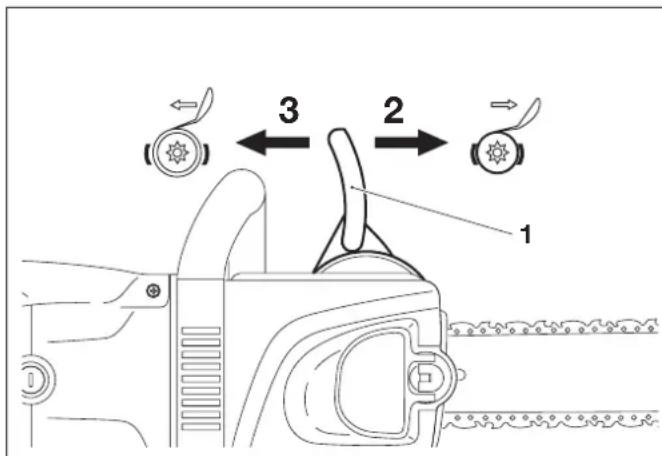
If the kickback is strong enough the sudden acceleration of the guide bar combined with the inertia of the hand guard (1) will automatically actuate the chain brake.
To engage the chain brake manually, simply push the hand guard (1) forward (towards the tip of the saw) with your left hand (arrow 2).
Releasing the chain brake
Pull the hand guard (1) towards you (arrow 3) until you feel it catch. The brake is now released.
Note:
When the chain brake is actuated the power supply to the motor will be cut off. Testing of the chain brake is described on page 14.
Saw chain oil
Use a special oil with adhesive addition for lubricating the saw chain and bar. The adhesive addition prevents that the oil is centrifuged too fast from the sawing device.
Do not use mineral oils. In order to protect the environment the use of biologically decomposable oil is prescribed.
The saw chain oil sold by DOLMAR, called BIOTOP, is made of special vegetable oils and is biologically decomposeable to 100% . BIOTOP has been granted the "blue angel" for being particularly favourable to the environment (RAL UZ 48).

BIOTOP oil is available in the following packing sizes to suit your individual requirements:
1 liter order number 980 008 210
5 liters order number 980 008 211
Biologically decomposeable oil is stable only for a limited period of time. It should be consumed within 2 years from the date of manufacture (printed on the container).
Important note on bio-degradable chain oils
If you are not planning to use the saw again for an extended period of time, empty the oil tank and put in a small amount of regular engine oil (SAE 30), and then run the saw for a time. This is necessary to flush out all remaining bio-degradable oil from the oil tank, oil-feed system, chain and guide bar, as many such oils tend to leave sticky residues over time, which can cause damage to the oil pump or other parts.
The next time you use the saw, fill the tank with BIOTOP chain oil again. In case of damage caused by using waste oil or inappropriate chain oil the product guarantee will be null and void.
Your salesman will inform you about the use of chain oil.
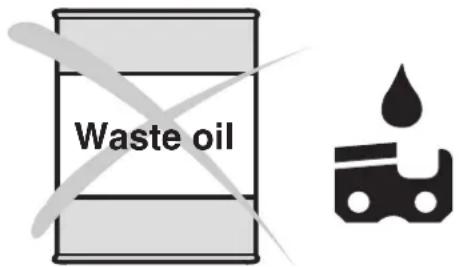
NEVER USE WASTE OIL
Waste oil is very dangerous for the environment.
Waste oil contains high amounts of carcinogenic substances.
The residues in the waste oil result in a high degree of wear and tear at the oil pump and the sawing device.
In the case of damage caused by using waste oil or inappropriate saw chain oil the product guarantee will be null and void.
Your salesman will inform you about the use of saw chain oil.
AVOID SKIN AND EYE CONTACTS
Mineral oil products as well as oil degrease the skin. If your skin repeatedly comes in contact with these substances for a longer period of time, it will desiccate. Various skin diseases may result. In addition, allergic reactions are known.
Eyes can be irritated by contact with oil. If oil gets into your eyes, immediately wash them with clear water. If your eyes are still irritated, go to see a doctor.

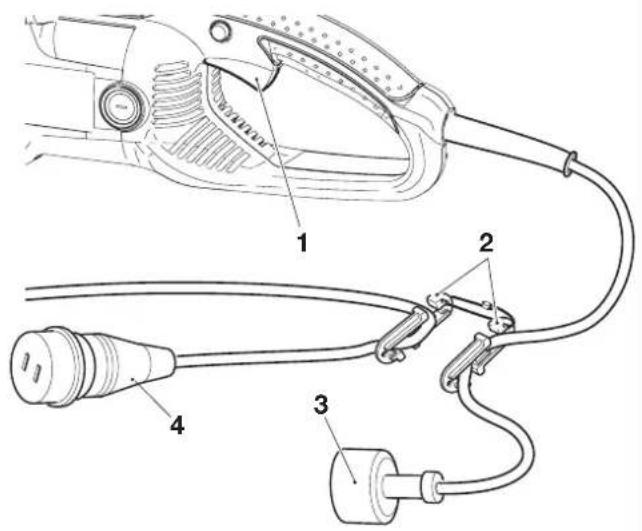
Plug in the saw
CAREFUL!
Before connecting the saw to a source of electricity, always make sure to check that when the ON/OFF switch (1) has been pressed in and released, it automatically comes back out to the "off" position. If it does not, do not under any circumstances connect the saw to a power source - do not plug it in. Take the saw to a DOLMAR service center before doing any work with it.
Clip the extension cord and the saw's power cord into the cord grip (2).
Plug the saw plug (3) into the socket of the extension cable (4).
A
Using the chain saw
Always be sure of you footing and hold the chain saw firmly with both hands while the motor is running.
Switching on the motor
- Plug in the saw (see above).
- When switching on the electric chain saw always hold it with both hands. Take the back handle with the right hand and the tubular handle with the left hand. Hold the handles tightly with your thumbs facing your fingers. The bar and chain must not be in contact with any object.
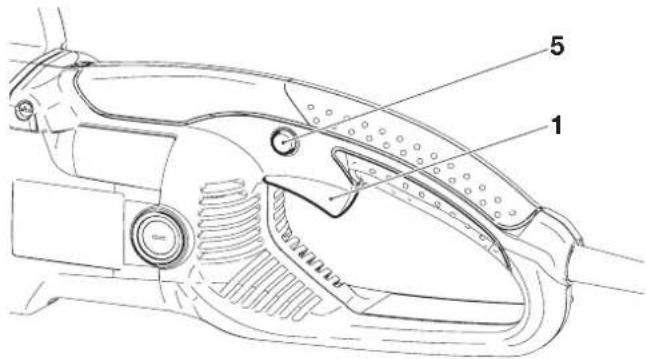
- First depress the locking button (5) and then the power switch (1). Then release the locking button (5).
- Attention: The chain starts running immediately. Keep the power switch depressed as long as the motor is to run.
CAUTION:
Never lock the power switch in the ON position.
Switching off the motor
- Release the power switch (1).
NOTE:
When the chain brake is actuated the power supply to the motor will be cut off.
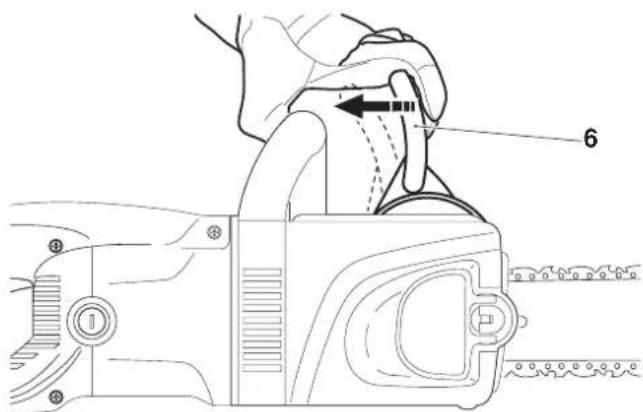
If the saw does not start when the ON/OFF switch (1) is actuated, it will be necessary to release the chain brake.
- Pull the hand guard ( 6) firmly in the direction of the arrow until you feel it catch.
Important:
These models are equipped with a starting current limiter. This electronic component prevents too abrupt starting of the electric motor.
Excess current cutoff: When the electrical current to the saw exceeds the permissible level, the power supply to the motor is automatically cut off. This prevents overheating of the motor and resulting damage. To start the saw up again, release the ON/OFF switch and press it again.
CAUTION: Do not use the saw if the current cutoff repeatedly switches off the saw. Consult a DOLMAR service center.



B
Felling a tree
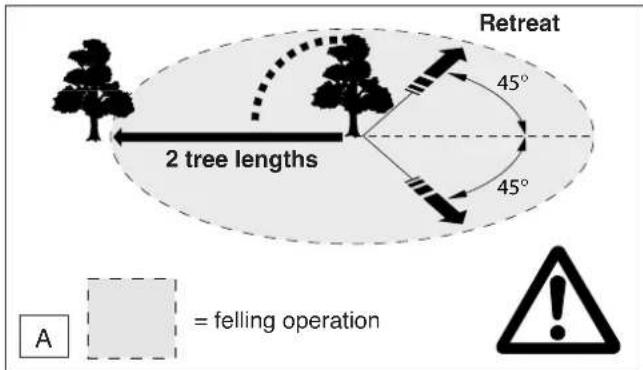
When bucking and felling operations are being performed by two or more persons, at the same time, the felling operation should be separated from the bucking operation by a distance of at least twice the height of the tree being felled. Trees should not be felled in a manner that would endanger any person, strike any utility line or cause any property damage. If the tree does make contact with any utility line, the utility company should be notified immediately.
The chain saw operator should keep on the uphill side of the terrain as the tree is likely to roll or slide downhill after it is felled.
A retreat path should be planned and cleared as necessary before cuts are started. The retreat path should extend back and diagonally to the rear of the expected line of fall as shown in Fig. A. The next working place is at least 2 tree lengths away.
Before felling is started, consider the natural lean of the tree, the location of larger branches and the wind direction to judge which way the tree will fall. Remove dirt, stones, loose bark, nails, staples, and wire from the tree where felling cuts are to be made.
Notching undercut
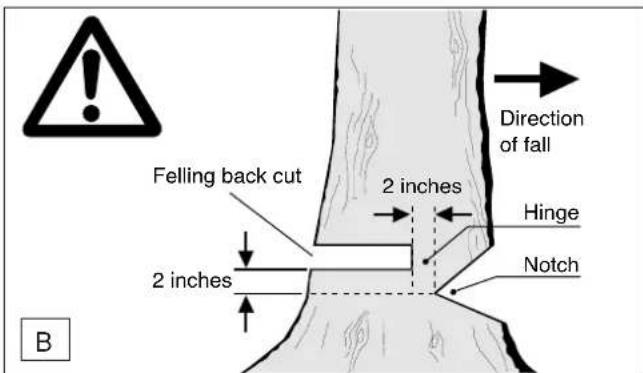
Make the notch 1/3 the diameter of the tree, perpendicular to the direction of fall as shown in Fig.B. Make the lower horizontal notching cut first. This will help to avoid pinching of either the saw chain or the guide bar when the second notch is being made.
Felling back cut
Make the felling back cut at least 2 inches (50.8 mm) higher than the horizontal notching cut as shown in Fig. B. Keep the felling back cut parallel to the horizontal notching cut. Make the felling back cut so enough wood is left to act as a hinge. The hinge wood keeps the tree from twisting and falling in the wrong direction. Do not cut through the hinge.
As the felling cut gets close to the hinge the tree should begin to fall. If there is any chance that the tree may not fall in the desired direction or it may rock back and bind the saw chain, stop cutting before the felling back cut is complete and use wedges of wood, plastic or aluminum to open the cut and drop the tree along the desired line of fall. When the tree begins to fall remove the chain saw from the cut, stop the motor, put the chain saw down, then use the retreat path planned. Be alert for overhead limbs falling and watch your footing.
Limbing a tree
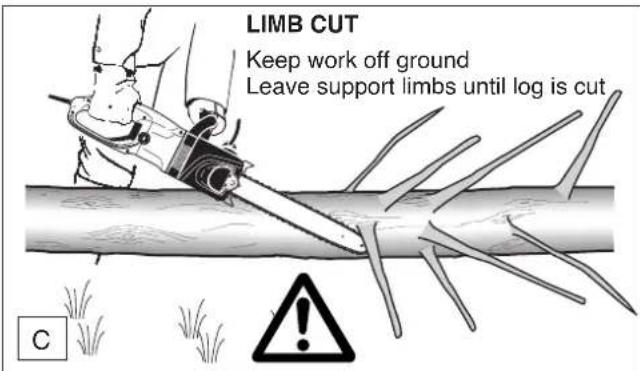
Limbing is removing the branches from a fallen tree. When limbing, leave larger lower limbs to support the log off the ground. Remove the small limbs in one cut as shown in Fig. C. Branches under tension should be cut from the bottom up to avoid binding the chain saw.
Bucking a log
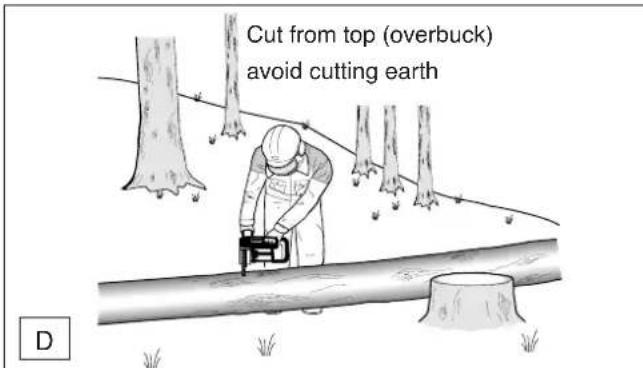
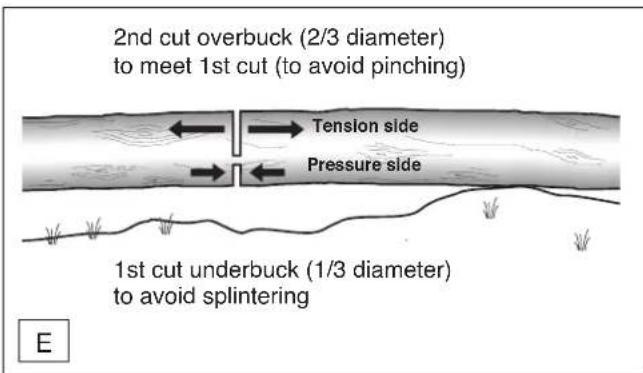
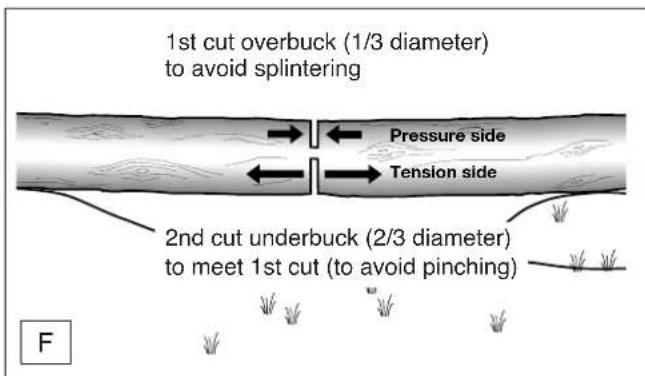
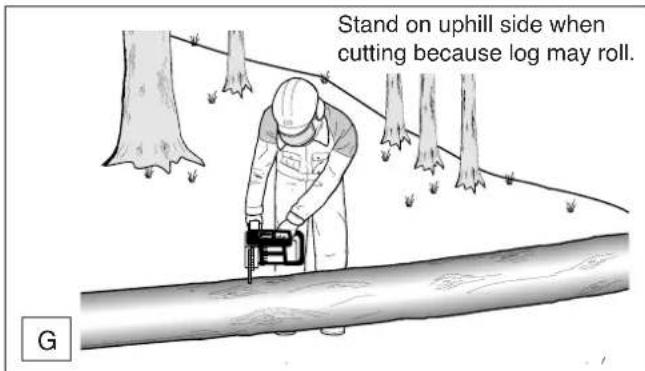
Bucking is cutting a log into lengths. It is important to make sure your footing is firm and your weight is evenly distributed on both feet. When possible, the log should be raised and supported by the use of limbs, logs or chocks. Follow the simple directions for easy cutting.
When the log is supported along its entire length as shown in Fig. D, it is cut from the top (overbuck).
When the log is supported on one end, as shown in Fig. E, cut 1/3 the diameter from the underside (underbuck). Then make the finished cut by overbucking to meet the first cut.
When the log is supported on both ends, as shown in Fig. F, cut 1/3 of that diameter from the top overbuck. Then make the finished cut by underbucking the lower 2/3 to meet the first cut.
When bucking on a slope, always stand on the uphill side of the log, as shown in Fig. G. When "cutting through", to maintain complete control, release the cutting pressure near the end of the cut without relaxing your grip on the chain saw handles. Don't let the chain contact the ground. After completing the cut, wait for the saw chain to stop before you move the chain saw. Always stop the motor before moving from tree to tree.
Carrying tool
Carry the tool by the front handle with the tool turned off, finger off the switch. Use the chain protection cover to cover the guide bar and the saw chain.
MAINTENANCE
Sharpening the saw chain
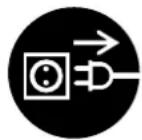
When working on the saw chain you must always pull out the power supply plug and wear protective gloves.


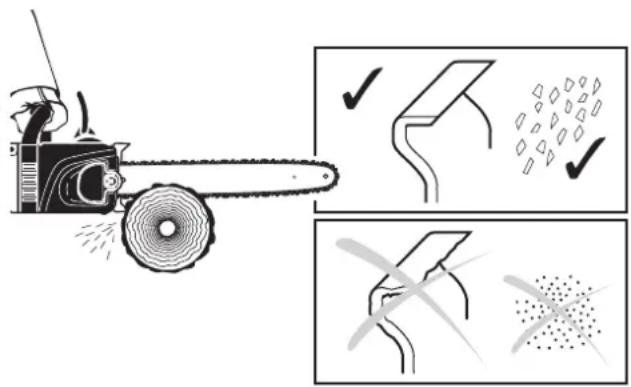
The chain needs sharpening when:
- the sawdust from sawing humid wood looks like wood flour.
- the saw chain penetrates the wood only under great pres - sure.
- the cutting edge is visibly damaged.
- the sawing device is pulled to the left or the right during the sawing operation. This is caused by uneven sharpening of the chain or by damage to one side of it.
Important: Sharpen frequently, but without removing too much metal!
Generally, 2-3 strokes of the file will be enough.
Have the chain resharpened in a service center when you have sharpened it yourself several times.
Proper sharpening:
CAUTION:
Use only chains and guide bars designed for this saw (see the Extract from the spare-parts list)!
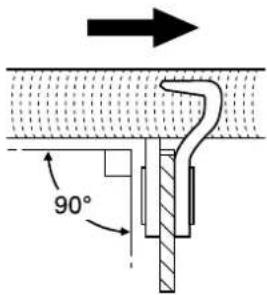
- All cutters must be of the same length (dimension a). Cutters with different lengths result in rough running of the chain and can cause cracks in the chain.
- Minimum cutter length is 3mm (0.11"). Do not resharpen the chain when the minimum cutter length has been reached; at this point, the chain must be replaced (see the Extract from the spare-parts list and "Replacing the chain").
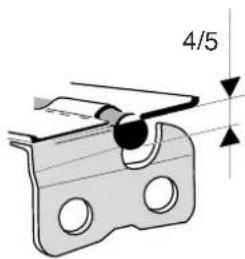
- The depth of the cut is determined by the difference in height between the depth limiter (round nose) and the cutting edge.
- The best results are obtained with a depth-limiter depth of 0.64 mm (.025") .
CAUTION:
Excessive depth increases the risk of kickback!
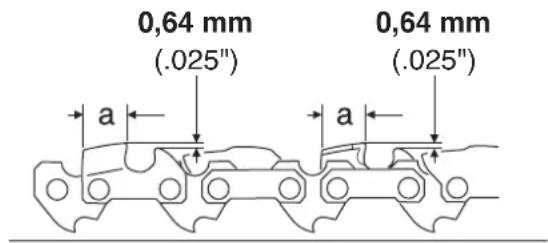
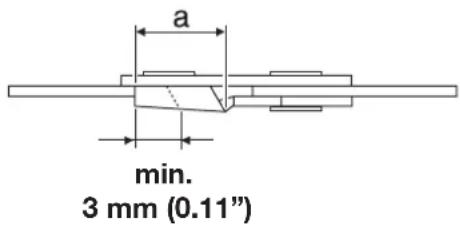
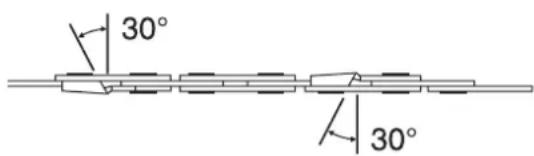
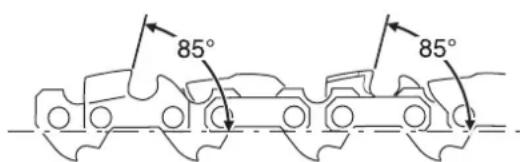
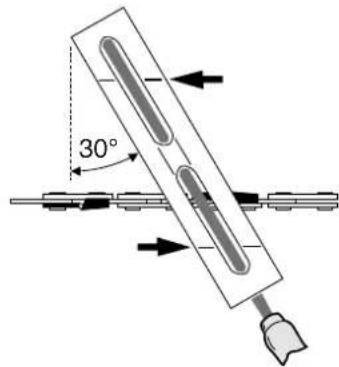
- All cutters must be sharpened to the same angle, 30^ . Different angles result in a roughly, irregularly running chain, increase wear and tear and cause chain breakage.
- The 85^ front rake of the cutter results from the cut depth of the round file. If the proper file is used in the right manner, the correct front rake will be obtained automatically.
A
B
Files and how to work with them
- Sharpen using a special file holder with a saw chain round file dia. 4.0 mm. Normal round files are not appropriate for this work. See "Accessories" for the order number.
- The file should cut only when pushed forwards (arrow). Lift the file when leading it backwards.
- First sharpen the shortest cutter. The length of this cutter is then the standard for all other cutters of the chain.
-
Always guide the file as in fig. shown
-
The file holder makes file guidance easier. It is marked for the correct 30^ sharpening angle (keep the marks parallel with the chain when filing, see illustration) and limits the cut depth to the correct 4/5 of the file diameter. See "Accessories" for the order number.
-
After having sharpened the chain, the height of the depth limiter must be checked by means of a chain gauge. See "Accessories" for the order number.
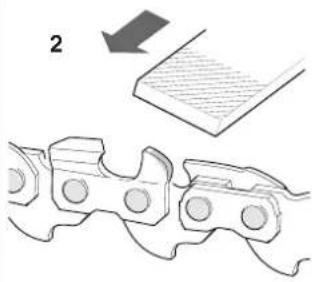
- Correct even the smallest excess height with a special flat file (1). See "Accessories" for the order number.
- Round off the front of the depth limiter ( 2).
C
Cleaning the guide bar, lubricating the sprocket nose
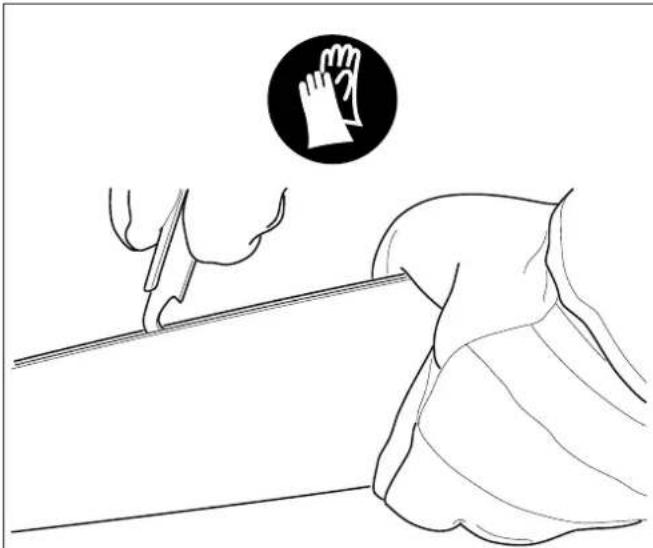
CAUTION: Protective gloves must be worn.
Regularly inspect the bearing surfaces of the guide bar for damage, and clean them with a suitable tool.
If the saw is used intensively it will be necessary to lubricate the return sprocket bearings regularly (once a week). To do this, first thoroughly clean the 2mm hole at the tip of the guide bar, and then press in a small amount of multi-purpose grease.
Multi-purpose grease and grease guns are available as accessories.
Multi-purpose grease (order no. 944 360 000)
Grease gun (order no. 944 350 000)
Replacing the saw chain
CAUTION:
Use only chains and guide bars designed for this saw (see the Extract from the spare parts list)!
Check the sprocket (1) before mounting a new chain.
CAUTION:
Worn out sprockets (2) may damage the new chain and must therefore be replaced.
Do not attempt to replace the sprocket yourself. Sprocket replacement requires special training and tools and must be done at a DOLMAR service center.

SERVICE

D
Inspecting and replacing the carbon brushes
Important:
Inspect the carbon brushes at regular intervals!
A notch on the brush shows the limit of wear.
NOTE:
The carbon brush is very delicate, so be careful not to let it drop. When taking it out, be sure to note the position it was installed in, since each brush is run in with the rotor.
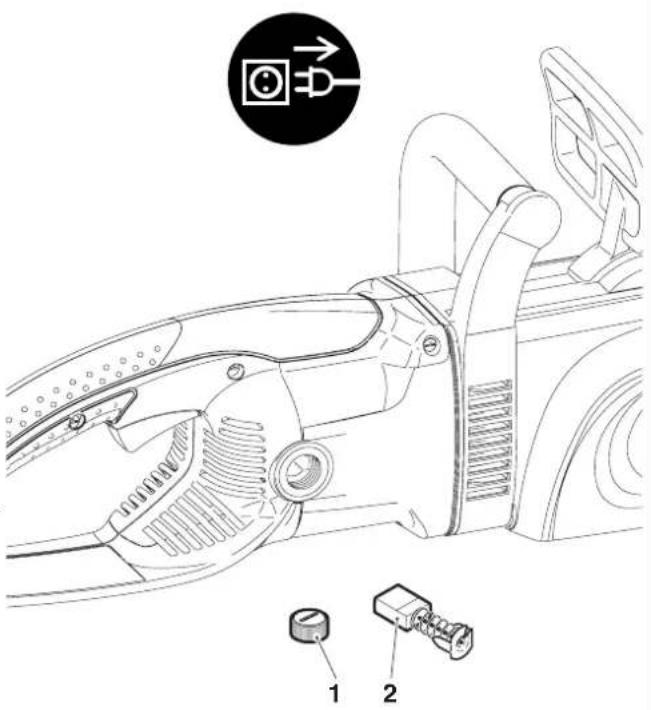
- Use a slotted bit screwdriver to unscrew the cover (1), and then pull out the brush (2).
- If the wear limit has not yet been reached, put the brush back in the same position and screw the cover (1) back on.
- Run the saw briefly (about a minute) so the brushes can run in again.
Important: Now test the run-out brake (see page 14). If the saw chain does not come to a full stop within two seconds, run the saw again briefly and repeat the test until the brake functions properly.
NOTE: After installing new carbon brushes, run the saw about 5 minutes and then check the run-out brake.
E
Trouble shooting
| Malfunction | System | Observation | Cause |
| Chain saw does not work insufficient performance no chain lubrication Chain brake Run-out brake | total Carbon brushes Oil tank, oil pump Brake Brake | electric motor does not function low pulling power no oil on the saw chain Saw chain does not stop instantly Saw chain continues to run | no power supply, cable defective chain brake actuated Mains fuse blown Carbon brushes worn down oil tank empty, oil guide groove dirty Brake band worn down Carbon brushes worn down |
Instructions for periodic maintenance
To ensure long life, prevent damage and ensure the full functioning of the safety features the following maintenance must be performed regularly. Guarantee claims can be recognized only if this work is performed regularly and properly. Failure to perform the prescribed maintenance work can lead to accidents!
The user of the electric chain saw is not allowed to perform maintenance works which are not described in the instruction manual. All other works must be carried out by a DOLMAR service center.
Page
| General work Electric chain Plastic case Check for cracks and ruptures. In case of damage have it immediately repaired at a service center. Saw chain Replace in time. Guide bar surfaces are uniformly worn. Replace in time. Sprocket Chain brake Run-out brake | saw Regularly clean the outside. Turn over after a certain period of time so that the bearing have it replaced in time at a service center. Have it inspected regularly at a service center. Have it inspected regularly at a service center. | Check for damage and sharpness. 10 burrs if necessary. 14 14 13 In case of damage have it replaced at a service center | 17-18 |
| Each time before putting the saw into operation Check the chain tension. Guide bar Chain lubrication Chain brake Run-out brake Power switch Power supply cable Oil tank cap | Saw chain Check for damage, and remove Functional check. Functional check. Functional check. Functional check. Functional check. Check for tightness. | ||
| After each shutdown | Guide bar Chain carrier | Clean the oil inlet bore. Clean, especially the oil guide groove. | 12 12 |
| Storage Saw chain/guide bar Clean the guide groove of the guide bar. Electric chain saw Store safely in a dry place. After a long time, the electric chain saw checked at a service center (residual oil can become resinic clogged). | Chain oil tank Demount, clean and lubricate the guide bar. Store safely in a dry place. After a long time, the electric chain saw checked at a service center (residual oil can become resinic clogged). | Empty. slightly. storage time, have | 12 |
Service, spare parts and guarantee
Maintenance and repair
The maintenance and repair work of modern electric motors as well as all safety related assemblies require qualified technical training and the availability of a special workshop equipped with special tools and testing devices.
Any work not described in this Instruction Manual must be performed only by a DOLMAR service center.
The DOLMAR service centers are provided with all the necessary equipment and skilled and experienced personnel to work out correct customer solutions and to advise you in all matters accordingly.
Repair attempts by third parties or unauthorised persons void all warranty claims.
Spare parts
A reliable and continuous operation as well as the safety of your chain saw is also subject to the quality of the spare parts used.
Use original DOLMAR spare parts only, marked:


Only original spare parts and accessories guarantee the highest quality in material, dimensions, functioning and safety.
Original spare parts and accessories can be obtained from your local dealer. He will also have the relative spare part lists to determine the required spare part numbers, and will be constantly informed about the latest improvements and also about spare part innovations.
Please, take in mind that in the case that foreign spare parts are used instead of the original DOLMAR spare parts this will automatically invalidate the DOLMAR product guarantee.
Guarantee
DOLMAR guarantees the highest quality and will therefore reimburse all costs for mending through replacement of damaged parts as a result of material or production faults, which occur within the guarantee time after purchase.
Please, note that in some countries particular guarantee conditions may exist. In case of any doubts, please, contact your salesman who is responsible for the guarantee of the product.
We ask for your understanding that we cannot accept any responsibility for damage caused by:
- Disregard of the instruction manual.
- Non-performance of the required maintenance and cleaning instructions.
Normal wear and tear. - Obvious overload due to permanent excess of the upper limits of capacity.
- Use of guide bars and saw chains which have not been approved.
- Use of guide bar and saw chain lengths which have not been approved.
- Use of force, improper use, misuse or accidents.
- Damage caused by overheating due to dirt obstructing the cool air supply at the motor case.
- Use of unsuitable spare parts or parts which are not original DOLMAR parts, as far as they have caused the damage.
- Use of unsuitable or old oil.
- Damage related to conditions arising from lease or rent contracts.
- Works on the chain saw by unskilled persons or performance of inappropriate repairs.
Cleaning, servicing and adjustment works are not covered by the guarantee. All repairs covered by the guarantee are to be performed by a DOLMAR service center.
Technical data
ES-153 A'ES-163 A ES-173 A
| Chain type 092 | |||
| Chain pitch inch 3/8" | |||
| Length of a cut inch / cm 12" / 30 14" / Max. chain speed m/min | 35 16" / 40 | ||
| 2.600 FPM (800m/min) | |||
| Oil tank capacity floz / ml | 4,73 / 140 | ||
| Power transmission | direct | ||
| Overload protection | electrical | ||
| Chain brake | manual | ||
| Run-out brake | electrical | ||
| Weight (without bar/chain) lbs / kg | 9,7 / 4,4 | ||
Extract from the spare parts list
Use original DOLMAR spare parts only. For performance of repairs and for replacement of other components your DOLMAR service center should be consulted.
ES-153 A, 163 A, 173 A
DOLMAR

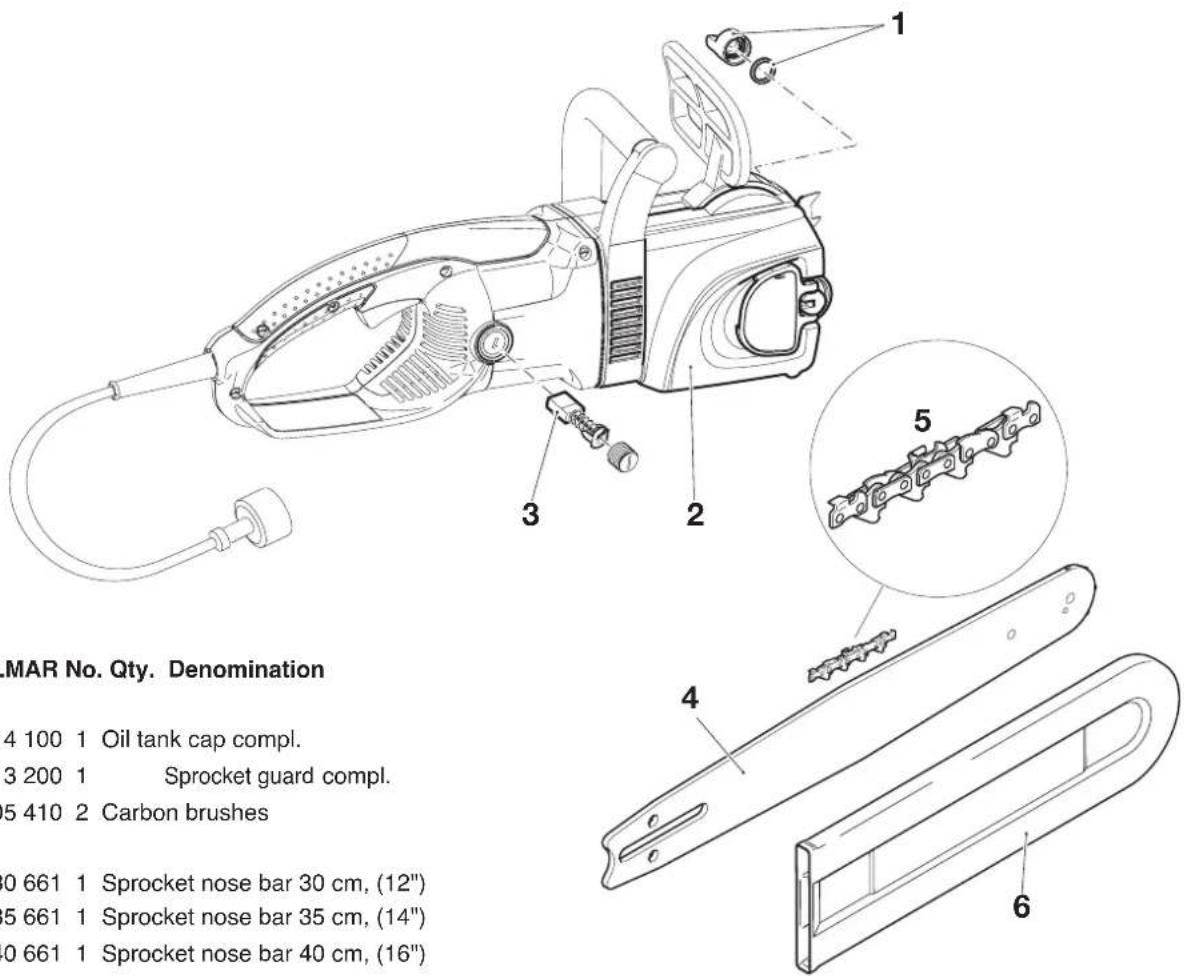
1 226 114 100 1 Oil tank cap compl.
2 226 213 200 1 Sprocket guard compl.
3 970 805 410 2 Carbon brushes
4 412 030 661 1 Sprocket nose bar 30~cm (12^ )
4 412 035 661 1 Sprocket nose bar 35 cm, (14")
4 412 040 661 1 Sprocket nose bar 40~cm (16")
5 528 092 046 1 Saw chain 3/8" , 30cm , (12^ )
5 528 092 052 1 Saw chain 3/8" , 35cm , (14^ )
5 528 092 056 1 Saw chain 3/8" , 40cm , (16^ )
6 952 010 130 1 Chain protection cover (30-35 cm, 12"-14")
6 952 010 140 1 Chain protection cover (40 cm, 16")
- 226 211 050 1 Chain oil filter (felt)
- 226 211 040 1 Lock washer (clamping ring)
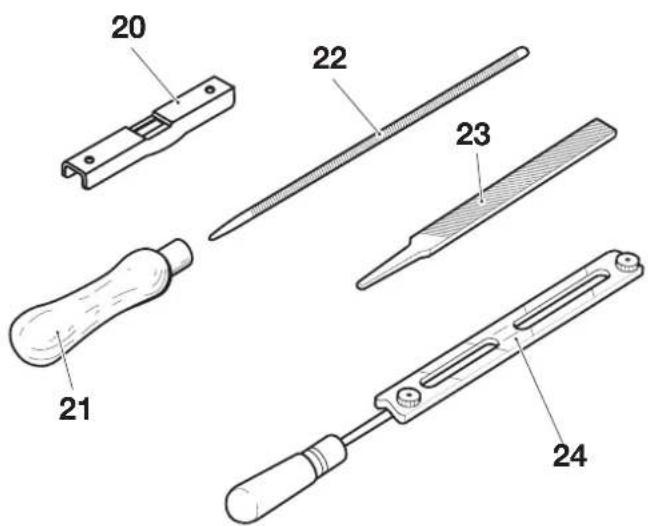
Accessories (not included in the delivery inventory)
20 953 100 090 1 Chain gauge 3/8
21 9530040101 File handle
22 953 003 090 1 Round file 4mm
23 9530030601 Flat file
24 953 030 010 1 File holder compl. 3 / 8
CONSERVEZ AVEC SOIN CES INSTRUCTIONS!