Duromatic Top - Saucepan Kuhn Rikon - Free user manual and instructions
Find the device manual for free Duromatic Top Kuhn Rikon in PDF.

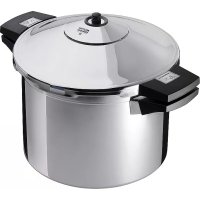
| Product type | Pressure cooker (pressure saucepan) |
| Brand | Kuhn Rikon |
| Model | Duromatic Top |
| Category | Saucepan |
| Material | Stainless steel, 3-layer superthermic base; some models with non-stick titanium coating |
| Available diameters | 20 cm, 22 cm, 24 cm, 28 cm |
| Cooking pressure | Level 1: 0.4 bar; Level 2: 0.8 bar; Max pressure: 1.2 bar |
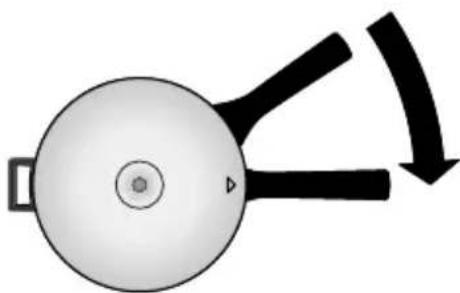
| Safety | Valve with pressure indicator (1st device), SI valve (2nd device), automatic lid lock, multiple steam vents |
| Compatible stove types | All types: gas, electric, ceramic, induction |
| Maximum filling capacity | 2/3 of the pot; 1/2 for foods that swell |
| Included/available accessories | Steaming basket, perforated rack, SWISS ENERGYSAVER, SWISS CLEANER |
| Care and cleaning | Do not put in dishwasher; clean with soft sponge; descale with vinegar or lemon juice; removable rubber gasket |
| Warranty | 10 years on materials and workmanship; 3 years for titanium coating |
| Origin | Made in Switzerland |
| Spare parts | Valve, rubber gasket, pressure indicator, spring, retaining knob, protective cap, stainless steel rack |
| Repairability | KUHN RIKON after-sales service; original parts only |
Frequently Asked Questions - Duromatic Top Kuhn Rikon
User questions about Duromatic Top Kuhn Rikon
0 question about this device. Answer the ones you know or ask your own.
Ask a new question about this device
Download the instructions for your Saucepan in PDF format for free! Find your manual Duromatic Top - Kuhn Rikon and take your electronic device back in hand. On this page are published all the documents necessary for the use of your device. Duromatic Top by Kuhn Rikon.
USER MANUAL Duromatic Top Kuhn Rikon
We congratulate you on your purchase. By opting for the KUHN RIKON brand, you have chosen a Swiss product of high quality. You will certainly enjoy using your new pressure cooker for many years to come.
Kuhn Rikon Corporation
46 Digital Drive, Suite 5
Novato, CA 94949
USA
Tel. 18006625882
Tel. 415 883 11 01
Fax 4158835985
kuhnrikon@kuhnrikon.com
www.kuhnrikon.com
UNITED KINGDOM
Kuhn Rikon (UK) Ltd.
Landport Road
Wolverhampton
WV22QJ
Great Britain
Tel. 01902 458 410
Fax 01902458160
sales@kuhnrikon.co.uk
www.kuhnrikon.co.uk
ESPAN
Kuhn Rikon Espanola S.A.
Sanclemente 4, pral. dcha
E-50001 Zaragoza
Tel. 976 23 59 23
Fax 976227859
oficinas@kuhnrikon.es
www.kuhnrikon.es
SINGAPORE
Kuhn Rikon Asia
Tel. +65 6294 0495
Fax +65 6295 0756
kuhnrikon@pacific.net.sg
GERMANY
Kuhn Rikon AG
Stephan Hoss
D-89407 Dillingen
Tel. +49 177 707 03 73
stephan.hoess@kuhnrikon.ch
www.kuhnrikon.de
Kuhn Rikon AG
Andreas Fohrer
D-70794 Filderstadt
Tel. +49 171 788 91 56
andreas.fohrer@kuhnrikon.ch
www.kuhnrikon.de
REPRESENTATIVES/AGENTS/
POINTS OF SALE
Australia, Austria, Belgium, Brunei, China, Colombia, Cyprus, Dubai, Ecuador, Finland, France, Greece, Hong Kong, Indonesia, Iran, Israel, Italy, Japan, Kazakhstan, Korea
Latvia, Lithuania, Luxembourg, Malaysia, Netherland, New Zealand, Norway
Philippines, Poland, Russia, South Africa, Sweden, Taiwan, Thailand
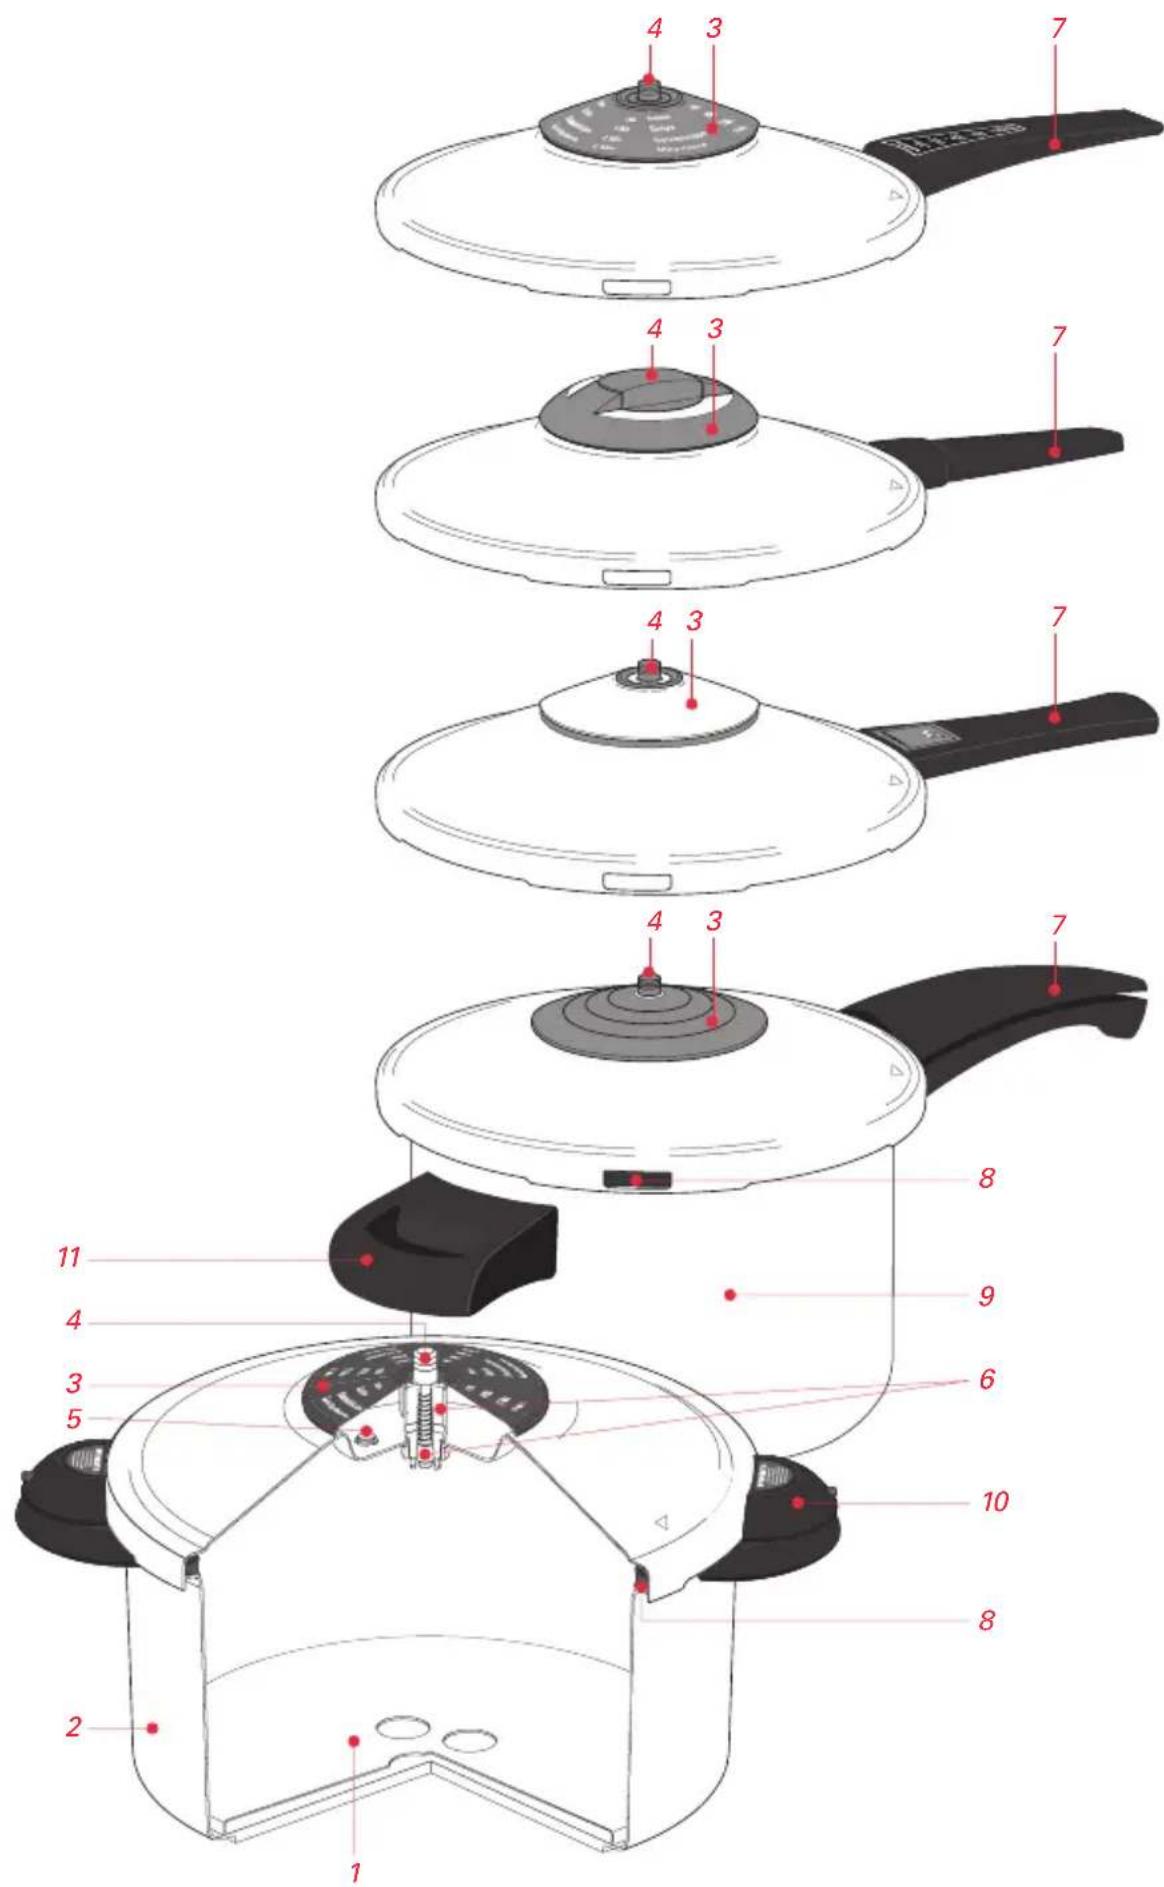
1 Siebeinsatz
2 Schnellkochtopf
3 Abdeckhaube
4 Ventilköpfchen
5 SI-Ventil
1 Trivet
2 Pressure cooker
3 Protection cap
4 Valve cap
5 SI valve (secondary safety device))
6 Valve with pressure indicator stem (primary safety device)
7 Pan or lid handle
8 Rubber gasket
9 Pressure cooker
10 Pan/lid side grips
11 Pan grip
DECLARATION OF CONFORMITY
DECLARATION DE CONFORMITE
Wir
We
Nos
KUHN
RIKON
SWITZERLAND

KUHN RIKON AG, CH-8486 Rikon
declare under our sole responsibility that the Product
to which this delaration relates is in conformity with the following standards or other normative documents
Following the provisions of Directives
The Swiss Association for Quality and Management Systems
SQS herewith certifies that the company named below has a management system which meets the requirements of the normative bases specified below.
KUHN RIKON
SWITZERLAND

Kuhn Rikon AG
CH-8486 Rikon
Certified area
Whole Company
Field of activity
Development, manufacture and distribution of cookware
Based on the audit result, SQS issues the
SQSCertificate ISO 9001:2000
CH-3052 Zollikofen, December 23, 2005
This SQS Certificate is valid up to and including December 22, 2008
Scope number 17
Registration number 10430
President SQS


X.Edelmann
Managing Director SQS
T. Zahner
Partner of IQNet
These instructions only apply to KUHN RIKON pressure cookers marked (base marking) as «DUROMATIC» and «DUROOTHERM»
(all information is etched into the base, see also section 13)
- The advantages of your DUROMATIC pressure cooker at a glance 54
- Directions for proper use 55
- Safety 56
- Using the pressure cooker for the first time 57
- Filling 58
- Checking the valve 58
- Closing 59
- Cooking under pressure 60
- Reducing steam pressure and opening 62
- Cleaning and care instructions for the DUROMATIC 64
- Troubleshooting the DUROMATIC 68
- Guarantee 69
- Repair and service addresses 69
- Environmental protection/disposal 70
- Table of cooking times 71
- DUROMATIC accessories 75
- DUROMATIC spare parts 76
- DUROOTHERM TIMAX spare parts 78
SYMBOL EXPLANATIONS

Important safety information
Tip/Note
1. The advantages of your DUROMATIC pressure cooker at a glance
Preserves vitamins (for your health)
- Saves energy and time (approx. one third of the usual cooking time)
- Stay cool plastic fittings (for safe handling)
- Capacity marks (on the inside: one-half and two-thirds fill levels)
- Fully-automatic lid locking system (prevents opening under pressure)
- Flavour valve (preserves natural flavours and food colours)
- Acoustic and visual pressure indicator (for easy control)
- Multiple over-pressure safety devices (for your safety)
- Superthermic-sandwichbase (for rapid and even heat absorption on all heat sources including halogen and induction)
- Rust-free stainless steel (guarantees durability and long life)
- Some models with automatic 2-stage pressure reduction function
- Products that are very easy to service and care for
1.1 The additional advantages of your pressure cooker with non-stick coating
In addition to the well-known features of KUHN RIKON pressure cookers, this coating offers you further decisive advantages:
- Hard, highly-resistant titanium base coating
- Non-stick coating (no difficult-to-remove food residues)
- Quick browning possible
- Simple cleaning
- Multifunctional pan: crisp fry in the traditional manner, then cook until done under pressure (cooking time under pressure approx. a 1/3 of normal cooking time)
2. Directions for proper use
The pressure cooker is intended for cooking foods to which liquid has been added, and can be used on all cooking ranges including induction hobs in homes and the catering trade.

KUHN RIKON Ltd. pressure cookers are particularly suited for foods that normally require a long cooking time, e.g.:
Soups
Meats (e.g. joints, goulash, stews etc.)
Vegetables
Potatoes / some cereals and pulses
Dried foods

The pressure cooker cooks under pressure.
Although the pressure cooker is characterized by a level of quality and safety, injury (by scalding) or material damage resulting from misuse or improper use cannot be ruled out. For this reason, take careful note of the safety instructions marked in red.
ENG
3. Safety
Read the operating instructions thoroughly before using your pressure cooker. Pay special attention to the sections on testing, cleaning and caring for the safety devices. Please carefully observe the safety instructions marked with a red triangle.
IMPORTANT SAFETY INSTRUCTIONS
Always observe the following basic safety precautions when using your pressure cooker
- Read all the instructions.
- Never touch hot surfaces. Only hold the pressure cooker by the lid handle and/or side grips.
- Close supervision is necessary when the pressure cooker is used near children.
- Never place the pressure cooker in a heated oven.
- Read section 4 before using the pressure cooker on a gas hob.
- Always use extreme care when handling your pressure cooker, especially when it contains hot liquids.
- Never use the pressure cooker for anything other than its intended purpose. (See section 2)
- This appliance cooks under pressure. Improper use may result in scalding injury. Ensure the cooker is properly closed before using it. (See section 7)
- Do not fill the unit over two-thirds full. When cooking foods that expand during cooking, such as rice or dried vegetables, do not fill the unit over one-half full. (See section 5)
- This cooker is not suitable for the preparation of apple compote, cranberries, porridge (oat flakes), barley or other cereals (except those listed on page 73), peas, pasta, macaroni or rhubarb. These foods tend to foam and froth and could block the valve. These foods should not be cooked in a pressure cooker.
- Before each use, ensure that the movement of the pressure indicator in the valve is unobstructed. (See section 6)
- Do not open the pressure cooker until it has cooled and the internal pressure has reduced. If the handles cannot be pushed apart, or can only be pushed apart with difficulty, this indicates that the cooker is still pressurized. Do not force the cooker open. Any pressure in the cooker can be hazardous. (See section 9)
- This pressure cooker must not be used for frying in oil under pressure.
- Follow the instructions for cleaning and care after each use.
- After normal cooking pressure has been reached, reduce the heat so that all the liquid inside the cooker does not escape as steam.
SAVE THESE INSTRUCTIONS!
4. Using the pressure cooker for the first time
Before using the pressure cooker the first time, wash the pan, lid and gasket with hot, soapy water.
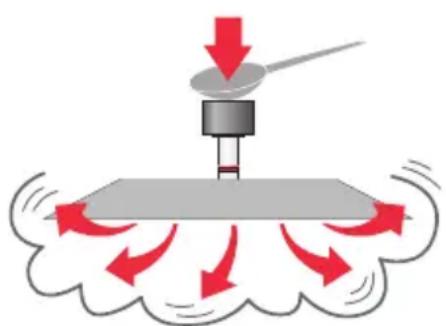
On electric cookers, the diameter of the pressure cooker base should match that of the hotplate or ring. The compatible hob diameter is etched into the base of the pan. (See section 13)
On some induction cookers noise may be generated whilst cooking under certain conditions on account of cookware oscillation in sympathy with the magnetic field. Unfortunately this cannot be prevented when using this cookware.
If you cook on gas, never allow the gas flame to lick the sides of the pan. If you do, the exterior of the pan will become discoloured and the grips (or handles) will overheat and degrade. We recommend using a flame protector. (See section 16)


4.1 Using your non-stick DUROMATIC pressure cooker for the first time
After washing out the pressure cooker thoroughly with warm water to which washing-up liquid has been added, place a few drops of cooking oil into the pressure cooker prior to its first use and then wipe out with a paper kitchen towel.
5. Filling

Never fill the pan more than two-thirds full including the liquid you have added (see the two-thirds mark on the inside of the pan).

Never fill the cooker beyond half full if you are preparing soup, certain cereals, dried pulses (see page 73) or dried beans.

If overfilled, the safety elements may become impaired (risk of scalding).

Never forget to add liquid (see the table of cooking times in section 15), as complete evaporation will spoil food and overheat the cooker.

Stir salt until it is completely dissolved. To avoid damage to the stainless steel, do not store salt water or heavily salted foods in the pressure cooker. Even the smallest amount of dampness containing salt will cause corrosion.
6. Checking the valve

The valve is a safety device!
Check whether the valve cap is screwed on tightly; if not, screw it on tightly (see the cleaning and care instructions in section 10).
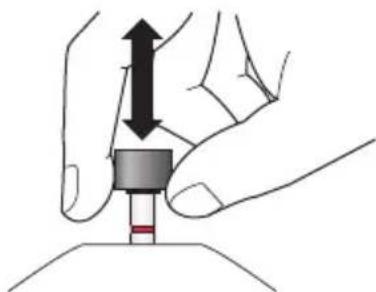
Check to see whether the valve is free to move by pulling gently on the pressure indicator. If the valve cannot be moved, do not use the pressure cooker. (see Troubleshooting in section 11)
7. Closing
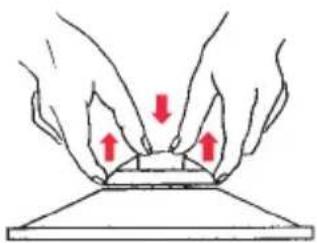
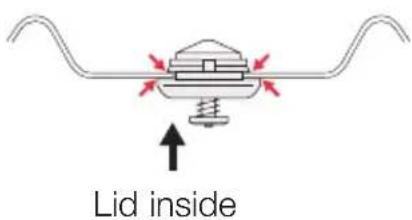
Place the gasket carefully into the lid, ensuring that it lies on the roof and under the flanges.
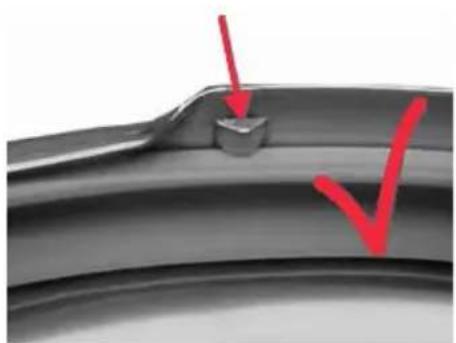


Check that the coloured safety bolt is pushing into the gasket.
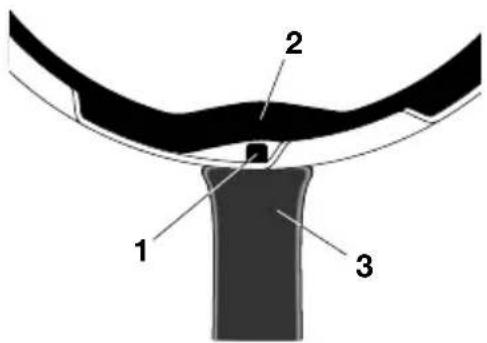
1 Safety bolt and spring (built into handle)
2 The gasket shape illustrated occurs only when the lid is not in use
3 Lid handle
Long handle model:
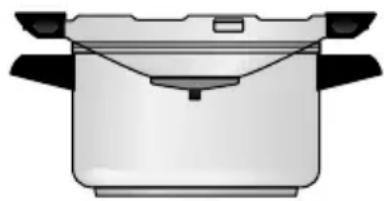
Place the lid on the pan as shown.
The positioning triangle on the lid must be aligned with the triangle on the pan handle.
Turn the lid in a clockwise direction until the handle of the lid is over the handle of the pan.

Check: The pressure cooker is correctly closed if the handle on the lid is positioned directly over the handle on the pan.

Side grip model:
Place the lid on the pan as shown. The positioning triangle on the lid should be aligned with the centre of the grip on the pan.
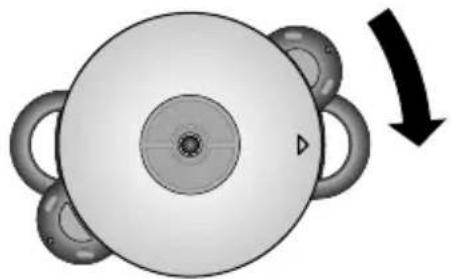
Turn the lid in a clockwise direction until the grip on the lid is over the grip of the pan.

Check: The pressure cooker is correctly closed if the grips of the lid are positioned directly over the grips on the pan.
8. Cooking under pressure

Only hold the hot pressure cooker by its grips or handles. Always handle the pressure cooker with extreme care, especially if it is filled with hot liquid. If your pan has metallic handles, the use of oven gloves may be necessary.

To avoid damage to the appliance, never allow the pressure cooker to boil dry.

Never leave an empty pressure cooker on a hot hob.

This cooker is not suitable for the preparation of apple compote, cranberries, porridge (oat flakes), barley or other cereals (except those listed on page 73), peas, pasta, macaroni or rhubarb. These foods tend to foam and froth and could block the valve.

In the case of problems during cooking: remove the pressure cooker from the heat source and allow it to cool.
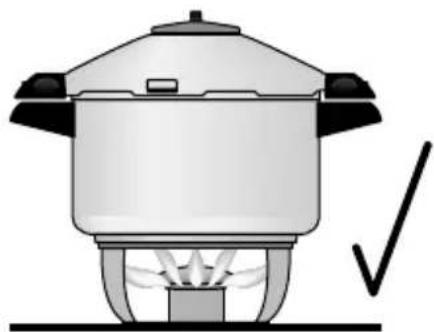
Place the properly closed cooker on a heat source commensurate with the size of the pressure cooker base. See underside of cooker base for correct size. (See section 13) Next turn the heat source up to full power.
As food begins to boil, any air present in the pressure cooker firstly escapes through the valve. The valve cap will then move up. Now, the pressure indicator stem rises with increasing pressure inside the pressure cooker. Please observe: after a short while the first red (pressure indication) line will become visible indicating that cooking level 1 has been reached.

The cooking time begins (see the cooking time table in section 15) once the desired cooking level has been reached.
Meaning of cooking levels:
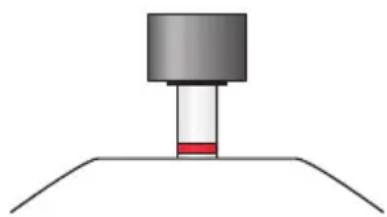
Cooking level 1
Gentle cooking at a low cooking pressure (0.4 bar).
Cooking level 1 is reached as soon as the first red line on the pressure indicator stem is visible. The first red line should always be visible during the entire cooking time.
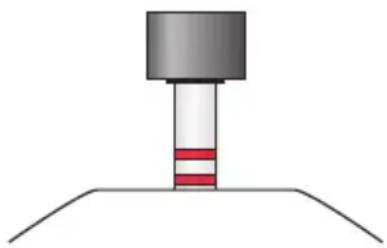
Cooking level 2
Rapid cooking at a high cooking pressure (0.8 bar).
Cooking level 2 is reached when both red lines on the pressure indicator stem are visible. The second red line should always be visible during the entire cooking time.
To maintain the desired cooking level, the amount of heat applied to the pressure cooker needs to be reduced accordingly.
A hissing sound accompanied by the escape of steam means that the maximum operating pressure of 1.2 bar has been reached. Reduce the heat and/or remove the pressure cooker from hob for a short time until the second red line is just visible.

Vegetables are cooked especially gently in the steamer insert or on the trivet. Colour, flavour, vitamins and nutrients are retained.
8.1 Frying with the DUROMATIC non-stick
Only use oils or vegetable fats suitable for frying (refer to the usage information on the oil container) when searing meats prior to the completion of cooking under pressure.

We recommend the use of plastic or wooden turners in spite of the hard and very resistant titanium base coating.
9. Reducing steam pressure and opening

Never use force to open the lid!

After cooking mash-type foods (like grains or pulses) or foods with a high fat content, shake the cooker gently before opening the lid. This will prevent the contents spitting when the lid is opened.
The pressure cooker can only be opened when there is no pressure inside it. This is a safety feature. Reduce the pressure in one of the following ways:
9.1 Slow pressure reduction
Remove the pressure cooker from the heat source and allow it to cool.
9.2 Normal pressure reduction
Press lightly on the pressure indicator stem until no more steam escapes.
9.3 Fast pressure reduction
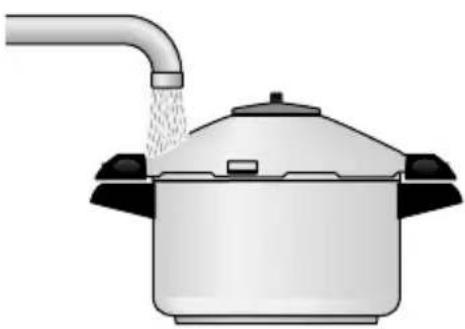
Cool the rim of the cooker under tepid running water (but wet the rim only to prevent water from being sucked into the cooker).
Some models also have an automatic pressure reduction function.
9.4 Normal automatic pressure reduction
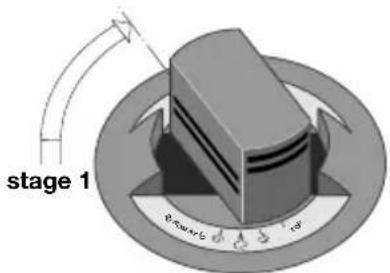
Lift the valve cap slightly and rotate by 75^ clockwise until it engages the first time (stage 1).

9.5 Rapid automatic pressure reduction
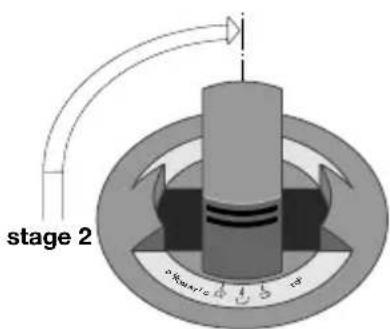
Lift the valve cap slightly and rotate by 90^ clockwise until it engages the second time (stage 2).
9.6 Completed Pressure Reduction
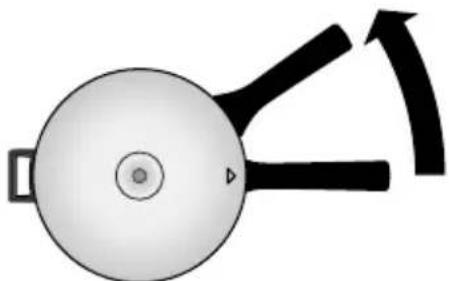
There is no more pressure in the cooker when the pressure indicator stem remains in its lowest position. To open the cooker, slide the handle or grip anti-clockwise in relation to the pan handle or grip until the arrows are once again aligned. The lid can now be easily removed.
Pressure reduction tips for specific foods:

Foods with a short cooking time:
Use fast pressure reduction as otherwise foods can become overcooked.

Vegetables with a long cooking time / soups / meats, completely covered by liquid / potatoes / cereals / dried pulses:
Use slow pressure reduction. Do not use water to cool!
(Potatoes could otherwise fall apart)

Meat / vegetables / frozen vegetables / fresh fruits / dried foods (excluding pulses):
Use normal or fast pressure reduction (for ready-prepared meals, allow the pressure cooker to stand beside the heat source for one minute before reducing pressure).

Fish / risotto:
Use fast pressure reduction.

Foods with a high fat content or mash-type foods (e.g. dried pulses):
Use slow pressure reduction and gently shake the cooker before opening the lid to prevent the contents from spitting when the lid is opened.

After cooking meat with a skin (e.g. ox tongue) which may swell under the effect of pressure, do not prick the meat while the skin is swollen as you might be scalded.
10. Cleaning and care instructions for the DUROMATIC

Under normal circumstances, the valve is self-cleaning. However, if food particles have passed through the valve, then it is necessary to take the valve apart in order to clean it. (See section 10.1.1)

Tighten loose handles or grips with a screwdriver. If you have difficulties, contact your local dealer or a KUHN RIKON Service Center. (See section 13)

After each use, remove the gasket from the lid. Rinse out and wash both, the gasket and the lid, taking care to thoroughly clean the area around the flanges.

The SI valve (secondary safety device) must always be correctly fitted to the lid when using the pressure cooker (= spring visible on the inside of the lid). Never remove this valve for cleaning!

Do not wash the pan, lid, protection cap or gasket in a dishwasher.

Never remove stains or baked-in marks with abrasive means such as with knives, steel wool or copper cloths. Instead, soak in hot water with a little detergent until stains can be easily removed with a soft brush, sponge or cloth.

The printed protection cap in particular should only ever be cleaned with a damp cloth (never use abrasive cleaners, bleach or SWISS CLEANER).

Do not use any corrosive agents like Javel water for cleaning.

Remove obstinate calcium stains (white spots) with a few drops of vinegar, lemon juice or SWISS CLEANER. (See section 16)

If the pan has become discoloured from overheating, then we recommend the use of SWISS CLEANER.

If the lid is difficult to turn when closing, then apply a light film of cooking oil to the rubber gasket.

When storing, place the inverted lid on the pan so that the rubber gasket inside the lid remains unstressed and free of deformation.
10.1 Valves
10.1.1 Removing the protection cap
Remove all protection caps using both hands.
10.1.2 Maintenance and cleaning
To dismantle the INOX, CLASSIC, SUPREME, ERGO and HOTEL valves, undo the valve screw with integral pressure indicator (6) on the lid inside using a coin or screwdriver, and holding the valve cap. Hold onto the valve cap while doing so.
INOX, CLASSIC, SUPREME, ERGO and HOTEL models
1 Valve cap
2 Pressure indicator
3 Valve socket
4 Valve spring
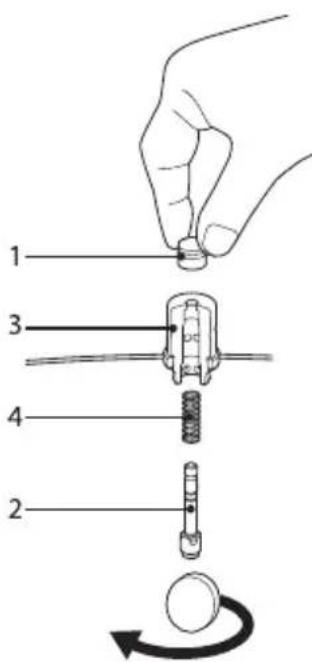
10.1.3 Dismantling the Top valve
To dismantle this valve, undo the valve screw with integral pressure indicator (2) on the lid inside using a screwdriver.
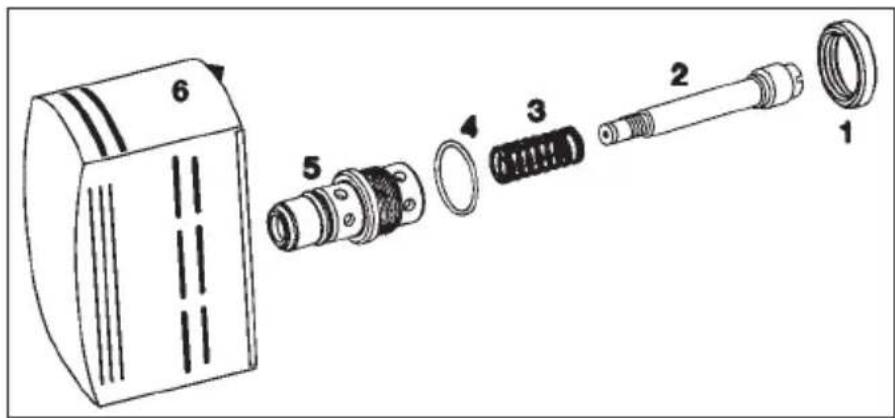
1 Counter nut
2 Pressure indicator
3 Valve spring
4 Valve seal
5 Valve socket
6 Valve cap with integral pressure indicator
10.1.4 Cleaning and re-assembling the valve
1.Disassemble the valve and clean it. Never use any abrasive cleaners.
2. During re-assembly, ensure that the valve cap is securely fastened to the pressure indicator stem and that the valve screw has been fully tightened by hand.
3. Check for proper valve operation after assembly. (See section 6)
10.1.5 Fitting the SI valve (secondary safety device)
Press the valve in by hand from the inside of the lid.
Check:
Blue rubber seal must fit tightly against the lid, all the way around, on the outside and inside of the lid.
Spring must be visible on the inside of the lid.

10.2 Additional cleaning and care instructions for the DUROMATIC non-stick coating
Apart from the general cleaning and care references in section 10 are following references to be considered.

Do not use any abrasive cleaning agents or SWISS CLEANER to clean the hard titanium base non-stick coating.
Wash the coating immediately after use, i.e. when the pan is still warm, with warm water and washing-up liquid so that no residues become hardened. This also retains the non-stick effect and prevents any residual oils or fats from being burnt on.
11. Troubleshooting the DUROMATIC

If you are unsure about using your pressure cooker or the safety devices, do not use it and contact your retailer or KUHN RIKON. (See section 13)

Is the pressure cooker leaking?
- Check that the rubber gasket is properly located (see section 7);
- Lubricate the gasket lightly with cooking/vegetable oil or moisten with a little water;
- Or, if necessary, replace.
If effort is required to open or close the lid even after the gasket has been lubricated with a little cooking oil, then the lid or pan may be deformed. The pressure cooker must be taken to a KUHN RIKON Service Center for inspection. (See section 13)
If the second safety device (SI valve) releases steam while cooking, the main valve is not functioning. Disassemble, clean and check the main valve. (See section 10)
If the pressure indicator stem does not move freely, then disassemble, clean and check the main valve. (See section 10) If this does not solve the problem, please refer to your dealer. (See section 13)
12. Guarantee
KUHN RIKON Ltd. guarantees its cookware for 10 years against faulty materials and poor workmanship. Titanium coating 3 years (proof of purchase required). Excludes wearing parts such as fittings and rubber seal etc. This warranty does not include damage due to overheating, soiling, scratches, discolouration.
13. Repair and service addresses

Do not modify the pressure cooker, particularly the safety devices, in any way.

Using replacement parts made by a different manufacturer can detrimentally affect the safety of your pressure cooker. KUHN RIKON cannot check every accessory available on the market. Only use KUHN RIKON spare parts.

Spare parts are illustrated in section 17 and 18.
ENG
For repairs, original spare parts and information, contact your dealer or a KUHN RIKON Service Centre:
Switzerland and overseas: Singapore:
KUHN RIKON AG KUHN RIKON ASIA
Service Center Tel. +65 6294 0495
CH-8486 Rikon Fax +65 6295 0756
Tel. +41 52 396 03 50 kuhnrikon@pacific.net.sg
Fax +41 52 396 02 02
service@kuhnrikon.ch
Great Britain: USA
KUHN RIKON (UK) LTD. KUHN RIKON CORPORATION
Landport Road 46 Digital Drive, Suite 5
Wolverhampton Novato, CA 94949
WV2 2QJ USA
Great Britain Tel. 1 800 662 5882
Tel. 01902 458410 Tel. 415 883 1101
Fax 01902 458160 Fax 415 883 5985
sales@kuhnrikon.co.uk
kuhnrikon@kuhnrikon.com
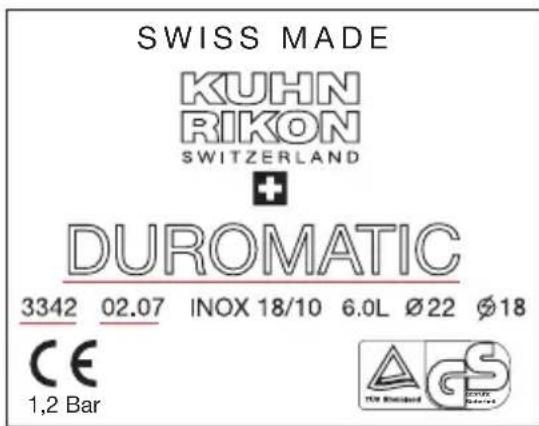
Information similar to that depicted
adjacently can be found on the base of
your pressure cooker.
Always provide the information underlined in red when enquiring or ordering spare parts (Item no.: e.g. 3342;
production date: e.g. 02.07.;
product name: e.g. DUROMATIC).
= Diameter of suitable hotplate
14. Environmental protection / disposal
Cookware, accessories and packaging should recycled in an environmentally-friendly manner. Please comply with your national and regional regulations. In Switzerland, worn-out KUHN RIKON cookware can be sent (postage prepaid please) directly to a KUHN RIKON Service Center. (See section 13)
15. Table of cooking times
The cooking times listed in the following tables may vary slightly according to food type, storage and quality.
Food Cooking time (min.) Cooking level Liquid added
Soups
Broth 201 as required
Pea soup 12 1 as required
Vegetable soup (depending on vegetables) 5-8 1 as required
Semolina soup 81 as required
Goulash soup 201 as required
Chicken broth/hen 40 1 as required
Chicken/pullet 15 1 as required
Potato soup 61 as required
Flour soup 12 1 as required
Minestrone 81 as required
Oxtail soup 30 1 as required
Beef soup (pot-au-feu) 451 as required
Onion soup 41 as required
Meat
Veal joint 30 2 acc. to recipe, at least 50ml / 2 oz
Knuckle of veal (piece) 45 2 acc. to recipe, at least 50ml / 2 oz
Knuckle of veal (sliced) 25 2 acc. to recipe, at least 50ml / 2oz
Veal stew 20 2 acc. to recipe, at least 50ml / 2 oz
Veal tongue 402 cover completely with water
Veal head 20 2 cover completely with water
Beef joint/Sauerbraten 45 2 acc. to recipe, at least 50ml / 2oz
Beef paupiettes (roulades) 13 2 acc. to recipe, at least 50ml / 2 oz
Sliced beef 12 2 acc. to recipe, at least 50ml / 2 oz
Beef Schnitzel in its own sauce 15 2 acc. to recipe, at least 50ml / 2 oz
Beef stew/goulash 25 2 acc. to recipe, at least 50ml / 2 oz
Boiled beef 45 2 acc. to recipe, at least 50ml / 2 oz
Knuckle of beef 35 2 acc. to recipe, at least 50ml / 2oz
Beef tongue 502 cover completely with water
Pork joint 40 2 acc. to recipe, at least 50ml / 2oz
Sliced pork 13 2 acc. to recipe, at least 50ml / 2oz
Knuckle of pork 40 2 acc. to recipe, at least 50ml / 2oz
Pork stew/goulash 25 2 acc. to recipe, at least 50ml/2 oz
Loin of pork 20 2 acc. to recipe, at least 50ml / 2oz
Pickled pork leg 352 cover completely with water
Smoked bacon 25 2 cover completely with water
Salted or unsalted bacon 202 cover completely with water
Lamb
Roast joint 302 acc. to recipe, at least 50ml / 2 oz
Lamb stew 20 2 acc. to recipe, at least 50ml / 2oz
Poultry
Poultry in pieces 8 2 acc. to recipe, at least 50ml/2 oz
Whole chicken 152 acc. to recipe, at least 50ml / 2oz
Game
Hare joint 302 acc. to recipe, at least 50ml / 2oz
Deer joint 302 acc. to recipe, at least 50ml / 2oz
Jugged game 18 2 acc. to recipe, at least 50ml / 2 oz
Sliced game 20 2 acc. to recipe, at least 50ml / 2oz
Miscellaneous
Minced meat (pork, lamb or beef) 8 2 acc. to recipe, at least 50ml / 2 oz
Rabbit (joint, pieces) 30 2 acc. to recipe, at least 50ml / 2oz
Tripe 15 2 acc. to recipe, at least 50ml / 2oz
Meat broth 302 acc. to recipe, at least 50ml / 2oz
Meat terrines 15 2 acc. to recipe, at least 50ml / 2 oz
Stews and hot pots (see cooking times for individual ingredients)
Warming meat dishes 3 2 acc. to recipe, at least 50ml / 2 oz
Aspic, jelly 60 2 acc. to recipe, at least 50ml / 2 oz
Fish (with trivet)
Whole fish (e.g. pike)
or large fish tail 61 in pan up to trivet
Fish portions (e.g. cod) 31 in pan up to trivet
Large fish fillets (e.g. halibut) 21 in pan up to trivet
Fish soup 51 in pan up to trivet
Fresh vegetables (with trivet or steamer insert)
Artichokes 142 up to trivet (at least 100ml / 4oz
Leafy vegetables (chard stalks, lettuce, chard) 3 2 up to trivet (at least 100ml / 4 oz)
3 up to trivet (at least 100 ml / 4 oz)
Beans 3 2 up to trivet (at least 100ml / 4 oz)
Broccoli 2 2 up to trivet (at least 100ml / 4 oz)
Fennel 6 2 up to trivet (at least 100ml / 4 oz)
White cabbage, halved 6 2 up to trivet (at least 100ml / 4 oz)
Chestnuts 12 2 up to trivet (at least 100ml / 4 oz)
Sugar peas 3 2 up to trivet (at least 100ml / 4 oz)
Kohlrabi (kale turnip) halved / sliced 6/2 2 up to trivet (at least 100ml/4 oz)
Leek, sliced 3 2 up to trivet (at least 100ml / 4 oz)
Corn cobs 7 2 up to trivet (at least 100ml / 4 oz)
Sweet peppers, sliced / paprika 3 2 up to trivet (at least 100ml / 4 oz)
Swedes, quartered 12 2 up to trivet (at least 100ml / 4 oz)
Swedes, sliced 5 2 up to trivet (at least 100ml / 4oz )
Beetroot 25 2 up to trivet (at least 100ml / 4oz )
Brussels sprouts 4 2 up to trivet (at least 100ml / 4oz )
Red cabbage 10 2 up to trivet (at least 100ml / 4oz
Carrots 62 up to trivet (at least 100ml / 4oz
Sauerkraut, raw 30 2 up to trivet (at least 100ml / 4oz )
Black salsify 12 2 up to trivet (at least 100ml / 4oz )
Celery halves, sliced 6/2 2 up to trivet (at least 100ml / 4oz )
Asparagus 5-10 2 up to trivet (at least 100ml / 4oz)^
Tomatoes for sauces (Sugo) 6 2
8 2
up to trivet (at least 100 ml / 4 oz)
up to trivet (at least 100ml / 4oz
- The pressure cooker should be cooled under cold running water.
Potatoes (with trivet)
(cooking time for new potatoes is reduced by up to one third)
Potatoes in jackets 7-102up to trivet
(without trivet, 100 ml liquid / 4 oz)
Boiled potatoes (quartered) 42 ditto
Sliced potatoes 22 ditto
Cereals
(Only add cereals to boiling water. Stir well before securing the lid! e.g., 1 cup rice = 1^1 / 2 cups liquid)
Rice (parboiled) 611:1 1 / 2
Brown rice, parboiled 611:3
Wild rice, soaked (unsalted water) 15 1 1:1 1 / 2
Wild rice, unsoaked 2511:3
Semolina 411:3
Corn meal, fine (polenta) 511:3
Corn meal, coarse 12 1 1:3
(Soaked overnight. The cooking time increases by approx. one third if unsoaked. Salt legumes only after cooking to avoid increasing the cooking time!)
Borlotti beans, soybeans, haricot beans 8 1 Cover food well with water
Chick peas, broad beans, yellow peas 10 1 Cover food well with water
Flageolte beans, black
(Brazilian) beans, Spanish beans 12 1 Cover food well with water
Lentils, green or brown, (unsoaked) 7 1 3x more water than food
Fresh Fruit (with trivet)
Pears, apples, peaches,
plums, apricots, very ripe 2 2 up to trivet (at least 100ml / 4oz )
plums, apricots, still hard 4 2 up to trivet (at least 100ml / 4 oz)
Quinces 10 2 up to trivet (at least 100ml / 4oz
Chestnuts 12 2 up to trivet (at least 100ml / 4oz )
Frozen vegetables, not thawed (with trivet)
Spinach leaves (pack of 500 g) 10 2 only to trivet
Cauliflower, in florets 6 2 only to trivet
Beans 5 2 only to trivet
Broccoli, in florets 5 2 only to trivet
Sugar peas 4 2 only to trivet
Brussels sprouts 3 2 only to trivet
Red cabbage, cooked (500 g red cabbage) 12 2 only to trivet
Spinach, chopped (500 g package)
(without trivet) 102
Preparation time for ready-to-serve frozen meals
In plastic packs:
Meat, whole meals, small packs 10 2 cover pack halfway with water
Meat, whole meals, large packs 12 2 cover pack halfway with water
Dried food
(Self-dried food must be soaked overnight. Commercially available dried foods need not be soaked.)
Apricots, peaches, plums 2 2 just cover with water
32 just cover with water
Whole pears (presoaked) 42 just cover with water
Chestnuts 20 2 just cover with water
Beans (presoaked) 12 2 just cover with water
Miscellaneous
Vegetable terrines 152 water up to trivet
Puddings, large portions 142 water up to trivet
Puddings, small individual portions 82 water up to trivet
| U.S. cups | Fluid ounces | Metric |
| 1/4 cup | 2 oz | 60 ml |
| 1/3 cup | 2 2/3 oz | 80 ml |
| 1/2 cup | 4 oz | 120 ml |
| 2/3 cup | 5 1/3 oz | 160 ml |
| 3/4 cup | 6 oz | 180 ml |
| 1 cup | 8 oz | 240 ml |
| 1 1/4 cups | 10 oz | 300 ml |
| 1 1/3 cups | 10 2/3 oz | 325 ml |
| 1 1/2 cups | 12 oz | 355 ml |
| U.S. cups | Fluid ounces | Metric |
| 1 1/3 cups | 13 1/3 oz | 385 ml |
| 1 3/4 cups | 14 oz | 415 ml |
| 2 cups | 16 oz | 475 ml |
| 2 1/2 cups | 20 oz | 595 ml |
| 3 cups | 24 oz | 710 ml |
| 4 cups (1qt) | 32 oz | 950 ml |
| 6 cups (1 1/2 qt) | 48 oz | 1420 ml |
| 8 cups (2qt) | 64 oz | 1900 ml |
16. Accessoires DUROMATIC
Description Ref. no. Fits
| Steamer insert 2005 Ø 14 - 22 cm | |
| Juice extractor 2010 DUROMATIC from 5 L Ø 24 cm DUROOTHERM 5 L Ø 22 cm | |
| SWISS ENERGYSAVER 2080 Ø 28 cm 2081 Ø 24 cm | |
| SWISS CLEANER 2015 Cleaning paste 200 gr / 7 oz | |
| SWISS EASY CLEANER 2016 Cleaning Liquid 250 ml / 8 oz |
17. DUROMATIC spare parts
We have selected the most important spare parts for you from a multitude of spare parts. All other spare parts are available via specialist retailers.
To ensure you receive the correct spare part, please notify us of the article number and the production date of your pressure cooker (see section 13), or send the defective part to one of the KUHN RIKON Service Centers.
| Description | Ref. no. | Fits | |
| Valve SI 1565 All models since 1980 | |||
| Pressure indicator with spring 3851 All models since 1980 (except TIMAX and TOP) | |||
| Pressure indicator with spring 1701 TOP | |||
| Spring for indicator 1553 TOP | |||
| Springs for DUOPACK 3122 All models since 1980 (except indicator TIMAX and TOP) | |||
| Valve caps 1488 SUPREME | INOX CLASSIC | ||
| Valve caps 1751 TOP | (since 09/00) | ||
| Valve housing cap blue D/F 1490 SUPREMEValve housing cap blue E/Sp 1491 SUPREMEValve housing cap blue I/R 1586 SUPREMEValve housing cap green D/F 1492 SUPREMEValve housing cap green E/Sp 1525 SUPREMEValve housing cap green I/R 1587 SUPREMEValve housing cap black 1454 CLASSICValve housing cap black 1679 ERGO | |||
17. DUROMATIC spare parts
Description Ref. no. Fits
| Valve housing cap 1621 INOX | ||||
| Valve housing cap 1752 TOP | ||||
| Rubber seal (gasket) black 1540 All models Ø 20 cmØ 20 cm (3026) | ||||
| Rubber seal (gasket) black 1541 All models Ø 22 cm (3034) | ||||
| Rubber seal (gasket) black 1542 All models Ø 24 cm (3009) | ||||
| Rubber seal (gasket) black 1503 HOTEL Ø 28 cm | ||||
| Rubber seal (gasket), blue 1657 All models Ø 20 cmsilicon, Ø 20 cm (3026) | ||||
| Rubber seal (gasket), blue 1501 All models Ø 22 cmsilicon, Ø 22 cm | ||||
| Rubber seal (gasket), blue 1502 All models Ø 24 cmsilicon, Ø 24 cm | ||||
| Trivet Inox 1402 All models Ø 20 cmØ 20 cm, inside Ø pot | ||||
| Trivet Inox 3319 All models Ø 22 cmØ 22 cm, inside Ø pot | ||||
| Trivet Inox 1404 HOTELØ 28 cm, inside Ø pot |
18. DUROOTHERM TIMAX spare parts
| Description | Ref. no. | Fits |
| Valve screw 1551 TIMAX | ||
| Pressure indicator with spring 1552 TIMAX | ||
| Spring for indicator 1553 TIMAX | ||
| Automatic module letters gold 1557 DUROOTHERM Automatic module letters silver 1581 DUROOTHERM | ||
| Battery 1558 | ||
| Battery lid 1549 | ||
| Underplate 1410 DUROOTHERM TIMAX Ø 18 cm Underplate 1411 DUROOTHERM TIMAX Ø 22 cm | ||
| Trivet Inox 1403 DUROOTHERM TIMAX 2 L Ø 18 cm, inside Ø pot Trivet Inox 1402 DUROOTHERM TIMAX 3-5 L Ø 20 cm, inside Ø pot | ||
DUROMATIC
Indice
products secos, arroz