
Pantera - Meter FALK - Free user manual and instructions
Find the device manual for free Pantera FALK in PDF.
| Product Type | GPS Bike Computer |
| Brand | FALK |
| Model | Pantera |
| Power supply | Rechargeable battery via USB cable and included power adapter |
| Integrated sensors | Combined speed/cadence sensor ANT+, heart rate monitor (chest strap) |
| Display | Color touch screen |
| Available maps | Premium (road), Base Plus (off-road), Premium Outdoor (mixed) |
| Navigation functions | Address entry, route options (flat, mountainous, neutral), choice of traffic lanes, alternate routes, elevation profile |
| User profiles | Multi Flow: switch between map screen, trip computer, and navigation |
| Mounting | Handlebar or stem mounting bracket with cable ties |
| Wheel circumference | Configurable via conversion table (sizes 16 to 28 inches) |
| Wireless connection | ANT+ for sensors |
| Included accessories | Bike mount, cable ties, combined speed/cadence sensor, magnets, heart rate strap, USB cable, power adapter |
| Safety | Do not use as an automotive navigation system; obey traffic laws; do not operate while driving |
| Maintenance | Clean with a soft, dry cloth; avoid abrasive products |
| Manual languages | French, German, English, Dutch |
Frequently Asked Questions - Pantera FALK
User questions about Pantera FALK
0 question about this device. Answer the ones you know or ask your own.
Ask a new question about this device
Download the instructions for your Meter in PDF format for free! Find your manual Pantera - FALK and take your electronic device back in hand. On this page are published all the documents necessary for the use of your device. Pantera by FALK.
USER MANUAL Pantera FALK
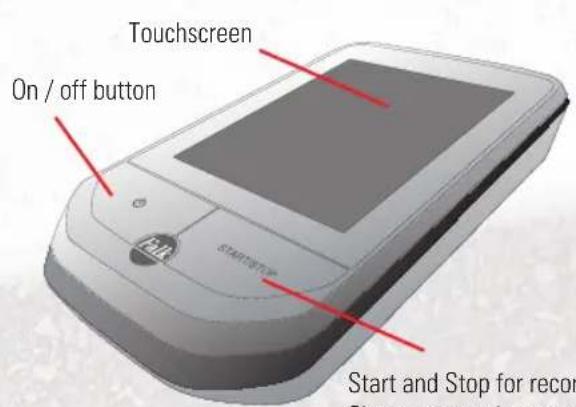
Connecting the speed sensor 24
Connecting the cadence sensor 25
Wheel circumference
Connecting the heart rate meter 27
Multi Flow Menu 28
Navigation view 29
Destination Eentry, Route options 30
My circuit


Seite
Votre PANTERA 33
Premièresétapes 34
Informations importantes 35
Vos profi Is menus multi flow 37
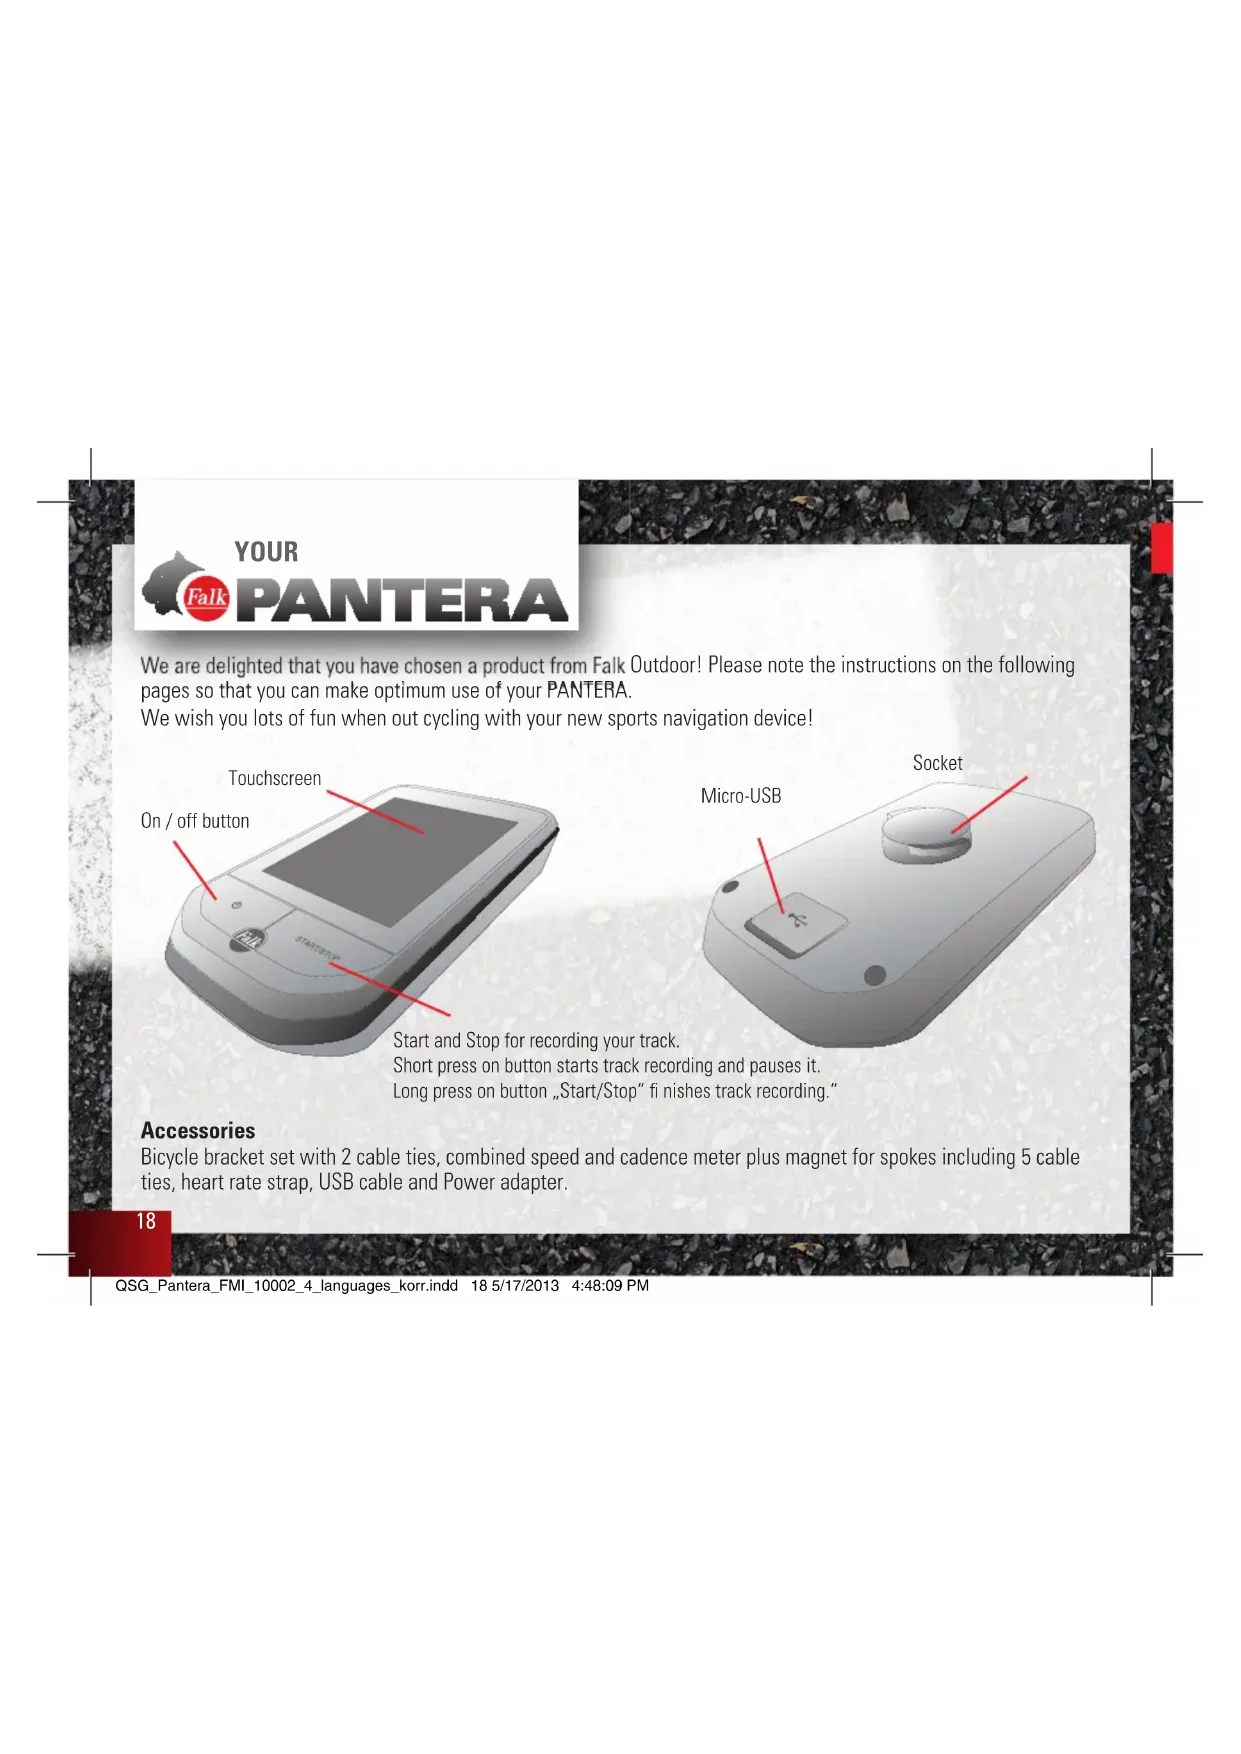
We are delighted that you have chosen a product from Falk Outdoor! Please note the instructions on the following pages so that you can make optimum use of your PANTERA.
We wish you lots of fun when out cycling with your new sports navigation device!

Start and Stop for recording your track.
Short press on button starts track recording and pauses it.
Long press on button „Start/Stop" fi nishes track recording.
Accessories
Bicycle bracket set with 2 cable ties, combined speed and cadence meter plus magnet for spokes including 5 cable ties, heart rate strap, USB cable and Power adapter.
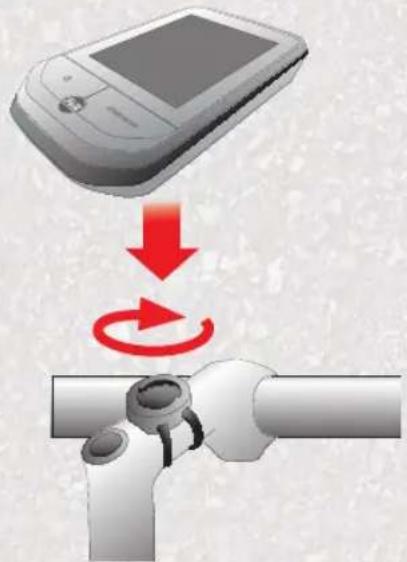
FIRST STEPS
Fitting the bracket to the bicycle handlebar
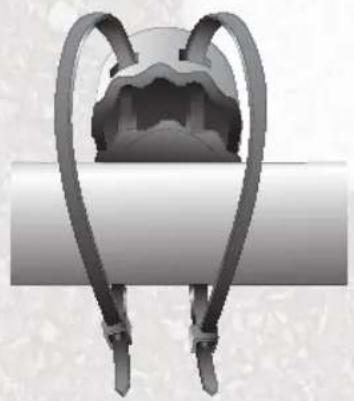
You can attach the bicycle bracket to the handlebar or to the handlebar stem.
Place your device with the bicycle bracket base into the bicycle bracket and lock it firmly in place with a turn to the right. Check whether it is firmly seated on the handlebar stem.
IMPORTANT INFORMATION
!
Make sure you observe the following safety instructions in order to prevent accidents or serious injuries:
This navigation device for outdoor use is merely an orientation and navigation aid which cannot be a substitute for making a sensible assessment of the situation you are in. Please in any event note the particular characteristics of the terrain and the routes you are using. Do not follow any routes or suggested routes which would entail a dangerous or illegal form of riding or would place you in a dangerous situation.
The road traffic regulations must be complied with at all times, for example when cycling, and have priority over the routes of the navigation device.
Never operate the navigation device while riding and do not allow yourself to be distracted by the device while riding.
Please note that United Navigation does not accept any liability for any damage caused by the device/bracket becoming detached from the bicycle.
The map data which is used may include inaccurate or incomplete data. You should therefore check the calculated route to see if it makes sense and choose your own alternative route if necessary.
CAUTION:
The navigation device is not suitable for use as a vehicle navigation system!
Operating temperature: The maximum operating temperature is -10^ to 60^ .
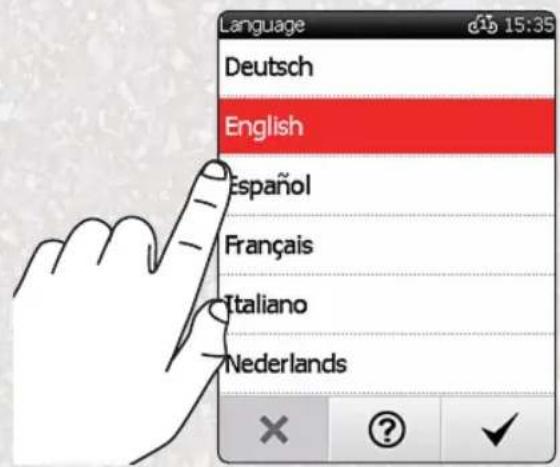
INITIAL START-UP
When you start your PANTERA for the first time, enter your home address. This will allow you to be navigated home easily with just one click."
Then enter your user data. We require this data in order to provide you with an accurate assessment of your fitness data.
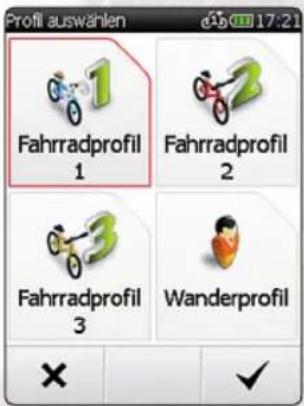
YOUR PROFILES MULTI-FLOW MENU
Set own profi les
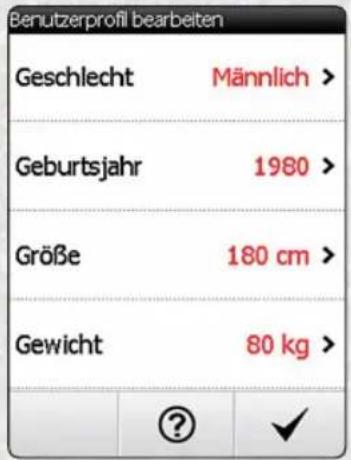
You can edit your profi les via Settings > Profi les / Sensors.
Here you can for example edit the user profi le that you set at
the start, change your bicycle profi le if you have different types of bicycle or edit your current set bicycle profi le.
On this menu, you will also find the „Fitness sensors" item.
With the aid of this menu item you can connect ANT+ fitness sensors to your PANTERA. Please follow the description here.
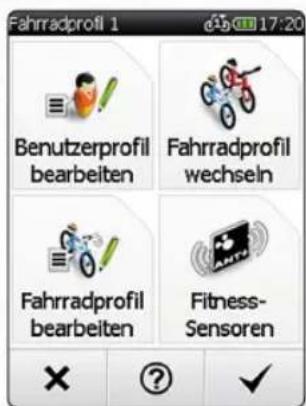
Important:
- The menu items „Edit bicycle profi le" and „Fitness sensors" relate to the bicycle profi le which is currently set.
- In the profi le selection you also opt for a map type on which you would like to travel.
You should select the Premium Road Map if you want to be travelling exclusively on the road network in Europe.
The Basic Map Plus is suitable if you mainly want to be travelling offroad.
The Premium Outdoor Map* contains both types of routes.
- Optional available on shop.falk-outdoor.de
OUR COMBI SENSOR
Fitting of the combined speed and cadence meter
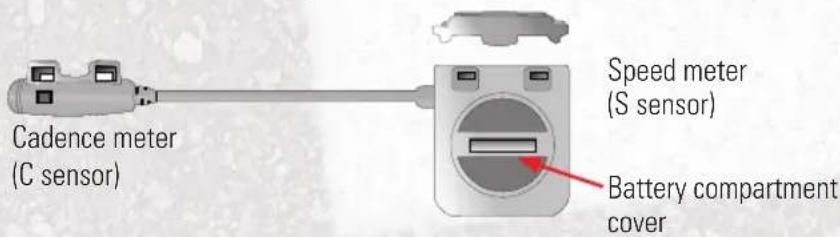

Battery change
* Applies to PANTERA products in the + series
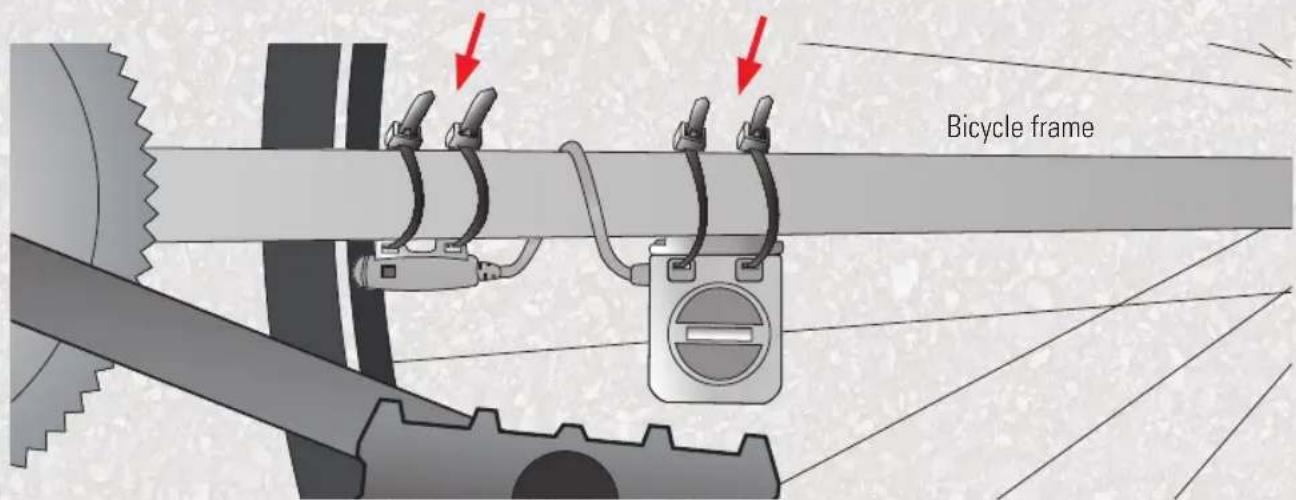
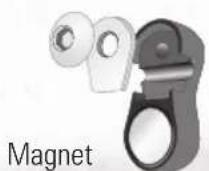
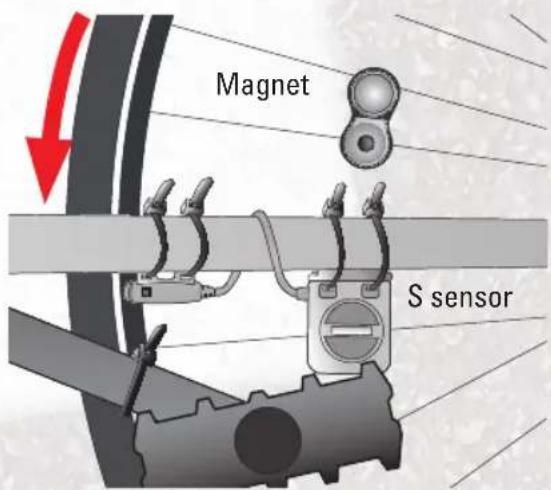
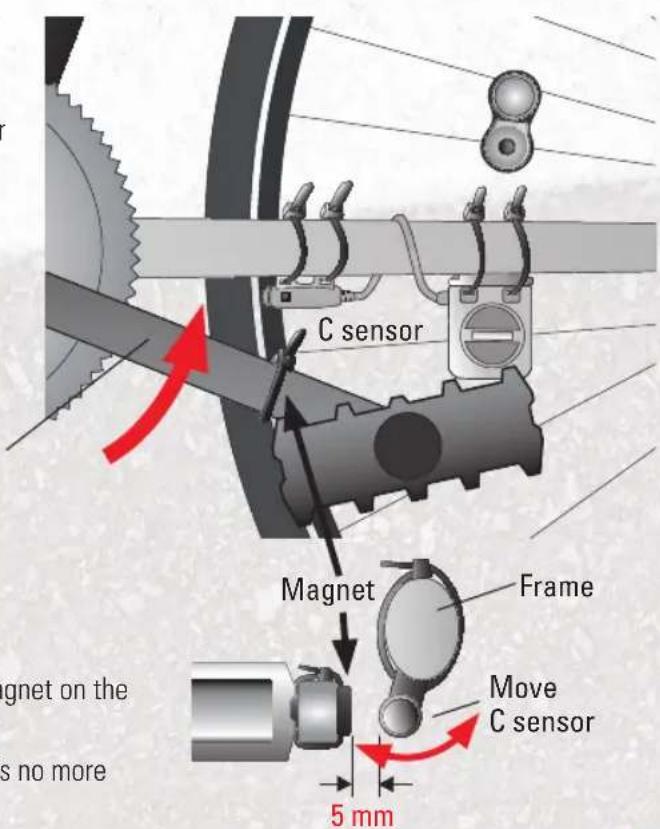
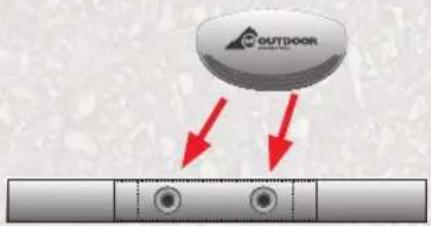
CONNECTING THE SPEED SENSOR
Fitting the magnet for measuring the speed
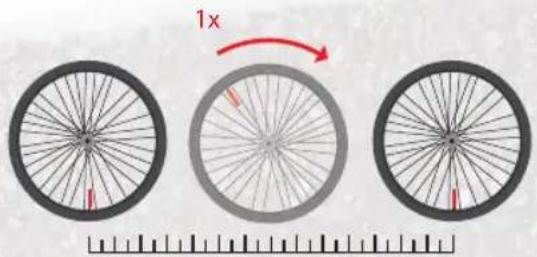
Please note that, before you start the sensor search on the device, you must have attached both sensors to the bicycle. Please attach the magnet to one spoke. Move the wheel and then tap on your device under settings on "Search for sensor".
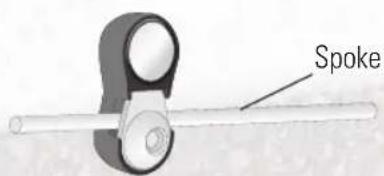
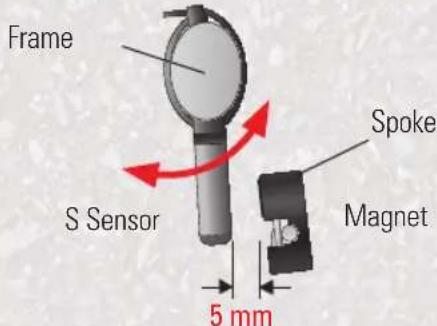
Please note that between the speed sensor and the magnet on a spoke there should be a gap of no more than 5mm
Please move the S sensor on the frame so that the gap is no more than 5mm
Please be aware that the S sensor on the frame needs to be fitted so that it faces downwards in order to avoid damage to the spokes.
CONNECTING THE CADENCE SENSOR *
Fitting the magnet for measuring the cadence
Please attach the magnet to the crank. Move the crank and then tap on your device under settings on „Search for sensor".
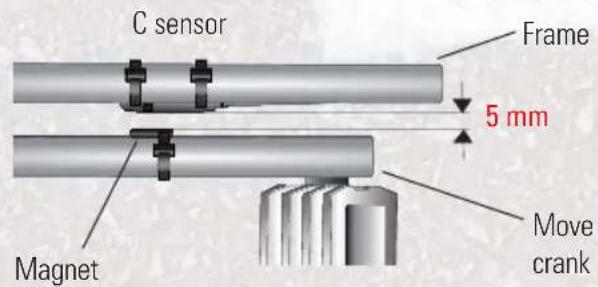
Please note that between the cadence sensor and the magnet on the crank there should be a gap of no more than 5mm
Please move the C sensor on the frame so that the gap is no more than 5mm
- Applies to PANTERA products in the + series
WHEEL CIRCUMFERENCE
1. Calculation possibility

mm x 3,14
km/h:
Wheel circumference = mm × 3,14
2. Calculation possibility
km/h:
Wheel circumference= mm

| 47-305 |
| 47-406 |
| 37-540 |
| 47-507 |
| 23-571 |
| 40-559 |
| 44-559 |
| 47-559 |
| 50-559 |
| 54-559 |
| 57-559 |
| 37-590 |
| 37-584 |
| 20-571 |
| 32-630 |
| 28-630 |
| 40-622 |
| 47-622 |
| 40-635 |
| 37-622 |
| 18-622 |
| 20-622 |
| 23-622 |
| 25-622 |
| 28-622 |
| 32-622 |
| 37-622 |
| 40-622 |
kmh
| 16x1.75x2 |
| 20x1.75x2 |
| 24x1 3/8A |
| 24x1.75x2 |
| 26x1 |
| 26x1.5 |
| 26x1.6 |
| 26x1.75x2 |
| 26x1.9 |
| 26x2.00 |
| 26x2 125 |
| 26x1 3/8 |
| 26x1 3/8x1 |
| 26x3/4 |
| 27x1 1/4 |
| 27x1 1/4 A |
| 28x1.5 |
| 28x1.75 |
| 28x1 1/2 |
| 28x1 3/8x1 |
| 700x1 BC |
| 700x200 |
| 700x23C |
| 700x25C |
| 700x2BC |
| 700x32C |
| 700x35C |
| 700x4DC |
| 1272 |
| 1590 |
| 1946 |
| 1907 |
| 1973 |
| 2026 |
| 2051 |
| 2070 |
| 2089 |
| 2114 |
| 2133 |
| 2105 |
| 2086 |
| 1954 |
| 2199 |
| 2174 |
| 2224 |
| 2268 |
| 2265 |
| 2205 |
| 2102 |
| 2114 |
| 2133 |
| 2146 |
| 2149 |
| 2174 |
| 2205 |
| 2224 |
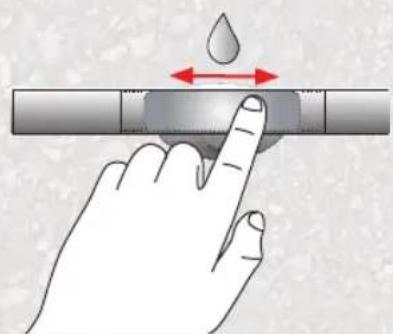
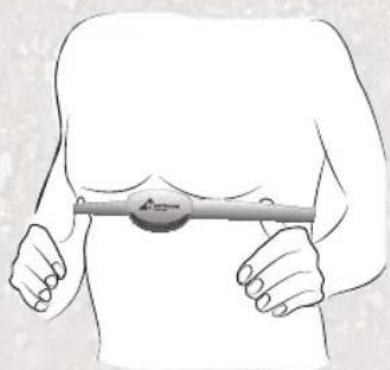
CONNECTING THE HEART RATE METER *
Then you clip the sensor to the chest strap, moisten the sensor contact area on the back and adjust the strap around your chest. The sensor should rest or lie below your chest.
The device should now automatically find the heart rate sensor; if this is not the case, then go to the Settings" menu, search for sensor and connect the heart rate meter.
Battery compartment cover
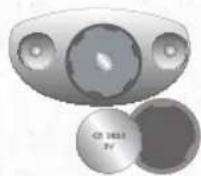
Battery change
* Applies to PANTERA products in the + series
MULTI-FLOW MENU
The Pantera is equipped with the Multi-Flow Menu which allows you while you are travelling easily to switch back and forth between the map screen, the trip computer and the navigation screen by swiping across the display. To do this, simply swipe from left to right or from right to left with your finger across the display. On the trip computer level you can also swipe upwards with your finger to display further data. The menu screens of the PANTERA can also be managed easily and quickly with the Multi-Flow Menu. You can swipe both horizontally and vertically through menus and lists. Red dots at the top of the screen show you what level you are currently on.
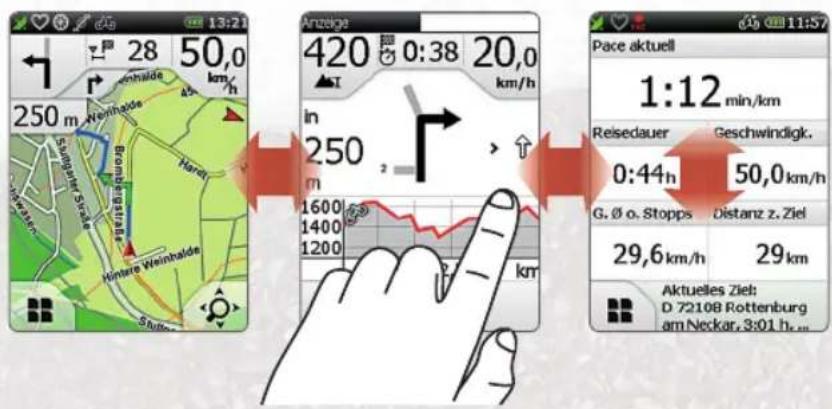
The 3 main functions of your PANTERA
These 3 main functions are easily to access by sliding your finger horizontally over the screen. With this functionality, you always have an easy access to all relevant information during your ride.
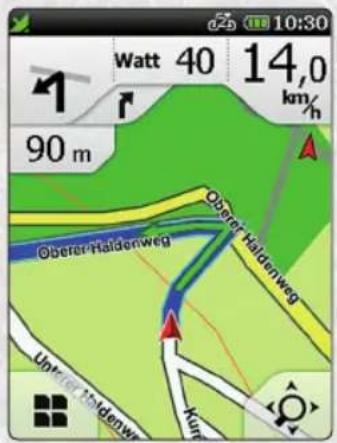
NAVIGATION VIEW
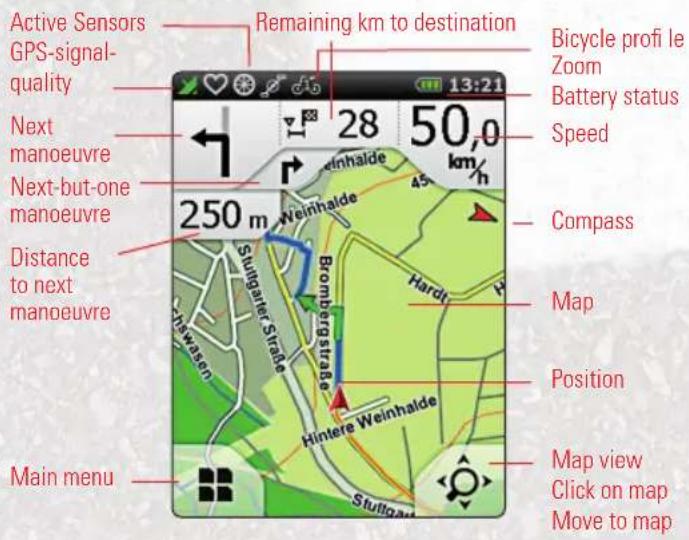
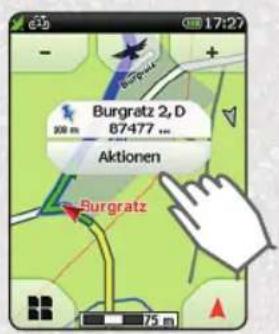
When you tap on the magnifying glass at the bottom right, you can click on the map to zoom in and out of it.
Click on map: When you tap on a point on the map, the point is marked with a pin and the address or position is displayed. When you tap on „Actions“, you could for example navigate to the marked point or save the position.

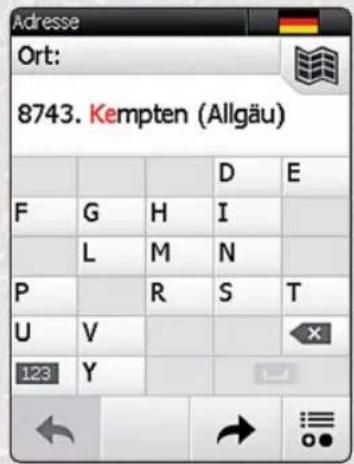
DESTINATION ENTRY
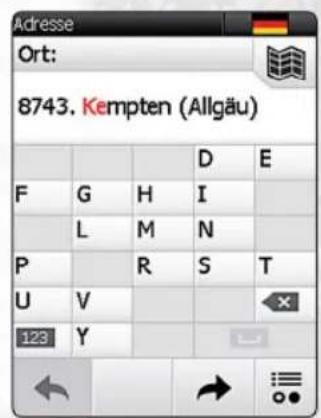
On the main menu select „Destination Entry > Address".
You can use the keypad which is shown to enter first the city, then the street and street number.
Confirm your entry for city, street and street number in each case by clicking on the right arrow and then on the OK tick to start the route calculation. Alternatively, when it comes to entering the street, you can click on the middle button to be navigated to the city centre or to the middle of the street when entering the street number.
As well as entering an address, other entry options are available to you such as POIs, waypoints or coordinates.
ROUTE OPTIONS
Create your own individual route by adjusting the route options to your needs. You can set the route options after every destination entry. Or you tap on the main menu on „Settings > Route Options".
First select the means of transport (bicycle or pedestrian). Tap on "Next".
Now specify the type of route:
plain gives preference to routes with inclines of 0 - 4%
mountainous gives preference to routes with inclines of 4 - 8%
neutral calculates the shortest route to the destination, regardless of inclines

ROUTE OPTIONS
Tap on "Next".
Choose the modes of transport that you want to use, prefer or avoid on the route, for example steep gradients, via ferrata or hiking trails.
Confirm your selection with „Done".
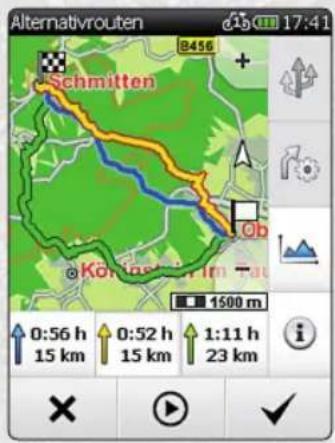
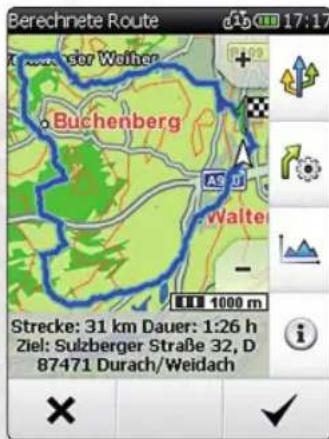
After the route calculation, you have the following options:

Calculates two alternative routes

Change the route options
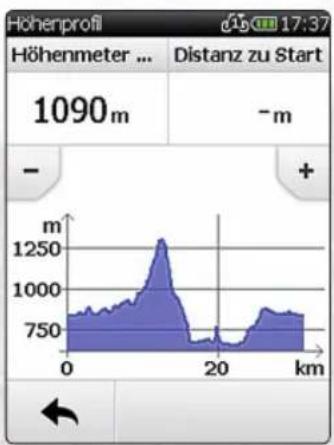
Shows the altitude profile
for the calculated route

Shows information
about the route

"tick" starts
guidance
MY CIRCUIT
Via the function „Plan tour" you can call up the feature „my circuit".
You can now plan a circuit either from your current position or from any other point you want, such as a POI, a city or your home address.
As a next step, you can set your desired parameters. This may for example be the desired distance or you can also restrict the duration of the circuit.
It is possible, for example, for you to enter 20km or correspondingly 3 hours.
In a next step, you are asked what activity you are performing. If you are out cycling and you want to do a circuit, click on „Bicycle“; if you are out walking, click on „Pedestrian“.
You can now select what your circuit should look like. For example, if you would prefer to plan a more sporty route, then click on "Hilly"; if you would prefer not to climb too many hills, then click on "Flat". Once you have done this, you can now stipulate what type of routes you would mainly like to travel on. For example, you can set it so that you will be guided primarily along cycle paths.

VOTRE
PANTERA
Verandert derouteopties.

Service-Hotline for Belgium and the Netherlands:
Belgium 0 70 270 018 (15 cent / min), Netherlands: 0 900 251 02 51 (15 cent / min)
www.falk-outdoor.com

- Seite
- Accessories
- FIRST STEPS
- Fitting the bracket to the bicycle handlebar
- IMPORTANT INFORMATION
- CAUTION:
- INITIAL START-UP
- YOUR PROFILES MULTI-FLOW MENU
- Set own profi les
- Important:
- OUR COMBI SENSOR
- Fitting of the combined speed and cadence meter
- CONNECTING THE SPEED SENSOR
- Fitting the magnet for measuring the speed
- CONNECTING THE CADENCE SENSOR *
- Fitting the magnet for measuring the cadence
- WHEEL CIRCUMFERENCE
- Calculation possibility
- Calculation possibility
- kmh
- CONNECTING THE HEART RATE METER *
- MULTI-FLOW MENU
- NAVIGATION VIEW
- DESTINATION ENTRY
- ROUTE OPTIONS
- MY CIRCUIT
- VOTRE
- PANTERA
- Service-Hotline for Belgium and the Netherlands:
Brand : FALK
Model : Pantera
Category : Meter