Pure F 2.1 - Elliptical bike TUNTURI - Free user manual and instructions
Find the device manual for free Pure F 2.1 TUNTURI in PDF.


Frequently Asked Questions - Pure F 2.1 TUNTURI
User questions about Pure F 2.1 TUNTURI
0 question about this device. Answer the ones you know or ask your own.
Ask a new question about this device
Download the instructions for your Elliptical bike in PDF format for free! Find your manual Pure F 2.1 - TUNTURI and take your electronic device back in hand. On this page are published all the documents necessary for the use of your device. Pure F 2.1 by TUNTURI.
USER MANUAL Pure F 2.1 TUNTURI
General assembly information. 5
Assembly steps 5
USE 10
Adjusting the support feet. 10
WORKOUTS 10
Pulse rate measurement 10
Heart rate measurement 10
Maximum heart rate. 11
USER INTERFACE 12
Display functions 12
Key functions 12
Extra functions 12
PROGRAMS 12
Manual mode. 13
Beginner mode 13
Advance mode 14
Sporty mode 14
Cardio mode 15
Watt mode 15
Body fat 16
Recovery 16
CLEANING AND MAINTENANCE ... 17
TRANSPORT AND STORAGE. 17
DISCLAIMER 17
WARRANTY 17
SPECIFICATIONS. 66
Parts list. 67
Exploded view 69
Welcome
Welcome to the world of Tunturi Fitness! Thank you for purchasing this piece of Tunturi equipment. Tunturi offers a wide range of professional fitness equipment, including cross trainers, treadmills, exercise bikes, and rowers. The Tunturi equipment is suitable for the entire family, no matter what fitness level. For more information, please visit our website www.tunturi.com
Safety warnings

WARNING
Read the safety warnings and the instructions. Failure to follow the safety warnings and the instructions can cause personal injury or damage to the equipment. Keep the safety warnings and the instructions for future reference.

WARNING
Heart rate monitoring systems may be inaccurate. Over exercise may result in serious injury or death. If you feel faint stop exercising immediately.
- The equipment is suitable for home use only. Max. usage is limited to 3 hrs a day. The equipment is not suitable for full commercial use (e.g. large gyms).
- The use of this equipment by children or persons with a physical, sensory,
- mental or motorial disability, or lack of experience and knowledge can give cause to hazards. Persons responsible for their safety must give explicit instructions or supervise the use of the equipment.
Before starting your workout, consult a physician to check your health.
If you experience nausea, dizziness or other abnormal symptoms, immediately stop your workout and consult a physician. - To avoid muscular pain and strain start each workout by warming up
and finish each workout by cooling down. Remember to stretch at the end of the workout.
- The equipment is suitable for indoor use only. The equipment is not suitable for outdoor use.
- Only use the equipment in environments with adequate ventilation. Do not use the equipment in draughty environments in order not to catch a cold.
- Only use the equipment in environments with ambient temperatures between 10^ and 35^ . Only store the equipment in environments with ambient temperatures between 5^ and 45^ .
- Do not use or store the equipment in humid surroundings. The air humidity must never be more than 80% .
- Only use the equipment for its intended purpose. Do not use the equipment for other purposes than described in the manual.
- Do not use the equipment if any part is damaged or defective. If a part is damaged or defective, contact your dealer.
- Keep your hands, feet and other body parts away from the moving parts.
- Keep your hair away from the moving parts.
- Wear appropriate clothing and shoes.
- Keep clothing, jewellery and other objects away from the moving parts.
Make sure that only one person uses the equipment at a time. The equipment must not be used by persons weighing more than 135kg (300 lbs). - Do not open equipment without consulting your dealer.
Electrical safety
(only for equipment with electric power)
- Before use, always check that the mains voltage is the same as the voltage on the rating plate of the equipment.
- Do not use an extension cable.
- Keep the mains cable away from heat, oil and sharp edges.
- Do not alter or modify the mains cable or the mains plug.
- Do not use the equipment if the mains cable or the mains plug is damaged or defective. If the mains cable or the mains plug is damaged or defective, contact your dealer.
Always fully unwind the mains cable. - Do not run the mains cable underneath the equipment. Do not run the mains cable underneath a carpet. Do not place any objects on the mains cable.
- Make sure that the mains cable does not hang over the edge of a table. Make sure that the mains cable cannot be caught accidentally or tripped over.
- Do not leave the equipment unattended when the mains plug is inserted into the wall socket.
- Do not pull the mains cable to remove the mains plug from the wall socket.
- Remove the mains plug from the wall socket when the equipment is not in use, before assembly or disassembly and before cleaning and maintenance.
Assembly
Parts out of box
| M8*55 CARRIAGE BOLTS | 4 | ||||
| M8*16*1.2 WASHER | 28 | ||||
| M8 NYLON NUT | 10 | ||||
| M8*56mm ALLEN HEAD SCREW | 6 | ||||
| M8 SPRING WASHER | 20 | ||||
| M8*20mm ALLEN HEAD BOLT | 10 | ||||
| M8*15mm ALLEN HEAD BOLT | 4 | ||||
| M8*25mm ALLEN HEAD BOLT | 2 | ||||
| M8*41.7*5 | 2 | ||||
| M8*56mm ALLEN HEAD BOLT | 4 | ||||
| M8*36*2.0mm WASHER | 2 | ||||
| M5*19*1.5mm WASHER | 8 | ||||
| M5 SPRING WASHER | 8 | ||||
| M5*12mm SCREW | 8 | ||||
| M8*28*2.0mm WASHER | 2 | ||||
| 1/1 | |||||
| 1/1 | |||||
| 1/1 | |||||
| 1/1 | |||||
| 1/1 | |||||
| 1/1 | |||||
| 1/1 | |||||
| 1/1 | |||||
| 1/1 | |||||
| 1/1 | 6 | ||||
| 1/1 | 4 | ||||
| 1 | |||||
The package contains the parts as shown in figure.
If a part is missing, contact your dealer.
Hardware kit
| ### | ### | ### | ### | |
| ### | ### | ### | ### | |
| ### | ### | ### | ### | ### |
| ### | ### | ### | ### | ### |
The package contains the fasteners as shown in figure.
If a part is missing, contact your dealer.
General assembly information
WARNING
- Assemble the equipment in the given order.
- Carry and move the equipment with at least two persons.
CAUTION
- Place the equipment on a firm, level surface.
- Place the equipment on a protective base to prevent damage to the floor surface.
- Allow at least 100cm of clearance around the equipment.
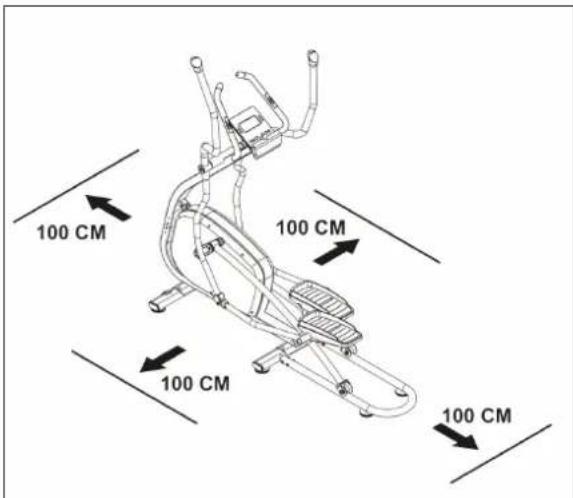
Refer to the illustrations for the correct assembly of the equipment.
Assembly steps
Assembly step A
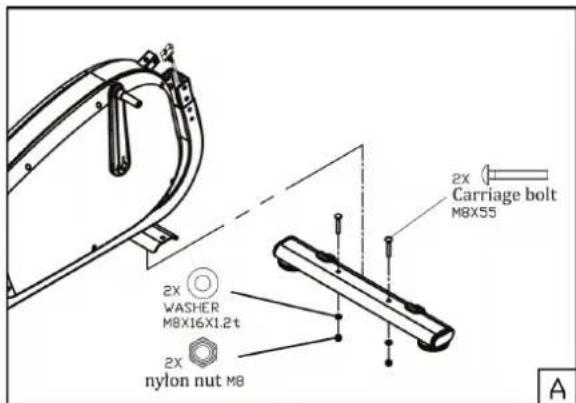
- Fit height adjustment pads to the front stabilizer.
- Fit front stabilizer by using the shown hardware.
Remark:
First put all screws/ bolts in correct place before tightening them fully.
Assembly step B
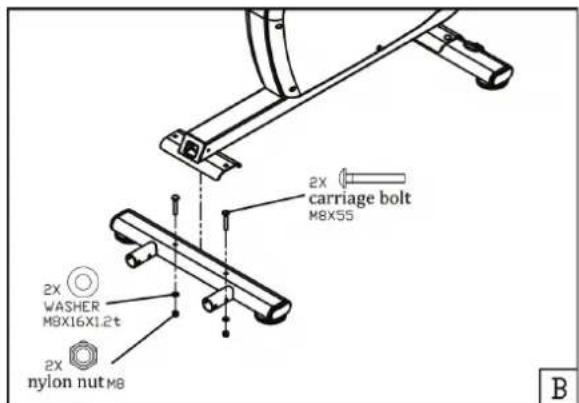
- Fit height adjustment pads to the rear stabilizer.
- Fit rear stabilizer by using the shown hardware.
Remark:
First put all screws/ bolts in correct place before tightening them fully.
Assembly step C
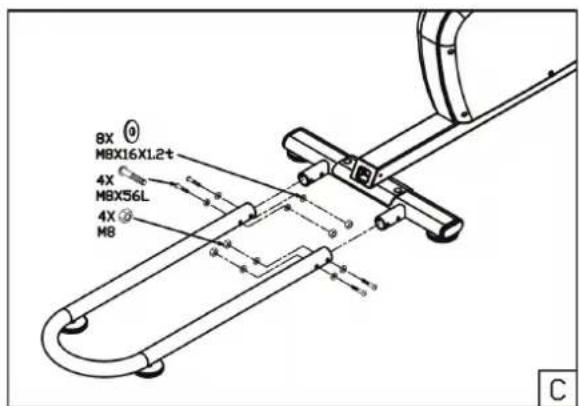
Fix height adjustment pads to the U shape rail
Fix U shape rail with the rear stabilizer.
Remark:
First tighten all 4 bolts hand tight before tightening them fully. This to avoid miss alignment
Assembly step D
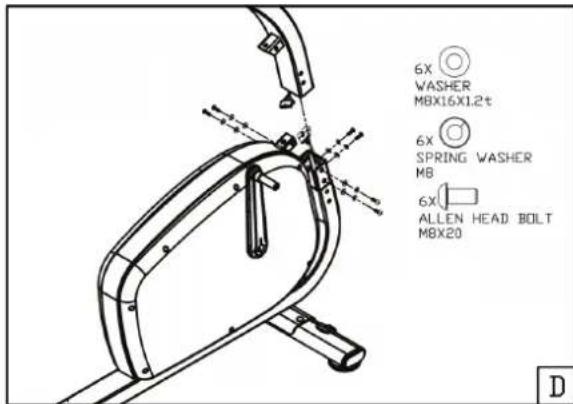
- Connect the wires from upright tube and main frame before sliding the upright tube in position.
Remark:
Do not remove screws from the frame before siding the upright tube in position.
- Use the enclosed Allen key to tighten both fastening screws through the holes in the tube from inside out.
- Tighten the fastening screws by turning them counter-clockwise.
Remark:
First tighten all 6 bolts hand tight before tightening them fully. This to avoid miss alignment
Assembly step E
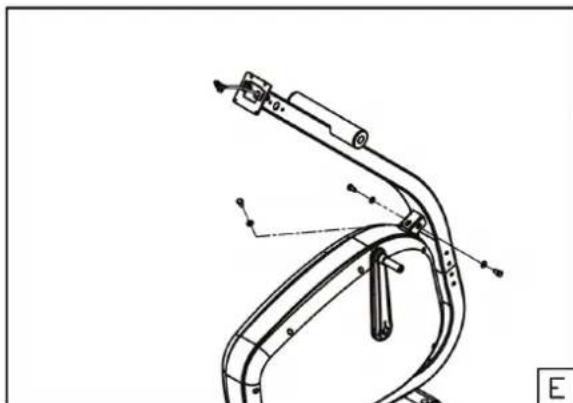
- Stabilize the upright tube as shown in picture.
Assembly step F
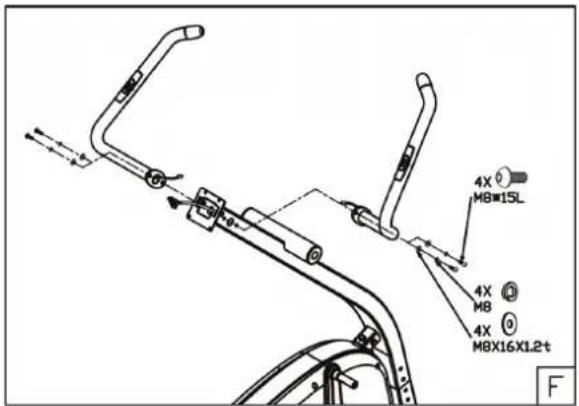
Fix both fixed handle bar tubes as shown in picture.
Remark:
First put all screws/ bolts in correct place before tightening them fully.
Assembly step G
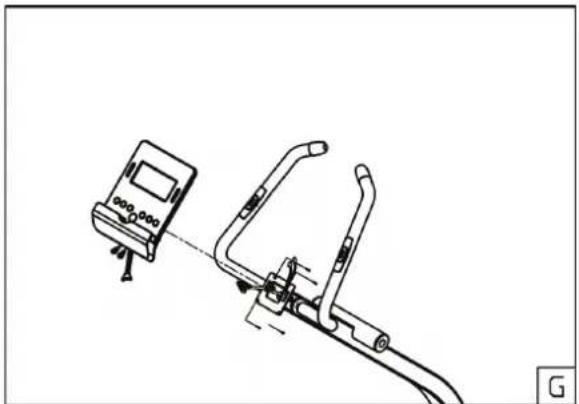
- Guide the hand pulse wires coming from the handlebar and data cable coming form upright tube through the console bracket hole.
- remove the 4 assembly screws from the consoles rear cover.
- Connect the hand pulse wires and data cable with the console.
Fix the console to the console bracket.
Remark:
Avoid the wires to damage during assembly
Assembly step H
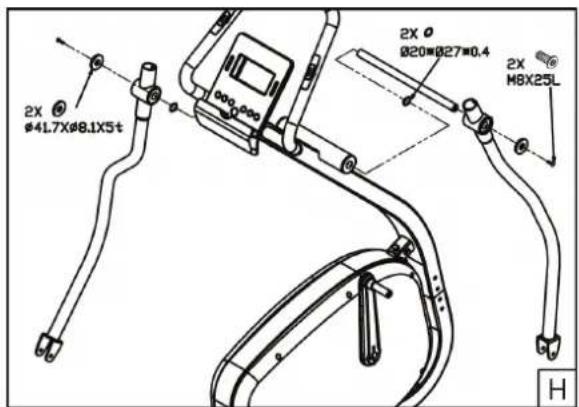
- Push the metal shaft through the bracket housing of the left arm. Attach now the left arm to the front frame tube by pushing the metal shaft through the opening in the tube. Push the right arm on the shaft and lock it by tightening a large washer, and a screw to the both ends of the shaft. Tighten the arms using two Allen keys.
Remark:
A think shim washer is in between both swivel arms and front frame tube..
Assembly step I

Fix upper moving handle bars as shown in picture.
Assembly step J
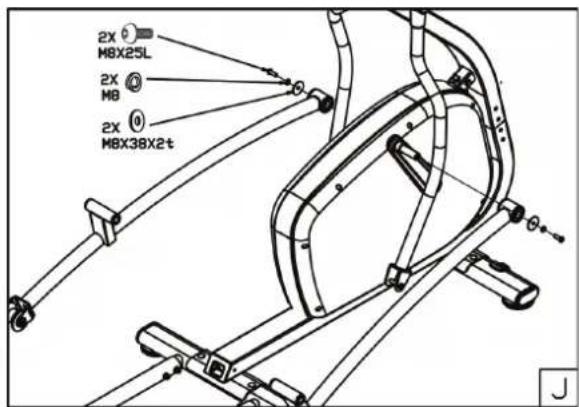
Fix both fixed pedal posts with the both crank arms as shown in picture.
Remark:
Pedal posts are marked with "L" and "R" label.
L = Left hand side pedal post
R = Right hand side pedal post.
Assembly step K
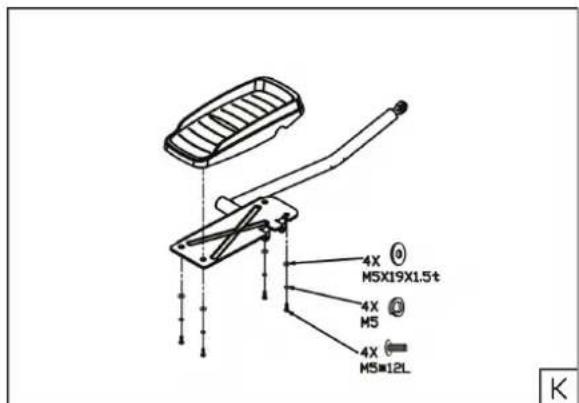
Fix foot rest to the left hand side outer pedal post as shown in picture. Left hand outer pedal post is marked with an "L" label
Remark:
First put all screws/ bolts in correct place before tightening them fully.
Assembly step L
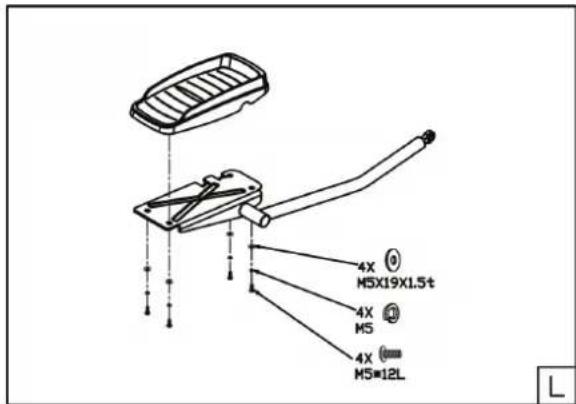
Fix foot rest to the right hand side outer pedal post as shown in picture. Left hand outer pedal post is marked with an "R" label
Remark:
First put all screws/ bolts in correct place before tightening them fully.
Assembly step M
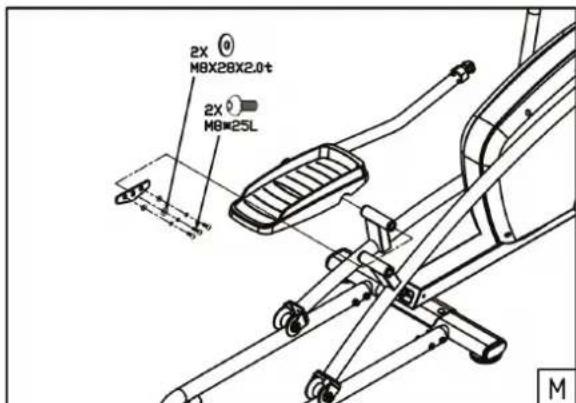
- Connect pedal left outer pedal post with the left pedal tube as shown in picture.
Remark:
First put all screws/ bolts in correct place before tightening them fully.
Assembly step N
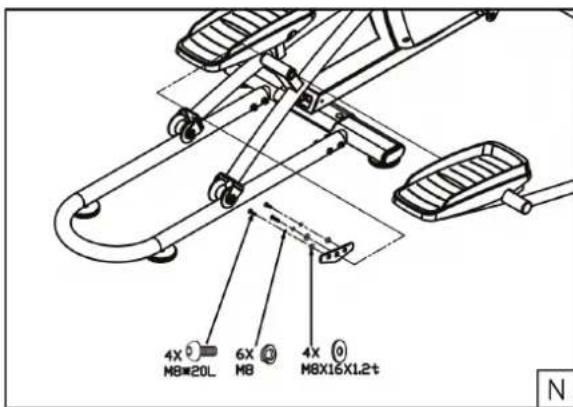
- Connect pedal right outer pedal post with the right pedal tube as shown in picture.
Remark:
First put all screws/ bolts in correct place before tightening them fully.
Assembly step O
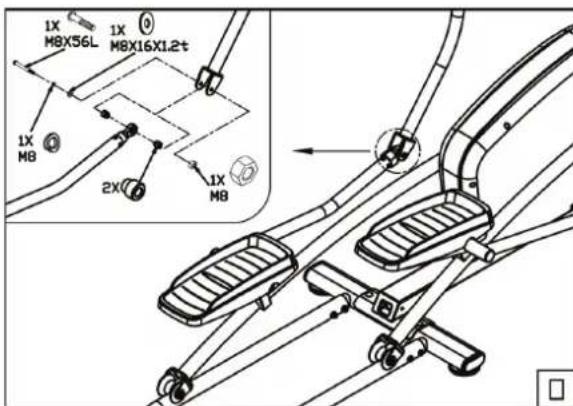
Fix left outer pedal post to left lower swivel handle bar shown in picture.
Assembly step P
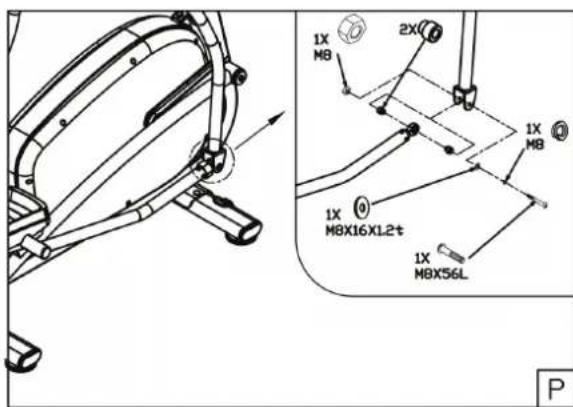
Fix right outer pedal post to right lower swivel handle bar shown in picture.
Assembly step Q
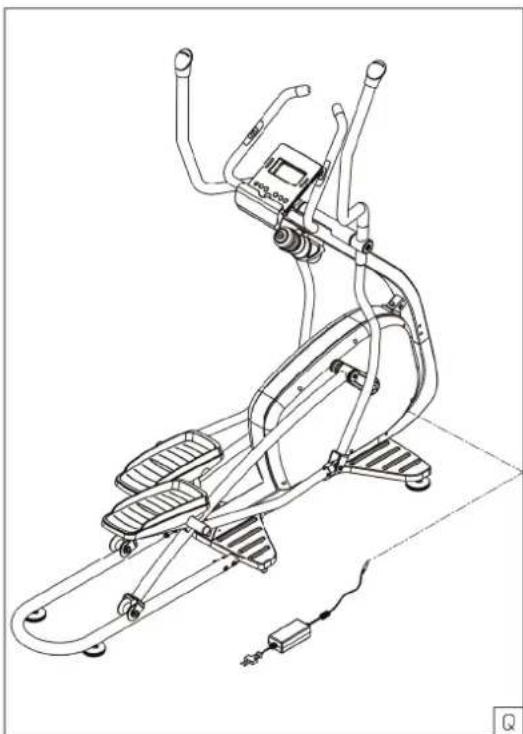
Find power input up front.
Use
Adjusting the support feet
The equipment is equipped with 4 support feet. If the equipment is not stable, the support feet can be adjusted.
- Turn the support feet as required to put the equipment in a stable position.
- Tighten the locknuts to lock the support feet.

NOTE
The machine is the most stable when all support feet are turned fully in. Therefore start to level the machine by turning all support feet fully in, before turning out the required support feet to stable the machine.
Workouts
The workout must be suitably light, but of long duration. Aerobic exercise is based on improving the body's maximum oxygen uptake, which in turn improves endurance and fitness. You should perspire, but you should not get out of breath during the workout.
To reach and maintain a basic fitness level, exercise at least three times a week, 30 minutes at a time. Increase the number of exercise sessions to improve your fitness level. It is worthwhile to combine regular exercise with a healthy diet. A person committed to dieting should exercise daily, at first 30 minutes or less at a time, gradually increasing the daily workout time to one hour.
Start your workout at low speed and low resistance to prevent the cardiovascular system from being subjected to excessive strain. As the fitness level improves, speed and resistance can be increased gradually. The efficiency of your exercise can be measured by monitoring your heart rate and your pulse rate.
Pulse rate measurement
(hand pulse sensors)
The pulse rate is measured by sensors in the handlebars when the user is touching both sensors at the same time.

WARNING
Heart rate monitoring systems may be inaccurate. Over exercise may result in serious injury or death. If you feel faint stop exercising immediately.
Most accurate pulse measurement is achieved when the skin is slightly moist and constantly touching the hand pulse sensors. If the skin is too dry or too moist, the pulse rate measurement might become less accurate.

NOTE
Do not use the hand pulse sensors in combination with a heart rate chest belt. If you set a heart rate limit for your workout, an alarm will sound when it is exceeded.
Heart rate measurement
(heart rate chest belt)
The most accurate heart rate measurement is achieved with a heart rate chest belt. The heart rate is measured by a heart rate receiver in combination with a heart rate transmitter belt. Accurate heart measurement requires that the electrodes on the transmitter belt are slight moist and constantly touching the skin. If the electrodes are too dry or too moist, the heart rate measurement might become less accurate.

WARNING
If you have a pacemaker, consult a physician before using a heart rate chest belt.

CAUTION
If there are several heart rate measurement devices next to each other, make sure that the distance between them is at least 2 meter.
If there is only one heart rate receiver and several heart rate transmitters, make sure that only one person with a transmitter is within transmission range.

NOTE
- Do not use a heart rate chest belt in combination with the hand pulse sensors.
Always wear the heart rate chest belt under your clothes directly in contact with your skin. Do not wear the heart rate chest belt above your clothes. If you wear the heart rate chest belt above your clothes, there will be no signal.
If you set a heart rate limit for your workout, an alarm will sound when it is exceeded.
The transmitter transmits the heart rate to the console up to a distance of 1,5 meter. If the electrodes are not moist, the heart rate will not appear on the display. - Some fibres in clothes (e.g. polyester, polyamide) create static electricity which can prevent accurate heart rate measurement.
- Mobile phones, televisions and other electrical appliances create an electromagnetic field which can prevent accurate heart rate measurement.
Maximum heart rate
(during training)
The maximum heart rate is the highest heart rate a person can safely achieve through exercise stress. The following formula is used to calculate the average maximum heart rate: 220 - AGE. The maximum heart rate varies from person to person.

WARNING
Make sure that you do not exceed your maximum heart rate during your workout. If you belong to a risk group, consult a physician.
Beginner: (50-60% of max. heart rate) Suitable for beginners, weight-watchers, convalescents and persons who have not exercised for a long time. Exercise at least three times a week, 30 minutes at a time.
Advance: (60-70% or max. heart rate) Suitable for persons who want to improve and maintain fitness. Exercise at least three times a week, 30 minutes at a time.
Expert: (70-80% or max. heart rate) Suitable for the fittest of persons who are used to long-endurance workouts.
User interface
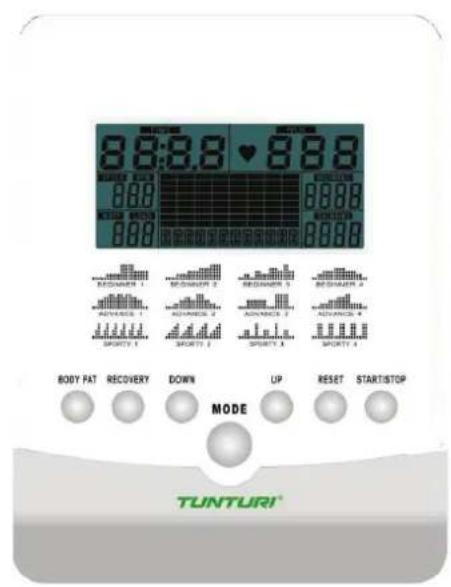
Display functions
Time window :
Shows workout time during exercise
Range: 0:00 ~ 99:59
Speed window :
Shows actual speed during exercise
Range: 0.0 99.9
RPM window :
Shows revolutions per minute during exercise
Range: 0 999
Watt window :
Shows workout watt power during exercise.
In watt program ode, console will show preset watt value.
Setting range: 0 350
Pulse window :
Shows pulse in bpm during exercise
Distance window :
Shows workout distance during exercise.
Range: 0.0 ~99.9
Calories window :
Shows burned calories during exercise
Range: 0~999
Key functions
Body fat key :
Test body fat in % and BMI.
Recovery key :
Test heart rate recovery status.
Down key :
Decrease resistance level during workout.
In setting selection lower value.
Mode key :
Confirm setting or selection
Up key :
Increase resistance level during workout. In setting selection upper value.
Reset key :
When press and hold for 2 seconds, display will reboot and start from main menu. (all shown data will be lost)
Reverse to main menu during presetting workout value or stop mode
Start/stopkey:
Start workout when in idle mode.
Stop/ pause workout when in active mode.
Extra functions
- Choose settings for units by using the Metric/ Imperial switch located on the back cover of the console Console needs to reboot to apply the change.
- When setting one or more targets, the target value starts to count up when reached "0"
Programs
- Power on the display or use reset key function to go to main menu.
- Press Up key or Down Key to select workout program.
Available programs are: Quick start, Manual, beginner, Advance, Sporty, Cardio and Watt program.
Manual mode
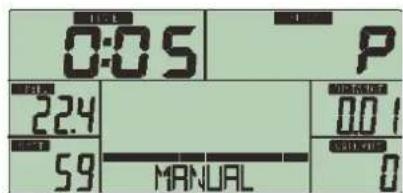
For Quick start you can
- Press Start/ stop key to start workout without any preset setting..
During workout you can press Up/Down key to adjust resistance level.
Quick start mode stops when, no input for longer than 4 minutes or when Start/stop key is pressed.
When settings in manual mode are required than you;
- Press Up/ Down key to select workout program, choose Manual mode and press mode key to enter next setting entry for manual mode program.
- Press Up/ Down key to preset training time, and press Mode key to confirm the setting.
After confirm you can set also (also): distance, Calories, and Pulse.

Note:
When setting more than one goal, the training will end at first achieved goal. Leave a goal blank and it will not be seen as a preset limit.
- Press Start/ Stop key to start workout
- Press Up/ Down key to adjust resistance level
- Press Start/ stop key to pause workout.
- Press Reset key to return to main menu. (active training data will be lost)
Beginner mode
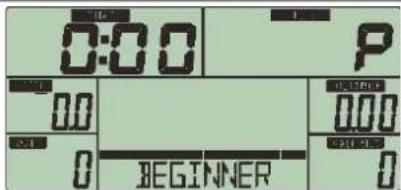
- Press Up/ Down key to select workout program, choose beginner mode and press Mode key to enter next setting menu for beginner mode.
There can be 4 beginner modes selected: beginner 1, beginner 2, beginner 3, and beginner 4. Select one by using the Up/Down key and confirm selected by pressing Mode key.
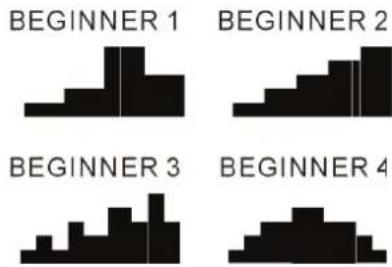
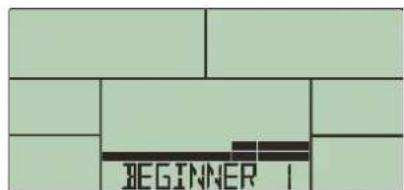
- Press Up/ Down key to preset training time, and press Mode key to confirm the setting.
After confirm you can set also (also): distance, Calories, and Pulse.

When setting more than one goal, the training will end at first achieved goal. Leave a goal blank and it will not be seen as a preset limit.
- Press Start/ Stop key to start workout
- Press Up/ Down key to adjust resistance level
- Press Start/ stop key to pause workout.
- Press Reset key to return to main menu. (active training data will be lost)
Advance mode
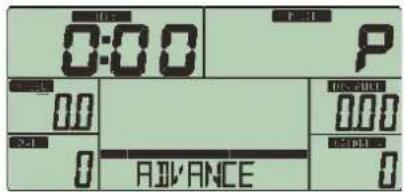
- Press Up/ Down key to select workout program, choose advance mode and press Mode key to enter next setting menu for advance mode.
- There can be 4 advance modes selected: advance 1, advance 2, advance 3, and advance 4. Select one by using the Up/Down key and confirm selected by pressing Mode key.
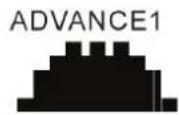

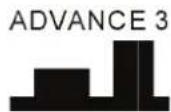
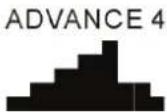
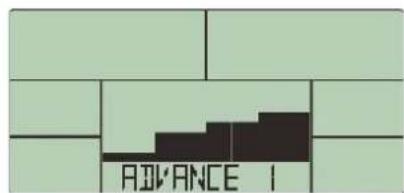
- Press Up/ Down key to preset training time, and press Mode key to confirm the setting.
After confirm you can set also (also): distance, Calories, and Pulse.

When setting more than one goal, the training will end at first achieved goal. Leave a goal blank and it will not be seen as a preset limit.
- Press Start/ Stop key to start workout
- Press Up/ Down key to adjust resistance level
- Press Start/ stop key to pause workout.
- Press Reset key to return to main menu. (active training data will be lost)
Sporty mode
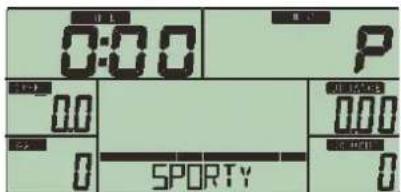
- Press Up/ Down key to select workout program, choose sporty mode and press Mode key to enter next setting menu for sporty mode.
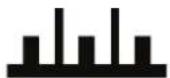
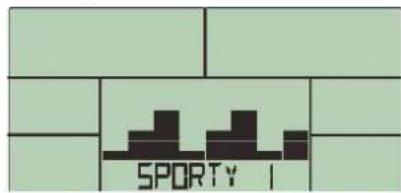
- There can be 4 Sporty modes selected: sporty 1, sporty 2, sporty 3, and sporty 4. Select one by using the Up key or Down key and confirm selected by pressing Mode key.
SPORTY1
SPORTY 2
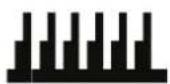
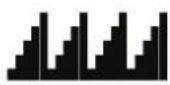
SPORTY 3
SPORTY 4
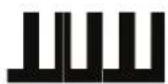
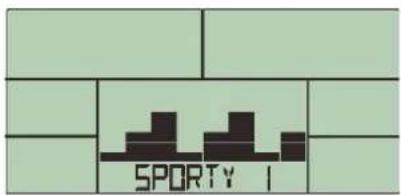
- Press Up/ Down key to preset training time, and press Mode key to confirm the setting.
After confirm you can set also (also): distance, Calories, and Pulse.

te:
When setting more than one goal, the training will end at first achieved goal. Leave a goal blank and it will not be seen as a preset limit.
- Press Start/ Stop key to start workout
- Press Up/ Down key to adjust resistance level
- Press Start/ stop key to pause workout.
- Press Reset key to return to main menu. (active training data will be lost)
Cardio mode
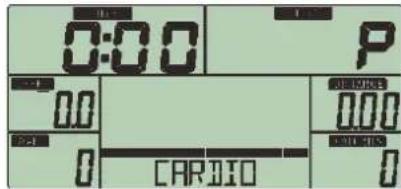
- Press Up/ Down key to select workout program, choose cardio mode and press Mode key to enter next setting menu for advance mode.
- Press Up/ Down key to set your age and confirm by pressing mode key.
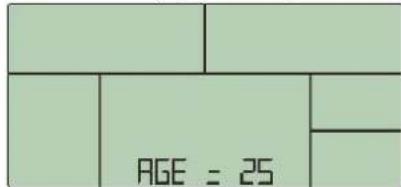
- There can be 4 cardio modes selected: 55% , 75% , 90% or TAG (target heart rate) default set on 100 (us Up/ Down key to change, and confirm by pressing mode key). Select one by using the Up/ Down key and confirm selected by pressing Mode key.
- Press Up/ Down key to preset training time, and press Mode key to confirm the setting.
- Press Start/ stop key to pause workout.
- Press Reset key to return to main menu. (active training data will be lost)

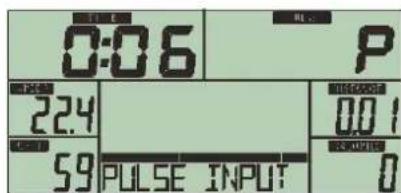
After 6 seconds without pulse input, LCD will show "Pulse Input" to notify the user.
Watt mode
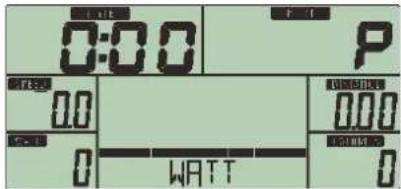
- Press Up/ Down key to select workout program, choose watt mode and press Mode key to enter next setting menu for advance mode.
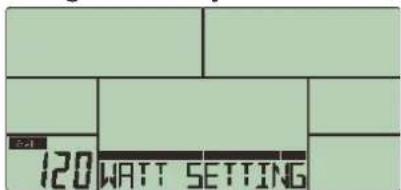
- Press Up/ Down key to set watt target (default set on 120) and confirm by pressing mode key.
- Press Up/ Down key to preset training time, and press Mode key to confirm the setting.
- Console will adjust tension level by the watt target and workout status (rpm)
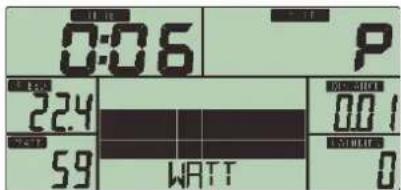
- User can use Up/ Down key to adjust watt target during workout.
- Press Start/ stop key to pause workout.
- Press Reset key to return to main menu. (active training data will be lost)
Body fat
In stop mode, press Body fat key to start this function.
- Set Gender by using Up/ Down key and confirm by Mode key.
- Set Age by using Up/ Down key and confirm by Mode key.
- Set Height by using Up/Down key and confirm by Mode key.
- Set Weight by using Up/ Down key and confirm by Mode key.
After confirm user must grab and hold both hand pulse sensors.

Note:
If hand grips are grabbed incorrectly, display cannot read and show "---" "---". re grab hand pulse sensors again to see if improves.
When console can read the display will show a progress bar.
display will show after finished body fat in percentage and BMI as a number by turns in every 3 seconds.
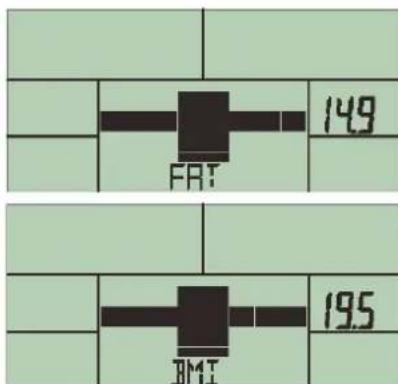

Note:
Error codes in body fat program are:
LCD show "----" : hand grips search for reading
E1: There is no heart rate signal input detected for at least 5 seconds.
E4: Occurs when FAT% is below 5% or exceeds 50%. Occurs when BMI result is below 5 or exceeds 50.
Recovery
After exercising for a period of time, keep holding on hand grips until display shows the actual pulse reading.
- Press Recovery key, and re grab hand grips
- All display functions will stop except "TIME" that will start counting down from 00:60 to 00:00.
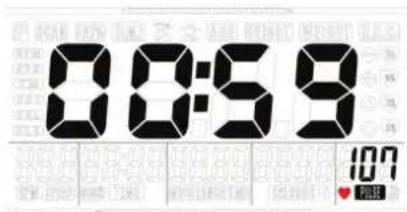
LCD will display your heart rate recovery status with the F1, F2...to F6.
F1 is the best result and F6 is the worst. Press the RECOVERY button again to return the main display.
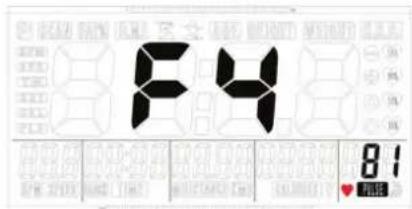

During the recovery time, re-press "RECOVERY" and console will go back to previous page.
Cleaning and maintenance
Defects and malfunctions Despite continuous quality control, defects and malfunctions caused by individual parts can occur in the equipment. In most cases, it will be sufficient to replace the defective part.
If the equipment does not function properly, immediately contact the dealer.
- Provide the model number and the serial number of the equipment to the dealer. State the nature of the problem, conditions of use and purchase date.
Transport and storage

WARNING
Carry and move the equipment with at least two persons.
- Remain standing in front of the equipment on each side and take a sturdy grip at the handlebars. Lift the front of the equipment so as to lift the rear of the equipment on the wheels. Move the equipment and carefully put the equipment down. Place the equipment on a protective base to prevent damage to the floor surface.
- Move the equipment carefully over uneven surfaces. Do not move the equipment upstairs using the wheels, but carry the equipment by the handlebars.
- Store the equipment in a dry place with as little temperature variation as possible.
Disclaimer
2014 Tunturi Fitness BV. All rights reserved
The product and the manual are subject to change. Specifications can be changed without further notice
Warranty
The product has a warranty from the date of delivery (to be documented by invoice or delivery note). Further information on warranty terms can be obtained from your local dealer. The warranty terms may vary from one country to another. Damages caused by normal wear, overloading or improper handling are excluded from the warranty. Damages caused by material or manufacturing faults are covered by the warranty and will repaired or replaced at no cost.
Index
WILLKOMMEN 18
| M8*55 CARRIAGE BOLTS | 4 | |||
| M8*16*1.2 WASHER | 28 | |||
| M8 NYLON NUT | 10 | |||
| M8*50mm ALLEN HEAD SCREW | 6 | |||
| M8 SPRING WASHER | 20 | |||
| M8*20mm ALLEN HEAD BOLT | 10 | |||
| M8*15mm ALLEN HEAD BOLT | 4 | |||
| M8*25mm ALLEN HEAD BOLT | 2 | |||
| M8*41.7*5 | 2 | |||
| M8*25mm ALLEN I CAD DOLT | 4 | |||
| M8*38*2.0mm WASHER | 2 | |||
| M5*19*1.5mm WASHER | 8 | |||
| M5 SPRING WASHER | 8 | |||
| M5*12mm SCREW | 8 | |||
| M8*28*2.0mm WASHER | 2 | |||
| M8*55 CARRIAGE BOLTS | 4 | |||
| M8*16*1.2 WASHER | 28 | |||
| M8 NYLON NUT | 10 | |||
| M8*36mm ALLEN HEAD SCREW | 6 | |||
| M8 SPRING WASHER | 20 | |||
| M8*20mm ALLEN HEAD BOLT | 10 | |||
| M8*15mm ALLEN HEAD BOLT | 4 | |||
| M8*25mm ALLEN HEAD BOLT | 2 | |||
| M8*41.7"5 | 2 | |||
| M8*25mm ALLEN HEAD BOLT | 4 | |||
| M8*38*2.0mm WASHER | 2 | |||
| M5*19*1.5mm WASHER | 8 | |||
| M5 SPRING WASHER | 8 | |||
| M5*12mm SCREW | 8 | |||
| M8*28*2.0mm WASHER | 2 | |||
VEILIGHEIDS WAARSCHUWINGEN 51
MONTAGE 53
| M8*55 CARRIAGE BOLTS | 4 | ||||
| M8*16*1.2 WASHER | 28 | ||||
| M8 NYLON NUT | 10 | ||||
| M8*56mm ALLEN HEAD SCREW | 6 | ||||
| M8 SPRING WASHER | 20 | ||||
| M8*20mm ALLEN HEAD BOLT | 10 | ||||
| M8*15mm ALLEN HEAD BOLT | 4 | ||||
| M8*25mm ALLEN HEAD BOLT | 2 | ||||
| M8*41.7*5 | 2 | ||||
| M8*25mm ALLEN HEAD DOLT | 4 | ||||
| M8*38*2.0mm WASHER | 2 | ||||
| M5*19*1.5mm WASHER | 8 | ||||
| M5 SPRING WASHER | 8 | ||||
| M5*12mm SCREW | 8 | ||||
| M8*28*2.0mm WASHER | 2 | ||||
| 1/1 | 1 | ||||
Watt program 1 (10 - 350 Watt)
Hrc programs 4 (55% / 75% / 90% + target)
Recovery HR 1
Max HR. 1
Quick start/ manual 1
Body fat ^+ bmi 1
User register
Fitness test Body fat BMI
Recovery
Control buttons. Yes
ERGONOMICS
Handlebar ... Fixed, Multi Grip
Bottle holder .Option
HR chest belt .........Option (5,4 kHz)
HR hand sensor Yes
Transport wheels
QUALITY
Operating environment .Home
En-957 class HB
Parts list
| NO. | Description Q'TY |
| 1 | Base frame 1 |
| 2 | Front post 1 |
| 3 | Handlebar (LH) 1 |
| 4 | Handlebar (RH) 1 |
| 5 | Upper swivel handlebar (LH) 1 |
| 6 | Upper swivel handlebar (RH) 1 |
| 7 | Carriage bolt (M8x55) 4 |
| 9 | Pedal post (LH) 1 |
| 10 | Pedal post (RH) 1 |
| 11 | Crank arm 2 |
| 12 | Outer pedal post (LH) 1 |
| 13 | Outer pedal post (RH) 1 |
| 14 | U shape rail 1 |
| 15 | Side cover metal strip 1 |
| 16 | Pivot shaft 1 |
| 17 | Pedal fix bracket 2 |
| 18 | Drive belt (Poly-V) 1 |
| 19 | Servo motor 1 |
| 20 | PH machine screw (M6x12) 4 |
| 21 | Rear stabilzier 1 |
| 22 | Self-align bearing 2 |
| 23 | Height adjust foot 6 |
| 24 | Oval end cap 4 |
| 25 | Fix handlebar foam grip 2 |
| 26 | Fix handlebar end cap 2 |
| 27 | Wh nut 2 |
| 28 | Flat washer (M10xø21x2t) 2 |
| 29 | C12 clip 2 |
| 30 | Grub screw (M6x15) 2 |
| 31 | Flywheel shaft 1 |
| 32 | Flywheel 1 |
| 33 | Idle wheel bracket 1 |
| 34 | Large spring 1 |
| 35 | Bearing (6203zz) 2 |
| 36 | C17 clip 1 |
| 37 | Hex taper nut (m6) 1 |
| 38 | Flat washer (M6xø16x1.2t) 4 |
| 39 | Rubber washer (M7) 1 |
| 40 | Nyloc nut (M6) 5 |
| 41 | Hex head bolt (M6x60) 1 |
| 42 | Magnet shoe assembly 1 |
| 43 | Press spring 1 |
| 44 | Wire rop 1 |
| 45 Hex head bolt (M8x52) | 1 | |
| 46 PH self tapping screw (M4x20) | 14 | |
| 47 Sensor wire | 1 | |
| 48 PH self tapping screw (6/32x12l) | 1 | |
| 49 Hex head bolt (M6x16) | 4 | |
| 50 Do wire | 1 | |
| 51 Lower U.I. wire | 1 | |
| 52 Upper U.I. wire | 1 | |
| 53 Hand pulse wire | 2 | |
| 54 Round allen head bolt (M8x25mm) | 4 | |
| 55 Sw handlebar foam grip | 2 | |
| 56 Sw handlebar end cap | 2 | |
| 57 Lower swivel handlebar (LH) 1 | ||
| 58 Lower swivel handlebar (RH) 1 | ||
| 59 Pedal | 2 | |
| 60 Front stabilizer | 1 | |
| 61 Spring washer (M8) | 24 | |
| 62 Screw (8/32*5/8") 4 | ||
| 63 Adaptor (6V DC/ 0.5A) | 1 | |
| 64 PH machine screw (M5x12) | 8 | |
| 65 Hand pulse sensor w/o wire | 2 | |
| 66 Flat washer (m8xø38x2t) | 2 | |
| 67 Plug axle support | 2 | |
| 68 Wave washer (ø20) | 2 | |
| 69 Bearing (6004zz) | 6 | |
| 70 Metal plate for sw handlebar | 2 | |
| 71 Dc cover | 1 | |
| 72 Cap of dc cover | 1 | |
| 73 Screw (M6*15) | 2 | |
| 74 plug axle support (inner) | 4 | |
| 75 Plug axle support | 4 | |
| 76 Self-align-bearing bush | 4 | |
| 77 Bearing (6001zz) | 6 | |
| 78 Roller | 2 | |
| 79 Roller shaft | 2 | |
| 80 Side cover (LH) 1 | ||
| 81 Side cover (RH) 1 | ||
| 82 Pulley | 1 | |
| 83 Pulley shaft | 1 | |
| 84 C20 clip | 2 | |
| 85 Sensor bracket | 1 | |
| 86 Cover clip m4 | 14 | |
| 87 Round allen head bolt (m8x20) | 4 |
| 88 Screw (M8x30) 2 | |
| 89 Key way (8*8*28l) 2 | |
| 90 Round allen head bolt (M8x56) 6 | |
| 92 Flat washer (M8xø16x1.2t) 35 | |
| 93 Round allen head bolt (M8x15) 4 | |
| 94 Nyloc nut (M8) 10 | |
| 95 Round allen head bolt (M8x20) 4 | |
| 96 PH self tapping screw (M4x15) 2 | |
| 97 Screw (M8x25) 2 | |
| 98 Sw handlebar bushing 4 | |
| 99 PH machine screw (M5x12) 6 | |
| 100 Round allen head bolt (M8x20) 10 | |
| 101 Flat wahser (m8xø28x2.0t) 2 | |
| 102 Flat wahser (m5xø19x1.5t) 8 | |
| 103 Spring washer (M5) 8 | |
| 104 Nyloc nut (M8) 1 | |
| 105 User interface 1 | |
| 107 Spacer bushing 3 | |
| 108 Hex head bolt (M6x14) 3 | |
| 110 Magnet 1 | |
| 111 Screw (M5x12) 4 | |
| 112 Console bracket 1 | |
| 113 Screw (M6x12) 2 | |
| 114 Nylon nut (M6) 2 | |
| 115 Hex nut (3/8-16) 6 | |
| 117 Screw (M8x15) 3 | |
| 118 Adhesive tape 1 |
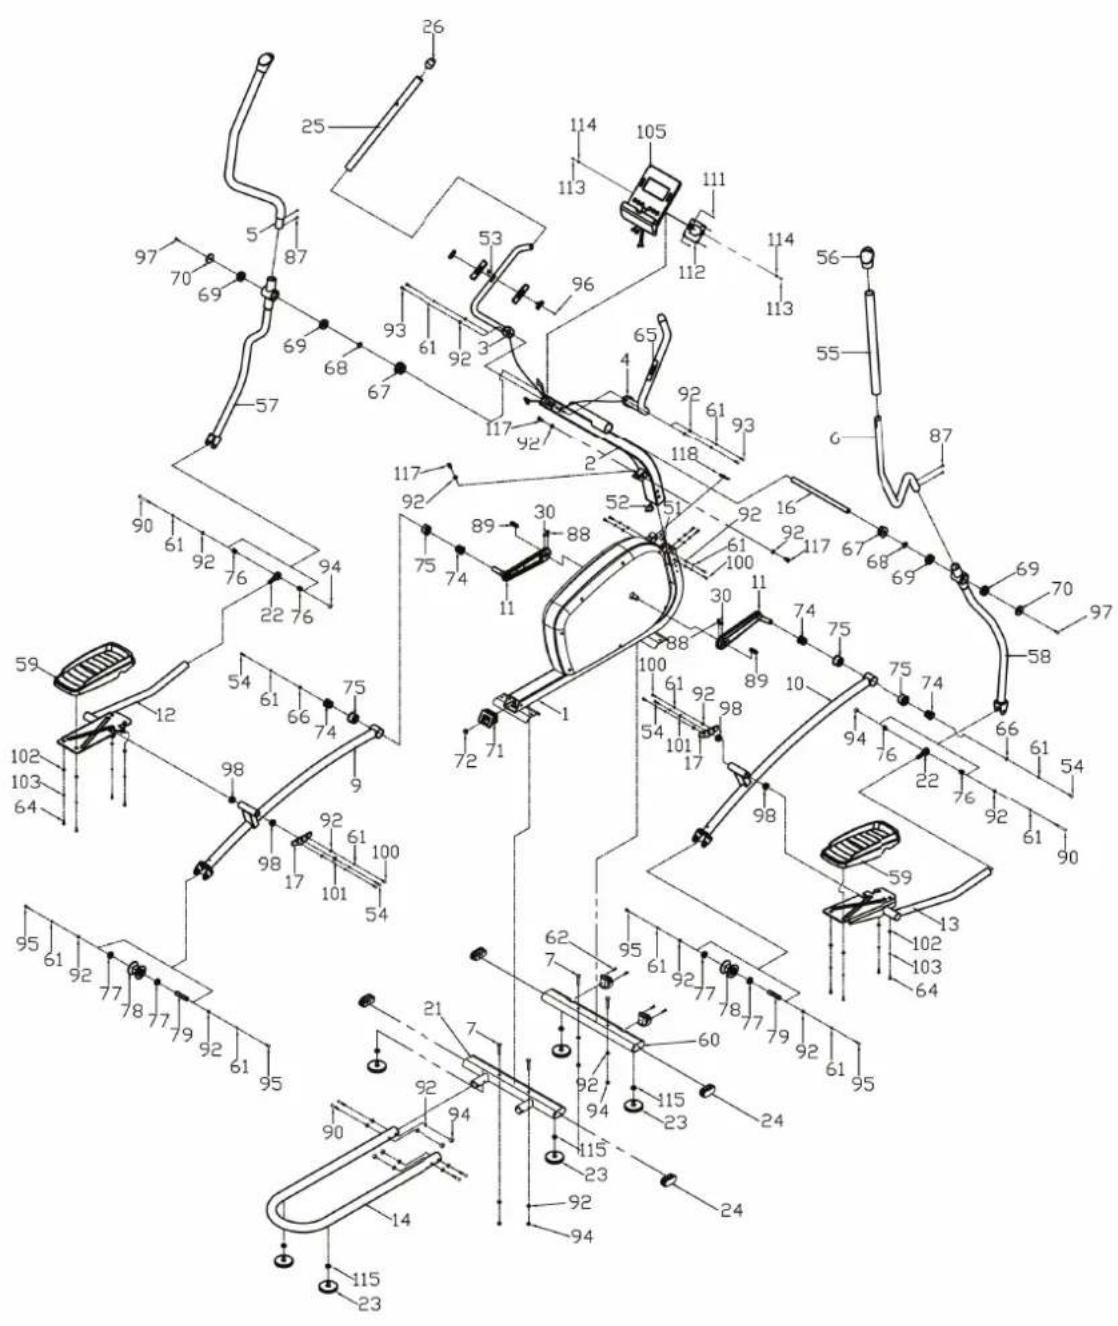
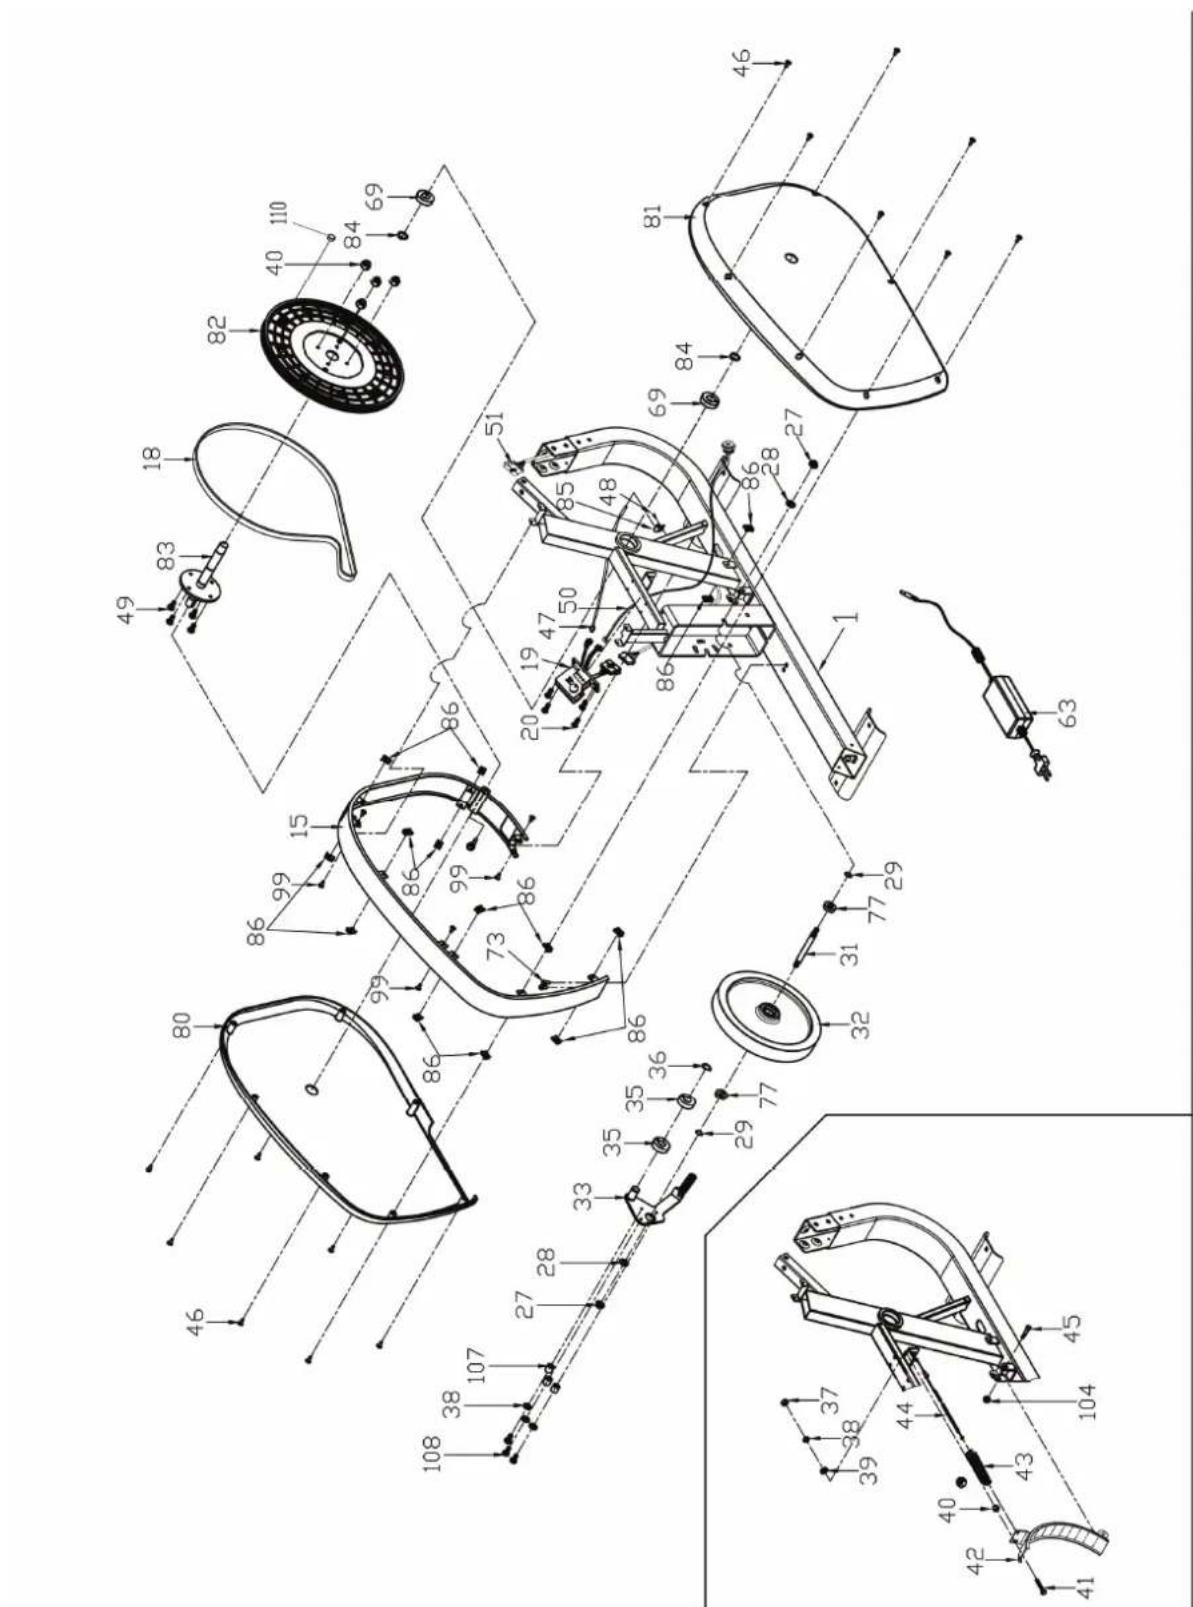
Owner's manual. Pure 2.1
