Ibis - Wheelchair Handicare - Free user manual and instructions
Find the device manual for free Ibis Handicare in PDF.
Frequently Asked Questions - Ibis Handicare
User questions about Ibis Handicare
0 question about this device. Answer the ones you know or ask your own.
Ask a new question about this device
Download the instructions for your Wheelchair in PDF format for free! Find your manual Ibis - Handicare and take your electronic device back in hand. On this page are published all the documents necessary for the use of your device. Ibis by Handicare.
USER MANUAL Ibis Handicare
natural_image
Exterior view of a modern wheelchair with adjustable arms and wheels (no text or symbols visible)
natural_image
Black and white photo of a modern wheelchair with adjustable armrest and wheels (no text or symbols visible)Nederlands 4
English 24
Français 44
Deutsch....65
Nederlands
© 2008 Handicare
text_image
A B C D E Etext_image
K C B F D L A I J H E Gtext_image
Technical diagram of a wheelchair with labeled parts from top to bottom, including wheelbase and seat components.3 Gebruik
text_image
Technical diagram of a wheelchair with labeled parts B and directional arrows indicating motion or assembly.
natural_image
Line drawing of a wheelchair with wheels and seat, showing a horizontal measurement of height (no text or symbols)Helling afrijden

natural_image
Technical line drawing of a vehicle's wheel assembly with two wheels and a handle (no text or symbols)
natural_image
Illustration of two individuals in mobility gear, one using a seatbelt and the other in a wheelchair, with a checkmark indicating the correct stance (no text or symbols on the figures themselves)
natural_image
Illustration of two people using mobility equipment, one in a wheelchair and the other in a wheelchair, with no visible text or symbols.text_image
Technical diagram of a vehicle chassis with labeled components A and B, showing structural parts and directional arrows indicating motion or movement.Wielpositie

text_image
Technical diagram of a bicycle suspension system with labeled components A and B, showing mechanical assembly and directional arrows.
text_image
BRem
text_image
24" 22" 20"
natural_image
Technical line drawing of a mechanical device with labeled component D (no text or symbols beyond label)
text_image
A D B C 010507010All rights reserved.
The information provided herein may not be reproduced and/or published in any form, by print, photoprint, microfilm or any other means whatsoever (electronically or mechanically) without the prior written authorization of Handicare.
The information provided is based on general data concerning the constructions known at the time of the publication of this manual. Handicare executes a policy of continuous improvement and reserves the right to changes and modifications.
The information provided is valid for the product in its standard version. Handicare cannot be held liable for possible damage resulting from specifications of the product deviating from the standard configuration.
The available information has been prepared with all possible diligence, but Handicare cannot be held liable for possible errors in the information or the consequences thereof. Handicare accepts no liability for loss resulting from work executed by third parties.
Names, trade names, etc. used by Handicare may not, as per the legislation concerning the protection of trade names, be considered as being available.
2008-01
Introduction......26
This manual 26
Product reference 26
Service and technical support....26
Identification plate....26
Approval 27
CE declaration of conformity 27
Warranty 27
Liability 29
Used wheelchairs and the environment 29
1 Safety....30
1.1 General safety instructions....30
1.2 Decals and instructions on the wheelchair 30
2 General description ....31
2.1 Product description 31
2.2 Main components....31
3 Operating instructions ....32
3.1 Inspection before use....32
3.2 Getting in and out....32
3.3 Parking....32
3.4 Driving....33
3.5 Obstacles 34
3.6 Slopes....34
3.7 Transport of the wheelchair (without occupant) 35
3.8 The wheelchair as a passenger seat in a car 35
3.9 Fastening the seat belt....37
3.10 Adjustment options (dealer) 38
3.11 Adjustment options (user) 40
4 Maintenance 42
4.1 Maintenance table 42
4.2 Checking and inflating the tyres 42
4.3 Cleaning the wheelchair....42
5 Technical specifications ....43
Introduction
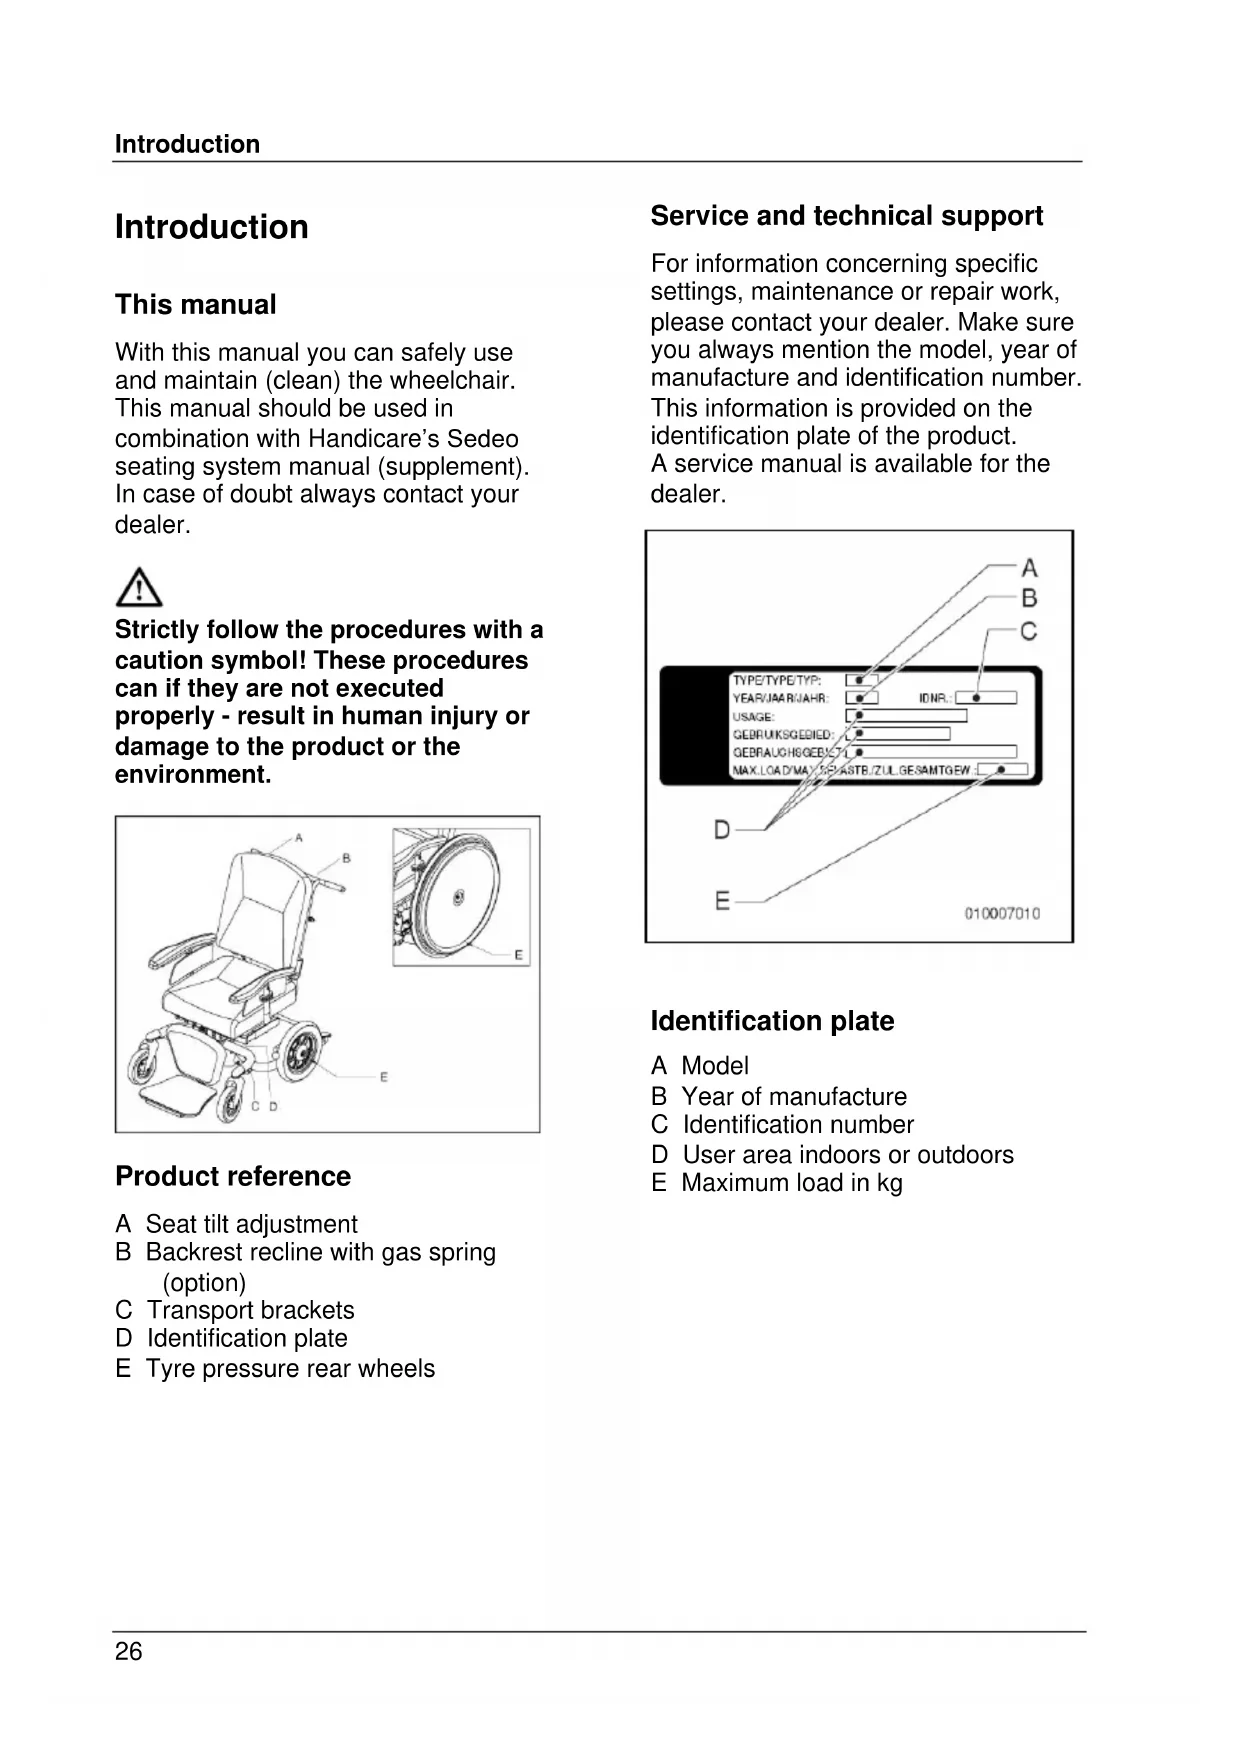
This manual
With this manual you can safely use and maintain (clean) the wheelchair. This manual should be used in combination with Handicare's Sedeo seating system manual (supplement). In case of doubt always contact your dealer.

Strictly follow the procedures with a caution symbol! These procedures can if they are not executed properly - result in human injury or damage to the product or the environment.
text_image
Technical diagram of a wheelchair with labeled parts A, B, C, D, E and an inset view of the wheel assembly.Product reference
A Seat tilt adjustment
B Backrest recline with gas spring (option)
C Transport brackets
D Identification plate
E Tyre pressure rear wheels
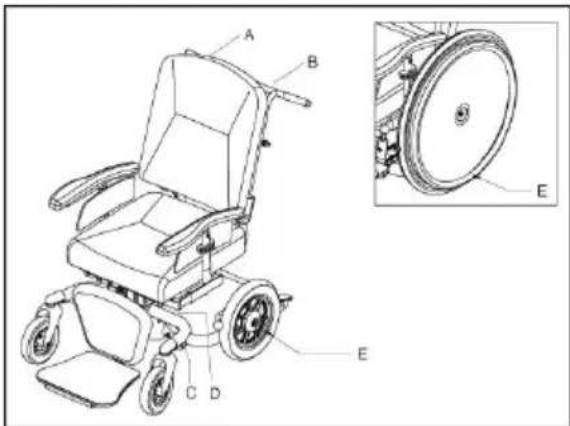
Service and technical support
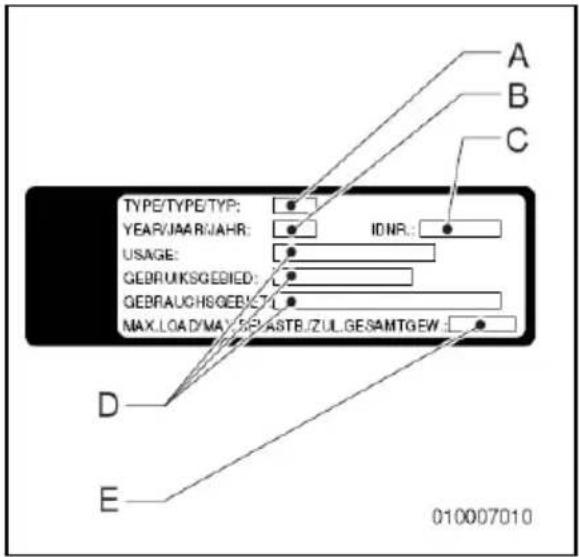
For information concerning specific settings, maintenance or repair work, please contact your dealer. Make sure you always mention the model, year of manufacture and identification number. This information is provided on the identification plate of the product. A service manual is available for the dealer.
text_image
TYPE/TYPE/TYP: YEAR/JAAR/AHR: IDNR: USAGE: GEBRUKSGEDIED: GEBRAUCHS/GEBICYL MAX.LOAD/MAY/SPIASTB/ZUL.GESAMTGEW: D E 010007010Identification plate
A Model
B Year of manufacture
C Identification number
D User area indoors or outdoors
E Maximum load in kg
Approval
The product meets the following standards:
- EN12183 (1999) Hand-operated wheelchairs.
- ISO7176-8 Requirements for impact, static and fatigue strength.
- ISO7176-9 Climate tests for wheelchairs and scooters.
- ISO7176-16 Requirements of resistance to fire.
- ISO 7176-19 Crash test.
CE declaration of conformity

The product is in conformity with the provisions of the Medical Devices Directive and thus has CE marking.
Warranty
In the following warranty and liability stipulations the terms and definitions as summed up hereafter must be explained as follows:
- Product: The hand-operated or electric wheelchair or scooter manufactured and delivered by Handicare.
- Customer: The person who directly obtains a Product from Handicare.
- Dealer: The person who delivers a Product obtained from Handicare to customers or third parties.
- User: The person who uses a Product manufactured by Handicare.
Irrespective of what is determined concerning warranty conditions applicable to the Product, in any case the following applies with regard to the warranty:
- Except insofar as described otherwise Handicare guarantees the Product for its suitability for the purpose for which the Product is
intended - all of these points as described in this manual - and for the quality of the material of which the Product is made and the manner in which the Product is manufactured.
-
Repairs or replacement of parts of the Product that may be necessary as a result of faults that are based on qualitatively faulty material or manufacturing errors will be executed free of charge, as long as such faults occurred within one (1) year after the date of delivery of the Product to the Customer. The parts to be replaced must be shipped post-paid to Handicare. Disassembly or assembly of these parts is for the expense of the Customer. Therefore the following cases are not eligible for free repair or replacement as meant above:
-
The repair or replacement that is necessary in connection with faults that arise after one (1) year after the date of delivery of the Product to the Customer;
- The repair or replacement that is required in connection with faults due to improper or careless use of the Product or that are based on the Product being used for another purpose than the one for which it is intended, in which regard it applies that if the Customer is a Dealer, this Dealer will indemnify Handicare against possible claims from Users or other third parties for faults based on an incorrect or careless use of the Product;
- Parts that are subject to wear, and the need for repair or replacement of the parts are the actual consequence of normal wear.
-
Irrespective of that stipulated under 2, it applies as far as an electric Product is concerned that with regard to the battery that forms part of the Product warranty is only given in case of faults or non-functioning of the battery that are demonstrably the direct consequence of material or manufacturing errors. A fault or non-functioning of the battery as a result of normal wear is not covered by the warranty as meant in these warranty stipulations. Similarly not covered by the warranty are faults or non-functioning that are the consequence of improper or unprofessional use of the Product or the battery that is part of the Product, including the incorrect charging of the battery and the failure to carry out timely and good maintenance, in which context it also applies that if the Customer is a Dealer, this Dealer will indemnify Handicare against possible claims from Users or other third parties that are based on the above mentioned improper or unprofessional use of the Product or the battery that is part of the Product.
-
The warranty conditions as mentioned in above stipulations in any case become null and void if:
-
The guidelines of Handicare for the maintenance of the Product are not, or insufficiently, followed;
- A necessary repair or replacement of parts is based on neglect, damage or abuse of the Product or a use of the Product for another purpose than the one for which it was intended;
- Parts of the Product are replaced by parts of another
origin than those which Handicare uses and/or parts of the Product are replaced without the permission of Handicare.
-
The warranties as mentioned in stipulations 1 through 3 also become null and void if what is involved is re-used by a new user within the warranty period and that such re-use necessitates adaptations to the product and those adaptations are carried out without the instructions and/or at the order of Handicare.
-
To retain rights under the above delineated warranties the Customer must, in case of damage or other calamities, as rapidly as possible contact Handicare and inform them as fully as possible. The possibility of taking recourse to the above-mentioned warranty conditions becomes null and void for the Customer in any case after 20 workdays after the claim situation or the calamity arises that was the reason for the recourse to the guarantee.
-
The replacement of a part or the repair or the reconditioning of the Product within a current warranty period does not extend the warranty period.
-
Handicare gives no warranty on repair to or reconditioning of the Product carried out other than under order of and/or at the instructions of Handicare. If repairs and/or reconditioning are executed by or on behalf of a Customer, the Customer indemnifies Handicare with respect to the claims of third parties who result, in the broadest sense of the word, from such repairs or reconditioning.
Liability
Irrespective of what is determined regarding liability in the general conditions applicable to the Product, with regard to liability in any case the following applies:
-
Taking into consideration the following stipulations, Handicare only accepts liability for loss due to death or physical injury that is the result of a defect in the Product for which Handicare is responsible and for damage to another object that is the private property of the user of the Product, as long as said loss is the direct result of a fault in the Product.
-
Handicare accepts no other or further liability than delineated under 1. In particular Handicare accepts no liability for consequential damage, in any form whatsoever.
Used wheelchairs and the environment

If your wheelchair has become superfluous or needs to be replaced, it can usually be taken back by your dealer. If this is not possible, please contact your local authorities for the possibilities of recycling or an environmentally friendly way of disposing of the used materials. For the production of the wheelchair several plastics and metals have been used.
1 Safety
Handicare accepts no liability whatsoever for damage or injury caused by the failure to (strictly) adhere to the safety guidelines and instructions or else due to carelessness during the use and cleaning of the wheelchair and possible accessories. Depending on the specific work circumstances or the accessories used, additional safety instructions may be required. Please contact your dealer immediately if you observe a potential danger during the use of the product.
1.1 General safety instructions

- The user of the wheelchair is at all times fully responsible for the fulfilment of the locally applicable safety regulations and guidelines.
- The technical specifications must not be altered.
- Modifications to (parts of) the wheelchair are not permitted.
1.2 Decals and instructions on the wheelchair

- Signs, symbols and instructions placed on this wheelchair comprise part of its safety facilities. They must never be covered or removed and must remain present and clearly legible throughout the entire lifespan of the wheelchair.
- Immediately replace or repair illegible or damaged signs, symbols and instructions. Contact your dealer with regard to this.
2 General description
2.1 Product description
The Ibis is a range of wheelchairs designed for users who need excellent seating posture and maximum comfort. Every model in the Ibis range has tilt-in-space adjustment, allowing the user to rest in the wheelchair.
The Ibis provides a range that extends from a push wheelchair (12"/16" rear wheels) and manual or foot-propelling wheelchair (20"/22"/24" rear wheels) for use in and around the house. As a result, a wheelchair offering maximum comfort and safety is available for every situation.
Depending on the model, the user will be able to push the wheelchair or an attendant will be required to push and operate the wheelchair.
The frame height of the wheelchair can easily be adjusted, ensuring a ideal seat height for everyone. Additionally, the seating system can be fully customized to satisfy the specific wishes and requirements of the individual.
De Ibis has been designed for:
- Transport of persons to a maximum weight of 160 kg.
- Use on paved roads, sidewalks, foot- and bicycle paths.
• Use in and around the house.
If you use the wheelchair for other purposes than those for which it is intended, Handicare accepts no liability whatsoever for damage or injury resulting from such use other than for which the wheelchair was developed and designed.

Please study this manual carefully before you use the wheelchair.
text_image
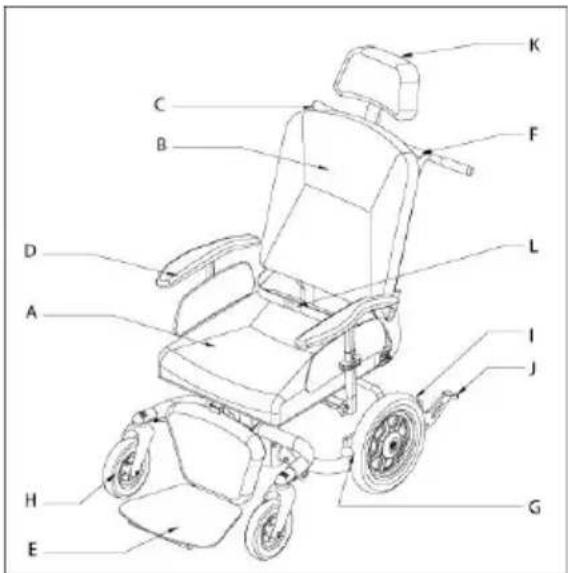
E H A D B C K F L I J G2.2 Main components
A Seat
B Backrest
C Seat tilt adjustment
D Armrest
E Legrest
F Push bracket
G Brake
H Castor wheels
I Rear wheels
J Anti-tip brackets
K Headrest (option)
L Lap belt, to be provided by the dealer (option)

text_image
Technical diagram of a wheelchair with labeled parts from top to bottom, including wheelbase and seat components.3 Operating instructions
3.1 Inspection before use
Check if the tyres are sufficiently inflated before you start using the wheelchair.
3.2 Getting in and out
Forward transfer

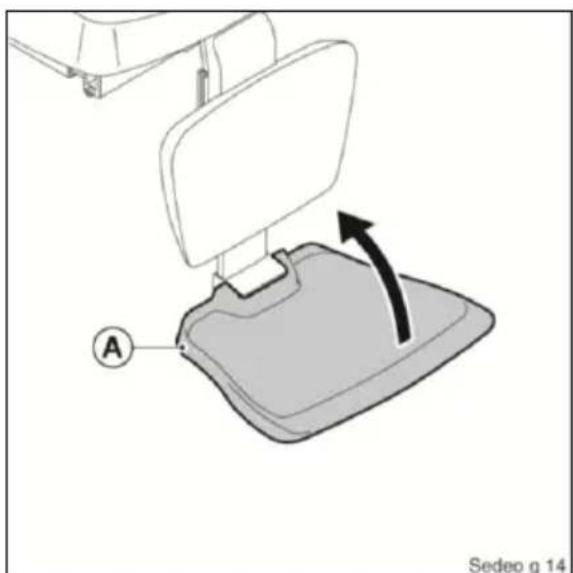
Do not stand on the footplates. Putting your full weight on the footplates may lead to wheelchair damage and to hazardous situations, including the wheelchair tipping up.
text_image
A Sedeo g 14Flipping up the central legrest footplate
Flip up (A).
Sideways transfer

Some versions of the controller will need to be swung aside.
text_image
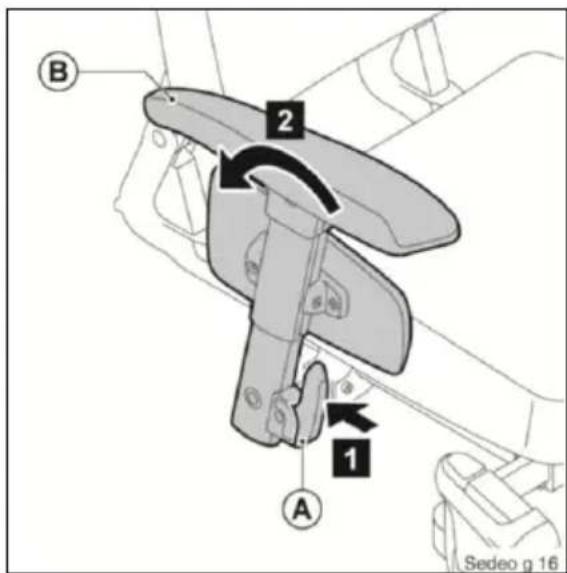
B 2 1 A Sedeo g 16Folding back the armrest assembly Press (A) and fold (B) to the rear.

- Remove the tray before folding back the armrest assembly.
- Do not lean on the armrest when folded back.
3.3 Parking
12"/16" rear wheels
Apply the brake to the wheelchair by pushing the footbrake (A) downward or pulling the handle (B) backward.
text_image
B A20"/22"/24" rear wheels
Apply the brake to the wheelchair by pushing the handle (B) downward.
text_image
Technical diagram of a wheelchair with labeled parts B and directional arrows indicating motion or assembly.
• Make sure the brake handle is pushed all the way backward while driving the wheelchair, so that the brake cannot be applied accidentally.
- If the wheelchair is stopped on a slope, the brake should be applied to prevent the wheelchair from moving down the slope.
3.4 Driving

- As a wheelchair user, you could be vulnerable in traffic. When travelling in or across a road, keep in mind that other traffic participants may not always notice you. Keep to the applicable traffic regulations.
- Avoid out-of-the way routes, so that help can be on its way quickly when needed.
Push the wheelchair (12"/16")
- Adjust the height of the push handles.
- Release the brake from the rear wheels.
- The wheelchair can now be pushed.
Foot propelling the wheelchair (20"/22"/24")
- Release the brake from the rear wheels.
- Take the hoops of the rear wheels and push the hoops forward or backward with your hands.
- The wheelchair can also be moved by foot-propelling.
Braking (20"/22"/24")
Tightly grasp both hoops.

By braking this way, friction is caused between your hands and the hoops, which will create heat. If you brake too fast, your hands may become very hot.

Miscellaneous
- Drive carefully on slippery roads, resulting from rain, ice or snow!
- Prevent the wheelchair from coming into contact with seawater: seawater is caustic and may damage the wheelchair.
-
Prevent the scooter from coming into contact with sand: sand may can affect the moving parts of the wheelchair, resulting in unnecessarily rapid wear.
-
Do not put the wheelchair in direct sunlight: the upholstery may become too hot, which may cause burning or an allergic reaction of the skin.
- Do not drive the wheelchair when you are under the influence of drugs, alcohol or medication that could affect your ability to drive.
- You must have sufficient eye sight to be able to safely drive the wheelchair.
- Be sure that no items of clothing hang loose. These could be caught between the wheels.
3.5 Obstacles
The method described below is to be used when the wheelchair is pushed by an attendant and will make the user feel safe.
Driving up obstacles
- Push the kick-tube downward and pull the wheelchair slightly backward, so that the castor wheels are released from the ground.
- Push the wheelchair onto the elevation and release the kick-tube.
- Push the wheelchair further and lift the rear wheels over the obstacle using the push bracket.

- Always descend from a sidewalk back to front, so that the wheelchair cannot tip over and make the user fall out of the chair.
- Do not drive down stairs.
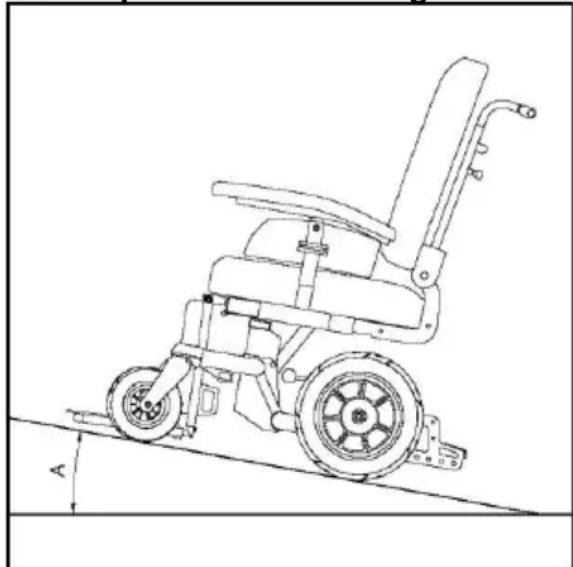
3.6 Slopes
Driving up slopes

- Slopes with an angle of more than 5^ must not be taken.
- If you move the wheelchair yourself, always make sure that you hold on to the hoops, so the wheelchair cannot start to move by itself.
- The wheelchair is less stable on a slope.
- Do not drive on slopes when the seat is tilted.
- The attendant pushing the wheelchair must continue to push to prevent the wheelchair from moving downhill on its own accord.
- Apply the brake of the wheelchair if it is not pushed or not pushed hard enough.
natural_image
Line drawing of a wheelchair with wheels and seat, showing a horizontal ramp and vertical load (no text or symbols)Driving down slopes

- The wheelchair will start to move by itself, caused by gravity.
- If you push the wheelchair yourself, use both hands to control the speed with the hoops.
- The attendant pushing the chair must hold on to the push handles to apply some brake force.
- Prevent the wheelchair from gaining too much speed.
3.7 Transport of the wheelchair (without occupant)

Parts of the wheelchair that can easily be detached should be removed when transporting the wheelchair
Reducing the wheelchair
- Remove the seat
- Remove the legrests
- Remove the armrests
- Fold down the backrest

Seating system)
Store these parts securely. Use suitable ramps for wheeling the chair in and out of the vehicle. Once the wheelchair is in the vehicle, it must be secured with an ISO 10542 approved tie-down system that is suited to the weight of that particular wheelchair including any options
3.8 The wheelchair as a passenger seat in a car

This wheelchair is crashtested according to ISO 7176-19 (2008) with a maximum passenger weight of 160 kg.
Wheelchairs are not primarily designed to be used as car seats and cannot offer the same degree of safety offered by standard car seats, no matter how securely they have been tied down in the vehicle concerned.
Due attention should be paid to the following points when a transfer from the wheelchair to a standard car seat is not possible.
The wheelchair can be used as a passenger seat in a car or bus by using a 4-point integrated transport tie-down system that has been approved to ISO 10542. standards. Make sure that this restraint system is suitable to the total weight of the wheelchair. The weight of a wheelchair depends on its configuration. The specifications give an overview of several options and their share in the total weight. Always weigh the total chair to make sure that the right restraint system is used.
natural_image
Technical line drawing of a vehicle chassis with two wheels and mechanical components (no text or symbols)The system requires tie-down rails to be mounted in the car. The chair must then always be strapped to the four tie-down points.

- Transfer to a regular car seat if possible
- Use for the fixation of the occupant a 3 point occupant restraint system. Always follow the instructions of this system.
- Always ask the transporter for confirmation that the vehicle is suitably designed, insured and equipped for transporting a person in a wheelchair.
- The wheelchair must be positioned in the vehicle so that it is facing forwards.
- The wheelchair has been dynamically tested in a forward-facing orientation with the test dummy restrained by both pelvic and shoulder belts (e.g. a shoulder belt as part of a three-point belt restraint).
- Both pelvic- and shoulder-belt restraints should be used to reduce the possibility of head and chest impacts with vehicle components.
-
Wheelchair mounted trays should:
-
be removed and secured separately in the vehicle
- be secured to the wheelchair but positioned away from the occupant with energy-absorbing padding placed between the tray and the occupant.
- Set the wheelchair in the standard position and use the headrest if the wheelchair is fitted with one.
- The chair must always be switched off when being transported.
- Support and positioning equipment must not be used as seat belts if not labelled as being in accordance with the requirements of ISO 7176/19
- No changes may be made to the tie-down points/car restraining points on the wheelchair, or to the design of the frame without consulting the manufacturer.
- The wheelchair should be inspected by a Handicare's representative before reuse following involvement in any type of vehicle collision.
- Care should be taken when applying the occupant restraint to position the seatbelt buckle so that the release button will not be contacted by wheelchair components during crash.
The wheelchair has been tested in accordance with ISO 7176-19 (2008). Test dummy weight 102 kg.
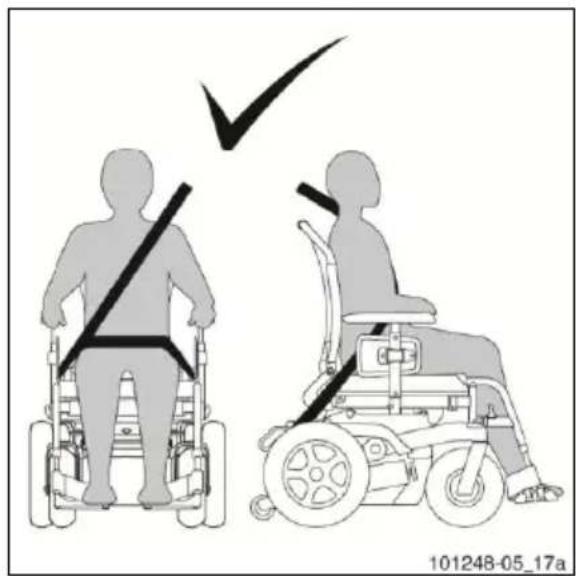
3.9 Fastening the seat belt

- Use the three-point seat belt in order to reduce the risk of head and chest injuries in the event of the wheelchair colliding with parts of the car.
- The wheelchair should always be inspected by a representative of the manufacturer following any kind of collision.
Use the seat belt as follows:
- Position the belt across the hips as tightly as possible at an angle between 30° and 75°. The other part of the belt is positioned to sit across the chest and shoulder.
- The seat belt should fit as tightly as possible and must not be twisted.
- Ensure that the seat belt is not
obstructed from having contact with the body by wheelchair parts, such as armrests or wheels.
text_image
101248-05_17a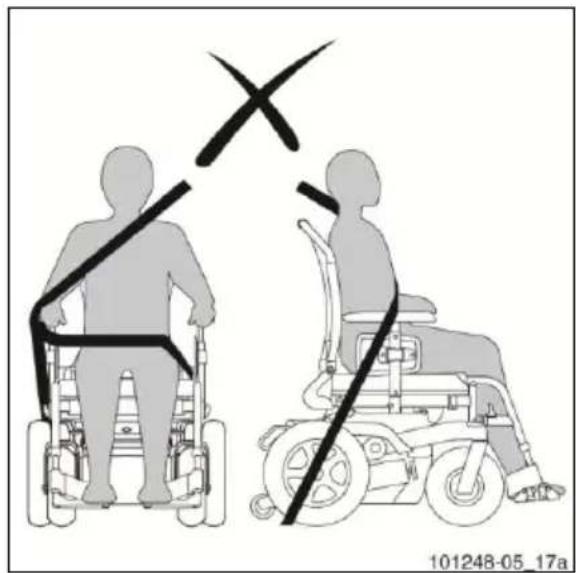
text_image
101248-05_17aTrays fitted to the wheelchair which do not comply with safety requirements must be:
- Removed and secured separately in the vehicle.
- Secured to the wheelchair, with shock-absorbing padding placed between the tray and the user.
In order to prevent injury in the event of a collision, secure wheelchair accessories to the wheelchair or remove them from the chair and secure them in the vehicle.
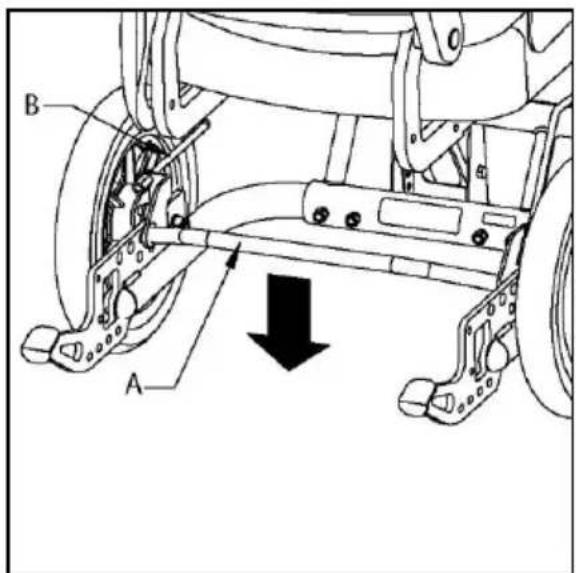
3.10 Adjustment options (dealer)

The seat tilt range can vary depending on the way the wheelchair is adjusted.
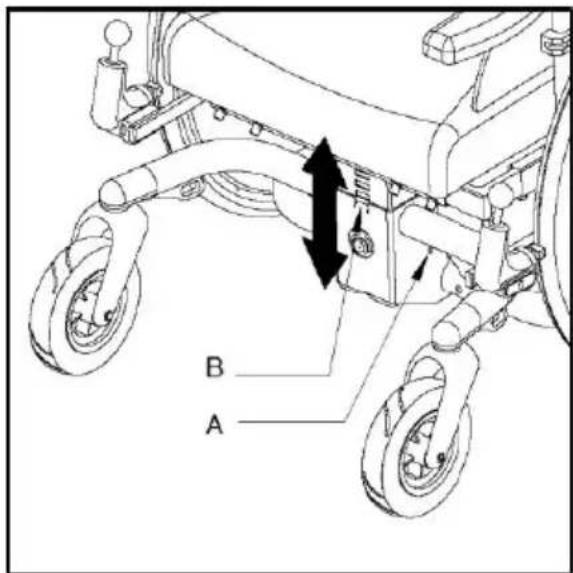
Seat height
Before adjusting the seat height, remove as many heavy seat parts as possible (seat, backrest, etc.) to limit the weight to be lifted.
- Loosen the 4 bolts (A) using a 13 mm spanner, and remove them.
- Lift the seat post off the bracket (B) and place it back in the desired position on the bracket.
- Tighten the bolts (A) securely.
Seat angle
- Tilt the seat with the seat tilt adjustment, so that the adjusting plate becomes free.
- Loosen the bolt (A) with a 4 mm Allen key, and remove it.
- Loosen the bolt (B) a few turns.
- Turn the plate © in the desired position (angle).
- Tighten both bolts (A and B) securely.
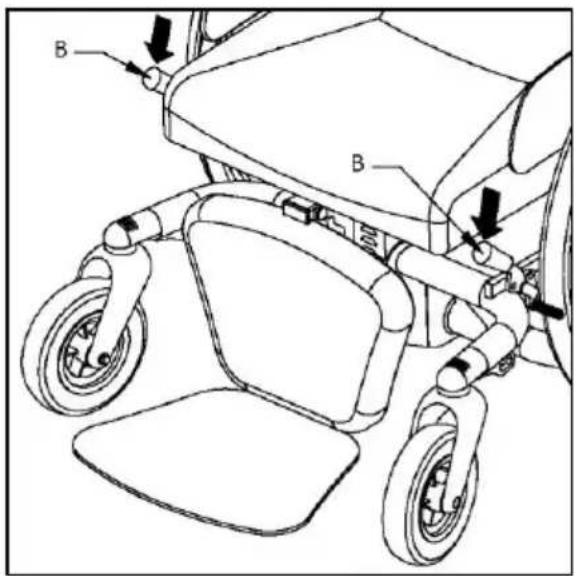
Frame width (20"/22"/24")
- Loosen the bolts (A) with a 13 mm spanner and remove them.
- Put the frame tube (B) in the desired position, so that the holes are level with the frame.
- Tighten the bolts (A) securely.
text_image
B A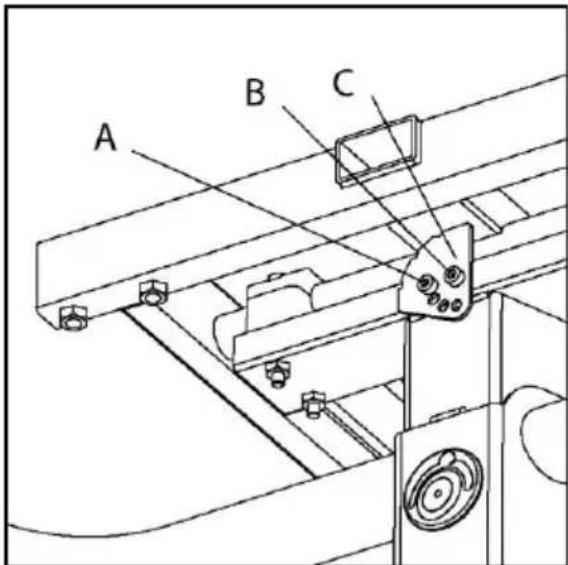
text_image
A B C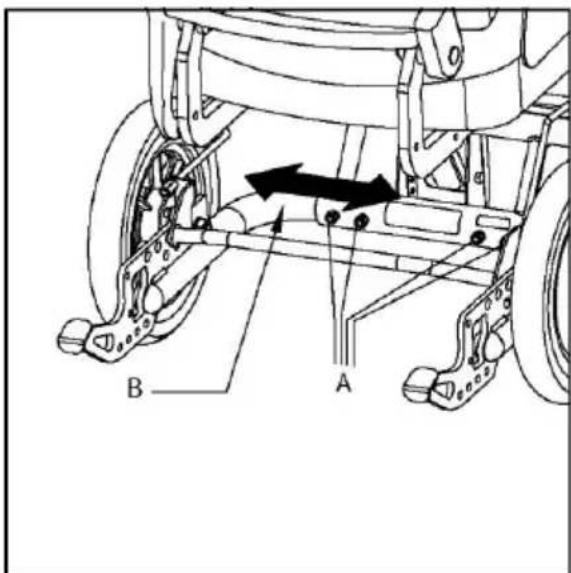
text_image
A BPosition of the wheels

- Changing the position of the wheels may affect the stability of the wheelchair. Check the stability of the chair and make sure the anti-tip brackets are well adjusted.
- Check the brake.
12"/16" rear wheels
- Put the frame on a solid base, so that the wheels are off the ground.
- Remove the manual control (A).
- Remove the foot bracket (B).
- Loosen the nut (C) with a 19mm spanner.
- Move the wheel into the desired position.
- Tighten the nut (C) securely.
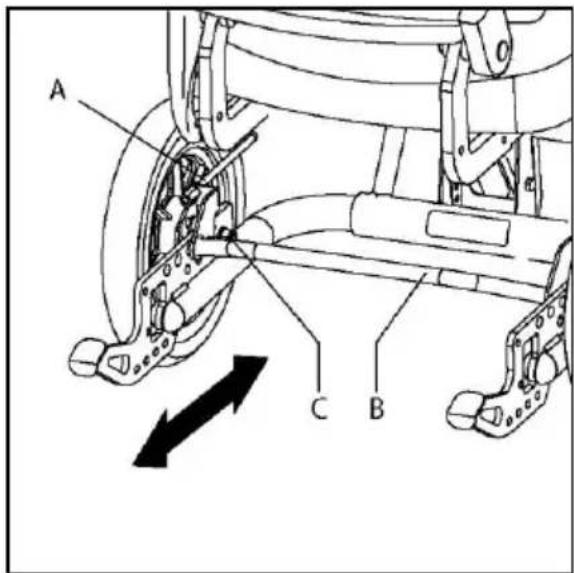
20"/22"/24" rear wheels
- Put the frame on a solid base, so that the wheels are off the ground.
- Loosen the bolts (A) with a 19 mm spanner and remove them.
- Move the wheel plate (B) into the desired position.
- Tighten the bolts (A) securely.
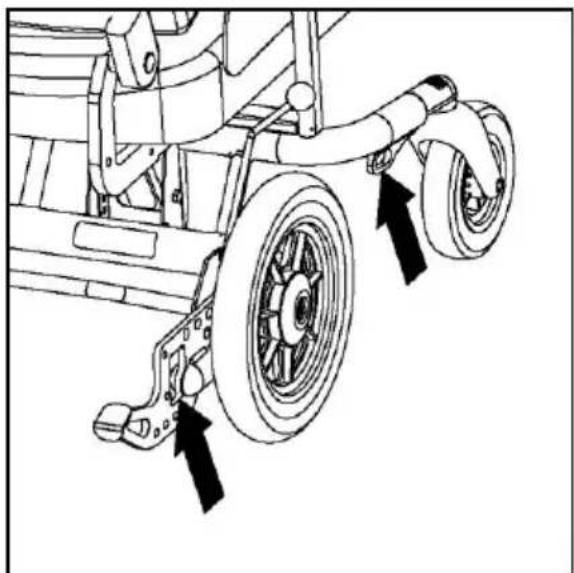
Anti-tip brackets
- Loosen the bolts (B).
- Put the anti-tip brackets in the desired position.
- Tighten the bolts (B) securely.

Check if the anti-tip brackets work properly.
text_image
A C B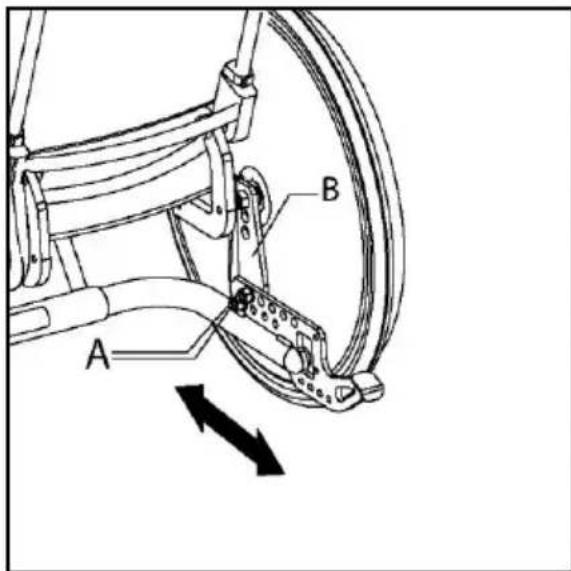
text_image
Technical diagram of a bicycle suspension system with labeled components A and B, showing mechanical assembly and directional arrows.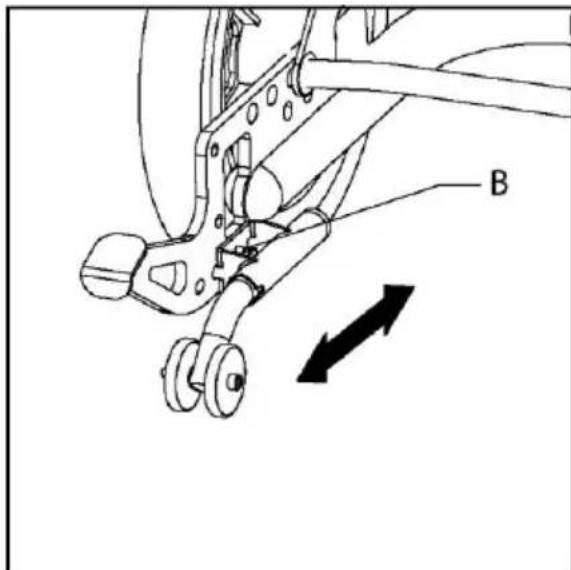
text_image
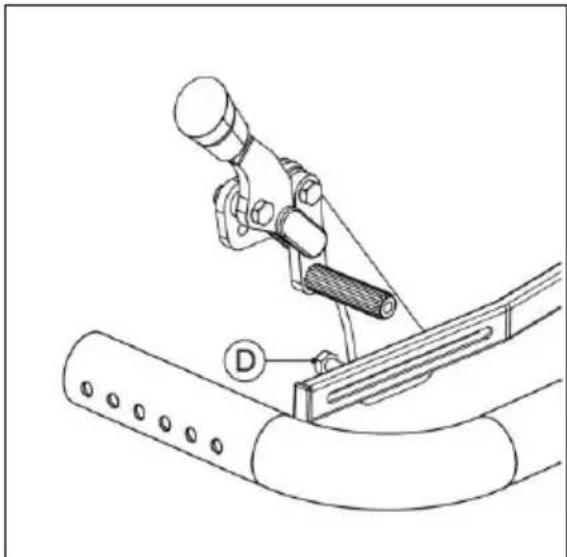
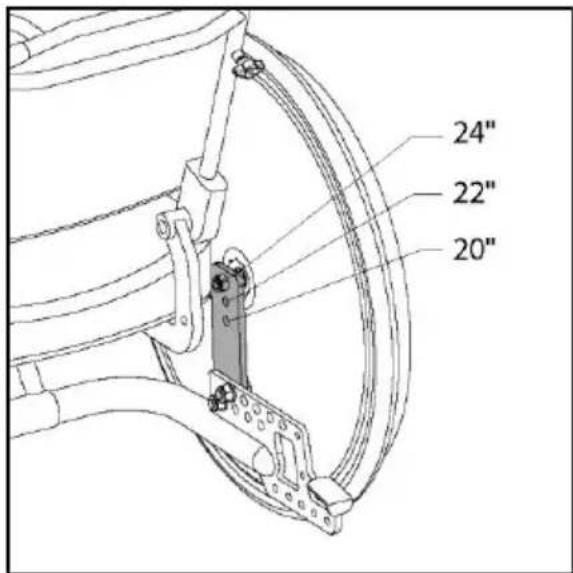
BBrake
For the various wheel sizes, specific holes are available.

Readjust the brake, so that the brake power is sufficient.
- Loosen the Allen bolt (D) a few turns with a 15 mm Allen key.
- Put the brake in the desired position.
- Tighten the Allen bolt (D) securely.

Check the brake.
3.11 Adjustment options (user)
Seat tilt adjustment
- Apply the wheelchair brake.
- Grasp the push handles of the push bracket and squeeze the handle (A).
- Push the push handles downward until the desired angle is reached.
text_image
24" 22" 20"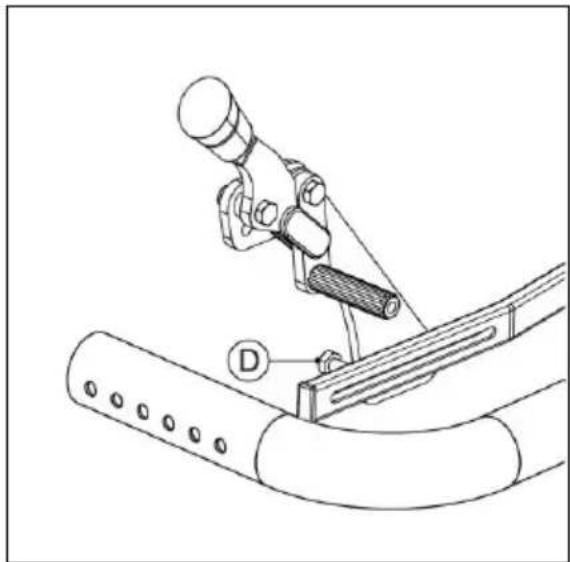
natural_image
Technical line drawing of a mechanical device with labeled component D (no text or symbols beyond label)
text_image
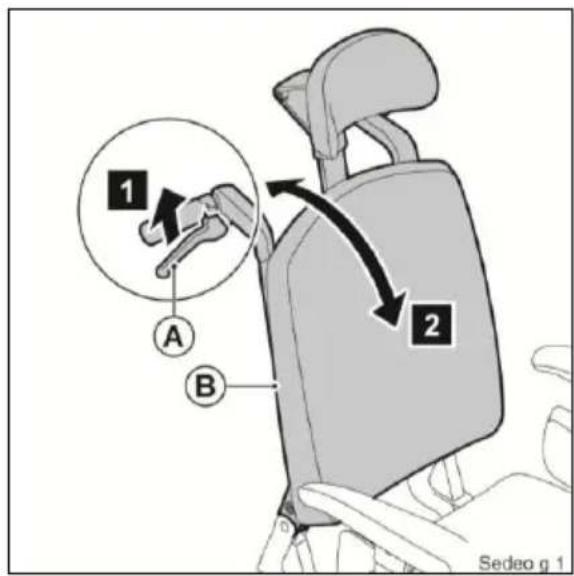
A D B C 010507010Manually recling backrest (by attendant)
- Squeeze (A).
- Adjust (B) to the desired position.

Keep squeezing (A)
- Release (A).
Manually recling backrest (by user)
- Squeeze (A).
- Lean forwards or backwards to adjust (B) to the desired position.

Keep squeezing (A).
- Release (A).
Push handle height
- Loosen (A) by one turn.
- Slide (B) into the desired position.
- Tighten (A).

The seat tilt adjustment cable should not be too tight.
text_image
1 A B 2 Sedeo g 1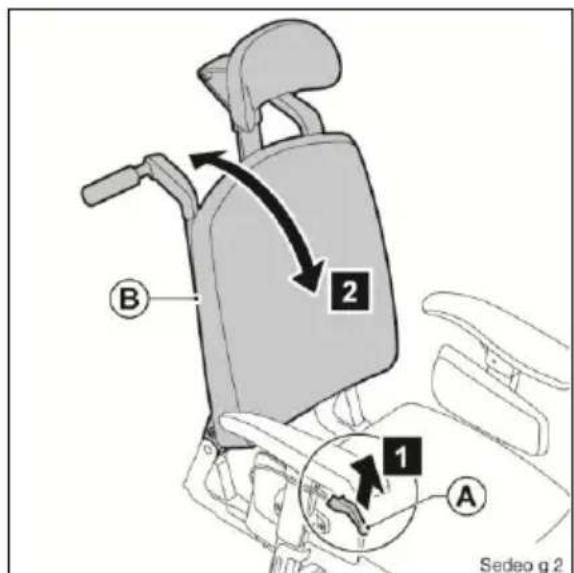
text_image
B 2 1 A Sedeo g 2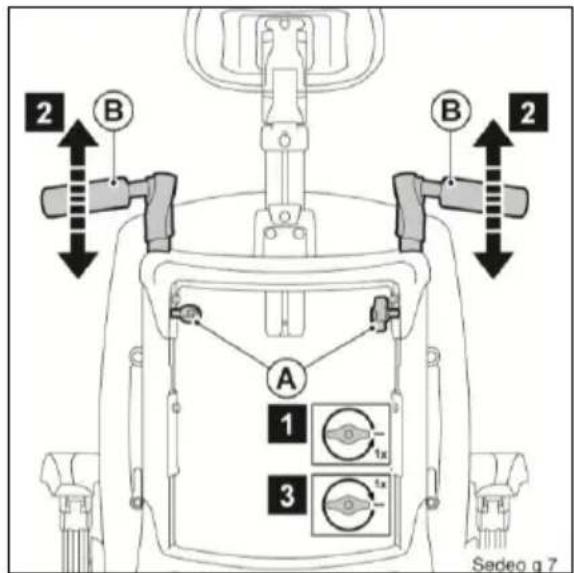
text_image
2 B A 1 3 Sedeo g 74 Maintenance
4.1 Maintenance table
It is recommended to have your wheelchair serviced by your dealer once a year or, in case of intensive use, every six months. The table below shows the maintenance activities you can perform yourself.
| Frequency | Description |
| Weekly | Check tyre pressure and inflate the tyres if necessary. See 4.2 |
| Monthly | Clean the wheelchair. See 4.3. |
| Lubricate the turning system of the seat. |
4.2 Checking and inflating the tyres

- Make sure the tyres are kept at the correct pressure.
- The tyre pressure may never exceed the maximum value indicated on the tyre.
Inflate the tyres with a foot pump or a bicycle pump, in combination with the reducing nipple included in the delivery. You can also have your tyres inflated at your local petrol station.
- Tyre pressure 12" rear wheel: 2.5 bar
4.3 Cleaning the wheelchair
Removing dry dirt
Upholstery, metal parts and frame parts can usually easily be cleaned with a dry soft cloth.
Removing mud and other wet dirt
The dirty parts can best be cleaned by first wiping them with a wet sponge and then wiping them dry with a dry soft cloth.

- Never use abrasive or aggressive cleansers. They can scratch the wheelchair.
- Do not use organic solvents such a thinner, benzene or white spirit.
5 Technical specifications
| Description | ||
| Diameter rear wheels | 12” / 16 | 20” / 22” / 24” |
| Diameter front wheel | 7” | 7” |
| Tyre pressure rear wheels | 2,5 Bar | 7,5 Bar |
| Max. user weight | 160 kg | 160 kg |
| Total length | 1040 mm | 1040 mm |
| Total width | 625 mm | 660-700-740 mm |
| Total weight | 40 kg | 42 kg |
| Total weight of the heaviest part | 26 kg | 28 kg |
| Static stability downward | 15° | 15° |
| Static stability upward | 15° | 15° |
| Static stability sideways | 15° | 15° |
| Seat tilt adjustment | 30° | 30° |
| Seat angle | 0 - 6° | 0 - 6° |
| Effective seat depth | 440 - 600 mm | 440 - 600 mm |
| Effective seat width | 400 - 540 mm | 400 - 540 mm |
| Seat height front | 390 - 540 mm | 390 - 540 mm |
| Backrest angle | 89 - 128° | 89 - 128° |
| Backrest height | 500 - 640 mm | 500 - 640 mm |
| Lower leg length | 360 - 530 mm | 360 - 530 mm |
| Armrest height | 170 - 290 mm | 170 - 290 mm |
| Front armrest (30 cm pad) to backrest | 360 - 500 mm | 360 - 500 mm |
| Front armrest (40 cm pad) to backrest | 390 - 500 mm | 390 - 500 mm |
| Minimum turning radius | 810 mm | 810 mm |
| Ground clearance | 70 mm | 70 mm |
| Push bracket height | 920 - 1250 mm | 920 - 1250 mm |
Français
© 2008 Handicare
text_image
A B C D E Etext_image
Technical diagram of a wheelchair with labeled parts from top to bottom, including head, arm, and legs.text_image
Technical diagram of a wheelchair with labeled parts from E to K, showing directional arrows indicating movement or force.3 Utilisation
natural_image
Line drawing of a wheelchair with wheels and seat, showing a horizontal measurement labeled 'A' (no text or symbols on the diagram itself)Descendre une pente

natural_image
Technical line drawing of a vehicle chassis with two wheels and mechanical components (no text or symbols)
natural_image
Illustration of two people using mobility equipment, one seated in a wheelchair and the other in a wheelchair, with a checkmark indicating the correct position (no text or symbols on figures)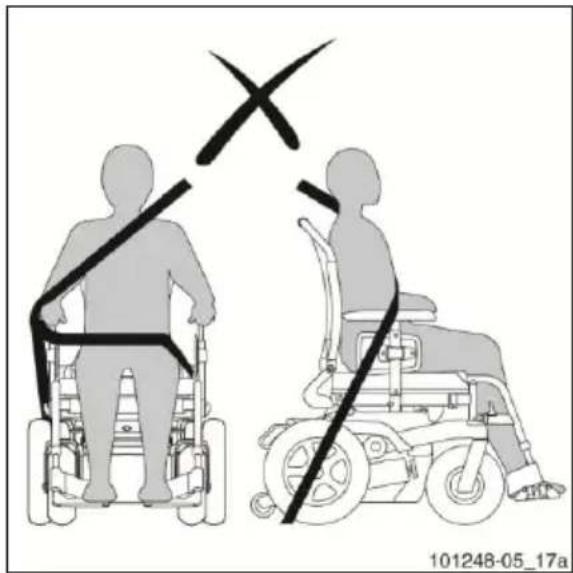
text_image
101248-05_17atext_image
Technical diagram of a vehicle chassis with labeled components A and B, showing structural components and directional arrows indicating motion or movement.Position de roues

text_image
24" 22" 20"
natural_image
Technical line drawing of a mechanical lever assembly with labeled component D (no text or symbols beyond label)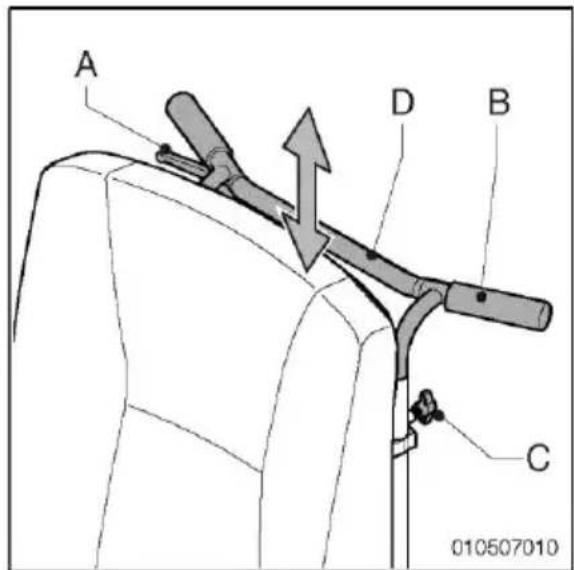
text_image
A D B C 010507010text_image
Technical diagram of a wheelchair with labeled parts A, B, C, D, E and an inset view of the wheel assembly.text_image
K C B F D L A I J H G E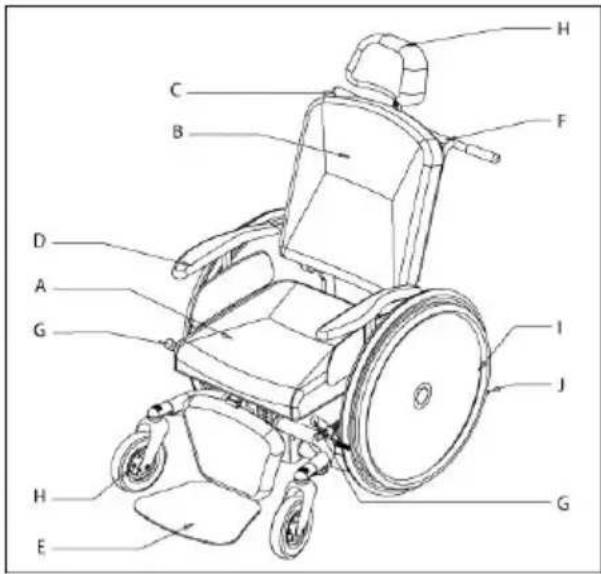
text_image
Technical diagram of a wheelchair with labeled parts from H to Jnatural_image
Line drawing of a wheelchair with wheels and seat, showing a horizontal measurement line labeled 'A' (no text or symbols on the diagram itself)Hänge hinabfahren

natural_image
Technical line drawing of a vehicle's lower body frame with two wheels and a handle, showing mechanical components without any text or symbols.
text_image
Technical diagram of a vehicle chassis with labeled components A and B, showing structural parts and directional arrows indicating movement or force.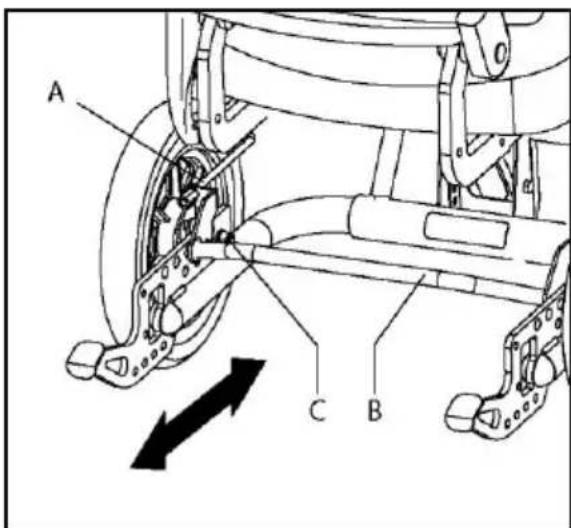
text_image
A C B
text_image
Technical diagram of a bicycle suspension system with labeled components A and B, showing mechanical assembly and directional arrows.Kippschutz
text_image
24" 22" 20"