
PS 705.4 C - Shredder OLYMPIA - Free user manual and instructions
Find the device manual for free PS 705.4 C OLYMPIA in PDF.

| Product Type | Document Shredder |
| Brand | Olympia |
| Model | PS 705.4 C |
| Dimensions (W x D x H) | 365 x 240 x 438 mm |
| Weight | 8 kg |
| Power Supply | 220 V / 50 Hz / 0.7 A |
| Max Power | 160 Watts |
| Manual Feed Capacity | Up to 6 sheets (75 g/m²) |
| Auto Feed Capacity | Up to 60 sheets (75 g/m²) |
| Feed Width | 220 mm |
| Cutting Method | Cross-cut (4 x 23 mm particles) |
| Duty Cycle | 5 minutes continuous |
| Noise Level | ≤ 58 dB(A) |
| Bin Volume | 16 liters |
| Bin Window | Yes |
| Operation Functions | Auto start/stop, reverse, forward |
| Displays | Run, safety open, jam |
| Security Level | P4 |
| Care and Cleaning | Oil cutting head regularly, clean exterior with damp cloth |
| Safety | Safety button, safety cover, motor thermal protection |
| Castors | Yes |
| Warranty | Return to dealer with original packaging and receipt |
Frequently Asked Questions - PS 705.4 C OLYMPIA
User questions about PS 705.4 C OLYMPIA
0 question about this device. Answer the ones you know or ask your own.
Ask a new question about this device
Download the instructions for your Shredder in PDF format for free! Find your manual PS 705.4 C - OLYMPIA and take your electronic device back in hand. On this page are published all the documents necessary for the use of your device. PS 705.4 C by OLYMPIA.
USER MANUAL PS 705.4 C OLYMPIA
natural_image
Two industrial washing machines, one white and one black, displayed against a plain background (no visible text or symbols on the devices themselves)PS 705.4 CC
Operating Instructions ....15
Service-Center Hattingen
Zum Kraftwerk 1
45527 Hattingen
Operating Instructions
[ENGLISH]
10.2013
1 Important Safety Regulations
In order to be able to exploit all the functions provided by the shredder, please read this operating manual thoroughly before starting to use the device.
- Keep the device out of reach of children and pets!
The device may only be operated by adults. - The device can only be used by one person at a time.
- Protect the equipment from direct sunlight, extreme heat and damp!
- Do not carry out any other activities when operating the device, such as clean it.
• Repairs may only be carried out by properly trained specialists.
1.1 Safety labels
 | Caution!Warning! |  | Read and observe the information in the operating instruction manual! |
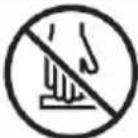 | Never insert your hands in the infeeds! |  | The device must not be operated by children! |
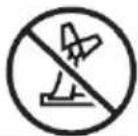
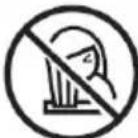 | Keep long hair, ties, scarves, jewellery and loose clothing well away from the infeed areas! | 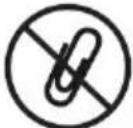 | Never insert paper clips in the infeeds! |
 | 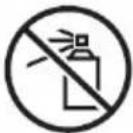 | Keep spray and vapours from spray cans well away from shredders. | |
 |
Attention: Failure to observe the safety labels can result in severe personal injury! If an object (sleeve, tie, etc.) does enter the infeed accidentally, disconnect the power plug from the power socket immediately!
Safety note: The power socket must be in the immediate vicinity of the unit and easily accessible. This enables you to disconnect the device from the power supply quickly in an emergency.
1.2 Electrical safety guidelines
- Disconnect the power plug from the power socket:
- before emptying the waste bin,
- if it will remain unused for a longer period,
• before cleaning the device, -
before moving the device.
-
Do not put the device into operation in the case of damage to the power cable, the power plug or the device itself (risk of injury)!
- Do not complete any modifications to the power cable because it is designed for the power supply specified.
- Never exceed the recommended load capacity of the power socket or any connected extension cables!
Attention: It is forbidden to open the cutting mechanism attachment for repair purposes. Risk of fatal injury! In addition, all claims under the terms of guarantee will be deemed null and void.
2 Intended Use
- Only use the PS 705.4 CC paper shredder for shredding paper! The paper to be shredded must be dry and comply with the requirements stipulated in Chapter "Technical Data"! Attempting to shred other material can lead to personal injury (e.g. through splinters from hard material, etc.) and damage to the equipment (e.g. damage to the cutting mechanism etc.).
- Remove all staples and paper clips before feeding paper in the device!
- Do not shred continuous forms in this device!
- The unit may only be used in dry, indoor rooms.
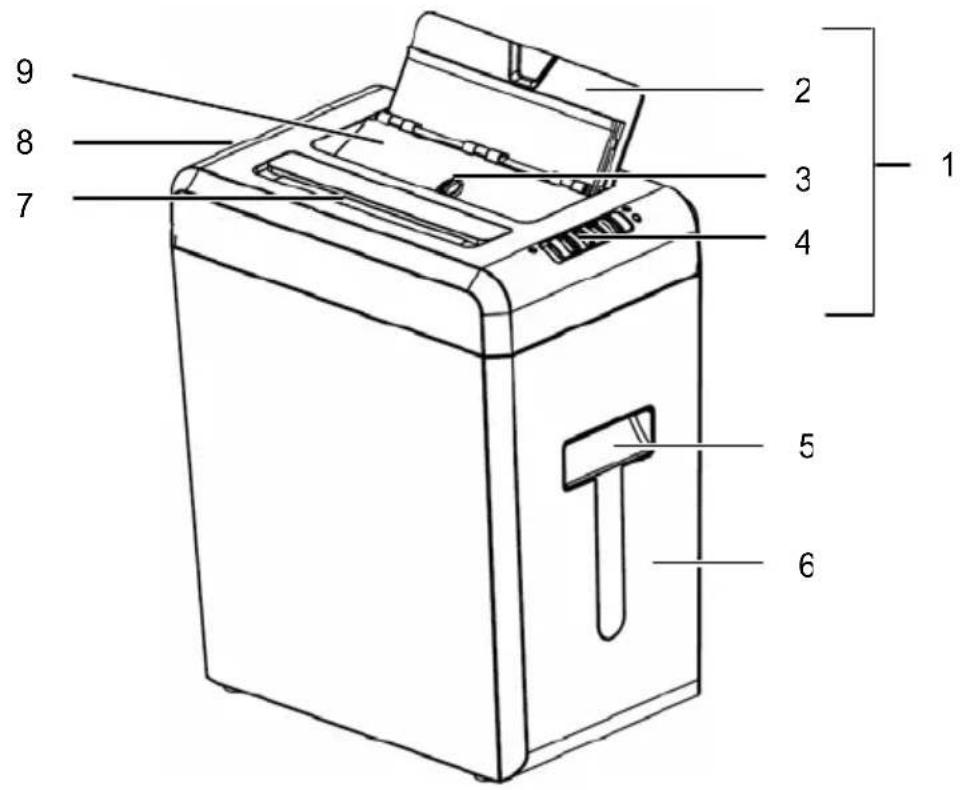
1 Cutting mechanism attachment
2 Automatic paper infeed
3 Locking button
4 Operating mode switch and indicator elements
5 Window to waste bin
6 Waste bin
7 Manual paper infeed
8 On/Off switch
9 Safety guard
4 Starting Up
- Remove the device carefully from the packaging.
Attention: The underside of the cutting mechanism attachment has sharp edges. Risk of injury!
- Place the device on a level surface.
- Position the device near a power socket. However, do not position it near a source of heat or water.
- Lock the safety guard of the automatic paper infeed by sliding the locking button to the LOCK position.
- Insert the waste bin.
Note: The shredder only operates when the original waste bin is inserted correctly.
- Set the On/Off switch to its OFF position.
- Connect the power plug to a power socket.
Note: Pay attention that the power cable is laid so that people or pets do not walk over it or that other objects can be set down on it. Pay attention to the information regarding power supply on the rear side of the device for the necessary precautions.
Safety note: For reasons of safety, the power socket to which the shredder power plug is connected must be near to the device and freely accessible so that the power supply can be disconnected quickly in an emergency!
5 Operation
Note: The recommended capacities stipulated in Chapter "Technical Data" must not be exceeded, otherwise paper will jam! Do not forget that the thickness of the paper increases when folded, as a result of which the recommended sheet capacity can be exceeded. Also reduce the quantity of paper when shredding coarse paper.
5.1 Switching the device on
- Set the On/Off switch to its ON position.
- Set the operating mode switch to AUTO. The POWER indicator lights up green and the device is ready for use.
5.2 AUTO function
When the AUTO function is activated, the shredding operation of the cutting mechanism starts up automatically as soon as material is inserted in the infeed slot:
- The device switches to forward drive and draws the paper in.
- When shredding is finished, the device switches off automatically.
Note: When the AUTO function is activated, paper can be shredded via the manual or automatic paper infeed. Only one infeed can be used at a time. Pay attention to the permissible quantity of paper which can be shredded.
5.3 Inserting paper in the manual paper infeed
Note: A maximum of 6 sheets of A4 paper with a weight of maximally 75 g/m^2 may be inserted in the manual paper infeed at a time.
- The device is switched on and the AUTO function is activated.
- Insert paper in the manual paper infeed.
5.4 Inserting paper in the automatic paper infeed
Note: A maximum of 60 sheets of A4 paper with a weight of maximally 75 g/m ^2 may be inserted in the automatic paper infeed at a time.
- Pivot up the automatic paper infeed.
- The device is switched on and the AUTO function is activated.
- Insert the paper to be shredded in the automatic paper infeed.
5.5 Switching the device off
Set the operating mode switch and On/Off switch to their OFF positions.
6 Indicator Elements
| Indicator | Cause | Solution | |
 | LOCK | Locking button open (OPEN) | Set the locking button to its LOCK position. |
 | OVERLOAD | Paper jam | Clear the paper jam, refer to Chapter "Clearing a paper jam".Observe the recommended capacities regarding the paper to be shred stipulated in Chapter "Technical Data". |
 |  | Device is ON | |
7 Motor Protection
The motor switches off automatically in the event of an overload. First of all, disconnect the power plug from the power socket and allow the motor to cool down to room temperature. Then connect the power plug to the power socket again and continue operation.
Note: Observe the operating cycle stipulated in Chapter "Technical Data".
If too much paper is fed into the cutting mechanism, a paper jam occurs. The shredder switches off automatically in the event of a paper jam.
Proceed as follows:
- Set the operating mode switch to REV to activate reverse running and feed the paper back out.
- Set the operating mode switch to FWD to clear the infeeds of any residual material.
- If necessary, remove any residual material manually from the automatic paper infeed.
- Set the operating mode switch to AUTO to reactivate the automatic function.
- Reduce the quantity of paper being fed into the shredder.
8.1 Reverse running
Set the operating mode switch to its REV position so that the cutting mechanism runs backwards and releases the paper.
Note: If a paper jam has occurred when the automatic paper infeed is in operation, you must also check whether there is any residual paper in the automatic paper infeed and remove it as well!
8.2 Forward running
Set the operating mode switch to FWD to draw in and shred any residual paper and clear it from the cutting mechanism.
Note: The forward running setting must be used after clearing a paper jam to start the cutting mechanism running without feeding any new paper through the infeed.
8.3 Removing residual paper from the automatic paper infeed
- Set the On/Off switch to its OFF position and disconnect the power plug from the power socket.
- Unlock the automatic paper infeed by setting the locking button to its OPEN position.
- Hinge up the safety guard on the automatic paper infeed.
- Remove any jammed paper carefully from the cutting mechanism using a suitable tool.
- Hinge the safety guard on the automatic paper infeed back down.
- Lock the safety guard of the automatic paper infeed by setting the locking button to its LOCK position.
- Reconnect the power plug in the power socket and set the On/Off switch to ON.
Attention: Maintenance work may only be completed when the power plug has been disconnected from the power socket!
9.1 Emptying the waste bin
- Set the On/Off switch to its OFF position.
- Pull the waste bin out of the device.
- Empty the contents according to waste disposal requirements.
- Slide the waste bin back in the device.
Note: It is recommended not to allow the waste bin to fill up against the cutting mechanism. This prevents the shredded paper congesting and jamming in the cutting mechanism. Empty the waste bin regularly.
9.2 Lubricating the cutting mechanism
To ensure a long service life for your paper shredder, we recommend clearing any residue from the cutting mechanism regularly and applying a little special oil for paper shredders on the cutting tool. You can obtain the special CFC-free oil from your supplier or directly from our service centre in Hattingen. This helps lengthen the service life of the device.
- Each time the waste bin is emptied, apply several lines of the special oil in a lateral direction on a suitable sheet of paper and feed this sheet through the shredder when the AUTO function is set.
Attention: It is forbidden to use oil spray from aerosol cans containing CFC!
9.3 Cleaning the device
- Set the On/Off switch to its OFF position and disconnect the power plug from the power socket.
- Clean the outside of the device with a slightly damp cloth.
Note: Never use any aggressive cleaning agents.
Never use any chemicals (e.g. cleaning solvent, alcohol) to clean the housing.
10 Technical Data
| PS 705.4 CC | |
| Manual paper infeed: Yes | |
| Cutting capacity Max. 6 sheets of A4 (75 g/m ^2 ) | |
| Width of paper infeed 220 mm | |
| Automatic paper infeed: Yes | |
| Cutting capacity Max. 60 sheets of A4 (75 g/m ^2 ) | |
| Width of paper infeed 220 mm | |
| Cutting method, cut width Cross cut (particle cut), 4 x 23 mm | |
| Operating cycle 5 min. continuous operation | |
| Noise level ≤ 58 dB(A) | |
| Waste bin volume 16 litres | |
| Waste bin with window Yes | |
| Range of operations | Auto start/Auto stopReverse runningForward running (without paper feed) |
| Indicator elements | On/OffLocking button openPaper jam |
| Dimensions (W x D x H) 365 x 240 x | 438 mm |
| Weight | 8 kg |
| Castors | Yes |
| Power supply 220 V / 50 Hz / 0.7 A | |
| Rated input power Max. 160 Watt | |
| Security level | P4 |
11 Troubleshooting
| Problem | Diagnosis & Cause Solution | |
| Device does not work | Is the power plug connected properly in the power socket? | Connect the power plug to the power socket properly. |
| Is the On/Off switch set to OFF? | Set the On/Off switch to its ON position. | |
| Is the AUTO function activated? | Set the operating mode switch to AUTO. | |
| Has the device been assembled properly? | Ensure that the waste bin has been inserted properly. | |
| Does the motor fail to start when paper is inserted? | Slide the paper in the respective infeed slot so that it makes contact with the sensor in the middle. | |
| Device does not function after a longer period out of service or stops during operation | Was the device shutdown for a longer time? Is the surface of the device warm? The permissible operating cycle has probably been exceeded. | First of all, disconnect the power plug from the power socket and allow the motor to cool down to room temperature. For information on the operating cycle, refer to Chapter "Technical Data". |
| Paper jam | Have you exceeded the permissible paper capacity (refer to Chapter "Technical Data")? Has the paper been fed in askew? | Clear the paper jam, refer to Chapter "Clearing a paper jam". |
Note: If you cannot clear the fault yourself, contact your dealer.
12 Disposal
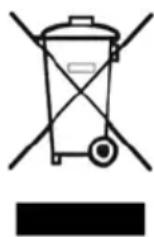
This symbol (crossed out waste bin) indicates that the product must be returned to an authorised recycling centre or separate collection point when it has reached the end of its service life. The symbol only applies to states within the EEA (*)
(*) EEA = European Economic Area, which is comprised of the member states of the EU plus Norway, Island and Liechtenstein.
13 Guarantee
Dear Customer,
we are pleased that you have chosen this equipment.
In the case of a defect, please return the device together with the receipt and original packing material to the point-of-sale.
OLYMPIA®
705.4 CC
Declaration of conformity
To view the complete Declaration of Conformity, please refer to the free download available on our website www.olympia-vertrieb.de.


- PS 705.4 CC
- Service-Center Hattingen
- Operating Instructions
- Important Safety Regulations
- Electrical safety guidelines
- Intended Use
- Starting Up
- Operation
- Switching the device on
- AUTO function
- Inserting paper in the manual paper infeed
- Inserting paper in the automatic paper infeed
- Switching the device off
- Indicator Elements
- Motor Protection
- Reverse running
- Forward running
- Removing residual paper from the automatic paper infeed
- Emptying the waste bin
- Lubricating the cutting mechanism
- Cleaning the device
- Troubleshooting
- Disposal
- Guarantee
- OLYMPIA®
- Declaration of conformity
Brand : OLYMPIA
Model : PS 705.4 C
Category : Shredder