
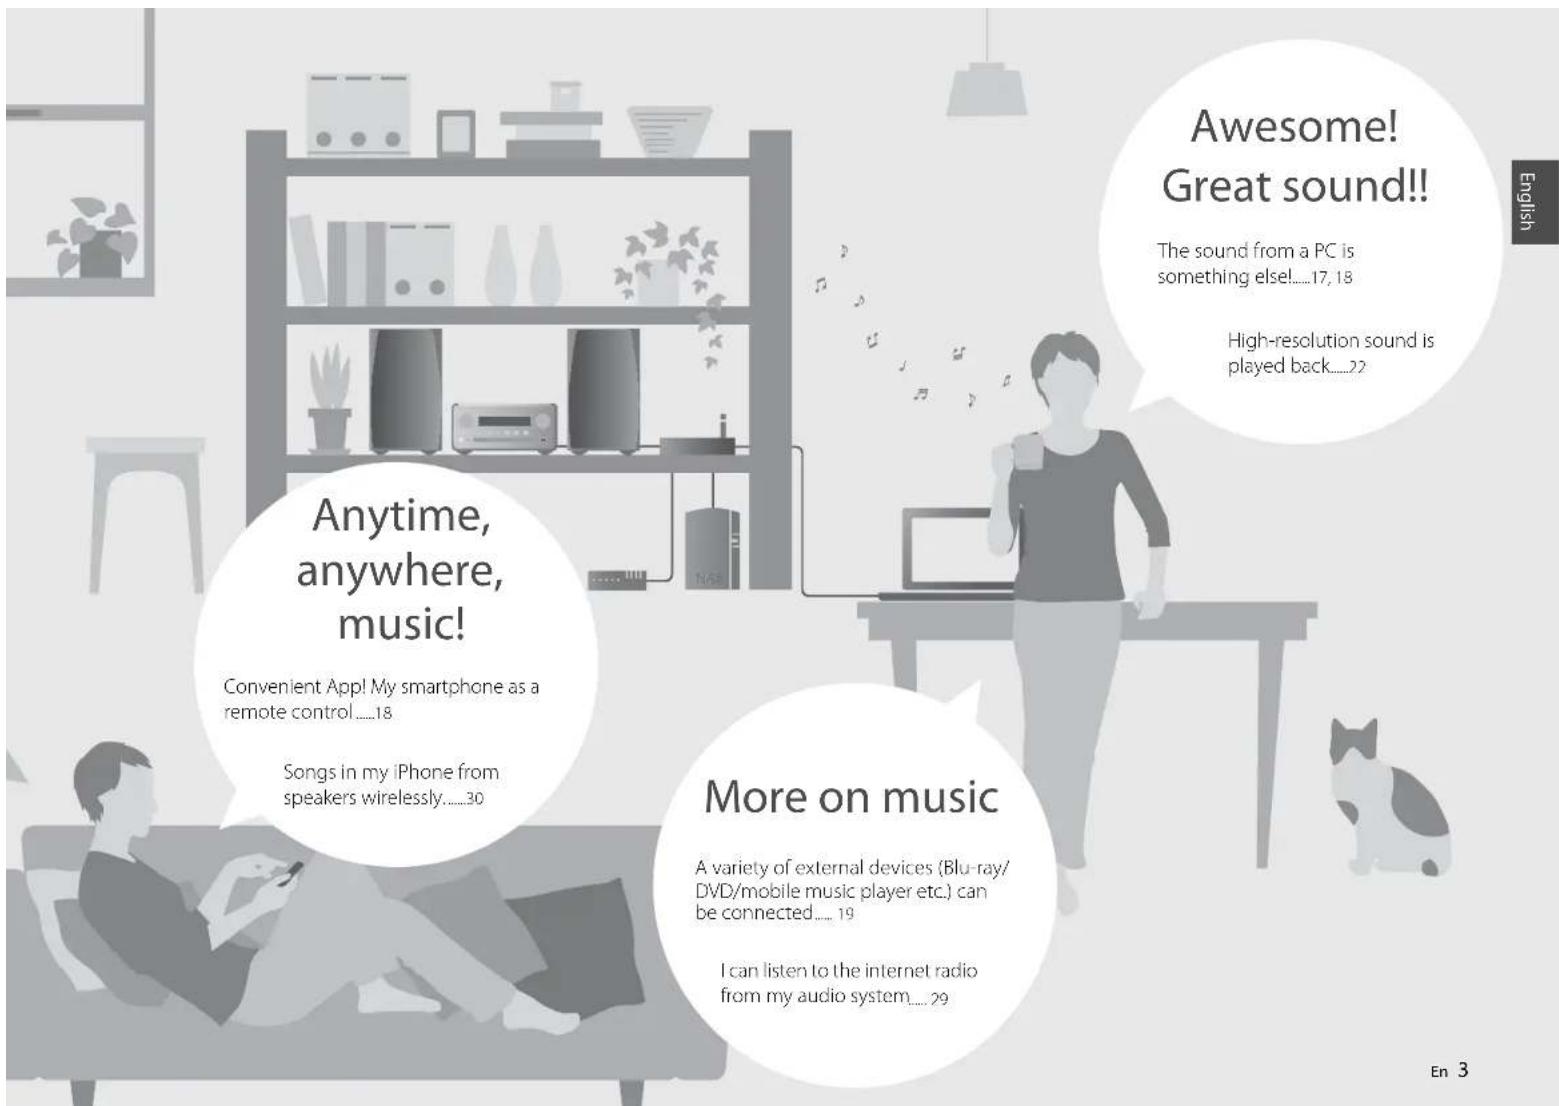
CRXN560D - Cd player/recorder YAMAHA - Free user manual and instructions
Find the device manual for free CRXN560D YAMAHA in PDF.

| Product type | CD player/recorder with built-in amplifier, DAB+/FM tuner, network connectivity |
| Brand | YAMAHA |
| Model | CRXN560D |
| Dimensions (W × H × D) | 215 × 110 × 288 mm |
| Weight | 2.7 kg |
| Power supply | 230 V AC, 50 Hz |
| Power consumption | 44 W (standby: 6 W, eco standby: 0.5 W) |
| Amplifier output power | 32 W + 32 W (6 Ω, 1 kHz, 10% THD) |
| Playable media | Audio CD, CD-R/RW, MP3/WMA files on data CD |
| Supported audio formats (USB/network) | MP3, WMA, MPEG-4 AAC, WAV (PCM), FLAC (up to 192 kHz/24 bit) |
| Radio tuner | DAB/DAB+ (Band III, 174-240 MHz) and FM (87.50-108.00 MHz) |
| Network connectivity | Ethernet 100Base-TX/10Base-T, RJ-45 network jack |
| Network functions | Internet radio (vTuner), DLNA 1.5 (client), AirPlay |
| Audio inputs | AUX1 (stereo RCA), AUX2 (stereo 3.5 mm mini-jack), DIGITAL IN1 (optical), DIGITAL IN2 (coaxial) |
| Audio outputs | Headphones (stereo 3.5 mm mini-jack), SUBWOOFER (mono pin cable), speaker terminals |
| USB port | Front, for audio file playback and iPod/USB charging (except in eco standby) |
| iPod/iPhone/iPad compatibility | iPod touch (1st to 5th gen.), iPod nano (2nd to 7th gen.), iPhone 5/4S/4/3GS/3G, iPad (4th/3rd/2nd), iPad mini |
| Additional functions | Clock, alarm, sleep timer, brightness adjustment, equalizer, balance, Music Enhancer |
| Maintenance and cleaning | Wipe with a soft, dry cloth. Do not use solvents. Clean discs from the center outward with a dry cloth. |
| Safety | Read the supplied safety brochure. Do not expose to moisture. Unplug during thunderstorms. |
| Spare parts and repairability | Spare parts are available from authorized Yamaha dealers. For repairs, contact an authorized service center. |
Frequently Asked Questions - CRXN560D YAMAHA
User questions about CRXN560D YAMAHA
0 question about this device. Answer the ones you know or ask your own.
Ask a new question about this device
Download the instructions for your Cd player/recorder in PDF format for free! Find your manual CRXN560D - YAMAHA and take your electronic device back in hand. On this page are published all the documents necessary for the use of your device. CRXN560D by YAMAHA.
USER MANUAL CRXN560D YAMAHA
Read the supplied booklet "Safety Brochure" before using the unit.
DAB Digital Audio Broadcasting

Contents
Introduction.....4
Supplied accessories.....4 About this manual.....4
Part name.....5
Front panel.....5
Rear panel.....6
Front panel display.....7
Adjusting display brightness.....7
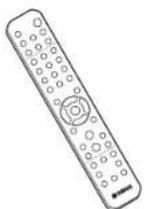
Remote control.....8
Preparations.....9
Connecting the speakers.....9
Connecting antenna.....10
Connecting to the network.....11
Turning on the power.....12
Setting the network devices.....13
PC.....13
NAS.....13
Mobile devices.....13
Listening to CD.....14
Listening to iPod/USB devices.....15
Playing iPod.....15
Playing USB devices.....15
Listening to the songs in the computer.....17
Setting the media sharing of music files.....17
Playing back songs in the PC.....18
Listening to external sources.....19
More on playback.....20
Shuffle playback.....20
Repeat playback.....20
Playback information.....21
Adjusting sound quality.....22
Listening to DAB stations (CRX-N560D only).....23
Initial scan.....23
Tuning in DAB stations.....23
Presetting DAB stations.....24
Selecting preset DAB stations.....24
Deleting a preset station.....24
Confirming the reception.....25
Listening to FM radio stations.....26
Tuning in FM stations.....26
Presetting FM stations.....26
Selecting preset FM stations.....27
Deleting a preset station.....27
Radio Data System.....28
Listening to Internet radio.....29
Listening to the Music with
AirPlay....30
Playing iPod.....30
Playing iTunes.....30
Using the clock.....31
Setting the clock.....31
Setting the wake-up timer.....32
Sleep timer.....33
Updating the firmware.....34
Option settings.....35
Option menu list.....36
Troubleshooting.....37
General.....37
Network.....38
iPod.....39
Disc.....40
USB devices.....40
DAB reception (CRX-N560D only).....41
FM reception.....41
Messages on the front panel display.....42
Supported devices/media and file formats.....43
Specifications.....45
Information about software.....
Introduction
Confirm the package contents and useful points of this manual.
Supplied accessories
Remote control

FM antenna (for CRX-N560)
DAB/FM antenna (for CRX-N560D)
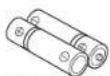
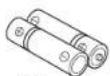
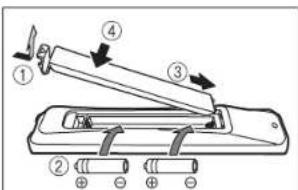
Batteries (× 2)
(AA, R6, UM-3)
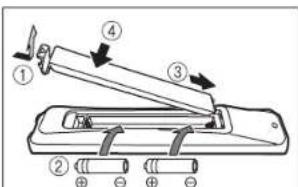
Check the "+" and "-" of the batteries and Inset them the correct way around.
About this manual
- Instructions and illustrations used in this manual refer to the CRX-N560, unless otherwise specified.
- How to operate this unit is described mainly using the remote control.
• Illustrations may differ from actual item depicted.
- "iPod" described in this manual may also refer to "iPhone" or "iPad."
Symbols:

Indicates precautions for use of the unit and its feature limitations.

Indicates supplementary explanations for better use.

Indicates the corresponding reference page(s).
!
- Change both batteries when the operation range of the remote control decreases.
Part name
Familiarize yourself with all parts and these functions.
Front panel
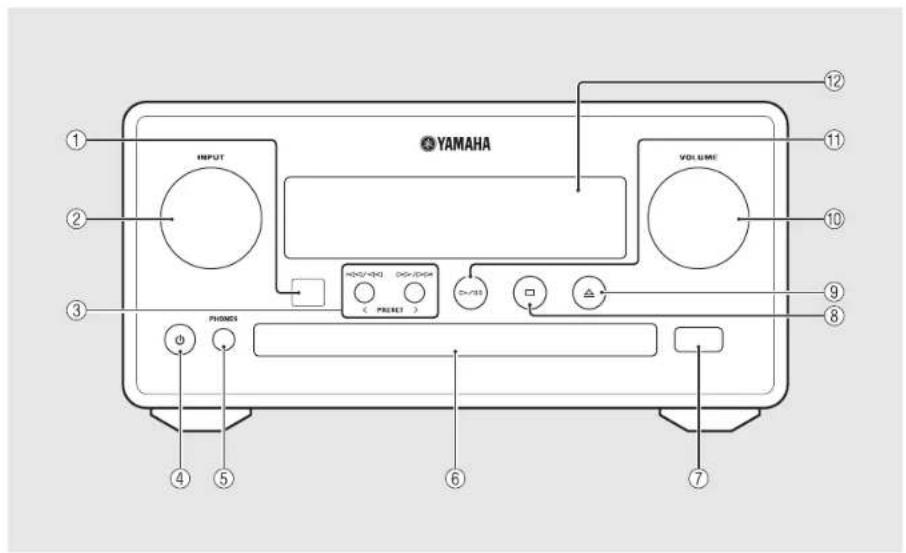
① Remote control receiver
②INPUT
Turn left or right to change the audio source. (The source is shown on the front panel display.)
③ ◀◀/◀◀ ▶▶/▶▶ (○ P.14, 16, 18)
PRESET</> (○ P.27)
④ ⏻ (Power) (√ P.12)
⑤PHONES
Connect headphones to this jack.
⑥ Disc tray (P.14)
⑦ USB jack (P.15)
⑧ □ (Stop) (○ P.14, 16, 18, 29)
⑨ △ (Open/close the disc tray) (P.14)
⑩VOLUME
Controls the volume.
⑪ ▷/□□ (Play/pause) (P.14, 16, 18)
⑫ Front panel display (P.7)
Rear panel
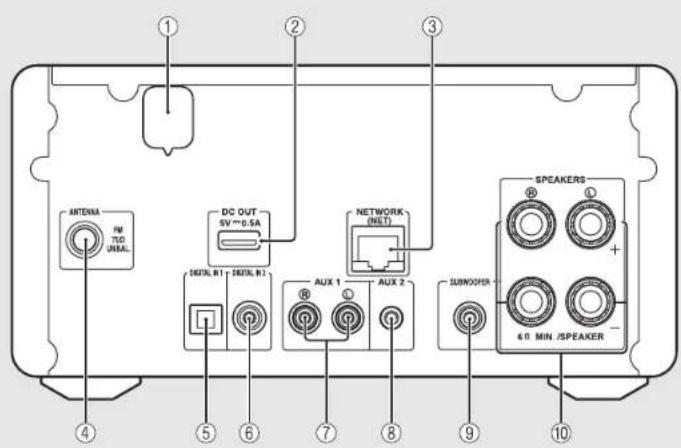
① Power cable (P.12)
②DC OUT terminal
Supplies power to the Yamaha AV accessories from this terminal. When using this, set [Use Accessory] in [System Config] from the option setting, to [YES] (P.35). For details, refer to the owner's manual supplied with the accessory.
③ NETWORK terminal (P.11)
Connects to a network using a commercially available network cable.
④ FM (DAB/FM) antenna terminal (P.10)
⑤ DIGITAL IN 1 terminal (optical input) (P.19)
⑥ DIGITAL IN 2 terminal (coaxial input) (P.19)
⑦ AUX 1 terminal (RCA input) (P.19)
⑧ AUX 2 terminal (mini jack input) (P.19)
⑨ SUBWOOFER terminal (P.9)
⑩ SPEAKERS terminal (P.9)
Front panel display
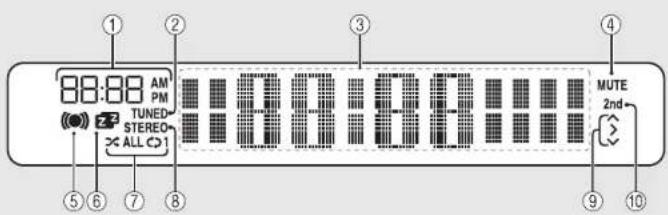
①Clock
Displays the time when the power is on.
②TUNED indicator
Lights up when the unit is tuned into a station.
③Multi information display
Shows various information, such as the clock in standby mode, music information, or radio frequency (alphanumerics only).
④MUTE indicator
Lights up when the sound is muted (P.8).
⑤Wake-up timer indicator
Blinks while setting the wake-up timer and lights up when the timer is set (P.32).
⑥Sleep timer indicator
Lights up when the sleep timer is set (P.33).
⑦Shuffle/repeat indicator
Lights up when you set your iPod, CD, USB device, or computer to shuffle or repeat playback (P.20).
⑧STEREO indicator
Lights up when the unit is receiving a strong signal from an FM stereo broadcast.
⑨Operation indicators
Shows available control buttons ▲/▼/ENTER (→ P S) of the remote control.
⑩2nd indicator (CRX-N560D only)
Appears when the DAB station has a secondary station (P.23).

Adjusting display brightness
You can adjust the brightness of the front panel display by pressing the DIMMER button on the remote control (P.8).
• Each press of the button changes the brightness: bright (default), mid dim, or dim.
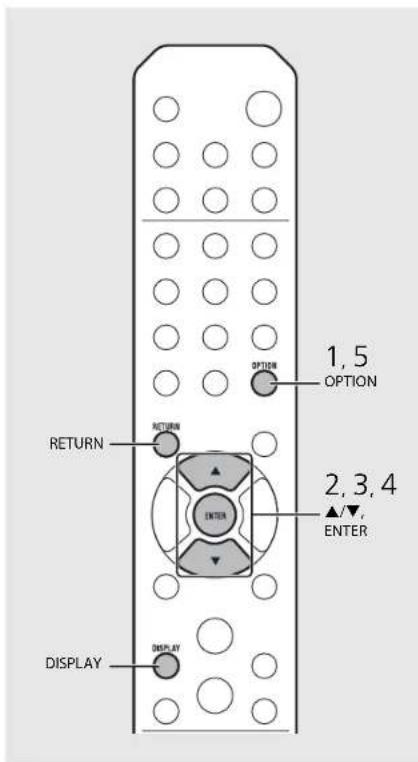
Remote control
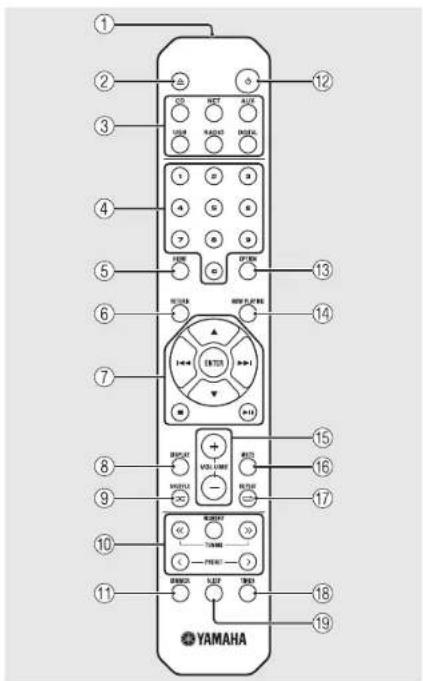
①Infrared signal transmitter
② △ (Open/close the disc tray) (P.14)
③Source buttons
Switch the audio source to be played.
④ Numeric buttons (P.14)
⑤ HOME (P.16, 18, 29)
⑥ RETURN (P.14, 16, 18, 29)
⑦Audio control, cursor control buttons (P.14, 16, 18, 29)
⑧ DISPLAY (P.21)
⑨ ✉ (SHUFFLE) (∼ P.20)
⑩ DAB/FM control buttons (P.23, 24, 26, 27)
⑪ DIMMER (P.7)
⑫ (Power) (P.12)
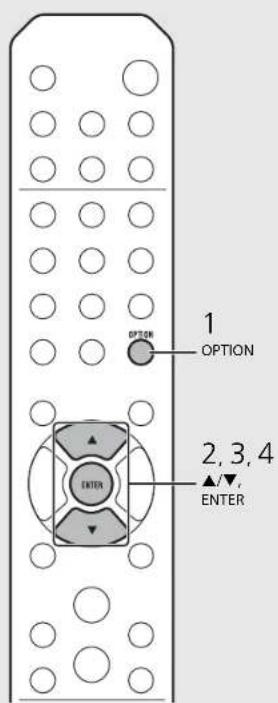
⑬ OPTION (P.22, 25, 31, 35)
⑭ NOW PLAYING (P.16, 18, 29)
⑮VOLUME +/-
Controls the volume.
⑯MUTE
Turns mute on or off.
⑰ (REPEAT) (P.20)
⑱ TIMER (√ P.32)
⑲ SLEEP (∼ P.33)
Preparations
Connect speakers or antenna and turn the unit on.
Do not connect the power cable of the unit until you have finished connecting all cables.
Connecting the speakers
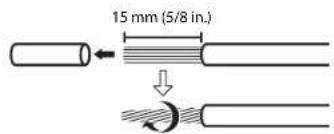
1 Remove the insulation from the end of the speaker cable to expose the bare wires.
2 Connect the speaker to the unit, as the illustration shows.
•Prepare speakers and speaker cables separately.
- For connection of the speakers, refer to the owner's manual supplied with them.
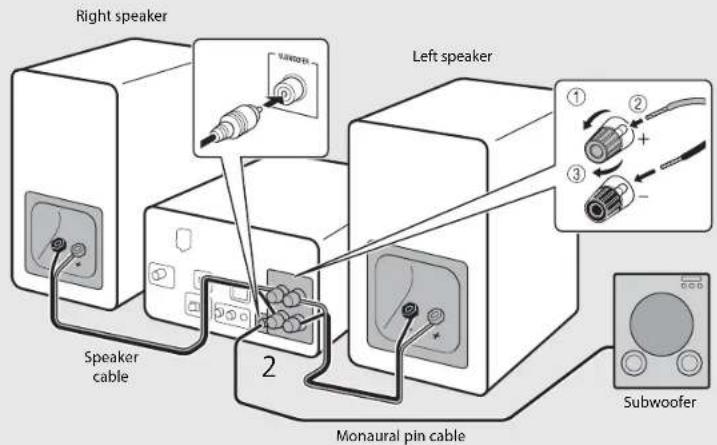

- Take care not to allow the bare speaker wires to touch each other or any metal part of the unit. This could damage the unit and/or the speakers.
- Make sure that left and right (I, P) connections and polarity (red: +, black: -) are correct. If connections are incorrect, the sound will be unnatural.
• Use speakers of at least 6 Q impedance. - You can also connect a subwoofer with built in amplifier to the unit.
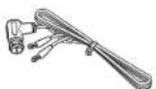
Connecting antenna
1 Connect the supplied antenna to the unit.
2 Install it with pins where the unit can obtain good reception.
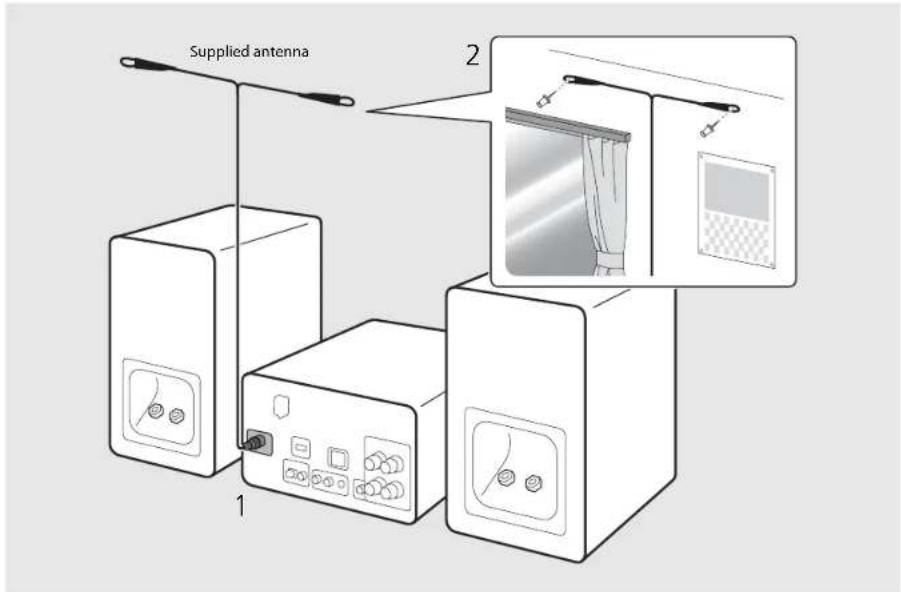

- Be sure to stretch out the antenna as the illustration shows.
- If radio reception with the supplied antenna is not satisfactory, a commercially available outdoor antenna may improve reception.
Connecting to the network
You can play back music files stored on your PC, mobile devices, DLNA*-compatible NAS, or audio contents on the Internet, by connecting this unit to the network. You can also operate the unit with your mobile device.
* Digital Living Network Alliance
Connect the unit to the network as shown on the right.
- Connect with a commercially available STP (shielded twisted pair) network cable (CAT-5 or higher, straight throughcable).
flowchart
graph TD
    A["This unit"] --> B["Broadband router"]
    B --> C["Network cable"]
    C --> D["Mobile device"]
    C --> E["PC"]
    C --> F["Network attached storage (NAS)"]
    G["Internet"] --> H["Modem"]
    H --> I["Grid"]
    I --> J["Grid"]
    J --> K["Grid"]
    K --> L["Grid"]
    L --> M["Grid"]
    M --> N["Grid"]
    N --> O["Grid"]
    O --> P["Grid"]
    P --> Q["Grid"]
    Q --> R["Grid"]
    R --> S["Grid"]
    S --> T["Grid"]
    T --> U["Grid"]
    U --> V["Grid"]
    V --> W["Grid"]
    W --> X["Grid"]
    X --> Y["Grid"]
    Y --> Z["Grid"]

- For details on Internet connection, refer to the owner's manuals of your network devices.
- If you are using a router that supports DHCP, you do not need to configure any network settings for the unit. If you are using a router that does not support DHCP, configure the network setting from [Network Config] in the option setting (P.35).
- Wired connections are recommended for devices other than the mobile to ensure high sound quality.
- Some security software installed on your PC or the firewall settings of network devices (such as a router) may block the access of the unit to the network devices or the Internet. In this case, change the setting of the security software or network devices.
- When setting the subnet manually, each server must be connected to the same subnet as the unit (P.36).
Turning on the power
Plug the power cable into the wall outlet and press ⏻
•The unit turns on.
- Press again to turn off (standby mode).
- "Lco standby" (default) reduces power consumption of the unit while limiting certain features (as shown in the table on the right).
Canceling the eco standby
1 Press

- Option menu is shown on the front panel display.
2 Cancel the eco standby.
- Set the item in the order of [System Config] - [Power Saving] - [Normal].
- Change the item with ▲/▼ and press ⏻ to set.
3 Press to finish the option setting.
Status in standby/eco standby
| Standby Eco standby | ||
| Charging of iPod/USB devices | √ — | |
| Enable/disable the wake-up timer* | √ — | |
| Operation of the source buttons* | √ | √ |
| CD load/eject | √ | |
| AirPlay | √ — | |
| Power-on by the application | √ — | |
| Clock display | √ — | |
* Operation with the remote control only
Option menu regarding power (System Config)
(Setting value. Bold: default)
Power Saving
Configure the power supply settings.
(Normal, Eco)
When you select [Eco], nothing is shown on the front
panel display in the eco standby mode.
Auto Power Off
Set the time at which the unit enters standby mode if no operation is performed.
(Timer 2H, Timer 4H, Timer 8H, Timer 12H, OFF)
Setting the network devices
Configure your devices connected to the network to play back music files stored on your PC or NAS, or configure your mobile device to control this unit.
PC
flowchart
graph LR
    A["Audio Input"] --> B["File Transfer"]
    B --> C["Laptop"]
    C --> D["Output"]
Configure the media sharing setting of your PC (P.17).
NAS
flowchart
graph TD
    A["Audio Input"] --> B["File Transfer"]
    B --> C["Server"]
    D["Document Icon"] --> B
    E["Document Icon"] --> C
Configure the settings to access your NAS.
- Enable DHCP setting of your NAS if needed.
- For more detailed settings, refer to the owner's manual supplied with your NAS.
Mobile devices
Install the dedicated application "NETWORK PLAYER CONTROLLER" to your mobile devices (P.18).
• The application supports iPhone/iPad/iPod touch and Android mobile devices.
• The mobile device needs to be connected to the same router as the unit.
Listening to CD
This unit allows playback of audio CDs and data CDs in which the MP3/WMA files are recorded. For details on playable CDs, see "Supported devices/medias" (P.43).
1 Turn INPUT to select [CD]. Or, press on the remote control.
2 Set a CD in a disc tray.
- Press to open/close the disc tray.
3 Playback starts.
• The remote control functions are shown below.
| ▲▼ | Skip to the first file of the previous or next folder when playing back MP3/ WMA files. |
| ▶II | Play/pause |
| ■ | Stop |
| Skip to the beginning of the song being played back or the previous song. | |
| ▶H | Skip to the next song. |
| ✕ | Starts shuffle playback (⇨ P.20). |
| ⇨ | Starts repeat playback (⇨ P.20). |
| 1 - 9, 0 Specify the song number. | |
| RETURN Cancel the song number. | |
| ENTER Apply the song number. | |

- Files on a data CD are played back in alphanumeric order. - When CD playback is stopped, playback will resume from the beginning of the song last played. Pressing - while playback is stopped will clear resume playback.
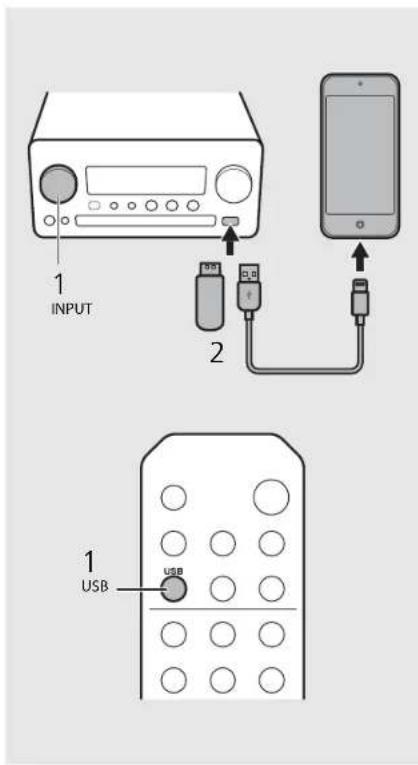
Listening to iPod/USB devices
This unit allows playback of iPod or USB devices which music files are recorded. For details on playable iPod/USB devices, see "Supported devices/media and file formats" (P.43).
Playing iPod
1 Turn INPUT to select [USB] or press on the remote control.
2 Connect the iPod to the USB jack.
• Prepare the USB cable supplied with your iPod.
• The source changes to [iPod].
3 Playback starts (P.16).
Playing USB devices
1 Turn INPUT to select [USB]. Or, press USB on the remote control.
2 Connect a USB device to the USB port.
3 Playback starts (P.16).
- Some iPods/USB devices may not work properly even if they meet the requirements. Playability of and power supply to all iPods/USB devices are not guaranteed.
- Yamaha and suppliers do not accept any liability for the loss of data saved on an iPod or a USB device connected to the unit. As a precaution, it is recommended to make backup copies of important files.
- Stop playback before disconnecting the USB device.
- An iPod or USB device is automatically charged when it is connected to the unit, except in the eco standby mode.
- Stop playback before disconnecting the USB device.
• An iPod or USB device is automatically charged when it is connected to the unit, except in the eco standby mode.
Remote control operation for iPods/USB devices
| Skip to the beginning of the song being played back or previous song (for iPod, press and hold to fast rewind). | |
| Skip to the next song (for iPod, press and hold to fast forward). | |
| Stop | |
| Play/pause | |
| Shuffle playback (P.20) | |
| Repeat playback (P.20) |

Switching the information display of iPod
- When operating your iPod with Yamaha's application "NETWORK PLAYER CONTROLLER," the information display switches to the extended mode.
To switch the information display mode, press and hold the DISPLAY button.
-Standard mode (default): Operate your iPod while viewing the screen of the iPod and select a song to play back.
-Extended mode: Operate the remote control while viewing the iPod information shown on the front panel display (browsing operation) and select a song to play back. The remote control functions are as shown below.
▲/▼ Show other item
ENTER Confirm the selected item and proceed to the next level or start playback.
HOME Show the top-level item.
RETURN Back to the previous item.
NOW Finish browsing and display the PLAYING playback content information.
Listening to the songs in the computer
This unit allows you to play back music files such as MP3, WMA, or FLAC (lossless audio data compression format) files stored in the computer (server) connected to the network or NAS. Brows the front panel display and select your favorite music file.
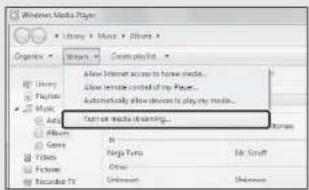
Setting the media sharing of music files
To play back music files in your computer with this unit, you need to make the media sharing setting between the unit and computer (Windows Media Player 11 or later). In here, setting with Windows Media Player 12 in Windows 7 is taken as an example.
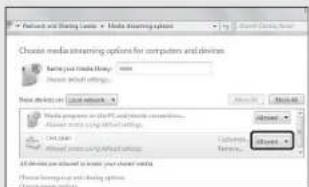
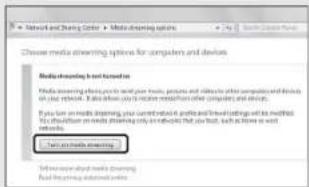
1 Start Windows Media Player 12 on your PC.
2 Select "Stream", then "Turn on media streaming."
•The control panel window of your PC is shown.
3 Click "Turn on media streaming."
4 Select "Allowed" from the drop-down list next to "CRX-N560."
5 Click "OK" to exit.
2
3
![Media streaming options Choose media streaming options for computers and devices Media streaming to find turned out Media streaming also provides your own music, picture and radio, other computers and devices on your platform. You should you to create entertainment other computers and devices. If you can use media streaming, your current format, profile and travel settings and its method, you should use the media streaming options for each of the platforms. You may not use any other online networks. [ ] Find up media streaming Tell me about media streaming Find the viewing of these options.](/content/2026/02/401065/images/567fd076fe40d33889cad59727391d74db54d9f56d33c8bfc9df3beb75acce49.jpg)
4


- For details on media sharing settings, refer to Windows Media Player help.
For Windows Media Player 11
1 Start the Windows Media Player 11 on your PC.
2 Select "Library" then "Media Sharing."
3 Check the "Share my media to" box, select the "CRX-N560" icon, and click "Allow."
4 Click "OK" to exit.
For a PC or a NAS with other DLNA server software installed
Refer to the owner's manual of your device or software and configure the media sharing settings.
Playing back songs in the PC
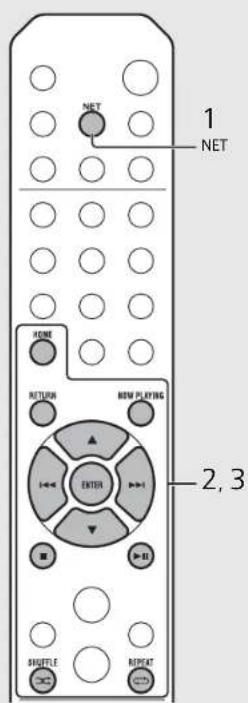
1 Press ^NET repeatedly and select [Server].
2 Browse and select a song.
▲/▼ Show other item.
ENTER Confirm the selected item and proceed to the next level or start playback.
I HOME Show the top-level item.
RETURN Back to the previous item.
NOW Finish browsing and display PLAYING playback content information.
3 Start playback.
Play/pause
▶▶/ Move to the next or previous song
in the folder.
■ Stop
Shuffle playback (P.20)
Repeat playback (P.20)

- If playback is not possible, make sure this unit and the PC (server) are connected to the same router (P.11).
Operating from your mobile device
Once you install the app "NETWORK PLAYER CONTROLLER" in your mobile device, you can operate the unit with the mobile device.
- features
-Power-on/off, adjusting volume or other basic operation
-Changing the music source
-Displaying the information of the radio tuner
-Selecting, playing back, and stopping songs
-Playing back songs stored in devices
For downloading the app or the latest information, access to the App Store or Google Play and search "NETWORK PLAYER CONTROLLER."
Listening to external sources
This unit allows playback of external devices, such as a DVD player or mobile music player. Use the terminal (DIGITAL IN 1/2 or AUX 1/2) according to the device to be connected (P.6). For the connection of each external device, refer to its supplied owner's manual.
1 Unplug the power cable of the unit and connect the external device to the unit.
•Prepare commercially available cables for connection.
2 Plug the power cable of the unit back into the wall outlet and press turn the unit on.
3 Change the music source.
- Press OR according to the connecting terminal for the external device you wish to play back.
- Press ☑ change the source to AUX1/AUX2 (analog input), press ☑ change the source to DIGITAL IN1/DIGITAL IN2 (digital input).
4 Play back the connected external device.
- For details on playback, refer to the owner's manual supplied with the external device.
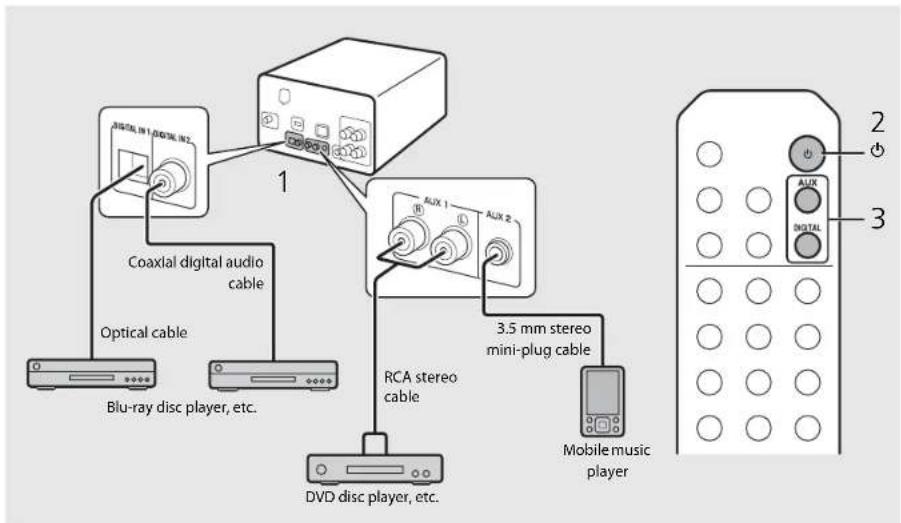

- Decrease the volume of the unit and the external device before connection. Otherwise, playback volume may be too loud.
More on playback
You can enjoy music in varied song order or sound quality, and view music information during playback. Operations described in this section apply to all devices, such as PC (server), iPod, USB device, or CD.
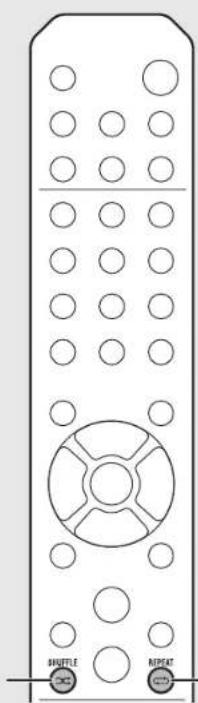
Shuffle playback
Press during playback.
•The shuffle indicator in the front panel display switches as shown below each time you press the button.
| ×ALL | Perform shuffle playback.* |
| Not displayed Does not perform shuffle playback. | |
* The range of shuffle depends on the media being played back.
Repeat playback
Press during playback.
•The repeat indicator in the front panel display switches as shown below each time you press the button.
| 1 | Repeat the song being played back. |
| ALL | Perform repeat playback* |
| Not displayed Does not perform repeat playback. | |
^3 The range of repeat depends on the playback media.
natural_image
Front view of a remote control panel with circular buttons labeled 'AMTLE' and 'RESET' (no additional text or symbols)REPEAT SHUFFLE

- Shuffle playback and repeat playback can be performed at the same time (except ⭕1
Playback information
Song title, elapsed time, etc., can be shown on the front panel display.
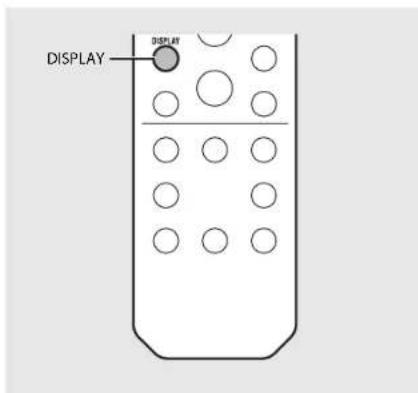
Press DISPLAY during playback.
5:36
ALBUM ▶Meteora
- Display switches in the order as shown below each time you press DISPLAY.
| USB/iPod/AirPlay/Server CD | |
| Song title*1 | Playing time |
| Album tile | Remaining time of the song*2 |
| Artist name | Remaining time of the disc*2 |
| Playing time Song title* | 1,3 |
| Album tile*3 | |
| Artist name*3 | |
*1 If the song title cannot be obtained, the file title may be displayed.
*2 Only when playing an audio CD.
*3 Only when playing an audio CD and when there is information to display.
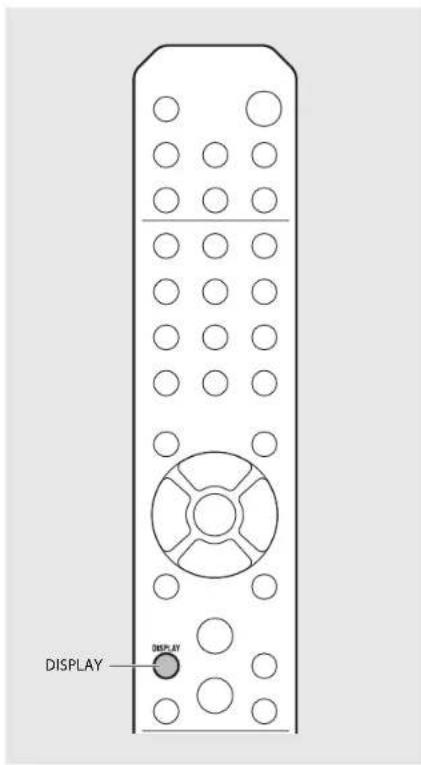
- Characters shown on the front panel display are alphanumeric only. - Information is not displayed when the iPod display mode is the standard mode (P.16).
Adjusting sound quality
Use the option setting to adjust sound quality.
1 Press

-Option menu is shown on the front panel display.
2
Press ▲/▼ to select the desired item and press ENTER
3
Press ▲/▼ to change the setting and press ENTER.
•The setting is applied.
- Press to return to the previous item.
•To cancel the sound quality setting, press . OPTION
•To set other items, repeat steps 2 and 3.
4
Press to finish the option setting.
Option menu regarding sound quality
(Setting value. Bold: default)
Equalizer
Adjusts low frequency [EQ Low], middle frequency [EQ Mid], and high frequency [EQ High]. The setting is also applied when using headphones. (10 to 0 to -10)
Balance
Adjusts the volume balance of the left and right speakers. This setting is not applied when using headphones. (Lch. 110 to --CENTER-- to Rch. 110)
Music Enhancer
Regenerates musical elements that are lost through compression.
(ON, OFF)
When playing back a high quality music source, such as FLAC or WAV, it is recommended to set to [OFF]. When playing back an audio CD that has not been compressed, this function is not available even if [ON] is set.
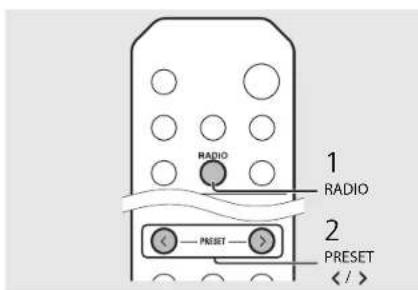
Listening to DAB stations (CRX-N560D only)
You can listen to radio of higher quality sound with Digital Audio Broadcasting (DAB) and DAB+ (upgraded version of DAB). Connect the supplied antenna (P.10) and perform an initial scan before you tune into DAB for the first time.
Initial scan
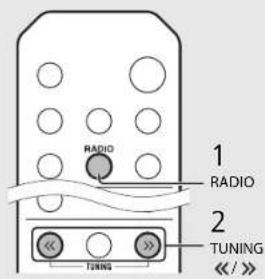
Press ^RADIO repeatedly to select [DAB].
- Initial scan starts automatically when you select [DAB] for the first time.
- When scanning is complete, the number of receivable DAB stations is shown on the front panel display momentarily, and the first station stored in station order is played.
Tuning in DAB stations
1 Press ^RADIO repeatedly to select [DAB].
- When the unit cannot receive the DAB signal, "Off Air" is shown on the front panel display.
2 Press TUNING / to select a DAB station.

Secondary indicator (appears if station has a sub station)

- You can also perform initial scan from the option setting.
1 Press OPTION when the source is DAB.
-Option menu is shown on the front panel display.
2 Press ▲/▼ to select [Initial Scan] and press ENTER.
-Initial scan starts and finishes automatically.
- If the initial scan is performed, stored DAB station information and preset DAB stations are cleared.
•This unit can receive only Band III DAB frequencies.
Frequency in MHz/Channel label
| 174.928/5A | 176.640/5B | 178.352/5C | 180.064/5D |
| 181.936/6A | 183.648/6B | 185.360/6C | 187.072/6D |
| 188.928/7A | 190.640/7B | 192.352/7C | 194.064/7D |
| 195.936/8A | 197.648/8B | 199.360/8C | 201.072/8D |
| 202.928/9A | 204.640/9B | 206.352/9C | 208.064/9D |
| 209.936/10A | 211.648/10B | 213.360/10C | 215.072/10D |
| 216.928/11A | 218.640/11B | 220.352/11C | 222.064/11D |
| 223.936/12A | 225.648/12B | 227.360/12C | 229.072/12D |
| 230.784/13A | 232.496/13B | 234.208/13C | 235.776/13D |
| 237.488/13E | 239.200/13F |
Presetting DAB stations
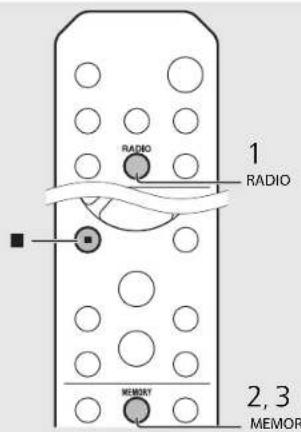
Use the preset function to store your favorite 30 DAB stations.
1 Tune in a DAB station you want to preset (P.23) and press MEMORY
- Preset number flashes on the front panel display.
- Preset Memory DAB01 Station1
2 Press ▲/▼ to select the desired preset number.
3 Press to completes presetting.
Selecting preset DAB stations
1 Press ^RADIO repeatedly to select [DAB].
2 Press PRESET / to select a preset station.
- To cancel the DAB preset setting, press - You can change the information of the DAB station shown on the front panel display by pressing the DISPLAY button. Display switches in the order as shown below each time you press the DISPLAY button.
DLS (Dynamic Label Segment) (default)
ENSEMBLE
CHANNEL/FREQ (Channel label and frequency)
SIGQ. (signal quality)
AUDIO FORMAT
Deleting a preset station
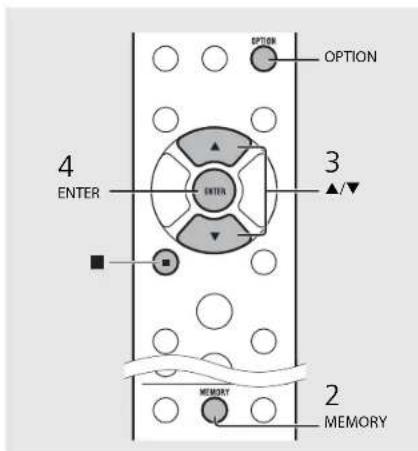
Use the option setting to delete a preset station.
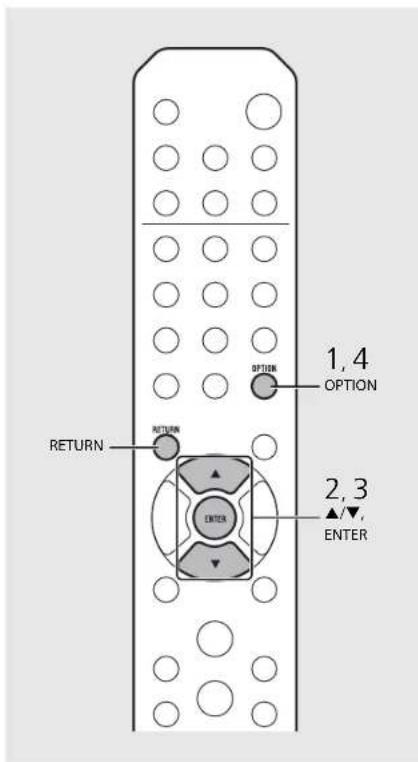
1 Press OPTION when the source is DAB.
-Option menu is shown on the front panel display.
2 Press ▲/▼ to select [Preset Delete] and press Ⓗ.
3 Press ▲/▼ to select the preset number to be deleted.
4 Press
-A preset station is deleted.
5 Press TO finish the option setting.
Confirming the reception
You can confirm the DAB signal level. This is useful when you set the antenna.
1 Press OPTION when the source is [DAB].
- Option menu is shown on the front panel display.
2 Press ▲/▼ to select [DAB Tune Aid] and press ENTER
3 Press ▲/▼ to change the channel label.
•The measured DAB signal reception level is displayed.

•The level is from 0 (none) to 100 (best).
4 Press to finish the option setting.

- When performing DAB Tune Aid and the DAB signal is weak, try adjusting the position of the antenna to obtain good reception.
Listening to FM radio stations
To listen to FM radio stations, connect the supplied antenna.
See "Connecting antenna" (P.10) for connecting the antenna to the unit.
Tuning in FM stations
1 Press RADIO
2 Press and hold TUNING

•Automatic tuning starts, then stops automatically when a station is tuned in.

FM
PService 95.60MHz

- If station reception is weak, you can tune into a station manually by pressing the TUNING « /» button repeatedly.
Presetting FM stations
Auto preset
Tunes in stations with good reception and presets them automatically.
1 Press RADIO
2 Press and hold for 2 seconds or more.
3 Press MEMORY
- Auto preset starts and when it finishes, "Completed" is shown on the front panel display.

•Auto preset replaces all currently-stored stations with newly-stored stations.

- You can preset up to 30 FM stations. - To cancel the auto preset, press
Manual preset
1 Tune into a station you want to store (P.26).
2 Press MEMORY
• Preset number flashes on the front panel display.
5:36. Preset Memory FM01 105.60MHz
3 Press ▲/▼ to select the desired preset number.
4 Press to preset the station.
Selecting preset FM stations
1 Press RADIO
2 Press PRESET / to select a station.

• To cancel manual preset setting, press .
Deleting a preset station
Use the option setting to delete a preset station.
1 Press OPTION when the source is FM.
-Option menu is shown on the front panel display.
-To cancel deleting preset stations, press . OPTION
2 Press ▲/▼ to select [Preset Delete] and press
3 Press ▲/▼ to select the preset number to be deleted.
4 Press
- The preset station is deleted and [Deleted] is shown on the front panel display.
5 Press TO finish the option setting.
Radio Data System
The unit can receive Radio Data System information.
Press DISPLAY when the source is FM.
•Each press of the button changes the information displays shown below.
Frequency (default)
PIY (Program Type)
RT (Radio Text)
CT (Clock Time)

- If the signal transmission of the Radio Data System station is too weak, this unit may not be able to receive Radio Data System information completely. In particular, RT (Radio Text) information uses a lot of bandwidth, so it may be less available compared to other types of information.
Listening to Internet radio
You can listen to world-wide radio stations via Internet.
Make sure that the unit is connected to the Internet properly (P.11).
1 Press ^NET repeatedly to select [Net Radio].
2 Browse the Internet and select a radio station.

• The remote control functions are shown below.
▲/▼ Shows other item.
ENTER Confirm the selected item and proceed to the next level or start playback.
HOME Show the top-level item.
RETURN Back to the previous item.
NOW Finish browsing and display the PLAYING playback content information.
3 Playback starts.
• To stop playback, press .


-Playback information can be shown by pressing the DISPLAY button while Internet radio is played back. Information changes as shown below each time you press it.
Radio station name (default)
Song title
Playing time
- You can register your favorite Internet radio stations to the "Bookmarks" folder by selecting [Net Radio] as the source on the unit and then accessing the following website with the web browser on your PC.
http://yradio.vtuner.com/ To use this feature, you need the vTuner ID of the unit and your e-mail address to create your personal account. You can check the vTuner ID (MAC address of the unit) in [Network Info] (P.36) in the option setting.
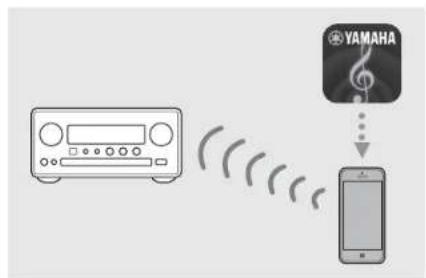
Listening to the Music with AirPlay
The AirPlay function allows you to play back iTunes/iPod music on the unit wirelessly via a network. Make sure that the unit and your PC or iPod are connected to the same router (P.11).
Playing iPod
1 Turn on the unit and display the playback screen on the iPod.
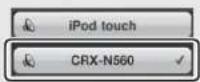
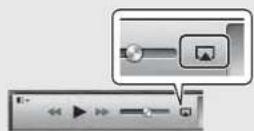
- If the iPod recognizes the unit, is known on the screen of the iPod.
2 Tap and select the unit's name.
- The source automatically switches to [AirPlay] and playback starts (except in the eco standby mode).
Example
1

2
Playing iTunes
1 Turn on the unit and start iTunes.
- If the iTunes recognizes the unit, is shown on the screen of iTunes.
2 Click and select the unit's name.
- The source automatically switches to [AirPlay] (except in the eco standby mode).
3 Play back songs with iTunes.
Example
1
2


- When you use iTunes/iPod controls to adjust volume, the volume may be unexpectedly loud. This could result in damage to the unit or speakers. If the volume increases during playback, stop playback on iPod/iTunes immediately.

- You can also use the unit and remote control to play back, pause, stop, and skip songs.
•To control iTunes playback with the remote control, you need to configure the iTunes preferences to enable iTunes control from remote speakers in advance.
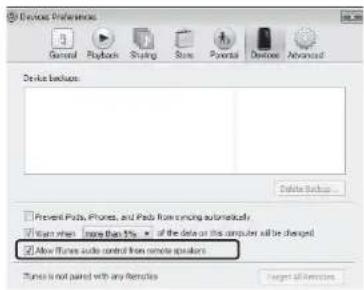
Clearing AirPlay
- Tap/click on the iPod/Tunes screen and select a device other than CRX-N560 from the speaker list. Or, change the source to other than AirPlay.
Using the clock
Once you set the clock, you can play your favorite song or radio program as an alarm.
Setting the clock
1 Press

-Option menu is shown on the front panel display.
2
Select [System Config] with ▲/▼ and press ENTER.
3
Select [Clock Setting] with ▲/▼ and press ENTER.
Clock Setting 2013-5-10
4 Set the date and time.
- Change the setting with ▲/▼ and press Ⓜ to confirm it.
•Perform the procedure in the order of year, month, day, hour, and minute.
•To cancel the setting, press . RETURN - When the setting completes, [Completed!] is shown.
5 Press to finish the option setting.

•The clock setting will be lost if you disconnect the power cable from the wall outlet for about a week. Set the clock again.

•The clock format (12-hour/24-hour) can be changed if you press the DISPLAY button while setting the clock.
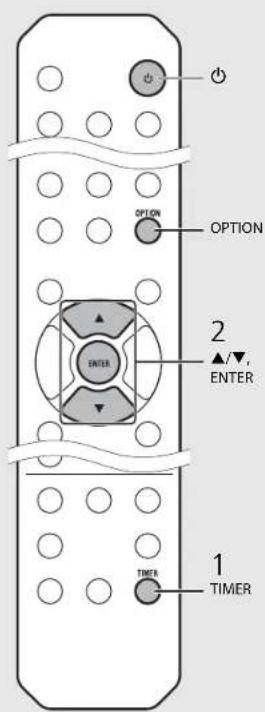
Setting the wake-up timer
Music or beep will be started at the time you set.
1 Press and hold . ○ TIMER
- [Timer Setting] and time are shown on the front panel display, and ①d hour flash.

2 Set the following items, ① to ③.
- Press ▲/▼ to select a setting value and press to set the item.
•The display switches to the next item.
•To cancel the setting, press . OPTION
① Start-up time
Set the hour and minute.
② Volume
Can be set between [5] to [59], and [MAX].
③ Repeat
Repeat: Wake-up timer sounds everyday at
the set time.
No Repeat: Wake-up timer sounds once.
Continue to the next page →
- Set the clock before setting the wake-up timer.
- Wake-up timer is not available when [Power saving] is set to [I-co]. Set it to [Normal] (P.12).
- You can also set the wake-up timer using the option setting.
1 Press OPTION
- The setting menu is shown on the front panel display.
2 Press ▲/▼ to select [Timer Setting] and press
3 Perform step 2 on the left.
4 Press to finish the option setting.
5 Set the music source, play back the source, and press Ⓤ.
- When the setting completes, [Completed] is shown and lights up on the front panel display.
536\~CD Completed!
3 Press

• The unit enters the standby mode and the beep sounds at the time you set.
- If you wish to play back music at the time you set, select an audio source and play it back before pressing this step. See (*) at the bottom of tips on the right for details on audio source playback.
Sleep timer
You can set the time to elapse which the unit automatically enters to standby mode.
Press SLEEP

several
times
to select the time.
•Time can be selected from 30/60/90/120 min., or OFF.
- lights up shortly after the time is selected, and the sleep timer is set.
•To cancel the sleep timer, press again.
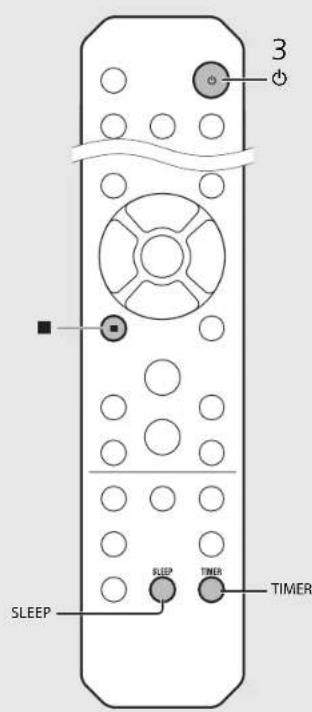

- If the source is removed from the unit after the wake-up timer is set, the unit will beep at the start up time.
- If any music source is played back at the start-up time, (f)ashes and playback will continue.
• After setting the wake-up timer, you can enable or disable it by pressing the TIMER button when the unit is on. - To stop the beep, press ■ or ⏻; otherwise, it will stop after 60 minutes.
* When the music source is set to AUX, Server, DIGITAL IN, or AirPlay, the unit beeps at the start up time.
Updating the firmware
When new firmware is released, a message to update your current firmware will be shown on the front panel display (when the unit is connected to the Internet only). In this page, an updating method via a network using the option setting is shown.
1 Press
- The option menu is shown on the front panel display.
2 Select [System Config] with ▲/▼ and press ENTER.
3 Select [Firm Update] with ▲/▼ and press ENTER.
4 Select [Network] with ▲/▼ and press ENTER.
- Update starts.

NET UPDATE 52:Writing 56%
- When update finishes, messages are shown in the following order: "Update success.", "Please...", and "power off!"
5 Unplug the power cable from the wall outlet and plug it back after about 30 seconds.
- Update is applied.

- Do not operate the unit or disconnect the power cable and network cables while updating.

- Once the message prompting update is shown on the front panel display, it will not be shown again, even if you do not perform updating. However, when you turn on the unit after the power cable has been disconnected from the wall outlet for a while, the message will be shown.
- When Internet speed is not fast enough or the unit is connected to the wireless network via a wireless network adapter, network update may not be possible depending on the condition of the wireless connection. In this case, try again or update the firmware using a USB memory device. The firmware can be downloaded from the Yamaha Website.
To update the firmware using a USB memory device
You can download the firmware to the USB memory device, and connect that USB memory device to the USB jack on the unit.
- Select [USB] in step 4 and press the ENTER button to start the update.
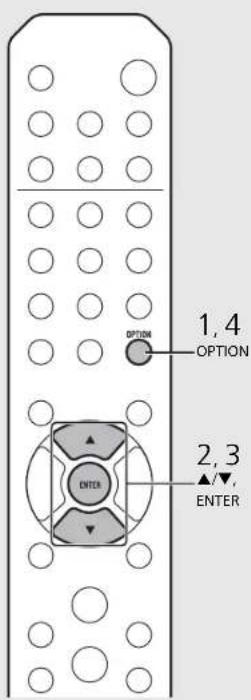
Option settings
Option settings allow you to configure the unit to suit how you will use it.
1
Press

-Option menu is shown on the front panel display (P.36).
2
Select a desired option menu with ▲/▼ and press CENTER
OPTION Network Config?
3
Change the setting with ▲/▼ and press ENTER.
- Repeat step 3 if the sub menu is required to be set.
- Press to cancel the setting and return to the previous level.
- Repeat steps 2 and 3 if you set another menu item.
4
Press to finish the option setting.

- To set [Advanced Setup] in the option menu, press the OPTION button on the remote control while pressing and holding □stop button) of the unit, then proceed to step 3.
Option menu list
| Menu Sub menu Default Function | ||
| Preset Delete ^*1 (P.24, 27) | Deletos preset stations. | |
| Initial Scan ^*2 (P.23) | ||
| DAB Tune Aid ^*2 (P.25) | Shows the level of received DAB signal. | |
| Equalizer(P.22) | EQ Low 0 Adjusts low frequency. | |
| EQ Mid 0 Adjusts middle frequency. | ||
| EQ High 0 Adjusts high frequency. | ||
| Balance (P.22) CENTER | ||
| Music Enhancer (P.22) | OFF Enables/disables Music Enhancer. | |
| Timer Setting (P.32) Sels the wake-up timer. | ||
| Network Info | Network Status | |
| MAC Address | ||
| System ID | ||
| Network Name | ||
| Menu Sub menu Default Function | |||
| Network Config | DHCP Enabled | YES | Enables/disables DHCP. |
| IP Address | 0.0.0.0 | Confirms and sets the IP address. | |
| Subnet Mask | 0.0.0.0 | Confirms and sets the subnet mask. | |
| Def. Gateway | 0.0.0.0 | Confirms and sets the default gateway. | |
| DNS Server(P): 0 | 0.0.0 | Confirms and sets the primary DNS server. | |
| DNS Server(S) | 0.0.0.0 | Confirms and sets the secondary DNS server. | |
| System Config | Clock Setting | Sets clock of this unit (P.31). | |
| Power Saving | Eco | Sets the eco standby (P.12). | |
| Auto Power Off | Timer 8H | Sets the unit into standby mode automatically (P.12). | |
| Use Accessory | NO | Selects whether or not to supply power to a Yamaha accessory connected through the DC.CUT jack. | |
| Firm Version S | Shows the firmware version of the unit. | ||
| Firm Update | Network | Updates the firmware of the unit (P.34). | |
| Advanced Setup(→ P.35) | MAC Add.Filter | OFF | Specifies the MAC address (up to 5) and restricts access to this unit of network components.(Operation with AirPlay is not affected even if [MAC Add.Filter] is set to [ON].) |
| Factory Reset | Resets the unit's settings to factory default. |
*1 Only when the radio is played back
*2 CRX-N560D only
Troubleshooting
Refer to the table below when the unit does not function properly. If your problem is not listed below or if the instruction below does not help, turn off the unit, disconnect the power cable, and contact the nearest authorized Yamaha dealer or service center.
First, check that the connectors of each cable are securely inserted in to jacks on each device.

General
| Problem Cause Solution | ||
| The unit enters the standby mode soon after the power is turned on. The unit does not operate properly. | The power cable is not properly connected. Connect the power cable firmly. | |
| The power does not turn off. | The internal microcomputer has frozen, due to an external electric shock (such as lightning or excessive static electricity) or to a drop in the power supply voltage. | Hold down on the front panel for more than 10 seconds to initialize and reboot the unit. (If the problem persists, unplug the power cable from the wall outlet and plug it again after 30 seconds or more.) |
| No sound. | No appropriate source has been selected. | Select an appropriate source with INPUT on the front panel or the source buttons on the remote control ( P.P.5,8 ). |
| Speaker connections are not secure. | Secure the connections ( P.P.9 ). | |
| The volume is minimum or mute. Turn up the volume. | ||
| The power is suddenly turned off. | The sleep timer may be set ( P.P.33 ). | Turn on the unit and play the source again. |
| Auto Power Off is set ( P.P.12 ). | ||
| The clock setting has been cleared. | The power cable has been disconnected or there was power outage. | Connect the power cable, and set the clock again ( P.P.31 ). |
| Sound is heard from the speaker on one side only. | Source device or speakers are not connected properly. | Connect the source device or speaker cables properly ( P.P.9,19 ). If the problem persists, the cables may be defective. |
| There is noise interference from digital or high-frequency equipment. | This unit is too close to the digital or high-frequency equipment. Place this unit farther away from such equipment. | |
| The remote control does not work or does not function properly. | The remote control may be operated outside its operation range. | Operate the remote control within its operation range ( P.P.12 ). |
| The remote control sensor on this unit may be exposed to direct sunlight or strong lighting such as an inverter type fluorescent lamp. | Change the orientation of lighting or the unit, or location of the unit. | |
| The battery may be worn out. | Replace the batteries with new ones ( P.P.4 ). | |
| There are obstacles between the sensor of this unit and the remote control. Remove the obstacles. | ||
Network
| Problem Cause Solution | ||
| The network feature does not function. The network parameters (IP address) have not been obtained properly. | Enable the DHCP server function on your router and set [DHCP Enabled] of [Network Config] in the option menu to [YES] on the unit. If you want to configure the network parameters manually, check that you are using an IP address which is not used by other network devices in your network (P.P.36). | |
| Playback stops (songs cannot be played back continuously). | There are unsupported files in the server. | Remove the files (including image files or hidden files) which the unit does not support, from the folder being played back. |
| The unit does not detect the PC. | The media sharing setting is not correct. | Configure the sharing setting and select the unit as a device to which music contents are shared (P.P.17). |
| Some security software installed on your PC is blocking the access of the unit to your PC. | Check the settings of security software installed on your PC. | |
| The unit and PC are not in the same network. | Check the network connections and your router settings, and then connect the unit and the PC to the same network. | |
| The MAC address filter is enabled on the unit. | In [Advanced Setup] in the option menu of the unit, set [MAC AddFilter] to [OFF] (P.P.36). | |
| Your PC is connected to the secondary SSID of a router supporting multi SSID. | When your PC is connected to the secondary SSID, access to the device connecting to the primary SSID or LAN is restricted (only Internet access is available). Connect your PC to the primary SSID. | |
| Multiple routers are connected between your network devices (double router). | Disconnect Internet temporarily, check the local network, and connect the network device you wish to use to the same router. | |
| The files in the PC cannot be viewed or played back. | The files are not supported by the unit or the media server. | Use the file format supported by both the unit and the media server (P.P.44). |
| Some files cannot be played back with the unit. | You are trying to play back files with DRM (Digital Rights Management) purchased on iTunes Store. | Files with DRM (Digital Rights Management) purchased on iTunes Store cannot be played back. |
| The Internet radio cannot be played. | The selected Internet radio station is currently not available. | There may be a network problem at the radio station, or the service may have been stopped. Try the station later or select another station. |
| The selected Internet radio station is currently broadcasting silence. | Some Internet radio stations broadcast silence at certain times of the day. Try the station later or select another station. | |
| Access to the network is restricted by the firewall settings of your network devices (such as the router). | Check the firewall settings of your network devices. The Internet radio can be played only when it passes through the port designated by each radio station. The port number varies depending on the radio station. | |
| The application dedicated to mobile devices does not detect the unit. | The MAC address filler is enabled on the unit. | In [Advanced Setup] in the option menu of the unit, set [MAC Add.Filter] to [OFF] or specify the MAC address of your mobile devices to allow it to access to the unit (P.P.36). |
| The unit and mobile devices are not in the same network. | Check the network connections and your router settings, and then connect the unit and mobile device to the same network. | |
| Your mobile device is connected to the secondary SSID of a router supporting multi SSID. | When your mobile device is connected to the secondary SSID, access to the device connecting to the primary SSID or LAN is restricted (only Internet access is available). Connect your mobile device to the primary SSID. | |
| Multiple routers are connected between your network devices (double router). | Disconnect Internet temporarily, check the local network, and connect the network device you wish to use to the same router. | |
| Update of the firmware via network failed. The network connection is unstable. | Try updating again after a while. Or update the firmware via USB memory (P.P.34). | |
iPod
| Problem Cause Solution | ||
| No sound. | The iPod is not connected properly. | Reconnect the iPod to the USB jack (P.15). |
| The iPod software version is out of date. | Download the latest iTunes software from Apple's website to update the iPod software version. | |
| The iPod is in the process of connecting with the unit. Please wait for a while. | ||
| The iPod cannot be operated by the iPod, unit, or remote control. | The iPod is not supported by this unit. | Use a supported iPod (P.43). |
| The iPod is not connected properly. | Reconnect the iPod to the USB jack (P.15). | |
| The iPod software version is out of date. | Download the latest iTunes software from Apple's website to update the iPod software version. If the problem cannot be solved, even with the latest software, reset the iPod. | |
| When the display mode for iPod is set to the standard mode, the unit or remote control cannot control an iPod. When in the extended mode, iPod does not function for controlling itself. | Check the display mode (P.16). | |
| The playback information is not shown on the front panel display. | The iPod does not support display of playback information. | This function is only available with an iPod suitably supported by this unit (P.43). |
| The display mode is set to the standard mode. | Change the display mode to the extended mode (P.16). | |
Troubleshooting
| Problem Cause Solution | ||
| The iPod does not charge up. | The iPod is not connected properly. | Reconnect the iPod to the USB jack (P.15). |
| The iPod is not supported by this unit. | Use a supported iPod (P.43). | |
| The unit is in the eco standby mode. | Set [Power Saving] to [Normal] with the option setting (P.12). | |

Disc
| Problem Cause Solution | ||
| Playback does not start after a disc is set. Some button operations do not work. | The disc set into the unit may not be compatible. | Use a disc supported by the unit (P43). |
| Playback does not start immediately after pressing ▷√□□unit or on ▶■the remote control (stops immediately). | The disc may be dirty. | Wipe the disc clean (P43). |
| The disc set in the unit may not be supported. | Use the disc supported by the unit (P43). | |
| If the unit was moved from a cold to warm place, condensation may have formed on the disc reading lens. | Wait for an hour or two until the unit adjusts to the room temperature, and try again. | |

USB devices
| Problem Cause Solution | ||
| The unit does not detect the USB device. | The USB device is not connected to the USB jack securely. | Turn off the unit, reconnect your USB device, and turn the unit on again (P.P.15). |
| The file system of the USB device is not FAT16 or FAT32. | Use a USB device with FAT16 or FAT32 format. | |
| Folders and files in the USB device cannot be viewed. | The data in the USB device is protected by the encryption. Use a USB device without an encryption function. | |
DAB reception (CRX-N560D only)
| Problem Cause Solution | ||
| Cannot tune into any DAB stations. | The initial scan operations were not performed. | Perform the initial scan operations (P.P.23). |
| The initial scan operations are not successful and [Not Found] is shown on the front panel display. | The DAB signals are too weak. | Use the DAB Tune Aid feature to conform the best position of the antenna (P.P.25). |
| The positioning of the antenna is not optimal for DAB reception. | ||
| There is no DAB coverage in your area. | Check with your dealer or WorldDMB online at http://www.worlddab.org for a listing of the DAB coverage in your area. | |
| There is noise interference (e.g. hiss, crackle or jitter) | The antenna needs to be repositioned. | Readjust the position of the antenna (P.P.10). |
| The DAB signals are too weak. | Use the DAB Tune Aid feature to conform the best position of the antenna (P.P.25). | |
| The DAB station information is not shown or is inaccurate. | The DAB station may be temporarily out of service, or the DAB station information is not provided by the DAB broadcaster. | Contact the DAB broadcaster. |
FM reception
| Problem Cause Solution | ||
| FM stereo reception is noisy. | The antenna is not connected properly. | Make sure the antenna is connected properly and change the position of the antenna (P.10). |
| The radio station you selected may be far from your area, or the antenna input is poor. | Use a commercially available outdoor antenna. For details, consult a specialist store. | |
| Automatic tuning does not work. | The radio station you selected may be far from your area, or the antenna input is poor. | Use a commercially available outdoor antenna. For details, consult a specialist store. |
| Use the manual tuning method (P.26). | ||
| Cannot select a preset radio station. | The preset (memory) may have been erased. | Preset radio stations again (P.26, 27). |
| There is distortion, and clear reception cannot be obtained even with a good FM antenna or an outdoor antenna. | Multipath reflection or other radio interference may have occurred. | Change the height, direction, or placement of the antenna. |
Messages on the front panel display
| Message Cause Solution | ||
| Unknown | There is a problem with the signal path from your iPod to this unit. Reconnect the iPod. | |
| The iPod/USB device being connected is not supported by the unit. | Use a supported iPod/USB device (P.P.43). | |
| The iPod software is out of date. | Download the latest iTunes software from Apple's website to update the iPod software version. | |
| Timer not work | The unit is in the eco standby mode. | Set [Power Saving] to [Normal] with the option setting (P.P.12). |
| Overcurrent | The connected iPod/USB device is not supported by the unit. | Disconnect the iPod/USB device, turn off the unit, and turn it on again. If this does not solve the problem for the USB device, it is not playable on the unit. |
| iPod/USB device is not connected properly. | ||
| Unplugged | iPod/USB device is not connected firmly. | Disconnect the iPod/USB device and reconnect it (P.P.15). |
| No Disc | The disc set in the unit may not be supported by the unit. | Use a disc supported by the unit (P.P.43). |
| The disc may be dirty, or foreign objects may be attached to it. Remove the disc and then wipe the disc clean. | ||
| Disc is set upside-down. Set the disc with the labeled side facing up. | ||
| No Songs | The disc does not contain playable files. | Set a disc with playable files (P.P.43). |
| Initializing The unit is starting up. | Wait until the message disappears. If the message stays more than 3 minutes, turn off the unit and turn it on again. | |
| Loading... | The unit is loading the specified file/contents. | Wait until the unit finishes loading. |
| No Content | Selected folder does not contain playable files. | Select a folder with playable files (P.P.44). |
| Not Connected | The unit is not connected to the Internet. | Check the Internet connection. |
| Unsupported | You are trying to play back a file which the unit does not support | Play a file supported by the unit (P.P.44). |
| No Operation | You are trying to open the disc tray while setting the option menu. | Open the disc tray after the option setting is finished. |
| Access Denied | Access to the PC is denied. | Configure the sharing settings and select the unit as a device to which music contents are shared (P.P.17). |
| Access Error | The unit cannot access the USB device. | Turn off the unit and reconnect your USB device. If the problem persists, try another USB device. |
| The unit cannot access the iPod. | Turn off the iPod and turn it on again. | |
| The connected iPod is not supported by the unit. | Use an iPod supported by the unit (P.P.43). | |
| There is a problem with the signal path from the network to the unit. | Make sure your router and modem are turned on. | |
| Check the connection between the unit and your router (or hub) (P.P.11). | ||
| Version Error | Firmware update is failed. | Update the firmware again. |
Supported devices/media and file formats
Supported devices/ medias
PCs
PC with Windows Media Player 11 or Windows Media Player 12 installed.
NAS
NAS that is compatible with DLNA version 1.5.
USB devices
- This unit supports USB mass storage class devices (e.g., flash memories or portable audio players) using FAT16 or FAT32 format.
- Do not connect devices other than USB mass storage class devices (such as USB chargers or USB hubs), PCs, card readers, an external HDD, etc.
•USB devices with encryption cannot be used.
iPod
| iPod | iPod touch (1st, 2nd, 3rd, 4th and 5th generations), iPod nano (2nd, 3rd, 4th, 5th, 6th and 7th generations) |
| iPhone | iPhone 5, iPhone 4S, iPhone 4, iPhone 3GS, iPhone 3G, iPhone |
| iPad | iPad (4th generation), iPad mini, iPad (3rd generation), iPad 2, iPad |
(As of August 2013)
Note
iPod is licensed on the condition that individuals perform privately duplication and playback of uncopyrighted material or material legally approved of duplication and playback. Infringement of copyright is prohibited by law.
Discs
- This unit is designed for use with audio CD, CD-R/RW (ISO 9660 format) with any of the following logos printed on the disc or the disc jacket.
Audio CD


CD-R/RW ^x


* Discs which bear one of the following.
FOR CONSUMER
FOR CONSUMER USE
FOR MUSIC USE ONLY
-8-cm discs are playable with this unit.
Set a disc in the inner recessed area of the disc tray.
Notes on discs
- Do not set any other type of disc other than stated above in this unit. Doing so may damage the unit.
- CD-R/RW cannot be played back unless finalized.
- Some discs cannot be played back depending on the disc characteristics or recording conditions.
- Do not use any non-standard shaped discs such as a heart-shaped disc.
- Do not use discs with many scratches or a crack on their surface, or warped/glued discs.
Handling discs
- Do not touch the surface of the disc. Hold a disc by its edge or center hole.
- Use a soft-tipped pen when writing on the label side of a disc.
- Do not put tape, seal, glue, etc., on a disc.
- Do not use a protective cover to prevent scratches.
- Do not set foreign object on the disc tray.
- Do not set more than one disc in this unit at one time. This could cause damage to both this unit and the discs.
- If a disc becomes dirty, wipe it with a clean, dry soft cloth from the center out to the edge. Do not use record cleaner or paint thinner.
- Do not use any lens cleaners as they may cause malfunction.
- Do not expose discs to direct sunlight, high temperature, high humidity, or dust.
- When a disc is not being used, remove it from this unit and store in an appropriate case.

File format
File format the unit supporting is as follows.
DLNA/USB
- The unit supports playback of WAV (PCM format only), MP3, WMA, MPEG-4 AAC and FLAC files (1- or 2-channel audio only).
•The unit is compatible with sampling rates of up to 192 kHz for WAV and FLAC files, and 48 kHz for other files.
• To play back FLAC files, you need to install server software that supports sharing of FLAC files via DLNA on your PC or use a NAS that supports FLAC files. - Digital Rights Management (DRM) contents cannot be played back.
Discs
• The unit supports playback of MP3 and WMA files with a sampling rate of up to 48 kHz.
- The unit is compatible with both constant and variable bitrates of from 8 to 320 kbps for MP3 files, and from 16 to 320 kbps for WMA files.
- This unit can play back a maximum of 512 files, 255 folders (maximum of 511 files in a folder).
•Digital Rights Management (DRM) files cannot be played back.

AirPlay works with iPhone, iPad, and iPod touch with iOS 4.3.3 or later, Mac with OS X Mountain Lion, and Mac and PC with iTunes 10.2.2 or later.
"Made for iPod," "Made for iPhone," and "Made for iPad" mean that an electronic accessory has been designed to connect specifically to iPod, iPhone, or iPad, respectively, and has been certified by the developer to meet Apple performance standards.
Apple is not responsible for the operation of this device or its compliance with safety and regulatory standards.
Please note that the use of this accessory with iPod, iPhone, or iPad may affect wireless performance.
AirPlay, iPad, iPhone, iPod, iPod nano, iPod touch and iTunes are trademarks of Apple Inc., registered in the U.S. and other countries.

Fraunhofer
MPEG Layer 3 audio coding technology licensed from Fraunhofer IIS and Thomson.

This unit supports network connections.

DLNA™ and DLNA CERTIFIED™ are trademarks or registered trademarks of Digital Living Network Alliance. All rights reserved. Unauthorized use is strictly prohibited.
Windows™
Windows is a registered trademark of Microsoft Corporation in the United States and other countries.
Internet Explorer, Windows Media Audio and Windows Media Player are either registered trademarks or trademarks of Microsoft Corporation in the United States and/or other countries.
Android™
Android and Google Play are trademarks of Google, Inc.

Digital Audio Broadcasting

Digital Audio Broadcasting
(For CRX-N560D)
The unit supports DAB/DAB+ tuning.
Specifications
Player section
| CD | Media CD, CD R/RW | ||
| Audio format Audio CD, MP3, WMA | |||
| Laser | Type Semiconductor | laser GaAs/GaAlAs | |
| Wave length 790 nm | |||
| Output power 10 mW | |||
| iPod(digitalconnection) | Supported iPod | See page 43 Supported iPhone | |
| Supported iPad | |||
| USB Supported file format | MP3, WMA, MPEG4 AAC, WAV*, FLAC*+ up to 192 kHz/24 bit | ||
| AUX IN | Inputconnector | AUX1 Stereo L/R: RCA | |
| AUX2 3.5 mm stereo | mini jack | ||
| DIGITAL IN | Inputconnector | DIGITAL IN 1 Optical | |
| DIGITAL IN 2 Coaxial | |||
| Network | Interface 100Base-TX/10Base-T | ||
| Internet radio vIuner service supported | |||
| PC client function | DLNA Ver. 1.5 (DMP/DMR function)supported | ||
| Supported file format | MP3, WMA, MPEG4 AAC, WAV*, FLAC*+ up to 192 kHz/24 bit | ||
| AirPlay AirPlay supported | |||
Tuner section
| Tuning range | DAB (CRX-N560D only) 174 to 240 MHz (Band III) | |
| FM | 8/50 to 108.00 MHz | |
Amplifier section
| Maximum output power | 32 W + 32 W (6 Ω 1 kHz, 10% THD) |
| Total harmonic distortion AUX1 1 kHz/12.5 W | 0.05% or less |
| EQ control | EQ High (treble)/EQ Mid (middle)/EQ Low (bass): ±10 dB |
| Headphones | Stereo L/R: 3.5mm stereo mini jackAdapted impedance: 16 Ω - 32 Ω |
General
| Power supply | AC 230 V, 50 Hz |
| Power consumption | 44 W |
| Power consumption in the standby mode | 6 W or less |
| Power consumption in the eco standby mode | 0.5 W or less |
| Dimensions (W × H × D) | 215 × 110 × 288 mm(8-1/2 × 4-3/8 × 11-3/8 in) |
| Weight | 2.7 kg (6.0 lbs.) |
(As of August 2013)
Specifications are subject to change without notice.
Table des matières
Introduction.....4
Accessoires fournis.....4
Piles (× 2)
(AA, R6, UM-3)
①Horloge
⑰ (REPEAT) (P.20)
⑱ TIMER (√ P.32)
⑲ SLEEP (○ P.33)
Préparations
3
![Network and Being Center > Media Streaming options Choose media streaming options for computers and devices Media streaming is not turned on Media streaming should play music, video, images and radio in other computers and devices on your website. You should play a video streamer or other computer and device. If you turn on media streaming, you currently play, video and radio settings will be modified. If you should change media streaming only on networks that you find, such as home or well networks. [ ] Let you change streaming... Tell me more about media streaming Find the tracking system.](/content/2026/02/401065/images/53af8ac1276f358d98878db3d29871a0442b1b61be9ce709bdfefa60a0b4eb11.jpg)
4


natural_image
Front view of a remote control panel with circular buttons and a central rotary knob (no text or symbols)REPEAT SHUFFLE

| 174.928/5A | 176.640/5B | 178.352/5C | 180.064/5D |
| 181.936/6A | 183.648/6B | 185.360/6C | 187.072/6D |
| 188.928/7A | 190.640/7B | 192.352/7C | 194.064/7D |
| 195.936/8A | 197.648/8B | 199.360/8C | 201.072/8D |
| 202.928/9A | 204.640/9B | 206.352/9C | 208.064/9D |
| 209.936/10A | 211.648/10B | 213.360/10C | 215.072/10D |
| 216.928/11A | 218.640/11B | 220.352/11C | 222.064/11D |
| 223.936/12A | 225.648/12B | 227.360/12C | 229.072/12D |
| 230.784/13A | 232.496/13B | 234.208/13C | 235.776/13D |
| 237.488/13E | 239.200/13F |
Préréglage de stations DAB

• Si le signal provenant de la station de
Annulation d'AirPlay
Anomalies Causes possibles Solution
Anomalies Causes possibles Solution
Anomalies Causes possibles Solution
Digital Audio Broadcasting

Digital Audio Broadcasting
(Pour CRX-N560D)
①Uhrzeit
⑰ (REPEAT) (S.20)
⑱ TIMER (▽ S.32)
⑲ SLEEP (○ S.33)
Vorbereitungen
3
![Search media streaming options for computers and devices Media streaming to find turned out Media streaming about your own products, pictures and silhouettes other computers and devices on your platform. You should you to make an app in selecting other computers and devices. If you can use media streaming, you currently receive preferential webpages and will be modified. If you should use media streaming only or without that you need, such as home or own networks. [ ] Find any media streaming Tell me more about media streaming. Find the pricing allowed online.](/content/2026/02/401065/images/68389742c9f599a5cc95a8862c31c78b156d8e951cd9bce70800a4a2adaef7ae.jpg)
4

natural_image
Front view of a remote control panel with circular buttons and a central rotary knob (no text or symbols)REPEAT SHUFFLE
| 174.928/5A | 176.640/5B | 178.352/5C | 180.064/5D |
| 181.936/6A | 183.648/6B | 185.360/6C | 187.072/6D |
| 188.928/7A | 190.640/7B | 192.352/7C | 194.064/7D |
| 195.936/8A | 197.648/8B | 199.360/8C | 201.072/8D |
| 202.928/9A | 204.640/9B | 206.352/9C | 208.064/9D |
| 209.936/10A | 211.648/10B | 213.360/10C | 215.072/10D |
| 216.928/11A | 218.640/11B | 220.352/11C | 222.064/11D |
| 223.936/12A | 225.648/12B | 227.360/12C | 229.072/12D |
| 230.784/13A | 232.496/13B | 234.208/13C | 235.776/13D |
| 237.488/13E | 239.200/13F |
DLS (Dynamic Label Segment) (Standard)
ENSEMBLE

536 NetRadio Station List
Digital Audio Broadcasting

Digital Audio Broadcasting
(Für CRX-N560D)
⑰ (REPEAT) (P.20)
⑱ TIMER (√ P.32)
⑲ SLEEP (○ P.33)
Voorbereidingen
Status in stand-by/ecostand-by
Installeer de speciale toepassing "NETWORK PLAYER CONTROLLER" op uw mobiele apparaten (P.18).
3
4


natural_image
Front view of a remote control panel with circular buttons labeled 'AMTLE' and 'RESET' (no additional text or symbols)REPEAT SHUFFLE

| 174.928/5A | 176.640/5B | 178.352/5C | 180.064/5D |
| 181.936/6A | 183.648/6B | 185.360/6C | 187.072/6D |
| 188.928/7A | 190.640/7B | 192.352/7C | 194.064/7D |
| 195.936/8A | 197.648/8B | 199.360/8C | 201.072/8D |
| 202.928/9A | 204.640/9B | 206.352/9C | 208.064/9D |
| 209.936/10A | 211.648/10B | 213.360/10C | 215.072/10D |
| 216.928/11A | 218.640/11B | 220.352/11C | 222.064/11D |
| 223.936/12A | 225.648/12B | 227.360/12C | 229.072/12D |
| 230.784/13A | 232.496/13B | 234.208/13C | 235.776/13D |
| 237.488/13E | 239.200/13F |

AirPlay wissen
Opmerking over discs
Digital Audio Broadcasting

Digital Audio Broadcasting
(Voor CRX-N560D)
This product uses the following free software. For information (copyright, etc) about each software, read the original sentences stated below.
About ASN.1 object dumping code
ASN.1 object dumping code, copyright Peter Gutmann pgut001@cs.auckland.ac.nz, based on ASN.1 dump program by David Kemp dpkemp@missincsc.mil, with contributions from various people including Matthew Hamrick hamrick@rsa.com, Bruno Couillard bcouillard@chrysalis-its.com, Hallyard Furuseth h.b.furuseth@usit.uio.no, Geoff Thorpe geoff@raas.co.nz, David Boyce d.boyce@isode.com, John Hughes john.hughes@entegrity.com, Life is hard, and then you die ronald@trustpoint.com, Hans-Olof Hermansson hans-olof.hermansson@postnet.se, Tor Rustad Tor.Rustad@bbs.no, Kjetil Barvik kjetil.barvik@lobs.no, James Sweeny jsweeny@us.ibm.com, and several other people whose names I've misplaced.
This code grew slowly over time without much design or planning, with features being tacked on as required.
It's not representative of my normal coding style.
About FLAC codec Library
Copyright © 2000,2001,2002,2003,2004,2005,2006,2007,2008,2009 Josh Coalson
Redistribution and use in source and binary forms, with or without modification, are permitted provided that the following conditions are met:
Redistributions of source code must retain the above copyright notice, this list of conditions and the following disclaimer.
Redistributions in binary form must reproduce the above copyright notice, this list of conditions and the following disclaimer in the documentation and/or other materials provided with the distribution.
Neither the name of the Xiph.org Foundation nor the names of its contributors may be used to endorse or promote products derived from this software without specific prior written permission.
THIS SOFTWARE IS PROVIDED BY THE COPYRIGHT HOLDERS AND CONTRIBUTORS "AS IS" AND ANY EXPRESS OR IMPLIED WARRANTIES, INCLUDING, BUT NOT LIMITED TO, THE IMPLIED WARRANTIES OF MERCHANTABILITY AND FITNESS FOR A PARTICULAR PURPOSE ARE DISCLAIMED. IN NO EVENT SHALL THE FOUNDATION OR CONTRIBUTORS BE LIABLE FOR ANY DIRECT, INDIRECT, INCIDENTAL, SPECIAL, EXEMPLARY, OR CONSEQUENTIAL DAMAGES (INCLUDING, BUT NOT LIMITED TO, PROCUREMENT OF SUBSTITUTE GOODS OR SERVICES; LOSS OF USE, DATA, OR PROFITS; OR BUSINESS INTERRUPTION) HOWEVER CAUSED AND ON ANY THEORY OF LIABILITY, WHETHER IN CONTRACT, STRICT LIABILITY, OR TORT (INCLUDING NEGLIGENCE OR OTHERWISE) ARISING IN ANY WAY OUT OF THE USE OF THIS SOFTWARE, EVEN IF ADVISED OF THE POSSIBILITY OF SUCH DAMAGE.
About libexpat
Copyright © 1998, 1999, 2000 Thai Open Source Software Center Ltd and Clark Cooper
Copyright © 2001, 2002, 2003, 2004, 2005, 2006 Expat. maintainers.
Permission is hereby granted, free of charge, to any person obtaining a copy of this software and associated documentation files (the "Software"), to deal in the Software without restriction, including without limitation the rights to use, copy, modify, merge, publish, distribute, sublicense, and/or sell copies of the Software, and to permit persons to whom
the Software is furnished to do so, subject to the following conditions:
The above copyright notice and this permission notice shall be included in all copies or substantial portions of the Software.
THE SOFTWARE IS PROVIDED "AS IS", WITHOUT WARRANTY OF ANY KIND, EXPRESS OR IMPLIED, INCLUDING BUT NOT LIMITED TO THE WARRANTIES OF MERCHANTABILITY, FITNESS FOR A PARTICULAR PURPOSE AND NONINFRINGEMENT. IN NO EVENT SHALL THE AUTHORS OR COPYRIGHT HOLDERS BE LIABLE FOR ANY CLAIM, DAMAGES OR OTHER LIABILITY, WHETHER IN AN ACTION OF CONTRACT, TORT OR OTHERWISE, ARISING FROM, OUT OF OR IN CONNECTION WITH THE SOFTWARE OR THE USE OR OTHER DEALINGS IN THE SOFTWARE.
About The Independent JPEG Group's JPEG software
The Independent JPEG Group's JPEG software
Copyright © 1991-2010, Thomas G. Lane, Guido Vollbeding.
All Rights Reserved except as specified below.
The authors make NO WARRANTY or representation, either express or implied, with respect to this software, its quality, accuracy, merchantability, or fitness for a particular purpose. This software is provided "AS IS", and you, its user, assume the entire risk as to its quality and accuracy.
Permission is hereby granted to use, copy, modify, and distribute this software (or portions thereof) for any purpose, without fee, subject to these conditions:
(1) If any part of the source code for this software is distributed, then this README file must be included, with this copyright and no-warranty notice unaltered; and any additions, deletions, or changes to the original files must be clearly indicated in accompanying documentation.
(2) If only executable code is distributed, then the accompanying documentation must state that "this software is based in part on the work of the Independent JPEG Group".
(3) Permission for use of this software is granted only if the user accepts full responsibility for any undesirable consequences; the authors accept NO LIABILITY for damages of any kind.
These conditions apply to any software derived from or based on the UG code, not just to the unmodified library. If you use our work, you ought to acknowledge us.
Permission is NOT granted for the use of any UG author's name or company name in advertising or publicity relating to this software or products derived from it. This software may be referred to only as "the Independent JPEG Group's software".
We specifically permit and encourage the use of this software as the basis of commercial products, provided that all warranty or liability claims are assumed by the product vendor.
About JsonCpp
Permission is hereby granted, free of charge, to any person obtaining a copy of this software and associated documentation files (the "Software"), to deal in the Software without restriction, including without limitation the rights to use, copy, modify, merge, publish, distribute, sublicense, and/or sell copies of the Software, and to permit persons to whom the Software is furnished to do so, subject to the following conditions:
The above copyright notice and this permission notice shall be included in all copies or substantial portions of the Software.
THE SOFTWARE IS PROVIDED "AS IS", WITHOUT WARRANTY OF ANY KIND, EXPRESS OR IMPLIED, INCLUDING BUT NOT LIMITED TO THE WARRANTIES OF MERCHANTABILITY, FITNESS
FOR A PARTICULAR PURPOSE AND NONINFRINGEMENT. IN NO EVENT SHALL THE AUTHORS OR COPYRIGHT HOLDERS BE LIABLE FOR ANY CLAIM, DAMAGES OR OTHER LIABILITY, WHETHER IN AN ACTION OF CONTRACT, TORT OR OTHERWISE, ARISING FROM, OUT OF OR IN CONNECTION WITH THE SOFTWARE OR THE USE OR OTHER DEALINGS IN THE SOFTWARE.
About Network
Copyright © 1988 Stephen Deering.
Copyright © 1992, 1993
The Regents of the University of California. All rights reserved.
Copyright © 1985, 1986, 1993
The Regents of the University of California. All rights reserved.
Redistribution and use in source and binary forms, with or without modification, are permitted provided that the following conditions are met:
(1) Redistributions of source code must retain the above copyright notice, this list of conditions and the following disclaimer.
(2) Redistributions in binary form must reproduce the above copyright notice, this list of conditions and the following disclaimer in the documentation and/or other materials provided with the distribution.
(3) All advertising materials mentioning features or use of this software must display the following acknowledgement:
This product includes software developed by the University of California, Berkeley and its contributors.
(4) Neither the name of the University nor the names of its contributors may be used to endorse or promote products derived from this software without specific prior written permission.
THIS SOFTWARE IS PROVIDED BY THE REGENTS AND CONTRIBUTORS "AS IS" AND ANY EXPRESS OR IMPLIED WARRANTIES, INCLUDING, BUT NOT LIMITED TO, THE IMPLIED WARRANTIES OF MERCHANTABILITY AND FITNESS FOR A PARTICULAR PURPOSE ARE DISCLAIMED. IN NO EVENT SHALL THE REGENTS OR CONTRIBUTORS BE LIABLE FOR ANY DIRECT, INDIRECT, INCIDENTAL, SPECIAL, EXEMPLARY, OR CONSEQUENTIAL DAMAGES (INCLUDING, BUT NOT LIMITED TO, PROCUREMENT OF SUBSTITUTE GOODS OR SERVICES; LOSS OF USE, DATA, OR PROFITS; OR BUSINESS INTERRUPTION) HOWEVER CAUSED AND ON ANY THEORY OF LIABILITY, WHETHER IN CONTRACT, STRICT LIABILITY, OR TORT (INCLUDING NEGLIGENCE OR OTHERWISE) ARISING IN ANY WAY OUT OF THE USE OF THIS SOFTWARE, EVEN IF ADVISED OF THE POSSIBILITY OF SUCH DAMAGE.
Copyright © 1982, 1986 Regents of the University of California.
All rights reserved.
Copyright © 1982, 1986, 1988 Regents of the University of California.
All rights reserved.
Redistribution and use in source and binary forms are permitted provided that the above copyright notice and this paragraph are duplicated in all such forms and that any documentation, advertising materials, and other materials related to such distribution and use acknowledge that the software was developed by the University of California, Berkeley. The name of the University may not be used to endorse or promote products derived from this software without specific prior written permission.
THIS SOFTWARE IS PROVIDED "AS IS" AND WITHOUT ANY EXPRESS OR IMPLIED WARRANTIES, INCLUDING, WITHOUT LIMITATION, THE IMPLIED WARRANTIES OF MERCHANTABILITY AND FITNESS FOR A PARTICULAR PURPOSE.
About PNG Reference Library
ibpng versions 1.2.6, August 15, 2004, through 1.4.5, December 9, 2010, are Copyright © 2004, 2006-2010 Glenn Randers-Pehrson, and are distributed according to the same disclaimer and license as libpng-1.2.5 with the following individual added to the list of Contributing Authors
Cosmin Truta
libpng versions 1.0.7, July 1, 2000, through 1.2.5 – October 3, 2002, are Copyright © 2000-2002 Glenn Randers Pehrson, and are distributed according to the same disclaimer and license as libpng-1.0.6 with the following individuals added to the list of Contributing Authors
Simon Pierre Cadieux Eric S. Raymond Gilles Vollant
and with the following additions to the disclaimer: There is no warranty against interference with your enjoyment of the library or against infringement. There is no warranty that our efforts or the library will fulfill any of your particular purposes or needs. This library is provided with all faults, and the entire risk of satisfactory quality, performance, accuracy, and effort is with the user.
libong versions 0.97, January 1998, through 1.0.6, March 20, 2000, are Copyright © 1998, 1999 Glenn Randers-Pehrson, and are distributed according to the same disclaimer and license as libong-0.96, with the following individuals added to the list of Contributing Authors:
Tom Lane Glenn Randers-Pehrson Willem van Schaik
libpng versions 0.89, June 1996, through 0.96, May 1997, are Copyright © 1996, 1997 Andreas Dilger Distributed according to the same disclaimer and license as libpng-0.88, with the following individuals added to the list of Contributing Authors:
John Bowler Kevin Bracey Sam Bushell
Magnus Holmgren Greg Roelofs Tom Tanner
libpng versions 0.5, May 1995, through 0.88, January 1996, are Copyright © 1995, 1996 Guy Eric Schainat, Group 42, Inc. For the purposes of this copyright and license, "Contributing Authors" is defined as the following set of individuals:
Andreas Dilger Dave Martindale Guy Eric Schalnat Paul Schmidt Tim Wegner
The PNG Reference Library is supplied "AS-IS". The Contributing Authors and Group 42, Inc. disclaim all warranties, expressed or implied, including, without limitation, the warranties of merchantability and of fitness for any purpose. The Contributing Authors and Group 42, Inc. assume no liability for direct, indirect, incidental, special, exemplary, or consequential damages, which may result from the use of the PNG Reference Library, even if advised of the possibility of such damage.
Permission is hereby granted to use, copy, modify, and distribute this source code, or portions hereof, for any purpose, without fee, subject to the following restrictions:
(1) The origin of this source code must not be misrepresented.
(2) Altered versions must be plainly marked as such and must not be misrepresented as being the original source.
(3) This Copyright notice may not be removed or altered from any source or altered source distribution.
The Contributing Authors and Group 42, Inc. specifically permit, without fee, and encourage the use of this source code as a component to supporting the PNG file format in commercial products. If you use this source code in a product, acknowledgment is not required but would be appreciated.
About RC4 Algorithm
Copyright Mocana Corp 2003-2005. All Rights Reserved.
Proprietary and Confidential Material.
About WPA Supplicant
Copyright © 2003-2008, Jouni Malinen j@w1.fi and contributors
All Rights Reserved.
Redistribution and use in source and binary forms, with or without modification, are permitted provided that the following conditions are met:
(1) Redistributions of source code must retain the above copyright notice, this list of conditions and the following disclaimer.
(2) Redistributions in binary form must reproduce the above copyright notice, this list of conditions and the following disclaimer in the documentation and/or other materials provided with the distribution.
(3) Neither the name(s) of the above-listed copyright holder(s) nor the names of its contributors may be used to endorse or promote products derived from this software without specific prior written permission.
THIS SOFTWARE IS PROVIDED BY THE COPYRIGHT HOLDERS AND CONTRIBUTORS "AS IS" AND ANY EXPRESS OR IMPLIED WARRANTIES, INCLUDING, BUT NOT LIMITED TO, THE IMPLIED WARRANTIES OF MERCHANTABILITY AND FITNESS FOR A PARTICULAR PURPOSE ARE DISCLAIMED. IN NO EVENT SHALL THE COPYRIGHT OWNER OR CONTRIBUTORS BE LIABLE FOR ANY DIRECT, INDIRECT, INCIDENTAL, SPECIAL, EXEMPLARY, OR CONSEQUENTIAL DAMAGES (INCLUDING, BUT NOT LIMITED TO, PROCUREMENT OF SUBSTITUTE GOODS OR SERVICES; LOSS OF USE, DATA, OR PROFITS; OR BUSINESS INTERRUPTION) HOWEVER CAUSED AND ON ANY THEORY OF LIABILITY, WHETHER IN CONTRACT, STRICT LIABILITY, OR TORT (INCLUDING NEGLIGENCE OR OTHERWISE) ARISING IN ANY WAY OUT OF THE USE OF THIS SOFTWARE, EVEN IF ADVISED OF THE POSSIBILITY OF SUCH DAMAGE.
About zlib Library
Copyright notice:
© 1995-2010 Jean-loup Gailly and Mark Adler
This software is provided 'as-is', without any express or implied warranty. In no event will the authors be held liable for any damages arising from the use of this software.
Permission is granted to anyone to use this software for any purpose, including commercial applications, and to alter it and redistribute it freely, subject to the following restrictions:
(1) The origin of this software must not be misrepresented; you must not claim that you wrote the original software. If you use this software in a product, an acknowledgment in the product documentation would be appreciated but is not required.
(2) Altered source versions must be plainly marked as such, and must not be misrepresented as being the original software.
(3) This notice may not be removed or altered from any source distribution.
Do not disassemble, decompile, or reverse engineer the software included in Yamaha AV products.

YAMAHA

- Contents
- Introduction.....4
- Part name.....5
- Preparations.....9
- Setting the network devices.....13
- Listening to CD.....14
- Listening to iPod/USB devices.....15
- Listening to the songs in the computer.....17
- Listening to external sources.....19
- More on playback.....20
- Listening to DAB stations (CRX-N560D only).....23
- Listening to FM radio stations.....26
- Listening to Internet radio.....29
- Listening to the Music with
- AirPlay....30
- Using the clock.....31
- Updating the firmware.....34
- Option settings.....35
- Troubleshooting.....37
- Supported devices/media and file formats.....43
- Specifications.....45
- Information about software.....
- Introduction
- Supplied accessories
- About this manual
- !
- Part name
- Rear panel
- Front panel display
- Adjusting display brightness
- Preparations
- Connecting the speakers
- Connecting antenna
- Connecting to the network
- Connect the unit to the network as shown on the right.
- Turning on the power
- Canceling the eco standby
- Power Saving
- Auto Power Off
- Setting the network devices
- Listening to CD
- Listening to iPod/USB devices
- Playing iPod
- Playing USB devices
- Switching the information display of iPod
- Listening to the songs in the computer
- Setting the media sharing of music files
- For Windows Media Player 11
- For a PC or a NAS with other DLNA server software installed
- Playing back songs in the PC
- Operating from your mobile device
- Listening to external sources
- More on playback
- Shuffle playback
- Press during playback.
- Repeat playback
- Playback information
- Adjusting sound quality
- Option menu regarding sound quality
- Equalizer
- Balance
- Music Enhancer
- Listening to DAB stations (CRX-N560D only)
- Initial scan
- Tuning in DAB stations
- Presetting DAB stations
- Selecting preset DAB stations
- Deleting a preset station
- Confirming the reception
- Listening to FM radio stations
- Tuning in FM stations
- Presetting FM stations
- Auto preset
- Manual preset
- Selecting preset FM stations
- Radio Data System
- Press DISPLAY when the source is FM.
- Listening to Internet radio
- Listening to the Music with AirPlay
- Playing iTunes
- Clearing AirPlay
- Using the clock
- Setting the clock
- Setting the wake-up timer
- Press and hold . ○ TIMER
- Set the following items, ① to ③.
- Continue to the next page →
- - Set the clock before setting the wake-up timer.
- - You can also set the wake-up timer using the option setting.
- 536\~CD Completed!
- Press
- Sleep timer
- Press SLEEP
- Updating the firmware
- NET UPDATE 52:Writing 56%
- To update the firmware using a USB memory device
- Option settings
- Troubleshooting
- General
- iPod
- Supported devices/media and file formats
- Supported devices/ medias
- PCs
- NAS
- USB devices
- Note
- Discs
- Notes on discs
- Handling discs
- File format
- DLNA/USB
- Windows™
- Android™
- Specifications
- Table des matières
- Préparations
- Préréglage de stations DAB
- Annulation d'AirPlay
- Vorbereitungen
- Voorbereidingen
- AirPlay wissen
- Opmerking over discs
- About ASN.1 object dumping code
- About FLAC codec Library
- About libexpat
- About The Independent JPEG Group's JPEG software
- The Independent JPEG Group's JPEG software
- About JsonCpp
- About Network
- About PNG Reference Library
- About RC4 Algorithm
- About WPA Supplicant
- About zlib Library
- YAMAHA
Brand : YAMAHA
Model : CRXN560D
Category : Cd player/recorder