SED 3.7 D2 - Epilator SILVERCREST - Free user manual and instructions
Find the device manual for free SED 3.7 D2 SILVERCREST in PDF.
| Product type | Epilator |
| Brand | SilverCrest |
| Model | SED 3.7 D2 |
| Power supply | Mains (adapter) or built-in rechargeable battery |
| Adapter input voltage | 100 – 240 V ~, 50/60 Hz |
| Adapter output voltage | 4.5 V ⎓, 1000 mA |
| Full charging time | Approximately 80 minutes |
| Battery life | Not specified (cordless use) |
| Speeds | 2 levels: level 1 (sensitive areas), level 2 (legs) |
| Epilation head | Removable, washable with water |
| Included accessories | Mains adapter, cleaning brush, storage bag, protective cap |
| Travel safety | Yes (lock) |
| Cleaning | Head washable under running water; device and adapter with damp cloth |
| Protection class | II (adapter) |
| Warranty | 3 years |
| After-sales service France | Tel. 0800 919270, email kompernass@lidl.fr |
| After-sales service Belgium | Monday-Friday 8am-8pm (CET) |
Frequently Asked Questions - SED 3.7 D2 SILVERCREST
User questions about SED 3.7 D2 SILVERCREST
0 question about this device. Answer the ones you know or ask your own.
Ask a new question about this device
Download the instructions for your Epilator in PDF format for free! Find your manual SED 3.7 D2 - SILVERCREST and take your electronic device back in hand. On this page are published all the documents necessary for the use of your device. SED 3.7 D2 by SILVERCREST.
USER MANUAL SED 3.7 D2 SILVERCREST
Operating instructions
NL BE
EPILERAPPARAAT, ACCU/STROOM
Gebruiksaanwijzing
FR BE
ÉPILATEUR BATTERIE/SECTEUR
Mode d'emploi
DE AT CH
EPILIERER,AKKU/NETZ
Bedienungsanleitung
IAN 273035
GB
Before reading, unfold the page containing the illustrations and familiarise yourself with all functions of the device.
FR BE
GB Operating instructions Page 1
Introduction 2
Copyright 2
Intended Use 2
Items supplied 3
Disposal of packaging 3
Operating Elements 4
Technical data 4
Safety instructions 5
Mains power operation 8
Battery operation 8
Tips and Tricks 9
Epilation 10
Cleaning and Care 12
Storage 13
Troubleshooting 13
Disposal of the appliance 14
Warranty and Service 15
Impor ter 16
GB
GB
Introduction
Congratulations on the purchase of your new appliance.
You have clearly decided in favour of a quality product. These operating instructions are a part of this product. They contain important information in regard to safety, use and disposal. Before using the product, familiarise yourself with all of these operating and safety instructions. Use the product only as described and only for the specified areas of application. In addition, pass these documents on, together with the product, to any future owner.
Copyright
This documentation is copyright protected.
Any copying or reproduction, including as extracts, as well as the reproduction of images, also in an altered state, is only permitted with the written authorisation of the manufacturer.
Intended Use
This appliance is intended exclusively for the epilation of human hair in domestic households. Do not use it for commercial purposes! This appliance is not intended for any other use or for uses beyond those mentioned.
Claims of any kind resulting from damage caused by improper use, incompetent repairs, unauthorised modifications or the use of non-approved spare parts will not be acknowledged.
The operator alone bears the risk.
Items supplied
The appliance is supplied with the following components as standard:
GB
Cordless Epilator
Mains adapter
Cleaning brush
Storage pouch
Operating Instructions
Extract all parts of the appliance from the carton and remove all packaging material. Check the contents to ensure everything has been supplied, and for signs of visible damage.
TIPS
As delivered, the storage pouch is located under the plastic shell containing the device itself. You must remove the cardboard under the plastic shell in order to take the storage pouch out.
If the delivery is incomplete, or has been damaged due to defective packaging or transportation, contact the Service Hotline (see chapter Warranty and Service).
Disposal of packaging
The packaging protects the appliance against transport damage. The packaging materials are selected from the point of view of their environmental friendliness and disposal technology and are therefore recyclable.
The recirculation of packaging into the material circuit saves on raw material and reduces generated waste. Dispose of packaging material that is no longer needed as per the regionally established regulations.
GB
Operating Elements
Figure A:
1 Protective cap
Epilator head
3 Restraint fixtures for epilator head
4 Travel lock
Speed switch
Control lamps red/green
7 Socket for mains adapter
Figure B:
8 Mains power adapter
Storage pouch
10 Cleaning brush
Technical data
| Mains adapter | |
| Type ZDJ045100EU | |
| Input voltage 100 - 240 V | ~, 50/60 Hz |
| Power consumption 0.2 A Max. | |
| Output voltage 4.5 V | == |
| Output current 1000 mA | |
| Protection class | II/□ |
| Polarity | ∅-∅-⊕ |
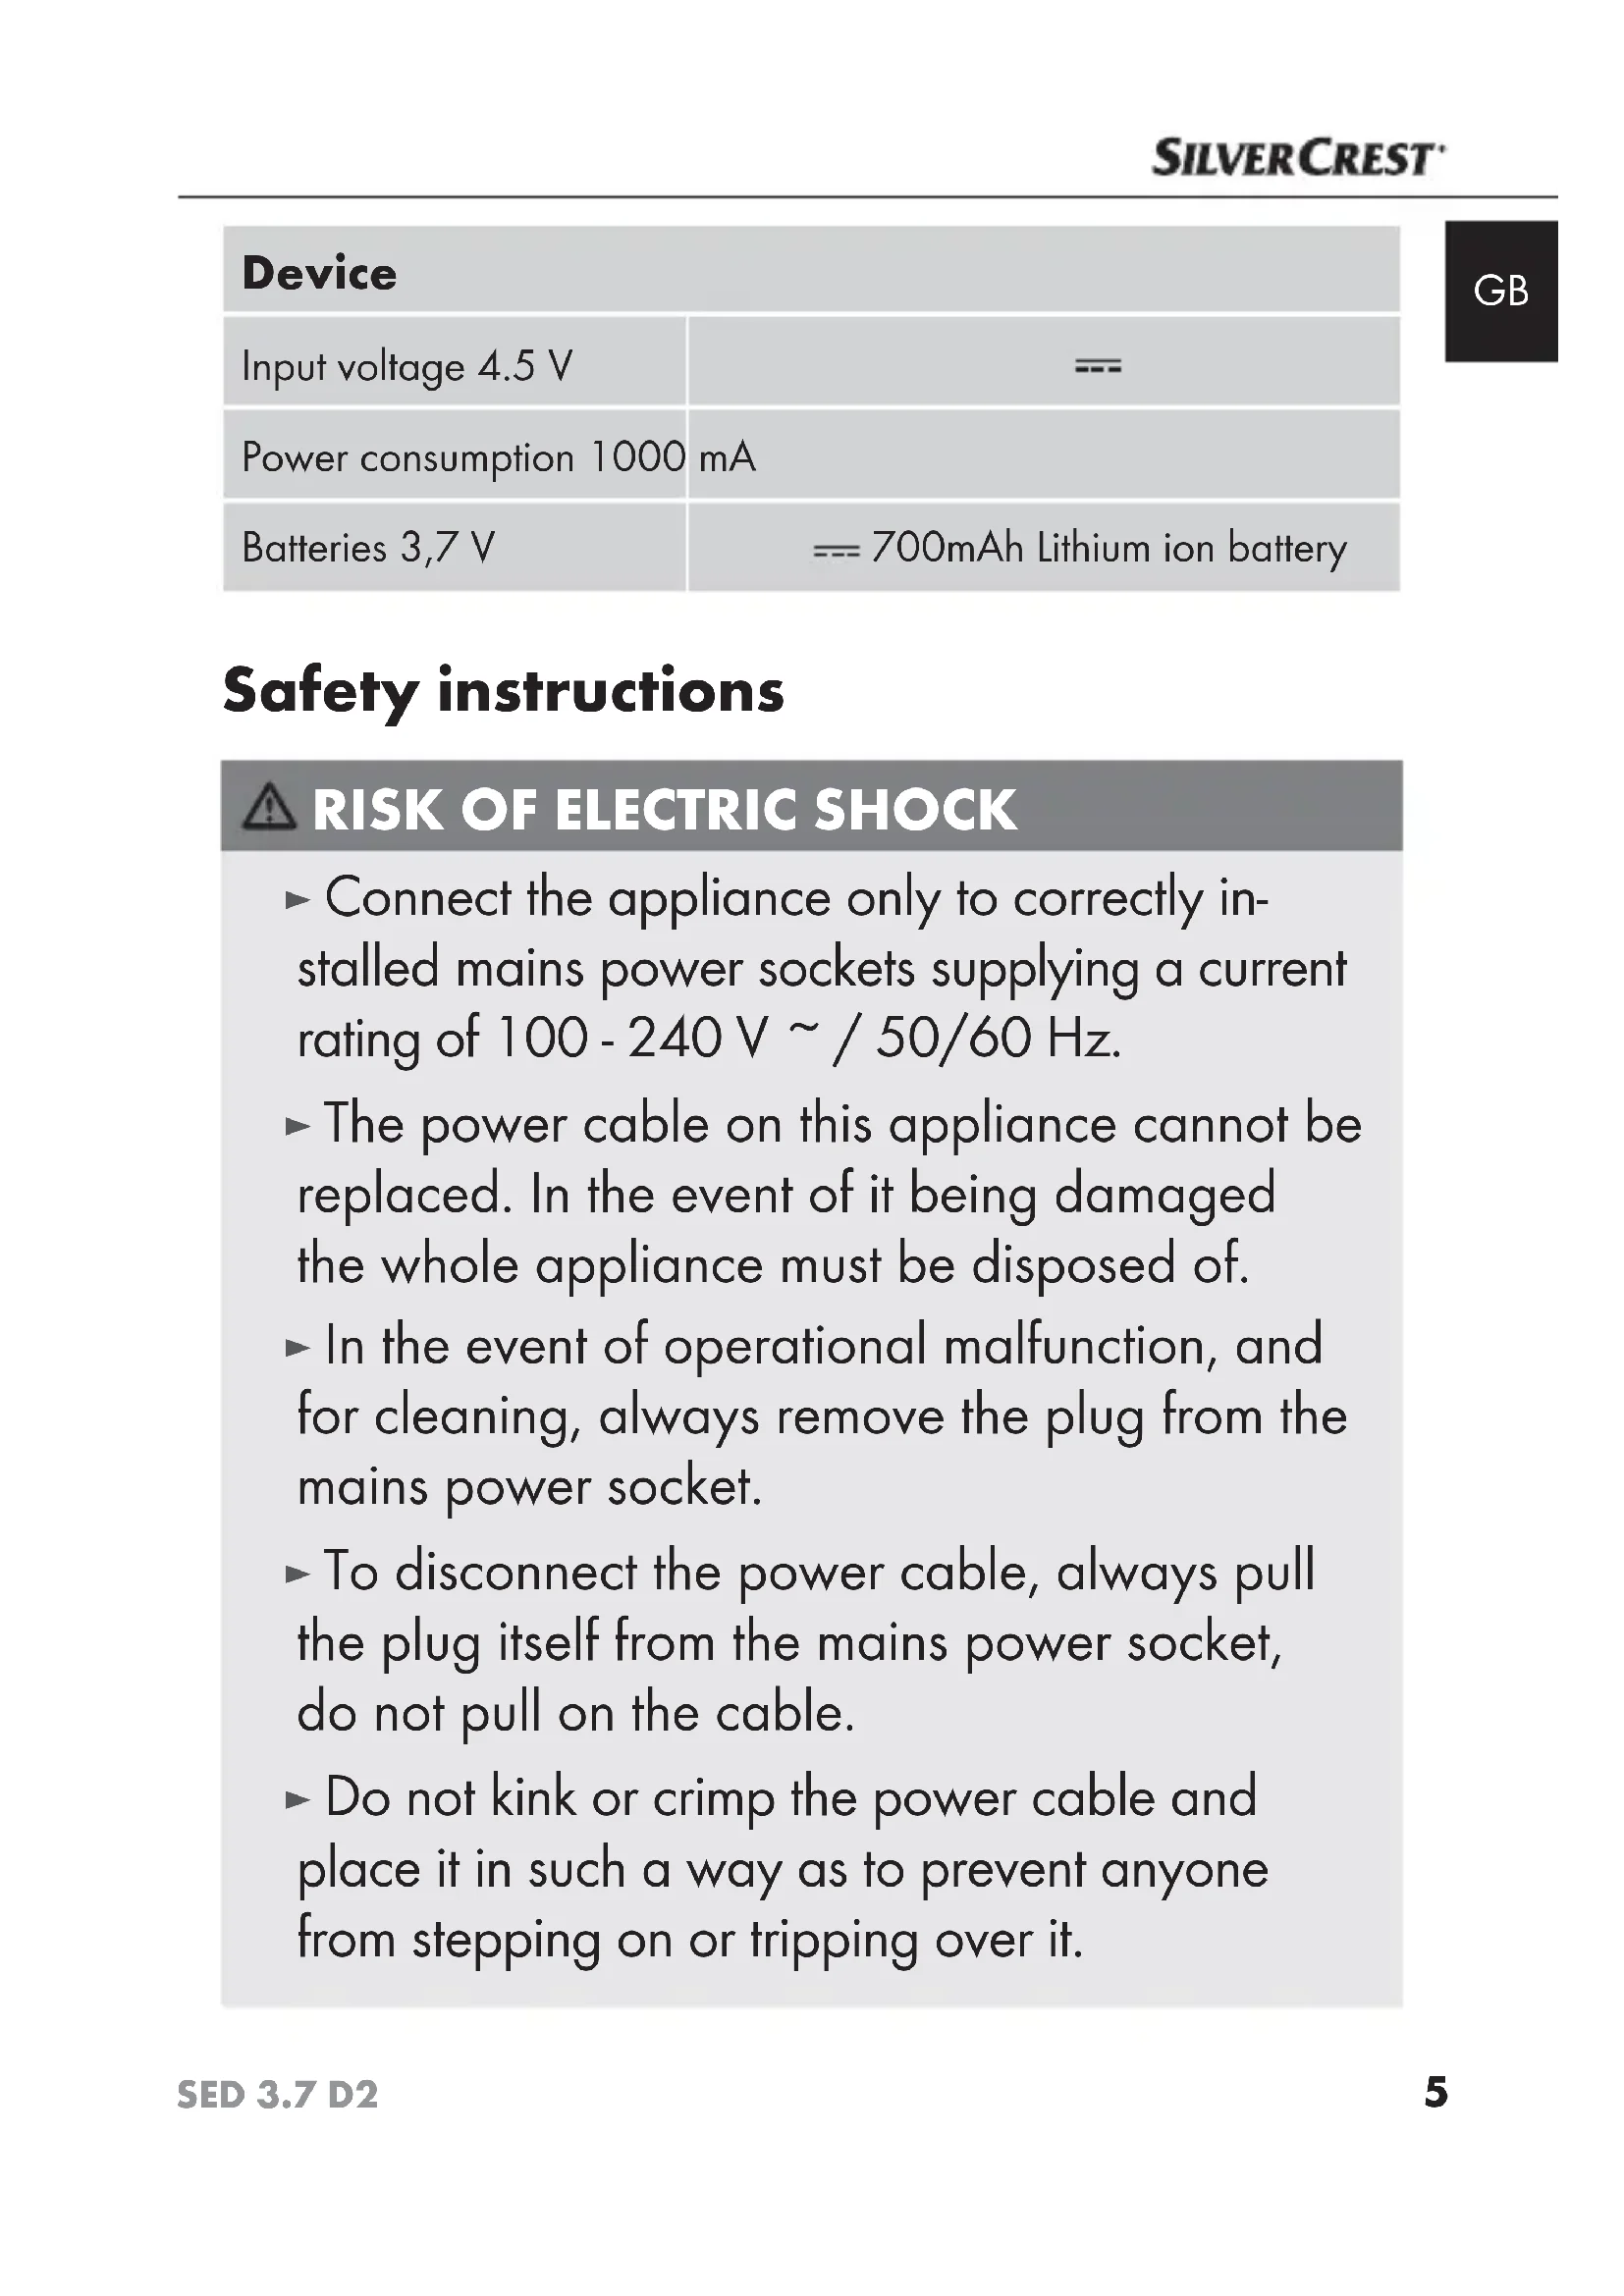
Device
Input voltage 4.5 V
Power consumption 1000 mA
Batteries 3,7 V
= 700mAh Lithium ion battery
Safety instructions

RISK OF ELECTRIC SHOCK
- Connect the appliance only to correctly installed mains power sockets supplying a current rating of 100 - 240 ~V / 50 / 60 ~Hz .
The power cable on this appliance cannot be replaced. In the event of it being damaged the whole appliance must be disposed of.
In the event of operational malfunction, and for cleaning, always remove the plug from the mains power socket. - To disconnect the power cable, always pull the plug itself from the mains power socket, do not pull on the cable.
- Do not kink or crimp the power cable and place it in such a way as to prevent anyone from stepping on or tripping over it.
GB

RISK OF ELECTRIC SHOCK
- Ensure that the power cable cannot become wet or moist during operation. Place it such that it cannot be squashed or damaged.
- To avoid risks, should the appliance be damaged discontinue the use of it immediately.
Do not use the appliance outdoors. - Do not wrap the power cable around the appliance and protect it from being damaged.
- NEVER grasp the appliance, power cable or plug with wet hands.
- TAKE NOTE! Keep the appliance dry.
Never use the appliance near water, particularly not near sinks, baths or other vessels. The proximity of moisture presents a danger, even when the appliance is switched off. After use, always remove the plug from the mains power socket. As additional protection, the installation of a faulty-current protection unit with an activation power rating of not more than 30mA is recommended for the power circuit in the bathroom. Consult your electrician for advice.
WARNING! RISK OF INJURY!
- Do not operate the appliance if it has sustained a fall or is damaged. Arrange for the appliance to be checked and/or repaired by qualified technicians.
- Do not open the housing or attempt to repair the appliance yourself. Should you do so, appliance safety can no longer be assured and the warranty will become void. Permit only authorised technicians to repair a defective appliance if repairs should be necessary.
- Use the appliance only with the supplied power adapter.
- Charge the appliance only with the supplied power adapter.
This appliance may be used by children aged 8 over and by persons with reduced physical, sensory or mental capabilities or lack of experience and knowledge, provided that they are under supervision or have been told how to use the appliance safely and are aware of the potential risks.
Children must not play with the appliance. - Cleaning and user maintenance tasks must not be carried out by children unless they are supervised.
GB
WARNING - PROPERTY DAMAGE!
- Use the appliance only indoors.
Mains power operation
1) Insert the connector plug of the mains power adapter ⑧ into the socket for mains adapter ⑦ on the appliance. Ensure that the speed switch ⑤ is set at "0".
2) Connect the mains power adapter 8 to a mains power socket. The control lamp 6 glows red to indicate that the charging process is active.
The appliance is ready for immediate use.
Battery operation
1) Insert the connector plug of the mains power adapter ⑧ into the socket for mains adapter ⑦ on the appliance. Ensure that the speed switch ⑤ is set at "0".
2) Connect the mains power adapter 8 to a mains power socket. The control lamp 6 glows red to indicate that the charging process is active.
As soon as the control lamp ⑥ glows green the appliance is fully charged and you can disconnect it from the mains power supply.
NOTICE
For the initial charging, the appliance requires about 80 minutes to fully charge.
- First recharge the appliance when the control lamps ⑥ indicate, by alternately flashing red and green, that the battery charge level is low..
Tips and Tricks
NOTICE
Do not use the appliance if...
- You have a sunburn on the specific part of the body.
Skin irritation or redness is extant. - You have a skin disease such as, for example, neurodermatitis.
- You have pimps, moles or warts on the specific parts of the body.
-
You have wounds, open sores or raised scars on the specific parts of the body.
-
First test the appliance on a small hidden location to establish the skin compatibility.
The hairs should be between 0.3 cm and 0.5 cm long. Shorter hairs are not gripped by the tweezers and plucking out longer hairs is very painful. If needs be, shorten long hair.
The skin must be free of grease or cream residues. Otherwise, the tweezers will stick/soil and the efficiency of the appliance will be reduced.
The skin must be completely dry.
The best time for epilation is in the evening after a shower. Then the skin is somewhat softened, so that the hairs can be plucked out easily. In addition, the skin can recover overnight, and any skin reddening will recede.
GB
Before epilation, treat the skin with a peeling or a massage glove. This helps remove dead skin cells, ingrowing hairs are avoided, and fine hairs stand proud. This enables the appliance to grip the hairs better.
After epilation, nurture the skin with a moisturising lotion or cream. Ideally, the cream will contain aloe vera or camomile extracts to soothe and maintain the skin.
Epilation
When the appliance is charged and the body part to be epilated is prepared:
1) Rub your hand once more against the growth direction of the hairs to be removed. Through this the hairs will be raised so that they can be better captured by the tweezers.
2) Remove the protective cap 1 from the epilator head 2.
3) Press the travel lock 4 and slide the speed switch 5 upwards to the desired speed level:
Level 1: for sensitive areas (armpits and bikini line)
Level 2: for legs
4) Hold the skin tight with one hand.
5) Place the epilator perpendicular to the skin and, without exerting any pressure, move it against the direction of the hair growth. Thereby, the side with the speed switch ⑤ must face towards you. Do not make back and forth or circular movements. Always start anew and pass over the body part to be epilated several times, so that all of the hair is removed.
NOTICE
It may be that the hair grows back after a few days. The reason for this is that these hairs were too short to be removed during the last epilation session.
6) When you are finished with the treatment, place the speed switch 5 to "0".
7) Clean the epilator head 2 as described in the section "Cleaning and Care".
8) Replace the protective cap ① on the epilator head ②.
NOTICE
If the epilator head 2 is damaged, discontinue all further use! To order a new epilator head 2, please contact the service department (see chapter "Guarantee and service"). Please have the IAN number ready (see operating manual cover). To replace the epilator head 2, please proceed as follows:
-
Press the two restraint fixtures ③ together and at the same time pull the epilator head ② upwards.
-
Press the new epilator head ② onto the appliance. Ensure that the gears on the epilator head ② and on the appliance mesh with each other. The epilator head ② must audibly engage.
GB
Cleaning and Care

RISK OF ELECTRIC SHOCK
Before cleaning, disconnect the appliance from the mains power adapter 8 and the mains power adapter 8 from the main power supply.
WARNING - PROPERTY DAMAGE!
NEVER submerse the appliance in water or other liquids!
After every use clean the epilator head 2 with the supplied cleaning brush 10 to remove loose hairs.
Disinfect the epilator head ② regularly by spraying and cleaning it with disinfectant spray.
To thoroughly clean the epilator head 2 you can remove it from the appliance:
- Press the two restraint fixtures 3 together and at the same time pull the epilator head 2 upwards.
- Clean the epilator head ② under running water and then allow it to dry.
- Place the epilator head ② back onto the appliance. Ensure that the gears on the epilator head ② and on the appliance mesh with each other. The epilator head ② must audibly engage.
Clean the appliance housing and the mains power adapter 8 with a moist cloth. If required, use some mild detergent on the cloth. Ensure that the appliance is completely dry before the next use.
Storage
GB
Always protect the epilator head ② with the supplied protective cap ①.
Store the appliance, the cleaning brush 10 and the mains power adapter 8 in the storage pouch 9.
Store the appliance at a dry and dustfree location.
Troubleshooting
| Problem Cause Solution | ||
| The appliance does not function. | The battery is drained. | Recharge the appliance. |
| The appliance is defective. | In this case, contact Customer Services. | |
| The appliance only runs slowly. | The battery is drained. | Recharge the appliance. |
| The plucking of the hairs is very painful. | The hairs may be too long. | Shorten the hairs to about 0.3 - 0.5 cm. See also the section "Tips and Tricks". |
| Not all hairs are plucked. | It is possible that the hairs are too short. | The hairs should have a length of 0.3 - 0.5 cm. |
| You are working too fast. | Move the appliance more slowly over your skin. | |
GB
Disposal of the appliance
To dispose of the appliance in an environmentally friendly manner you must remove the battery from the appliance.

RISK OF ELECTRIC SHOCK
- Disconnect the appliance from the mains power supply when you remove the battery!
WARNING - PROPERTY DAMAGE!
- Only remove the battery from the appliance if you want to dispose of/scrap it! The appliance is defective when you have removed the battery!
1) Take the epilator head 2 from the appliance.
2) Lift the two internal restraints with a small screwdriver or similar to the top and press them outwards, so that the side elements of the appliance can be released.
3) Loosen the two now visible screws. You can then take the housing apart.
4) Snip the red and black cable that connects the circuit board with the blue-jacketed battery. You can now remove the battery from the appliance.
5) Dispose of the battery environmentally friendly. Observe the currently applicable regulations. In case of doubt, please contact your waste disposal centre.
Do not dispose of the appliance in your normal domestic waste. This product is subject to the provisions of European Directive 2012/19/EU.
GB
Dispose of the appliance through an approved disposal centre or at your community waste facility. Observe the currently applicable regulations. In case of doubt, please contact your waste disposal centre.
Warranty and Service
The warranty for this appliance is for 3 years from the date of purchase. The appliance has been manufactured with care and meticulously examined before delivery.
Please retain your receipt as proof of purchase. In the case of a warranty claim, please make contact by telephone with our service department. Only in this way can a post-free despatch for your goods be assured.
NOTICE
The warranty applies to material or manufacturing faults only, not for transport damage, parts subject to wear and tear or for damage to fragile parts.
This appliance is intended solely for domestic, not commercial, use. If this product has been subjected to improper or inappropriate handling, abuse, or modifications not carried out by one of our authorised service centres, the warranty will be considered void.
Your statutory rights are not restricted in any way by this warranty. The warranty period is not extended by repairs made under the warranty. This applies also to replaced and repaired parts.
GB
Damages and defects extant at the time of purchase must be reported immediately after unpacking, resp. no later than two days after the date of purchase.
Repairs carried out after lapse of the warranty period are subject to charge.
GB Service Great Britain
Tel.: 0871 5000 720 (£ 0.10/Min.)
E-Mail: kompernass@lidl.co.uk
IAN 273035
Hotline availability: Monday to Friday 08:00 - 20:00 (CET)
Importer
KOMPERNASS HANDELS GMBH
BURGSTRASSE 21
44867 BOCHUM
GERMANY
www.kompernass.com
Sommaire
3.7 = 700 mAh battery lithium-ion
KOMPERNASS HANDELS GMBH
BURGSTRASSE 21
44867 BOCHUM
GERMANY
www.kompernass.com
Inhoud
WAARSCHUWING! LETSELGEVAAR!
KOMPERNASS HANDELS GMBH
BURGSTRASSE 21
44867 BOCHUM
GERMANY
www.kompernass.com
Inhaltsverzeichnis
KOMPERNASS HANDELS GMBH
BURGSTRASSE 21
44867 BOCHUM
GERMANY
www.kompernass.com
KOMPERNASS HANDELS GMBH
BURGSTRASSE 21
44867 BOCHUM
DEUTSCHLAND/GERMANY
www.kompernass.com
Last Information Update - Version des informations
Stand van de informatie · Stand der Informationen:
10/2015·Ident.-No.:SED3.7D2-092015-2